Tài liệu về Dash
Dash là loại tiền điện tử mã nguồn mở ngang hàng tập trung mạnh mẽ trong lĩnh vực thanh toán điện tử. Dash cung cấp một dạng tiền có thể dễ dàng mang đi, chi phí rẻ, có thể phân tách và rất nhanh. Nó có thể chi tiêu cả trên online lẫn dùng trực tiếp giữa các cá nhân với mức phí giao dịch cực nhỏ. Phát triển dựa trên dự án Bitcoin, Dash nhắm đến việc trở thành hệ thống thanh toán thân thiện với người sử dụng và có khả năng mở rộng tốt nhất trên thế giới. Thêm vào những tính năng của Bitcoin, Dash hiện cung cấp khả năng giao dịch tức thời (InstantSend), giao dịch riêng tư (PrivateSend) và vận hành một mô hình tự quản trị và tự cấp vốn, nó cho phép mạng lưới của Dash chi trả cho những cá nhân và doanh nghiệp làm việc và tạo thêm giá trị cho mạng lưới. Hệ quản trị và ngân sách phi tập trung này làm cho Dash trở thành một Tổ chức Tự quản Phi tập trung (DAO) đầu tiên trên thế giới.
Nếu bạn mới biết đến tiền điện tử, điều thay đổi quan trọng nhất cần phải hiểu đó là các giao dịch của tiền số là đi trực tiếp giữa các bên thanh toán mà không cần phải qua một cấp thẩm quyền trung tâm nào xét duyệt. Điều đó cũng có nghĩa là bạn phải có trách nhiệm về sự an toàn về tiền của mình - không có ngân hàng hoặc công ty thẻ tín dụng nào giúp bạn đảo ngược lại những giao dịch nếu tiền của bạn bị đánh cắp hoặc bị mất. Điều này cũng giống như với tiền mặt hoặc vàng, nhưng với tiền điện tử thì nó có thể chi tiêu trực tiếp hoặc cũng có thể qua mạng toàn cầu, nếu bạn tự tin thì bạn có thể chuyển tiền đến đúng nơi cần đến. Chính vì những lý do này mà Tài Liệu về Dash sẽ tập trung nhiều về tính an toàn và giúp bạn hiểu những khái niệm và những tính năng tạo nên động lực của hệ sinh thái Dash. Những video, những đường link và các tài liệu dưới đây sẽ giúp bạn bắt đầu, hoặc sử dụng bảng mục lục ở bên trái để tìm những chủ đề cụ thể mà bạn quan tâm.
Mục lục
Dash là gì?
Dash nhắm đến việc trở thành loại tiền điện tử tập trung vào lĩnh vực thanh toán có giao diện người dùng thân thiện nhất và khả năng mở rộng nhất trên thế giới. Mạng lưới Dash đặc trưng bởi giao dịch xác thực tức thời, bảo vệ chống tiêu lặp, ẩn danh tương tự như tiền mặt vật lý, có cơ chế tự quản trị, mô hình tự cấp vốn thúc đẩy bởi các full node có động lực tài chính và một lộ trình rõ ràng cho việc mở rộng trên blockchain đến mức block kích thước 400 MB sử dụng phần cứng mã nguồn mở được thiết kế riêng. Trong khi Dash dựa trên Bitcoin và tương thích với rất nhiều thành phần quan trọng trong hệ sinh thái của Bitcoin, cấu trúc mạng hai tầng của nó cung cấp những cải tiến quan trọng trong tốc độ xử lý giao dịch, tính ẩn danh và khả năng quản trị. Phần tài liệu này sẽ mô tả những tính năng đó và rất nhiều những tính năng quan trọng khác làm cho Dash trở nên khác biệt trong nền kinh tế blockchain.
Những video, các đường link và tài liệu được thu thập ở đây có thể sẽ giúp bạn bắt đầu, hoặc bạn có thể sử dụng mục lục ở bên trái để tìm ra những chủ đề cụ thể mà mình quan tâm. Những người dùng mới có thể sẽ quan tâm đến phần bắt đầu với một ví phù hợp, tìm hiểu về làm thế nào để mua Dash 2 và tiêu Dash ở những đâu, tìm hiểu về an toàn hoặc tham gia một trong rất nhiều các website cộng đồng của Dash.
Dash Videos
Dash School
Dash School là một chuỗi video gồm 6 phần được sản xuất bởi Amanda B. Johnson. Nó giải thích về Dash cho người từ mức mới bắt đầu trở lên và mô tả nhiều tính năng nâng cao.
Dash 101
Dash 101 là một chuỗi video gồm 8 phần được sản xuất bởi Aaron Koenig. Nó mở ra những tính năng độc đáo và những chức năng chỉ có được trên mạng lưới của Dash, và nó có bản tiếng Anh:, Bản tiếng Pháp, Bản tiếng Đức, Bản tiếng Tây Ban Nha và Bản tiếng Nga.
Cáo bạch
Bản cáo bạch của Dash mô tả những giá trị độc đáo và những đổi mới chủ chốt của Dash từ gốc độ học thuật và lý thuyết. Nó là một tài liệu thường xuyên cập nhật và duy trì như là một wiki trên GitHub, chính việc thường xuyên được cập nhận cũng như được cộng đồng biên dịch cũng là một tính năng mới được thực hiện. Có rất nhiều những cáo bạch khác mô tả những tính năng cụ thể nào đó một cách chi tiết hơn và (cho lý do theo dõi lịch sử quá trình) phiên bản cáo bạch đầu tiên ở dạng PDF cho mọi người có thể download.
Lộ trình
Lộ trình của Dash đặt ra các mốc cho những phiên bản ra mắt trong tương lai của Dash và bao gồm những chi tiết đặc tả về mặt kỹ thuật mô tả nhóm phát triển lập kế hoạch thế nào và nhận thức ra sao về những thách thức. Cũng giống như bản cáo bạch, nó có nhiều phiên bản khác nhau và được duy trì như là một dự án trên GitHub.
Các tính năng
Những đặc tả
- Khối đầu tiên được đào vào lúc 11 giờ tối giờ bờ đông Mỹ, Ngày 18 tháng 1 năm 2014
- Không đào trước
- Thuật toán băm X11, hiện có thể đào được với CPU/GPU/ASIC
- Thời gian khối 2.6 phút, kích thước khối 2MB, ~56 giao dịch mỗi giây
- Phần thưởng khối giảm 7.14% mỗi năm
- Thuật toán điều chỉnh độ khó Dark Gravity Wave
- Tổng lượng coin có thể sinh ra vào khoảng từ 17.74 triệu đến 18.92 triệu
- Mạng lưới bậc hai phi tập trung của các masternode
- Cơ chế ẩn danh ưu việt sử dụng PrivateSend
- Giao dịch tức thời sử dụng InstantSend
- Hệ quản trị phi tập trung bởi Blockchain cho phép các chủ masternode bỏ phiếu cho các đề xuất ngân sách và các quyết định mà ảnh hưởng đến Dash
Các masternode
Ngoài phần thưởng của Proof of Work (PoW) truyền thống cho việc đào Dash, người dùng cũng được thưởng cho việc vận hành và duy trì các máy chủ đặc biệt được gọi là masternode. Nhờ mạng hai tầng tiên tiến này, Dash có thể cung cấp các tính năng sáng tạo theo cách không cần tin tưởng và phi tập trung. Các Masternode được sử dụng cho PrivateSend, InstantSend và hệ thống quản trị và ngân quỹ. Người dùng được trả thưởng cho việc vận hành các masternode; 45% của phần thưởng khối được phân bổ để trả cho mạng lưới masternode. Bạn có thể xem hướng dẫn cụ thể về tất cả các chủ đề liên quan đến masternodes tại đây.
Masternode cung cấp những dịch vụ sau đây:
- InstantSend cho phép có những giao dịch gần như tức thời. Các giao dịch InstantSend của Dash được xác thực đầy đủ chỉ trong vòng hai giây đồng hồ.
- PrivateSend cho khả năng riêng tư về tài chính bằng việc che mờ nguồn cung của nguồn tiền trên blockchain.
- Quản trị và ngân quỹ cho phép các cổ đông của Dash khả năng định hướng cho các dự án và dành 10% phần thưởng khối cho công việc phát triển các dự án và phát triển hệ sinh thái (ví dụ vào tháng 5 năm 2018, ngân sách hàng năm vượt quá 30 triệu đô la Mỹ).
- Dash Evolution sẽ làm cho việc sử dụng tiền kỹ thuật số trở nên dễ dàng như dùng PayPal
Các chủ masternode cần phải sở hữu 1000 DASH, để chứng minh họ cần phải ký một thông điệp và phát tán nó lên mạng lưới. Những coin trong khoản đó có thể chuyển đi bất cứ khi nào, nhưng khi chuyển chúng đi thì sẽ làm cho masternode bị đẩy khỏi hàng đợi và không được trao thưởng nữa. Người chủ masternode cũng được cấp quyền bỏ phiếu cho các đề xuất. Mỗi một masternode có một phiếu bầu và phiếu bầu này có thể dùng cho các đề xuất kinh phí hoặc các quyết định quan trọng ảnh hưởng đến Dash.
Masternode làm tốn kém tiềm bạc và nỗ lực để vận hành và nó cũng được trả bằng một phần của phần thưởng khối như là cách tạo động lực. Với số lượng masternode và phần thưởng khối hiện tại, thì các masternode sẽ kiếm được xấp xỉ 8% cho khoản đầu tư 1000 Dash (nó có nghĩa là 6.97 Dash hoặc USD 1360 vào tháng 7 năm 2017) cho năm 2017. Công cụ này hiển thị tính toán tức thời về khoản tiền mà masternode kiếm được. Phần thưởng sẽ giảm đi khoảng 7% mỗi năm, nhưng việc tăng giá của Dash có thể bù đắp cho sự giảm này. Như thực tế đã xảy ra, các masternodes đã nhận được 140 Dash mỗi tháng vào đầu năm 2016, nhưng điều này thực sự là ít tiền hơn so với ngày nay: 600 đô la Mỹ mỗi tháng. Ngoài ra còn có khả năng cho các masternode kiếm tiền từ các khoản phí giao dịch trong tương lai.
PrivateSend
PrivateSend cho bạn thực sự riêng tư về tài chính bằng việc che khuất nguồn gốc nguồn tiền của bạn. Tất cả số Dash trong ví của bạn gồm có "các đầu vào" khác nhau, mà bạn có thể nghĩ chúng là các coin tách rời, phân biệt. PrivateSend sử dụng một quy trình trộn tiên tiến để trộn lẫn các đầu vào của bạn với những đầu vào của hai hay nhiều người khác, mà không làm cho số coin của bạn đi ra khỏi ví. Bạn vẫn giữ quyền kiểm soát tiền của bạn ở bất cứ thời điểm nào.
Bạn có thể xem hướng dẫn thực hành việc sử dụng PrivateSend ở đây.
Tiến trình làm việc của PrivateSend hoạt động như sau:
- PrivateSend bắt đầu bằng việc chia những đầu vào trong giao dịch của bạn thành các mệnh giá chuẩn. Những mệnh giá đó là 0.01 Dash, 0.1 Dash, 1 Dash và 10 Dash -- Nó cũng giống như các loại tiền giấy mà bạn vẫn dùng hàng ngày.
- Ví của bạn sau đó sẽ gửi yêu cầu cho một nút có phần mềm được cấu hình đặc biệt trên mạng, được gọi là "masternode". Các masternode được thông báo rằng bạn đang muốn trộn một mệnh giá nhất định. Không có thông tin nhận dạng nào được gửi cho các masternode, và họ không bao giờ biết bạn "là ai".
- Khi có hai người khác gửi các thông điệp tương tự, cho biết họ muốn trộn cùng một mệnh giá, thì một phiên trộn sẽ bắt đầu. Masternode trộn những đầu vào và ra lệnh cho tất cả các ví của ba người dùng bắt đầu biến đổi đầu vào để trả cho chính họ. Ví của bạn trả mệnh giá đó trực tiếp cho chính nó, nhưng trong một địa chỉ khác (gọi là địa chỉ đổi tiền hay địa chỉ trả tiền lẻ).
- Để ngân quỹ của bạn được hoàn toàn được che mờ, ví của bạn phải thực hiện lại quy trình này một số lần với mỗi loại mệnh giá. Mỗi khi tiến trình được hoàn tất, nó được gọi là một "vòng". Mỗi vòng của PrivateSend làm cho độ khó để xác định đâu là nguồn vốn gốc của bạn tăng lên rất nhiều. Người dùng có thể chọn trong khoảng từ 2-8 vòng trộn.
- Quá trình trộn xảy ra ở chế độ nền mà không cần bạn can thiệp. Khi bạn muốn gửi một giao dịch, lúc ngân quỹ của bạn đã được ẩn danh. Thì lúc đó không còn cần phải chờ đợi gì thêm.
Chú ý rằng những giao dịch PrivateSend sẽ được làm tròn để tất cả các đầu vào giao dịch đều được chi tiêu. Bất kỳ số Dash dư thừa sẽ được chi tiêu vào phí giao dịch.
QUAN TRỌNG: Ví của bạn chỉ chứa 1000 "địa chỉ trả tiền lẻ". Mỗi khi có lần trộn xảy ra, một trong những địa chỉ được dùng hết. Khi chúng đã được sử dụng hết, ví của bạn phải tạo thêm các địa chỉ nữa. Nó chỉ có thể làm điều này, nếu bạn bật chế độ tự động sao lưu. Do đó, những ai tắt chế độ sao lưu thì cũng tắt chế độ PrivateSend.
InstantSend
Các loại tiền số phi tập trung truyền thống phải đợi một khoảng thời gian nhất định để đủ các khối được thông qua để đảm bảo rằng giao dịch không thể bị đảo ngược và không bị cố tiêu lại nhiều lần một số tiền đã được tiêu trước đó ở đâu đó khác. Quá trình này rất tốn thời gian, và nó thường mất ở đâu đó vào khoảng từ 15 phút cho đến hàng giờ cho đủ số lượng được chấp nhận rộng rãi trong sáu khối nối tiếp. Những loại tiền số khác đạt được thời gian xác thực nhanh hơn bằng cách tập trung quyền hạn trên mạng ở những mức độ khác nhau.
Dash không phải chịu những giới hạn này nhờ có mạng lưới bậc hai của các masternode. Các Masternode có thể được gọi để hình thành các quorum bỏ phiếu để kiểu tra rằng liệu các giao dịch được gửi có hợp lệ không. Nếu nó hợp lệ, các masternode sẽ "khoá" những đầu vào của những giao dịch này và phát tán thông tin này lên mạng, điều này hứa hẹn rằng giao dịch sẽ được gộp vào trong khối được khai thác và không cho phép những chi tiêu khác trên những đầu vào đó trong khoảng thời gian xác thực.
Công nghệ InstantSend sẽ cho phép những đồng tiền như Dash có thể cạnh tranh với những hệ thống giao dịch gần như tức thời như thẻ tín dụng cho các tình huống như điểm bán hàng trong khi không cần phải dựa vào thẩm quyền tập trung. Việc có nhiều nhà kinh doanh chấp nhận rộng rãi Dash và InstantSend có thể làm nên một cuộc cách mạng về tiền số bằng việc giảm thời gian trễ của các giao dịch từ lâu như hàng giờ (với Bitcoin) xuống một khoảng thời gian rất ngắn là vài giây.
Bạn có thể xem hướng dẫn thực hành việc sử dụng InstantSend ở đây. InstantSend được giới thiệu trong một bản cáo bạch gọi là Khoá giao dịch và Đồng thuận Masternode: Cơ chế giảm thiểu các cuộc tấn công chi tiêu lặp.
Làm thế nào mà cơ chế 'InstantSend' của Dash bảo vệ người bán khỏi sự tiêu lặp, Dash Detail của Amanda B. Johnson, ngày 16 tháng 9 năm 2016
Sporks
Để đối phó với các vấn đề không lường trước được khi triển khai bản cập nhật lớn "RC3" vào tháng 6 năm 2014, nhóm phát triển Dash đã tạo cơ chế theo đó mã cập nhật được phát hành cho mạng, nhưng không được kích hoạt ngay lập tức ("thi hành"). Sự cải tiến này cho phép việc chuyển đổi trơn tru hơn hình thức hard fork truyền thống, cũng như việc thu thập dữ liệu thử nghiệm trong môi trường mạng trực tiếp. Quá trình phân chia nhiều giai đoạn này thường được gọi là "soft fork" nhưng cộng đồng trìu mến gọi nó là "spork" và thành tên như vậy.
Các tính năng hoặc các phiên bản mới của Dash đang được kiểm tra một cách kỹ lưỡng trên mạng testnet trước khi công bố lên mạng chính thức. Khi một chức năng hoặc một phiên bản của Dash được công bố trên mạng chính thức, thông tin được gửi cho người dùng để nhắc họ về những thay đổi và cho họ nâng cấp phần mềm của mình. Những ai nâng cấp phần mềm sẽ chạy mã mới, nhưng nó chưa được kích hoạt đến tận khi có đủ một lượng phần trăm nhất định (thường khoảng 80%) thì mới đạt được sự đồng thuận về việc chạy đó. Trong trường hợp khi có lỗi xảy ra đối với bản mã mới, những khối của phần mềm mới không bị từ chối bởi mạng lưới và tránh được việc phân nhánh không mong muốn. Dữ liệu về lỗi sau đó có thể được thu thập và chuyển tiếp đến nhóm phát triển. Khi nhóm phát triển hài lòng với sự ổn định của mã mới trong môi trường mạng chính - và một khi sự đồng thuận của mạng đã đạt được - việc thực thi mã cập nhật có thể được kích hoạt từ xa bởi nhiều thành viên của Core Team cùng ký vào một thông điệp với các khoá riêng của họ. Nếu có vấn đề phát sinh, mã có thể bị vô hiệu hóa theo cách tương tự, mà không cần cập nhật toàn bộ hoặc cập nhật phần mềm. Để có thông tin kỹ thuật cụ thể về các spork riêng, hãy xem ở đây.
Thuật toán băm X11
X11 là một thuật toán băm được sử dụng rộng rãi, nó được tạo ra bởi người phát triển ra Dash tên là Evan Duffield. Chuỗi các thuật toán băm của X11 sử dụng một chuỗi 11 thuật toán băm để xử lý vấn đề proof-of-work. Nó cũng giúp cho việc phân phối coin một cách công bằng và các coin của Dash cũng được phân phối theo cách giống như với Bitcoin. X11 được tạo ra sao cho việc tạo khó khăn hơn trong việc tạo ra chip ASIC, và như vậy nó cho phép coin có nhiều thời gian hơn để phát triển trước khi bị đe doạ bởi sự tập trung hoá của việc đào coin. Cách tiếp cận này cũng khá thành công; và đầu năm 2016 thì chip ASIC dành cho X11 được ra mắt và nó chiếm một phần khá lớn trong tổng năng lực băm của mạng lưới, nhưng điều đó vẫn không làm cho nó bị một mức độ tập trung như Bitcoin hiện nay. Thông tin về việc đào coin với X11 có thể tìm thấy ở phần Đào coin trong tài liệu này.
X11 là tên của một chuỗi các thuật toán proof-of-work (PoW) được giới thiệu trong Dash (ra mắt vào tháng Giêng năm 2014 với tên là "Xcoin"). Nó một phần có được nhờ cảm hứng của chuỗi các thuật toán băm giống như Quark, và thêm vào độ "sâu" và độ phức tạp bằng cách tăng số lượng phép băm, nhưng nó khác với Quark ở chỗ số vòng băm được xác định trước một trật tự thay vì sử dụng các phép băm được chọn một cách ngẫu nhiên.
Thuật toán X11 sử dụng nhiều vòng của 11 thuật toán băm (blake, bmw, groestl, jh, keccak, skein, luffa, cubehash, shavite, simd, echo), như vậy nó đảm bảo sự an toàn cao nhất nhờ sự kết hợp các thuật toán băm rất tinh vi mà thường được sử dụng trong các loại tiền điện tử hiện đại. Cái tên X11 không liên quan đến hệ thống cửa sổ mã nguồn mở X11, thông dụng trên các hệ điều hành kiểu Unix.
Ưu điểm của X11
Việc tăng độ phức tạp của chuỗi các thuật toán nhằm nâng cao mức độ an toàn và giảm sự không chắc chắn cho tiền kỹ thuật số, so với việc sử dụng giải pháp PoW dùng một thuật toán đơn, dùng thuật toán đơn là không bảo đảm cho việc rủi ro về mặt an ninh mà người ta gọi là SPOF (Một Điểm Chịu Lỗi). Ví dụ, giả sử có khả năng về tính toán mà nó "phá vỡ" thuật toán SHA256 thì nó có thể gây nguy hại cho toàn bộ mạng lưới của Bitcoin cho đến khi Bitcoin phải chuyển đổi bằng hard fork sang thuật toán mới.
Trong sự kiện tương tự nếu có sự cố về mặt tính toán, một loại tiền dùng cơ chế PoW với X11 sẽ vẫn hoạt động một cách an toàn trừ khi cả 11 thuật toán băm đều được phá vỡ một cách đồng thời. Thậm chí nếu vài thuật toán băm trong X11 được chứng minh là không đáng tin cậy, thì nó vẫn đủ thời gian để cảnh báo cho đồng tiền dùng X11 đánh giá và thay thế những thuật toán băm có vấn đề bằng các thuật toán băm khác đáng tin cậy hơn.
Với đặc tính đầu cơ của các loại tiền kỹ thuật số và những tính chất không chắc chắn được thừa kế của nó như là một lĩnh vực mới, thì thuật toán X11 có thể cung cấp sự tự tin cao hơn cho người dùng cũng như những nhà đầu tư tiềm năng mà cách tiếp cận sử dụng một thuật toán đơn không giải quyết được. Giải pháp sử dụng chuỗi các thuật toán băm như X11, cung cấp sự an toàn nâng cao và tính bền vững hơn trong mục đích gìn giữ giá trị, đa dạng hoá đầu tư và bảo hiểm trước những rủi ro liên quan như vấn đề SPOF (Một điểm Chịu lỗi Đơn lẻ) của các loại tiền điện tử sử dụng một thuật toán băm đơn.
Evan Duffield, người sáng lập của Dash và chuỗi thuật toán băm X11, đã một số lần viết rằng việc tích hợp X11 vào Dash không nhằm mục đích ngăn chặn các nhà sản xuất tạo ra chip ASIC cho thuật toán X11 trong tương lai, mà chỉ cung cấp cách chuyển đổi tương tự như Bitcoin là có (CPU, GPU, và ASIC).
Dark Gravity Wave
DGW hay Dark Gravity Wave là một thuật toán mã nguồn mở để điều chỉnh độ khó cho các loại tiền điện tử dựa trên Bitcoin, nó lần đầu tiên được sử dụng ở Dash và sau đó xuất hiện trên nhiều loại tiền điện tử khác. DGW được sáng tạo ra bởi Evan Duffield, cũng là người sáng lập ra Dash, để xử lý cho vấn đề bù-thời-gian được tìm thấy ở Kimoto's Gravity Well. Khái niệm về DGW cũng tương tự như thuật toán Kimoto Gravity Well, là điều chỉnh mức độ khó ở mỗi block (thay vì mỗi 2016 block giống như ở Bitcoin) dựa trên những dữ liệu thống kê được tìm thấy từ những block gần nhất. Nó cũng làm cho việc sinh khối với khoảng thời gian tương đối đồng nhất, thậm chí ngay cả khi tổng tốc độ băm dao động mạnh, mà không phải gánh chịu lỗi bù-thời-gian.
- Phiên bản 2.0 của DGW đã được thực hiện ở Dash từ khối 45,000 trở về sau để hoàn toàn làm giảm nhẹ loại lợi dụng làm-lệch-thời-gian.
- Phiên bản 3.0 được thực hiện vào ngày 14 tháng 5 năm 2014 để tiếp tục cải tiến điều chỉnh độ khó với sự chuyển đổi mượt hơn. Nó cũng xử lý vấn đề với nhiều kiến trúc mà có nhiều cấp độ khác nhau của độ chính xác của dấu chấm động thông qua việc sử dụng số nguyên.
Tốc độ phát sinh
Các loại tiền kỹ thuật số như Dash và Bitcoin được tạo ra thông qua một tiến trình giải quyết vấn đề khó về lĩnh vực mật mã học gọi là đào coin. Đào coin liên quan đến việc liên tục phải giải quyết các thuật toán băm đến khi tìm được lời giải phù hợp cho cái khó của đào coin. Một khi giải pháp được tìm ra, thợ mỏ được phép tạo ra một số đơn vị tiền mới. Cái này gọi là phần thưởng khối. Để đảm bảo cho việc đồng tiền không bị lạm phát vô hạn, phần thưởng khối được thiết kế để giảm dần theo thời gian, như trong tính toán này. . Biểu đồ hiển thị kết quả dữ liệu trong một đường cong cho thấy tổng số lượng coin được lưu thông, nó được biết với cái tên là tỷ lệ phát sinh coin.
Trong khi Dash dựa trên Bitcoin, nó cũng thay đổi rất nhiều tỷ lệ phát sinh coin để đưa ra khả năng giảm bớt lượng coin phát sinh một cách trơn tru hơn theo thời gian. Trong khi Bitcoin giảm lượng con phát sinh theo tỷ lệ 50% cứ mỗi 4 năm, thì Dash lại giảm dần lượng coin phát sinh Theo tỷ lệ 1/14 (xấp xỉ 7.14%) cứ mỗi 210240 khối (xấp xỉ 383.25 ngày). Chúng ta có thể thấy sự giảm phần thưởng khối bởi một lượng nhỏ dần mỗi năm làm cho sự chuyển đổi được trơn tru hơn về phía phần thưởng dựa dần về phí giao dịch so với Bitcoin.

So sánh tốc độ phát sinh coin giữa Bitcoin và Dash
Tổng số coin phát sinh ra
Tổng số coin phát sinh của Bitcoin có thể được tính là tổng của một chuỗi hình học, với tổng số phát sinh tiệm cận (nhưng không bao giờ chạm tới) 21,000,000 BTC. Nó sẽ tiếp tục sinh đến tận năm 2140, nhưng phần thưởng khi đào coin sẽ giảm một cách nhanh chóng mà 99% của tất cả số bitcoin sẽ được lưu thông vào năm 2036, và 99.9% vào năm 2048.
Tổng số Dash được phát sinh cũng sẽ là tổng của chuỗi hình học, nhưng tổng số tiền phát sinh là không chắc chắn bởi vì không thể biết bao nhiêu của 10% phần thưởng khối dự trữ cho các đề xuất ngân sách sẽ thực tế được cấp phát, vì nó còn phụ thuộc vào việc bỏ phiếu trong tương lai. Dash sẽ tiếp tục phát sinh coin trong vòng xấp xỉ 192 năm trước khi mà tổng số coin phát sinh cho cả một năm là ít hơn 1 DASH. Sau năm 2209 chỉ còn có 14 DASH sẽ được tạo ra. Đồng DASH cuối cùng sẽ mất đến 231 năm để sinh ra, bắt đầu từ năm 2246 và việc sinh ra đồng cuối cùng này sẽ dừng lại vào năm 2477. Dựa trên các con số đó, nguồn cung cấp số coin tối đa và tối thiểu vào năm 2254 có thể được tính trong khoảng như sau:
| 17,742,696 DASH | Giả sử không phân bổ ngân quỹ |
| 18,921,005 DASH | Giả sử phân bổ toàn bộ quỹ |
Phân phối phần thưởng khối
Không giống như Bitcoin, đã cấp phát 100% phần thưởng khối cho các thợ mỏ, Dash giữ lại 10% của phần thưởng khối để dùng cho hệ thống ngân sách phi tập trung. Phần còn lại của phần thưởng khối, cũng như các khoản phí giao dịch, được chia 50/50 giữa thợ mỏ và một masternode, nó được chọn bằng việc áp dụng logic thanh toán. Dash có các siêu khối, nó sẽ xuất hiện cứ mỗi 16616 khối (xấp xỉ 30.29 ngày) và sẽ giải ngân khoản lên đến 10% của ngân sách tích luỹ được giữ lại trong suốt chu kỳ thanh toán cho những đề xuất thắng cử trong hệ thống ngân sách. Tùy thuộc vào việc sử dụng ngân sách, điều này dẫn đến cấp phát một lượng coin tương đương trong một chu kỳ ngân sách như sau:
| 45% | Phần thưởng cho việc đào |
| 45% | Phần thưởng của Masternode cho Bằng-chứng-phục-vụ |
| 10% | Cơ chế quản trị ngân sách phi tập trung |
Tài liệu này là dựa trên tính toán và bài viết của moocowmoo. Hãy xem bài viết trên reddit này để có thêm thông tin chi tiết, hoặc tự chạy tính toán việc phát sinh coin của riêng bạn bằng việc sử dụng công cụ. Xem website này để có dữ liệu trực tiếp về những thông tin thống kê hiện tại của mạng.
Quản trị Phi tập trung
Hệ Quản trị Phi tập trung trên Blockchain, hay DGBB, là một nỗ lực của Dash nhằm giải quyết hai vấn đề quan trọng trong lĩnh vực tiền số: đó là quản trị và cấp vốn. Quản trị một dự án phi tập trung là rất khó, bởi vì theo định nghĩa thì nó không có một thẩm quyền tập trung nào để ra những quyết định cho dự án. Ở Dash, những quyết định như vậy được thực hiện bởi chính mạng lưới, đó chính là các chủ masternode. Hệ thống DGBB cho phép mỗi masternode được bỏ phiếu một lần (yes/no/bỏ qua) cho mỗi một đề xuất. Nếu một đề xuất được thông qua, nó có thể được thực hiện (hoặc không) bởi những người phát triển của Dash. Một ví dụ điển hình là đầu năm 2016, khi nhóm Dash Core gửi đề xuất cho mạng lưới và đề nghị tăng kích thước khối lên 2 MB. Chỉ trong vòng 24 giờ, mạng lưới đã đạt được sự đồng thuận và cho phép sự thay đổi này. So với mạng lưới Bitcoin, nơi mà tranh cãi về kích thước khối này kéo dài đến gần ba năm.
Hệ thống DGBB cũng cung cấp một ý nghĩa cho Dash là cấp vốn cho sự phát triển của chính nó. Trong khi những dự án khác phải phụ thuộc kinh phí vào sự tài trợ hoặc sự hiến tặng, thì Dash dành 10% của phần thưởng khối để cấp vốn cho sự phát triển của chính nó. Khi mỗi khối được đào, 45% phần thưởng sẽ trả cho thợ mỏ, 45% được trả cho masternode, và 10% còn lại không được tạo ngay mà chờ đến cuối tháng. Trong tháng, bất kỳ ai cũng có thể tạo một đề xuất xin kinh phí từ mạng lưới. Nếu đề xuất được thông qua với bởi nhất 10% của mạng lưới masternode, thì cuối tháng một chuỗi gọi là "siêu khối" sẽ được tạo ra. Tại thời điểm đó, phần thưởng khối mà đã chưa được chi trả (10% của mỗi khối) sẽ được sử dụng để cấp vốn cho những đề xuất được thông qua. Như vậy mạng lưới tự cấp vốn cho chính nó bằng việc dành riêng 10% của phần thưởng khối cho ngân sách các dự án.
Bạn có thể đọc thêm về cơ chế quản trị của Dash ở mục quản trị của tài liệu này.
Sentinel
SentinelSentinel là một tác nhân động để duy trì, xử lý và tự động hóa các đối tượng quản trị và các nhiệm vụ của Dash 12.1 và các chức năng mở rộng phiên bản Dash V13 sắp tới (Evolution). Sentinel được thực hiện như một ứng dụng Python liên kết với một phiên phiên bản cục bộ của dashd 12.1 hiện diện trên mỗi Dash masternode 12.1.
Một Đối tượng Quản trị (hoặc "govObject") là một cấu trúc chung được giới thiệu trong Dash Core 12.1 cho phép việc tạo ra các đề xuất ngân sách, các Trigger, và các Watchdogs. Lớp kế thừa cũng sử dụng để mở rộng đối tượng chung này thành một đối tượng "Đề xuất" để thay thế hệ thống ngân sách hiện nay của Dash.

Sơ đồ làm nổi bật mối quan hệ giữa Dash Sentinel và Core
"Sự khác biết với Sentinel là thực sự kiến trúc này không dễ/hay thú vị khi giải thích với người dùng về bước chuyển từ 12.0 lên các những tính năng của Evo (nhưng chưa thực hiện chúng một cách đầy đủ), và Sentinel dẫu sao chỉ là một phần của những cải tiến trong 12.1. Trước Sentinel, chức năng quản trị được "ghi cứng" vào trong mã chương trình. Sentinel làm trừu tượng hoá quá trình này bởi vì trong Evolution có nhiều kiểu đối tượng, từ người dùng đến tài khoản đến thông tin liên hệ,... và nếu chúng ta không thực hiện thay đổi này trước, thì những thay đổi trong tương lai/những cải tiến trong Evolution (ví dụ như thêm kiểu đối tượng) sẽ cần phải thay đổi mã nguồn của phần mềm lõi. Bây giờ phần Lõi là không thể biết đối với các loại đối tượng và chúng ta có thể lấy chúng ra khỏi trải nghiệm của nười dùng và nó không chỉ là quản trị. Trong phạm vi tài liệu này, không có một cáo bạch nào cụ thể về Sentinel, nhưng chúng ta có rất nhiều tài liệu cho Evo trong tiến trình RFC sắp tới nó sẽ được dùng như là phần cơ bản của quá trình phát triển Evo."
—Andy Freer, lập trình viên cho Evolution
Phí giao dịch
Giao dịch trên mạng lưới Dash được ghi nhận trên các khối trên blockchain. Kích thước của mỗi giao dịch được đo bằng đơn vị byte, nhưng không cần phải có sự liên quan giữa những giao dịch có giá trị cao với số lượng byte cần để xử lý giao dịch. Thay vào đó, kích thước giao dịch bị ảnh hưởng bởi số lượng bao nhiêu địa chỉ đầu vào và đầu ra liên quan, như vậy có nhiều dữ liệu phải được ghi vào block để lưu những thông tin này. Mỗi khối mới được sinh bởi thợ mỏ, người sẽ được trả công cho việc thực hiện công việc sinh khối với một phần thưởng khối. Để ngăn chặn không cho mạng bị tràn ngập bởi các giao dịch spam thì kích thước của mỗi khối là được hạn chế một cách nhân tạo. Khi lượng giao dịch tăng lên, không gian trong mỗi khối trở nên một tài sản khan hiếm. Bởi vì các thợ mỏ có bổn phận đưa bất kỳ giao dịch nào vào khối mà anh ta tạo ra, mỗi khi khối đầy, một khoản phí giao dịch tự nguyện có thể được đưa vào như là một động lực cho thợ mỏ xử lý giao dịch. Hầu hết các ví đều tính một khoản phí nhỏ ngầm định, mặc dù rất nhiều thợ mỏ sẽ xử lý các giao dịch thậm chí nó không có phí đi kèm.
Phiên bản 0.12.2.0 và việc kích hoạt DIP0001 cho thấy một sự giảm phí xuống 10 lần trong khi tăng kích thước khối từ 1MB lên 2MB để thúc đẩy sự phát triển của các giao dịch phí thấp thậm chí cả khi giá của Dash tăng. Dash cũng cung cấp giao dịch InstantSend và PrivateSend, hoạt động với các cơ chế phí bắt buộc khác. Mức phí dự kiến cho Dash 12.2.x ra mắt tháng 12 năm 2017 như sau:
| Kiểu giao dịch | Mức phí gợi ý | Mỗi đơn vị |
|---|---|---|
| Giao dịch chuẩn | .00001 DASH | Cho mỗi kB dữ liệu giao dịch |
| InstantSend | .0001 DASH | Cho mỗi đầu vào giao dịch |
| PrivateSend | .001 DASH | Mỗi 10 vòng trộn (trung bình) |
Giống như một ví dụ, một chuẩn và giao dịch tương đối đơn giản trên mạng lưới Dash với một đầu vào và một đầu ra và có thể một địa chỉ trả tiền lẻ điển hình phù hợp với khoảng 200 - 400 bytes. Giả sử giá một Dash là US$800, mức phí sẽ rơi vào khoảng từ $0.0015 - $0.0030, hoặc dưới một nửa cent. Phí giao dịch sử dụng InstantSend cũng cùng mức giá như vậy nhưng thêm $0.08 hoặc 8 cent cho một giao dịch. Mức phí đó áp dụng bất kể giá trị bản thân giao dịch là bao nhiêu.
PrivateSend hoạt động bằng cách tạo ra các mệnh giá 10, 1, 0.1.0.01 DASH và sau đó trộn các mệnh giá của những người dùng với nhau. Việc tạo các mệnh giá như vậy là tính một khoản phí ngầm định như một giao dịch thông thường. Việc trộn thì miễn phí, nhưng để ngăn chặn spam, cứ trung bình một trong mười phiên giao dịch trộn sẽ bị tính một khoản phí là 0.001 DASH. Đầu vào của chi phí trộn sử dụng PrivateSend xuất hiện một cách như chuẩn thông thường hoặc như các phí InstantSend, nhưng để tránh nguy cơ bị phát hiện địa chỉ trả lại, khoản phí luôn được làm tròn về mức mệnh giá thấp nhất có thể. Nó thường là 0.01 DASH, do vậy điều quan trọng là trừ khoản phí vào khoản được chi tiêu nếu có thể để giảm thiểu phí. Kết hợp InstantSend và PrivateSend có thể tốn kém do yêu cầu này và do thực tế giao dịch PrivateSend có thể yêu cầu một số đầu vào, trong khi InstantSend lại tính phí 0,0001 DASH cho mỗi đầu vào. Bởi vậy nên luôn kiểm tra mức phí trước khi thực hiện một giao dịch gửi tiền.
Evolution
Dash Evolution là tên mã cho một nền tảng tiền phi tập trung được xây dựng trên công nghệ blockchain của Dash. Mục đích là cung cấp cách truy cập đơn giản đến những tính năng độc đáo và lợi ích của Dash nhằm hỗ trợ việc tạo ra công nghệ phi tập trung. Dash giới thiệu một thiết kế mạng phân tầng, nó cho phép người dùng thực hiện rất nhiều công việc trên mạng lưới, cùng với việc truy cập một phi tập trung và một hệ thống file phi tập trung.
Dash Evolution sẽ được công bố theo các giai đoạn. Dash Core với các phiên bản từ 12.1 đến 12.4 sẽ đặt nền tảng cho các tính năng phi tập trung ở phần hậu cảnh. Phiên bản Alpha của Evolution dự kiến sẽ ra mắt vào nửa đầu năm 2018, bao gồm tính năng cơ bản của DashDrive, Primitives, DAPI và một ví T3 đơn giản. Nó cũng được giới thiệu cùng với một loạt các Đề xuất Cải tiến Dash (DIPs), tiếp theo bởi giai đoạn testnet cùng với những tính năng cơ bản nhất, và phiên bản ổn định đầu tiên sẽ được ra mắt vào mùa hè năm 2018.
Dưới đây là công việc hiện tại của chúng tôi về Evolution, ngoài ra còn có thêm nhiều thành phần như:
- DashDrive: Một hệ thống chia sẻ file cho dữ liệu của người dùng được lưu trữ trên mạng bậc hai
- DAPI: Là giao diện lập trình phi tập trung cho phép người dùng trên các ứng dụng bậc 3 có thể truy cập mạng lưới một cách an toàn
- DashPay Decentralized Wallets: Là những ví nhẹ được kết nối với mạng thông qua DAPI và chạy trên nhiều nền tảng khác nhau
- Bậc hai: Là mạng lưới masternode, nó cung cấp hạ tầng bổ sung cho dự án
- Ngân sách: Mạng bậc hai cho phép việc bỏ phiếu để cấp phát ngân sách cho những dự án cụ thể của mạng lưới qua hệ thống ngân sách
- Quản trị: Mạng bậc hai cho phép việc bỏ phiếu để quản trị hệ thống tiền tệ và quản lý các hoạt động cần thiết của hệ thống tiền tệ
- Chuỗi quorum: Tính năng này đưa ra một danh sách masternode ổn định, nó có thể được dùng để tính toán những quorum trong quá khứ và hiện tại
- Social Wallet: Chúng tôi giới thiệu một social wallet hay còn gọi là ví xã hội, nó cung cấp tính năng danh sách bạn bè, nhóm người dùng, và các tài khoản chia sẻ đa chữ ký.
Xem trước về Evolution
Những video sau đây được giới thiệu bởi người sáng lập Dash là Evan Duffield và trưởng nhóm phát triển UI/UX là Chuck Williams mô tả quy trình phát triển và những tính năng dự kiến của nền tảng Dash Evolution.
Evolution Demo #1 - The First Dash DAP, 16 tháng 3 năm 2018
Evolution Demo #2 - Mobile Evolution, 25 tháng 4 năm 2018
Evolution Demo #3 - Trải nghiệm người dùng Dashpay, 15 tháng 5 năm 2018
Chuck Williams với Evolution, Hội thảo của Dash ở London, 14 tháng 9 năm 2017
Evan Duffield Lộ trình của Evolution, Dash Force News, 28 tháng 6 năm 2017
Làm thế nào để mua
Dash có thể mua và bán theo nhiều cách, mỗi cách đều có những ưu điểm và nhược điểm riêng. Những thông tin sau đây sẽ cho bạn lựa chọn:
- Exchanges are one of the most popular ways to trade cryptocurrency. A wide range of exchanges exist, each offering slightly different features. Some serve different markets, some are in direct competition, some have cheaper fees, and some are subject to more or less strict regulatory requirements. Most exchanges are centralized, meaning they are operated by a single company, which may be obliged by the laws of the jurisdiction in which it operates to collect data on its customers. Others are decentralized, but as a result have higher escrow requirements since you are dealing peer-to-peer instead of with a trusted entity. Exchanges can be broadly broken down into two categories: exchanges which accept national currency (fiat money) and exchanges which deal in cryptocurrencies only. For safety, exchanges should not be used as wallets. Exchanges are for trading, not for savings.
- Instant exchanges perform a similar function to normal exchanges, but without the requirement to log in. They effectively convert one currency to another, with some limits on the amount to be exchanged and usually at a less advantageous rate. Others may even offer to sell cryptocurrency as a credit card purchase.
- Over the counter exchanges have recently appeared to facilitate sale of Dash directly from a company to the individual at a specified price, or peer-to-peer between individuals at a negotiated price. Volume may be limited compared to exchanges, but these services are usually much easier to use. More advanced peer-to-peer sites offer escrow services for a fee to prevent cheating during the sale between two parties who have never met.
- ATMs accepting card and cash payments in return for crypto are widely available. Mapping services can show the specific location of these machines, or you can even set one up at your own business and earn a percentage of sales.
TỪ CHỐI TRÁCH NHIỆM: Danh sách được cung cấp ở đây chỉ mang mục đích cung cấp thông tin. Những dịch vụ được liệt kê ở đây không được đánh giá và xác nhận bởi Dash Core và không đảm bảo rằng nó được thực hiện một cách chính xác. Xin hãy vui lòng thận trọng trong việc sử dụng dịch vụ của các bên thứ ba.
Các sàn giao dịch
Cryptocurrency exchanges exist to convert national currency, also known as fiat money, into cryptocurrency. Many exchanges do not accept fiat money, and exchange between various cryptocurrencies only. Trades are handled on markets, and trades are created between pairs of currencies, identified by their ticker codes. Dash is widely accepted on exchanges and many pairs exist against both fiat money and cryptocurrency. This means it is possible to exchange EUR for DASH, or DASH for BTC, for example. The volume traded on an exchange provides a good indication of how quickly a buy or sell order you place will be filled. This section introduces some of the most popular exchanges for trading Dash.
Marketplace comparison websites
- Cryptoradar

https://cryptoradar.co/buy-dash
Cryptoradar is a real-time cryptocurrency marketplace price comparison and review platform. The website compares dozens of Dash markets based on prices, fees, payment methods, reviews and more.
- CoinMarketCap

https://coinmarketcap.com/currencies/dash/#markets
CoinMarketCap liệt kê tất cả các loại tiền só theo giá trị thị trường của chúng. Click vào một trong những loại tiền số đó cho phép bạn xem biểu đồ giá, và khi click vào Markets nó cho bạn xem các sàn giao dịch mà nó có thể giao dịch theo các cặp.
Các thị trường Dash.org

https://www.dash.org/exchanges
Website chính thức của Dash cũng cung cấp một danh sách các sàn giao dịch chính có giao dịch Dash.
Danh sách các sàn giao dịch
Các sàn giao dịch liệt kê ở đây chỉ với mục đích cung cấp thông tin và không có bảo lãnh hoặc liên kết với bất kỳ nền tảng cụ thể nào.
- Poloniex

Poloniex là một sàn có địa chỉ ở Mỹ, nó chỉ cho giao dịch các loại tiền điện tử với nhau, và đây là nơi có giao dịch DASH với BTC, XMR và USDT có khối lượng giao dịch cao. Có giao dịch ký quỹ và cho vay đòn bẩy được hỗ trợ cho Dash.
- Bittrex

Bittrex là một sàn giao dịch ở Mỹ mà nó chỉ làm việc với các loại tiền số, mặc dù chuyển khoản bằng USD đã được hỗ trợ liên tục trong quá khứ. DASH có thể giao dịch từng cặp với BTC, ETH, và USDT.
- Bitfinex

Bitfinex là một sàn giao dịch có trụ sở ở Hồng Kông nó có lượng giao dịch BTC và USD cao đối với Dash, cũng nhu cung cấp công cụ giao dịch đòn bẩy.
- Kraken

Kraken là một sàn giao dịch với dung lượng lớn có trụ sở ở Mỹ cho phép giao dịch bằng các loại tiền thông thường như EUR, USD, JPY và GBP. DASH cũng có thể giao dịch trực tiếp theo cặp với EUR, USD, và BTC.
- Binance

Binance is a pure-crypto with a focus on ICOs and the Chinese market. DASH is available for funding and can be traded against BTC.
- HitBTC

HitBTC cung cấp các phương tiện cho các nhà đầu tư như tín dụng đô la Mỹ, EUR và bảng Anh cũng như là BTC, ETH và USDT cho các cặp giao dịch với Dash cho người dùng thông thường.
- Bithumb

Bithumb là sàn giao dịch tiền số lớn nhất của Hàn Quốc. Nó chấp nhận ký quỹ bằng tiền Fiat chỉ bằng đồng Won của Hàn Quốc và cung cấp nơi giao dịch Dash với khối lượng lớn.
- Huobi

Huobi is a major Chinese exchange offering high volume DASH trading against BTC. A native app is available for both iOS and Android.
- CEX.IO

CEX.IO là một sàn giao dịch ở Anh Quốc với hơn một triệu người sử dụng và có hỗ trợ các cặp giao dịch Dash với các loại tiền fiat như bảng Anh, EUR, và đô la Mỹ.
- YoBit

YoBit là sàn giao dịch tập trung cho các token trên Ethereum, nhưng cũng hỗ trợ các cặp giao dịch BTC, USD và RUB với Dash.
- Chaoex

Có trụ sở ở Hồng Kông và hỗ trợ hai ngôn ngữ là tiếng Anh và tiếng phổ thông Trung Quốc, Chaoex là một sàn giao dịch thuần tuý tiền số cung cấp khả năng giao dịch tập trung đến các loại tài sản mới và hỗ trợ ứng dụng giao dịch trên điện thoại di động cho cả hệ điều hành iOS và Android.
- Bit-Z

Bit-Z là một sàn giao dịch tiền điện tử tập trung vào lựa chọn cấp vốn OTC cho những người giao dịch Trung Quốc. Dash cũng được giao dịch với BTC trên sàn này.
- WEX

WEX, trước đây nó được biết đến với cái tên là BTC-E đến tận khi bị đánh sập bởi chính quyền, và sau đó trở lại bằng cái tên mới. Dash được giao dịch với các loại như BTC, USD, RUB, EUR, LTC và ETH.
- Koineks

Koineks serves the Turkish market and offers trading pairs for DASH against the Turkish Lira and Bitcoin.
- Sistemkoin

Sistemkoin serves the Turkish market and offers trading pairs for DASH against the Turkish Lira and Bitcoin.
- Ovis

Ovis serves the Turkish market and offers trading pairs for DASH against the Turkish Lira and Bitcoin.
- Exmo

Exmo là một sàn giao dịch được đăng ký ở Anh nó cho phép ký quỹ bằng tiền fiat dưới dạng đô la Mỹ, Euro, và UAH (đơn vị tiền của Ukraina). Dash có thể giao dịch với BTC, đô la Mỹ và RUB.
- BitBay

BitBay is based in Poland and accepts fiat deposits in EUR, USD and PLN. DASH can be traded against all three fiat currencies and BTC.
- Livecoin

Livecoin cung cấp khả năng ký quỹ bằng EUR, USD và RUB và DASH có giao dịch với BTC, USD và một số loại tiền số có khối lượng giao dịch thấp.
- xBTCe

xBTCe is an exchange based in St. Kitts and Nevis with a focus on providing fiat currency trading pairs. Various deposit methods are available for currencies including CNH (Chinese Offshore Yuan), EUR, GBP, JPY, IDR and RUB. DASH trading pairs include BTC, USD and CNH.
- Upbit

UPbit là một sàn giao dịch Hàn Quốc cho phép ký quỹ bằng đồng Won của Hàn Quốc và cho phép giao dịch DASH với Won, ETH, BTC và USDT.
- CoinEx

CoinEx là một sàn giao dịch ở Hong Kong tập trung vào giao dịch Bitcoin và tiền mặt. DASH cũng được hỗ trợ để giao dịch với BTC và BCH.
- Trade by Trade

Trade By Trade is registered in Vanuatu and provides a trading platform for over 60 cryptocurrencies with a range of tools to manage your trades.
- Bitinka

Bitinka is the premiere exchange in Latin America, and offers BTC, LTC, ETH, XRP and DASH in exchange for over 10 national currencies from America and Europe.
- eToro

With legal entities in the UK, Israel and Cyprus, eToro offers a social trading platform where you can copy top performing accounts. DASH and a number of other cryptocurrencies, forex and stocks are available.
- Liqui

Liqui is headquartered in Ukraine and offers a modern interfaced for leveraged trading of many cryptocurrencies, including a DASH/BTC pair.
- Bitbns

Bitbns offers DASH trading against the Indian Rupee (INR) for Indian citizens with bank deposits supported from many major Indian banks.
- Coinome

Coinome is an Indian exchange offering DASH trading against the Indian Rupee (INR).
- WazirX

WazirX is an Indian exchange offering DASH trading against BTC and USDT, and funding in the Indian Rupee (INR).
- Coinsquare

Coinsquare là một sàn giao dịch của Canada nó cung cấp việc giao dịch Dash với BTC và CAD
- Lykke

Incorporated in Switzerland, Lykke is an open source exchange, online/mobile wallet service, idea accelerator and ICO platform. DASH is available for both trading and investment.
- Liquid

Liquid serves the Asian market with funding support for HKD, AUD, CNY, INR, JPY, PHP, IDR, UDS, SGD and EUR, and trading against ETH, BTC, BCH and DASH.
- BitcoinVN

BitcoinVN is a Vietnamese exchange offering BTC, BCH, LTC and DASH for trading against Vietnamese đồng.
- Ginero

Ginero is a peer-to-peer exchange operating in Vietnam and offeringexchange offering BTC, BCH, LTC, ETH, GIN and DASH for trading against Vietnamese đồng.
- ZB.com

With a focus on the Chinese market, ZB.com offers trading from specialized applications for macOS, Windows, Android and iOS. Crypto deposits and DASH trading against QC, USDT and BTC.
- Coinfield

Coinfield is a Canadian exchange offering funding in CAD and quick market purchases or advanced trading against DASH.
- Bitshares

BitShares is a decentralized exchange (DEX) offering DASH trading pairs for BTC and BTS, as well as the bit assets bitUSD, bitCNY and bitBTC.
- Cryptopia

Cryptopia is a New Zealand cryptocurrency exchange with a reputation for supporting a large number of low-volume altcoins. It offers DASH trading pairs for BTC, LTC, DOGE and USDT.
- ACX

ACX is an Australian exchange accepting fiat deposits from Australian bank accounts. DASH is available to trade against BTC.
- Lescovex

Registered in Switzerland, Lescovex offers deposits and withdrawals in a wide range of fiat currencies (EUR, USD, CAD, GBP, CHF, SEK, RON) for trading against DASH and other cryptocurrencies. The platform is designed to assist in the creation of tokens and cryptographic contracts.
- OKEX

OKEX, previously known as OKCoin, is an exchange focused on the Chinese market offering DASH trading pairs against BTC. Funding with CNY and futures trading is also available.
- Bitexbook

Bitexbook hứa hẹn về khả năng gửi và rút tiền nhanh nhất và hỗ trợ khách hàng nhanh chóng. Có thể gửi tiền bằng đô la Mỹ, Rub Nga, và cũng hỗ trợ các loại thẻ tín dụng.
- MoneyPolo

MoneyPolo cung cấp dịch vụ sàn giao dịch và chuyển tiền, thẻ trả trước và khả năng giữ các tài khoản với nhiều loại tiền khác nhau. Có thể gửi và rút tiền bằng DASH, BTC, ETH, LTC, BCH và BTG, và nó cũng có khả năng nạp tiền vào thẻ trả trước hay bất kỳ tài khoản ngân hàng nào trên thế giới.
- Miami Crypto Exchange

Miami Crypto Exchange (MCEX), operated by Dash partner Mercury Cash, is a legal and fully compliant crypto gateway between the U.S. and the world, with a specific focus on Latin America and the Caribbean. DASH can be traded against USD and BTC.
- Coinapult

Coinapult is an asset exchange headquartered in Panama City and providing exchange services between BTC, DASH, USD, GBP and EUR, as well as gold and silver.
- Panda.exchange

Based in Latin America, Panda.exchange specializes in making digital assets such as Dash available in Latin America and, through a branch in Portugal, the EU market.
- Whaleclub

Based in Hong Kong, Whaleclub offers an advanced platform that allows highly leveraged trading of cryptocurrency including DASH against other cryptocurrencies, forex, metals, stocks and bonds.
- Golix

Based in Zimbabwe, Golix is a digital currency exchange that helps people in Sub-Saharan Africa buy and sell DASH and other cryptocurrencies.
- Bisq

Bisq is a decentralized exchange running on the Tor network and offers complete privacy, but trades are manual, require escrow and must be settled between users.
- Coincheck

Coincheck là một sàn giao dịch của Nhật Bản cho phép ký quỹ bằng đồng Yên hoặc USD để giao dịch với DASH và các loại tiền số khác.
- Coindeal

Coindeal cho phép ký quỹ bằng đồng EUR và cung cấp nhiều cặp giao dịch, trong đó có DASH. Sàn giao dịch này cũng tập trung để nhận chứng chỉ FINMA ở Thuỵ Sỹ để có thể chấp nhận ký quỹ nhiều loại tiền fiat khác nhau.
- BuyUcoin

BuyUcoin is a large Indian exchange offering DASH and many other cryptocurrencies in exchange for Indian Rupees (INR).
- BitMEX

BitMEX là một sàn giao dịch thuần tuý tiền số và phái sinh cung cấp khả năng giao dịch với đòn bẩy gấp 100x. DASH cũng có thể được giao dịch với BTC.
- MBAex

MBAex is a pure crypto exchange with a focus on the Chinese market. DASH can be traded against BTC, USDT and MDP.
- KuCoin

KuCoin is a pure crypto exchange with a focus on the Chinese market. DASH can be traded against BTC, USDT, ETH and KCS.
- Indodax

Indodax allows funding in IDR and offers a DASH/BTC trading pair.
- ALFAcashier

ALFAcashier, incorporated in Belize, provides electronic exchange and fiat services. DASH trading pairs are available for BTC, XRP, XMR, XEM, ETH, LTC, BCH, USD, EUR, CNY, CAD and RUB.
- CoinSuper

Registered in Hong Kong and with a focus on the Chinese market, CoinSuper allows fiat deposits in USD and offers DASH trading against BTC, ETH and USD.
- Exrates

Exrates allows crypto and USD deposits, and offers DASH trading against BTC and USD.
- Bleutrade

Registered in Brazil, Bleutrade offers DOGE and BTC trading pairs for DASH.
- SatoWallet

SatoWallet is a multi-coin crypto wallet with built-in exchange functionality. Dash is available for trade against Nigerian Naira (NGN), USD, BTC and ETH.
- LBank

Available in English and Chinese, LBank has a focus on token trading. DASH is available to trade against BTC.
- Coinroom

Registered in Poland, Coinroom has a strong focus on trading against fiat currencies. Deposits are available in CHF, CZK, DKK, EUR, GBP, NOK, PLN and USD. DASH can be traded against USD, BTC, EUR, PLN and GBP.
- CoinSpot

CoinSpot is an Australian exchange offering DASH, BTC, LTC and ETH in exchange for AUD.
- Holy Transaction

Holy Transaction offers DASH trading pairs for BTC, USD and EUR, as well as over ten other altcoins.
- RealExchange

RealExchange is a Brazil-based exchange offering support for a handful of currencies including Dash, Bitcoin, Litecoin, and SmartCash. The exchange also supports fiat trading pairs with the Brazilian real.
- NegocieCoins

https://www.negociecoins.com.br
Based in Brazil, NegocieCoins offers deposits in Brazilian real and Dash trading pairs. A premium service with higher withdrawal limits is available.
- OmniTrade

Based in Brazil, OmniTrade accepts deposits in Brazilian real through a partnership with Neon Bank, which can then be traded against Dash.
- Braziliex

Based in Brazil, Brazilies accepts deposits in Brazilian real, and offers trading of real, Bitcoin and USDT against Dash.
- Bitcointoyou

Based in Brazil, Bitcointoyou has been in operation since 2010 and offers trading of a number of cryptocurrencies, including Dash, against the Brazilian real.
- SouthXchange

Based in Argentina, SouthXchange offers DASH for USD and BTC.
- Coinrail

Coinrail is a Korean exchange offering DASH trading against KRW.
- Tidex

Tidex is an exchange focusing on tokens on the WAVES and Ethereum blockchains, but also offers trading against fiat currencies. DASH can be traded against ETH, BTC, WAVES and Waves pegged currencies.
- LiteBit

LiteBit is a service based in The Netherlands selling cryptocurrency including Dash for EUR.
- Laissez Faire

Laissez Faire cung cấp giao dịch được khuyến khích bao gồm cả DASH.
- Bitsane

Bitsane (and its altcoin sister site Anybits) offer trading pairs for Dash and allows deposits in EUR and USD.
Sàn giao dịch tức thời
- Changelly

Changelly is a broker service offering a range of cryptocurrency, including Dash, for instant exchange against other cryptocurrencies without needing to create an account. Be sure to check the fees and rates before purchasing.
- ShapeShift

ShapeShift cho phép người dùng trao đổi trực tiếp một tài sản tiền số sang một loại khác mà không cần tạo một tài khoản, dù với một tỷ giá cao hơn hầu hết các sàn giao dịch. ShapeShift hỗ trợ Dash đổi sang hơn 70 loại tiền số khác.
- SimpleSwap

SimpleSwap is a simple and easy-to-use platform for cryptocurrency exchanges that works without registration and limits. It is possible to exchange Dash with over 60 other cryptocurrencies.
- AirTM

AirTM allows rapid exchanges between a range of cryptocurrencies, traditional banks and proprietary regional payment schemes such as Alipay, Western Union or Skrill.
- changeNOW

changeNOW is a non-custodian exchange service based in the Netherlands, with low commissions and quick service. Offers crypto to crypto exchanges, as well as purchases through credit/debit cards.
- Guarda

Guarda offers an entire blockchain ecosystem consisting of desktop, web and mobile wallets, OTC crypto sales and instant crypto exchange. Dash is supported throughout the ecosystem, making it an easy and convenient way for new users to get started.
- Godex

Godex allows users to directly exchange one crypto asset for another without creating any account, albeit with a higher markup than most exchanges. Godex supports Dash and over 120 other cryptocurrencies.
- Flyp.me

Flyp.me is developed by the team at HolyTransaction, the first multicurrency web wallet. It offers instant exchange services between 18 different cryptocurrencies without creating an account.
- CoinSwitch

CoinSwitch is a crypto to crypto exchange aggregate with more than 300 different coins and tokens listed. Also offers purchases through credit/debit cards.
- BlockTrades

BlockTrades is a decentralized exchange designed to facilitate free movement between the Steemit, BitShares, Bitcoin and Dash blockchains. The system is designed to find the best possible instant conversion rate between any two given cryptocurrencies.
- MorphToken

MorphToken is an instant exchange allowing users to instantly convert between Dash, Bitcoin, Bitcoin Cash, Ethereum, Litecoin and Monero. It is even possible to convert into more than one cryptocurrency in a single exchange.
Giao dịch Không Qua Sàn
- Uphold

Uphold accounts may be funded with over 30 national currencies by bank account or credit card to purchase and spend multiple cryptocurrencies including Dash.
- WeSellCrypto

WeSellCrypto is a broker service offering a range of cryptocurrency, including Dash, paid using Paypal. Be sure to check the fees and rates before purchasing.
- Bitpanda

https://www.bitpanda.com https://www.bitpanda.com/togo
Bitpanda is a broker service offering Bitcoin, Ethereum, Litecoin and Dash both online and at over 400 Post branches and about 1300 Post partners throughout Austria. Pay with cash, credit card or bank transfer.
- Bitnovo

Bitnovo is a broker service offering Bitcoin and Dash both on their website and at tens of thousands of physical locations throughout Europe. They also offer reloadable cards, vouchers and cryptocurrency wallets.
- Bitit

Bitit is a broker service offering Bitcoin, Dash and several other cryptocurrencies for sale online. Payment in a range of currencies is support using both direct banking, credit cards and vouchers.
- Kraken
-
Kraken offers private, personalized OTC service with deep liquidity to institutions and high net-worth individuals needing to fill orders in excess of $100,000. Simply send an email to otc@kraken.com to get started.
- Coinfinity

Coinfinity offers Dash and Bitcoin broker services in Austria and Germany, as well as through their coupon-based Bitcoinbon service.
- Bitcoin Meester

https://www.bitcoinmeester.nl https://www.bitladon.com
Bitcoin Meester, and it's international sister site Bitladon, allows you to buy and sell Dash (and other cryptocurrencies) OTC in exchange for Euro.
- eBitcoinics

eBitcoinics is a cryptocurrency exchange and education platform for the African market. Dash is available for exchange against Nigerian Naira (NGN) and Ghanaian Cedi (GHS).
- Kurecoinhub

Kurecoinhub offers DASH and other cryptocurrencies for sale OTC for the Nigerian Naira.
- Gredo E-currency

https://www.gredoe-currency.com
Gredo E-currency offers OTC sale of Dash and other cryptocurrencies for Nigerian Naira (NGN).
- TruexGOLD

TruexGOLD offers OTC sale of Dash in Nigeria for Nigeria Naira (NGN).
- Cryptomate

Cryptomate sells a range of cryptocurrencies, including Dash, for GBP. Cryptomate's goal is to make buying and selling cryptocurrency as simple as possible for people who want a pain-free experience and the fastest transactions - coins can be in your wallet as soon as 5 minutes after ordering.
- BitPrime

BitPrime operates a secure and compliant platform for easy retail trading in New Zealand. Dash is available OTC for both purchase and sale together with many other cryptocurrencies.
- Coindirect

Coindirect offers OTC and P2P services to buy and sell many cryptocurrencies, including Dash. Verified users can create offers in their local currency to buy and sell with other users. Online wallets and exchange services are available for most currencies as well.
- Mercury Cash

Mercury Cash is an online/mobile wallet and licensed money transmitter with integration for merchant services. Balances can be held in both Ethereum and Dash, and deposited or withdrawn in local currencies through a number of methods, including credit cards.
- Graviex

Graviex is a part of the Gravio ecosystem, a blockchain-based communication platform. It offers extremely low rates and fees for trading. DASH can be traded against BTC, ETH, LTC and DOGE.
- SlithEx

Based in Malaysia and funded by the Dash Treasury, SlithEx (and its payment processor, RocketPay) offer exchange, wallet and sale/trading of Dash against the Malaysian ringgit.
- cryptomonster

https://www.cryptomonster.co.uk
cryptomonster have created an easy to use platform where you can buy DASH and other digital assets within minutes. All you need is a UK bank account and a wallet address. cryptomonster pride themselves on a next-level service and regard themseleves as the leading digital assets platform in the UK.
- Changelly
-
Changelly is a popular instantaneous crypto to crypto exchange platform with more than 100 different coins and tokens listed. Also offers purchases via credit/debit cards.
- Cryptobuyer

Cryptobuyer is a direct purchasing service with a focus on the Latin American market and Venezuela in particular. It can be linked with a bank account to purchase Dash, Litecoin and Bitcoin directly. The company also operates a network of ATMs and merchant integrations.
- BasiChange

BasiChange offers exchange, trading and OTC crypto sales with a focus on Venezuela and Colombia.
- CryptoWay

On CryptoWay, you can buy and sell Dash, Bitcoin, Ethereum, Litecoin and Doge peer-to-peer (P2P) with Venezuelan bolivars on a secure, fast and simple platform. You can also link your bank account for efficient processing of deposits and withdrawals.
- Stratum CoinBR

CoinBR is a Brazil-based cryptocurrency company offering a variety of services including an exchange, mining, bill payment, point-of-sale, and more. Dash is available for purchase at over 13,000 locations around Brazil.
- Wall of Coins

Wall of Coins allows user to post offers to buy or sell Dash and Bitcoin within their region or country. The service, which is available in over 20 countries, then holds the coins in escrow while the buyer completes payment.
- Liberalcoins

Liberalcoins allows users to arrange trades to buy or sell Dash, Monero, Bitcoin and Litecoin directly with one another.
- QCashPay

QCashPay is a Hong Kong company specialising in direct sale of cryptocurrency, including Dash, for USD and CNY using various bank and third party payment schemes.
- MegaChange

MegaChange offers direct sale and exchange of various digital forms of currency in a simple market system. It supports Dash and multiple methods of adding fiat currency, including USD, RMB and RUB.
- Dashous

Dashous cho phép người dùng đăng tin rao mua hoặc rao bán Dash và Bitcoin trong phạm vi khu vực hoặc quốc gia. Sau đó người dùng tự dàn xếp để thực hiện việc giao dịch với nhau.
- Magnetic Exchange

Magnetic Exchange offers Bitcoin, Ethereum, Litecoin and Dash in exchange for USD or EUR through various payment services.
- AnycoinDirect

AnycoinDirect.eu is a broker service offering 14 cryptocurrencies, including Dash, for sale online. Pay by bank transfer or various national instant payment schemes.
- Dash Nearby

Dash Nearby cho phép người dùng sắp xếp giao dịch trao đổi trực tiếp tiền số hoặc tiền địa phương với các loại tiền khác.
ATMs
ATMs are a popular method of buying cryptocurrency at businesses to encourage adoption and spending in these currencies. A number of ATMs support Dash, and the mapping services listed on this page can help you find one near you. It is also possible to operate your own ATM to sell Dash on-site at your business - simply contact the companies listed on this page.
- Coin ATM Radar

Various coin ATMs are available around world. Coin ATM Radar helps you find one close to you.
- General Bytes

General Bytes cung cấp một loạt các máy ATM hai chiều và giải pháp điểm bán hàng tích hợp Dash.
- Lamassu

Lamassu offers modular one-way and two-way cash ATMs integrating Dash.
- CoinFlip

CoinFlip operates a network of ATMs across the USA and offers hosted ATMs for businesses.
- TigoCTM

TigoCTM cung cấp giải pháp ATM đơn giản được tích hợp với một blockchain quản lý.
- Trovemat

Focusing on the European market, Trovemat provides a risk-free solution to sell cryptocurrency from a physical device.
An toàn
Nếu bạn mới biết đến tiền điện tử, điều thay đổi quan trọng nhất cần phải hiểu về sự so sánh giữa hệ thống ngân hàng truyền thống với những giao dịch xảy ra trực tiếp giữa hai bên mà không cần một thẩm quyền trung tâm nào xử lý giao dịch. Điều này có nghĩa là bạn chịu trách nhiệm cho sự an toàn của chính mình - không có ngân hàng hoặc công ty thẻ tín dụng nào có thể đảo ngược giao dịch nếu như tiền của bạn bị đánh cắp hoặc bị mất. Nếu bạn quên hoặc mất file ví của mình, mã phục hồi hoặc mã PIN, bạn sẽ mất vĩnh viễn và không thể khôi phục lại quyền truy cập đến tiền của mình.
Dash được thiết kế từ đầu để đảm bảo nhanh, an toàn, có thể thay thế được và riêng tư. Theo nghĩa này, nó tương tự như tiền mặt hoặc vàng, nhưng là tiền điện tử có thể chi tiêu ở địa phương hoặc quốc tế mà vẫn dễ dàng như nhau, nếu bạn thấy tự tin rằng mình đang gửi tiền cho địa chỉ đúng. Vì những lý do đó, tài liệu Dash tập trung mạnh mẽ vào tính an toàn và giúp bạn hiểu những khái niệm và tính năng thúc đẩy hệ sinh thái của Dash.
Một số hướng dẫn chung về an toàn:
- Không nên tin vào bất kỳ một dịch vụ online nào hoặc một người nào chỉ vì họ có vẻ có uy tín. Luôn sử dụng các dịch vụ uỷ thác nếu bạn muốn mua ngang hàng qua mạng.
- Lưu giữ Dash của bạn trên một ví phần cứng nếu có thể. Nếu không, hãy lưu coin của bạn trên ví chính thức Ví Dash Core hoặc Ví Dash Electrum chính thức.
- Không sử dụng các sàn giao dịch như là ví. Các sàn giao dịch chỉ nên dùng cho việc trao đổi, không dùng để cất giữ.
- Ví di động chỉ nên dùng cho các mua bán hàng ngày, đừng giữ khoản lớn trên đó. Chỉ chuyển vào khi cần.
Có một danh sách các trò lừa đảo đã được biết, các loại ví giả và các mô hình Ponzi và mô hình kim tự tháp có thể xem ở dưới đây. Đừng tin vào chúng.
Các trò lừa đảo
Có rất nhiều trang web "giả" của Dash/Darkcoin trên mạng Internet để lừa người dùng gửi Dash hoặc các loại tiền số khác hoặc "mở một ví". Những loại lừa đảo khác bao gồm giả vờ bán máy đào, giả Dash hoặc các altcoin với cái tên tương tự, hoặc các mô hình Ponzi (xem dưới đây). Hãy cẩn thận đừng nên tin bất kỳ bên thứ ba nào được liệt kê dưới đây!!
Danh sách dưới đây là những trò lừa đảo đã được biết liên quan đến Dash:
- dash-wallet dot com là một trang lừa đảo đã biết!
- electrumdash dot org là một trang nhái và giả của trang chính thức!
- dashcoinmining dot com không liên quan đến Dash!
- dashcrypto dot info không liên quan đến Dash!
- onclooud dot com không liên quan đến Dash!
- as-shop dot su bán máy đào Baikal giả!
- minershop dot biz bán máy đào Baikal giả!
- dashcoinclub dot com là mô hình Ponzi không liên quan đến Dash!
- dash-coin dot net là một ví web giả, đừng gửi tiền vào nó!
- coinvert dot io là một sàn giao dịch giả!
Hãy cẩn thận các tài khoản giả Dash! Tài khoản Twitter chính thức của Dash là: https://twitter.com/Dashpay
Hãy báo về những trò lừa đảo khác mà bạn gặp về các địa chỉ sau:
- Thông báo lừa đảo cho Google: https://www.google.com/safebrowsing/report_phish
- Kiểm tra thông tin đăng ký tên miền và gửi khiếu nại: https://www.whois.com/whois
- Thông báo lừa đảo cho Netcraft: https://www.netcraft.com
- Thông báo lừa đảo cho BadBitcoin Project: http://www.badbitcoin.org
- Nếu có nghi ngờ, hãy dùng Crypto Scam Checker để kiểm tra xem liệu đã có thông báo và thông báo về nó: https://fried.com/crypto-scam-checker
Hãy thoải mái để thông báo về bất cứ trường hợp lừa đảo nào mà bạn thấy trên diễn đàn về cho "đội swat" ở topic sau https://dashtalk.org/threads/www-dash-wallet-com-is-a-scam-website.8267
Mô hình Ponzi
Một mô hình Ponzi, mô hình Kim tự tháp hoặc tiếp thị đa cấp là một loại hình đầu tư gian lận mà ở đó những người điều hành cung cấp những báo cáo đúc sẵn và sinh ra các khoản trả lại cho những nhà đầu tư cũ từ nguồn doanh thu được trả bởi các nhà đầu tư mới. Cứ như vậy mọi người phải liên tiếp tham gia vào mô hình này để nó có thể tiếp tục hoạt động, thậm chí với số người lớn hơn sẽ mất tiền cho những người tạo ra mô hình này.
- Mô hình Ponzi là gì?
- Làm thế nào để phát hiện một mô hình Ponzi
- BehindMLM - Tin tức và blog về mô hình Ponzi
Nếu bạn gặp một mô hình Ponzi, hãy Theo các bước sau để thông báo giống như thông báo về website lừa đảo!
Danh sách của các mô hình Ponzi đã biết (còn có rất nhiều nữa -hãy thận trọng)
- OneCoin
- http://themerkle.com/dr-ruja-flees-sinking-ship-as-regulators-crack-down-on-onecoin/
- http://siliconangle.com/blog/2016/09/29/dodgy-cryptocurrency-onecoin-under-police-investigation-accused-of-being-a-ponzi-scheme/
- https://cointelegraph.com/news/one-coin-much-scam-onecoin-exposed-as-global-mlm-ponzi-scheme
- http://www.makemoneyexpert.com/online/network-marketing/reviews/onecoin/
- https://pageone.ng/2016/11/05/beware-onecoin-ponzi-scheme/
- SwissCoin
- The Billion Coin
- Sustaincoin
- E-Dinar
- DasCoin
- BitConnect
- HashOcean
- CryptoDouble
Các link và thông tin
Links
Các site chính thức
- Website: https://www.dash.org
- Tài liệu cho người dùng: https://docs.dash.org
- Tài liệu về giao thức: https://dash-docs.github.io
- Quỹ Dash: https://www.dashfoundation.io
- GitHub: https://github.com/dashpay
- GitHub (Evolution): https://github.com/dashevo
- Roadmap: https://github.com/dashpay/dash-roadmap
- DIPs: https://github.com/dashpay/dips
Các site cộng đồng
- https://www.dashnexus.org
- https://www.dashwatch.org
- https://www.dashboost.org
- https://dashroots.fund
- https://www.dashcentral.org
- https://www.dashninja.pl
- https://www.dashforcenews.com
- http://www.dashnation.com
- https://dashvotetracker.com
- https://www.dashspain.org
- http://www.dashhaiti.com
- http://thedashbrain.com
Diễn đàn
- Diễn đàn: https://www.dash.org/forum
- Chủ đề thảo luận trên BitcoinTalk: https://bitcointalk.org/index.php?topic=421615.0
- Cryptocurrencytalk.com: https://cryptocurrencytalk.com/forum/693-dash/
- 巴比特 (8BTC) Forum: http://8btc.com/forum-115-1.html
- 百度贴吧 达世币吧 (Baidu Tieba): https://tieba.baidu.com/f?kw=达世币
- 彩云比特 达世币 (CYBTC Dash): http://www.cybtc.com/forum-123-1.html
Chat
- Dash Nation Discord: https://discordapp.com/invite/9z8zX5j
- Dash Talk Discord: https://discordapp.com/invite/PXbUxJB
- Dash English Telegram: https://t.me/dash_chat
- Dash Brasil Telegram: https://telegram.me/dashbrasil
- Dash Russia Telegram: https://telegram.me/Dash_Ru
- Dash en Español Telegram: http://unete.dashespanol.com
- Dash Embassy D-A-CH auf Deutsch Telegram: https://t.me/dashembassydach
- Rô-bốt tin tức Dash cho Telegram: https://telegram.me/dashnews
- QQ 达世币官方群 DASH.China: 419967021
- Freenode IRC: #dashpay
Facebook
- Tiếng Anh (Official): https://www.facebook.com/DashPay
- Dash News En Español: https://www.facebook.com/DashNewsEspanol
- Dash Embassy Thailand: https://www.facebook.com/DashEmbassyThailand
- Brazil: https://www.facebook.com/DashBrazil
- Đan Mạch: https://www.facebook.com/DashDenmark
- Đức: https://www.facebook.com/dashgermany
- Hy Lạp: https://www.facebook.com/DashGreece
- Ba Lan: https://www.facebook.com/Dash.Polska
- Nga: https://www.facebook.com/Dash.Russia
- Thái Lan: https://www.facebook.com/groups/1127359790623640
- Venezuela: https://www.facebook.com/groups/DarkcoinVenezuela
- Vietnam: https://www.facebook.com/dashvietnam
Twitter
- Tài khoản chính thức của Dash: https://twitter.com/dashpay
- Ryan Taylor, CEO của Dash Core Group: https://twitter.com/RTaylor05
- Dash Force News: https://twitter.com/DashForceNews
- Joël Valenzuela, Tổng biên tập, Dash Force News: https://twitter.com/TheDesertLynx
- Mark Mason, Giám đốc Media & PR, Dash Force News: https://twitter.com/StayDashy
- Amanda B. Johnson, Một fan cuồng của Dash và là nhà thầu được Dash cấp vốn: https://twitter.com/AmandaB_Johnson
- Tao of Satoshi, Dash Nation Founder and DAO-funded contractor: https://twitter.com/Dash_Nation
- とみ三(Samurai33), Dash Nhật Bản: https://twitter.com/samurai3311
- Dash Vietnam: https://twitter.com/dashvietnam
Tin tức
- Dash Force News: https://www.dashforcenews.com
- Dash News En Español: https://dashnewsespanol.com
- Dash News En Español (YouTube): https://www.youtube.com/channel/UCG6Cuh8Q2eUt4NlZu4K-u8g
- Dash News Korea: https://dashnewskorea.com
- Cointelegraph: https://cointelegraph.com/tags/dash
- 巴比特 (8BTC): http://www.8btc.com/dash
- 比特时代 (BTC38): http://www.btc38.com/altcoin/dash
- Dash Embassy D-A-CH: http://www.dash-embassy.org/
- Dash News Germany: https://dash-news.de
- Dash Việt Nam: https://dashvn.blogspot.com
- Dash France: https://dashfrance.com/
- Dash News China (Wechat): dashnews (or scan QR below)

Blogs
- Blog của Evan Duffield: https://medium.com/@eduffield222
- Dashdot: https://dashdot.io/alpha/
Chưa kích hoạt
- Diễn đàn Bitcoin.com: https://forum.bitcoin.com/dash-f67
- Trang Crypto-city.com: https://www.crypto-city.com/index.php/dash-dash-coin
- Diễn đàn Bitco.in: https://bitco.in/forum/threads/dash-digitalcash.891
Công cụ
Khám phá khối, thống kê và trực quan hoá
- https://explorer.dash.org
- https://insight.dash.org/insight
- https://chainz.cryptoid.info/dash
- https://www.coinexplorer.net/dash
- https://bitinfocharts.com/dash/explorer
- https://dashblockexplorer.com
- https://live.blockcypher.com/dash
- https://dash.holytransaction.com
- https://dashradar.com
- http://explorer.coinpayments.net/index.php?chain=7
- http://udjinm6.github.io/bitlisten
- http://insight.dash.crowdnode.io
Công cụ cho ngân quỹ
Quản lý Masternode
Theo dõi giá và thống kê
Dự án cộng đồng Dash
Các Trang DarkNet
- Dash (bản sao trên của trang chính): http://dashorg64cjvj4s3.onion
- Wiki trên darknet: http://zqktlwi4fecvo6ri.onion/wiki/Dash_-_DigitalCash
Ứng dụng trên di động
iOS
- Ví Dash Wallet: https://itunes.apple.com/app/id1206647026
- Ví Edge: https://itunes.apple.com/app/id1344400091
- Ví Jaxx: https://itunes.apple.com/app/id1084514516
- Coinomi Wallet: https://itunes.apple.com/app/id1333588809
- Dashy: https://itunes.apple.com/app/id1033268631
- CoinCap: https://itunes.apple.com/app/id1074052280
- Blockfolio: https://itunes.apple.com/app/id1095564685
- Cryptonaut: https://itunes.apple.com/app/id1312756405
- Quoinex: https://itunes.apple.com/app/id1140955992
- Abra: https://itunes.apple.com/app/id966301394
Android
- Ví Dash Wallet: https://play.google.com/store/apps/details?id=hashengineering.darkcoin.wallet
- Ví Edge: https://play.google.com/store/apps/details?id=co.edgesecure.app
- Ví Jaxx: https://play.google.com/store/apps/details?id=com.kryptokit.jaxx
- Ví Coinomi: https://play.google.com/store/apps/details?id=com.coinomi.wallet
- Ví Cryptonator: https://play.google.com/store/apps/details?id=com.aev.cryptonator
- DashCentral: https://play.google.com/store/apps/details?id=net.paregov.android.dashcentral
- CoinCap: https://play.google.com/store/apps/details?id=io.coinCap.coinCap
- Blockfolio: https://play.google.com/store/apps/details?id=com.blockfolio.blockfolio
- Cryptonaut: https://play.google.com/store/apps/details?id=org.cryptonaut.app
- Quoinex: https://play.google.com/store/apps/details?id=mobi.quoine
- Abra: https://play.google.com/store/apps/details?id=com.plutus.wallet
- Bitcoin Ticker Widget: https://play.google.com/store/apps/details?id=st.brothas.mtgoxwidget
Thuật ngữ
- Tấn công 51%
- Một điều kiện trong đó hơn một nửa sức mạnh tính toán trên mạng lưới tiền số được kiểm soát bởi một thợ mỏ hoặc một nhóm thợ mỏ duy nhất. Lượng sức mạnh tính toán đó theo lý thuyết khiến chúng có thể kiểm soát toàn mạng. Điều này có nghĩa là mọi phần mềm trên mạng đều tin vào mã băm trong khối giao dịch của kẻ tấn công.
- Địa chỉ
- Một địa chỉ dash được dùng để Gửi/Nhận một khoản thanh toán trên mạng lưới Dash. Nó có chứa một xâu gồm các ký tự chữ cái và chữ số, nhưng có thể hiện diện như là một mã quét được dạng mã QR. Một địa chỉ Dash cũng là một khoá công khai trong một cặp khoá được dùng bởi người dùng Dash để ký số cho các giao dịch (xem thêm phần Mã công khai).
- Thuật toán
- Trong toán học và khoa học máy tính, một thuật toán là một tập hợp các bước hoạt động độc lập để thực hiện một nhiệm vụ nào đó. Thuật toán thực hiện các phép tính toán, xử lý dữ liệu và/hoặc các nhiệm vụ suy luận tự động.
- Altcoin
- Vì Bitcoin là tiền điện tử đầu tiên và có vốn hóa thị trường lớn nhất, nó được coi là tham chiếu. Một đồng altcoin, hay còn gọi là đồng tiền thay thế, là bất kỳ loại tiền điện tử nào khác ngoài Bitcoin.
- AML
- Kỹ thuật chống rửa tiền viết tắt tiếng Anh là AML được dùng để ngăn chặn mọi người nhận những khoản tiền mà nó có vẻ như được kiếm bằng những hình thức bất hợp pháp. Các cơ chế AML có thể ở dưới dạng luật pháp hay kỹ thuật. Các nhà làm luật thường áp dụng các kỹ thuật AML vào các sàn giao dịch Dash.
- API
Trong lĩnh vực lập trình máy tính, một giao diện lập trình ứng dụng (API) là một tập hợp các đoạn mã được tái sử dụng, các giao thức, và các công cụ dùng để xây dựng nên phần mềm và ứng dụng.
Một API có thể hiểu như là một thành phần của phần mềm Theo nghĩa mà hoạt động của nó, các đầu ra, đầu vào và các kiểu dữ liệu, các chức năng độc lập với triển khai tương ứng, cho phép định nghĩa và triển khai thay đổi mà không ảnh hưởng đến giao diện. Một API tốt sẽ giúp việc phát triển một chương trình dễ dàng hơn bằng việc cung cấp tất cả các thành phần xây dựng, mà nó có thể được lắp ghép lại với nhau bởi các lập trình viên.
- ASIC
- Một mạch tích hợp cho ứng dụng cụ thể (ASIC), là một mạch tích hợp (IC) được thiết kế riêng cho việc sử dụng đặc biệt, hơn là sử dụng cho các mục tiêu chung. Ví dụ, một chip được thiết kế để ghi âm số hoá hoặc để đào Dash với hiệu suất cao là một ASIC.
- ATM / BTM
- Một Dash ATM là một máy vật lý cho phép khách hàng có thể mua Dash bằng tiền mặt. Có rất nhiều nhà sản xuất khác nhau, một số cho phép người dùng có thể bán Dash để lấy tiền mặt. Đôi khi chúng có thể được gọi là 'BTM' hoặc 'Dash AVMS'. Dash được hỗ trợ trên một số loại ATMs.
- Backlog
- Backlog thường nói đến một sự tích luỹ theo thời gian chờ đợi công việc được hoàn thành hoặc các đơn hàng được hoàn thành.
- Sao lưu
- Tiến trình mà tạo ra các bản sao của một file dữ liệu để đảm bảo tính nhất quán trong trường hợp bị mất, bị trộm, hoặc hỏng. Dash cho phép người dùng tạo các bản sao dự phòng của ví tiền số của họ. Điều này bảo vệ chống lại việc mất tiền trong trường hợp máy tính bị hỏng hoặc mất điện thoại. Điều này tương tự như việc sao lưu dự phòng cho tiền trong ví của bạn, và nếu bạn có bị mất ví, bạn cũng có thể khôi phục tiền của mình từ bản sao lưu.
- Bitcoin 2.0
- Đây là một thuật ngữ giải thích bước phát triển tiếp theo của dự án Bitcoin bắt đầu như một rẽ nhánh của Bitcoin nhưng mở rộng mã nguồn của nó sang một mức cao hơn của các dự án Blockchain (Hợp đồng thông minh, Bỏ phiếu phi tập trung,...)
- Blockchain
- Một blockchain là một cơ sở dữ liệu phân tán nó duy trì một danh sách các bản ghi dữ liệu ngày càng tăng liên tục nhằm chống giả mạo và sửa đổi. Nó gồm có các khối cấu trúc dữ liệu - mà phiên bản đầu tiên nó lưu giữ hoàn toàn chỉ có dữ liệu trong một chuỗi khối, và trong một vài những phiên bản gần đây thì nó lưu giữ cả dữ liệu và chương trình - với mỗi khối nắm giữ các bó các giao dịch và các kết quả của bất kỳ các chương trình blockchain. Mỗi khối có chứa những thông tin được gắn dấu thời gian và liên kết với một khối trước đó.
- Khối
- Các giao dịch trên blockchain được tập hợp vào thành "các khối" trong đó ghi lại và xác thực khi nào và những giao dịch nào được đưa vào khối và ghi lại trong blockchain. Các khối được tạo bởi những người dùng được biết với cái tên "thợ mỏ" là những người dùng các phần mềm và phần cứng được thiết kế đặc biệt cho mục đích tạo các khối.
- Hệ thống Ngân sách / DGBB
- Sự phát triển của Dash và hệ sinh thái Dash là được tự cấp vốn bởi chính mạng lưới. Mỗi khi có một block được tạo, 45% của phần thưởng khối sẽ trả cho thợi mỏ và 45% sẽ trả cho các masternode. Mười phần trăm được giữ lại bởi mạng lưới và được dùng để cấp vốn cho các dự án mà được chấp thuận bởi mạng lưới masternode. Quá trình này được biết với tên là Quản trị Phi tập trung bởi Blockchain (DGBB). Với khoản phí, bất kỳ ai cũng có thể gửi một đề xuất cho mạng lưới, và sẽ được trả trực tiếp bởi blockchain nếu nó được các masternode chấp nhận. Hệ thống Ngân sách đôi khi còn được gọi là Hệ thống Ngân quỹ; hai thuật ngữ này có thể dùng thay thế cho nhau.
- Cloud Wallet
- Các bên thứ ba sẽ lưu giữ Dash của bạn trên máy chủ của họ cho bạn, và do đó bạn có thể truy cập nguồn tiền của mình từ bất kỳ thiết bị nào kết nối vào mạng Internet. Nếu website của họ bị hack hoặc máy chủ của họ bị hỏng bạn sẽ gặp rủi ro làm mất số Dash của mình. Bất kỳ ví online nào cũng nên đảm bảo an toàn với mật khẩu mạnh và bảo mật 2 lớp. Bạn không thể tạo bản sao cho ví online của mình, bởi vì bạn không thể truy cập đến các khoá riêng. Chúng tôi không khuyên bạn để một lượng lớn tiền trên các ví online.
- Giao dịch tạo coin
- Là giao dịch đầu tiên trong một khối. Nó luôn được tạo bởi thợ mỏ, nó đưa vào một đầu vào đơn mà ở đó tạo thành phần thưởng khối. Nó được tách giữa thợ mỏ và và một masternode đã được chọn.
- Lưu trữ lạnh
- Một phương pháp sinh và lưu giữ khoá riêng hoàn toàn offline. Nó có thể là một máy tính để bàn hoặc laptop không kết với mạng Internet, một phần cứng chuyên biệt, một thẻ nhớ USB, hoặc một ví giấy.
- Giao dịch (đã được) xác thực
- Khi một giao dịch Dash được tạo, một thợ mỏ phải kiểm tra xem liệu giao dịch đó có hợp lệ không. Khi các đầu vào và các đầu ra được kiểm tra, giao dịch sẽ được đưa vào một khối trong blockchain. Giao dịch sau đó có thể được xem là hoàn chỉnh và không thể đảo ngược được. Số lượng xác thực được tăng lên theo số lượng khối được thêm vào blockchain.
- Số xác thực
- The number of confirmations for a specific Dash transaction. Zero confirmations means that the transaction is unconfirmed. One confirmation means that the transaction is included in the latest block in the blockchain. Two confirmations means the transaction is included in two blocks, three confirmations for three blocks, and so on. The probability of a transaction being reversed (double spent) diminishes exponentially with every block and subsequent confirmation. Six confirmations is usually considered "safe" and irreversible.
- Những giao dịch đx được xác thực
- Các giao dịch đã được xử lý bởi các thợ mỏ và được xem là không thể đảo ngược được, thường sau sáu xác thực. Trong trường hợp InstantSend, khoản tiền có thể được coi là không thể đảo ngược được chỉ sau một vài giây, nhưng vẫn cần được viết vào blockchain (và sau đó "được xác thực").
- CPU
- Một bộ xử lý trung tâm (CPU) là một mạch điện tử trong máy tính mà nó thực hiện các câu lệnh của một chương trình máy tính bằng việc thực hiện các thao tác cơ bản như số học, logic, điều khiển và xuất/nhập (I/O) dữ liệu được chỉ ra bởi các câu lệnh. Thuật ngữ này được sử dụng trong ngành công nghiệp điện toán ít nhất từ đầu những năm 1960. Theo truyền thống, thuật ngữ "CPU" dùng để chỉ một bộ xử lý, cụ thể hơn cho đơn vị xử lý và đơn vị điều khiển (CU), phân biệt các thành phần cốt lõi của máy tính với các thành phần bên ngoài như bộ nhớ chính và mạch vào ra.
- Tiền số
- Một loại tiền kỹ thuật số (hoặc tiền điện tử hoặc tiền mã hoá) là một phương tiện trao đổi sử dụng mật mã học để đảm bảo an toàn cho các giao dịch và kiểm soát việc tạo ra những đơn vị tiền tệ mới.
- Mật mã học
- Cryptography - Mật mã hoặc cryptology - mật mã học (từ tiếng Hy Lạp κρυπτός kryptós, có nghĩa là "ẩn giấu, bí mật"; và γράφειν graphein, là "ghi chép", hoặc -λογία -logia, là "nghiên cứu,") là các hoạt động nghiên cứu về các kỹ thuật nhằm đảm bảo an toàn cho việc truyền thông trong trường hợp có sự hiện diện của bên thứ ba được gọi là kẻ thù. Một cách tổng quát hơn, mật mã là về xây dựng và phân tích các giao thức nhằm ngăn chặn bên thứ ba hoặc công chúng trong việc đọc các thông điệp bí mật; có rất nhiều khía cạnh trong an toàn dữ liệu như bảo mật dữ liệu, toàn vẹn dữ liệu, xác thực và không chối bỏ là những trọng tâm của ngành mật mã học hiện đại. Mật mã hiện đại tồn tại như là sự giao thua của các nguyên tắc toán học, khoa học máy tính, kỹ thuật điện. Ứng dụng của mật mã bao gồm thẻ ATM, mật khẩu máy tính, và thương mại điện tử.
- DAP
- Decentralized Application Protocol. This term describes an application running on top of the Dash DAPI platform.
- DAP Client
- An HTTP Client that connects to DAPI and enables Dash blockchain users to read and write data to their DAP Space.
- DAP Schema
- A Dash Schema document extending the Dash System Schema to define consensus data and rules within a DAP contract.
- DAP Space
- The part of a DAP State that is owned by a specific blockchain user. Data in a DAP Space can only be changed by the owner.
- DAP State
- The total set of data stored in a DAP. This data consists of user DAP Spaces.
- DAPI
- Decentralized Application Programming Interface. See above for a definition of API. DAPI will perform the same functions as an API, but with quorums of masternodes acting as the endpoints for API communication.
- Dark Gravity Wave
- Khái niệm về Dark Gravity Wave (DGW) cũng tương tự như thuật toán Kimoto Gravity Well, là điều chỉnh mức độ khó ở mỗi block (thay vì mỗi 2016 block giống như ở Bitcoin) dựa trên những dữ liệu thống kê được tìm thấy từ những block gần nhất. Nó cũng làm cho việc sinh khối với khoảng thời gian tương đối đồng nhất, thậm chí ngay cả khi tổng tốc độ băm dao động mạnh, mà không phải gánh chịu lỗi bù-thời-gian.
- Darkcoin
- Dash ban đầu được công bố với cái tên là XCoin và sau đó đổi tên thành Darkcoin rồi cuối cùng đổi thành Dash.
- Dash
- Ban đầu được giới thiệu là Xcoin và sau đó đổi tên thành Darkcoin, loại tiền này sau đó được đổi tên thành "Dash" để tránh liên kết với các thị trường darknet. Dash là một từ ghép của từ "Digital Cash" có nghĩa là tiền mặt kỹ thuật số. Dash là loại tiền điện tử mã nguồn mở ngang hàng, nó giải quyết rất nhiều vấn đề của Bitcoin. Những tính năng của Dash bao gồm PrivateSend, InstantSend, Cơ chế quản trị phi tập trung bởi Blockchain (DGBB), và một mạng bậc 2 (có nghĩa là mạng các masternode). Hãy xem trang Tính năng để có một danh sách đầy đủ các tính năng của Dash.
- DashDrive
- Dash network data storage backend service used by masternodes for off-chain data relating to Evolution. DashDrive implements IPFS, a type of distributed file storage system.
- Phần mềm Dash
- Phần mềm Dash là những phần mềm được sử dụng để giao tiếp với mạng lưới Dash. Chúng lưu trữ khoá riêng cần thiết để kiểm soát các giao dịch cũng như bản sao của toàn bộ blockchain. Một phần mềm Dash kết nối với mạng lưới Dash và trở thành một nút mạng của mạng lưới. Một nút chia sẻ và truyền bá những giao dịch mới cho toàn bộ mạng lưới, tạo nên một hạ tầng phi tập trung mạnh mẽ.
- Ví Dash Core
- Ví Dash Core (còn được biết với tên là ví QT) là ví "chính thức" của Dash nó được biên dịch bởi nhóm Dash Core và cung cấp cả hai tính năng là PrivateSend và InstantSend. Ví DashCore sẽ tải toàn bộ blockchain và phục vụ việc đồng bộ blockchain qua mạng Internet cho bất kỳ nút mạng ngang hàng nào yêu cầu.
- Dash Evolution
- Đây là một cơ chế phát triển mạng lưới Dash 3 tầng hiện đang được phát triển. Nó sẽ làm cho Dash trở nên dễ sử dụng giống như PayPal, trong khi vẫn giữ được đặc tính phi tập trung. Hãy xem trang Evolution để có thêm thông tin.
- Dash Schema
- A JSON-based language specification for defining and validating consensus data in Evolution.
- DDoS
- Một cuộc tấn công từ chối dịch vụ phân tán hay còn gọi tắt là DDoS sử dụng một lượng lớn các máy tính dưới sự kiểm soát của kẻ tấn công nhằm làm kiệt nguồn tài nguyên của mục tiêu trung tâm. Chúng thường gửi một lượng nhỏ thông tin qua mạng Internet để làm tắc nghẽn khả năng tính toán và băng thông của mục tiêu, nhằm mục đích ngăn cản mục tiêu cung cấp dịch vụ cho những người dùng hợp pháp. Các sàn giao dịch Dash đôi khi bị những đợt tấn công DDoS như vậy.
- Phi tập trung
- Tính toán phi tập trung là việc phân bổ tài nguyên, cả phần cứng và phần mềm, cho mỗi máy trạm hoặc vị trí văn phòng riêng lẻ. Ngược lại tính toán tập trung tồn tại khi phần lớn các chức năng được đem đến hoặc thu nhận từ một vị trí tập trung từ xa. Tính toán phi tập trung là một xu hướng trong môi trường kinh doanh hiện đại. Nó ngược lại với tính toán tập trung, vốn đã thịnh hành trong những ngày đầu của kỷ nguyên máy tính. Một hệ thống máy tính phi tập trung có nhiều lợi ích hơn so với một mạng tập trung thông thường. Máy tính để bàn đã phát triển nhanh đến mức mà khả năng của chúng vượt xa yêu cầu của hầu hết các ứng dụng kinh doanh. Điều này dẫn đến việc hầu hết các máy tính để bàn hầu như được nghỉ ngơi gần như hầu hết thời gian. Tuy vậy, vẫn có những tranh cãi rằng những mạng lưới đó đã tăng hiệu suất tổng thể.
- Ví trên máy tính
- Một ví là một phần mềm mà quản lý Dash của bạn. Có rất nhiều loại ví khác nhau cho bạn chọn, nhưng điều quan trọng là phải chọn một loại an toàn. Chúng tôi gợi ý bạn nên dùng bất cứ loại nào trong các loại sau: Ví Dash Core / Ví Dash Electrum / Các ví cứng
- Độ khó
- Con số này xác định độ khó của phép băm cho một khối mới. Nó liên quan đến số lượng tối đa cho phép trong một phần bằng số của mã băm của một khối giao dịch. Số càng nhỏ càng khó để tạo một giá trị băm phù hợp với nó. Độ khó thay đổi tuỳ thuộc vào số lượng năng lực tính toán được sử dụng bởi các thợ mỏ trong mạng lưới của Dash. Nếu có nhiều máy đào rời bỏ mạng thì độ khó sẽ giảm xuống. Do Dash càng ngày càng được nhiều người biết đến và đã có máy đào ASIC chuyên biệt dành riêng nên làm cho độ khó của nó càng ngày càng tăng.
- Ví số
Xem đường link này để có tài liệu đầy đủ về các ví.
Một ví số cũng tương tự như một chiếc ví vật lý trừ điều là nó dùng để giữ tiền số. Một ví Dash quản lý các khoá riêng mà nó cho phép bạn chi tiêu Dash. Bạn cũng có thẻ tạo các sao lưu ví của bạn để đảm bảo rằng bạn không bao giờ bị mất quyền truy cập đến Dash của mình. Các ví số có thể tồn tại với rất nhiều kiểu và trên nhiều thiết bị.
- Ví Desktop (Ví Dash Electrum, Ví Dash Core): Là các phần mềm ví mà bạn cài trên máy laptop hoặc máy tính để bàn. Bạn là người duy nhất chịu trách nhiệm bảo vệ file ví và những khoá riêng được chứa trong đó. Hãy sao lưu dự phòng file ví của mình để đảm bảo rằng bạn không bị mất quyền truy cập đến nguồn tiền của mình.
- Ví di động: (Android, iOS): Những ví này có thể tải thông qua các cửa hàng ứng dụng Google Play hoặc Apple (iTunes). Ví di động cho phép bạn sử dụng Dash một cách di động bằng việc quét mã QR để có thể chuyển tiền. Hãy sao lưu dự phòng file ví để đảm bảo rằng bạn sẽ không mất quyền truy cập đến nguồn tiền của mình. Vì lý do an toàn với điện thoại di động, chúng tôi khuyên bạn không nên để khoản tiền lớn ở trong ví này.
- Ví Online/Cloud/Web (Exodus, MyDashWallet): Các bên thứ ba sẽ lưu giữ Dash của bạn trên máy chủ của họ cho bạn, và do đó bạn có thể truy cập nguồn tiền của mình từ bất kỳ thiết bị nào kết nối vào mạng Internet. Nếu website của họ bị hack hoặc máy chủ của họ bị hỏng bạn sẽ gặp rủi ro làm mất số Dash của mình. Bất kỳ ví online nào cũng nên đảm bảo an toàn với mật khẩu mạnh và bảo mật 2 lớp. Bạn không thể tạo bản sao cho ví online của mình, bởi vì bạn không thể truy cập đến các khoá riêng. Chúng tôi muốn nhấn máy rằng bạn KHÔNG nên lưu giữ một lượng lớn Dash trên bất kỳ ví online hoặc sàn giao dịch tiền số nào.
- Ví cứng (Trezor, KeepKey, Ledger, Nano): Một ví cứng là một thiết bị phần cứng đặc biệt để lưu giữ những khoá riêng của bạn. Thiết bị này có thể ký vào các giao dịch với khoá riêng của bạn mà không phải kết nối với Internet. Tuy nhiên, bạn cần phải có kết nối với Inernet để gửi giao dịch của bạn lên mạng lưới Dash. Điều này cho phép khoá riêng của bạn có thể truy cập một cách dễ dàng trong khi vẫn giữ chúng được bảo vệ an toàn. Ví cứng được nhiều người công nhận là cách lưu trữ an toàn nhất đối với Dash của bạn.
- Offline/Lưu trữ Lạnh (Paper wallet): Một ví đặc biệt được tạo offline và không bao giờ được phơi ra trên mạng Internet. Nó được thực hiện bằng việc sử dụng phần mềm để sinh ra các cặp khoá riêng và khoá công khai một cách offline và lưu lại khoá đã được sinh ra đó. Những khoá đó có thể được in ra giấy hoặc thậm chí là khắc lazer vào kim loại. Sau đó có thể lưu trữ ở két sắt cá nhân hoặc gửi nơi an toàn ở ngân hàng chẳng hạn. Điều này thì cực kỳ an toàn để lưu trữ Dash. Nó không có những rủi ro liên quan đến việc sử dụng các file trên máy tính, mà nó có thể bị hỏng, hoặc bị hack. CHÚ Ý: thẻ nhớ USB không an toàn cho việc lưu trữ lâu (nhiều năm) bởi vì thiết bị điện tử có thể bị hỏng vì thời gian.
- Chữ ký số
- Một chữ ký số là một cơ chế toán học nó cho phép một người chứng minh danh tính của họ hoặc quyền sở hữu một tài sản số. Khi ví tiền số của bạn ký vào một giao dịch với một khoá riêng thích hợp, toàn mạng có thể thấy chữ ký đó tương ứng với địa chỉ Dash đã được chi tiêu, mà không cần tiết lộ khoá riêng cho mạng lưới. Bạn có thể ký số cho các thông điệp sử dụng khoá riêng của mình, để chứng minh rằng ví dụ, mình là sở hữu của một địa chỉ Dash nào đó.
- Ví Electrum
- Ví Dash Electrum là một loại ví nhẹ mà nó không yêu cầu bạn phải tải hoặc đồng bộ toàn bộ blockchain, điều này làm cho ví nhẹ hơn và nhanh hơn. Tuy nhiên, nó thiếu những tính năng nhất định như InstantSend và PrivateSend.
- Mã hoá
- Trong mật mã học, mã hoá là một quá trình biến đổi một thông điệp hoặc thông tin theo một cách mà chỉ có những bên có thẩm quyền mới có thể đọc được. Thông điệp được mã hoá dù có được một bên thứ ba chặn lấy được cũng không thể đọc được nội dung nếu như không có chìa khoá. Trong lược đồ mã hoá, một thông điệp bản gốc được mã hoá sử dụng thuật toán mã hoá sẽ tạo ra bản mã mà chỉ có thể đọc được nếu được giải mã bởi đúng người nhận. Vì những lý do kỹ thuật, các lược đồ mã hoá thường sử dụng các chìa khoá tương đối ngẫu nhiên được sinh ra bởi một thuật toán. Việc tăng khả năng tín toán đã "phá vỡ" rất nhiều thuật toán mã hoá trong quá khứ, nhưng một hệ thống hiện đại được thiết kế tốt như AES256 cơ bản được cho là "không thể phá vỡ được".
- Dịch vụ ký quỹ
Một dịch vụ uỷ thác là:
- một thoả thuận hợp đồng trong đó bên thứ ba nhận và giải ngân tiền hoặc tài liệu cho các bên giao dịch chính, mà việc giải ngân phụ thuộc vào các điều kiện đã được các bên giao dịch thỏa thuận; hoặc là
- một tài khoản được lập bởi một nhà môi giới để nắm giữ các quỹ thay mặt cho người môi giới chính hoặc một người khác cho đến khi kết thúc hoặc chấm dứt một giao dịch; hoặc là
- một tài khoản ủy thác được giữ trong tên của người vay để trả các nghĩa vụ như thuế tài sản và phí bảo hiểm.
Dịch vụ ủy thác đáng tin cậy thường được sử dụng khi mua tiền điện tử hoặc các hàng hóa / dịch vụ khác qua internet. Cả người mua và người bán sẽ chọn một bên thứ ba đáng tin cậy, người bán sẽ gửi hàng (hoặc tiền điện tử) cho đại diện ký quỹ và người mua cũng sẽ gửi tiền mua cho đại diện ký quỹ. Khi đại lý ký quỹ thỏa mãn rằng cả hai bên đã đáp ứng các điều khoản của thỏa thuận, họ sẽ chuyển tiền và hàng (hoặc tiền điện tử) được mua cho bên thích hợp.
- Evan Duffield
- Người sáng lập và người lãnh đạo nhóm phát triển đầu tiên của Dash. Người phát minh ra X11, InstantSend và PrivateSend. Trước khi tạo ra Dash, Evan là một chuyên gia tư vấn tài chính và sở hữu chứng chỉ Series 65.
- Sàn giao dịch
- Mức giá hiện tại của một Dash so với giá của các loại tiền khác, như đô la Mỹ, Yên Nhật, Euro, hoặc Bitcoin. Bởi vì hầu hết lượng giao dịch được thực hiện trên cặp BTC/DASH, nên giá đôi khi được tính Theo tỷ lệ của một đồng Bitcoin. Ví dụ, giá của một Dash ở thời điểm cuối tháng ba năm 2017 là 0.08 (Bitcoin cho một Dash). Có một website tuyệt vời để theo dõi tỷ giá của Dash đó là CoinMarketCap. Các doanh nghiệp muốn giảm rủi ro của việc phải nắm giữ một loại tiền kỹ thuật số với tỷ giá biến động có thể tránh rủi ro hoàn toàn bằng việc sử dụng một phương tiện xử lý giao dịch để có thể trao đổi tức thời ra tiền thông thường tại thời điểm của mỗi giao dịch.
- Faucet
- Faucets là một cơ chế trao thưởng, thường ở dạng một website hoặc app, nó phân phát phần thưởng dưới dạng một microdash hoặc Duff, tương đương với một phần trăm của một phần triệu Dash, cho những người truy cập để đổi lại họ phải hoàn thành việc gõ captcha hoặc công việc nào đó được mô tả bởi website/app đó.
- Fiat Gateway
TiềnFiat được định nghĩa với rất nhiều cách như:
- Bất kỳ khoản tiền nào được chính phủ tuyên bố là hợp pháp.
- Tiền do chính phủ phát hành là không thể chuyển đổi sang bất cứ thứ gì khác theo luật cũng như không cố định về giá trị theo bất kỳ tiêu chuẩn khách quan nào.
- Tiền không có giá trị nguyên thuỷ nhưng được sử dụng là tiền bởi vì nó được quyết định bởi chính phủ.
Ví dụ gồm có đô la Mỹ, Euro, Yên Nhật, đồng Việt Nam và vân vân.
- Fintech
- Công nghệ tài chính, cũng được biết với cái tên là FinTech, là một ngành công nghiệp kinh tế bao gồm các công ty sử dụng công nghệ để làm cho các dịch vụ tài chính trở nên hiệu quả hơn. Các công ty công nghệ tài chính thường khởi nghiệp bằng việc làm cho các quy trình tài chính trở nên hiệu quả hơn hoặc loại bỏ những thành phần trung gian. Gần đây nhiều công ty công nghệ tài chính bắt đầu sử dụng công nghệ blockchain, đây là công nghệ giống như công nghệ nền tảng cho Dash và Bitcoin.
- Fork
Khi blockchain bị phân rẽ hoặc chia tách, với một số phần mềm nhận dạng một phiên bản của blockchain là hợp lệ, còn những phần mềm khác lại tin rằng một phiên bản khác của blockchain mới là hợp lệ. Hầu hết các phân nhánh đều tự giải quyết mà không gây ra bất kỳ vấn đề nào, bởi vì blockchain dài nhất luôn được coi là hợp lệ. Trong một thời điểm, một phiên bản của blockchain sẽ luôn "chiến thắng" và trở thành được nhận dạng chung là hợp lệ. Phân nhánh hay còn gọi Fork là có thể, tuy nhiên, nó cực kỳ nguy hiểm và tốt nhất là nên tránh.
Forking thường xuất hiện trong khi cập nhật phần mềm lên mạng lưới. Dash sử dụng một hệ thống Fork đa giai đoạn (“Spork”) nhằm cho có sự linh hoạt và an toàn hơn.
- Full Nodes
- Bất kỳ phần mềm nào phục vụ một phiên bản đầy đủ của blockchain cho các nút mạng ngang hàng. Nó có thể là một người dùng chạy phần mềm ví Dash Core trên máy tính của anh ta, hoặc có thể là một masternode. Full node thúc đẩy sự phi tập trung bằng việc cho phép bất kỳ người dùng nào cũng có thể kiểm tra kép tính hợp lệ của blockchain.
- Tính có thể thay thế
- Mọi đơn vị của đồng tiền đều có giá trị hoàn toàn giống với cùng một trong những đơn vị khác của đồng tiền.
- Khối khởi tạo
- Khối đầu tiên trong blockchain.
- GPU
- Một Bộ xử lý đồ hoạ (GPU), cũng thỉnh thoảng được gọi là bộ xử lý trực trực quan hay visual processing unit (VPU), là một mạch điện tử được thiết kế đặc biệt cho việc xử lý nhanh và tăng tộc việc tạo hình ảnh trong bộ đệm trước khi kết xuất ra màn hình. GPU được sử dụng trong cá hệ thống nhúng, trong điện thoại di động, trong máy tính cá nhân, trong những máy trạm, và trong các thiết bị trò chơi điện tử. Các GPU hiện đại là rất hiệu quả trong việc tính toán xử lý vấn đề đồ hoạ và xử lý hình ảnh, và kiến trúc xử lý song song tốc độ cao cho phép nó xử lý hiệu quả hơn CPU cho những thuật toán xử lý các khối lớn dữ liệu một cách song song. Trong máy tính cá nhân, GPU có thể nằm trên card đồ hoạ hoặc nó có thể nhúng ngay chính bo mạch chính của máy hoặc thậm chí cùng một chỗ với CPU hoặc trên đế của CPU. Các loại tiền số cũng sử dụng các thuật toán đào một cách rất hiệu quả trên các GPU.
- Ví cứng
- Ví cứng thuộc trong những loại ví an toàn nhất để lưu trữ Dash của bạn. Khoá riêng được bảo vệ ở trong một phần cứng, và không được phơi bày lên mạng Internet. Bạn vẫn có thể ký cho các giao dịch như bình thường, điều này làm cho nó vừa an toàn vừa thuận tiện.
- Hash
- Một quy trình toán học mà lấy một lượng dữ liệu có độ dài bất kỳ và tạo ra một đầu ra ngắn hơn và có độ dài cố định. Một hàm băm có hai đặc điểm quan trọng như sau. Thứ nhất, về mặt toán học nó rất khó để có thể tìm ra được đầu vào chỉ bằng việc dựa vào đầu ra. Thứ hai, thay đổi thậm chí một chút xíu trong đầu vào sẽ tạo ra đầu ra hoàn toàn khác.
- Tốc độ băm
- Số các phép băm có thể được thực hiện bởi một thợ mỏ Dash trong một khoảng thời gian nhất định (thường là một giây).
- Insight
- Blockchain information server used to power block explorers and respond to transaction queries.
- InstantX
- Xem InstantSend
- InstantSend
- Công nghệ InstantSend sử dụng mạng lưới masternode để "khoá" các đầu vào giao dịch, để ngăn cho Dash bị tiêu lặp. Không giống như Bitcoin, cần phải mất hàng giờ hoặc lâu hơn để các giao dịch được xác thực một cách đầy đủ, giao dịch sử dụng InstantSend được "khoá" và không thể đảo ngược được chỉ sau một vài giây.
- Tính thanh khoản
- Khả năng mua và bán một tài sản một cách dễ dàng, với giá cả tương đối giống nhau giữa các giao dịch. Một cộng đồng lớn người mua và người bán phù hợp là rất quan trọng đối với tính thanh khoản. Kết quả của một thị trường không thanh khoản là sự biến động giá cả, và không có khả năng dễ dàng xác định giá trị của một tài sản.
- Masternode
Một masternode là một loại full node đặc biết mà nó thực hiện các dịch vụ cho mạng lưới và được trả một phần trong phần thưởng khối. Masternode cần phải chứng minh sở hữu 1000 DASH.
Các masternode phục vụ như là một mạng lưới bậc hai của Dash, và nó cung cấp các dịch vụ như InstantSend, PrivateSend, và hệ thống Ngân sách của Dash.
- Đào coin
- Các thợ mỏ xử lý các giao dịch trên mạng lưới Dash và công bố chúng trên blockchain. Có một phần thưởng để khuyến khích cho công việc đó, các thợ mỏ sẽ được trả 45% của phần thưởng khối.
- Ví di động
- Những ví này có sẵn cho các thiết bị di động (iOS + Android).
- Đa chữ ký
- Địa chỉ đa chữ ký cung cấp một mức bảo mật gia tăng bằng việc yêu cầu nhiều người phải ký cho một giao dịch với những khoá riêng của họ trước khi giao dịch có thể được gửi. Ví dụ, đối với đa chữ ký 2 trong 3, cần hai trên tổng số ba chữ ký cần phải ký thì giao dịch mới được tiến hành. Địa chỉ đa chữ ký thường được dùng bởi các sàn giao dịch và những tổ chức khác mà họ có giữ một lượng lớn tiền kỹ thuật số, và điều này làm cho việc đánh cắp tiền số khó khăn hơn.
- Nút
- Một nút là bất kỳ thiết bị nào chạy phần mềm ví Dash. Full node là phần mềm mà có tải xuống đầy đủ toàn bộ blockchain và phục vụ cho các phần mềm khác trên mạng lưới mạng ngang hàng của Dash.
- OTC
- Giao dịch chưa lên sàn (OTC) là những giao dịch bên ngoài các sàn giao dịch. Trong một giao dịch OTC, người bán và người mua trao đổi trực tiếp với nhau hoặc thông qua một trung gian. Giao dịch thường hữu ích khi một người muốn mua hoặc bán một lượng lớn tiền số và sợ rằng khi mua hoặc bán lớn như vậy trên sánex làm thay đổi giá (nó được gọi là "slippage")
- P2P
- Peer-to-peer hoặc ngang hàng: Các tương tác phi tập trung xảy gia giữa ít nhất hai bên trong mạng lưới kết nối qua lại cao. Đây là một hệ thống kết nối thay thế cho kiểu kết nối thông qua một điểm trung tâm, là cách mà mỗi bên giao dịch với nhau đều cần thông qua một điểm trung gian.
- Ví in trên giấy
- Ví giấy là các ví offline, được in ra trên giấy cho mục tiêu an toàn. Nếu nó được cất giữ một cách đảm bảo thì nó có thể được coi là một trong những cách cất giữ tiền số an toàn nhất.
- Tính riêng tư
- Tính riêng tư là khả năng mà một cá nhân hoặc một nhóm tách biệt bản thân họ, hoặc thông tin về họ, và do đó thể hiện bản thân một cách chọn lọc. Ranh giới và nội dung của những gì được coi là riêng tư khác nhau giữa các nền văn hoá và giữa các cá nhân, nhưng cùng chia sẻ chung những đề tài. Khi điều gì đó là riêng tư với một người, nó thường có nghĩa là gì đó vốn đã đặc biẹt hoặc nhạy cảm đối với họ. Phạm vi của tính riêng tư đặc biệt chồng lên tính bảo mật (bí mật), mà có thể bao gồm những khái niệm về việc sử dụng thích hợp, cũng như việc bảo vệ thông tin. Dash gồm có PrivateSend, nó cho phép người dùng duy trì sự riêng tư về tài chính.
- Khoá riêng
- Khoá riêng là một đoạn mật mã dài mà nó cho phép Dash có thể được tiêu. Mỗi ví Dash đều có chưa một hoặc nhiều các khoá riêng được chứa trong file ví. Những khoá riêng tương ứng về mặt toán học với các địa chỉ Dash được sinh ra trong ví. Bởi vì khoá riêng là "tấm vé" cho phép bất cứ ai cũng có thể chi tiêu Dash, nên điều rất quan trọng là làm sao bảo quản nó được an toàn và bí mật.
- PrivateSend
- PrivateSend che mờ nguồn gốc của tiền để giữ cho sự riêng tư về mặt tài chính giữa những người dùng. Nó có thể bật hoặc tắt theo ý của người dùng.
- Proof of Service - PoSe
- Consensus mechanism used in Dash to verify that a masternode has provided uninterrupted service meeting a minimum quality level to the network. Maintaining this service allows a masternode to enter and move up through the global list and eventually into the selection pool to receive payment.
- Proof of Stake - PoS
- Cơ chế đồng thuận dựa trên quyền sở hữu của một loại tiền số để duy trì blockchain. Trong hệ thống Proof of Stake, mỗi người chủ ví cần sử dụng ví để "góp vốn" và có một cơ hội nhỏ cho họ được chọn để tạo khối tiếp theo và đưa nó vào chuỗi khối. Theo cách này sự đồng thuận được duy trì thông qua tất cả các nút. Proof of Stake tiết kiệm chi phí điện năng và không đòi hỏi phần cứng máy tính đặc biệt. Tuy nhiên, nó cũng có một vài trở ngải, bao gồm vấn đề "không có gì ở vốn góp". Khi mà nó không tốn điện, nên trong trường hợp tấn công thì thực ra nó có lợi cho các nút khi họ "bỏ phiếu" chấp nhận cả chuỗi hợp pháp và chuỗi của kẻ tấn công.
- Proof of Work - PoW
- Cơ chế đồng thuận giữ cho tất cả các nút trung thực bằng việc yêu cầu sức mạnh tính toán cần thiết để tạo ra một khối mới. Các thợ mỏ phải sử dụng những thiết bị đắt tiền và tiêu tốn năng lượng để thêm các khối vào blockchain. Nếu không có một cơ chế đồng thuận nào đó, bất kỳ nút nào cũng có thể thêm các khối vào chuỗi và các nút trên mạng sẽ không bao giờ đồng ý được với nhau rằng chuỗi nào là hợp lệ.
- Khoá công khai
- Khoá công khai được tính ra từ khoá riêng nhưng nó không bí mật và có thể chia sẻ với bất cứ ai. Khoá riêng thì được dùng để ký vào các thông điệp, còn khoá công khai lại được dùng để kiểm tra xem chữ ký đó có phải là hợp lệ hay không.
- Bơm và Xả
- Sự tăng giá của một tài sản tài chính có thể có được khi mua nó khi còn rất rẻ, thường được sử dụng trong những tuyên bố công khai gây hiểu lầm. Những quảng cáo có thể gây nên việc mua dồn dập và đẩy giá của nó lên cao. Khi giá đã lên cao đến một ngưỡng đủ lớn, những kẻ thao túng thị trường sẽ xả hàng, làm tràn ngập với giá rẻ, và điều này làm giá trị bị sụp đổ. Điều này rất hay xảy ra khi thị trường ở giai đoạn có lượng giao dịch thanh khoản thấp, như các loại altcoin.
- Quorum
- Group of masternodes signing or voting on some action, with the formation of the group determined by some determiniation algorithm.
- Mã QR
- Một khối đồ họa hai chiều chứa một mẫu đơn sắc biểu diễn một chuỗi dữ liệu. Mã QR được thiết kế để quét bằng máy ảnh, bao gồm loại trên điện thoại di động, và mã QR thường được sử dụng để mã hóa địa chỉ Dash.
- Satoshi Nakamoto
- Satoshi Nakamoto là tên được dùng bởi một người hoặc nhóm người đã thiết kế ra Bitcoin và lập trình ra phiên bản đầu tiên của phần mềm này.
- SDK
- Software Development Kit. A set of tools, code and documentation used by developers to create apps targeting a specific hardware or software platform.
- State View
- The current state of all data objects once all changes from state transitions have been applied. Used in Evolution to determine what should be displayed in a given social wallet, for example.
- Spork
- Nhóm phát triển Dash tạo ra một cơ chế được biết với tên là "spork" theo đó mã cập nhận được giới thiệu lên mạng, nhưng không được kích hoạt ngay lập tức (hoặc "cưỡng bức"). Việc truyền thông được gửi cho người dùng báo rằng có những thay đổi và cần mọi người cập nhật phần mềm của mình. Những ai cập nhật phần mềm sẽ chạy trên những đoạn mã nguồn mới, nhưng trong trường hợp xảy ra lỗi với mã mới đó, các khối của phần mềm đó sẽ không bị từ chối bởi mạng lưới và tránh được việc rẽ nhánh không mong muốn. Dữ liệu về lỗi sau đó có thể được thu thập và chuyển tiếp đến nhóm phát triển. Khi nhóm phát triển hài lòng với sự ổn định của mã mới trong môi trường mạng chính - và một khi sự đồng thuận của mạng đã đạt được - việc thực thi mã cập nhật có thể được kích hoạt từ xa bởi nhiều thành viên của Core Team cùng ký vào một thông điệp với các khoá riêng của họ. Nếu có vấn đề phát sinh, mã có thể bị vô hiệu hóa theo cách tương tự, mà không cần quay ngược lại toàn bộ hoặc cập nhật phần mềm.
- Tainted Coins
- Vết là việc đo lường liên quan giữa hai địa chỉ (ví). Nó chỉ quan trọng nếu người dùng cố gắng giữ tính ẩn danh.
- tDash
- Test Dash, được sử dụng trên mạng testnet.
- Testnet
- Testnet là một mạng lưới chỉ cho việc thử nghiệm (nó chạy song song với mạng chính thức - mainnet), ví testnet, coin test, masternode test, thợ mỏ test, và người dùng test tất cả được giả lập giống như trên mạng chính thức trong một môi trường an toàn để nếu có lỗi hoặc fork xảy ra thì cũng không gây hại.
- Tor
- Một giao thức định tuyến ẩn danh được sử dụng bởi những người muốn danh danh tính trực tuyến của họ.
- Transaction
- Some movement of data on the distributed blockchain ledger. Transactions may be divided into classical and special transactions. Similar to Bitcoin, classical transactions move balances between addresses on the blockchain. Special transactions contain an extra payload in the format defined by DIP2, and can be used to manage blockchain users, for example.
- Khối giao dịch
- Một tập hợp các giao dịch trên mạng lưới Dash, được tập hợp thành một khối và sau đó được băm và đưa vào blockchain.
- Phí giao dịch
- Một khoản phí nhỏ đặt lên trên các giao dịch chuyển tiền trên mạng lưới Dash. Phí giao dịch này được trao cho thợ mỏ đã băm thành công khối có chứa giao dịch liên quan
- Giao dịch chưa được xác thực
- Những giao dịch mà chưa được xử lý bởi các thợ mỏ hoặc được giữ bởi InstantSend là "chưa được xác thực trên blockchain". Những giao dịch chưa được xác thực thì có thể bị đảo ngược và chưa nên coi nó là "an toàn".
- Địa chỉ hư ảo
- Một địa chỉ Dash với một mẫu mong muốn, như là một cái tên.
- Dash Trinh tiết
- Đồng Dash nhận được như là một phần thưởng của việc đào coin hoặc chạy một masternode. Nó chưa từng được chi tiêu ở đâu cả thì gọi là "trinh tiết".
- Biến động tỷ giá
- Việc đo lường biến động giá theo thời gian cho một tài sản tài được giao dịch (bao gồm cả Dash).
- Ví
- Một phương pháp lưu trữ Dash để sử dụng về sau. Một ví giữ những khoá riêng liên hệ với các địa chỉ Dash. Blockchain là danh sách ghi lại những số dư Dash (và các giao dịch) liên kết với những địa chỉ đó.
- Cáo bạch
- Môt bản cáo bạch là một báo cáo căn cứ chính xác hoặc hướng dẫn để chỉ giúp cho người đọc một cách súc tích về những vấn đề phức tạp và trình bày những triết lý của đơn vị phát hành. Điều này có nghĩa sẽ giúp người đọc hiểu về vấn đề, cách giải quyết vấn đề, và ra quyết định.
- X11
- X11 là một thuật toán băm được tạo bởi người phát triển Dash Core là Evan Duffield.
- Không xác thực
- Đây là một giao dịch mà không có xác thực nào từ blockchain. Về mặt kỹ thuật thì nó có thể đảo ngược lại được (trừ khi InstantSend được sử dụng).
- vin
- Một giao dịch (tx) bao gồm một hoặc nhiều đầu vào và một hoặc nhiều đầu ra. Vin là một danh sách các đầu vào của giao dịch, và vout là danh sách của các đầu ra. Masternode cần một vin 1000 DASH (một số chính xác) để có thể hoạt động.
- VMN
- Virtual Masternode - a standalone masternode emulator in JavaScript that simulates Layer 1-3 Evolution functions for DAP design, development and testing.
Ví
Whenever you are storing objects with a market value, security is necessary. This applies to barter systems as well as economies using currency as a medium of exchange. While banks store balances on a private ledger, cryptocurrencies store balances under unique addresses on a distributed public ledger. The cryptographic private keys to access the balance stored on each public address are therefore the object of value in this system. This section of the documentation discusses different practical methods of keeping these keys safe in wallets, while still remaining useful for day-to-day needs.
VÌ sự an toàn, bạn không nên chứa nhiều tiền trên các sàn giao dịch hoặc trên các ví mềm. Nếu bạn giữ tiền số có giá trị nhiều hơn thiết bị mà bạn đang dùng để chứa, thì bạn nên mua một ví cứng.
Ví Dash Core
Ví Dash Core là ví đầy đủ chính thức của Dash, và nó hỗ trợ tất cả các tính năng mà Dash cung cấp, bao gồm InstantSend và PrivateSend, cũng như là cửa sổ lệnh RPC và các tính năng quản trị. Ví Dash Core (đôi khi được biết với tên là ví QT, do sử dụng nền tảng QT để phát triển nên) là ví chuyên nghiệp và nặng, nó sẽ tải toàn bộ blockchain (kích thước vài GB) và hoạt động giống như một full node hoặc masternode trên mạng. Bởi vì nó đòi hỏi phải chứa toàn bộ đầy đủ cả blockchain, nên thường thường nó sẽ đòi hỏi đồng bộ ví mỗi khi khởi động phần mềm ví. Khi việc đồng bộ xong, số dư chính xác sẽ được hiển thị và các chức năng ví mới có thể dùng được. Ví Dash Core có thể hoạt động trên macOS, Linux, Raspberry Pi và Windows.
Các tính năng
- PrivateSend
- InstandSend
- Mã hoá ví
- Kiểm soát coin và kiểm soát phí
- Sinh mã QR và sổ địa chỉ
- Các lệnh Masternode và việc bỏ phiếu
- Sao lưu tự động
- Cửa sổ debug
Các tài liệu
Cài đặt
Cài đặt Dash Core khá đơn giản chỉ bằng việc vào trang web https://www.dash.org/ và tải file phù hợp cho hệ thống của bạn, sau đó theo những bược cài đặt phù hợp với hệ thống của bạn. Hướng dẫn chi tiết cũng có sẵn cho các hệ điều hành Linux, macOS và Windows ở dưới đây:
Cũng có thể biên dịch Dash Core từ mã nguồn.
Hướng dẫn cài đặt trên Linux
Hướng dẫn này sẽ mô tả cách tải, cài đặt và mã hoá ví Dash Cor trên Linux. Hướng dẫn này viết cho Ubuntu 16.04 LTS, nhưng các bước thì cũng tương tự như vậy đối với các phiên bản Linux khác.
Truy cập https://www.dash.org/get-dash/ để tải phiên bản ví Dash Core mới nhất. Trong hầu hết các trường hợp, website sẽ tự động phát hiện phiên bản mà bạn cần. Click vào nút màu xanh Dash Core để tải trực tiếp bộ cài đặt.

Website tự động xác định phiên bản ví phù hợp cho hệ thống của bạn
Nếu tính năng tự động nhận dạng không hoạt động, bạn cần phải tự chọn hệ điều hành tương ứng nếu nó là 32 bit hay 64 bit. Nếu bạn không chắc chắn bạn đang dùng bản Linux nào 32 bit hay 64 bit, bạn có thể kiểm tra trong Ubuntu bằng cách vào System menu > About This Computer. Để có hướng dẫn cụ thể về việc kiểm tra trên các phiên bản Linux khác hãy xem ở đây.

Ubuntu System Overview. This is a 64 bit system.
Once you know which version you need, download Dash Core to your computer from https://www.dash.org/wallets.

Chọn và tải chương trình cài đặt bằng tay
Lưu file mà bạn đã tải vào thư mục Downloads.
Bước này là không bắt buộc, tuy nhiên chúng tôi khuyến cáo bạn kiểm tra tính toàn vẹn của file mà bạn đã tải. Điều này thực hiện bởi việc kiểm tra mã băm SHA256 của file tải với mã băm được công bố bởi nhóm phát triển Dash Core. Để xem mã băm được công bố, click vào nút Hash file trên trang tải phần mềm ví.

Tải file hash của Dash Core
Khi cả file Dash Core và file hash đã được tải, hãy mở file hash bằng phần mềm soạn thảo văn bản hoặc bằng trình duyệt và tìm giá trị hash cho file Dash Core mà bạn đã tải.

Xem file hash của Dash Core
Giá trị băm, này cần phải tương ứng với giá trị băm của file mà bạn đã tải để đảm bảo rằng nó là chính hãng và không bị hỏng hoặc sửa đổi trong quá trình truyền tải. Để làm việc này, mở Terminal, chọn đến thư mục mà bạn lưu file, và chạy câu lệnh sha256sum.

Sinh ra một mã băm SHA256 cho file được tải
Nếu mã băm giống nhau, là bạn có một bản chính hãng của ví Dash Core cho Linux.
Dash Core for Linux is distributed as a compressed archive and not an installer. This is because this same archive also contains other files built for running a masternode on a server, for example. In this guide, we will extract the executable file with a graphical user interface (GUI) designed for use by end users as a wallet.
Begin by creating a folder for the Dash Core executable file on the Desktop. Browse to the Desktop (or the location of your choice) and create the folder.

Tạo một thư mục trên Desktop

Đổi tên thư mục thành Dash
Next, open the archive by double-clicking on it. The Archive Manager will appear. Browse to the dashcore-0.12.1/bin/ folder and extract the dash-qt file to the Dash folder you created on the Desktop by drag and drop.

The dash-qt file in Archive Manager

The dash-qt file in the Dash folder on the Desktop
To run Dash Core for the first time, open Terminal and browse to the
Dash folder on the Desktop, or where you chose to extract the file. Type
./dash-qt to run the file.

Chạy Dash Core từ Terminal
Trong lần chạy đầu tiên của chương trình, bạn sẽ được hỏi về chọn nơi bạn muốn lưu trữ blockchain và dữ liệu ví. Chọn nơi có đủ không gian trống, và blockchain có thể đạt kích thước 3-4GB. Bạn nên sử dụng thư mục dữ liệu ngầm định thì càng tốt.

Chọn thư mục dữ liệu cho Dash Core
Sau đó Dash Core sẽ khởi động. Nó sẽ mất một chút lâu hơn so với bình thường trong lần chạy đầu tiên, vì Dash Core cần phải sinh ra một số dữ liệu mã hoá để đảm bảo an toàn cho ví của bạn.

Khởi động Dash Core
Khi Dash Core đã được cài đặt và khởi động thành công, bạn sẽ thấy màn hình tổng thể của ví. Bạn sẽ thấy rằng ví "chưa được đồng bộ", và thanh trạng thái ở đáy của cửa sổ sẽ hiển thị tiến trình đồng bộ.

Dash Core bắt đầu đồng bộ với mạng lưới Dash
Trong tiến trình này, Dash Core sẽ tải bản đầy đủ của blockchain của Dash từ những nút khác vào thiết bị của bạn. Tuỳ thuộc vào tốc độ kết nối Internet của bạn, nó có thể mất khá nhiều thời gian. Nếu bạn thấy thông báo "Không có nguồn block", hãy kiểm tra kết nối internet. Khi việc đồng bộ hoàn tất, bạn sẽ nhìn thấy hình đánh dấu tích nhỏ màu xanh ở góc dưới bên phải của cửa sổ chương trình.

Việc đồng bộ của Dash Core đã hoàn tất
Bây giờ bạn có thể bắt đầu dùng ví của mình để gửi và nhận tiền.
Sau khi ví của bạn được đồng bộ với mạng lưới Dash, thì điều chúng tôi đặc biệt khuyến cáo đó là mã hoá ví của bạn bằng một mật khẩu để ngăn chặn việc truy cập mà bạn không mong muốn. Bạn nên sử dụng mật khẩu mới và mạnh mà bạn chưa từng dùng ở nơi nào khác. Hãy ghi lại mật khẩu của bạn và lưu nó ở nơi an toàn để sao cho bạn không bị mất quyền truy cập đến tài sản tiền số của mình.
To encrypt your wallet, click Settings > Encrypt wallet.

Mã hoá ví Dash với một mật khẩu
Bạn sẽ được hỏi để nhập lại và xác nhận mật khẩu.

Nhập mật khẩu

Xác nhận rằng bạn muốn mã hoá ví
Khi quá trình mã hoá được hoàn tất, bạn sẽ thấy một cảnh báo rằng những bản sao lưu của ví của bạn sẽ không còn dùng được nữa, và bạn sẽ được hỏi việc thoát khỏi chương trình Dash Core. Khi bạn khởi động Dash Core, bạn sẽ thấy một hình chiếc khoá màu xanh ở góc dưới bên phải của màn hình.

Ví Dash Core của bạn đã được mã hoá và đồng bộ hoàn chỉnh
Ubuntu allows you to add third-party repositories to install and update software using the apt command line utility. Dash Core team maintains such a repository, although the software version included here may be older than what is available on the website. To install Dash Core from the repository, open the Terminal and enter the following commands:
sudo add-apt-repository ppa:dash.org/dash
sudo apt update
sudo apt install dashd dash-qt
Hướng dẫn cài đặt trên macOS
Hướng dẫn này sẽ mô tả cách tải, cài đặt và mã hoá ví Dash Cor trên macOS. Hướng dẫn này viết cho macOS Sierra, nhưng các bước thì cũng tương tự như vậy đối với các phiên bản khác.
Truy cập https://www.dash.org/get-dash/ để tải phiên bản ví Dash Core mới nhất. Trong hầu hết các trường hợp, website sẽ tự động phát hiện phiên bản mà bạn cần. Click vào nút màu xanh Dash Core để tải trực tiếp bộ cài đặt.

Website tự động xác định phiên bản ví phù hợp cho hệ thống của bạn
Nếu chức năng tự động phát hiện không hoạt động, bạn cần phải tự chọn hệ điều hành. Hãy truy cập https://www.dash.org/wallets và chọn trang OSX sau đó click vào Download DMG.

Chọn và tải chương trình cài đặt bằng tay
Lưu file mà bạn đã tải vào thư mục Downloads.
Bước này là không bắt buộc, tuy nhiên chúng tôi khuyến cáo bạn kiểm tra tính toàn vẹn của file mà bạn đã tải. Điều này thực hiện bởi việc kiểm tra mã băm SHA256 của file tải với mã băm được công bố bởi nhóm phát triển Dash Core. Để xem mã băm được công bố, click vào nút Hash file trên trang tải phần mềm ví.

Tải file hash của Dash Core
Khi cả file Dash Core và file hash đã được tải, hãy mở file hash bằng phần mềm soạn thảo văn bản hoặc bằng trình duyệt và tìm giá trị hash cho file Dash Core mà bạn đã tải.

Xem file hash của Dash Core
Giá trị băm, này cần phải tương ứng với giá trị băm của file mà bạn đã tải để đảm bảo rằng nó là chính hãng và không bị hỏng hoặc sửa đổi trong quá trình truyền tải. Để làm việc này, mở Terminal, chọn đến thư mục mà bạn lưu file, và chạy câu lệnh sau, thay thế phiên bản với phiên bản cụ thể của file mà bạn đã tải.
shasum -a 256 dashcore-version-osx.dmg

Sinh ra một mã băm SHA256 cho file được tải
Nếu mã băm giống nhau, là bạn có một bản chính hãng của ví Dash Core cho macOS.
Mở Finder và chọn thư mục Downloads. Rồi click đúp vào file .dmg mà bạn đã tải để giải nén. Một cửa sổ sẽ xuất hiện và hiển thị nội dung của file.

Mở file Dash Core.dmg
Kéo file chương trình Dash Core vào thư mục Applications của bạn để cài đặt Dash Core.

Cài đặt Dash Core
To run Dash Core for the first time, either open Launchpad or browse to your Applications folder in Finder. Double-click Dash Core or Dash-Qt to start the application. You may see a warning about opening an app from an unidentified developer. To resolve this problem, simply Control-click the app icon and choose Open from the shortcut menu, then click Open again in the dialog box. The app is saved as an exception to your security settings, and you can open it in the future by double-clicking it just as you can any registered app.


Unblocking macOS from running Dash Core
Trong lần chạy đầu tiên của chương trình, bạn sẽ được hỏi về chọn nơi bạn muốn lưu trữ blockchain và dữ liệu ví. Chọn nơi có đủ không gian trống, và blockchain có thể đạt kích thước 3-4GB. Bạn nên sử dụng thư mục dữ liệu ngầm định thì càng tốt.

Chọn thư mục dữ liệu cho Dash Core
Sau đó Dash Core sẽ khởi động. Nó sẽ mất một chút lâu hơn so với bình thường trong lần chạy đầu tiên, vì Dash Core cần phải sinh ra một số dữ liệu mã hoá để đảm bảo an toàn cho ví của bạn.

Khởi động Dash Core
Khi Dash Core đã được cài đặt và khởi động thành công, bạn sẽ thấy màn hình tổng thể của ví. Bạn sẽ thấy rằng ví "chưa được đồng bộ", và thanh trạng thái ở đáy của cửa sổ sẽ hiển thị tiến trình đồng bộ.

Dash Core bắt đầu đồng bộ với mạng lưới Dash
Trong tiến trình này, Dash Core sẽ tải bản đầy đủ của blockchain của Dash từ những nút khác vào thiết bị của bạn. Tuỳ thuộc vào tốc độ kết nối Internet của bạn, nó có thể mất khá nhiều thời gian. Nếu bạn thấy thông báo "Không có nguồn block", hãy kiểm tra kết nối internet. Khi việc đồng bộ hoàn tất, bạn sẽ nhìn thấy hình đánh dấu tích nhỏ màu xanh ở góc dưới bên phải của cửa sổ chương trình.

Việc đồng bộ của Dash Core đã hoàn tất
Bây giờ bạn có thể bắt đầu dùng ví của mình để gửi và nhận tiền.
Sau khi ví của bạn được đồng bộ với mạng lưới Dash, thì điều chúng tôi đặc biệt khuyến cáo đó là mã hoá ví của bạn bằng một mật khẩu để ngăn chặn việc truy cập mà bạn không mong muốn. Bạn nên sử dụng mật khẩu mới và mạnh mà bạn chưa từng dùng ở nơi nào khác. Hãy ghi lại mật khẩu của bạn và lưu nó ở nơi an toàn để sao cho bạn không bị mất quyền truy cập đến tài sản tiền số của mình.
Để mã hoá ví, click Tuỳ chỉnh > Mã hoá ví.

Mã hoá ví Dash với một mật khẩu
Bạn sẽ được hỏi để nhập lại và xác nhận mật khẩu.

Nhập mật khẩu

Xác nhận rằng bạn muốn mã hoá ví
Khi quá trình mã hoá được hoàn tất, bạn sẽ thấy một cảnh báo rằng những bản sao lưu của ví của bạn sẽ không còn dùng được nữa, và bạn sẽ được hỏi việc thoát khỏi chương trình Dash Core. Khi bạn khởi động Dash Core, bạn sẽ thấy một hình chiếc khoá màu xanh ở góc dưới bên phải của màn hình.

Ví Dash Core của bạn đã được mã hoá và đồng bộ hoàn chỉnh
Bây giờ bạn có thể bắt đầu dùng ví của mình để gửi và nhận tiền một cách an toàn.
Hướng dẫn cài đặt trên Windows
Hướng dẫn này sẽ mô tả cách tải, cài đặt và mã hoá ví Dash Cor trên Windows. Hướng dẫn này viết trên Windows 10, nhưng các bước thì cũng tương tự như vậy đối với Windows XP, Vista, 7 hoặc 8.
Truy cập https://www.dash.org/get-dash/ để tải phiên bản ví Dash Core mới nhất. Trong hầu hết các trường hợp, website sẽ tự động phát hiện phiên bản mà bạn cần. Click vào nút màu xanh Dash Core để tải trực tiếp bộ cài đặt.

Website tự động xác định phiên bản ví phù hợp cho hệ thống của bạn
Nếu tính năng tự động nhận dạng không hoạt động, bạn cần phải tự chọn hệ điều hành tương ứng nếu nó là 32 bit hay 64 bit. Nếu bạn không chắc chắn bạn đang dùng bản Windows nào 32 bit hay 64 bit, bạn có thể kiểm tra trong Windows 10 bằng cách vào Start > Settings > System > About. Để có hướng dẫn cụ thể về việc kiểm tra trên các phiên bản Windows khác hãy xem ở đây.

Trong Windows Settings, click vào System

Trong phần System, click vào About để xem thông tin về hệ thống. Đây là một hệ thống 64 bit.
Khi bạn đã biết bạn cần phiên bản nào, thì tải bộ cài Dash Core vào máy tính của bạn từ địa chỉ https://www.dash.org/wallets/

Chọn và tải chương trình cài đặt bằng tay
Lưu file mà bạn đã tải vào thư mục Downloads.
Bước này là không bắt buộc, tuy nhiên chúng tôi khuyến cáo bạn kiểm tra tính toàn vẹn của file mà bạn đã tải. Điều này thực hiện bởi việc kiểm tra mã băm SHA256 của file tải với mã băm được công bố bởi nhóm phát triển Dash Core. Để xem mã băm được công bố, click vào nút Hash file trên trang tải phần mềm ví.

Tải file hash của Dash Core
Khi cả file Dash Core và file hash đã được tải, hãy mở file hash bằng phần mềm soạn thảo văn bản hoặc bằng trình duyệt và tìm giá trị hash cho file Dash Core mà bạn đã tải.

Xem file hash của Dash Core
Giá trị băm, này cần phải tương ứng với giá trị băm của file mà bạn đã tải để đảm bảo rằng nó là chính hãng và không bị hỏng hoặc sửa đổi trong quá trình truyền tải. Để làm việc này, mở Cửa sổ lệnh Command Prompt, chọn đến thư mục mà bạn lưu file, và chạy câu lệnh sau, thay thế phiên bản với phiên bản cụ thể của file mà bạn đã tải.
certutil -hashfile <dashcore-version-windows>.exe SHA256

Sinh ra một mã băm SHA256 cho file được tải
Nếu mã băm giống nhau, là bạn có một bản chính hãng của ví Dash Core cho Windows.
Click đúp vào file để bắt đầu cài đặt Dash Core.

Chương trình cài đặt Dash Core trong thư mục Downloads
Ở lúc này, bạn có thể sẽ nhìn thấy một cảnh báo từ SmartScreen của Windows nói rằng chương trình này là không được xác định. Bạn có thể yên tâm bỏ qua phần thông báo này bằng cách click vào More info, rồi Run anyway.


Bỏ qua SmartScreen của Windows để chạy chương trình. Cảnh báo đó được biết là "cảnh báo không đúng".
Chương trình cài đặt sẽ hướng dẫn bạn tiến trình cài đặt.

Màn hình Chào mừng của trình cài đặt Dash Core
Bấm qua các màn hình sau. Tất cả các tuỳ chọn có thể bỏ qua như giá trị ngầm didnhj của nó trừ khi bạn có lý do cụ thể để thay đổi chúng.

Chọn thư mục cài đặt

Chọn thư thư mục menu Start

Dash Core đang được cài đặt

Cài đặt đã xong
Khi việc cài đặt hoàn tất, Dash Core sẽ khởi động ngay sau đó. Nếu nó không chạy, click vào Start > Dash Core > Dash Core để khởi động chương trình. Trong lần chạy đầu tiên của chương trình, bạn sẽ được hỏi về chọn nơi bạn muốn lưu trữ blockchain và dữ liệu ví. Chọn nơi có đủ không gian trống, và blockchain có thể đạt kích thước 3-4GB. Bạn nên sử dụng thư mục dữ liệu ngầm định thì càng tốt.

Chọn thư mục dữ liệu cho Dash Core
Sau đó Dash Core sẽ khởi động. Nó sẽ mất một chút lâu hơn so với bình thường trong lần chạy đầu tiên, vì Dash Core cần phải sinh ra một số dữ liệu mã hoá để đảm bảo an toàn cho ví của bạn.

Khởi động Dash Core
Khi Dash Core đã được cài đặt và khởi động thành công, bạn sẽ thấy màn hình tổng thể của ví. Bạn sẽ thấy rằng ví "chưa được đồng bộ", và thanh trạng thái ở đáy của cửa sổ sẽ hiển thị tiến trình đồng bộ.

Dash Core bắt đầu đồng bộ với mạng lưới Dash
Trong tiến trình này, Dash Core sẽ tải bản đầy đủ của blockchain của Dash từ những nút khác vào thiết bị của bạn. Tuỳ thuộc vào tốc độ kết nối Internet của bạn, nó có thể mất khá nhiều thời gian. Nếu bạn thấy thông báo "Không có nguồn block", hãy kiểm tra kết nối internet. Khi việc đồng bộ hoàn tất, bạn sẽ nhìn thấy hình đánh dấu tích nhỏ màu xanh ở góc dưới bên phải của cửa sổ chương trình.

Việc đồng bộ của Dash Core đã hoàn tất
Bây giờ bạn có thể bắt đầu dùng ví của mình để gửi và nhận tiền.
Sau khi ví của bạn được đồng bộ với mạng lưới Dash, thì điều chúng tôi đặc biệt khuyến cáo đó là mã hoá ví của bạn bằng một mật khẩu để ngăn chặn việc truy cập mà bạn không mong muốn. Bạn nên sử dụng mật khẩu mới và mạnh mà bạn chưa từng dùng ở nơi nào khác. Hãy ghi lại mật khẩu của bạn và lưu nó ở nơi an toàn để sao cho bạn không bị mất quyền truy cập đến tài sản tiền số của mình.
Để mã hoá ví, click Tuỳ chỉnh > Mã hoá ví.

Mã hoá ví Dash với một mật khẩu
Bạn sẽ được hỏi để nhập lại và xác nhận mật khẩu.

Nhập mật khẩu

Xác nhận rằng bạn muốn mã hoá ví
Khi quá trình mã hoá được hoàn tất, bạn sẽ thấy một cảnh báo rằng những bản sao lưu của ví của bạn sẽ không còn dùng được nữa, và bạn sẽ được hỏi việc thoát khỏi chương trình Dash Core. Khi bạn khởi động Dash Core, bạn sẽ thấy một hình chiếc khoá màu xanh ở góc dưới bên phải của màn hình.

Ví Dash Core của bạn đã được mã hoá và đồng bộ hoàn chỉnh
Bây giờ bạn có thể bắt đầu dùng ví của mình để gửi và nhận tiền một cách an toàn.
Video hướng dẫn cài đặt
Những video sau đây sẽ hướng dẫn bạn tải, kiểm tra mã checksum và cài đặt ví Dash Core trên các hệ điều hành Linux, macOS và Windows. Dù nó có thể là phiên bản hơi cũ, nhưng về mặt quy trình thì phần lớn là giống như vậy. Khác biệt chính chỉ là trang web chính thức bây giờ là https://www.dash.org/ chứ không phải là https://www.dashpay.io/ như trong các video trên, mặc dù trang web cũ cũng sẽ tái định hướng đến trang web mới bây giờ. Cũng vậy, trong các phiên bản mới hơn của Dash Core, dữ liệu của chương trình như blockchain bây giờ được đặt trong thư mục "DashCore" thay vì trong thư mục "Dash".
Làm thế nào cài đặt ví DashQT trên Linux*
Làm thế nào kiểm tra CheckSum của ví DashQT cho Linux
Làm thế nào cài đặt ví DashQT trên macOS
Làm thế nào kiểm tra CheckSum của ví DashQT cho macOS
Làm thế nào cài đặt ví DashQT trên Windows*
Làm thế nào kiểm tra CheckSum của ví DashQT cho Windows
Làm thế nào Mã hoá/Giải mã ví DashQT của bạn
Giao diện
The Dash Core Wallet is an application that runs on your computer and allows you to make transactions on the Dash network. Most transactions are for sending or receiving Dash, but it is also possible to create signed messages or control a masternode, for example. The Dash Core Wallet interface is described in detail in the following sections.
Cửa sổ chính

Ví Dash Core
The Dash Core window is broken up into several areas:
- Thanh menu
- Thanh tab
- Khu vực chính
- Thanh trạng thái
The tab bar is used to quickly switch between the main areas of the Dash Core. The content in the main area of Dash Core changes depending on which tab you have selected. The following tabs are available:
The overview tab offers quick access to your balance and most recent transactions, as well as the PrivateSend feature and options for coin mixing.

The Dash Core Overview tab
The left part of the main area is divided into two areas. The upper area shows your balances:
- Available
- This shows your current liquid balance. This is the amount of Dash you can spend now.
- Đang chờ
- This shows funds waiting for a transaction to complete.
- Chưa hoàn chỉnh
- This shows funds from masternode or mining payments which have not yet reached the required number of confirmations.
- Tổng số
- This is simply your available and pending funds added together.
The lower area shows the status of PrivateSend and allows you to mix your funds using the Dash Masternode Network.
The right part of the screen shows your recent transactions. These are identified by icons as follows:
- Recent incoming transactions appear black, prefixed by a + sign
- Recent outgoing transactions appear red, prefixed by a – sign
- Incoming mining or masternode payments also appear black
For more details on your transaction history, see the Transactions tab.
The Send tab allows you to send funds to another address on the Dash network. It contains fields to enter the recipient’s address, a label for the address, and the amount of Dash you wish to send. Options related to the transaction fee, InstantSend and PrivateSend are also available. A quick view of your total balance is also available in the lower right corner.

The Send tab
The Receive tab allows you to create addresses to receive Dash. You can create a request for a specific amount of Dash or include a specific message, and send it to another user as a link or QR code.

The Receive tab
The transactions tab shows the entire transaction history for all addresses associated with your wallet. This appears as a table showing the time, type, label and amount of Dash for each transaction. You can also export the transaction history as a CSV file by clicking the Export button in the bottom right corner of the window.
The icons in the leftmost column indicate the status of the transaction. A tick indicates that the recommended number of confirmations has been passed, while a clock indicates that the transaction has yet to reach six confirmations.

The transactions tab
The status bar shows a synchronization progress bar and a row of status icons which indicate the status of your connection to the Dash network.
This bar shows the synchronization status of Dash Core with the Dash network. Each time you open Dash Core, it will begin downloading the blocks which have been created on the blockchain in the time since you last opened the app. These blocks are downloaded from other Dash users and masternodes. If you have never opened the app before, this could mean several years’ worth of blocks need downloading. The following statuses are possible:
- Không thấy nguồn block
- This occurs if your internet connection is down, or if the ports required by Dash Core are blocked by a firewall.
- Đang đồng bộ với mạng lưới
- Dash Core is downloading blocks from the network.
- Synchronizing masternodes/masternode payments/governance objects
- Dash Core is synchronizing other data with the second layer network.
Once synchronization is complete, the progress bar will disappear and a tick will appear on the right of the status bar.

The lock icons indicate the status of your wallet: either locked or unlocked. You need to unlock your wallet to send funds or perform certain other actions.
These icons indicate the quality of your connection to the Dash network. If you cannot connect because of network problems, you will see the icon on the left. More bars indicate more connections to your peers on the network.

These icons show the synchronization status of Dash Core with the network. Once synchronization is complete, the refresh icon will become a blue tick.

These icons indicate whether your wallet is running in hierarchical deterministic (HD) mode or standard mode.
The Options Dialog
This documentation describes the functionality of the Dash Core Options dialog, available under the Settings > Options menu in Dash Core.
The Main tab of the Options dialog contains settings related to startup and performance of the Dash Core app.

The Main tab of the Dash Core Options dialog
- Start Dash Core on system login
- This option causes Dash Core to start automatically when the current user logs in. On most computers there is only one main user account which is logged in automatically when the computer turns on, so this option is effectively the same as starting Dash Core together with the operating system.
- Kích thước vùng đệm cho cơ sở dữ liệu
- This option specifies the size of the database cache in memory. A higher value will result in increased performance when adding new blocks at the cost of higher memory usage. The default value is 100MB and it should not be set lower than this level.
- Number of script verification threads
- This option sets the number of script verification threads, ranging from -4 to 16. Script verification is the process of following instructions recorded in the blockchain to ensure the transactions are valid. 0 means automatic and will allow script verification to scale to the number of cores available on your processor. Setting a positive number specifies that Dash Core should use that number of processor cores, while setting a negative number will leave that number of processor cores free.
The Wallet tab of the Options dialog contains settings related to how addresses are managed in the Dash Core app. The first time you run Dash Core, it will generate a new wallet containing 1000 unique Dash addresses. This tab allows you to configure how these addresses are used as inputs with the Coin Control, PrivateSend and Masternode features.

The Wallet tab of the Dash Core Options dialog
- Bật chức năng kiểm soát coin
- Your Dash Core wallet balance is actually the sum total of all addresses holding balance that are associated with your wallet. When you spend Dash, Dash Core will withdraw from as many inputs as necessary to make up the desired amount of Dash to be transferred. This behavior may be undesirable if you want to keep a certain balance on one address. The most common use case is the requirement to maintain 1000 Dash on a single address as collateral for a masternode. Enabling this option will add a button labelled Inputs on the Send tab. This provides access to the Coin selection dialog, which can be used to lock, unlock and prioritize different addresses in your wallet. See here for a more detailed explanation of Coin Control.
- Hiển thị trang Masternodes
- Enabling this option causes Dash Core to display an additional Masternodes tab to the right of the Transactions tab. This option requires you to restart the Dash Core app. The Masternodes tab can be used to manage interactions (start, stop, check status, etc.) with masternodes controlled by this wallet. This tab is an advanced feature not required by users that do not operate a masternode on the Dash network.
- Bật giao diện PrivateSend nâng cao
- Enabling this option changes the PrivateSend mixing interface on the Overview tab of the Dash Core wallet to include more options, such as Try Mix and percentage completion. See here for a full explanation of how to use PrivateSend.
- Warn if PrivateSend is running out of keys
- Enabling this option will cause Dash Core to display a warning when your original set of 1000 addresses is running out, which may affect PrivateSend mixing. Every time a mixing event happens, up to 9 of your addresses are used up. This means those 1000 addresses last for about 100 mixing events. When 900 of them are used, your wallet must create more addresses. It can only do this, however, if you have automatic backups enabled. Consequently, users who have backups disabled will also have PrivateSend disabled.
- Bật tính năng PrivateSend đa phiên
- Normally PrivateSend mixing is completed in several consecutive rounds, each using a single masternode. Enabling this option allows multi-session, which means you can use multiple masternode servers at the same time, greatly increasing the speed of the mixing process at the cost of creating more addresses and thus requiring more frequent wallet backups. This feature is experimental as of Dash Core 12.1.5.
- Tiêu khoản tiền trả lại chưa được xác nhận
- When this option is enabled, the Dash Core wallet permits you to immediately spend change from previous transactions that has been transferred internally between addresses associated with the same wallet. This is possible even if the transaction has not yet been confirmed because the wallet knows it will eventually be confirmed since it created the internal transaction itself. Leaving this option enabled allows you to create new transactions even if previous transactions have not yet been confirmed.
- Số vòng PrivateSend sử dụng
- Use this option to control the number of rounds of PrivateSend mixing to be carried out for your chosen balance. Each round of mixing uses a new masternode. The higher the number of rounds, the more difficult it becomes to trace the Dash to its original address. This is at the expense of more time required for mixing and potentially higher fees. See here for a full explanation of how to use PrivateSend.
- Amount of Dash to keep anonymized
- This option allows you to specify how much Dash should be kept on balance in a ready-to-use anonymized state, meaning it has already passed through the PrivateSend mixing process. If you do not have sufficient Dash available in your balance of unlocked inputs, the amount will be automatically reduced to the available balance and shown in red in the PrivateSend interface on the Overview tab.
This tab includes options related to how your connection to the Dash network is made.

The Network tab of the Dash Core Options dialog
- Map port using UPnP
- This option causes Dash Core to automatically attempt to open and map the client port on your router using UPnP (Universal Plug and Play). This feature is supported by most modern home routers and will allow you to connect to the Dash network without making any special settings on your router.
- Allow incoming connections
- This option causes your client to accept external connections. Since Dash is a peer-to-peer network and Dash Core is considered a full client because it stores a copy of the blockchain on your device, enabling this option helps other clients synchronize the blockchain and network through your node.
- Connect through SOCKS5 proxy (default proxy)
- These options allow users on an intranet requiring a proxy to reach the broader internet to specify the address of their proxy server to relay requests to the internet. Contact your system administrator or check out the network settings in your web browser if you are unable to connect and suspect a proxy may be the source of the problem.
- Use separate SOCKS5 proxy to reach peers via Tor hidden services
- These options allow you to specify an additional proxy server designed to help you connect to peers on the Tor network. This is an advanced option for increased privacy and requires a Tor proxy on your network. For more information about Tor, see here.
This option contains options governing behavior of the Dash Core app window under Microsoft Windows.

The Window tab of the Dash Core Options dialog
- Ẩn biểu tượng trên khay
- When this option is enabled, Dash Core will not display an icon in the system tray. This option cannot be selected at the same time as Minimize to the tray instead of the taskbar.
- Minimize to the tray instead of the taskbar
- When this option is enabled and the Dash Core window is minimized, it will no longer appear in your taskbar as a running task. Instead, Dash Core will keep running in the background and can be re-opened from the Dash icon in the system tray (the area next to your system clock). This option cannot be selected at the same time as Hide tray icon.
- Minimize on close
- When this option is enabled, clicking the X button in the top right corner of the window will cause Dash Core to minimize rather than close. To completely close the app, select File > Exit.
This tab contains options relating to the appearance of the Dash Core app window.

The Display tab of the Dash Core Options dialog
- User interface language
- Select your preferred language from this drop-down menu. Changing the language requires you to restart the Dash Core app.
- Mẫu giao diện người dùng
- You can use this option to select a different theme governing the appearance of the Dash Core window. All functionality is identical under the different themes, although the default Dash-light theme is most recent and most likely to work without any display artifacts.
- Đơn vị để hiển thị số lượng
- This allows you to change the default unit of currency in Dash Core from DASH to mDASH, µDASH or duffs. Each unit shifts the decimal separator three places to the right. Duffs are the smallest unit into which Dash may be separated.
- Số chữ số thập phân
- This option allows you to select how many decimal digits will be displayed in the user interface. This does not affect internal accounting of your inputs and balance.
- Third party transaction URLs
- This option allows you to specify and external website to inspect a particular address or transaction on the blockchain. Several blockchain explorers are available for this. To use this feature, enter the URL of your favorite blockchain explorer, replacing the %s with the transaction ID. You will then be able to access this blockchain explorer directly from Dash Core using the context menu of any given transaction.
The Tools Dialog
This documentation describes the functionality of the Dash Core Tools dialog, available under the Tools menu in Dash Core.

The Information tab of the Dash Core Tools dialog
- General
- This section displays information on the name and version of the client and database, and the location of the current application data directory.
- Mạng
- This section displays information and statistics on the network to which you are connected.
- Block chain
- This section shows the current status of the blockchain.
- Memory pool
- This section shows the status of the memory pool, which contains transactions that could not yet be written to a block. This includes both transactions created since the last block and transactions which could not be entered in the last block because it was full.
- Open debug log file
- This button opens debug.log from the application data directory. This file contains output from Dash Core which may help to diagnose errors.
The Console tab provides an interface with the Dash Core RPC (remote
procedure call) console. This is equivalent to the dash-cli command
on headless versions of Dash, such as dashd running on a masternode.
Click the red – icon to clear the console, and see the detailed
documentation on RPC commands to learn about the possible commands you can
issue.

The Console tab of the Dash Core Tools dialog
The Network Traffic tab shows a graph of traffic sent and received to peers on the network over time. You can adjust the time period using the slider or Clear the graph.

The Network Traffic tab of the Dash Core Tools dialog
The Peers tab shows a list of other full nodes connected to your Dash Core client. The IP address, version and ping time are visible. Selecting a peer shows additional information on the data exchanged with that peer.

The Peers tab of the Dash Core Tools dialog
The Wallet Repair tab offers a range of startup commands to restore a wallet to a functional state. Selecting any of these commands will restart Dash Core with the specified command-line option.

The Wallet Repair tab of the Dash Core Tools dialog
- Salvage wallet
- Salvage wallet assumes wallet.dat is corrupted and cannot be read. It makes a copy of wallet.dat to wallet.<date>.bak and scans it to attempt to recover any private keys. Check your debug.log file after running salvage wallet and look for lines beginning with "Salvage" for more information on operations completed.
- Quét lại các file blockchain
- Rescans the already downloaded blockchain for any transactions affecting accounts contained in the wallet. This may be necessary if you replace your wallet.dat file with a different wallet or a backup - the wallet logic will not know about these transactions, so a rescan is necessary to determine balances.
- Khôi phục các giao dịch
- The recover transactions commands can be used to remove unconfirmed transactions from the memory pool. Your wallet will restart and rescan the blockchain, recovering existing transactions and removing unconfirmed transactions. Transactions may become stuck in an unconfirmed state if there is a conflict in protocol versions on the network during PrivateSend mixing, for example, or if a transaction is sent with insufficient fees when blocks are full.
- Nâng cấp định dạng ví
- This command is available for very old wallets where an upgrade to the
wallet version is required in addition to an update to the wallet
software. You can view your current wallet version by running the
getwalletinfocommand in the console. - Tái tạo index
- Discards the current blockchain and chainstate indexes (the database of unspent transaction outputs) and rebuilds it from existing block files. This can be useful to recover missing or stuck balances.
Gửi và nhận
Your Dash Core Wallet is associated with a number of unique addresses that can be used to send and receive Dash. Each address holds its own balance, and the sum of all your balances is what appears on the Overview tab. When you send Dash, your wallet will automatically transfer funds from as many of your addresses as necessary to the destination address, which is controlled by another Dash user and associated with their wallet. You can control which addresses you use using the Coin Control feature.
When you confirm a transaction, Dash Core will enter the transaction in a block, which will then be added to the blockchain for other clients to confirm. A transaction is generally considered confirmed once six blocks have been added after the block containing your transaction, although masternode and mining payments are only released after 101 blocks. Note that a different process is used for InstantSend and PrivateSend transactions.
Dash addresses are 34 characters long and begin with an uppercase X.
Gửi Dash
You can use Dash Core to send Dash from your balance to another user. The receiving user will provide you with a Dash address to which you should send the funds. Click the Send tab in the tab bar and enter the destination address in the Pay To field.
The Dash Core Send tab
You can also use the three icons  to the right of the Pay
To field to select a previously used address, paste an address from
the clipboard, or clear the current address. If this is a new address,
you can enter a name for the address in the Label field to help
identify it again later. Finally, enter the amount of Dash you want to
transfer in the Amount field.
to the right of the Pay
To field to select a previously used address, paste an address from
the clipboard, or clear the current address. If this is a new address,
you can enter a name for the address in the Label field to help
identify it again later. Finally, enter the amount of Dash you want to
transfer in the Amount field.
The other options relate to fees and PrivateSend/InstantSend. You can choose if you want to pay the network fee in addition to the amount sent, or subtract it from the amount sent. You can also increase your fee to encourage nodes on the network to prioritize your transaction. Choosing InstantSend has a similar effect, but actually relies on a different mechanism in the second layer network to speed up the transaction time. Choosing PrivateSend will send Dash from an address that has previously been mixed. You can find out more about PrivateSend and InstantSend here.
Let’s try an example. Say you have received an invoice which you now want to pay with Dash. The writer of the invoice has included a Dash address, which can be seen in the following window beginning with Xpa. The invoice is for 2.45 Dash, which you fill in the Amount field.

The Send tab filled out for a transaction
Once you have entered the destination address and the amount, click the Send button. If you have encrypted your wallet, you will now be required to enter your password to unlock the wallet.

Nhập mật khẩu để mở khoá ví
Finally, you are given one final confirmation and chance to cancel your send transaction before Dash Core processes the transaction on the blockchain.

Final confirmation window
If you respond with Yes, your transaction will be processed. Your operating system may display a notification, and the transaction will appear on the Transactions tab, where you can monitor its progress.

The Windows 10 sent transaction confirmation notification
Note that the amount of the transaction increased by .000045 Dash. This is the transaction fee. In the next section, we will see what this procedure looks like from the receiving side.
Nhận Dash
To receive Dash, you must first create a receiving address to give to the sending party. To do this, click File > Receiving addresses. The Receiving addresses window appears.

The Receiving addresses window
Either copy an existing address by clicking on the address and then the Copy button, or create a new address by clicking the New button. You can also edit an existing address by right clicking and selecting Edit address from the context menu. Give this address to the person who will send you Dash. Your wallet does not need to be open to receive funds, but if it is, you can watch the transaction arrive in real time. This is because your wallet constantly watches for new blocks on the blockchain when it is open, and will recognize a new transaction involving your receiving address when it occurs.

The Windows 10 received transaction confirmation notification
Once you have been paid, you can see the balance both on the Overview tab and on the Transactions tab.

The received transaction
How to Create New Receiving Addresses in DashQT
PrivateSend và InstantSend
PrivateSend
This documentation describes how to use Dash Core to send Dash anonymously. PrivateSend, released as DarkSend in RC4 of the DarkCoin client and rebranded to PrivateSend in May 2016, is a trustless method of running a sequence of transactions (known as "mixing") such that an external observer is unable to determine the source of funding when a PrivateSend transaction is created. This gives your Dash the same anonymous properties as cash withdrawn from an ATM, for example. The mixing and denomination process is seamless, automatic, and requires no intervention on the part of the user. The current implementation of PrivateSend in the Dash Core wallet allows any amount of Dash to be mixed for later use in PrivateSend transactions. As of April 2018, PrivateSend is not currently available in other Dash wallets.
Knowledge of the exact number of rounds of PrivateSend mixing used in any given PrivateSend transaction has a quantifiable effect on the confidence an adversary may have when attempting to guess the source of a PrivateSend transaction. For this reason, the recommended (and default) number of rounds of PrivateSend mixing is set to four.
Bạn có thể đọc thêm về lý thuyết của PrivateSend và các quy trình ở đây.
Mở ví Dash Core của bạn, đến mục Các thiết lập và chọn mục Các tuỳ chọn. Rồi mở trang Ví.

Next to PrivateSend rounds to use, enter a value between 1-8. Each round of PrivateSend performs one denominated fund mixing transaction. Higher numbers of rounds increase your overall level of anonymity while decreasing the chance of detection via node collusion. 8 is the highest number of rounds currently available.
CHÚ Ý: Để ngăn chặn hệ thống bị lạm dụng, một mức phí trung bình cho một trong mười vòng trộn của masternode sẽ phát sinh một khoản phí là .001 DASH.
Enter a target value for Amount of Dash to keep anonymized. This value provides a lower boundary on the final amount of funds to be anonymized. Depending on how the client splits your wallet balance, you may end up with denominated inputs whose sum total is greater than the target amount. In this case the client will use all existing denominated inputs in the PrivateSend process. The final anonymized amount may be higher than your target, but should be close.
Bấm OK để lưu lại những thiết lập.
PrivateSend is disabled by default when you open the wallet. It will only start after you set the number of rounds and number of Dash to mix under settings and click Start Mixing on the Overview tab of your wallet.
The PrivateSend process is initiated by clicking the Start Mixing button on the Overview tab of the Dash Core wallet. Mixing is possible once the following conditions have been met:
- The wallet contains sufficient non-anonymized funds to create the minimum required denominated values
- The user has not disabled PrivateSend in the Options dialog
- The target value for anonymized Funds in the Options dialog is greater than zero
If your wallet is encrypted (highly recommended), you will be asked to enter your wallet passphrase. Enable the Only for mixing via PrivateSend checkbox to unlock the wallet for mixing only.

Entering a password for PrivateSend mixing only
This will unlock your wallet, and the PrivateSend mixing process will begin. The wallet will remain unlocked until PrivateSend mixing is complete, at which point it will be locked automatically.

PrivateSend interface after clicking the Start Mixing button. Note the Status is Enabled.
PrivateSend will begin creating transactions and your PrivateSend balance will gradually increase. This process can take some time, so be patient. You can monitor the process in more detail as described in the following section.
Any of the following actions will interrupt the mixing process. Because the transactions are atomic (they either take place completely, or do not take place at all), it should be possible to safely interrupt PrivateSend mixing at any time.
- Clicking the Stop Mixing button on the Overview tab
- Closing the client before PrivateSend mixing is completed
- Sending PrivateSend funds from the wallet before PrivateSend rounds are completed
- Disabling PrivateSend before the process is complete
If you want to monitor PrivateSend in more detail, you need to enable some advanced features of the wallet. Go to Settings, select Options and go to the Wallet tab. Check the boxes next to the Enable coin control features and Enable advanced PrivateSend interface options.

Enabling advanced options for PrivateSend in the Dash Core wallet settings
This will allow you to monitor progress and see which individual operations PrivateSend is carrying out in the background.

Theo dõi tiến trình PrivateSend
Since PrivateSend mixing creates a lot of new address keys to send and receive the anonymized denominations, you may receive a warning when the number of remaining keys runs low. This is nothing to be worried about, since the wallet will simply create more keys as necessary. However, these keys will not exist in any previous backups of your wallet. For this reason, it is important to backup your wallet again after mixing is complete.
You can also monitor PrivateSend progress by viewing the transactions created by the mixing process on the Transactions tab.

Transactions created by PrivateSend on the Transactions tab
The following table describes the PrivateSend-related transactions displayed in the Type column of the Transactions tab:
| PrivateSend Transaction Type | Transaction Description |
|---|---|
| PrivateSend Make Collateral Inputs (Mixing) | Wallet funds were moved to collateral inputs that will be used to make collateral payments. This is done to minimize traceability of collaterals. |
| PrivateSend Create Denominations (Mixing) | Wallet funds were broken into PrivateSend denominations (Step 1 here) |
| PrivateSend Denominate (Mixing) | A transaction was sent to a masternode in order to participate in a mixing session (Step 3 here) |
| PrivateSend Collateral Payment (Mixing) | The mixing session collateral was claimed. This fee is charged in ~10% of mixing sessions to prevent spam attacks. |
| PrivateSend (Spending) | Mixed funds were used to send a payment to someone. Note: Unlike the previous 4 transaction types, this is not a mixing process transaction. |
You can also use the coin control feature to view which addresses hold mixed denominations ready to be used for PrivateSend transactions. Go to the Send tab of your wallet and click Inputs to view the possible input addresses for your transactions. You can see how each address holds given denominations of mixed Dash, and how many rounds of mixing have been completed. This is to ensure that an efficient combination of addresses can be used as inputs in PrivateSend transactions without too much change, since amount in a PrivateSend transaction must be rounded up to completely spend all inputs. The current minimum balance for an input used in a PrivateSend transaction is 0.01000010 DASH.

Coin Selection dialog showing addresses holding PrivateSend mixed balances in different denominations
You can only use PrivateSend for payments once you have mixed enough Dash to make up the amount you are trying to send. Because the mixing process takes time, it must be done in advance before you create the send transaction. A PrivateSend transaction is effectively the same as any other transaction on the blockchain, but it draws only from input addresses where the denomination has previously been mixed to ensure anonymity of funds. Because several input addresses are usually required to make up the amount you are trying to send, a PrivateSend transaction will usually take up more space (in kilobytes) on the blockchain, and therefore will be charged a slightly higher fee.
To send a payment using PrivateSend, go to the Send tab of the Dash Core wallet and enable the PrivateSend option. The balance displayed will change to show your PrivateSend balance instead of the total balance. You can then enter the Pay To address, Label, Amount and click Send as usual. Your payment will be rounded up to completely spend the lowest possible denomination of mixed balance available (currently to the nearest 0.01 DASH). You will be prompted to enter your password and receive a detailed breakdown of the fee structure for PrivateSend before sending.

Dash Core ready to send a PrivateSend transaction. Note PrivateSend is enabled and the amount to be sent is less than the available PrivateSend balance
InstantSend
This documentation describes how to use InstantSend to instantly send funds to any other Dash user around the world. Dash InstantSend is supported by many wallets and vendors, including (but not limited to) the following:
- Ví Dash Core
- Ví Dash cho Android
- Ví Dash cho iOS
- Ví Dash Copay
- Ví My Dash Wallet
- Kraken
- Bitrefill
- and many more...
You can read more about InstantSend theory and processes here.
InstantSend functions by setting a flag on the transaction, causing deterministic selection of a quorum of 10 masternodes for each input spent in an InstantSend transaction. The masternodes examine the input, and if a majority determines it has at least six confirmations, they then accept the transaction. The input is then locked until the transaction has been confirmed in six mined blocks, at which point the output can be used as an input in another InstantSend transaction. This differs from inputs used in normal transactions, which can be spent after just one confirmation regardless of whether the Dash was received using InstantSend or not. A higher fee will be charged for InstantSend transactions, according to the fee schedule. Note that the receiving wallet must also be aware of InstantSend in order to be able to immediately continue with the transaction or display an appropriate notification that the transaction should be considered locked. If the receiving wallet is not aware of InstantSend, it will simply appear as a normal transaction and you will need to wait for standard block confirmations.
To pay with InstantSend, simply check the relevant checkbox in your app. The following screenshots indicate where this setting can be found in the Dash Core, iOS and Android wallets.


Các ví Dash hiển thị tuỳ chọn InstantSend
Sao lưu và phục hồi ví
Sao lưu
This documentation describes how to safely back up your wallet file for safe storage in case your computer or laptop is damaged or lost. Dash Core stores all data necessary to control your Dash addresses in a single file called wallet.dat. This wallet is in the Berkeley DB format and stores the pairs of private/public cryptographic keys used to manage your balances on the Dash blockchain. Dash Core makes most of these operations transparent and even generates automatic backups of your wallet file in case it is corrupted, but the user is responsible for ensuring that these backups are stored in a safe place. If you lose access to your wallet file, you will permanently lose access to your Dash.
It is important to consider that if you have not encrypted your wallet using the Settings > Encrypt Wallet menu item, anyone with access to the backed up wallet.dat file will immediately have full access to your Dash. If you do choose to encrypt your wallet, do not store the password in the same place as the wallet.dat file, particularly if you are saving the backup to the cloud.
Firstly, never copy your wallet.dat file while Dash Core is open. Always use the File > Backup Wallet menu if the wallet is open. When you select this menu item, a dialog box will appear to specify where the file should be saved. Enter a name for the file, select a location and click Save. The example below shows saving the file to a USB stick. Keep this file in a physically separate location to your computer.


Sao lưu ví Dash Core từ menu File
Nếu ví Dash Core đang không chạy, bạn cũng có thể sao lưu dự phòng ví của bạn bằng cách đơn giản là copy file "wallet.dat" đến một nơi khác. File này có chứa trong thư mục DashCore. Bạn được lựa chọn để chỉ ra vị trí cho thư mục này khi cài đặt, nhưng ngầm định thì thư mục này nằm ở các vị trí như sau trên những hệ điều hành khác nhau:
Windows
C:\Users\YourUserName\Appdata\Roaming\DashCore
Bạn có thể truy cập thư mục này trực tiếp bằng cách bấm Windows Key + R và gõ
%APPDATA%\DashCoreLinux
/home/YourUserName/.dashcore
You can access this folder directly by typing
cd ~/.dashcoreat the terminal or~/.dashcorein the path bar using the Go > Enter Location... menu item in FilesmacOS
/Users/YourUserName/Library/Application Support/DashCore
You can access this folder by typing
cd ~/Library/Application Support/DashCoreat the terminal or~/Library/Application Support/DashCorein dialog at the Go > Go To Folder menu item in Finder
Ensure Dash Core is not running, then simply copy the wallet.dat file from this folder to another folder in the normal way for your operating system. The example below shows copying the file to a USB stick using simple drag and drop while holding down Ctrl on a Windows system. On most operating systems, you can also right click on the file and select Copy, then select Paste in the target folder. Keep this file in a physically separate location to your computer. Be careful to copy (not move) the file!

Backing up wallet.dat by copying to another folder
Every time you open Dash Core, it will automatically create a backup
copy of wallet.dat in the dashcore/backups folder. Up to 10
backups can be kept here by default, and the oldest backup will be
deleted as each additional new backup is created. You can modify the
number of backups kept here using the -createwalletbackups=n
parameter at the command line or in dash.conf. Setting this value to 0
completely disables backups.
You can view the automatic backups folder by browsing to DashCore folder at the location specified above for wallet.dat and opening the backups folder, or by selecting Tools > Show Automatic Backups from the menu in Dash Core. Since these files are not active when Dash Core is running, you can safely copy them at any time. They are also a handy backup if the original files in the DashCore folder become corrupted due to improper shutdown of the Dash Core app.
Khôi phục
To restore a backup, install Dash Core on the target system (or stop it, if already installed) and rename the existing wallet.dat file in the DashCore folder.

Đổi tên file wallet.dat cũ thành wallet.old trong thư mục DashCore
Then copy the backup wallet file to the DashCore folder and ensure it is named wallet.dat. Now, when you start Dash Core again, it will load the new wallet. Do not replace wallet.dat while Dash Core is running, since this will result in data corruption!


Copy file sao lưu vào thư mục DashCore và đổi tên nó thành wallet.dat
Cân nhắc việc lưu trữ sao lưu
Any backup depends to some extent on the existence of software capable of reading the data at some future point in time. As such, it is good practice to store a copy of the software used to create the backup together with the backup file itself. In this case, this would be a copy of the version of Dash Core you used to create the backup.
The wallet.dat file itself should be encrypted using a password set from the Settings > Encrypt Wallet menu item. However, this only prevents someone with access to the file from creating transactions, not from opening the file. You could additionally store the file in another encrypted container, such as a USB stick using BitLocker in Windows, LUKS in Linux or FileVault on macOS. It is also possible to create disk images or zip files with password encryption - the choice is yours. For further reading on encrypted containers, see here.
Where you store this file is then up to you. It could be in your home, in a safe deposit box at a bank, a waterproof or fireproof container, or on cloud storage such as Google Drive, Dropbox or iCloud. Consider where you will store any passwords needed to restore access to the wallet (in your head, on paper, in a password manager, etc.) and who may need access to the password in the future.
Finally it is important to understand that wallet.dat itself is a relatively dangerous way to store large amounts of funds - it is simply a database file storing private keys. While the convenience of storing a wallet file directly is fine for smaller holdings, it is more secure to to store large amounts of Dash on a single predefined address in a way that you are guaranteed access through any software supporting the protocol, rather than a specific implementation of that protocol. If you are interested in this, read more about paper wallets, where the private key can be printed directly or also encrypted using BIP38 for safe storage.
Kiểm tra sao lưu
There is no fixed procedure to verify your backup, but you should test restoring it at least once to make sure it works. If you have a simple copy of the file, try to restore it to your current DashCore folder and start Dash Core to make sure it opens without any errors. If you decided to store the file in an encrypted zip file, make sure you can unzip it and that it opens correctly in Dash Core. In short, make sure that you (or the person you are trusting to eventually go through this process for you) can actually reverse your backup process to get access to your Dash, instead of relying on the fact that this process should theoretically be reversible.
Các tham số và các câu lệnh
All command-line options (except for -datadir and -conf) may be
specified in a configuration file, and all configuration file options
may also be specified on the command line. Command-line options override
values set in the configuration file. The configuration file is a list
of setting=value pairs, one per line, with optional comments
starting with the # character.
The configuration file is not automatically created; you can create it
using your favorite plain-text editor. By default, dash-qt (or dashd)
will look for a file named dash.conf in the dash data directory, but
both the data directory and the configuration file path may be changed
using the -datadir and -conf command-line arguments.
| Nền tảng | Đường dẫn đến thư mục dữ liệu | Typical path to configuration file |
|---|---|---|
| Linux | ~/ | /home/username/.dashcore/dash.conf |
| macOS | ~/Library/Application Support/ | /Users/username/Library/Application Support/DashCore/dash.conf |
| Windows | %APPDATA% | (Vista-10) C:\Users\username\AppData\Roaming\DashCore\dash.conf (2000-XP) C:\Documents and Settings\username\Application Data\DashCore\dash.conf |
Note: if running Dash in testnet mode, the sub-folder testnet3 will
be appended to the data directory automatically.
Các tham số của dòng lệnh
These commands are accurate as of Dash Core version 0.12.2.1.
Dash Core Daemon
- dashd [options]
- Start Dash Core Daemon
| --help | This help message |
| --version | Print version and exit |
| --alerts | Receive and display P2P network alerts (default: 1) |
| --alertnotify=<cmd> | |
| Execute command when a relevant alert is received or we see a really long fork (%s in cmd is replaced by message) | |
| --blocknotify=<cmd> | |
| Execute command when the best block changes (%s in cmd is replaced by block hash) | |
| --assumevalid=<hex> | |
| If this block is in the chain assume that it and its ancestors are valid and potentially skip their script verification (0 to verify all, default: 00000000000000b4181bbbdddbae464ce11fede5d0292fb63fdede1e7c8ab21c, testnet: 00000ce22113f3eb8636e225d6a1691e132fdd587aed993e1bc9b07a0235eea4) | |
| --conf=<file> | Specify configuration file (default: dash.conf) |
| --daemon | Run in the background as a daemon and accept commands |
| --datadir=<dir> | |
| Specify data directory | |
| --dbcache=<n> | Set database cache size in megabytes (4 to 16384, default: 100) |
| --loadblock=<file> | |
| Imports blocks from external blk000??.dat file on startup | |
| --maxorphantx=<n> | |
| Keep at most <n> unconnectable transactions in memory (default: 100) | |
| --maxmempool=<n> | |
| Keep the transaction memory pool below <n> megabytes (default: 300) | |
| --mempoolexpiry=<n> | |
| Do not keep transactions in the mempool longer than <n> hours (default: 72) | |
| --par=<n> | Set the number of script verification threads (-1 to 16, 0 = auto, <0 = leave that many cores free, default: 0) |
| --pid=<file> | Specify pid file (default: dashd.pid) |
| --prune=<n> | Reduce storage requirements by pruning (deleting) old blocks. This mode is incompatible with -txindex and -rescan. Warning: Reverting this setting requires re-downloading the entire blockchain. (default: 0 = disable pruning blocks, >945 = target size in MiB to use for block files) |
| --reindex-chainstate | |
| Rebuild chain state from the currently indexed blocks | |
| --reindex | Rebuild chain state and block index from the blk*.dat files on disk |
| --sysperms | Create new files with system default permissions, instead of umask 077 (only effective with disabled wallet functionality) |
| --txindex | Maintain a full transaction index, used by the getrawtransaction rpc call (default: 1) |
| --addressindex | Maintain a full address index, used to query for the balance, txids and unspent outputs for addresses (default: 0) |
| --timestampindex | |
| Maintain a timestamp index for block hashes, used to query blocks hashes by a range of timestamps (default: 0) | |
| --spentindex | Maintain a full spent index, used to query the spending txid and input index for an outpoint (default: 0) |
| --addnode=<ip> | Add a node to connect to and attempt to keep the connection open |
| --banscore=<n> | Threshold for disconnecting misbehaving peers (default: 100) |
| --bantime=<n> | Number of seconds to keep misbehaving peers from reconnecting (default: 86400) |
| --bind=<addr> | Bind to given address and always listen on it. Use [host]:port notation for IPv6 |
| --connect=<ip> | Connect only to the specified node(s) |
| --discover | Discover own IP addresses (default: 1 when listening and no -externalip or -proxy) |
| --dns | Allow DNS lookups for -addnode, -seednode and -connect (default: 1) |
| --dnsseed | Query for peer addresses via DNS lookup, if low on addresses (default: 1 unless -connect) |
| --externalip=<ip> | |
| Specify your own public address | |
| --forcednsseed | Always query for peer addresses via DNS lookup (default: 0) |
| --listen | Accept connections from outside (default: 1 if no -proxy or -connect) |
| --listenonion | Automatically create Tor hidden service (default: 1) |
| --maxconnections=<n> | |
| Maintain at most <n> connections to peers (temporary service connections excluded) (default: 125) | |
| --maxreceivebuffer=<n> | |
| Maximum per-connection receive buffer, <n>*1000 bytes (default: 5000) | |
| --maxsendbuffer=<n> | |
| Maximum per-connection send buffer, <n>*1000 bytes (default: 1000) | |
| --onion=<ip:port> | |
| Use separate SOCKS5 proxy to reach peers via Tor hidden services (default: -proxy) | |
| --onlynet=<net> | |
| Only connect to nodes in network <net> (ipv4, ipv6 or onion) | |
| --permitbaremultisig | |
| Relay non-P2SH multisig (default: 1) | |
| --peerbloomfilters | |
| Support filtering of blocks and transaction with bloom filters (default: 1) | |
| --port=<port> | Listen for connections on <port> (default: 9999 or testnet: 19999) |
| --proxy=<ip:port> | |
| Connect through SOCKS5 proxy | |
| --proxyrandomize | |
| Randomize credentials for every proxy connection. This enables Tor stream isolation (default: 1) | |
| --seednode=<ip> | |
| Connect to a node to retrieve peer addresses, and disconnect | |
| --timeout=<n> | Specify connection timeout in milliseconds (minimum: 1, default: 5000) |
| --torcontrol=<ip:port> | |
| Tor control port to use if onion listening enabled (default: 127.0.0.1:9051) | |
| --torpassword=<pass> | |
| Tor control port password (default: empty) | |
| --upnp | Use UPnP to map the listening port (default: 0) |
| --whitebind=<addr> | |
| Bind to given address and whitelist peers connecting to it. Use [host]:port notation for IPv6 | |
| --whitelist=<netmask> | |
| Whitelist peers connecting from the given netmask or IP address. Can be specified multiple times. Whitelisted peers cannot be DoS banned and their transactions are always relayed, even if they are already in the mempool, useful e.g. for a gateway | |
| --whitelistrelay | |
| Accept relayed transactions received from whitelisted peers even when not relaying transactions (default: 1) | |
| --whitelistforcerelay | |
| Force relay of transactions from whitelisted peers even they violate local relay policy (default: 1) | |
| --maxuploadtarget=<n> | |
| Tries to keep outbound traffic under the given target (in MiB per 24h), 0 = no limit (default: 0) | |
| --disablewallet | |
| Do not load the wallet and disable wallet RPC calls | |
| --keypool=<n> | Set key pool size to <n> (default: 1000) |
| --fallbackfee=<amt> | |
| A fee rate (in DASH/kB) that will be used when fee estimation has insufficient data (default: 0.0002) | |
| --mintxfee=<amt> | |
| Fees (in DASH/kB) smaller than this are considered zero fee for transaction creation (default: 0.0001) | |
| --paytxfee=<amt> | |
| Fee (in DASH/kB) to add to transactions you send (default: 0.00) | |
| --rescan | Rescan the block chain for missing wallet transactions on startup |
| --salvagewallet | |
| Attempt to recover private keys from a corrupt wallet.dat on startup | |
| --sendfreetransactions | |
| Send transactions as zero-fee transactions if possible (default: 0) | |
| --spendzeroconfchange | |
| Spend unconfirmed change when sending transactions (default: 1) | |
| --txconfirmtarget=<n> | |
| If paytxfee is not set, include enough fee so transactions begin confirmation on average within n blocks (default: 2) | |
| --maxtxfee=<amt> | |
| Maximum total fees (in DASH) to use in a single wallet transaction; setting this too low may abort large transactions (default: 0.20) | |
| --usehd | Use hierarchical deterministic key generation (HD) after bip39/bip44. Only has effect during wallet creation/first start (default: 0) |
| --mnemonic | User defined mnemonic for HD wallet (bip39). Only has effect during wallet creation/first start (default: randomly generated) |
| --mnemonicpassphrase | |
| User defined mnemonic passphrase for HD wallet (bip39). Only has effect during wallet creation/first start (default: empty string) | |
| --hdseed | User defined seed for HD wallet (should be in hex). Only has effect during wallet creation/first start (default: randomly generated) |
| --upgradewallet | |
| Upgrade wallet to latest format on startup | |
| --wallet=<file> | |
| Specify wallet file (within data directory) (default: wallet.dat) | |
| --walletbroadcast | |
| Make the wallet broadcast transactions (default: 1) | |
| --walletnotify=<cmd> | |
| Execute command when a wallet transaction changes (%s in cmd is replaced by TxID) | |
| --zapwallettxes=<mode> | |
| Delete all wallet transactions and only recover those parts of the blockchain through -rescan on startup (1 = keep tx meta data e.g. account owner and payment request information, 2 = drop tx meta data) | |
| --createwalletbackups=<n> | |
| Number of automatic wallet backups (default: 10) | |
| --walletbackupsdir=<dir> | |
| Specify full path to directory for automatic wallet backups (must exist) | |
| --keepass | Use KeePass 2 integration using KeePassHttp plugin (default: 0) |
| --keepassport=<port> | |
| Connect to KeePassHttp on port <port> (default: 19455) | |
| --keepasskey=<key> | |
| KeePassHttp key for AES encrypted communication with KeePass | |
| --keepassid=<name> | |
| KeePassHttp id for the established association | |
| --keepassname=<name> | |
| Name to construct url for KeePass entry that stores the wallet passphrase | |
| --zmqpubhashblock=<address> | |
| Enable publish hash block in <address> | |
| --zmqpubhashtx=<address> | |
| Enable publish hash transaction in <address> | |
| --zmqpubhashtxlock=<address> | |
| Enable publish hash transaction (locked via InstantSend) in <address> | |
| --zmqpubhashgovernancevote=<address> | |
| Enable publish hash of governance votes in <address> | |
| --zmqpubhashgovernanceobject=<address> | |
| Enable publish hash of governance objects (like proposals) in <address> | |
| --zmqpubhashinstantsenddoublespend=<address> | |
| Enable publish transaction hashes of attempted InstantSend double spend in <address> | |
| --zmqpubrawblock=<address> | |
| Enable publish raw block in <address> | |
| --zmqpubrawtx=<address> | |
| Enable publish raw transaction in <address> | |
| --zmqpubrawtxlock=<address> | |
| Enable publish raw transaction (locked via InstantSend) in <address> | |
| --zmqpubrawinstantsenddoublespend=<address> | |
| Enable publish raw transactions of attempted InstantSend double spend in <address> | |
| --uacomment=<cmt> | |
| Append comment to the user agent string | |
| --debug=<category> | |
| Output debugging information (default: 0, supplying <category> is optional). If <category> is not supplied or if <category> = 1, output all debugging information.<category> can be: addrman, alert, bench, coindb, db, http, libevent, lock, mempool, mempoolrej, net, proxy, prune, rand, reindex, rpc, selectcoins, tor, zmq, dash (or specifically: gobject, instantsend, keepass, masternode, mnpayments, mnsync, privatesend, spork). | |
| --gen | Generate coins (default: 0) |
| --genproclimit=<n> | |
| Set the number of threads for coin generation if enabled (-1 = all cores, default: 1) | |
| --help-debug | Show all debugging options (usage: --help -help-debug) |
| --logips | Include IP addresses in debug output (default: 0) |
| --logtimestamps | |
| Prepend debug output with timestamp (default: 1) | |
| --minrelaytxfee=<amt> | |
| Fees (in DASH/kB) smaller than this are considered zero fee for relaying, mining and transaction creation (default: 0.0001) | |
| --printtoconsole | |
| Send trace/debug info to console instead of debug.log file | |
| --printtodebuglog | |
| Send trace/debug info to debug.log file (default: 1) | |
| --shrinkdebugfile | |
| Shrink debug.log file on client startup (default: 1 when no -debug) | |
| --testnet | Use the test chain |
| --litemode=<n> | Disable all Dash specific functionality (Masternodes, PrivateSend, InstantSend, Governance) (0-1, default: 0) |
| --masternode=<n> | |
| Enable the client to act as a masternode (0-1, default: 0) | |
| --mnconf=<file> | |
| Specify masternode configuration file (default: masternode.conf) | |
| --mnconflock=<n> | |
| Lock masternodes from masternode configuration file (default: 1) | |
| --masternodeprivkey=<n> | |
| Set the masternode private key | |
| --enableprivatesend=<n> | |
| Enable use of automated PrivateSend for funds stored in this wallet (0-1, default: 0) | |
| --privatesendmultisession=<n> | |
| Enable multiple PrivateSend mixing sessions per block, experimental (0-1, default: 0) | |
| --privatesendrounds=<n> | |
| Use N separate masternodes for each denominated input to mix funds (2-16, default: 2) | |
| --privatesendamount=<n> | |
| Keep N DASH anonymized (default: 1000) | |
| --liquidityprovider=<n> | |
| Provide liquidity to PrivateSend by infrequently mixing coins on a continual basis (0-100, default: 0, 1=very frequent, high fees, 100=very infrequent, low fees) | |
| --enableinstantsend=<n> | |
| Enable InstantSend, show confirmations for locked transactions (0-1, default: 1) | |
| --instantsenddepth=<n> | |
| Show N confirmations for a successfully locked transaction (0-9999, default: 5) | |
| --instantsendnotify=<cmd> | |
| Execute command when a wallet InstantSend transaction is successfully locked (%s in cmd is replaced by TxID) | |
| --bytespersigop | |
| Minimum bytes per sigop in transactions we relay and mine (default: 20) | |
| --datacarrier | Relay and mine data carrier transactions (default: 1) |
| --datacarriersize | |
| Maximum size of data in data carrier transactions we relay and mine (default: 83) | |
| --mempoolreplacement | |
| Enable transaction replacement in the memory pool (default: 0) | |
| --blockminsize=<n> | |
| Set minimum block size in bytes (default: 0) | |
| --blockmaxsize=<n> | |
| Set maximum block size in bytes (default: 750000) | |
| --blockprioritysize=<n> | |
| Set maximum size of high-priority/low-fee transactions in bytes (default: 10000) | |
| --server | Accept command line and JSON-RPC commands |
| --rest | Accept public REST requests (default: 0) |
| --rpcbind=<addr> | |
| Bind to given address to listen for JSON-RPC connections. Use [host]:port notation for IPv6. This option can be specified multiple times (default: bind to all interfaces) | |
| --rpccookiefile=<loc> | |
| Location of the auth cookie (default: data dir) | |
| --rpcuser=<user> | |
| Username for JSON-RPC connections | |
| --rpcpassword=<pw> | |
| Password for JSON-RPC connections | |
| --rpcauth=<userpw> | |
| Username and hashed password for JSON-RPC connections. The field <userpw> comes in the format: <USERNAME>:<SALT>$<HASH>. A canonical python script is included in share/rpcuser. This option can be specified multiple times | |
| --rpcport=<port> | |
| Listen for JSON-RPC connections on <port> (default: 9998 or testnet: 19998) | |
| --rpcallowip=<ip> | |
| Allow JSON-RPC connections from specified source. Valid for <ip> are a single IP (e.g. 1.2.3.4), a network/netmask (e.g. 1.2.3.4/255.255.255.0) or a network/CIDR (e.g. 1.2.3.4/24). This option can be specified multiple times | |
| --rpcthreads=<n> | |
| Set the number of threads to service RPC calls (default: 4) | |
Dash Core QT GUI, use same command line options as dashd with additional options for UI as described below.
- dash-qt [command-line options]
- Start Dash Core QT GUI
| --windowtitle=<name> | |
| Wallet window title | |
| --debug=<category> | |
| Output debugging information (default: 0, supplying <category> is optional). If <category> is not supplied or if <category> = 1, output all debugging information.<category> can be: addrman, alert, bench, coindb, db, http, libevent, lock, mempool, mempoolrej, net, proxy, prune, rand, reindex, rpc, selectcoins, tor, zmq, dash (or specifically: gobject, instantsend, keepass, masternode, mnpayments, mnsync, privatesend, spork), qt. | |
| --choosedatadir | |
| Choose data directory on startup (default: 0) | |
| --lang=<lang> | Set language, for example "de_DE" (default: system locale) |
| --min | Start minimized |
| --rootcertificates=<file> | |
| Set SSL root certificates for payment request (default: -system-) | |
| --splash | Show splash screen on startup (default: 1) |
| --resetguisettings | |
| Reset all settings changed in the GUI | |
Dash Core RPC client
- dash-cli [options] <command> [params]
- Send command to Dash Core
- dash-cli [options] help
- List commands
- dash-cli [options] help <command>
- Get help for a command
| --help | This help message |
| --conf=<file> | Specify configuration file (default: dash.conf) |
| --datadir=<dir> | |
| Specify data directory | |
| --testnet | Use the test chain |
| --regtest | Enter regression test mode, which uses a special chain in which blocks can be solved instantly. This is intended for regression testing tools and app development. |
| --rpcconnect=<ip> | |
| Send commands to node running on <ip> (default: 127.0.0.1) | |
| --rpcport=<port> | |
| Connect to JSON-RPC on <port> (default: 9998 or testnet: 19998) | |
| --rpcwait | Wait for RPC server to start |
| --rpcuser=<user> | |
| Username for JSON-RPC connections | |
| --rpcpassword=<pw> | |
| Password for JSON-RPC connections | |
| --rpcclienttimeout=<n> | |
| Timeout during HTTP requests (default: 900) | |
Dash Core dash-tx utility
- dash-tx [options] <hex-tx> [commands]
- Update hex-encoded dash transaction
- dash-tx [options] -create [commands]
- Create hex-encoded dash transaction
| --help | This help message |
| --create | Create new, empty TX. |
| --json | Select JSON output |
| --txid | Output only the hex-encoded transaction id of the resultant transaction. |
| --testnet | Use the test chain |
| --regtest | Enter regression test mode, which uses a special chain in which blocks can be solved instantly. This is intended for regression testing tools and app development. |
- delin=N
- Delete input N from TX
- delout=N
- Delete output N from TX
- in=TXID:VOUT
- Add input to TX
- locktime=N
- Set TX lock time to N
- nversion=N
- Set TX version to N
- outaddr=VALUE:ADDRESS
- Add address-based output to TX
- outdata=[VALUE:]DATA
- Add data-based output to TX
- outscript=VALUE:SCRIPT
- Add raw script output to TX
- sign=SIGHASH-FLAGS
- Add zero or more signatures to transaction. This command requires JSON registers:prevtxs=JSON object, privatekeys=JSON object. See signrawtransaction docs for format of sighash flags, JSON objects.
- load=NAME:FILENAME
- Load JSON file FILENAME into register NAME
- set=NAME:JSON-STRING
- Set register NAME to given JSON-STRING
RPC commands
This documentation lists all available RPC commands as of Dash version 0.12.2.1, and limited documentation on what each command does. For full documentation of arguments, results and examples, type help ( "command" ) to view full details at the console. You can enter commands either from Tools > Debug console in the QT wallet, or using dash-cli for headless wallets and dashd.
- getaddressbalance
- Returns the balance for an address(es) (requires addressindex to be enabled).
- getaddressdeltas
- Returns all changes for an address (requires addressindex to be enabled).
- getaddressmempool
- Returns all mempool deltas for an address (requires addressindex to be enabled).
- getaddresstxids
- Returns the txids for an address(es) (requires addressindex to be enabled).
- getaddressutxos
- Returns all unspent outputs for an address (requires addressindex to be enabled).
- getbestblockhash
- Returns the hash of the best (tip) block in the longest block chain.
- getblock "hash" ( verbose )
- If verbose is false, returns a string that is serialized, hex-encoded data for block 'hash'. If verbose is true, returns an Object with information about block <hash>.
- getblockchaininfo
- Returns an object containing various state info regarding block chain processing.
- getblockcount
- Returns the number of blocks in the longest block chain.
- getblockhash index
- Returns hash of block in best-block-chain at index provided.
- getblockhashes timestamp
- Returns array of hashes of blocks within the timestamp range provided.
- getblockheader "hash" ( verbose )
- If verbose is false, returns a string that is serialized, hex-encoded data for blockheader 'hash'. If verbose is true, returns an Object with information about blockheader <hash>.
- getblockheaders "hash" ( count verbose )
- Returns an array of items with information about <count> blockheaders starting from <hash>. If verbose is false, each item is a string that is serialized, hex-encoded data for a single blockheader. If verbose is true, each item is an Object with information about a single blockheader.
- getchaintips ( count branchlen )
- Return information about all known tips in the block tree, including the main chain as well as orphaned branches.
- getdifficulty
- Returns the proof-of-work difficulty as a multiple of the minimum difficulty.
- getmempoolinfo
- Returns details on the active state of the TX memory pool.
- getrawmempool ( verbose )
- Returns all transaction ids in memory pool as a json array of string transaction ids.
- getspentinfo
- Returns the txid and index where an output is spent.
- gettxout "txid" n ( includemempool )
- Returns details about an unspent transaction output.
- gettxoutproof ["txid",...] ( blockhash )
- Returns a hex-encoded proof that "txid" was included in a block.
- gettxoutsetinfo
- Returns statistics about the unspent transaction output set. Note this call may take some time.
- verifychain ( checklevel numblocks )
- Verifies blockchain database.
- verifytxoutproof "proof"
- Verifies that a proof points to a transaction in a block, returning the transaction it commits to nd throwing an RPC error if the block is not in our best chain.
- debug ( 0 | 1 | addrman | alert | bench | coindb | db | lock | rand | rpc | selectcoins | mempool | mempoolrej | net | proxy | prune | http | libevent | tor | zmq | dash | privatesend | instantsend | masternode | spork | keepass | mnpayments | gobject )
- Change debug category on the fly. Specify single category or use comma to specify many.
- getinfo
- Deprecated. Returns an object containing various state info.
- help ( "command" )
- List all commands, or get help for a specified command.
- stop
- Stop Dash Core server.
- getgovernanceinfo
- Returns an object containing governance parameters.
- getpoolinfo
- Returns an object containing mixing pool related information.
- getsuperblockbudget index
- Returns the absolute maximum sum of superblock payments allowed.
- gobject "command"...
Manage governance objects. Available commands:
- check
- Validate governance object data (proposal only)
- prepare
- Prepare governance object by signing and creating tx
- submit
- Submit governance object to network
- deserialize
- Deserialize governance object from hex string to JSON
- count
- Count governance objects and votes
- get
- Get governance object by hash
- getvotes
- Get all votes for a governance object hash (including old votes)
- getcurrentvotes
- Get only current (tallying) votes for a governance object hash (does not include old votes)
- list
- List governance objects (can be filtered by signal and/or object type)
- diff
- List differences since last diff
- vote-alias
- Vote on a governance object by masternode alias (using masternode.conf setup)
- vote-conf
- Vote on a governance object by masternode configured in dash.conf
- vote-many
- Vote on a governance object by all masternodes (using masternode.conf setup)
- masternode "command"...
Set of commands to execute masternode related actions. Available commands:
- count
- Print number of all known masternodes (optional: 'ps', 'enabled', 'all', 'qualify')
- current
- Print info on current masternode winner to be paid the next block (calculated locally)
- genkey
- Generate new masternodeprivkey
- outputs
- Print masternode compatible outputs
- start-alias
- Start single remote masternode by assigned alias configured in masternode.conf
- start-<mode>
- Start remote masternodes configured in masternode.conf (<mode>: 'all', 'missing', 'disabled')
- status
- Print masternode status information
- list
- Print list of all known masternodes (see masternodelist for more info)
- list-conf
- Print masternode.conf in JSON format
- winner
- Print info on next masternode winner to vote for
- winners
- Print list of masternode winners
- masternodebroadcast "command"...
Set of commands to create and relay masternode broadcast messages. Available commands:
- create-alias
- Create single remote masternode broadcast message by assigned alias configured in masternode.conf
- create-all
- Create remote masternode broadcast messages for all masternodes configured in masternode.conf
- decode
- Decode masternode broadcast message
- relay
- Relay masternode broadcast message to the network
- masternodelist ( "mode" "filter" )
- Get a list of masternodes in different modes
- mnsync [status|next|reset]
- Returns the sync status, updates to the next step or resets it entirely.
- privatesend "command"
Available commands:
- start
- Start mixing
- stop
- Stop mixing
- reset
- Reset mixing
- sentinelping version
- Sentinel ping.
- spork <name> [<value>]
- <name> is the corresponding spork name, or 'show' to show all current spork settings, active to show which sporks are active<value> is a epoch datetime to enable or disable spork. Requires wallet passphrase to be set with walletpassphrase call.
- voteraw <masternode-tx-hash> <masternode-tx-index> <governance-hash> <vote-signal> [yes|no|abstain] <time> <vote-sig>
- Compile and relay a governance vote with provided external signature instead of signing vote internally.
- generate numblocks
- Mine blocks immediately (before the RPC call returns).
- getgenerate
- Return if the server is set to generate coins or not. The default is false. It is set with the command line argument -gen (or dash.conf setting gen). It can also be set with the setgenerate call.
- setgenerate generate ( genproclimit )
- Set 'generate' true or false to turn generation on or off. Generation is limited to 'genproclimit' processors, -1 is unlimited. See the getgenerate call for the current setting.
- getblocktemplate ( "jsonrequestobject" )
- If the request parameters include a 'mode' key, that is used to explicitly select between the default 'template' request or a 'proposal'. It returns data needed to construct a block to work on.
- getmininginfo
- Returns a json object containing mining-related information.
- getnetworkhashps ( blocks height )
- Returns the estimated network hashes per second based on the last n blocks. Pass in [blocks] to override # of blocks, -1 specifies since last difficulty change. Pass in [height] to estimate the network speed at the time when a certain block was found.
- prioritisetransaction <txid> <priority delta> <fee delta>
- Accepts the transaction into mined blocks at a higher (or lower) priority.
- submitblock "hexdata" ( "jsonparametersobject" )
- Attempts to submit new block to network. The 'jsonparametersobject' parameter is currently ignored. See https://en.bitcoin.it/wiki/BIP_0022 for full specification.
- addnode "node" "add|remove|onetry"
- Attempts add or remove a node from the addnode list. Or try a connection to a node once.
- clearbanned
- Clear all banned IPs.
- disconnectnode "node"
- Immediately disconnects from the specified node.
- getaddednodeinfo dummy ( "node" )
- Returns information about the given added node, or all added nodes (note that onetry addnodes are not listed here).
- getconnectioncount
- Returns the number of connections to other nodes.
- getnettotals
- Returns information about network traffic, including bytes in, bytes out, and current time.
- getnetworkinfo
- Returns an object containing various state info regarding P2P networking.
- getpeerinfo
- Returns data about each connected network node as a json array of objects.
- listbanned
- List all banned IPs/Subnets.
- ping
- Requests that a ping be sent to all other nodes, to measure ping time. Results provided in getpeerinfo, pingtime and pingwait fields are decimal seconds. Ping command is handled in queue with all other commands, so it measures processing backlog, not just network ping.
- setban "ip(/netmask)" "add|remove" (bantime) (absolute)
- Attempts add or remove a IP/Subnet from the banned list.
- setnetworkactive true|false
- Disable/enable all p2p network activity.
- createrawtransaction [{"txid":"id","vout":n},...] {"address":amount,"data":"hex",...} ( locktime )
- Create a transaction spending the given inputs and creating new outputs. Outputs can be addresses or data. Returns hex-encoded raw transaction. Note that the transaction's inputs are not signed, and it is not stored in the wallet or transmitted to the network.
- decoderawtransaction "hexstring"
- Return a JSON object representing the serialized, hex-encoded transaction.
- decodescript "hex"
- Decode a hex-encoded script.
- fundrawtransaction "hexstring" includeWatching
- Add inputs to a transaction until it has enough in value to meet its out value. This will not modify existing inputs, and will add one change output to the outputs.
- getrawtransaction "txid" ( verbose )
- Return the raw transaction data. If verbose=0, returns a string that is serialized, hex-encoded data for 'txid'. If verbose is non-zero, returns an Object with information about 'txid'.
- sendrawtransaction "hexstring" ( allowhighfees instantsend )
- Submits raw transaction (serialized, hex-encoded) to local node and network. Also see createrawtransaction and signrawtransaction calls.
- signrawtransaction "hexstring" ( [{"txid":"id","vout":n,"scriptPubKey":"hex","redeemScript":"hex"},...] ["privatekey1",...] sighashtype )
- Sign inputs for raw transaction (serialized, hex-encoded). The second optional argument (may be null) is an array of previous transaction outputs that this transaction depends on but may not yet be in the block chain. The third optional argument (may be null) is an array of base58-encoded private keys that, if given, will be the only keys used to sign the transaction.
- createmultisig nrequired ["key",...]
- Creates a multi-signature address with n signature of m keys required. It returns a json object with the address and redeemScript.
- estimatefee nblocks
- Estimates the approximate fee per kilobyte needed for a transaction to begin confirmation within nblocks blocks.
- estimatepriority nblocks
- Estimates the approximate priority a zero-fee transaction needs to begin confirmation within nblocks blocks.
- estimatesmartfee nblocks
- WARNING: This interface is unstable and may disappear or change! Estimates the approximate fee per kilobyte needed for a transaction to begin confirmation within nblocks blocks if possible and return the number of blocks for which the estimate is valid.
- estimatesmartpriority nblocks
- WARNING: This interface is unstable and may disappear or change! Estimates the approximate priority a zero-fee transaction needs to begin confirmation within nblocks blocks if possible and return the number of blocks for which the estimate is valid.
- validateaddress "dashaddress"
- Return information about the given dash address.
- verifymessage "dashaddress" "signature" "message"
- Verify a signed message.
- abandontransaction "txid"
- Mark in-wallet transaction <txid> as abandoned. This will mark this transaction and all its in-wallet descendants as abandoned which will allow for their inputs to be respent.
- addmultisigaddress nrequired ["key",...] ( "account" )
- Add a nrequired-to-sign multisignature address to the wallet. Each key is a Dash address or hex-encoded public key. If 'account' is specified (DEPRECATED), assign address to that account.
- backupwallet "destination"
- Safely copies wallet.dat to destination, which can be a directory or a path with filename.
- dumphdinfo
- Returns an object containing sensitive private info about this HD wallet.
- dumpprivkey "dashaddress"
- Reveals the private key corresponding to 'dashaddress'. Then the importprivkey can be used with this output
- dumpwallet "filename"
- Dumps all wallet keys in a human-readable format.
- encryptwallet "passphrase"
- Encrypts the wallet with 'passphrase'. This is for first time encryption. After this, any calls that interact with private keys such as sending or signing will require the passphrase to be set prior the making these calls. Use the walletpassphrase call for this, and then walletlock call. If the wallet is already encrypted, use the walletpassphrasechange call. Note that this will shutdown the server.
- getaccount "dashaddress"
- DEPRECATED. Returns the account associated with the given address.
- getaccountaddress "account"
- DEPRECATED. Returns the current Dash address for receiving payments to this account.
- getaddressesbyaccount "account"
- DEPRECATED. Returns the list of addresses for the given account.
- getbalance ( "account" minconf addlockconf includeWatchonly )
- If account is not specified, returns the server's total available balance. If account is specified (DEPRECATED), returns the balance in the account. Note that the account "" is not the same as leaving the parameter out. The server total may be different to the balance in the default "" account.
- getnewaddress ( "account" )
- Returns a new Dash address for receiving payments. If 'account' is specified (DEPRECATED), it is added to the address book so payments received with the address will be credited to 'account'.
- getrawchangeaddress
- Returns a new Dash address, for receiving change. This is for use with raw transactions, NOT normal use.
- getreceivedbyaccount "account" ( minconf addlockconf )
- DEPRECATED. Returns the total amount received by addresses with <account> in transactions with specified minimum number of confirmations.
- getreceivedbyaddress "dashaddress" ( minconf addlockconf )
- Returns the total amount received by the given dashaddress in transactions with specified minimum number of confirmations.
- gettransaction "txid" ( includeWatchonly )
- Get detailed information about in-wallet transaction <txid>
- getunconfirmedbalance
- Returns the server's total unconfirmed balance.
- getwalletinfo
- Returns an object containing various wallet state info.
- importaddress "address" ( "label" rescan p2sh )
- Adds a script (in hex) or address that can be watched as if it were in your wallet but cannot be used to spend.
- importelectrumwallet "filename" index
- Imports keys from an Electrum wallet export file (.csv or .json)
- importprivkey "dashprivkey" ( "label" rescan )
- Adds a private key (as returned by dumpprivkey) to your wallet.
- importpubkey "pubkey" ( "label" rescan )
- Adds a public key (in hex) that can be watched as if it were in your wallet but cannot be used to spend.
- importwallet "filename"
- Imports keys from a wallet dump file (see dumpwallet).
- instantsendtoaddress "dashaddress" amount ( "comment" "comment-to" subtractfeefromamount )
- Send an amount to a given address. The amount is a real and is rounded to the nearest 0.00000001
- keepass <genkey|init|setpassphrase>
- Keepass settings.
- keypoolrefill ( newsize )
- Fills the keypool.
- listaccounts ( minconf addlockconf includeWatchonly)
- DEPRECATED. Returns Object that has account names as keys, account balances as values.
- listaddressgroupings
- Lists groups of addresses which have had their common ownership made public by common use as inputs or as the resulting change in past transactions.
- listlockunspent
- Returns list of temporarily unspendable outputs. See the lockunspent call to lock and unlock transactions for spending.
- listreceivedbyaccount ( minconf addlockconf includeempty includeWatchonly)
- DEPRECATED. List balances by account.
- listreceivedbyaddress ( minconf addlockconf includeempty includeWatchonly)
- List balances by receiving address.
- listsinceblock ( "blockhash" target-confirmations includeWatchonly)
- Get all transactions in blocks since block [blockhash], or all transactions if omitted
- listtransactions ( "account" count from includeWatchonly)
- Returns up to 'count' most recent transactions skipping the first 'from' transactions for account 'account'.
- listunspent ( minconf maxconf ["address",...] )
- Returns array of unspent transaction outputs with between minconf and maxconf (inclusive) confirmations. Optionally filter to only include txouts paid to specified addresses.
- lockunspent unlock [{"txid":"txid","vout":n},...]
- Updates list of temporarily unspendable outputs. Temporarily lock (unlock=false) or unlock (unlock=true) specified transaction outputs.
- move "fromaccount" "toaccount" amount ( minconf "comment" )
- DEPRECATED. Move a specified amount from one account in your wallet to another.
- sendfrom "fromaccount" "todashaddress" amount ( minconf addlockconf "comment" "comment-to" )
- DEPRECATED (use sendtoaddress). Sent an amount from an account to a dash address.
- sendmany "fromaccount" {"address":amount,...} ( minconf addlockconf "comment" ["address",...] subtractfeefromamount use_is use_ps )
- Send multiple times. Amounts are double-precision floating point numbers.
- sendtoaddress "dashaddress" amount ( "comment" "comment-to" subtractfeefromamount use_is use_ps )
- Send an amount to a given address.
- setaccount "dashaddress" "account"
- DEPRECATED. Sets the account associated with the given address.
- settxfee amount
- Set the transaction fee per kB. Overwrites the paytxfee parameter.
- signmessage "dashaddress" "message"
- Sign a message with the private key of an address.
- walletlock
- Removes the wallet encryption key from memory, locking the wallet. After calling this method, you will need to call walletpassphrase again before being able to call any methods which require the wallet to be unlocked.
- walletpassphrase "passphrase" timeout ( mixingonly )
- Stores the wallet decryption key in memory for 'timeout' seconds. This is needed prior to performing transactions related to private keys such as sending dashs
- walletpassphrasechange "oldpassphrase" "newpassphrase"
- Changes the wallet passphrase from 'oldpassphrase' to 'newpassphrase'.
Advanced topics
Coin Control
Coin Control allows users of the Dash Core Wallet to specify which addresses and Unspent Transaction Outputs (UTXOs) should be used as inputs in transactions. This allows you to keep a specific balance on certain addresses in your wallet, while spending others freely. In Dash Core Wallet, click Settings > Options > Wallet > Enable coin control features. Now, when you go to the Send tab in your wallet, a new button labelled Inputs… will appear. Click this button to select which UTXOs can be used as input for any transactions you create. The following window appears:

Coin Selection window in Dash Core wallet, showing two masternodes (testnet)
Right click on the transaction(s) you do not want to spend, then select Lock unspent. A small lock will appear next to the transaction. You can click the Toggle lock state button to invert the locked/unlocked state of all UTXOs. When you are ready to continue, click OK. You can now safely create transactions with your remaining funds without affecting the locked UTXOs.


Locking UTXOs in Dash Core wallet
HD Wallets
Since version 0.12.2.0, Dash Core has included an implementation of
BIP39/BIP44 compatible hierarchical deterministic (HD) key generation.
This functionality is only available from the command line by specifying
the usehd option when starting Dash Core for the first time. Use
this function with care, since the mnemonic seed and keys will be stored
in plain text until you specify a wallet passphrase. Note that the
wallet passphrase is different to the mnemonic passphrase, which is
often also referred to as the "25th word" or "extension word". The
wallet passphrase encrypts the wallet file itself, while the mnemonic
passphrase is used to specify different derivation branches from the
same mnemonic seed.
We will use the Windows GUI wallet in this example, but the commands are
similar if using dash-qt or dashd on other operating systems.
Enter the following command to get started with a randomly generated HD
wallet seed and no mnemonic passphrase:
dash-qt.exe --usehd=1
A new HD wallet will be generated and Dash Core will display a warning
informing you that you must encrypt your wallet after verifying it works
correctly. Open the console from Tools -> Debug console or issue the
following RPC command from dash-cli to view the mnemonic seed:
dumphdinfo
Dash Core will display the HD seed in both hexadecimal and as a BIP39
mnemonic. To restore an existing HD wallet, or define your own
separately generated mnemonic and/or passphrase, ensure no
wallet.dat file exists in the datadir and enter the following
command:
dash-qt.exe --usehd=1 --mnemonic="enter mnemonic" --mnemonicpassphrase="optional mnemonic passphrase"
The HD wallet will be restored and your balance will appear once sync is complete.
Multisignature
This section presents a worked example to demonstrate multisig functionality in Dash Core. While the transactions are no longer visible on the current testnet blockchain and some address formats or RPC responses may differ slightly from the version shown here, the principle and commands are the same. The example demonstrates how to set up a 2-of-3 multisig address and create a transaction. The example parties involved are a buyer, a seller and an arbiter. This example is based on:
- https://people.xiph.org/~greg/escrowexample.txt
- https://gist.github.com/gavinandresen/3966071
- https://bitcoin.org/en/developer-examples#p2sh-multisig
Seller:
seller@testnet03:~$ ./dash-cli getnewaddress
n18cPEtj4ZfToPZxRszUz2XPts4eGsxiPk
seller@testnet03:~$ ./dash-cli validateaddress n18cPEtj4ZfToPZxRszUz2XPts4eGsxiPk
{
"isvalid" : true,
"address" : "n18cPEtj4ZfToPZxRszUz2XPts4eGsxiPk",
"ismine" : true,
"isscript" : false,
"pubkey" : "02a862b412ff9e3afd01a2873a02622897f6df92e3fc85597788b898309fec882e",
"iscompressed" : true,
"account" : ""
}
seller@testnet03:~$ ./dash-cli dumpprivkey n18cPEtj4ZfToPZxRszUz2XPts4eGsxiPk
cVQVgBr8sW4FTPYz16BSCo1PcAfDhpJArgMPdLxKZQWcVFwMXRXx
Buyer:
buyer@testnet03:~$ ./dash-cli getnewaddress
mp5orHuaFaHCXFSCeYvUPL7H16JU8fKG6u
buyer@testnet03:~$ ./dash-cli validateaddress mp5orHuaFaHCXFSCeYvUPL7H16JU8fKG6u
{
"isvalid" : true,
"address" : "mp5orHuaFaHCXFSCeYvUPL7H16JU8fKG6u",
"ismine" : true,
"isscript" : false,
"pubkey" : "0315617694c9d93f0ce92769e050a6868ffc74d229077379c0af8bfb193c3d351c",
"iscompressed" : true,
"account" : ""
}
buyer@testnet03:~$ ./dash-cli dumpprivkey mp5orHuaFaHCXFSCeYvUPL7H16JU8fKG6u
cP9DFmEDb11waWbQ8eG1YUoZCGe59BBxJF3kk95PTMXuG9HzcxnU
Arbiter:
arbiter@testnet03:~$ ./dash-cli getnewaddress
n1cZSyQXhach5rrj2tm5wg6JC7uZ3qPNiN
arbiter@testnet03:~$ ./dash-cli validateaddress n1cZSyQXhach5rrj2tm5wg6JC7uZ3qPNiN
{
"isvalid" : true,
"address" : "n1cZSyQXhach5rrj2tm5wg6JC7uZ3qPNiN",
"ismine" : true,
"isscript" : false,
"pubkey" : "0287ce6cf69b85593ce7db801874c9a2fb1b653dbe5dd9ebfa73e98b710af9e9ce",
"iscompressed" : true,
"account" : ""
}
arbiter@testnet03:~$ ./dash-cli dumpprivkey n1cZSyQXhach5rrj2tm5wg6JC7uZ3qPNiN
cUbDFL81a2w6urAGZf7ecGbdzM82pdHLeCaPXdDp71s96SzDV49M
This results in three keypairs (public/private):
seller: 02a862b412ff9e3afd01a2873a02622897f6df92e3fc85597788b898309fec882e / cVQVgBr8sW4FTPYz16BSCo1PcAfDhpJArgMPdLxKZQWcVFwMXRXx
buyer: 0315617694c9d93f0ce92769e050a6868ffc74d229077379c0af8bfb193c3d351c / cP9DFmEDb11waWbQ8eG1YUoZCGe59BBxJF3kk95PTMXuG9HzcxnU
arbiter: 0287ce6cf69b85593ce7db801874c9a2fb1b653dbe5dd9ebfa73e98b710af9e9ce / cUbDFL81a2w6urAGZf7ecGbdzM82pdHLeCaPXdDp71s96SzDV49M
The createmultisig command takes as variables the number n
signatures of m keys (supplied as json array) required. In this example,
2 of 3 keys are required to sign the transaction.
Note: The address can be created by anyone, as long as the public keys and their sequence are known (resulting address and redeemScript are identical, see below).
Seller:
seller@testnet03:~$ ./dash-cli createmultisig 2 '["02a862b412ff9e3afd01a2873a02622897f6df92e3fc85597788b898309fec882e","0315617694c9d93f0ce92769e050a6868ffc74d229077379c0af8bfb193c3d351c","0287ce6cf69b85593ce7db801874c9a2fb1b653dbe5dd9ebfa73e98b710af9e9ce"]'
{
"address" : "2MuEQCZh7VB8pNrT4bj1CFZQh2oK7XZYLQf",
"redeemScript" : "522102a862b412ff9e3afd01a2873a02622897f6df92e3fc85597788b898309fec882e210315617694c9d93f0ce92769e050a6868ffc74d229077379c0af8bfb193c3d351c210287ce6cf69b85593ce7db801874c9a2fb1b653dbe5dd9ebfa73e98b710af9e9ce53ae"
}
Buyer:
buyer@testnet03:~$ ./dash-cli createmultisig 2 '["02a862b412ff9e3afd01a2873a02622897f6df92e3fc85597788b898309fec882e","0315617694c9d93f0ce92769e050a6868ffc74d229077379c0af8bfb193c3d351c","0287ce6cf69b85593ce7db801874c9a2fb1b653dbe5dd9ebfa73e98b710af9e9ce"]'
{
"address" : "2MuEQCZh7VB8pNrT4bj1CFZQh2oK7XZYLQf",
"redeemScript" : "522102a862b412ff9e3afd01a2873a02622897f6df92e3fc85597788b898309fec882e210315617694c9d93f0ce92769e050a6868ffc74d229077379c0af8bfb193c3d351c210287ce6cf69b85593ce7db801874c9a2fb1b653dbe5dd9ebfa73e98b710af9e9ce53ae"
}
Arbiter:
arbiter@testnet03:~$ ./dash-cli createmultisig 2 '["02a862b412ff9e3afd01a2873a02622897f6df92e3fc85597788b898309fec882e","0315617694c9d93f0ce92769e050a6868ffc74d229077379c0af8bfb193c3d351c","0287ce6cf69b85593ce7db801874c9a2fb1b653dbe5dd9ebfa73e98b710af9e9ce"]'
{
"address" : "2MuEQCZh7VB8pNrT4bj1CFZQh2oK7XZYLQf",
"redeemScript" : "522102a862b412ff9e3afd01a2873a02622897f6df92e3fc85597788b898309fec882e210315617694c9d93f0ce92769e050a6868ffc74d229077379c0af8bfb193c3d351c210287ce6cf69b85593ce7db801874c9a2fb1b653dbe5dd9ebfa73e98b710af9e9ce53ae"
}
This works the same as a usual transaction.
Buyer:
buyer@testnet03:~$ ./dash-cli sendtoaddress 2MuEQCZh7VB8pNrT4bj1CFZQh2oK7XZYLQf 777.77
a8b3bf5bcace91a8dbbddbf9b7eb027efb9bd001792f043ecf7b558aaa3cb951
The seller/arbiter can trace the transaction by its txid in the block explorer. Or from the console as follows.
Buyer:
seller@testnet03:~$ ./dash-cli getrawtransaction a8b3bf5bcace91a8dbbddbf9b7eb027efb9bd001792f043ecf7b558aaa3cb951 1
{
"hex" : "010000001a2e514dd90f666e3de4cddd22682ae1ca7225988656369d98228c742482fee16b010000006b48304502200ea8dddd404aac644fd382d3089480f2c9a6ce753a3c4fc0b12ac81afe8ffa3b022100d88f698a0d9fefbbf76240790530fe7e23bf6b354a1feedb4effa99813405b00012103954bfa8b6b1b0f1f5624ea2925b18cd1477fde2087eada1a51323a6617172689ffffffff3181c52614be8742c36665b6a287a2d6c7970494b0a341ff9595c1c9a8f23aa2010000006b483045022041ee176da4df13adc782c9ff2afdb24c4e1b61b450895486388431bf1a88b81f02210082be1b3bd20d3f121c971fb745cba52523f6b8093ec93df5987c9beb302c19ac012103954bfa8b6b1b0f1f5624ea2925b18cd1477fde2087eada1a51323a6617172689ffffffff332356f7d5e4264302ca4cc0f38d2a75a9b4c1df4bc4f94044f8a8fab81b7e1b010000006b483045022100dc322074961ae5e2e8cb11828301b1e083eff9ed6078aa064c52ed70d52737410220776b99c8552bbc2e644c7450ef8502d3497c3de7196b176f1c49cca18d1ff09f012103954bfa8b6b1b0f1f5624ea2925b18cd1477fde2087eada1a51323a6617172689ffffffff388b56a8a74338ce10e931dc198ed25fa4cb7213e0ea9905d32a3e902366661f010000006b48304502206d2cdfe9af498e9e46f88d0bd881746bf2dae182664d03f7a635ff599bdee84b022100bf3a7b88ed80b30d8915a2ae34d546defbc9a660ebf941afb4aa29461e0b4c95012103954bfa8b6b1b0f1f5624ea2925b18cd1477fde2087eada1a51323a6617172689ffffffff44578d7579bef2a204359f8c878993480b306193d954ee735c53f8b3e076c3ea010000006c4930460221008a67da5764934392437fa9e05483e4b29204fd5d78dea01f744d4a23c403881b022100c77e58307f58953b578de568138659b4efd2fadaec51917c2270fab0bd4a57a6012103954bfa8b6b1b0f1f5624ea2925b18cd1477fde2087eada1a51323a6617172689ffffffff4a3b7b666ce8f249ef4f253b7f718fb5cc2f21f899608d319bcc04c75ec47353010000006b48304502203ca5a0559647ee0d1790714296396ca0bca27a3ef3e68f76706c63da9cd3684f0221008c9529f7a54d89440f8dca89c1c47725821012670d05a70681b57f182b069a74012103954bfa8b6b1b0f1f5624ea2925b18cd1477fde2087eada1a51323a6617172689ffffffff4ab5d98908e4424929bfdba3d6402e6b45db60a622b4df8c73da1b37bdb949a4010000006b48304502210094da4e007ba94cdb47a8c4805dab4b93dc475a44340a9b6f6d7956d49749e3d3022077b94861995ffe3f59429bf5b873914d3c1157f23f018697650bc3bd2dc2de1f012103954bfa8b6b1b0f1f5624ea2925b18cd1477fde2087eada1a51323a6617172689ffffffff4cd58c1ad5b0ffd8556deff402854d94a79222799916be8e0f88d0cca3c38c85010000006b483045022030e72eec0386c83489efff8f3c71aed8eec0265565cddeb1492aab6644cc63220221008d6df06656dae12dae573b860d65045f088e4df5e2127902231d8edd4196ef1d012103954bfa8b6b1b0f1f5624ea2925b18cd1477fde2087eada1a51323a6617172689ffffffff501ff2345fc47b9b7749afcc32e790fdbe5d22fd96b2c5d0522d4cad0cd5566f010000006a47304402204e9bc23796974fdf323c49399ca7db76e2238630add4c617631549f4595af4a80220658038b14884c1a0d730de79c7e2769d4d28135ed7896e7aff01ca94c8edf7bb012103954bfa8b6b1b0f1f5624ea2925b18cd1477fde2087eada1a51323a6617172689ffffffff5020fe72d4c1038213cc3e1b99f5b313c4b2d57f1e0d9abba90860dc5c38630a010000006a473044022071b7cca6a7d72fef4b46ad425c23c37f28c72501e5e61821f00e022c4c8ef49502200d8ba406fe336d64a8ae909cad20d0ffe302cd977900013ea72b37c488550625012103954bfa8b6b1b0f1f5624ea2925b18cd1477fde2087eada1a51323a6617172689ffffffff59f32023d4225cc193182e81444f00f6d95652a9458daa08f4324ab4bdac7bed010000006b4830450221009e0f701840c01c2c37e2baec0ea2c43d517126107ef874c3d68f32dfa2e4f05f02206d1306dee274267598d5ab8d7c4c26346d25d8118b30a6921b9b238307916d6e012103954bfa8b6b1b0f1f5624ea2925b18cd1477fde2087eada1a51323a6617172689ffffffff05b5b8ecaf7bcbd5fdfc64fd7dbd6ebfee18dcaf57e00b6711ba0abe4329eb23010000006a47304402200515822e6d9641c72f1af7968ba63d47463caffeca03733750b0866ef123fe00022071fd40bac12aa1d36244fc5391162b70ec306a5ed2dffef3a3d4995524317a10012103954bfa8b6b1b0f1f5624ea2925b18cd1477fde2087eada1a51323a6617172689ffffffff09cc372e4409bcbacd85adb17918ca5b20427dc280b44bd4f234fb698ac07fc6010000006b483045022051e5c430110e8b0d85693c421031f14abf89bee1a14702e6655a1eaa2663927c0221009a54781fddd4093032507f12fe8a97ce926a743851a1a56c2ca70026ce98b7e6012103954bfa8b6b1b0f1f5624ea2925b18cd1477fde2087eada1a51323a6617172689ffffffff0963f2cc80666835ae8c5939ac3011d2962ae88e872cdc13257cfb0188f83c7a010000006b483045022032fd819b1cdb8f506e27f26b3e46330c498b965386c3e96c34dceeff2a517cf7022100a4c34d77ed25116dc05ca7d783bd6cb91c1e38db0541878dac72f2d63d4b7c11012103954bfa8b6b1b0f1f5624ea2925b18cd1477fde2087eada1a51323a6617172689ffffffff14cff38ccbdd840ffc491614e9b5167edb6ad6b9eeaf8e3dc30feaeefa39d820010000006c493046022100f4d6dfce7778acee6bdcf9f2ec39dbf902b6ca977b8622c886eadddefa01bf5502210089b3c2d23b5fc5b03d2d6ea4bf28f04b98342b02dd7d2020a6466bddd85c3d50012103954bfa8b6b1b0f1f5624ea2925b18cd1477fde2087eada1a51323a6617172689ffffffff63750bbce93657a59fe3472fce714eafa09791fcf7f687f30a923162f2ba5196010000006c493046022100bbbf84829fcc2ec70bc6d77cfc69f512c1a14359958eee46243001908dc2a0ab0221008f1fbda61fcfccb78fe6d4e6385e8f508035676ef82654425bb704727f1e59b4012103954bfa8b6b1b0f1f5624ea2925b18cd1477fde2087eada1a51323a6617172689ffffffff6466da482404f4a719f7eb16798d05878af2c36ad7174e2b68964693f39e954b010000006a47304402204d57344da5a1a29ea800215d19ada89787b1026f7e47c2f2f1ea0ef82bec5b6d02203039bd98546843a99d9e6749819875a4d996a682c57a192d9e5cef9b694a028b012103954bfa8b6b1b0f1f5624ea2925b18cd1477fde2087eada1a51323a6617172689ffffffff8b0b4a84522fded19446eef3fdd94cc0f7449c71b6e0080837d5f240c78ce03b010000006c493046022100c152177ec49bb572d70976b53c10d0c4be55584975d657c43e87fbaac8c081ec0221009dd150697257cf769c3e90afbde88fbbe5f95c17c561883546537644ed628f6f012103954bfa8b6b1b0f1f5624ea2925b18cd1477fde2087eada1a51323a6617172689ffffffff8d7078622b75fc2c3ea1094d07099b0e460a7f7a4c53cf225d066f919f17daf6010000006b483045022100e440d404867748cfba792119faae12d286b265a185cec86215fe2737ec1e7ca402207770447154f81564f7022b375943c2b7eaf3d05a3281c6f5c70328b098423d7d012103954bfa8b6b1b0f1f5624ea2925b18cd1477fde2087eada1a51323a6617172689ffffffff98c23cc59412943bfedba3b4a48bb2f97f58c119946e5c492031c43a36dd576e010000006c493046022100910cf6fb057269e5e02fa44fc2ba03925d9e0e3232d3d5a66aac440db9627f9f022100b656d982dec47000de616f21a331b1fb5e19d1ab312c5845f5f1538dac4dd301012103954bfa8b6b1b0f1f5624ea2925b18cd1477fde2087eada1a51323a6617172689ffffffff9d4851f00e3c2fa22816adc55703fcb539ae0fe218f369f23af079964a6225fc020000006c4930460221009918ee137e4aead4760c79dbe940556ae1ecb7935a653543b486f4198f16cc6a022100f82e04cd970f2c5fd8dd48813e38f87c10ed8fa7b45eec1854562948f9d43a1b012103954bfa8b6b1b0f1f5624ea2925b18cd1477fde2087eada1a51323a6617172689ffffffffa13c3221f0e08289657208bccf7b466ea5795c591751065a20b16f00892bd598010000006b483045022073d9fed13def14a655fd423f5c4fa63e46eeea76668cdf8bb89d96630890760d022100f70edce3513c9cbc671f92dc0b4d97c5edc0d9d26f4e726bb2d66776a3b9e411012103954bfa8b6b1b0f1f5624ea2925b18cd1477fde2087eada1a51323a6617172689ffffffffcac4f229bd19c47cd15ee9355af8383531a960ba0e0f3e8e4fa0a607ab2000d9010000006b483045022100967624e60a7670e849eb7500cf185620fd65de10d1e5f7cef9131d3c6403cb5f022005182af16fba1b7dbdd27a8935205b439c6034d566c6f14950aba6bb328cbf79012103954bfa8b6b1b0f1f5624ea2925b18cd1477fde2087eada1a51323a6617172689ffffffffcbf8cb94ee2bcda1c9ceb54feaf6815441f722b70c4f7569525cc9dee7cbbdc2010000006b4830450221008cfcfdc62f0a398e2419ebd56cf067e2abadf8116936250939b9fa763dd428680220052c6d316189d5f7164d2423aae99e97d05165f3e5c7d138e2858f0adab4ebba012103954bfa8b6b1b0f1f5624ea2925b18cd1477fde2087eada1a51323a6617172689ffffffffdbad6da5900987f77e5bcf714c935889fbea2d3ff388586a331fe42e0a82efe0010000006c493046022100e80d73130bcd25faa73764f4ff6c05e1b401f3960b7ef30b4244daaf5fce953a022100b99a55caaaa312df54c7d743791052c3e8392725becf91d2aa886d2e8259af10012103954bfa8b6b1b0f1f5624ea2925b18cd1477fde2087eada1a51323a6617172689fffffffffdc2d56fd131ae16837fc86e3015c9e78077dd36b6a2591cf1d500c584bbcc6a010000006b483045022100d13e5a55a4a71e039603bd2d3d76a757c63b1d199bcf340e3f2eeb5bed10897c022046a43ecc6cd8295981bde38c34c29708e402db59fc93e657196fc3032858d967012103954bfa8b6b1b0f1f5624ea2925b18cd1477fde2087eada1a51323a6617172689ffffffff0240d6de1b1200000017a91415c85c2472f5941b60a49462a2cfd0d17ab49d1c87c02fdf67000000001976a914b8d899f7193a7b3278be037b006c8f08998ebef388ac00000000",
"txid" : "a8b3bf5bcace91a8dbbddbf9b7eb027efb9bd001792f043ecf7b558aaa3cb951",
"version" : 1,
"locktime" : 0,
[...]
"vout" : [
{
"value" : 777.77000000,
"n" : 0,
"scriptPubKey" : {
"asm" : "OP_HASH160 15c85c2472f5941b60a49462a2cfd0d17ab49d1c OP_EQUAL",
"hex" : "a91415c85c2472f5941b60a49462a2cfd0d17ab49d1c87",
"reqSigs" : 1,
"type" : "scripthash",
"addresses" : [
"2MuEQCZh7VB8pNrT4bj1CFZQh2oK7XZYLQf"
]
}
},
[...]
],
"blockhash" : "000000034def806f348cadf6a80660aed1cfc30ccbd1492a8ea87062800ea94d",
"confirmations" : 3,
"time" : 1409224896,
"blocktime" : 1409224896
}
Now we assume the deal is complete, the buyer got the goods and everyone is happy. Now the seller wants to get his Dash. As a 2-of-3 multisig was used, the transaction must be signed by 2 parties (seller + buyer or arbiter). The seller creates a transaction (we will reuse his public address from above).
Seller:
seller@testnet03:~$ ./dash-cli createrawtransaction '[{"txid":"a8b3bf5bcace91a8dbbddbf9b7eb027efb9bd001792f043ecf7b558aaa3cb951","vout":0}]' '{"n18cPEtj4ZfToPZxRszUz2XPts4eGsxiPk":777.77}'
010000000151b93caa8a557bcf3e042f7901d09bfb7e02ebb7f9dbbddba891ceca5bbfb3a80000000000ffffffff0140d6de1b120000001976a914d728be76cd74b5d148eba2a49246b80dac12f73e88ac00000000
And partially signs it, using the redeemScript, scriptPubKey and his private key
Seller:
seller@testnet03:~$ ./dash-cli signrawtransaction '010000000151b93caa8a557bcf3e042f7901d09bfb7e02ebb7f9dbbddba891ceca5bbfb3a80000000000ffffffff0140d6de1b120000001976a914d728be76cd74b5d148eba2a49246b80dac12f73e88ac00000000' '[{"txid":"a8b3bf5bcace91a8dbbddbf9b7eb027efb9bd001792f043ecf7b558aaa3cb951","vout":0,"scriptPubKey":"a91415c85c2472f5941b60a49462a2cfd0d17ab49d1c87","redeemScript":"522102a862b412ff9e3afd01a2873a02622897f6df92e3fc85597788b898309fec882e210315617694c9d93f0ce92769e050a6868ffc74d229077379c0af8bfb193c3d351c210287ce6cf69b85593ce7db801874c9a2fb1b653dbe5dd9ebfa73e98b710af9e9ce53ae"}]' '["cVQVgBr8sW4FTPYz16BSCo1PcAfDhpJArgMPdLxKZQWcVFwMXRXx"]'
{
"hex" : "010000000151b93caa8a557bcf3e042f7901d09bfb7e02ebb7f9dbbddba891ceca5bbfb3a800000000b500483045022051a7f0e95a5066859ce37fe64a6e7ab6e30bfe9a68d9d3f1453064052eab5625022100c0067a33d2ee02478d89fc1a71f3a93c883db022e970886181c50ca9afc3dfa4014c69522102a862b412ff9e3afd01a2873a02622897f6df92e3fc85597788b898309fec882e210315617694c9d93f0ce92769e050a6868ffc74d229077379c0af8bfb193c3d351c210287ce6cf69b85593ce7db801874c9a2fb1b653dbe5dd9ebfa73e98b710af9e9ce53aeffffffff0140d6de1b120000001976a914d728be76cd74b5d148eba2a49246b80dac12f73e88ac00000000",
"complete" : false
}
Note that the output hex is getting longer, but complete flag is "false" as the transaction needs another signature. So now either the buyer or the arbiter can complete the signature of the transaction, using the output from above and their private key. Let's assume the buyer is completing the signature.
Buyer:
buyer@testnet03:~$ ./dash-cli signrawtransaction '010000000151b93caa8a557bcf3e042f7901d09bfb7e02ebb7f9dbbddba891ceca5bbfb3a800000000b500483045022051a7f0e95a5066859ce37fe64a6e7ab6e30bfe9a68d9d3f1453064052eab5625022100c0067a33d2ee02478d89fc1a71f3a93c883db022e970886181c50ca9afc3dfa4014c69522102a862b412ff9e3afd01a2873a02622897f6df92e3fc85597788b898309fec882e210315617694c9d93f0ce92769e050a6868ffc74d229077379c0af8bfb193c3d351c210287ce6cf69b85593ce7db801874c9a2fb1b653dbe5dd9ebfa73e98b710af9e9ce53aeffffffff0140d6de1b120000001976a914d728be76cd74b5d148eba2a49246b80dac12f73e88ac00000000' '[{"txid":"a8b3bf5bcace91a8dbbddbf9b7eb027efb9bd001792f043ecf7b558aaa3cb951","vout":0,"scriptPubKey":"a91415c85c2472f5941b60a49462a2cfd0d17ab49d1c87","redeemScript":"522102a862b412ff9e3afd01a2873a02622897f6df92e3fc85597788b898309fec882e210315617694c9d93f0ce92769e050a6868ffc74d229077379c0af8bfb193c3d351c210287ce6cf69b85593ce7db801874c9a2fb1b653dbe5dd9ebfa73e98b710af9e9ce53ae"}]' '["cP9DFmEDb11waWbQ8eG1YUoZCGe59BBxJF3kk95PTMXuG9HzcxnU"]'
{
"hex" : "010000000151b93caa8a557bcf3e042f7901d09bfb7e02ebb7f9dbbddba891ceca5bbfb3a800000000fdff0000483045022051a7f0e95a5066859ce37fe64a6e7ab6e30bfe9a68d9d3f1453064052eab5625022100c0067a33d2ee02478d89fc1a71f3a93c883db022e970886181c50ca9afc3dfa401493046022100dc3f61fdb7b8ea7ec729682d355646c922f5512054c4985534e6b91040c5bd660221008b48c117ec95814f573d33bca981cb703fdd9fa6e52aa8fe67423e06cad87215014c69522102a862b412ff9e3afd01a2873a02622897f6df92e3fc85597788b898309fec882e210315617694c9d93f0ce92769e050a6868ffc74d229077379c0af8bfb193c3d351c210287ce6cf69b85593ce7db801874c9a2fb1b653dbe5dd9ebfa73e98b710af9e9ce53aeffffffff0140d6de1b120000001976a914d728be76cd74b5d148eba2a49246b80dac12f73e88ac00000000",
"complete" : true
}
The signature is complete now, and either of the parties can transmit the transaction to the network.
Buyer:
buyer@testnet03:~$ ./dash-cli sendrawtransaction 010000000151b93caa8a557bcf3e042f7901d09bfb7e02ebb7f9dbbddba891ceca5bbfb3a800000000fdff0000483045022051a7f0e95a5066859ce37fe64a6e7ab6e30bfe9a68d9d3f1453064052eab5625022100c0067a33d2ee02478d89fc1a71f3a93c883db022e970886181c50ca9afc3dfa401493046022100dc3f61fdb7b8ea7ec729682d355646c922f5512054c4985534e6b91040c5bd660221008b48c117ec95814f573d33bca981cb703fdd9fa6e52aa8fe67423e06cad87215014c69522102a862b412ff9e3afd01a2873a02622897f6df92e3fc85597788b898309fec882e210315617694c9d93f0ce92769e050a6868ffc74d229077379c0af8bfb193c3d351c210287ce6cf69b85593ce7db801874c9a2fb1b653dbe5dd9ebfa73e98b710af9e9ce53aeffffffff0140d6de1b120000001976a914d728be76cd74b5d148eba2a49246b80dac12f73e88ac00000000
cf1a75672006a05b38d94acabb783f81976c9e83a8de4da9cbec0de711cf2d71
Again, this transaction can be traced in a block explorer. And the seller is happy to receive his coins at his public address as follows.
Seller:
seller@testnet03:~$ dash-cli listtransactions "" 1
[
{
"account" : "",
"address" : "n18cPEtj4ZfToPZxRszUz2XPts4eGsxiPk",
"category" : "receive",
"amount" : 777.77000000,
"confirmations" : 17,
"blockhash" : "000000067a13e9bd5c1d5ff48cb4b9f8414a6adcc470656262731bfd013510dd",
"blockindex" : 9,
"blocktime" : 1409228449,
"txid" : "cf1a75672006a05b38d94acabb783f81976c9e83a8de4da9cbec0de711cf2d71",
"time" : 1409227887,
"timereceived" : 1409227887
}
]
Multiple wallets
It is possible to select between different Dash wallets when starting
Dash Core by specifying the wallet argument, or even run multiple
instances of Dash Core simultaneously by specifying separate data
directories using the datadir argument.
To begin, install the Dash Core wallet for your system according to the
installation instructions. When you get
to the step Running Dash Core for the first time, you can decide
whether you want to maintain separate wallet.dat files in the
default location (simpler if you do not need to run the wallets
simultaneously), or specify entirely separate data directories such as
e.g. C:\Dash1 (simpler if you do want to run the wallets
simultaneously).
For this scenario, we will create two shortcuts on the desktop, each
using a different wallet file. Navigate to the binary file used to start
Dash Core (typically locatd at C:\Program Files\DashCore\dash-qt.exe
or similar) and create two shortcuts on the desktop. Then open the
Properties window for each of these shortcuts.

Creating desktop shortcuts using Windows 10
Modify the Target property of each shortcut to point to a different
wallet file by specifying the wallet argument when starting the
wallet. If you do not specify a wallet argument, wallet.dat will
be used by default. The specified wallet file will be created if it does
not exist. The following example demonstrates two wallets named
workwallet.dat and homewallet.dat:
- Wallet Target 1:
"C:\Program Files\DashCore\dash-qt.exe" -wallet=workwallet.dat - Wallet Target 2:
"C:\Program Files\DashCore\dash-qt.exe" -wallet=homewallet.dat

Specifying separate wallet files
You can now use the two icons to quickly and easily open different wallets from your desktop. Note that you cannot open both wallets simultaneously. To do this, you will need two separate data directories, as described below.
Start Dash Core and allow it to synchronize with the network, then close
Dash Core again. You can now create two directories at e.g. C:\Dash1
and C:\Dash2 and copy the blocks and chainstate directories
from the synchronized data directory into the new directories. Each of
these will serve as a separate data directory, allowing you to run two
instances of Dash Core simultaneously. Create two (or more) shortcuts on
your desktop as described above, then specify arguments for datadir
as shown below:
- Datadir Target 1:
"C:\Program Files\DashCore\dash-qt.exe" -datadir=C:\Dash1 -listen=0 - Datadir Target 2:
"C:\Program Files\DashCore\dash-qt.exe" -datadir=C:\Dash2 -listen=0

Specifying separate datadirs
You can now use the two icons to quickly and easily open different wallets simultaneously from your desktop. Both wallets maintain separate and full copies of the blockchain, which may use a lot of drive space. For more efficient use of drive space, consider using an SPV or "light" wallet such as Dash Electrum to maintain multiple separate wallets without keeping a full copy of the blockchain.

Two instances of Dash Core running simultaneously
KeePass
Since version 0.11.0, Dash Core has supported integration with KeePass, the popular open source password manager. This guide describes how to configure the association between Dash Core and KeePass, and how to save a Dash Core wallet passphrase in KeePass using the integration. When this is done, KeePass can be used to unlock the wallet.
You will need the following:
- KeePass 2: http://keepass.info
- KeePassHttp plugin: https://github.com/pfn/keepasshttp
- Dash Core: https://www.dash.org
If not already installed, install these packages according to the instructions linked below:
The following KeePass RPC commands are available in the Dash Core client console or server:
- keepass genkey
- Generates a base64 encoded 256 bit AES key that can be used for communication with KeePassHttp. This is only necessary for manual configuration. Use init for automatic configuration.
- keepass init
- Sets up the association between Dash and KeePass by generating an AES key and sending an association message to KeePassHttp. This will trigger KeePass to ask for an ID for the association. Returns the association and the base64 encoded string for the AES key.
- keepass setpassphrase
- Updates the passphrase in KeePassHttp to a new value. This should match the passphrase you intend to use for the wallet. Please note that the standard RPC commands walletpassphrasechange and the wallet encryption from the QT GUI already send the updates to KeePassHttp, so this is only necessary for manual manipulation of the password.
The following new arguments are available for dashd and dash-qt:
- keepass
- Use KeePass 2 integration using KeePassHttp plugin (default: 0)
- keepassport=<port>
- Connect to KeePassHttp on port <port> (default: 19455)
- keepasskey=<key>
- KeePassHttp key for AES encrypted communication with KeePass
- keepassid=<name>
- KeePassHttp id for the established association
- keepassname=<name>
- Name to construct url for KeePass entry that stores the wallet passphrase
Ví Dash Core
Vì Dash Electrum
Dash Electrum is a light wallet which uses powerful external servers to index the blockchain, while still securing the keys on your personal computer. Transactions are verified on the Dash blockchain using a technique called Secure Payment Verification (SPV), which only requires the block headers and not the full block. This means that wallet startup is almost instant, while still keeping your funds secure and mobile. It does not currently support advanced InstantSend and PrivateSend features.
Dash Electrum là phiên bản ví được fork từ ví Electrum dành cho Bitcoin. Khi tài liệu này tập trung vào việc sử dụng ví Dash Electrum, một tài liệu đầy đủ về các tính năng của ví Bitcoin Electrum (hầu hết giống với Dash Electrum) có thể xem ở website tài liệu chính thức.
Cài đặt
Tải xuống
You can download Dash Electrum from the official Dash website or the Dash Electrum minisite.
Dash Electrum is developed by community member akhavr and is released through his GitHub account. SHA256 checksums are available in the releases section of the Dash Electrum repository to verify authenticity.
Dash Electrum for Linux is available from a PPA for Ubuntu and Linux Mint, and as a source tarball for other systems. As of version 3.0.6, it requires Python 3 to run. Enter the following commands to install from PPA:
sudo add-apt-repository ppa:akhavr/dash-electrum
sudo apt update
sudo apt install electrum-dash
Enter the following commands (changing the version number to match the current version as necessary) in the terminal to install Dash Electrum from the source tarball:
sudo apt install python3-pyqt5 python3-pip python3-setuptools
wget https://github.com/akhavr/electrum-dash/releases/download/3.0.6.3/Electrum-DASH-3.0.6.3.tar.gz
tar -zxvf Electrum-DASH-3.0.6.3.tar.gz
cd Electrum-DASH-3.0.6.3
sudo python3 setup.py install
Simply download and run the DMG file. You may need to grant permission to install, depending on your security settings. Click through the installation wizard and run Dash Electrum from your Applications folder when complete.
Simply download and run the installer file to set up Dash Electrum. You may need to grant permission to install, depending on your security settings. Click through the installation wizard and run Dash Electrum from the Start menu when complete.
Download and run the APK file from https://electrum.dash.org to set up Dash Electrum. You may need to grant permission to install from unknown sources, depending on your security settings. Click through the installation wizard and run Dash Electrum when complete.
Creating a New Wallet
Dash Electrum gathers configuration data when run for the first time. For more on the concepts behind this process, skip to the later sections of this guide discussing backups, security, and addresses. When setting up Dash Electrum for the first time, a wizard will guide you through the process of creating your first wallet. The first screen asks how you would like to connect to the remote server. Select Auto connect and click Next to continue. You will see a notice that no wallet currently exists. Enter a name for your wallet (or accept the default name) and click Next to create your wallet.


Selecting the server and naming your first wallet
You will be asked what kind of wallet you want to create. Choose between Standard wallet, Multi-signature wallet and Watch Dash addresses. If you are unsure, select Standard wallet and click Next to continue. You will then be asked how you want to store/recover the seed. If stored safely, a seed can be used to restore a lost wallet on another computer. Choose between Create a new seed, I already have a seed, Use public or private keys or Use a hardware device. If you are using Electrum Dash for the first time and not restoring an existing wallet, choose Create a new seed and click Next to continue.


Selecting the wallet type and keystore
Electrum Dash will generate your wallet and display the recovery seed. Write this seed down, ideally on paper and not in an electronic format, and store it somewhere safe. This seed is the only way you can recover your wallet if you lose access for any reason. To make sure you have properly saved your seed, Electrum Dash will ask you to type it in as a confirmation. Type the words in the correct order and click Next to continue.


Generating and confirming the recovery seed
A password optionally secures your wallet against unauthorized access. Adding a memorable, strong password now improves the security of your wallet by encrypting your seed from the beginning. Skipping encryption at this point by not selecting a password risks potential theft of funds later, however unlikely the threat may be. Enter and confirm a password, ensure the Encrypt wallet file checkbox is ticked and click Next to continue.

Entering and confirming a wallet encryption password
Your Dash Electrum wallet is now set up and ready for use.

Dash Electrum after setup is complete
Gửi và nhận
You may own Dash stored in another software wallet, or on an exchange such as Bittrex or Kraken, or simply want to send or receive funds as a wage or business transaction. Funds can be transferred between these source and the Electrum wallet using Dash addresses. Your wallet contains multiple addresses, and will generate new addresses as necessary. Since the Dash blockchain is transparent to the public, it is considered best practice to use a new address for each transaction in order to maintain your privacy.
Gửi
Click the Send tab to make a payment. Enter the destination address in the Pay to field, either manually or by pasting from the clipboard. Optionally enter a Description for to appear in your transaction history, followed by the Amount to be sent. The total amount of the transaction is the sum of the sent amount and transaction fee, which is calculated automatically. Dash Electrum issues a warning if the total transaction amount exceeds the wallet balance.

Transaction ready to send in Dash Electrum wallet
The wallet will request your password, then broadcast the transaction to the network and display a confirmation dialog with your transaction ID.


Password prompt and transaction confirmation in Dash Electrum wallet
Nhận
You can view your receiving addresses by clicking the Receive tab. Double-click the Receiving address, then copy it to the clipboard by clicking the Copy to clipboard icon. If you intend to use the address repeatedly, you can also enter a description click Save to store the address in the Requests list. Clicking an address in the list will display the stored information in the top area, together with a QR code containing the same information.

Transaction ready to send in Dash Electrum wallet
Enter this address in the software sending the funds, send it to the person transferring funds to you or scan it directly from your mobile wallet. Once the transaction is complete, the balance will appear in the lower left corner of your wallet, and the indicator in the Requests table will change from Pending to Paid.

Successfully received payment in Dash Electrum wallet
Once you have used an address, you can either continue using it or click New to generate a new address.
Monitoring transactions
The History tab lists all current and pending transactions. A transaction to an address in your wallet will appear in the list soon after it is made. Initially, this transaction will be marked as Unconfirmed, followed by a clock indicator on the left. As the Dash network processes the transaction, the status will update in the transaction history list. The network confirms transactions with a new block roughly every 2.5 minutes, and a transaction is considered confirmed (and therefore spendable) after six confirmations. These processed transactions are denoted with a green checkmark and the timestamp at which the transaction was made.


Dash Electrum wallet History tab immediately after receiving a transaction and after confirmation is complete
To view additional transaction details, right click a transaction on the History tab and select Details from the context menu. You can also use this menu to copy the transaction ID to the clipboard (this can be used as proof that a given transaction occurred), edit the transaction description for your records or view the transaction on an external block explorer.

Transaction details in Dash Electrum wallet
Wallet security
Change password
To change the wallet's password, select the Wallet > Password option from the main menu, or click on the lock icon in the lower right of the main window. Enter and confirm a new secure password. Should you forget your wallets' password, all is not lost. Your wallet can be restored in its entirety using the backup procedure described here.
Sao lưu
In Dash Electrum, a seed is a complete backup of all addresses and transactions. Access your wallet's seed through the seed icon in the lower right of the main screen, or the Wallet > Seed main menu option. When prompted, enter the secure password you chose when setting up the Dash Electrum wallet.

Displaying the wallet recovery seed in Dash Electrum
Hand-copy the twelve words found in the box to a piece of paper and store it in a safe location. Remember, anyone who finds your seed can spend all of the funds in your wallet.

Viewing the recovery seed
Alternatively, a backup file can be saved using the File > Save Copy main menu option. This file stores the wallet's encrypted seed along with any imported addresses. Restoring this backup will require the wallet password.
Khôi phục
The only thing needed to recover a Dash Electrum wallet on another computer is its seed. You can test wallet recovery with your current installation of Dash Electrum by removing the wallet data from the application data folder. This optional procedure is described below. Before continuing, verify that your seed is written down clearly and correctly on paper.
To get Dash Electrum to generate a new wallet, the old wallet data needs to be deleted. Begin by closing Dash Electrum. Next, locate the application data folder according to your operating system:
- Linux:
- Open Files, select Go > Go to folder, copy the path
~/.electrumand paste it into the dialog box - Delete all files in the folder
- Open Files, select Go > Go to folder, copy the path
- macOS:
- Open Finder, select Go > Go to Folder, copy the path
~/.electrumand paste it into the dialog box - Delete all files in the folder
- Open Finder, select Go > Go to Folder, copy the path
- Windows:
- Open Explorer, copy the path
%APPDATA%\Electrum-DASHand paste it in to the address bar - Delete all files in the folder
- Open Explorer, copy the path
Having cleared the data directory, restart Dash Electrum. A dialog will appear asking you to name your new wallet. Enter a name, select Standard wallet as the wallet type and then choose I already have a seed.

Restoring a wallet from an existing seed
Next, copy the twelve word seed into the text field.

Entering the recovery seed
If your seed was entered correctly, Dash Electrum gives you the option to add a password for your wallet. After restoring your wallet, Dash Electrum will list any existing transactions from this wallet. This process may take a few minutes, and the transactions may appear as Not Verified. This problem disappears after restarting the program.

Unverified transactions after recovery
Frequently Asked Questions
How does Dash Electrum work?
Dash Electrum focuses on speed, low resource usage and providing a simple user experience for Dash. Startup times are instant because it operates in conjunction with high-performance servers that handle the most complicated parts of the Dash system.
Does Dash Electrum trust servers?
Not really; the Dash Electrum client never sends private keys to the servers. In addition, it verifies the information reported by servers using a technique called Simple Payment Verification.
What is the Seed?
The seed is a random phrase that is used to generate your private keys. Example:
constant forest adore false green weave stop guy fur freeze giggle clock
Your wallet can be entirely recovered from its seed. To do this, select the I already have a seed option during startup.
How secure is the seed?
The seed created by Dash Electrum has 128 bits of entropy. This means that it provides the same level of security as a Dash private key (of length 256 bits). Indeed, an elliptic curve key of length n provides n/2 bits of security.
What are change addresses?
The Dash Electrum wallet design and workflow are based on a concept called a “wallet generation seed”. This seed is a unique, randomly- selected list of twelve words. A Dash Electrum wallet uses its seed as a template for generating addresses.
To understand the problem that seeds solve, browse to the Electrum Receive tab. Next, open the collapsible entry marked Change.

Receiving and change addresses in Dash Electrum
Notice that the total balance does not only show the sum of all receiving addresses, but also the separately listed Change addresses. Where did these new change addresses come from and why does the first one now hold funds?
Dash is an electronic cash system, meaning that it shares much in common with the process of using paper banknotes. Although some cash payments involve exact change, many do not. You tend to “overpay” when using cash, and expect to receive the difference as change. Perhaps surprisingly, this is how Dash transactions work as well. If the entire balance of an address is not required for any given transaction, the remainder is sent to a new and unused address under control of the same wallet. This address is generated deterministically (rather than randomly) from the wallet seed, which means that any other wallet will also regenerate the change addresses in the same order from the same recovery seed, and have access to the balances.
Spending the entire balance and sending any remainder to a change address is considered good practice because it prevents the transaction recipient from linking transactions by browsing the blockchain, thus compromising your privacy. If privacy is not a concern, change addresses can be disabled via the Tools > Electrum preferences menu option.
How can I send the maximum available in my wallet?
Type an exclamation mark (!) in the Amount field or simply click the Max button. The fee will be automatically adjusted for that amount.
How can I send Dash without paying a transaction fee?
You can create a zero fee transaction in the GUI by following these steps:
- Enable the Edit fees manually option
- Enter 0 in the Fee field
- Enter the amount in the Amount field
Note that transactions without fees might not be relayed by the Dash Electrum server, or by the Dash network.
Is there a way to enter amounts in USD in Dash Electrum?
Yes, go to Tools > Prefernce > Fiat and select a Fiat currency to display the current exchange rate from the chosen Source.

Entering values in fiat currency in Dash Electrum
What does it mean to “Freeze” an address in Dash Electrum?
When you freeze an address, the funds in that address will not be used for sending Dash. You cannot send Dash if you don’t have enough funds in your non-frozen addresses.
How is the wallet encrypted?
Dash Electrum uses two separate levels of encryption:
- Your seed and private keys are encrypted using AES-256-CBC. The private keys are decrypted only briefly, when you need to sign a transaction; for this you need to enter your password. This is done in order to minimize the amount of time during which sensitive information is unencrypted in your computer's memory.
- In addition, your wallet file may be encrypted on disk. Note that the wallet information will remain unencrypted in the memory of your computer for the duration of your session. If a wallet is encrypted, then its password will be required in order to open it. Note that the password will not be kept in memory; Dash Electrum does not need it in order to save the wallet on disk, because it uses asymmetric encryption (ECIES).
Wallet file encryption is activated by default since version 2.8. It is intended to protect your privacy, but also to prevent you from requesting Dash on a wallet that you do not control.
I have forgotten my password but still have my seed. Is there any way I can recover my password?
It is not possible to recover your password. However, you can restore your wallet from its seed phrase and choose a new password. If you lose both your password and your seed, there is no way to recover your money. This is why we ask you to save your seed phrase on paper.
To restore your wallet from its seed phrase, create a new wallet, select the type, choose I already have a seed and proceed to input your seed phrase.
Does Dash Electrum support cold wallets?
Yes. See the cold storage section.
Can I import private keys from other Dash clients?
In Dash Electrum 2.0, you cannot import private keys in a wallet that has a seed. You should sweep them instead.
If you want to import private keys and not sweep them you need to create a special wallet that does not have a seed. For this, create a new wallet, select Use public or private keys, and instead of typing your seed, type a list of private keys, or a list of addresses if you want to create a watching-only wallet. A master public (xpub) or private (xprv) will also work to import a hierarchical deterministic series of keys. You will need to back up this wallet, because it cannot be recovered from seed.

Importing a list of private keys to create a wallet
Can I sweep private keys from other Dash clients?
Sweeping private keys means to send all the Dash they control to an existing address in your wallet. The private keys you sweep do not become a part of your wallet. Instead, all the Dash they control are sent to an address that has been deterministically generated from your wallet seed.
To sweep private keys go to Wallet > Private Keys > Sweep. Enter the private keys in the appropriate field. Leave the Address field unchanged. This is the destination address from your existing Dash Electrum wallet. Click on Sweep. Dash Electrum then takes you to the Send tab where you can set an appropriate fee and then click on Send to send the coins to your wallet.
Where is my wallet file located?
The default wallet file is called default_wallet and is created when you first run the application. It is located under the /wallets folder.
- Linux: Open Files, select Go > Go to folder, copy the path
~/.electrum-dashand paste it into the dialog box - macOS: Open Finder, select Go > Go to Folder, copy the path
~/.electrum-dashand paste it into the dialog box - Windows: Open Explorer, copy the path
%APPDATA%\Electrum-DASHand paste it in to the address bar
Can I do bulk payments with Dash Electrum?
You can create a transaction with several outputs. In the GUI, type each address and amount on a line, separated by a comma.

Creating a transaction with multiple outputs in Dash Electrum
Amounts are in the current unit set in the client. The total is shown in the GUI. You can also import a CSV file in the Pay to field by clicking on the folder icon.
Can Dash Electrum create and sign raw transactions?
Dash Electrum lets you create and sign raw transactions right from the user interface using a form.
Dash Electrum freezes when I try to send Dash
This might happen if you are trying to spend a large number of transactions outputs (for example, if you have collected hundreds of donations from a Dash faucet). When you send Dash, Dash Electrum looks for unspent coins that are in your wallet in order to create the new transaction. Unspent coins can have different values, much like physical coins and bills.
If this happens, you should consolidate your transaction inputs by sending smaller amounts of Dash to one of your wallet addresses; this would be the equivalent of exchanging a stack of nickels for a dollar bill.
What is the gap limit?
The gap limit is the maximum number of consecutive unused addresses in your deterministic sequence of addresses. Dash Electrum uses it in order to stop looking for addresses. In Dash Electrum 2.0, it is set to 20 by default, so the client will get all addresses until 20 unused addresses are found.
How can I pre-generate new addresses?
Dash Electrum will generate new addresses as you use them, until it hits the gap limit.
If you need to pre-generate more addresses, you can do so by typing wallet.create_new_address() in the console. This command will generate one new address. Note that the address will be shown with a red background in the address tab, to indicate that it is beyond the gap limit. The red color will remain until the gap is filled.
WARNING: Addresses beyond the gap limit will not automatically be recovered from seed. To recover them will require either increasing the client’s gap limit or generating new addresses until the used addresses are found.
If you wish to generate more than one address, you may use a ‘for’ loop. For example, if you wanted to generate 50 addresses, you could do this:
for x in range(0, 50):
print wallet.create_new_address()
How to upgrade Dash Electrum?
Warning: always save your wallet seed on paper before doing an upgrade.
To upgrade Dash Electrum, just install the most recent version. The way to do this will depend on your OS. Note that your wallet files are stored separately from the software, so you can safely remove the old version of the software if your OS does not do it for you.
Some Dash Electrum upgrades will modify the format of your wallet files. For this reason, it is not recommended to downgrade Dash Electrum to an older version once you have opened your wallet file with the new version. The older version will not always be able to read the new wallet file.
The following issues should be considered when upgrading Dash Electrum 1.x wallets to Dash Electrum 2.x:
- Dash Electrum 2.x will need to regenerate all of your addresses during the upgrade process. Please allow it time to complete, and expect it to take a little longer than usual for Dash Electrum to be ready.
- The contents of your wallet file will be replaced with a Dash Electrum 2 wallet. This means Dash Electrum 1.x will no longer be able to use your wallet once the upgrade is complete.
- The Addresses tab will not show any addresses the first time you launch Dash Electrum 2. This is expected behaviour. Restart Dash Electrum 2 after the upgrade is complete and your addresses will be available.
- Offline copies of Dash Electrum will not show the addresses at all because it cannot synchronize with the network. You can force an offline generation of a few addresses by typing the following into the Console: wallet.synchronize(). When it’s complete, restart Dash Electrum and your addresses will once again be available.
Những tính năng nâng cao
Dash Electrum is based on Electrum, a Bitcoin wallet. Most functions are identical, which means it is not necessary to reproduce the entirety of the Electrum documentation here. The following sections describe some frequently used advanced functions. For further details on other advanced functions in Electrum for both Bitcoin and Dash, please click the links below.
- Electrum documentation
- Electrum seed version system
- Electrum protocol specification
- Serialization of unsigned or partially signed transactions
- Simple Payment Verification
- The Python Console
- Using Electrum Through Tor
Masternodes in Dash Electrum
Dash Electrum supports masternode creation through an interface called the Masternode Manager. The functionality is available starting from the protocol version 70201.
The Masternode Manager can be accessed either from the Wallet > Masternodes menu or by pressing Ctrl+M. This manager displays the status of your masternode(s). A wallet with no masternodes will begin with a default masternode for which you can fill in the necessary information.
The manager displays the following data about each masternode you have set up:
- The alias (name) of the masternode.
- The status of the masternode (e.g. whether it has been activated).
- The collateral payment of the masternode.
- The private delegate key.
- The IP address and port that your masternode can be reached at.
- The protocol version that your masternode supports.
A masternode requires a "delegate" key, which is known to both Dash Electrum and your masternode. Your masternode will use this key to sign messages, and the Dash network will know that you authorized it to. A delegate key can either be one of your Dash Electrum keys, or an imported key. Either way, your masternode and Dash Electrum will both need to know the private key.
To use one of your Dash Electrum keys as a delegate key, put its private key in the Masternode Private Key field of the View Masternode tab.
Certain information about your masternode is required. The IP address and port that your masternode uses must be supplied. Also, the protocol version that your masternode supports is required. This information is filled in automatically if you import a "masternode.conf" file.

Entering IP and protocol information
To start a masternode, you must have a 1000 DASH payment available in your wallet. You can scan your wallet for 1000 DASH payments in the Choose Collateral tab of the Masternode Manager.
After scanning, a list of available 1000 DASH collateral payments will be displayed. Selecting one of them will cause the selected masternode's data to be filled in, though these changes won't be saved until you click the Save button in the lower-right corner of the tab.

Entering IP and protocol information
After selecting a collateral payment and specifying a delegate key, you can activate your masternode. Do this by clicking Activate Masternode in the Activate Masternode tab of the Masternode Manager. If the Activate Masternode button cannot be clicked, look at the message in the Status bar. It will show you why your masternode cannot be activated.
Activation will require your password if your wallet is encrypted, because a message must be signed. After waiting for Dash Electrum to sign and broadcast your masternode announcement, you will be presented with a message detailing the result. The status of your masternode will be updated in the table and the View Masternode tab.

Entering IP and protocol information
You can import a masternode.conf file using the Masternode.conf tab of the Masternode Manager. This is the recommended way of setting up masternodes, as it allows you to configure masternodes for Dash Core and Dash Electrum in the same way. Importing a masternode.conf file will automatically set up one or more masternode configurations in the Masternode Manager.
Multisig wallets
This tutorial shows how to create a 2 of 2 multisig wallet. A 2 of 2 multisig consists of 2 separate wallets (usually on separate machines and potentially controlled by separate people) that have to be used in conjunction in order to access the funds. Both wallets have the same set of addresses.
- A common use-case for this is if you want to collaboratively control funds: maybe you and your friend run a company together and certain funds should only be spendable if you both agree.
- Another one is security: one of the wallets can be on your main machine, while the other one is on a offline machine. That way you make it very hard for an attacker or malware to steal your coins.
Each cosigner needs to do this: In the menu select File > New, then select Multi-signature wallet. On the next screen, select 2 of 2.

Selecting x of y signatures for a multi-signature wallet
After generating and confirming your recovery seed, you will be shown the xpub address for this wallet.

xpub key of the first wallet
After generating a seed (keep it safely!) you will need to provide the master public key of the other wallet. Of course when you create the other wallet, you put the master public key of the first wallet.

Entering xpub from the second wallet in the first wallet
You will need to do this in parallel for the two wallets. Note that you can press cancel during this step, and reopen the file later.
Check that both wallets generate the same set of Addresses. You can now send to these Addresses (note they start with a “7”) with any wallet that can send to P2SH Addresses.
To spend coins from a 2-of-2 wallet, two cosigners need to sign a transaction collaboratively. To accomplish this, create a transaction using one of the wallets (by filling out the form on the Send tab). After signing, a window is shown with the transaction details.

Partially signed 2-of-2 multisig transaction in Dash Electrum
The transaction now has to be sent to the second wallet. Several options are available for this:
You can transfer the file on a USB stick
You can save the partially signed transaction to a file (using the Save button), transfer that to the machine where the second wallet is running (via USB stick, for example) and load it there (using Tools > Load transaction > From file)
You can use QR codes
A button showing a QR code icon is also available. Clicking this button will display a QR code containing the transaction, which can be scanned into the second wallet (Tools > Load Transaction > From QR Code)
With both of the above methods, you can now add the second signature to the transaction (using the Sign button). It will then be broadcast to the network.

Fully signed 2-of-2 multisig transaction in Dash Electrum
Sweep a paper wallet
You may have received a paper wallet as a gift from another Dash user, or previously stored one in a safe deposit box. Funds are swept from a paper wallet into a live wallet by importing its private key, which is a long sequence of characters starting with the number "7" or the capital letter "X". The example below displays a private key (WIF format).

Public address and associated private key produced by Dash Paper Wallet Generator
Funds from paper wallets are swept into an Dash Electrum Wallet by creating a transaction using the private key and sending it to a new address from your wallet. This is necessary because it is not possible to add new public or private keys to an existing deterministic series of addresses derived from a seed phrase.
Begin by selecting the Wallet > Private Keys > Sweep menu item. The Sweep private keys dialog will appear, where you can paste your private key(s). An unused address controlled by your Dash Electrum wallet appears in the lower field, and can be changed by clicking the Address button. Once you have pasted your private key, click the Sweep button.

Entering the private key
Dash Electrum then prepares a transaction using the private key you just imported to derive the public address for the transaction input and the address from your wallet as the output, and signs the message. Click Broadcast to enter the transaction on the blockchain. The balance will then appear in your wallet under the specified address. The address you swept is left with zero balance.

Broadcasting the sweep transaction
Cold storage
This section shows how to create an offline wallet that holds your Dash and a watching-only online wallet that is used to view its history and to create transactions that have to be signed with the offline wallet before being broadcast on the online one.
Create a wallet on an offline machine, as per the usual process (File > New). After creating the wallet, go to Wallet -> Master Public Keys.

Master Public Key of a new offline wallet
The Master Public Key of your wallet is the string shown in this popup window. Transfer that key to your online machine somehow.
On your online machine, open Dash Electrum and select File > New/Restore. Enter a name for the wallet and select Use public or private keys. Paste your master public key in the box. Click Next to complete the creation of your wallet. When you’re done, you should see a popup informing you that you are opening a watching-only wallet.

Master Public Key of a new offline wallet
The transaction history of your cold wallet should then appear.
Go to the Send tab on your online watching-only wallet, input the transaction data and click Send. A window will appear to inform you that a transaction fee will be added. Continue. In the window that appears up, click Save and save the transaction file somewhere on your computer. Close the window and transfer the transaction file to your offline machine (e.g. with a USB stick).
On your offline wallet, select Tools > Load transaction -> From file in the menu and select the transaction file created in the previous step. Click Sign. Once the transaction is signed, the Transaction ID appears in its designated field. Click Save, store the file somewhere on your computer, and transfer it back to your online machine.
On your online machine, select Tools -> Load transaction -> From file from the menu. Select the signed transaction file. In the window that opens up, click Broadcast. The transaction will be broadcast over the Dash network.
Command line
Dash Electrum has a powerful command line available when running under Linux or macOS. This section will show you a few basic principles.
To see the list of Dash Electrum commands, type:
electrum help
To see the documentation for a command, type:
electrum help <command>
The arguments passed to commands may be one of the following magic words: ! ? : -.
The exclamation mark ! is a shortcut that means ‘the maximum amount available’. Note that the transaction fee will be computed and deducted from the amount. Example:
electrum payto Xtdw4fezqbSpC341vcr8u9HboiJMFa9gBq !
A question mark ? means that you want the parameter to be prompted. Example:
electrum signmessage Xtdw4fezqbSpC341vcr8u9HboiJMFa9gBq ?
Use a colon : if you want the prompted parameter to be hidden (not echoed in your terminal). Note that you will be prompted twice in this example, first for the private key, then for your wallet password:
electrum importprivkey :
A parameter replaced by a dash - will be read from standard input (in a pipe):
cat LICENCE | electrum signmessage Xtdw4fezqbSpC341vcr8u9HboiJMFa9gBq -
You can use DNS aliases in place of bitcoin addresses, in most commands:
electrum payto ecdsa.net !
Command outputs are either simple strings or json structured data. A very useful utility is the ‘jq’ program. Install it with:
sudo apt-get install jq
The following examples use it.
We may use a variable to store the signature, and verify it:
sig=$(cat LICENCE| electrum signmessage Xtdw4fezqbSpC341vcr8u9HboiJMFa9gBq -)
And:
cat LICENCE | electrum verifymessage Xtdw4fezqbSpC341vcr8u9HboiJMFa9gBq $sig -
The listunspent command returns a list of dict objects, with various fields. Suppose we want to extract the value field of each record. This can be achieved with the jq command:
electrum listunspent | jq 'map(.value)'
Incoming transactions have a positive ‘value’ field:
electrum history | jq '.[] | select(.value>0)'
The following command selects transactions that were timestamped after a given date:
after=$(date -d '07/01/2015' +"%s")
electrum history | jq --arg after $after '.[] | select(.timestamp>($after|tonumber))'
Similarly, we may export transactions for a given time period:
before=$(date -d '08/01/2015' +"%s")
after=$(date -d '07/01/2015' +"%s")
electrum history | jq --arg before $before --arg after $after '.[] | select(.timestamp>($after|tonumber) and .timestamp<($before|tonumber))'
First we need the public key of a wallet address:
pk=$(electrum getpubkeys Xtdw4fezqbSpC341vcr8u9HboiJMFa9gBq| jq -r '.[0]')
Encrypt:
cat | electrum encrypt $pk -
Decrypt:
electrum decrypt $pk ?
Note: this command will prompt for the encrypted message, then for the wallet password.
The following command will export the private keys of all wallet addresses that hold some Dash:
electrum listaddresses --funded | electrum getprivatekeys -
This will return a list of lists of private keys. In most cases, you want to get a simple list. This can be done by adding a jq filer, as follows:
electrum listaddresses --funded | electrum getprivatekeys - | jq 'map(.[0])'
Finally, let us use this list of private keys as input to the sweep command:
electrum listaddresses --funded | electrum getprivatekeys - | jq 'map(.[0])' | electrum sweep - [destination address]
Using cold storage with the command line
This section will show you how to sign a transaction with an offline Dash Electrum wallet using the command line.
With your online (watching-only) wallet, create an unsigned transaction:
electrum payto Xtdw4fezqbSpC341vcr8u9HboiJMFa9gBq 0.1 --unsigned > unsigned.txn
The unsigned transaction is stored in a file named ‘unsigned.txn’. Note that the –unsigned option is not needed if you use a watching-only wallet.
You may view it using:
cat unsigned.txn | electrum deserialize -
The serialization format of Dash Electrum contains the master public key needed and key derivation used by the offline wallet to sign the transaction. Thus we only need to pass the serialized transaction to the offline wallet:
cat unsigned.txn | electrum signtransaction - > signed.txn
The command will ask for your password, and save the signed transaction in ‘signed.txn’.
Send your transaction to the Dash network, using broadcast:
cat signed.txn | electrum broadcast -
If successful, the command will return the ID of the transaction.
How to accept Dash on a website using Dash Electrum
This tutorial will show you how to accept dash on a website with SSL signed payment requests. It is updated for Dash Electrum 2.6.
- A webserver serving static HTML
- A SSL certificate (signed by a CA)
- Electrum version >= 2.6
Create a wallet on your web server:
electrum create
You can also use a watching only wallet (restored from xpub), if you want to keep private keys off the server. Once your wallet is created, start Dash Electrum as a daemon:
electrum daemon start
You should have a private key and a public certificate for your domain. Create a file that contains only the private key:
-----BEGIN PRIVATE KEY-----
your private key
-----BEGIN END KEY-----
Set the path to your the private key file with setconfig:
electrum setconfig ssl_privkey /path/to/ssl.key
Create another file that contains your certificate and the list of certificates it depends on, up to the root CA. Your certificate must be at the top of the list, and the root CA at the end:
-----BEGIN CERTIFICATE-----
your cert
-----END CERTIFICATE-----
-----BEGIN CERTIFICATE-----
intermediate cert
-----END CERTIFICATE-----
-----BEGIN CERTIFICATE-----
root cert
-----END CERTIFICATE-----
Set the ssl_chain path with setconfig:
electrum setconfig ssl_chain /path/to/ssl.chain
This directory must be served by your webserver (eg Apache):
electrum setconfig requests_dir /var/www/r/
By default, Dash Electrum will display local URLs, starting with ‘file://‘ In order to display public URLs, we need to set another configuration variable, url_rewrite. For example:
electrum setconfig url_rewrite "['file:///var/www/','https://electrum.org/']"
electrum addrequest 3.14 -m "this is a test"
{
"URI": "dash:Xtdw4fezqbSpC341vcr8u9HboiJMFa9gBq?amount=3.14&r=https://electrum.org/r/7c2888541a",
"address": "Xtdw4fezqbSpC341vcr8u9HboiJMFa9gBq",
"amount": 314000000,
"amount (DASH)": "3.14",
"exp": 3600,
"id": "7c2888541a",
"index_url": "https://electrum.org/r/index.html?id=7c2888541a",
"memo": "this is a test",
"request_url": "https://electrum.org/r/7c2888541a",
"status": "Pending",
"time": 1450175741
}
This command returns a json object with two URLs:
- request_url is the URL of the signed BIP70 request.
- index_url is the URL of a webpage displaying the request.
Note that request_url and index_url use the domain name we defined in url_rewrite. You can view the current list of requests using the listrequests command.
Let us open index_url in a web browser.

Payment request page in a web browser
The page shows the payment request. You can open the dash: URI with a wallet, or scan the QR code. The bottom line displays the time remaining until the request expires.

Wallet awaiting payment
This page can already be used to receive payments. However, it will not detect that a request has been paid; for that we need to configure websockets.
Get SimpleWebSocketServer from here:
git clone https://github.com/ecdsa/simple-websocket-server.git
Set websocket_server and websocket_port in your config:
electrum setconfig websocket_server <FQDN of your server>
electrum setconfig websocket_port 9999
And restart the daemon:
electrum daemon stop
electrum daemon start
Now, the page is fully interactive: it will update itself when the payment is received. Please notice that higher ports might be blocked on some client’s firewalls, so it is more safe for example to reverse proxy websockets transmission using standard 443 port on an additional subdomain.
Commands to the Dash Electrum daemon can be sent using JSONRPC. This is useful if you want to use Dash Electrum in a PHP script.
Note that the daemon uses a random port number by default. In order to use a stable port number, you need to set the rpcport configuration variable (and to restart the daemon):
electrum setconfig rpcport 7777
With this setting, we can perform queries using curl or PHP. Example:
curl --data-binary '{"id":"curltext","method":"getbalance","params":[]}' http://127.0.0.1:7777
Query with named parameters:
curl --data-binary '{"id":"curltext","method":"listaddresses","params":{"funded":true}}' http://127.0.0.1:7777
Create a payment request:
curl --data-binary '{"id":"curltext","method":"addrequest","params":{"amount":"3.14","memo":"test"}}' http://127.0.0.1:7777
Vì Dash Electrum
Ví Dash cho Android
Dash offers a standalone wallet for Android, with development supported by the Dash budget. The Dash Android Wallet supports advanced Dash features, including contact management and InstandSend. You can scan and display QR codes for quick transfers, backup and restore your wallet, keep an address book of frequently used addresses, pay with NFC, sweep paper wallets and more.
Cài đặt
Từ file APK
Một số điện thoại Android không có quyền truy cập vào cửa hàng ứng dụng Google Play bởi vì phần mềm của điện thoại, nhà mạng cung câp hoặc quốc gia không cho phép nó. Bạn có thể cài ứng dụng bằng tay trước hết bằng việc bật chức năng cho phép cài đặt ứng dụng từ nguồn bên ngoài (nếu bạn chưa làm việc đó) và sau đó tải và cài từ file APK. Hãy làm theo hướng dẫn sau:
- Hãy đảm bảo rằng Android của bạn có phiên bản ít nhất là 4.0.3 bằng việc vào Settings → About phone và kiểm tra số phiên bản.
- Cho phép nguồn không xác định bằng việc vào Settings → Security → Unknown sources. Sau đó đọc và chấp nhận cảnh báo.
- Sử dụng điện thoại của bạn, tải phiên bản mới nhất của APK từ đường link này.
- Nếu bạn không thể dùng điện thoại để truy cập mạng Internet, thì tải file APK bằng cách dùng máy tính và sau đó copy nó vào điện thoại bằng cáp hoặc bluetooth. Bạn cũng có thể cần chương trình duyệt file để tìm và copy file. Chúng tôi gợi ý với bạn phần mềm này ES File Explorer để dùng cho việc đó.
Bạn cũng có thể cài một file APK trực tiếp từ máy tính của bạn bằng cách dùng Android Debug Bridge (ADB). Hãy làm theo những hướng dẫn sau:
Hãy đảm bảo rằng Android của bạn có phiên bản ít nhất là 4.0.3 bằng việc vào Settings → About phone và kiểm tra số phiên bản.
Hãy chắc rằng bạn đã có một bản của ADB trên máy tính của mình. Nó được bao gồm trong Android SDK Platform Tools cho Mac, Windows hoặc Linux.
Cho phép nguồn không xác định bằng việc vào Settings → Security → Unknown sources. Sau đó đọc và chấp nhận cảnh báo.
Bật chế độ USB debugging bằng việc vào Settings → Developer options → USB debugging. Nếu không có tuỳ chọn Developer options, thì vào About phone, cuốn xuống, và bấm vào Build number bảy lần.
Sử dụng máy tính của bạn, tải phiên bản APK mới nhất từ đường link này.
Kết nối điện thoại của bạn vào máy tính, mở cửa sổ dòng lệnh terminal/command và gõ:
adb install <<path to .apk file>>
Từ mã nguồn
The source code for the Dash Android wallet is available on GitHub. The following
instructions describe how to compile an APK from source under an up-to-
date installation of Ubuntu 18.04 LTS with a single non-root user. Note
that NDK version 12b is required, instead of installing the latest
version using sdkmanager. Begin by installing dependencies and
downloading the latest Android SDK Tools:
sudo apt install openjdk-8-jdk-headless unzip make
mkdir android-sdk-linux
cd android-sdk-linux
wget https://dl.google.com/android/repository/sdk-tools-linux-3859397.zip
wget https://dl.google.com/android/repository/android-ndk-r12b-linux-x86_64.zip
unzip sdk-tools-linux-3859397.zip
unzip android-ndk-r12b-linux-x86_64.zip
Next, update the SDK Tools and download the necessary SDK platform bundles and dependencies, then add and load the appropriate environment variables:
./tools/bin/sdkmanager --update
./tools/bin/sdkmanager "platforms;android-15" "platforms;android-25" "build-tools;25.0.2"
echo 'export ANDROID_HOME=$HOME/android-sdk-linux' >> ~/.bashrc
echo 'export ANDROID_NDK_HOME=$ANDROID_HOME/android-ndk-r12b' >> ~/.bashrc
source ~/.bashrc
cd ~
Now that the build environment is ready, download and build the Dash Android Wallet source:
git clone https://github.com/HashEngineering/dash-wallet.git
cd dash-wallet
./gradlew clean build -x test
The built APK files are now available in the
~/dash-wallet/wallet/build/outputs/apk folder.
Bắt đầu
Tạo ví mới
When you first start your Dash Wallet, it will automatically generate a new wallet for you. It will then ask you to enter a PIN to protect spending from the wallet. The first thing you should do after setting a PIN is back up the wallet by tapping the menu button in the top left corner and selecting Safety > View recovery phrase. You will need this phrase to recover the funds later if you lose or damage your phone or need to transfer the account to another device. Write the phrase down and store it in a safe place - if you lose this, you will also lose access to your funds forever. If you prefer, you can also back up a password protected wallet file by selecting Safety > Back up wallet.


Viewing the recovery phrase for a new wallet in Dash Wallet for Android
Khôi phục từ bản sao lưu
If you already have an existing Dash Wallet for Android, you can restore it at this point by tapping the menu button in the top left corner and selecting Safety > Restore from recovery phrase. Carefully enter your recovery phrase and tap Restore. Your wallet may restart, and it will take some time for any past transactions and balances to appear.


Restoring an existing wallet from recovery phrase in Dash Wallet for Android
Nhận
Tap the Request coins button at the bottom left of the screen to receive Dash. The wallet will generate and display a QR code for the other device to scan, and you can optionally enter the dash or dollar value of the transaction to save the payer time. You can tap the menu button in the top right corner and select Copy address to copy and paste it in another app to send it to a person paying you remotely. You will receive a notification when the transfer occurs, and you can view the confirmation status on the main screen and the balance in the top right corner. Dash Wallet for Android considers a transaction spendable after 1 block confirmations has taken place (approx. 2.5 minutes), or 6 block confirmations if you want to generate InstantSend transactions.


Receiving Dash and viewing your transactions and balance in Dash Wallet for Android
Gửi
Tap the Send coins button at the bottom right of the screen to send Dash. You will be prompted to type, paste or scan (by tapping the round QR button) a Dash address, the amount to pay and whether to use InstantSend. Note that this information may already be included if you are scanning a QR code. The automatically determined network fee is displayed. Tap Send to complete the transaction.


Sending Dash and viewing your transactions and balance in Dash Wallet for Android
Buying
Since version 6.1.0, it has been possible to link your Android wallet with Uphold to purchase Dash using any funding methods available to you in Uphold. To get started, tap the menu button, select Uphold account and then Link Uphold account. Enter your username and password and complete two-factor authentication (if enabled for your account). Your Uphold balance will appear. Tap Buy Dash to add funds and convert them to Dash using Uphold. Tap Transfer from Uphold enter the amount, tap Transfer and confirm the transaction details to move funds from Uphold into your Dash wallet. For more information on using Uphold, see the Uphold documentation.


Logging in to Uphold and purchasing Dash


Transferring Dash from Uphold to your Dash Android wallet
Những tính năng nâng cao
Sổ địa chỉ
Your Android wallet allows you to manage frequently used addresses by adding a label to help you identify the owner. You can also label your own addresses in the wallet in order to keep track of regular incoming payments. You can access the address book by tapping the Menu button, then Address book. This will display a screen where you can swipe left and right between your own addresses and the addresses to which you frequently send Dash, such as family members for example. Tap the More options button to Paste from clipboard or to Scan address from a QR code, or tap an existing address to Send Dash or Edit the label.


Accessing the address book and adding an address
You can also add labels directly from the main transaction history screen by tapping the More options button for the transaction (three vertical dots) and selecting either Add label to your address, Edit label of your address, Add sending address or Edit label of sending address.


Adding and editing address labels in transaction view
Tỷ giá giao dịch
Dash Wallet for Android allows you to display the equivalent value of your Dash balance and in transactions by selecting a default fiat currency. To select a default currency, tap the Menu button, then Exchange rates. Find your preferred fiat currency, then tap the More options button for that currency and select Set as default. The exchange rate for this currency will appear when sending Dash, and you can also tap in the fiat currency field to enter the value in the fiat currency directly, instead of in Dash.


Selecting a fiat exchange rate and creating a transaction denominated in USD
Quét ví giấy
Sweeping a paper wallet is a method of transferring the value stored on an address you may have received as a paper wallet or from an ATM into your own wallet. You must have access to the private key for an address to use this function. In this process, all Dash stored on the address will be sent to a new address that has been deterministically generated from your wallet seed. The private keys you sweep do not become a part of your wallet.
To sweep a paper wallet, tap the Menu button and select Sweep paper wallet. Tap the Scan button and scan the QR code from your paper wallet. Once the private key has been identified, tap Sweep to create the transaction moving the Dash into your own wallet. Once this transaction is confirmed, the paper is worthless and should be destroyed.


Sweeping a paper wallet with 0.10 DASH into the Android Wallet
Theo dõi thông tin mạng
The Dash Android Wallet is a light wallet and functions in SPV mode, meaning it does not download a full copy of the blockchain. The network monitor allows you to view details about the full nodes to which you are connected. You can also swipe left to view blocks as they are created on the blockchain.


Viewing peers and blocks to monitor network activity
Tuỳ chỉnh


The Settings menu in Dash Android Wallet
The settings menu contains a range of options to control the behavior of the Dash Android Wallet. To access the settings, tap the Menu button, then Settings. You can then choose between Settings, Diagnostics and About, which displays wallet version, copyright, license and source code information.
- Denomination and precision
- Select the number of decimal places to show for DASH denominations, or switch to mDASH or µDASH denominations
- Own name
- Enter a short name to be included in your QR codes when displaying to other users for scanning. The short name will then appear as a label in their wallet to verify the recipient and simplify address management.
- Auto-close send coins dialog
- Specify whether or not to close the send dialog once a payment is complete.
- Connectivity indicator
- Enables display of an indicator in the Android notification area to be able to quickly verify connectivity.
- Trusted peer
- Enter the IP address or hostname of a single peer to connect to.
- Skip regular peer discovery
- Enabling this option prevents automatic peer discovery and forces connection to the one specified trusted peer only.
- Khám phá khối
- Allows you to select which block explorer you want to use for functions linking to a block explorer.
- Dữ liệu sử dụng
- Links to the Android Data usage function to view and/or restrict data usage for the app.
- Balance reminder
- Enables an Android system notification to remind you of any unspent Dash if you don't open the app in that time.
- Bật InstantSend
- Enables functionality to use InstantSend to send and receive Dash.
- Enable Lite Mode
- Enabling lite mode reduces bandwidth usage.
- Show disclaimer
- Enables or disables various disclaimers and warning messages in the app.
- BIP70 for scan-to-pay
- Enables use of the BIP70 payment protocol to add further verification and security features when scanning QR codes.
- Tìm các tên ví
- Enables use of DNSSEC to attempt to identify a wallet name when creating transactions.
- Báo cáo vấn đề
- Allows you to gather a range of information related to your wallet in order to send a bug report to developers for troubleshooting.
- Hiển thị xpub
- Displays the extended public key for the seed used to generate addresses in your wallet. Providing your xpub to a third party will allow them to view your entire transaction history, but not make new transactions.
- Khởi tạo lại chuỗi khối
- Resets data stored on your device relating to the blockchain. This data will need to be collected again from full nodes, similar to when setting up a new wallet. This process may take some time.


Ví Dash cho Android
Ví Dash cho iOS
Dash offers a standalone wallet for iOS, with development supported by the Dash budget. The official Dash Wallet supports advanced Dash features such as InstandSend. You can scan and display QR codes for quick transfers, backup your wallet using a recovery phrase and even pay to Bitcoin addresses through native integration with ShapeShift.
Cài đặt
App Store
The easiest way to install the Dash Wallet for iOS is from the App Store. While older versions of iOS are supported, you will need to be using iOS 10.0 or newer to use the latest version.

Biên dịch từ mã nguồn
The source code for the wallet is available here. The following steps describe how to download and compile the wallet from source.
Install Xcode from the App Store. The download is about 5GB, so this step may take some time.
Open Xcode, agree to the terms and conditions, then close the app.
Open the Terminal app and enter the following commands:
cd ~/Documents mkdir src cd src git clone https://github.com/QuantumExplorer/dashwallet.git
Open Xcode again and click File -> Open
Navigate to
~/Documents/src/dashwallet/DashWallet.xcodeprojand click Open.Click Product > Run to build and run the app in Simulator.

Dash iOS wallet running in Simulator after compiling in Xcode
You can also make modifications to the code and sideload the app onto your iOS device. For details, see this post on Reddit.
Bắt đầu
Tạo ví mới
Khi bạn khởi động ví Dash lần đầu tiên, bạn sẽ được nhắc để lựa chọn giữa việc tạo một ví mới hoặc phục hồi từ một ví đã có sẵn. Chọn Tạo ví mới để tạo một ví mới, ngược lại nếu bạn đã có sẵn một ví mà đã có tiền trong đó thì bạn sử dụng một câu phục hồi. Khi ví mới của bạn được tạo, và một câu phục hồi sẽ xuất hiện để giúp bạn có thể phục hồi để lấy lại tiền trong ví trong tương lai nếu bạn bị mất hoặc hỏng điện thoại hay bạn muốn chuyển tài khoản sang thiết bị khác. Hãy viết dòng chữ đó xuống và cất giữ nó ở nơi an toàn - nếu bạn để mất nó, bạn sẽ có thể mất quyền truy cập đến khoản tiền của mình mãi mãi.


Tạo một ví mới và sinh một câu khôi phục trong ví Dash Wallet trên iOS
Bạn có thể được hỏi để xác định một số PIN hoặc liên kết app với TouchID của bạn. Bạn có thể bấm vào logo Dash ở phía trên của app để xem số dư của mình. Bạn sẽ cần phải mở khoá ví để làm việc đó, cũng như bạn muốn nhìn lịch sử giao dịch hoặc gửi Dash.
Nhận
Khi bạn đã thiết lập xong ví, bạn sẽ có hai loại màn hình khác nhau để cho việc gửi và nhận Dash. Bạn có thể quệt tay sang trái và sang phải giữ các màn hình này. Để nhận Dash, ứng dụng sẽ sinh cho bạn một địa chỉ xuất hiện ở dưới cuối màn hình. Bạn có thể bấm vào đó để copy hoặc chia sẻ, hoặc quét mã QR đó một cách trực tiếp. Khi việc chuyển tiền thành công, bạn có thể xem lại số dư, lịch sử giao dịch và trạng thái của các giao dịch đang chờ bằng việc bấm vào nút menu ở góc trên bên trái màn hình.


Nhận Dash và xem số dư trên ví Dash Wallet cho iOS
Gửi
Màn hình gửi DASH cho bạn hai chọn lựa để nhập địa chỉ cần thanh toán: Quét mã QR hoặc Lấy địa chỉ từ vùng bộ nhớ đệm clipboard. Bạn có thể chọn để sử dụng InstandSend để có xác thực tức thời, hoặc tắt tính năng này để gửi theo cách bình thường mà nó sẽ cần nhiều thời gian hơn để chờ xác thực. Tuy thuộc vào mã mà bạn quét, số lượng Dash yêu cầu có thể được bao gồm hoặc bạn có thể tự nhập vào. Một màn hình xác nhận sẽ xuất hiện để giải thích về mức phí và cần bạn nhập mã mở khoá ví (mã PIN hoặc TouchID). Sau đó giao dịch sẽ được gửi.


Gửi Dash từ ví Dash trên iOS
Gửi đến một địa chỉ Bitcoin
Bạn cũng có thể gửi từ ví Dash của bạn trực tiếp đến một địa chỉ Bitcoin sử dụng dịch vụ được cung cấp bởi ShapeShift đã được tích hợp trực tiếp trong phần mềm ví. Nếu bạn quét hoặc nhập địa chỉ Bitcoin, bạn sẽ được hỏi nhập vào số lượng sẽ được gửi theo đơn vị là Bitcoin thay vì tính bằng Dash. Khi bạn đã nhập số lượng, click vào nút Shapeshift! thì sẽ hiện một màn hình xác nhận bổ sung để xác nhận mức phí của ShapeShift trước khi giao dịch được tiến hành. Hãy chắc chắn rằng địa chỉ nhận Bitcoin là chính xác. (Nếu bạn thấy một thông báo lỗi về giá trị là quá thấp, bấm vào nút Dash màu xám ở trên đỉnh để nhập số lượng cần chuyển tính theo đơn vị là Dash thay vì theo Bitcoin.) Khi giao dịch được chấp nhận, ví Dash Wallet cho iOS sẽ hiển thị Shapeshift đang xử lý đến khi giao dịch được hoàn tất.


*Gửi Dash đến một địa chỉ Bitcoin qua ShapeShift từ ví Dash Wallet trên iOS *
Những tính năng nâng cao
URL Scheme
iOS allows apps to communicate with one another through URL schemes. The Dash Wallet for iOS implements the dashwallet:// scheme, allowing you to call the wallet to complete a transaction denominated in Dash. This page documents the methods available using the URL scheme.
Payment request URL format:
dashwallet://pay=<address>&amount=<amount>&(req-)IS=<0/1>&sender=<sender>
Ghi chú:
senderis both your callback URL and the name of the app that you show to the user. This is to prevent 3rd party apps from phishing.req-can be added before IS to force use of InstantSend for the transaction. If the user doesn’t have InstantSend enabled and doesn’t want to enable it, he will not be offered the option to send as a normal transaction.
The user will see something similar to this:

Yêu cầu thanh toán trên iOS
If the user enters the correct passcode, then the transaction is sent and the user is returned to the sender app following the callback URL.
Callback URL format:
<sender>://callback=payack&address=<example:XiUsEXvLjqhuz1Gunbymtw7JUwtkQXQHaa>&txid=<example:09855ac1c57725d8be2c03b53f72d1cb00ecb7b927bc9e7f5aed95cb3a985d76>
Master public key request format:
dashwallet://request=masterPublicKey&account=0&sender=<sender>
Note: account is optional and corresponds to BIP32/BIP44 account, most
of the time this should be 0. If account is not specified, we use
account 0. This will send back both the extended public key at
44’/5’/<account>’ and <account>’
Callback:
<sender>://callback=masterPublicKey&masterPublicKeyBIP32=<example:xpub68GSYNiJZ7k1beEHGmkMUjPsawFvhM7adhbXgnaY1zj5iucUgKPJNDh5iCB8KV2A9FFAGKcGZp5JtQ1XNmT7j2ErRnf8eb4Mt4wjLG6uRcN>&masterPublicKeyBIP44=<example:xpub6DTuSViCnkd1jcgoiQLcghtTAAntBX4zWhfwNMSsmcD94JATNaWZ1tC4NEv6bxcD1YA4474S2BzCDsBA97sM52jiJcmFPBiXcH9JzZSLQJm>&account=0&source=dashwallet
dashwallet://request=address&sender=<sender>
Callback:
<sender>://callback=address&address=<example:XjkMY3GiK5aHwbpg9Uaw7QCPk3QE63Nh5i>&source=dashwallet


Ví Dash cho iOS
Ví Dash Copay
Ví Dash Copay là một ví hiện đại và nhiều tính năng nó có cả phiên bản cho di động lẫn cho máy tính để bàn. Nó hỗ trợ những tính năng tiên tiến của Dash như InstantSend, sinh địa chỉ HD, sử dụng sổ danh bạ thân thiện, hỗ trợ nhiều ví trong một app và chức năng đa chữ ký dễ sử dụng. Dash Copay cũng là ví nhẹ, nghĩa là nó sẽ không cần phải tải toàn bộ blockchain, các khoá riêng và sổ địa chỉ được lưu trữ an toàn trên thiết bị của bạn trong mọi thời điểm.
Bắt đầu
Tài liệu này mô tả cách sử dụng hầu hết các tính năng thông dụng của ví Dash Copay. Các chức năng này là tương tự nhau cho các nền tảng mà nó hỗ trợ (Android, iOS, Windows, macOS và Linux), hướng dẫn và ảnh chụp màn hình sẽ dùng trên phiên bản Android, những sự khác nhau giữa các nền tảng sẽ được làm rõ khi cần.
The easiest way to install the Dash Copay for Android is from the Google Play Store.

Dash Copay for iOS is available through Apple TestFlight. To join the list of testers, send an email to elizabeth.robuck@dash.org with your Apple Account ID. For other platforms, or to view and compile the source code yourself, please see the instructions on GitHub.
Cài đặt
When you first start your Dash Copay Wallet, you will be prompted to choose between creating a new wallet or restoring an existing wallet from backup. Choose Get Started to create a new wallet, unless you have existing funds stored in another wallet using a recovery phrase. When prompted, enter and confirm a spending password to encrypt your wallet keys. You will need this password every time you want to send Dash from your wallet. At this point, you will be offered a chance to back up your wallet using a recovery phrase. It is highly recommended to do this immediately by tapping the Backup wallet button. Acknowledge the warnings, enter your password and write down the displayed recovery phrase on paper. Do not take a screenshot, since your device will likely make a copy on cloud storage, which is not necessarily under your personal control. Confirm the recovery phrase and terms of use. Your Dash Copay wallet is now ready to go!


Tạo một ví mới và sinh một câu khôi phục trong ví Dash Copay
Nếu bạn muốn khôi phục từ một ví Dash Copay đã có, chỉ cần đơn giản bấm vào Restore from backup và nhập vào 12 từ của câu phục hồi. File/text backups cũng được hỗ trợ.
Nhận
Simply tap the Receive icon at the bottom of the screen to receive Dash. The wallet will generate and display a QR code for the other device to scan, or you can tap the displayed address to copy it to the clipboard so you can paste it in another app. If you have multiple wallets, you can see the name of the wallet at the bottom of the screen, and tap it to switch between wallets. The receiving address will change and you will receive a notification when you receive the transfer.


Nhận Dash và xem số dư của bạn trong ví Dash Copay
Gửi
Depending on how your payee has provided their receiving address to you, you can send Dash by tapping either the Scan icon to use the device camera to scan a QR code, or the Send icon to paste a copied address or select an address from your Dash Copay address book. Once you have entered the address, it may be possible or necessary to enter the amount of Dash to be sent or an optional label for the recipient, and to decide if you want to send with InstantSend on or off (off by default). If you have multiple wallets, you must also choose which wallet you will use to send the funds. Once the transaction is complete, you will see a payment confirmation screen.


Gửi Dash từ ví Dash Copay
Xem các giao dịch và các số dư
Những giao dịch gần đây của bạn xuất hiện ở màn hình Home. Bạn có thể bấm vào bất kỳ giao dịch nào để xem cụ thể hơn hoặc nhập một Memo để giúp bạn nhớ được mục đích của giao dịch. Bấm vào View on blockchain để mở chức năng Insight blockchain explorer để xem đầy đủ chi tiết giao dịch. Tất cả các ví của bạn được tạo và có số dư tương ứng xuất hiện ở bên dưới các giao dịch gần đây trên màn hình Home. Bạn có thẻ bấm vào bất kỳ ví nào để xem số dư và lịch sử giao dịch trong mỗi ví đó.


Màn hình chính, chi tiết giao dịch và chi tiết ví trong ví Dash Copay
Các ví chia sẻ
Normal transactions in Dash only need to be approved by the person sending the funds. The Dash Copay wallet supports multisig, short for multisignature, meaning that it is possible to require more than one key to approve a transaction. This can be used like a joint checking account, or in situations where majority approval from a board is required to create a transaction. This documentation describes how to set up and use shared wallets.
Before you create a shared wallet, think about how many people should have access to it, and how many of those people will be required to authorise a transaction. Is it just one or two? Or a majority, or even everyone? Shared wallets allow you to specify a total number of copayers and a required number of signatures to create a transaction. These are often referred to as M-of-N transactions, where for example 2-of-3 signatures are required to transact. In practice, this is used to share responsibility for the funds between several people. It is not possible require a certain person, such as the manager, to be one of the copayers (although adding a password only the manager knows can have the same effect). Shared wallets are inherently risky because if more than the minimum required number of people involved lose access to their keys, the funds will be inaccessible forever. Make sure everyone understands the risks and responsibilities of shared wallets before committing significant funds.
Tạo một ví chia sẻ
Funds and addresses in shared wallets are managed separately from your personal wallets, so you will need to create a new wallet and then add copayers before you can begin creating transactions. From the Home screen, click the + button at the top right to add a new wallet. Select Create shared wallet and enter a name for the wallet, your own name, the total number of copayers and the required number of signatures for a transaction. Tap the Create m-of-n wallet button to create the wallet. The wallet will appear with your other wallets, listed as Incomplete until the copayers have joined.


Tạo một ví chia sẻ 2-của-3 trong Dash Copay
Tap the incomplete shared wallet when you are ready to add users. A QR code will be displayed. Have your copayers scan the code or share it to them by email or instant message by tapping the Share invitation button. Once everyone has scanned the code and entered their name, the wallet is ready for use. Simply tap the wallet to display addresses for receiving funds, but note that the addresses begin with 7 instead of X to indicated they are multisig addresses. It is possible to receive Dash to a shared wallet in exactly the same way as a normal wallet. Only sending Dash requires participation from the copayers.


Thêm các người gửi vào một ví chia sẻ 2-của-3 trong Dash Copay
Ví Dash Copay
Ví giấy Dash
Phần mềm sinh ví Dash trên giấy cho phép bạn sinh ra, mã hoá và bảo mật các khoá về một địa chỉ Dash đơn nhất trên một máy tính sách mà không kết nối vào Internet. Nó là cách tuyệt vời cho việc lưu trữ lâu dài một cách an toàn.
Giới thiệu
A paper wallet is a method of storing a private key to access funds stored on a single address. It can be generated on a computer that has never been connected to the internet, and printed out for air-gapped offline storage. As such, they are suitable for storing large amounts of Dash, but care must be taken not to lose the private key, since there is no way of recovering funds if it is ever lost. To use the key, it must be imported or "swept" into an online wallet and should not be used again. Paper wallets are extremely secure but somewhat inconvenient for everyday use compared to hardware wallets, which also offer a high degree of security.
Paper wallets use random user and machine input to create a set of keys/addresses which you then print. You can never regenerate a paper wallet once you turn off the machine. What you print is all you get. For this reason, paper wallets are somewhat vulnerable and require special care because they can get damaged, lost, destroyed or stolen. Even if you encrypt them with BIP38 (which you should), a sufficiently motivated adversary (e.g. robbery/home invasion) could bypass this encryption using the proverbial "$5 wrench attack".
The $5 wrench attack. Credit: xkcd.com
Nevertheless, together with appropriate planning, paper wallets are a highly convenient and user-friendly way to store Dash long term.
An ninh
While you can create a paper wallet using a machine that is connected to the internet, wallets that will be used to store significant funds should be generated using an offline computer running a single-use operating system to ensure that all generated data will be permanently wiped from memory once the process is complete.
A simple method of doing this is to burn a live Linux CD. Ubuntu Desktop is recommended because it will have the most drivers and is simple to use, while Tails and Kali Linux are popular choices for extremely strong security. Booting from an actual CD is most secure since it is mounted read-only, but a USB stick is generally fine as well. Both laptops and desktops can be used if you can ensure that all networking hardware is disabled when you get to the stage of actually generating your keys.
Boot from the CD and download/install your tools (or download them ahead of time to a USB drive). Disconnect from the internet, generate your keys/addresses/printouts, and power off the machine. You are now the only person with access to these addresses.
Death plan
Whichever type of cold storage you choose, make a plan to pass on the necessary data to regenerate the keys to your loved ones in the event of an accident - it will happen to us all eventually. Write down your paper wallet BIP38 decryption password or brain wallet passphrase. Then write down instructions on how to use it, and keep them separate with a clear procedure on how they can be accessed when necessary.
Công cụ
A Dash paper wallet can be generated in several ways.
- Using the generator at https://paper.dash.org/
- Using the generator at https://walletgenerator.net/?currency=Dash
- Offline using the Dash Paper Wallet source code from GitHub at https://github.com/dashpay/paper.dash.org/releases/latest
- Offline using the same code which powers both sites, by viewing the GitHub project or downloading directly
Since the source code for all three options is largely similar, this guide will use https://paper.dash.org/ as an example. The websites listed here run entirely in your web browser without sending any of the data generated to an external server, but the most secure option is to download the wallet generator and run it on a computer with a freshly installed operating system that is not connected to the internet.
This guide is based on the guide available from https://walletgenerator.net/. Please donate if you find this project useful!
Sinh địa chỉ
Go to https://paper.dash.org/ in your web browser (or open index.html if you downloaded the wallet generator). Select your language and choose Dash as the currency if necessary. The following screen will appear:

The Dash Paper Wallet Generator at paper.dash.org
Some random data is required to ensure the generated address and key are unique. Move our mouse around and/or type random characters into the text box until the process reaches 100% and the following screen appears:

Generating randomness for the Dash Paper Wallet Generator

A Dash address and private key generated using Dash Paper Wallet Generator
Once your public address and private key (shown in Wallet Import Format or WIF) are visible on the Single Wallet tab, you should immediately click Print to print the data and store it securely. If you leave the page without somehow recording the dash address and private key, all data will be irretrievably lost, together with any funds you have sent to the address.
Mã hoá
The information shown on the Single Wallet tab does not have a passphrase and is not encrypted. You can print this paper wallet as it is and use it, but it is not protected from being stolen if someone finds it. You should keep it safe the same way you would jewels or cash.
If you decide that you need the additional security of a password for this address, click Paper Wallet. A different address/key pair will appear. To create an encrypted wallet, select BIP38 Encrypt? and enter a passphrase. Tick the box Hide Art? and change to 1 the field Addresses to Generate and then click on Generate. A new wallet will be generated where the private key (WIF) is encrypted using the password you specified, resulting in a BIP38 key. You now need both this BIP38 key and the password to control funds on the address, so be sure to click Print and store both safely. If you are unsure about how to use BIP38 encryption, it is highly recommended to test the workflow with a low amount of Dash before storing significant funds on an encrypted paper wallet. If you forget the password or lose the encrypted key, you will permanently lose access to your funds.
A Dash WIF address can be easily identified because it always begins with "7". A BIP38 format encrypted key can be identified because it always begins with "6P". See here to learn more about BIP38.

Encrypted paper wallet generated using Dash Paper Wallet Generator
Sending to a paper wallet and viewing the balance
You can send Dash to a paper wallet address in the same way as to any other Dash address. See the documentation for your wallet if you do not know how to do this. For this example, 0.05 Dash (minus transaction fee) has been sent to the paper wallet address. Anyone with knowledge of the public address is able to see the balance of the wallet using a block explorer, but only someone with knowledge of the private key can access the funds. You can make as many deposits and send as many coins to the same address as you’d like. Just make sure you test your wallet with small amounts first to learn how it works.

Viewing the balance of the paper wallet using the Dash Block Explorer at explorer.dash.org
Spending from a paper wallet
In order to access the funds stored on the paper wallet address, you will need the following:
- The public address
- The private key in WIF
If you encrypted the wallet, you will additionally need the following to convert the BIP38 key into the WIF key:
- Khoá riên được mã hoá dưới định dạng BIP38
- Câu mật khẩu bạn đã sử dụng để mã hoá khoá
Tuỳ chọn: Giải mã khoá BIP38 thành WIF
If you encrypted your paper wallet, you will first need to decrypt the BIP38 key. You can skip this step if your private key was not encrypted.
Go to the Wallet Details tab, enter the encrypted key in the Enter Private Key field and click View Details. You will be asked to Enter BIP38 Passphrase in the field. Enter the passphrase and click Decrypt BIP38. A range of information derived from the key will appear, the information required to access the funds on the public address appears under Private Key WIF. Copy the Private Key WIF and use it in the next step.

Dash Paper Wallet Generator displaying information derived from an encrypted private key
Nhập khoá riêng vào ví hiện tại của bạn
When you are ready to spend the balance on the paper wallet, you will need to import the private key used to control the address printed on the wallet into another Dash wallet that is connected to the internet. We will use the Dash Core Wallet in this example, although Dash Electrum and mobile wallets are also supported. Open Dash Core Wallet, click Settings and Unlock Wallet. Enter your wallet passphrase. Then click Tools and select Debug Console. The console appears. Enter the following command:
importprivkey <your private key in WIF>

Ví Dash Core đang nhập một khoá riêng
This process requires rescanning the entire downloaded blockchain for transactions involving this address, and will therefore take some time. Be patient. Once the process is complete, any transactions involving the imported address will appear in your list of transactions. If you use Coin Control, you can also enable or disable the address for spending there.


Paper wallet address successfully imported into Dash Core Wallet from WIF private key
Since the paper wallet public address still holds the funds, it can also be imported again into a second wallet if it is not destroyed. It is recommended to transfer the balance from the paper wallet to an internal wallet address or another address where you have exclusive control over the private key. This will prevent a third party from obtaining unauthorised access to the same address from the paper wallet before you do. You can then spend your balance as usual.
Once the paper wallet is empty and you are sure it will not be receiving any further deposits, you can destroy the paper.
Ví giấy Dash
Các loại ví cứng
A hardware wallet is a type of device which stores private keys for a blockchain in a secure hardware device, instead of in a database file such as wallet.dat used with common software wallets. This offers major security advantages over software wallets, as well as practical benefits over paper wallets. To date, there is no verifiable evidence of hardware wallets being compromised by viruses, and they are also immune to keylogger attacks that could be used to steal passwords to unlock the private keys used with software wallets.
Các ví phần cứng hoạt động bằng cách lưu khoá riêng của bạn trong một phần được bảo vệ bởi bộ vi điều khiển. Không thể để các khoá riêng của bạn ở trên thiết bị dưới dạng không mã hoá - chỉ đầu ra được ký trên một mã băm mới được truyền tài đến máy tính/điện thoại để tương tác với blockchain. Hầu hết các ví phần cứng đều có màn hình để cho phép bạn xác nhận một cách độc lập địa chỉ mà bạn muốn gửi tiền đến để đảm bảo sự chính xác.
Phần này liệt kê hầu hết các ví phần cứng thương mại thông dụng mà hỗ trợ Dash, mặc dù một vài dự án khác của những người nhiều tình cũng có thể có.
Giới thiệu
Hardware wallets offer you the security of storing your keys in secure device while still allowing you to make simple transactions through a web interface. Three major manufacturers of hardware wallets currently exist, with Dash supported on all of them.
Trezor
Developed by Czech startup SatoshiLabs, the $99 device is essentially a USB dongle designed to add an extra authentication layer to all outbound bitcoin transactions. Trezor has supported Dash since January 2017 with the release of firmware version 1.4.2.
By virtue of its design, Trezor can be used to sign transactions on 'unsafe' computers and is impervious to keyloggers and many other vectors of attack, so even if your host PC is compromised, the attacker has no way of getting your private key. That's also where the device gets its name, as 'trezor' translates into 'vault' in most Slavic languages, including Czech. A kind of 'vault' for your private bitcoin key, Trezor claims to use a number of clever tricks to maintain security even on compromised and unsafe machines.
- Site: https://trezor.io
- Review: https://www.dashforcenews.com/trezor-hardware-wallet-review
- Mua: https://shop.trezor.io
- Ví: https://wallet.trezor.io
It is also possible to operate a Dash masternode using your Trezor. See here for details.
Bắt đầu
Once you have bought your Trezor from https://shop.trezor.io or an authorized reseller, you will need a wallet to use it with. Trezor supports the following Dash wallets:
- Trezor Wallet (documentation)
- Dash Electrum Wallet (documentation)
- Dash Masternode Tool (documentation)
This documentation describes how to get started using the official Trezor web wallet at https://wallet.trezor.io. Always confirm the URL is correct and SSL encryption is enabled when working with the Trezor Wallet. Follow these steps when setting up your Trezor for the first time:
- Inspect the packaging for tampering. There should be two seals and the flaps should be glued shut. It should be impossible to remove the device without totally destroying the packaging.
- Go to https://trezor.io/start/ and watch the video to introduce the concepts of a shifting PIN layout and recovery seed.
- Go to https://wallet.trezor.io/ to begin the setup process.
- If not already installed, install the Trezor Bridge application from https://wallet.trezor.io/#/bridge
- Connect the Trezor to your computer when prompted.
- If this is the first time you connect your Trezor, you will be prompted to install firmware. Click the Install button, wait for the download and confirm on the device.
- When complete, the device will display a fingerprint. Verify that this matches the fingerprint shown on the screen. Note that this is hexadecimal and therefore not case-sensitive.
- After verification is complete, disconnect and reconnect your device. Enter a device label on the screen that appears.
- Enter and confirm a PIN by clicking on the squares according to the mapping shown on the device.
- Your Trezor device will now display a sequence of 24 words on the screen. This is your recovery seed. Write the words down in the order they appear on the recovery card. Never store your recovery seed in any digital format, including photos or text.
- Verify the seed against what you have written down and store it in a safe place.
- You will be asked to enter your PIN again.
- The Trezor Wallet will appear with a message that your device is ready for use. Your device name will appear on the device.
- Switch to the Dash wallet using the menu at the top left. You can now use your Trezor to send and receive Dash.

Trezor Web Wallet for Dash ready for first use
Nhận Dash
We will now create a Dash receiving address and attempt to receive 1.0 DASH.
- In the Trezor Dash wallet, click Account #1, then click Receive.
- A Dash address will appear. Click Show full address to verify the address on the Trezor device.

- Send 1 DASH to this address using an exchange or another wallet.
- Once the transaction is confirmed, it will appear on the Transactions tab of your Trezor Wallet.

Trezor Web Wallet after receiving Dash
Gửi Dash
We will now send the Dash (minus transaction costs) to an external address.
- In the Trezor Dash wallet, click Account #1, then click Send.
- Enter the Dash address and amount in the fields.

- Enter your PIN.
- Confirm the address on the device, then confirm the action.

- The transaction will be transmitted to the network and the recipient receives the funds.

Trezor Web Wallet after sending Dash
Advanced Functions
Your PIN is your primary form of security when using your hardware wallet. It is considered secure because the layout of the PIN keypad changes each time you use it. If you suspect your PIN has been compromised, change it using the following instructions. For extra security, or if you believe you may be subjected to duress at some point in the future, you can add a passphrase to reveal further wallets which only appear when you enter your passphrase. Since the passphrase acts as a cryptographic salt, there is no "correct" passphrase - a different wallet will be displayed for each passphrase you enter. Be absolutely sure you understand passphrases before using them. For more information, see here.
You can change your Trezor PIN from both the Trezor wallet and DMT.
From Trezor: Go to https://wallet.trezor.io and click the cog icon next to your username. Then click Change PIN. You will need to confirm you want to change your PIN on the hardware device, then enter your existing PIN and the new PIN twice.

From DMT: Open DMT and click Tools > Hardware Wallet PIN/Passphrase configuration. The following window will appear. Click Change. You will need to confirm you want to change your PIN on the hardware device, then enter your existing PIN and the new PIN twice.

You can add a passphrase to your Trezor from both the Trezor wallet and DMT. Before you add a passphrase, you should be fully aware of how it functions as a "25th word" to your seed, and the risks of forgetting your passphrase. Note that you do not need to enter a passphrase - blank is perfectly acceptable and will reveal your normal wallet.
From Trezor: Click Advanced, confirm you understand the risks and click Enable passphrase encryption. This enables a prompt to enter a passphrase each time you use your Trezor.

From DMT: Open DMT and click Tools > Hardware Wallet PIN/Passphrase configuration. The following window will appear. Click Enable. This enables a prompt to enter a passphrase each time you use your Trezor.
Your Trezor allows you to change the homescreen image from the default Trezor logo. A range of existing images can be selected, you can generate one yourself using the Trezor Homescreen Editor, or you can create and upload your own 128x64px black and white image. To change your homescreen image:
- Go to https://wallet.trezor.io and open your wallet
- Click the small cog icon next to your device name
- Click the Homescreen tab
- Select the new homescreen, then click the Set as homescreen button at the top
- Confirm the change on the Trezor device
A few sample images are available for Dash:


While losing a Trezor is not a security threat (unless someone knows your PIN and/or passphrase), it is a moderately expensive device that can be damaged by pressure or water, for example. For this reason, Dash community member tungfa has shared photos of a custom-made Trezor case. The following materials are required:
- Pelican Case 1010 Micro Case
- Foam
- Trezor + Cable
- USB Stick (for wallet.dat files + blockchains of all portfolios)
- Notepad


KeepKey
The $129 KeepKey hardware wallet features a large screen and 100% open source firmware to guarantee the security of your private keys. KeepKey has supported Dash since firmware version 4.2.10, released on March 28, 2017, and added support for InstantSend in firmware version 5.7.2, released on September 5, 2018. Follow these instructions to begin using Dash on your KeepKey device.
- Site: https://www.keepkey.com
- Review: https://coincentral.com/keepkey-wallet-review
- Mua: https://keepkey.myshopify.com/
- Product video: https://vimeo.com/133811189
It is also possible to operate a Dash masternode using your KeepKey. See here for details.
Ledger
Founded in 2014, French startup Ledger markets enterprise and consumer blockchain security solutions, including the €58 Ledger Nano S and upcoming Ledger Blue. Ledger Nano S has supported Dash since November 2016 and firmware version 1.2. Follow these instructions to add Dash support to the device.
- Site: https://www.ledgerwallet.com
- Review: https://www.dashforcenews.com/ledger-nano-s-review
- Shop: https://www.ledgerwallet.com/products
Product video:
It is also possible to operate a Dash masternode using your Ledger. See here for details.
Ví web Trezor
Các loại ví của các hãng thứ 3
Những ví này đã được phát triển bởi những lập trình viên bên ngoài để hỗ trợ cho Dash. Có rất nhiều các ví của các bên thứ ba hỗ trợ nhiều loại tiền số khác nhau tại cùng một thời điểm, hoặc tích hợp sàn giao dịch tực thời.
Giới thiệu
The Dash protocol and many Dash products such as Dash Core and the mobile wallets are entirely open source, which makes it easy for third parties to integrate Dash with their existing cryptocurrency wallet solutions. This section describes some of the third party wallets available and the functions they offer. Please note that Dash does not provide support for any of these wallets, and any listing here should not be considered an endorsement or recommendation. Contact the software vendor for support.
Abra

Abra is a multi-cryptocurrency wallet supporting Dash amongst other currencies. It is designed for investment and can be funded from your bank account, credit/debit card, cash (in the Philippines), Bitcoin, Bitcoin Cash, or Litecoin. Dash deposits and withdrawals are currently not supported.
Tải xuống


Abra is available from the Google Play Store for Android and the Apple App Store for iOS.
Tài liệu
Abra offers detailed documentation of all functions at https://abra.zendesk.com

Abra wallet running on iOS
Atomic Wallet

Atomic Wallet is a multi-asset custody-free wallet with atomic swap exchange and decentralized orderbook functionality. It provides a powerful, secure service that transparently and reliablly allows users to reduce effort spent on managing and exchanging crypto assets.
Cài đặt
All Atomic Wallet releases are available from https://atomicwallet.io - simply download and install the appropriate package for your system.
Tài liệu
Atomic Wallet offers detailed documentation of all functions at https://atomicwallet.freshdesk.com and a few quick links are also collected here:
- Getting started with Atomic Wallet
- How to install Atomic Wallet
- How to create a wallet
- Getting started with Atomic Swaps

Atomic Wallet Portfolio screen
Cobo

Cobo is a multi-currency mobile wallet supporting Dash with options to either register a cloud wallet (private keys backed up on the cloud) or generate your own HD wallet seed (private keys encrypted on your device), giving you maximum control over how you handle the crypographic keys to all assets in the wallet. The wallet offers a unique "staking" feature where users can pool their Dash to set up masternodes and enjoy weekly returns.
Tài liệu
Cobo offers detailed documentation of all functions at https://support.cobo.com

Cobo wallet
Coinomi

Coinomi is an open-source multi-currency mobile wallet available for iOS and Android. Your private keys never leave your device, and strong wallet encryption guarantees that your funds are always under your control only. Instant exchange is available directly in the wallet through ShapeShift and Changelly integrations.
Tải xuống
Coinomi is available from the Google Play Store for Android and the Apple App Store for iOS.
Tài liệu
Coinomi offers detailed documentation of all functions at https://coinomi.freshdesk.com

Coinomi wallet running on Android
Cryptonator

Cryptonator offers a web/mobile wallet which can be accessed using a simple username/password combination. It supports multiple currencies including Dash, and offers instant exchange between the various currencies. It also support Euro-denominated SEPA payments directly from within the account.
Tải xuống
Cryptonator is available from the Google Play Store for Android and online at https://www.cryptonator.com
Tài liệu
Coinomi offers detailed documentation of all functions at https://www.cryptonator.com/hc

Cryptonator wallet running on Android
Edge

Edge is a secure multi-currency wallet for iOS and Android. It offers a unique login system to store your encrypted HD seed on the cloud while still performing all sensitive operations requiring a private key on your device. Edge is fast and simple to use, allowing you to scan QR codes and sign transactions using your fingerprint ID or a simple PIN code. ShapeShift is also integrated to facilitate exchange between different cryptocurrencies.
Tài liệu
Edge offers detailed documentation of all functions at https://support.edgesecure.co and a few quick links are also collected here:
- Getting started
- How do I create a new wallet?
- How do I send money?
- How do I receive money into my account?
- What is ShapeShift and how does it work?

Edge Welcome, Receive Dash and Balance screens
Ethos

The Ethos Universal Wallet allows you to store Dash and over 100 other cryptocurrencies. It features a single recovery phrase, known as the SmartKey, with which you can restore all balances on another device. Features include human-readable usernames, ShapeShift coin conversion and a portfolio tracker.
Cài đặt
Ethos Universal Wallet is available from the Google Play Store for Android and the Apple App Store for iOS.
Tài liệu
Ethos offers detailed documentation of all functions at https://support.ethos.io and a few quick links are also collected here:
- How to Create and Ethos Account
- How to Create Your SmartKey and First SmartWallet
- How to Add Coins to a SmartWallet
- How to Receive Cryptocurrency to a SmartWallet
- How to Send Cryptocurrency from the SmartWallet

Ethos Universal Wallet on Android
Evercoin

Evercoin is a multi-currency mobile wallet combined with the full power of an instant exchange, all in one app. Advanced features like limit orders allows you to execute advantageous trades without having to copy addresses around and use complicated online exchanges. Private keys are stored on the device and backed up using a typical 12-word phrase. An Evercoin hardware wallet is also due to launch soon.
Cài đặt
Evercoin is available from the Google Play Store for Android and the Apple App Store for iOS.
Tài liệu
Read the FAQ or visit the Evercoin site to chat with the support team directly.

Evercoin wallet running on Android
Exodus

The Exodus wallet features an engaging visual design and can simultaneously store multiple currencies. It is available for Windows, Mac and Linux. It is also fully integrated with Shapeshift to offer exchange between the different currencies.
Cài đặt
All Exodus releases are available from https://www.exodus.io/releases - simply download and install the appropriate package for your system.
Tài liệu
Exodus offers detailed documentation of all functions at http://support.exodus.io and a few quick links are also collected here:

Exodus wallet Portfolio screen
Guarda

Guarda offers an entire blockchain ecosystem consisting of desktop, web and mobile wallets, OTC crypto sales and instant crypto exchange. Dash is supported throughout the ecosystem, making it an easy and convenient way for new users to get started. All keys are held by the user, ensuring the safety of your funds.
Cài đặt
Guarda desktop wallets are available from https://guarda.co/desktop for Linux, macOS and Windows, or you can use web wallet at https://guarda.co/app to create new or restore existing wallets.
Tài liệu
Guarda offers detailed documentation of all functions at https://guarda.freshdesk.com and a few quick links are also collected here:

Guarda wallet
Jaxx

Jaxx supports multiple currencies in one wallet, including Dash. It is available for almost all platforms including Android, iOS, macOS, Windows, Linux and also as a Chrome extension. Jaxx is open source software.
Cài đặt
All Jaxx releases are available from https://jaxx.io/downloads.html - simply download and install the appropriate package for your system.
Tài liệu
Jaxx offers detailed documentation of all functions at https://decentral.zendesk.com and a few quick links are also collected here:

Jaxx wallet running on various devices
Mobi

Mobi is a multi-currency mobile wallet linked to your phone number. As a hosted wallet, Mobi holds the private keys to your funds on your behalf, meaning you can restore your funds simply by receiving a text message and entering your PIN. However, you must trust Mobi to act responsibly with these private keys, and you will lose access to your funds if you lose access to your phone number. A web interface is also available, and you can use fiat currency to buy cryptocurrency in the app.
Tài liệu
Read the FAQ, join the Mobi Telegram group or send an email to support@mobi.me for support with Mobi.

Mobi wallet running on Android
Paytomat

Paytomat offers a multicurrency wallet for Android and iOS which integrates a loyalty program to incentivize retailers and consumers to transact in Dash.
Cài đặt
Paytomat is available from the Google Play Store for Android and coming soon on the Apple App Store for iOS.
Tài liệu
Join the Paytomat Telegram group or send an email to support@paytomat.com for support with Paytomat.

Paytomat wallet running on Android
Ví Edge
Các ví trên Web
Web wallets are services which keep a Dash balance for you, while maintaining control of the private keys on your behalf. Any Dash stored on exchanges falls under this category, but there are also some services able to store Dash for you through simple Google/Facebook login systems. Be extremely careful with web storage, as your Dash is only as secure as the reputation of the company storing it for you. A particular exception is MyDashWallet.org, which provides a secure web interface to the Dash blockchain while leaving you with full control of your private keys.
MyDashWallet

MyDashWallet là một giao diện web cho blockchain của Dash, được truyền cảm hứng bởi MyEtherWallet và được tạo bởi DeltaEngine.net. Nó thực sự không phải là một ví online, theo nghĩa bạn vẫn duy trì quyền kiểm soát trên khoá riêng của mình trong mọi thời điểm. Không giống rất nhiều những loại ví nhẹ khác, MyDashWallet có hỗ trợ những tính năng tiên tiến của Dash như InstantSend và PrivateSend. Dự án này là phi lợi nhuận, mã nguồn mở và sử dụng miễn phí. Bạn có thể tải một ví và giao dịch theo nhiều định dạng ví sau:
- Ví chìa khóa (dựa trên file)
- Ví cứng Ledger
- Ví cứng Trezor
- Khoá riêng
- BIP39/44 HD recovery phrase (sắp ra mắt)
- BIP32 HD recovery phrase (sắp ra mắt)
MyDashWallet cung cấp tài liệu đầy đủ và chi tiết cho tất cả các chức năng.
- Bắt đầu
- Làm thế nào để Tạo một ví Web dựa vào file chìa khoá
- Sử dụng ví cứng Ledger trên MyDashWallet
- Sử dụng ví cứng Trezor trên MyDashWallet
- InstantSend của Dash hoạt động thế nào trên MyDashWallet?
- PrivateSend của Dash hoạt động thế nào trên MyDashWallet?


Ví My Dash Wallet
Text Wallets
Text wallets (or SMS wallets) allow users without smartphones or internet access to transact in Dash using text messages on simple feature phones. Innovative shortcodes, usually in collaboration with national mobile service providers, make it relatively simple to create transactions to both send and receive Dash.
Giới thiệu
Text message (SMS) wallets allow you to easily transact in Dash using a simple feature phone. An internet connection is not required. Because text wallets require access to text messages, they generally only support specific regions. See below for details.
CoinText

CoinText is a for-purpose project to make cryptocurrency easy to use to expand economic freedom around the world. It makes it possible to transact in Dash without internet, apps, accounts or complicated addresses. CoinText currently supports Dash transactions in the USA and Canada and aims to expand to over 50 countries in coming months. It is possible to denominate the amount to be sent in both Dash and the local currency, and send Dash to both phone numbers and Dash addresses.
Instructions
Simply text START to the CoinText phone number for your region. For more the list of supported regions and more detailed instructions on how to send and receive payments, see the links below:
DashText

DashText is a service available in Venezuela to allow users to transact in Dash using text messages. The only fees are the cost of a standard SMS, incurred by the network operator. Users can send Dash to innovative shortcodes to securely confirm transactions.
Instructions
Simply text CREATE to the DashText phone number to get started. Further instructions and links will appear here once the project is ready for mass market.

Dash CoinText
Hướng dẫn sử dụng ví
Tài liệu trong phần này sẽ mô tả những chức năng thông dụng và những câu hỏi liên quan đến các loại ví.
Khôi phục ví
Long-time users of cryptocurrency sometimes find old wallet files on USB drives or cloud storage that they have forgotten about. Others may have a backup, but can't remember the software they used to create it, or have forgotten the password. Other users may have an old version of Dash Core that no longer works because the network has upgraded. This documentation is intended to help these users restore access to their funds.
Determining the backup format
The first step is to determine the format of your backup. In most cases, this will either be a file, probably named wallet.dat, or a phrase of words. In some cases, you may have stored the private key for a Dash address directly. The following list shows the possibilities and methods to restore your wallet in order of probability.
- Backup is stored in an older version of Dash Core that no longer works
- Follow instructions for restoring wallet files using Dash Core
- Sao lưu là một file
- If file name is similar to wallet.dat, try to restore using Dash Core
- If file name is similar to dash-wallet-backup or includes the word 'mobile', try to restore using Dash Wallet for Android
- Sao lưu là một chuỗi các từ
- If 12 words long, try to restore using Dash Electrum wallet or Dash wallet for Android or iOS, depending what you used to create the backup
- If 13 words long, try to restore using Dash Electrum wallet
- If 12, 18 or 24 or 25 words long, try to restore with the hardware wallet you used to create the recovery phrase
- Backup is a long string of random characters or a QR code
- If 34 characters long and starting with X, this is a public address and cannot be used to restore access to lost funds. You need the private key.
- If 51 characters long and starting with 7, this is a private key in WIF, import using Dash Core
- If 58 characters long and starting with 6P, this is a BIP38 encrypted private key, decrypt using paper wallet then import using Dash Core
Once you have determined your backup format, follow the links to view the restore guide for that format.
File Backups
One of the most common wallet backup formats is a wallet.dat file from Dash Core wallet. Before you begin, make absolutely sure that you have a copy of this file stored somewhere safe in case the restore process accidentally corrupts your wallet file! In most cases, wallet.dat backups will also be protected by a password, which you will need to know to regain access to your Dash funds. If you already have Dash Core installed, first ensure it has been updated to the latest version by clicking Help > About Dash Core. Compare this with the latest available version of Dash Core on the website as follows:


Comparing the installed version of Dash Core with the latest version available on the website
Update Dash Core to the latest version according to the installation instructions. If you have only a wallet file and no existing installation of Dash Core, simply install Dash Core according to the installation instructions and start it once to create the DashCore folder. Then close Dash Core and copy the wallet.dat file you want to restore to the DashCore folder in the location specified below, replacing or renaming the existing file.
| Nền tảng | Đường dẫn đến thư mục dữ liệu | How to navigate |
|---|---|---|
| Linux | ~/ | Go to your home folder and press Ctrl+H to show hidden files, then open .dashcore |
| macOS | ~/Library/Application Support/ | Press Shift + Control + G, type ~/Library/Application Support, then open DashCore |
| Windows | %APPDATA% | Press Windows Key + R and type %APPDATA%, then open DashCore |
If your existing version of Dash Core is older than v0.12.1.x, you may
need to rename your data folder from Dash to DashCore.
To repair a broken installation, navigate to the DashCore folder and delete all .log and .dat files except wallet.dat. The following files can be safely deleted:
- banlist.dat
- budget.dat
- db.log
- debug.log
- fee_estimates.dat
- governance.dat
- mncache.dat
- mnpayments.dat
- netfulfilled.dat
- peers.dat
Leave .conf files and the folders (such as backups, blocks,
chainstate, etc.) intact, since they will help you get started
faster by providing a copy of the blockchain and your settings.
Now open Dash Core and wait for blockchain synchronization to complete. Your wallet will be restored/upgraded and all balances should be displayed. You should ensure you have the correct password by trying to unlock your wallet from Settings > Unlock Wallet to make sure you can actually create transactions using your balances. If you have any problems with your balance not appearing, try to force a rescan of the blockchain by going to Tools > Wallet Repair and selecting Rescan blockchain files. Rebuild index may also help. Dash Core will restart and perform a full scan of the blockchain.


Forcing Dash Core to rescan the blockchain
At this stage, recovery is complete and you should make another backup using File > Backup Wallet or following the instructions here. If you have any further problems, try asking on the forum, Reddit or the #dash- support-desk channel at Dash Nation Discord.
Similar to Dash Core wallet, Dash Wallet for Android can back up your
wallet to a file. To restore this wallet on another device, simply copy
the backup file to the /Downloads folder of your device using either
a computer connected by USB or a file manager app on the device. Ensure
your Dash wallet is fully updated in the Play Store, then open Dash. If
you have an existing balance, either make another backup or transfer it
to an external address, because restoring a wallet will replace your
existing wallet!
Click the menu button in the top left corner, select Safety > Restore wallet and select the appropriate file from the list. Enter your password and click Restore. This may take some time, and your balance will be displayed when complete.


Restoring a file backup using Dash Wallet for Android
Câu phục hồi
If you have a 12-word phrase and feel certain your backup was made on an iOS or Android mobile device, follow these instructions.
Ensure your Dash wallet is fully updated in the Play Store, then open Dash. If you have an existing balance, either make another backup or transfer it to an external address, because restoring a wallet will replace your existing wallet! Click the menu button in the top left corner, select Safety > Restore from recovery phrase and enter your 12-word phrase.


Restoring a 12-word recovery phrase using Dash wallet for Android
Ensure your Dash wallet is fully updated in the App Store, then open Dash. If this is the first time you are opening the app, you can enter your recovery phrase directly by selecting Recover wallet on the start screen. If you have an existing balance, either make another backup or transfer it to an external address, because restoring a wallet will replace your existing wallet!
Click the menu button in the top left corner, select Settings > Start/recover another wallet. Enter your current wallet recovery phrase, then the app will reset and you will see the option to Recover wallet again.


Restoring a 12-word recovery phrase using Dash wallet for iOS
Ensure you are using the latest version of Dash Electrum according to the installation instructions here. Dash Electrum supports multiple simultaneous wallets, so you can safely restore to a new wallet file without losing your old wallet. Click File > New/Restore and enter a file name to store your new wallet. Then select I already have a seed and enter your 12/13-word recovery phrase. Enter a new password for your wallet and click Next to recover your addresses from the recovery phrase.


Restoring a 12-word recovery phrase using Dash Electrum
If your 12, 18 or 24-word recovery phrase was generated by a hardware wallet, follow these instructions:
You can use your Dash iOS recovery phrase with Dash Electrum to recover funds if you lose access to your iOS device for any reason. However, since the wallet derivation paths are not identical, the process only works in one direction, meaning it is not possible to restore a Dash Electrum wallet using the Dash iOS wallet. Also, because the import process uses an xprv key rather than the recovery phrase directly, it will not be possible to display the recovery phrase in Dash Electrum. It is therefore recommended to move the funds (either to a standard Dash Electrum wallet or some other wallet) once recovery is successful to ensure that standard backup procedures work as expected.
Recovery takes place in two steps. First, we will convert the Dash iOS recovery phrase into an xprv key. In the second step, we will import the xprv key into Dash Electrum.
Go to the BIP39 Mnemonic Code Converter page. This is a useful tool for manipulating/displaying BIP32/39 seed data. If you are not comfortable performing this procedure online, an offline version is available by downloading the file described in these instrutions. Once the tool is loaded in your browser, complete the following steps:
- Enter your 12 word seed phrase in the BIP39 Mnemonic field.
- Leave BIP39 Passphrase blank.
- Set coin to Dash.
- Under Derivation Path, click the BIP44 tab.
- Copy the value shown in Account Extended Private Key.
- Open Dash Electrum and click File -> New/Restore.
- Type a name for your wallet.
- Select Standard wallet.
- Select Use public or private keys.
- Paste in your value from Account Extended Private Key.
- Optionally enter a password.
Dash Electrum should now detect your Dash iOS balance and you should have complete access to your funds. The seed phrase won't be available in Dash Electrum , so you will just need to follow the steps above again if you want to restore this wallet from the recovery phrase again. It is recommended to send your funds to a new Dash Electrum wallet instead and follow standard backup procedures.
Older versions of the Dash iOS wallet used BIP32 addresses under the
m/0' derivation path. The wallet should migrate these funds over to
BIP44 addresses during normal use, but some residual balance may be
under this derivation path, so restoring the BIP32 Extended Private
Key may be helpful in some situations. Please see this forum thread
for further discussion on this process.
Các khoá riêng
Most wallets offer a function to import an address from a private key, see the documentation for your wallet for specific instructions. While private keys can be stored in many ways, in this example we will work through the process of restoring a private key from a paper wallet using Dash Core. If you only have a QR code and not the key, use a barcode scanning app (Android or iOS) to read the code first.
First, start Dash Core and unlock your wallet by selecting Settings > Unlock Wallet. Enter your password, then open the debug console by selecting Tools > Debug Console. In the console, type the following, replacing the example private key with your key:
importprivkey 7rPQWnMrh3oWLtZrzt1zLRSCVyuBbwnt7fRBXPp2EwcPhtzXSzp

Importing a private key using the debug console in Dash Core wallet
Dash Core will rescan the blockchain for transactions involving the public address of this key and enter the transactions and balance in your wallet.
The private key must be in wallet import format (WIF). If your key is encrypted using BIP38 (key begins with 6P instead of 7), you must first decrypt it to view the key in WIF. To do so, go to https://paper.dash.org/ and click Wallet Details. Enter the encrypted private key in the field and click View Details. You will be prompted for the password, and your keys will be decrypted. Find the key named Private Key WIF and import this into your wallet.


Decrypting a BIP38 encrypted key to WIF for import in Dash Core wallet
Forgotten Passwords
In most cases, if you selected a strong password and have forgotten or lost it, there is practically no hope of recovery. The encryption used by the Dash wallets is extremely strong by design, and a well-chosen password should defeat most brute force cracking attempts. If you can recall some details of the password, particularly its length or sequences of characters that may be included, then brute force password cracking techniques may be worth attempting. Several services exist to do this, or you can attempt it yourself. Because Dash Core is based on Bitcoin Core, most approaches to apply brute force to crack a Bitcoin wallet will also work for Dash wallets.
Ký và Kiểm tra thông điệp
Dash wallets function by securely storing the private keys used to create transactions using publicly visible addresses on a distributed ledger called a blockchain. In some cases, it may be necessary to verify an address to demonstrate control of the funds that it holds, that you can receive using the address, or even to verify your identity to an exchange that has previously seen a transaction from that address. To avoid phishing attacks, take great care when sending signed messages to parties you do not trust, since ambiguously worded messages could be used to impersonate your identity.
Signing messages requires a private key. Verifying messages requires a public address. In this way, you can write an arbitrary message and generate a signature that could only have been created by a user with control of the private key for this address. Any user with the message, the public address and the signature can easily verify that only you could have created the signature. Messages are not stored on the blockchain. Instead, you must send these three text snippets (message, address and signature) to your intended recipient using another communication channel, such as email. As an example, you can test the following message and signature and verify that it was signed by the given address:
Thông điệp: Documentation test signature Địa chỉ: XwHihwiQzheVKbT76e7ZhPkujDCQGEZC6P Chữ ký: IKaEt7MTb4Y57WIde5TLUkm1vbVsjk/L9eG+TE2tdQhMeK9vGgTsqcVOTmXXQ6QA0/WQtxqPURH2qZG27YR2VE0=
Ký một thông điệp
Những ảnh chụp màn hình sau cho thấy cách ký một thông điệp sử dụng ví Dash Core (File > Ký thông điệp) và ví web Trezor (Sign & Verify > Sign message) và DMT (Tools > Sign message with HW for current masternode's address):


Ký vào các thông điệp trong Dash Core, ví web Trezor và DMT
Kiểm tra một thông điệp
Những ảnh chụp màn hình sau cho thấy cách kiểm tra một thông điệp sử dụng ví Dash Core (File > Ký thông điệp) và ví web Trezor (Sign & Verify > Sign message):


Đang kiểm tra các thông điệp trong Dash Core và ví web Trezor. Chú ý rằng thông điệp được kiểm tra bởi Dash Core đã được sinh ra trong Trezor và ngược lại
Thu nhập và Chi tiêu
Dash được thiết kế từ đầu để thực hiện chức năng giống như tiền mặt. Tài liệu này sẽ chia sẻ về việc người dùng Dash bằng cách nào và ở đâu có thể quản lý tất cả những tài chính cá nhân của họ thông qua Dash.
Thu nhập
A range of services and businesses are available to convert your wage to and from Dash as you receive it. It is of course easiest to receive payment from your employer in Dash directly, however this may not always be an option. Uphold allows you to instantly and automatically convert any received deposits to and from Dash. Building on this functionality, Bitwage allows you to invoice and receive payment from any employer, practically anywhere in the world, and have a percentage of your wage immediately converted to Dash. You can then withdraw your wage to any Dash wallet for spending or saving. For more information, see the following blog posts:
Chi tiêu
Danh bạ các thương nhân
Có thể tiêu Dash ở hàng trăm cửa hàng và dịch vụ cả trên mạng cũng như ở các địa điểm vật lý.

Khám phá Dash liệt kê các doanh nghiệp trên khắp thế giới chấp nhận Dash, nó được sắp xếp theo các phân loại. Bạn có thể thêm doanh nghiệp của mình vào danh sách này một cách rất dễ dàng, và hãy mô tả ngắn gọn phần giới thiệu để gây ấn tượng cho người dùng Dash. Trang web này được quản lý và duy trì bởi Dash Force và đã được nêu bật ở trang Dash Force News <https://www.dashforcenews.com/300-businesses-accept-dash-worldwide- come-blockcypher-grants>`_.
Thẻ ghi nợ
Thẻ ghi nợ hoạt động bằng việc trả trước bằng Dash để nạp tiền cho tài khoản sau đó có thể rút tiền mặt ở máy ATM hoặc chi tiêu only hoặc tại bất cứ nơi nào hỗ trợ thẻ ghi nợ/tín dụng. Dash có thể được trao đổi tại thời điểm mua hoặc trước đó. Để có được cái nhìn toàn cảnh hoặc bài đánh giá về tất cả các loại thẻ hiện hành và những loại sắp ra mắt bao gồm các thẻ được cấp vốn bởi hệ ngân sách của Dash, hãy xem bài báo này trên Dash Force News.
Những diễn tiến nhanh chóng gần đây về việc áp dụng các quy định đối với các loại tiền số như Dash và các giải pháp sàn giao dịch tức thời như ShapeShift có nghĩa là việc có các thẻ ghi nợ là không có gì đảm bảo ở tất cả các khu vực pháp lý. Hãy kiểm tra với các nhà cung cấp sau đây để biết thông tin cập nhật về tính khả dụng của thẻ ghi nợ Dash.
TỪ CHỐI TRÁCH NHIỆM: Danh sách dưới đây chỉ có tính chất cung cấp thông tin. Dash Core không chịu trách nhiệm về việc các giao dịch thực hiện bị lỗi đối với các nhà cung cấp, hoặc tính chính xác của thông tin trên trang web này.
- Shakepay

Shakepay là một thẻ ảo (iOS và Android) và một thẻ nhựa được hỗ trợ bởi VISA và có thể sử dụng ở Canada. Thẻ này có thể nạp giá trị bằng Bitcoin, Dash và Ethereum, và số dư có thể theo dõi bằng đô la Mỹ, đô la Canada, và Euro. Xem ở đây để đọc bài đánh giá trên Dash Force News.
- Wirex

Wirex cung cấp ví tiền số, dịch vụ chuyển tiền và bán lẻ tiền số, và có thể một thẻ vật lý cũng sẽ được ra mắt trong thời gian tới. Vào ngày 2 tháng 10 năm 2017 Wirex công bố hợp tác với Dash và tích hợp việc nạp tiền bằng Dash vào thẻ Wirex.
- FuzeX

The FuzeX Card & FuzeX Wallet strive to offer an all in one payment solution that provides a smarter way to pay. The card offers real-time exchange of cryptocurrency at the time of purchase. The goal is to make paying with cryptocurrency secure, fast and a seamless process for everyday use.
- Paycent

Paycent cung cấp phần mềm ví cho iOS và Android mà có thể nạp tiền bằng cả tiền thông thường và tiền điện tử. Người dùng có thể giao dịch với người khác ngay trong app, xác định bằng số điện thoại hoặc đặt mua thẻ ghi nợ vật lý để có thể chi tiêu. Dash là đối tác mạng ưu tiên của Paycent.
- SpectroCoin

Spectrocoin cung cấp dịch vụ dịch vụ sàn giao dịch, ví và dịch vụ POS, với một thẻ vật lý có thể sẽ sớm ra mắt. Dash, Bitcoin và Ethereum đã được hỗ trợ cũng như hơn 20 loại tiền fiat.
- MoneyPolo

MoneyPolo cung cấp dịch vụ sàn giao dịch và chuyển tiền, thẻ trả trước và khả năng giữ các tài khoản với nhiều loại tiền khác nhau. Có thể gửi và rút tiền bằng DASH, BTC, ETH, LTC, BCH và BTG, và nó cũng có khả năng nạp tiền vào thẻ trả trước hay bất kỳ tài khoản ngân hàng nào trên thế giới.
- Bitwala

Bitwalla hiện đang chuẩn bị các tài liệu pháp lý cho việc tái phát hành dịch vụ card ở Châu Âu, nó cũng đã từng hỗ trợ Dash trước đây.
- TenX

TenX đang thảo luận với các cơ quan quản lý để bắt đầu tích hợp Dash với ứng dụng ví và thẻ vật lý của họ.
Thuế
Những luật thuế là rất khác nhau tuỳ thuộc nơi bạn sống. Những dịch vụ sau đây sẽ giúp bạn tính thuế mà bạn sẽ có trách nhiệm phải nộp.
Bắt đầu
Dash welcomes new merchants and supports integration through a standardised onboarding process. It's easy to begin accepting payments in Dash and enjoy the following benefits:
- Settlement within seconds and clearance within minutes
- Ability to accept payments from any market around the world
- Irreversible transactions to prevent fraud
- Advanced privacy for both customers and merchants
- Lowest fees in the industry
A three-part course on why Dash is a popular choice for payments and how integration takes place is available in English and Spanish on DashAcademy.com. To get started with an integration in your sales system, simply select an online or point of sale payment solution from the lists below. If you are unsure, GoCoin is a popular choice due its support for InstantSend, while CoinPayments supports the largest range of online shop software. Anypay is an incredibly simple solution for retail stores, and also supports InstantSend. Larger integrations may require some customisation. This documentation also describes the administrative and technical steps required to integrate various Dash services.
Many major merchants accept Dash - check out Bitrefill or CheapAir for examples of what merchant integration can look like. Once you are up and running accepting Dash, consider adding your business to the directory maintained at Discover Dash for increased visibility.
Payment Processors
This section lists known payment processors supporting Dash and the business platforms they support. Please conduct thorough research before choosing a payment provider to ensure your needs will be met.
Online Stores
Due to the wide range of platforms for online stores, the following table is intended to help you select an appropriate payment processor for your existing store.
| CoinPayments | GoCoin | PayBear | Coingate | CryptoWoo | DashPayments | GoURL | CopPay | MyCryptoCheckout | CDPay | |
|---|---|---|---|---|---|---|---|---|---|---|
| aMember Pro | ✓ | |||||||||
| Arastta | ✓ | |||||||||
| bbPress | ✓ | |||||||||
| Blesta | ✓ | ✓ | ||||||||
| BoxBilling | ✓ | |||||||||
| Drupal Commerce | ✓ | |||||||||
| Easy Digital Downloads | ✓ | ✓ | ✓ | |||||||
| Ecwid | ✓ | |||||||||
| Give (Donations) | ✓ | |||||||||
| Hikashop | ✓ | |||||||||
| Jigoshop | ✓ | |||||||||
| Magento | ✓ | ✓ | ✓ | ✓ | ||||||
| MarketPress | ✓ | |||||||||
| NATS | ✓ | |||||||||
| nopCommerce | ✓ | |||||||||
| OpenCart | ✓ | ✓ | ✓ | ✓ | ✓ | |||||
| osCommerce | ✓ | ✓ | ✓ | |||||||
| PaidMembershipsPro | ✓ | |||||||||
| PrestaShop | ✓ | ✓ | ✓ | ✓ | ||||||
| Shopify | ✓ | |||||||||
| Tomato Cart | ✓ | |||||||||
| Ubercart | ✓ | ✓ | ||||||||
| VirtueMart | ✓ | ✓ | ||||||||
| WHMCS | ✓ | ✓ | ✓ | |||||||
| WooCommerce | ✓ | ✓ | ✓ | ✓ | ✓ | ✓ | ✓ | ✓ | ✓ | |
| WP eCommerce | ✓ | ✓ | ||||||||
| X-Cart | ✓ | |||||||||
| ZenCart | ✓ | ✓ | ✓ |
Point of Sale
A range of Point of Sale systems are available. Many function as an app or simple website serving a checkout interface and QR code generator, while others support custom features such as NFC or a rewards scheme. QR.cr, Spark Payments and Anypay are supported by the community and are particularly widespread.
| Tên | App? | Web interface? | Hardware? | NFC? | Notes |
|---|---|---|---|---|---|
| 34 Bytes | ✓ | Hardware terminal capable of printing receipts. | |||
| Alt36 | Full stack system. Supports integration of suppliers and employees. | ||||
| Anypay | ✓ | Popular solution for smartphones with web interface and backend. | |||
| CDPay | ✓ | ||||
| CoinPayments | ✓ | ✓ | |||
| CopPay | ✓ | ||||
| EletroPay | ✓ | POS device with ePaper display for unique QR codes and built-in receipt printer. | |||
| Festy | ✓ | NFC wristband payments for festivals. | |||
| GB CortexPay | ✓ | Professional hardware terminal with multiple payment options. | |||
| Paytomat | Token rewards for crypto payments. | ||||
| QR.cr | ✓ | ✓ | Cheap solution with many features to use a mobile phone as a POS terminal. | ||
| QuikWallet | ✓ | ✓ | India only. Also supports SMS payment. | ||
| Spark Payments | ✓ | ✓ | Available for Android, Windows, macOS, Linux. 94 exchange rates and Uphold.com supported |
Installation Examples
This section contains worked examples of how to install, configure and process your first payment using the payment processors listed in this documentation.
WooCommerce and GoCoin
If your online store is built on WooCommerce, you can simply install GoCoin as an additional payment gateway and immediately begin accepting Dash. This guide assumes you have already installed Wordpress, installed WooCommerce and created at least one product in your store.
Go to the gocoin-woocommerce GitHub Releases page and download a zip file of the latest version of the plugin, as shown below. In your WordPress administration backend, select Plugins -> Add New and then click Upload Plugin. Click Choose File and select the file you just downloaded, then click Install Now and Activate Plugin.


Next, go to the GoCoin merchant sign up page and create an account. Once you are logged in, go to Preferences, select Dash and click Add DASH Address to add a payment withdrawal address. You will receive an email with a link to confirm the address. Next, go to Developers and copy the Merchant ID into a temporary text file. Next, click Get Key to display a valid API key. Copy this key into your temporary text file as well. Finally, you can optionally add a Dash logo to your checkout by Profile section and clicking Logo -> Upload.


Back in the WordPress plugins section, click the Settings button for the WooCommerce plugin and navigate to Checkout -> GoCoin section. Ensure the GoCoin plugin is enabled here, then enter the Merchant ID and API Key in the appropriate fields as shown below, modifying the other fields as necessary. Click Save changes when you are ready.

Your customers will now see an option to pay with Dash when completing the checkout process for an order. The payment will be processed by GoCoin, and you will receive emails detailing each purchase procedure. You can choose how often you want to withdraw your payments, to which Dash address and various other options in the GoCoin administration section. See the GoCoin Documentation for more information.


Completing payment through the GoCoin payment processor
WooCommerce and CoinPayments.net
If your online store is built on WooCommerce, you can simply install CoinPayments as an additional payment gateway and immediately begin accepting Dash. This guide assumes you have already installed Wordpress, installed WooCommerce and created at least one product in your store. A video of the process to install the CoinPayments payment processor is also available.
In your WordPress administration backend, select Plugins -> Add New and type "coinpayments.net" into the search box. A plugin named CoinPayments.net Payment Gateway for WooCommerce should appear. Click Install Now to install the plugin. Alternatively, you can download the plugin from the WordPress website as a zip file and upload it using the Upload Plugin button. Once the plugin is installed, click Activate to begin configuration.

Installing the CoinPayments.net WooCommerce plugin
Next, go to CoinPayments.net and sign up to create an account. Once you are logged in, go to Account -> Coin Acceptance Settings and enable Dash, as well as optionally entering a withdrawal address. Next, go to Account -> Account Settings and copy Your Merchant ID from the Basic Settings area into a text file. Then navigate to the Merchant Settings section and enter a long, random series of characters for the IPN Secret. Copy this code to your temporary file as well.
Back in the WordPress plugins section, click the Settings button for the WooCommerce plugin and navigate to Checkout -> CoinPayments.net section. Ensure the CoinPayments plugin is enabled here, then enter the Merchant ID, IPN Secret and Description in the appropriate fields as shown below. Click Save Changes when you are ready.

Configuring the CoinPayments.net WooCommerce plugin
Your customers will now see an option to pay with Dash when completing the checkout process for an order. The payment will be processed by CoinPayments.net, and you will receive emails detailing each purchase procedure. You can choose how often you want to withdraw your payments, to which Dash address and various other options in the CoinPayments administration section. See the CoinPayments Documentation or Merchant Tools for more information.


Completing payment through the CoinPayments.net payment processor
Point-of-Sale with Anypay
Anypay.global allows you to quickly start accepting point-of-sale payments in Dash at a physical store. The service functions as a simple website that you load on any internet- connected and touch-enabled device, such as a smartphone or tablet.
Begin by registering an account with Anypay. You will be asked to specify an email address and password. Once you are signed in, you must add a Dash payment withdrawal address.


Setting up Anypay
Once this has been set up, you can begin processing payments immediately. Simply log in to https://pos.anypay.global or tap Merchant Point of Sale App in the admin area using your device. A keypad will appear. Enter the invoice amount in USD or DASH and press the COLLECT button at the bottom of the screen. The app will generate a QR code for your customer to scan. Once payment is complete, you will be able to create a new invoice by tapping Next Payment, or view the status of your invoices by tapping the menu button in the top left corner of the keypad, or checking the Invoices section of the administration backend. Withdrawals are processed to the address you specified shortly after payment is complete.


Point-of-Sale with Spark
Spark Payments allows you to quickly start accepting point-of-sale payments in Dash at a physical store. The system works as an app, and is available for Android, macOS, Windows and Linux, with an iOS progressive web app (PWA) in development.
The project is an external terminal application for processing Dash payments in brick and mortar stores. The merchant types the sale amount in their local currency (94 currencies supported), the application will generate a QR code sale for the proper amount of Dash for the customer to scan. Then the terminal will provide feedback on the status of the payment (received, timed out, partial, instantsend or regular), and if set up - fiat conversion through uphold.com. A guide on how to set up Spark with Uphold to convert payments to fiat currency is available in English and German.
To use Spark, open the app on your device. If this is the first time you are using the app, you will need to specify a Dash address to receive payments from the system, as well as your chosen fiat currency. You can change this information at any time from the menu. To generate a payment invoice, enter the amount in fiat currency. Spark will generate a QR code containing your specified address and the requested amount, denominated in Dash. The customer scans the QR code, and the app will display a visual indication when payment is complete.

Configuring and receiving payment using Spark Payments
Payment systems like Anypay and Spark can be integrated with your existing terminal and/or accounting software (such as Square Register, by recording sales invoiced in Dash as an Other Payment Type in the system. This allows you to keep track of your Dash income as easily as if you were accepting cash.
Administrative Processes
It's easy to get started integrating Dash, but you will need to make some decisions about whether you plan to convert your income earned in Dash into your local fiat currency, or if you prefer to hold some or all of it in Dash. Most payment processors offer a range of fiat conversion options, although various fees and limits may be applicable.
Onboarding Process
New merchants typically go through the following steps when joining the Dash ecosystem:
- Set up a Dash wallet
- Identify an appropriate payment processor
- Decide on how and when to convert funds
- Implementation and testing
- Release and marketing
- Integration on DiscoverDash
Promoting Dash
A wide range of ready-to-go visual products are available to help you promote Dash as a payment method to your customers. This includes promotional graphics and stickers, fonts for consistent visual design and guidelines on how to use the Dash visual identity. See the Marketing section for more information.
The reduced fees may also offer an additional incentive for your customers to pay with Dash, particularly in businesses with high cash handling fees or where it is necessary to add a fee to process credit card transactions.
Currency Conversion
Cryptocurrency is a relatively recent development, and rapid development in the ecosystem coupled with various barriers to access and heavy trading mean that fiat-denominated value is subject to considerable fluctuation. As a merchant, you will need to make decisions about how much of your income taken in cryptocurrency should actually be held in cryptocurrency, and how much should be converted back to a fiat currency (such as USD) directly. Different payment processors offer different solutions to this problem.
Services such as GoCoin are able to convert a specified percentage of received payments into a range of fiat currencies for withdrawal. Others such as CoinPayments offer the ability to diversify your payments into a range of different cryptocurrencies, but require you to set up automatic withdrawals to an exchange for conversion to fiat currency. Finally, services such as Uphold allow you to convert your Dash payments between various currencies and commodities very easily, and even offer automated investment services.
Note that these listing are not endorsements, and you must complete your own due diligence and/or seek advice from a tax and investment specialist before investing.
Legal considerations
Tax, legal and regulatory considerations may be applicable in some jurisdictions.
Technical Guides
Several API services exist to facilitate quick and easy integration with the Dash network for services including:
- Transaction broadcasting
- Tỷ giá giao dịch
- Currency conversion
- Invoice generation
API Services
This documentation is also available as a PDF.
API Services are typically leveraged to eliminate that requirement of running your own infrastructure to support blockchain interactions. This includes mechanisms such as:
- Forming and Broadcasting a Transaction to the network.
- Address generation using HD Wallets.
- Payment Processing using WebHooks.
There are a variety of options for supporting these methods, with the key differentiator being the pricing model included and supported features. The following list of API Providers attempts to outline these key features/differentiators and also includes a link to related documentation.
Insight

https://github.com/dashevo/insight-api
The open-source Insight REST API provides you with a convenient, powerful and simple way to read data from the Dash network and build your own services with it.
- Features: Transaction Broadcast, WebSocket Notifications.
- Pricing Model: Free / Open Source
- Documentation: https://github.com/dashevo/insight-api
BlockCypher

BlockCypher is a simple, mostly RESTful JSON API for interacting with blockchains, accessed over HTTP or HTTPS from the api.blockcypher.com domain.
- Features: Transaction Broadcast, HD Wallet / Address Generation, WebSocket and WebHook Callbacks as well as Payment Forwarding. BlockCypher does not handle Private Keys.
- Pricing Model: Per API Call, 5000 Requests -> $85.00 per month (https://accounts.blockcypher.com/plans)
- Documentation: https://www.blockcypher.com/dev/dash/
ChainRider

ChainRider is a cloud service providing a set of REST APIs for digital currency management and exploration.
- Features: Blockchain queries, Event Notifications, Transaction Broadcast, Payment Processing, etc.
- Pricing Model: Free trial, pay per API call
- Documentation: https://www.chainrider.io/docs/dash
GoCoin

The GoCoin platform makes taking Dash as easy as installing a plugin. Payment processing is already implemented for every major shopping platform. GoCoin is focused on helping merchants in privacy-related niches and specific industries, and handles all transaction risk for all payments from your customers.
- Features: Invoicing, Exchange Rates, WebHook Callbacks. GoCoin holds Private Keys on their server allowing the merchant to withdraw funds in Cryptocurrency or convert to Fiat.
- Integrations: WooCommerce, Magento, Prestashop, VirtueMart, ZenCart, OpenCart, OSCommerce, UberCart, nopCommerce, WHMCS, NATS4, Shopify.
- Pricing Model: 1% Processing Fee (https://gocoin.com/fees)
- Documentation: https://gocoin.com/docs
CoinPayments

CoinPayments is an integrated payment gateway for cryptocurrencies such as Dash. Shopping cart plugins are available for all popular webcarts used today. CoinPayments can help you set up a new checkout, or integrate with your pre-existing checkout.
- Features: Invoicing, Exchange Rates, WebHook Callbacks. CoinPayments holds Private Keys on their server allowing merchant to withdraw funds in Cryptocurrency or convert to Fiat.
- Integrations: aMember Pro, Arastta, Blesta, BoxBilling, Drupal, Ecwid, Hikashop, Magento, OpenCart, OSCommerce, PrestaShop, Tomato Cart, WooCommerce, Ubercart, XCart, ZenCart
- Pricing Model: 0.5% Processing Fee (https://www.coinpayments.net/help-fees)
- Documentation: https://www.coinpayments.net/apidoc
SDK Resources
This documentation is also available as a PDF.
SDKs (Software Development Kits) are used to accelerate the design and development of a product for the Dash Network. These resources can either be used to interface with an API provider or for the creation of standalone applications.
Dash Developer Guide

https://dash-docs.github.io/en/developer-guide
The Dash Developer Guide aims to provide the information you need to understand Dash and start building Dash-based applications. To make the best use of this documentation, you may want to install the current version of Dash Core, either from source or from a pre-compiled executable.
- Documentation: https://dash-docs.github.io/en/developer-guide
Dashcore

Dashcore is a fork of Bitcore and operates as a full Dash node — your apps run directly on the peer-to-peer network. For wallet application development, additional indexes have been added into Dash for querying address balances, transaction history, and unspent outputs.
- Platform: NodeJS / Javascript
- Documentation: https://bitcore.io/api/lib
- Repository lib: https://github.com/dashevo/dashcore-lib
- Repository node: https://github.com/dashevo/dashcore-node
DashJ

https://github.com/HashEngineering/dashj
DashJ is a library for working with the Dash protocol. It can maintain a wallet, send/receive transactions (including InstantSend) without needing a local copy of Dash Core, and has many other advanced features. It's implemented in Java but can be used from any JVM compatible language: examples in Python and JavaScript are included.
- Platform: Java
- Documentation: https://bitcoinj.github.io/getting-started
- Example application: https://github.com/tomasz-ludek/pocket-of-dash
NBitcoin
https://github.com/MetacoSA/NBitcoin
NBitcoin is the most complete Bitcoin library for the .NET platform, and has been patched to include support for Dash. It implements all most relevant Bitcoin Improvement Proposals (BIPs) and Dash Improvement Proposals (DIPs). It also provides low level access to Dash primitives so you can easily build your application on top of it.
- Platform: .NET
- Documentation: https://programmingblockchain.gitbooks.io/programmingblockchain/content/
- Repository: https://github.com/MetacoSA/NBitcoin
BlockCypher
BlockCypher also offers client SDKs.
- Platform: Ruby, Python, Java, PHP, Go, NodeJS
- Repositories: https://www.blockcypher.com/dev/dash/#blockcypher-supported-language-sdks
InstantSend
This documentation is also available as a PDF.
InstantSend is a feature provided by the Dash network that allows for 0-confirmation transactions to be safely accepted by Merchants and other service providers. Secured by the Masternode Network, this mechanism eliminates the risk of a “Double Spend” by locking transaction inputs for a given transaction at a protocol level.
InstantSend Transactions vs. Standard Transactions
From an integration perspective there are only minor differences between an InstantSend Transaction and a Standard Transaction. Both transaction types are formed in the same way and are signed using the same process; the key difference is the fee structure and input requirements for InstantSend.
- Fee Structure: InstantSend utilizes a “per-input” fee of 0.0001 DASH per Input.
- Input Requirements: All inputs for an InstantSend transaction must have at least 6 confirmations.
In the event that a given transaction does not meet both criteria it will revert to a standard transaction.
Receiving InstantSend Transactions
InstantSend transactions are handled in the same way as a Standard Transaction, typically through JSON-RPC, Insight API, or an internal notification script / service that is configured at a server level.
JSON-RPC: The following RPC commands will include InstantSend-related information. Within the response you’ll find an “InstantLock” field the status of a given Transaction. This true/false (boolean) value will indicate whether an InstantSend has been observed.
- GetTransaction: https://dash-docs.github.io/en/developer-reference#gettransaction
- ListTransactions: https://dash-docs.github.io/en/developer-reference#listtransactions
- ListSinceBlock: https://dash-docs.github.io/en/developer-reference#listsinceblock
Insight API: Insight API can be used to detect InstantSend transactions and to push notifications to clients using WebSockets. The API can also be manually polled to retrieve Transaction information including InstantSend status.
Script Notify: The Dash Core Daemon can be configured to execute an external script whenever an InstantSend transaction relating to that wallet is observed. This is configured by adding the following line to the dash.conf file:
instantsendnotify=/path/to/concurrent/safe/handler %sNote that only addresses imported to the wallet will be monitored for InstantSend Transactions.
Broadcasting InstantSend Transactions
InstantSend Transactions can be constructed and broadcast using an approach similar to Standard Transactions. Provided the InstantSend Fee Structure and Input Requirements are met, an InstantSend can be broadcast using JSON-RPC or Insight API as a Raw Transaction.
JSON-RPC: The “SendRawTransaction” RPC command can be utilized to broadcast a raw transaction using InstantSend. When utilizing this command be sure to set both optional parameters as “true”
sendrawtransaction "hexstring" ( allowhighfees instantsend )sendrawtransaction "hexstring" true trueMore Information: https://dash-docs.github.io/en/developer-reference#sendrawtransaction
Insight API: Raw Transactions can also be broadcast as an InstantSend using Insight API. In this case all that is required is to POST the raw transaction using the
/tx/sendixroute.More Information: https://github.com/dashevo/insight-api#instantsend-transaction
Additional Resources
The following resources provide additional information about InstantSend and are intended to help provide a more complete understanding of the underlying technologies.
Vending Machines
Community member moocowmoo has released code to help merchants build their own vending machine and set it up to receive Dash InstantSend payments. The Dashvend software can also be used to create any sort of payment system, including point-of-sale systems, that can accept InstantSend payments.
Price Tickers
You can add a simple price ticket widget to your website using the simple code snippet generator from CoinGecko.
Similar widgets with different designs are available from CoinLib, WorldCoinIndex and Cryptonator, while an API providing similar information is available from DashCentral.
QR Codes
Many wallets are capable of generating QR codes which can be scanned to simplify entry of the Dash address. Printing these codes or posting the on your website makes it easy to receive payment and tips in Dash, both online and offline.
- In Dash Core, go to the Receive tab, generate an address if necessary, and double-click it to display a QR code. Right click on the QR code and select Save Image to save a PNG file.
- In Dash for Android, tap Request Coins and then tap the QR code to display a larger image. You can screenshot this to save an image.
- In Dash for iOS, swipe to the left to display the Receive Dash screen. A QR code and address will appear. You can screenshot this to save an image.
- To generate a QR code from any Dash address, visit CWA QR Code Generator and simply paste your Dash address to generate an image.
Quản Trị
Quản trị phi tập trung bởi Blockchain, hay DGBB, là nỗ lực của Dash để giải quyết hai vấn đề quan trọng trong lĩnh vực tiền số: quản trị và cấp vốn. Quản trị trong một dự án phi tập trung là rất khó khăn, bởi vì theo định nghĩa thì không có một thẩm quyền trung tâm nào để ra quyết định cho dự án. Ở Dash, những quyết định như vậy được tạo ra bởi mạng lưới, đó là, bởi các chủ của các masternode. Hệ thống DGBB cho phép mỗi masternode được bỏ phiếu một lần (đồng ý/không đồng ý/bỏ trắng) cho mỗi một đề xuất. Nếu một đề xuất được thông qua, nó sẽ được thực hiện (hoặc không) bởi những người phát triển Dash. Một ví dụ điển hình là vào đầu năm 2016, khi nhóm Dash Core gửi một đề xuất lên mạng và hỏi về việc liệu có nên tăng block lên 2 MB không. Chỉ trong vòng 24 giờ, đồng thuận đã được lập để chấp thuận thay đổi này. So với Bitcoin, nơi những tranh cãi về kích thước khối kéo dài gần 3 năm và kết quả là sự chia rẽ nghiêm trọng ở bên trong cộng đồng và thậm chí phải phân tách Bitcoin thành các blockchain khác nhau.
DGBB cũng mang đến một ý nghĩa cho Dash đó là cấp vốn cho sự phát triển của chính nó. Trong khi những dự án khác phải phụ thuộc vào nguồn tài trợ hoặc phải có một lượng coin đào trước, Dash sử dụng 10% của phần thưởng khối để cấp vốn cho sự phát triển của chính nó. Khi mỗi khối được đào, 45% của phần thưởng khối sẽ đến với thợ mỏ, 45% sẽ đến một masternode, và phần còn lại 10% sẽ không được tạo đến tận cuối tháng. Trong tháng, bất cứ ai cũng có thể lập một đề xuất xin cấp ngân sách gửi lên cho mạng. Nếu đề xuất có đủ sự chấp thuật bằng ít nhất 10% số masternode của mạng lưới, thì cuối tháng lượng yêu cầu sẽ được trả trong một "siêu khối". Tại thời điểm đó, phần của phần thưởng khối đã không được trả trước đó (10% của mỗi khối) sẽ được dùng để cấp vốn cho những đề xuất. Như vậy mạng lưới sẽ cấp vốn cho chính nó bằng việc dự trữ 10% của phần thưởng khối cho ngân sách của các dự án.
In late 2016, IOHK prepared a detailed report on version 0.12.1 of the Dash governance system, including formal analysis of weaknesses and areas for improvement. You can view the report here.
Bạn có thể tìm hiểu thêm về cơ chế Quản trị của Dash trong các phần sau:
Tìm hiểu về Cơ chế quản trị của Dash
Một trong những thách thức lớn nhất trong việc tạo nên một nền tảng tiền kỹ thuật số là đảm bảo việc tạo ra một hệ thống quản trị phi tập trung để quản lý, cấp vốn, duy trì, và mở rộng dự án. Những thành phần cốt yếu này đã bị bỏ sót trong tất cả các loại tiền điện tử lớn cho đến ngày nay, và như vậy thì kết quả tất yếu của nó là tạo ra một nền tảng phi lợi nhuận và nhiệm vụ chỉ để duy trì những giao thức cốt lõi và quảng bá cho đồng tiền đó, nhưng nó không thực sực kết nối với những người nắm giữ tiền theo bất kỳ cách có ý nghĩa nào. Cách tiếp cận này có một số vấn đề mà đã thể hiện rõ ràng từ kinh nghiệm của những nền tảng tiền điện tử trước đây.
Các nền tảng tiền điện tử hiện tại không liên quan đến chính tiền tệ theo bất kỳ cơ chế nào được đưa vào trong giao thức và không được thiết kế để sống lâu hơn những người dùng đầu tiên khi họ mất hứng thú. Nền tảng sau đó phải vật lộn để duy trì nguồn tài trợ cho đến khi nó bùng nổ và phát triển cốt lõi của giao thức bị xáo trộn để được tài trợ hoặc phụ thuộc vào các nguồn từ thiện không đáng tin cậy và không cho phép có được ngân sách và kế hoạch phù hợp. Các khoản quyên góp cũng không công bằng với các nhà tài trợ vì luôn có những người tận dụng miễn phí được hưởng lợi từ những nỗ lực của những người khác mà không đóng góp gì. Các dự án khác đã phải lấy nguồn tài chính bằng việc đào coin trước hoặc chạy các chiến dịch bán coin trước khi công bố, đó không phải là một giải pháp tuyệt vời bởi vì việc kiểm soát quỹ bị tập trung và ở giai đoạn đó không thể định lượng được nhu cầu trong tương lai của dự án.
Thông qua mạng lưới của các full node và được yêu cầu đặt cọc, Dash đã có một mạng lưới phi tập trung các nhà vận hành mạng mà đã đầu tư đáng kể vào tương lai của loại tiền điện tử này, và nhóm người này có thể hành xử như những người quản lý việc phát triển giao thức lõi và quảng bá. Chúng tôi đề xuất một hệ quản trị phi tập trung dựa trên cơ chế bỏ phiếu của các masternode. Những người vận hành masternode không chỉ là những người quan tâm đến sự thành công của Dash, nhưng họ cũng là những người ổn định nhất bởi vì, không giống như người đào coin, họ không thể sử dụng lại tài sản của họ cho những mục đích hoặc đồng coin nào khác.
Trong hệ thống ngân sách, một phần của phần thưởng khối sẽ được giữ lại trong phần uỷ thác của bản thân mạng lưới, sau đó những người chủ masternode sẽ thực hiện việc bỏ phiếu để cấp phát ngân sách này cho các đề xuất khác nhau để phát triển và mở rộng mạng lưới. Những nguồn vốn này sẽ được định hướng để hỗ trợ cho việc phát triển và quảng bá Dash. Những người chủ masternode sẽ bỏ phiếu để cấp vốn cho các dự án cụ thể, qua đó tạo định hình được định hướng cho Dash. Điều này được thực hiện bởi một cách rất minh bạch thông qua một trang web mà ở đó những khởi xướng được đề xuất và các masternode thì có thể bỏ phiếu cho nó. Cách này hoạt động như một dạng Kickstarter hoặc Lighthouse phi tập trung mà nguồn ngân sách có thể sử dụng cho bất cứ thứ gì mà tạo ra giá trị cho hệ sinh thái.
Đây là một hệ thống phi tập trung 100% nhờ các masternode, nơi ngân sách được thiết lập và chi trả trực tiếp từ blockchain. Blockchain thuê đội ngũ lập trình viên cốt lõi cũng theo cách này và đưa ra một khái niệm mới về việc blockchain chi trả cho các nhà thầu, nơi những người làm việc cho và được chi trả thù lao trực tiếp bởi mạng lưới, thông qua việc bỏ phiếu phi tập trung của những người vận hành masternode. Nếu những người vận hành masternode ban đầu bán đi các coin của họ, thì những người chủ mới có thể sẽ thiết lập một masternode khác và cũng có được quyền bỏ phiếu với ngân sách và các dự án. Điều này đảm bảo cho hệ thống vận hành và duy trì dù cho có những người đến và đi, nó làm cho mạng lưới khả năng tự duy trì chính mình mà không phải phụ thuộc vào các nhân tố cụ thể nào.
Chú ý rằng nếu bạn không vận hành một masternode, bạn vẫn có thể bỏ phiếu cho các đề xuất trên DashBoost. Hãy xem https://www.dashboost.org để biết thêm thông tin.
Ngân sách và việc bỏ phiếu của Masternode
Hệ thống hoạt động như một cơ chế bỏ phiếu phi tập trung đã thiết lập nên những chuẩn mực cho quản trị blockchain, nơi mà các ngân sách cho những dự and được đề xuất lên và rồi các masternode sẽ bỏ phiếu cho nó. Mỗi dự án, nếu được phê duyệt sẽ được đưa vào trong ngân sách và sau đó sẽ được chi trả trực tiếp từ blockchain đến những người làm việc cho dự án. Điều này cho phép Dash có thể thuê đội ngũ những lập trình viên nòng cốt và chi trả trực tiếp cho họ sau khi công việc được phê duyệt theo một cách thức phi tập trung.
Một masternode sẽ bỏ phiếu cho một đề xuất (về mặt kỹ thuật đó là một đối tượng quản trị trên blockchain) sẽ sử dụng một lệnh ví dụ như "masternode vote yes", “masternode vote no” hay “masternode vote abstain”. Sau đó việc bỏ phiếu đó sẽ lan truyền trên toàn mạng, và sau đó sẽ được kiểm phiếu theo thuật toán và mạng lưới sẽ kiểm soát. Chúng ta có thể xem lại đề xuất về ngân sách cũng như tiến trình bỏ phiếu bằng câu lệnh đại loại như "masternode budget show”.
Một hệ thống quản trị phi tập trung được xác định rõ ràng cho phép một loại tiền số có thể tồn tại cùng với những người sáng tạo ban đầu của nó. Theo cách này, những thế hệ chủ masternode về sau có một đường lối rõ ràng để hỗ trợ hệ thống cũng giống như đã được xác định trước bởi chính giao thức của nó, áp dụng kỹ thuật trí tuệ đám đông và những ràng buộc về niềm tin được thiết lập thông qua khoản đặt cọc cho masternode để tạo nên một hệ thống quản trị phi tập trung. Điều này tạo nên những giá trị phi thường bên trong nội tại của đồng tiền, nó cho phép chúng ta trở nên linh hoạt hơn và cạch tranh hơn với những hệ thống thanh toán hiện có, như Bitcoin và các loại thẻ tín dụng, trên quy mô toàn cầu.
Khi hệ thống đã được phát triển, một đội các nhà thầu có năng lực được trả lương từ phần thưởng khói đã được thiết lập và phát triển. Trong đó bao gồm nhóm phát triển chính, các nhà cung cấp dịch vụ ký quỹ, các nhóm truyền thông, các phòng thí nghiệm phát triển, hợp tác với các trường đại học, thuê các hãng truyền thông và marketing và tích hợp với các sàn giao dịch và các hệ thống thanh toán. Thị trường đang nhận ra giá trị của sự ổn định của mạng lưới một cách tổng thể, và có lẽ nhờ nguồn cấp vốn ổn định và đầy đủ đã giúp cho quá trình thực hiện được nhanh chóng hơn và kết dính hơn với lộ trình của Dash với các dịch vụ cốt lõi.
Cơ cấu phần thưởng
Để đảm bảo tính bền vững về mặt dài hạn của blockchain, mạng lưới giữ một phần của phần thưởng khối lại đến khi có những khối mới được tạo, với các nhà vận hành masternode được giao nhiệm vụ quản lý và đầu tư trong việc bảo trì và mở rộng mạng lưới bằng việc bỏ phiếu. Điều này dẫn đến việc phát triển và xúc tiến nhanh hơn, tạo ra chu kỳ đạo đức mang lại lợi ích cho tất cả các thành phần tham gia bao gồm thợ mỏ, người vận hành masternode, nhà đầu tư, và người dùng. Quan trọng hơn, nó đem đến cho bản thân blockchain một cơ chế tự bảo tồn vượt qua khỏi sự kiểm soát của bất kỳ cá nhân nào.
| Phần thưởng đào mỏ cho Proof-of-Work | 45% |
| Phần thưởng Masternode cho Proof-of-Service | 45% |
| Cơ chế quản trị ngân sách phi tập trung | 10% |
Các masternode và thợ mỏ mỗi bên nhận 45% phần thưởng khối, tại thời điểm mà khối được tạo. Phần còn lại 10% sẽ được phân phối hàng tháng bởi những người vận hành masternode một khi kết quả việc bỏ phiếu của họ được kiểm, điều này tạo nên một nền tảng tiền số phi tập trung và bền vững được tổ chức như là một Tổ chức Tự quản Phi tập trung (DAO). Những người vận hành masternode thiết lập một hợp đồng xã hội với mạng lưới mà họ có được lợi ích từ nó và ràng buộc với việc chăm sóc, dành thời gian, làm việc chăm chỉ và nhận một phần thưởng từ mạng để phát triển hệ sinh thái. Điều này tạo nên một hiệu ứng lan toả mà nó tạo nên lợi ích cho tất cả các bên liên quan - đặc biệt là người dùng cuối.
Những giá trị được sinh ra bởi việc thực hiện xong công việc trong các đề xuất được cho là lớn hơn 100% phần thưởng được cấp phát cho việc đào coin bởi vì mạng lưới cần vượt quá nhu cầu đảm bảo an toàn về mặt mật mã học cho blockchain. Kết quả mong đợi là lớn hơn lợi ích không chỉ cho những người có đề xuất được cấp vôn, nhưng cho cả những người vận hành masternode, những thợ mỏ và cả những người dùng bình thường. Thực ra, bản thân việc áp dụng cơ chế quản trị phi tập trung cũng là quyết định bởi việc bỏ phiếu của các masternode, nó đã tạo nên một quyết định phân tán đầu tiên cho sự sáng tạo của hệ thống, nó cũng tương tự như một bản hiến pháp.
Cách tiếp cận về việc phân phối phần thưởng khối bình thường theo một cách mà có cân nhắc đến tất cả các thành phần quan trọng mà loại tiền điện tử cần cho sự phát triển dài hạn của nó, ví dụ, đào coin, full node, phát triển và quảng bá, thực sự là cuộc cách mạng đã được được thực hiện mà không cần phải thay đổi lượng coin được phát sinh hoặc tạo thêm những lạm phát mới để thu hút nhà đầu tư mới. Mạng lưới chỉ đơn giản là phân phối những nguồn tài nguyên có sẵn theo một cách mà đem lại lợi ích lớn hơn cho tất cả các bên tham gia.
Nhà thầu và các đề xuất
Contractors of the blockchain can be developers, outreach professionals, team leaders, attorneys or even people appointed to do specific tasks. Proposals generally begin life as simple pre-proposal forum posts on the Dash Forum, where feedback and suggestions are solicited from the general community. Once the proposal owner decides they have a reasonable chance of passing their proposal, it is created as a governance object on the blockchain. A fee of 5 DASH is associated with this action to prevent spam and ensure only serious proposals make it to this stage. Several tools exist to allow masternode operators to comfortably review and vote on proposals. The net total of yes votes must exceed 10% of the total masternode count at the time votes are tallied in order to pass. If there are more passing proposals than the available block reward can provide for, the proposals with the most yes votes will pass first, creating a cut-off point for less popular proposals. The same process is then repeated every month, and the total amount of Dash available for proposals decreases by approximately 7.14% per year, together with the overall block reward.
Video của Tao of Satoshi sau đây chứa đựng những lười khuyên cho những người muốn đưa ra đề xuất trong những thời điểm mà có sự cạnh tranh cao trong việc xin cấp vốn:
Những trang web đề xuất
The community has gathered around DashCentral as a website to facilitate discussion and voting on proposals formally entered on the Dash blockchain. Other websites, such as Dash Ninja and Dash Nexus are available to monitor progress over time and gather more detailed statistics. Dash Masternode Tool also allows for voting without the need to share masternode private keys with a third party service.

Một cái nhìn cơ bản về những thảo luận của đề xuất và việc bỏ phiếu trên Dash Central
Each proposal includes a description of the proposal goals, details of what work will be done and a breakdown of the requested budget. Many proposals also link to their own website or the pre-proposal discussion, or include a video to validate the identity and sincerity of the proposal owner. Discussion on Dash Central occurs below this information, and masternode owners have the option to verify their ownership of a masternode and ability to cast a vote by signing a message from the masternode collateral address. Masternodes can vote at any time, and also change their vote at any time until the cutoff block is mined and voting stops. This occurs 1662 blocks prior to the superblock. After voting stops, the blockchain executes a decentralized tally and validates all votes. Once consensus is reached, the results are broadcast and the budget is allocated soon after in a superblock.

Chi tiết về đề xuất và những nút bỏ phiếu trên Dash Central
Một khi được thông qua, các đề xuất có thể được báo cáo lại với mạng lưới trên Diễn đàn Dash hoặc thông qua các kênh công khai và mạng xã hội. Do có thể tạo các đề xuất mà nó có thể chi trả cho nhiều tháng, và nó cũng có thể cắt bỏ việc cấp vốn cho một dự án bằng cách bỏ phiếu thay đổi nếu việc phát triển hoặc các khoản chi tiêu đã được cấp không đạt như mong đợi. Điều này cũng khuyến khích những người lập đề xuất làm việc một cách trung thực và chăm chỉ để đạt được sự tin cậy và chấp thuận của mạng lưới. Việc thường xuyên thảo luận và kết quả cải thiện dần dần theo thời gian trong mối liên kết chặt chẽ giữa mạng lưới và những người làm việc cho mạng lưới trong vai trò hỗ trợ.
Voting on proposals is updated in real time every 2.5 minutes as blocks are mined, so current winning proposals and the total allocation of the available budget are always open and visible to everyone. Dash Nexus is a popular site used for this purpose.

Monitoring budget allocation on Dash Nexus
Finally, Dash Watch (which was itself funded through a budget proposal) exists to monitor the ability of blockchain contractors to deliver on their promises with respect to delivery dates and the total amounts of budget allocated over multiple voting periods. A team of dedicated staff routinely interact with proposal owners to track progress of the various projects and provide reports to voting masternodes in a single location. While providing data on the performance of your proposal to Dash Watch is optional, many masternode owners take advantage of the data they make available to make their voting decisions. The Dash Watch team may be contacted at team@dashwatch.org email address or through their website.

Theo dõi Đề xuất trên Dash Watch
Cấp phát ngân sách
The total budget of the network can be calculated by taking 10% of the
reward over the period of time between two superblocks, which occur
every 16616 blocks or approximately 30.29 days. A voting cutoff occurs
1662 blocks before the superblock, and the final votes are tallied at
this point. A proposal must satisfy the condition (YES votes - NO
votes) > (Total Number of Masternodes / 10) in order to be considered
passing. Then, in the superblock, the winning proposals are awarded in
the order of the margin by which they are passing until either the
entire budget is allocated or no more passing proposals exist. This
allows for completely trustless and decentralized allocation of the
budget.
If a proposal has passed the voting threshold but insufficient funds remain to pay the full amount requested, it will not receive partial funding. Instead, any smaller proposals which have also passed the threshold that will fit in the budget will be funded, even if they have lower net approval than the larger proposal. Proposals requesting payment over multiple budget periods will remain in the treasury system for the duration of their validity, even if they do not pass the voting threshold, and even if insufficient budget is available for funding as described above. Any unallocated budget is simply never created in the superblock, reducing unnecessary inflation.
Do tính chất phi tập trung của hệ thống masternode, đôi khi cần thiết để hình thành các tổ chức được tài trợ, chẳng hạn như ủy ban hoặc công ty, để có trách nhiệm đối với một số dự án hoặc nhiệm vụ. Chúng được đệ trình theo cách tương tự, nhưng bản thân ủy ban đó sẽ nhận được tiền. Một lựa chọn khác là sử dụng các dịch vụ ủy thác đáng tin cậy ở giữa sự kiện cấp phát ngân sách và người thực tế gửi đề xuất để đảm bảo rằng công việc được thanh toán theo các giai đoạn, mỗi khi nó được hoàn thành. Một số giám sát trên các nhà thầu blockchain đôi khi là cần thiết. Mỗi mục ngân sách yêu cầu một người quản lý nhóm hoặc một ủy ban chịu trách nhiệm triển khai công việc. Định kỳ, người quản lý này dự kiến sẽ báo cáo về chi tiêu ngân sách và tiến độ hoàn thành công việc để thể hiện giá trị được tạo ra từ nguồn ngân sách được cấp phát. Điều này giúp những người đề xuất nhiều lần xây dựng danh tiếng và giành được lòng tin trong cộng đồng. Các đề xuất không cung cấp các báo cáo thường xuyên và không thể trả lời các câu hỏi về việc phân bổ ngân sách sẽ sớm bị ngừng cấp vốn nếu nó là một phần của một đề xuất có chu kỳ giải ngân hàng tháng. Kết quả đây là một loại hệ thống tự lập chính sách.
Khả năng mở rộng và việc sử dụng trong tương lai
Khi mà số lượng nhà thầu cho blockchain tăng lên, đến khi đạt một mức mà các nhà vận hành masternode không thể mong đợi thực tế có thể đánh giá được hết số lượng đề xuất. Tại điểm đó các tổ chức cấp vốn có thể được tạo ra như là những nhà thầu để phân phối lại nguồn vốn cho các dự án phi tập trung nhỏ hơn, theo nhu cầu hiện tại. Dash Core Group, Inc. là một ví dụ của một tổ chức như vậy.
Nhờ có hệ thống ngân sách phi tập trung nó đã đặt để sức mạnh của sự quyết tâm đưa Dash tiến vào tương lai trong tay bản thân của mạng lưới các masternode. Tất cả sự phát triển cốt lõi và nhiều lập trình viên phát triển các giải pháp ngoại vi đã được cấp vốn từ ngân sách này, và những dự án khác thậm chí hiện tại còn chưa được biết đến cũng sẽ được tài trợ để phát triển trong tương lai. Điều này giải thích sự tồn tại và giá trị của blockchain từ những người dùng hiện tại và ác lập trình viên, đang tạo ra Dash là một blockchain đầu tiên được thiết kế để tồn tại vượt quá những người dùng ban đầu của nó, một mạng lưới tiền số có cơ chế tự bảo tồn phi tập mà nó có thể tiếp tục hoạt động một cách kết dính đem lại những dịch vụ giá trị gia tăng cho người dùng theo một cách rất nhất quán.
Kết luận
Mỗi người vận hành masternode thiết lập một liên kết tin tưởng và hợp đồng xã hội với mạng lưới mà ở đó anh ta ràng buộc mình vào sự tham gia đóng góp cho sự duy trì và phát triển của hệ sinh thái mà anh ta được hưởng lợi từ đó. Theo mô hình này, một phần của số tiền mà người vận hành bị ràng buộc nhận được theo nghĩa được phân bổ trong quyền chăm sóc, không thuộc quyền sở hữu và được giữ ký quỹ bởi mạng lưới để những người vận hành thực hiện vì lợi ích của hệ sinh thái. Mọi người đều đóng góp như nhau và tương xứng với những lợi ích và những rủi mà họ nhận, không có đặc quyền và không có sơ hở. Điều này được bổ sung bởi cơ chế bỏ phiếu của full node cho phép nhóm phân tán bình chọn một cách liên tục trên các vấn đề thực tế mà không cần phải tước quyền quyết định của những người khác, cứ vài năm một lần, như với các chính phủ truyền thống hoặc các tập đoàn.
Chúng tôi hình dung một tương lai trong đó mô hình minh bạch, không thể phá vỡ và ai cũng có thể xác minh được sẽ đóng góp cho lợi ích chung, kết hợp với sự tham gia liên tục của cộng đồng thông qua bỏ phiếu tích cực. Nó sẽ được sử dụng để quản lý các tổ chức được sở hữu hoặc điều hành bởi các thành viên cùng chia sẻ lợi ích và trách nhiệm trong sự tập hợp đó. Nó cũng giống như các chính phủ, các tập đoàn hợp tác, công đoàn, DAO, tiền điện tử, v.v. Chúng tôi gọi mô hình này là quản trị phi tập trung bởi blockchain.
Sử dụng cơ chế Quản trị Dash
Cơ chế Quản trị Phi tập trung bởi Blockchain (DGBB) là một nền tảng cấp vốn và biểu quyết mới lạ. Tài liệu này sẽ giới thiệu và nói rõ chi tiết về mặt lý thuyết và thực tiễn của việc sử dụng hệ thống này.
Tìm hiểu về quy trình
Giới thiệu
- DGBB bao gồm ba thành phần sau: Đề xuất, Bỏ phiếu, và Ngân sách
- Bất cứ ai cũng có thể đăng một đề xuất với một khoản phí nhỏ
- Các chủ masternode có thể bỏ phiếu để chống lại, hoặc bỏ qua những đề xuất
- Những đề xuất được chấp thuận sẽ trở thành các ngân sách
- Ngân sách được trả trực tiếp từ blockchain cho người lập đề xuất
Các đề xuất
- Các đề xuất yêu cầu được cấp phát ngân sách
- Đề xuất có thể được đưa ra bởi bất cứ ai với mức phí 5 Dash cho mỗi lần. Phí đề xuất này được tiêu huỷ mà không đảo ngược lại được khi đăng đề xuất.
- Đề xuất không thể thay đổi lại được một khi nó được đăng lên.
Bỏ phiếu
- Việc bỏ phiếu có thể thực hiện bởi các chủ masternode
- Việc bỏ phiếu cũng có thể được thay đổi ở bất cứ thời gian nào
- Các phiếu bầu được tính cứ mỗi 16616 khối (xấp xỉ 30.29 ngày)
Ngân sách
- Ngân sách là các đề xuất mà nhận được tổng số vote YES ít nhất bằng 10% tổng số khả năng bỏ phiếu (ví dụ đạt 448 trên tổng số 4480)
- Ngân sách có thể bị huỷ bỏ tại bất kỳ thời điểm nào nếu tổng số phiếu (bỏ phiếu hoặc bỏ phiếu lại) dưới ngưỡng được chấp nhận.
- Ngân sách được xử lý (chi trả) theo cách lấy số phiếu đồng ý - YES trừ đi số phiêu không đồng ý - NO. Ưu tiên thanh toán cho những đề xuất có nhiều bỏ phiếu ủng hộ hơn.
- Có xấp xỉ 6176 dash (trong năm 2018) dành cho mỗi chu kỳ ngân sách, khoảng một tháng, ngân sách này giảm dần 7.14% cứ mỗi 210240 block (xấp xỉ 383.25 ngày)
Cấu trúc đối tượng
Thông tin sau đây là cần thiết để tạo một Đề xuất:
- proposal-name: là một tiêu đề không trùng nhau, dài không quá 20 ký tự
- url: là trang web do người lập đề xuất tạo hoặc một chủ đề trên diễn đàn có chứa thông tin cụ thể về đề xuất
- payment-count: số chu kỳ thanh toán mà đề xuất này muốn được chi trả
- block-start: đề xuất yêu cầu bắt đầu thanh toán từ block thứ bao nhiêu
- dash-address: là địa chỉ để nhận tiền cho đề xuất
- monthly-payment-dash: số tiền của mỗi lần thanh toán cho từng tháng
Sự nhất quán
- Đề xuất sẽ được kích hoạt một ngày sau khi đăng lên
- Các đề xuất vẫn sẽ hiển thị trên mạng lưới đến tận khi hoặc là nó không còn được chấp nhận hoặc kết thúc chu kỳ thanh toán cuối cùng.
- Chấp thuận xảy ra khi những phiếu YES trừ đi những phiếu NO đạt ít nhất 10% trên tổng số lượng phiếu bầu.
- Không chấp thuận xảy ra khi số phiếu bầu NO trừ đi số phiếu bầu YES ít nhất bằng 10% tổng số lượng phiếu bầu.
- Tổng số phiếu bầu có thể là số masternode đang online và đáp ứng đủ điều kiện, nó có thể xem bằng cách chạy lệnh
masternode counttrong cửa sổ Debug của ví Dash Core. Một biểu đồ về tổng số masternode có thể tìm thấy ở đây
Các mẫu
Những định dạng mẫu cho Microsoft Word sau đây từ Dash Core Group sẽ giúp chúng ta chuẩn hoá những mẫu đề xuất và được thường xuyên cập nhật. Bạn nên sử dụng những mẫu này, nhưng nó không phải là bắt buộc.
Các chu kỳ ngân sách
Khi chuẩn bị một đề xuất, hãy chú ý khi nào thì chu kỳ tới sẽ đến và lập kế hoạch cho phù hợp. Bạn nên chọn kỳ thanh toán cho đề xuất ít nhất trước một chu kỳ thanh toán để có thời gian cho thảo luận và thu hút đủ sự hỗ trợ và bỏ phiếu ủng hộ. Hãy chú ý rằng các phiếu sẽ không được kiểm trong vòng 1662 khối (khoảng 3 ngày) trước khi siêu khối được ra.
| Độ cao khối | Ngày dự kiến |
|---|---|
| 747720 | Thứ 3, ngày 3 tháng 10 20:17:56 UTC 2017 |
| 764336 | Thứ 6 ngày 3 tháng 11 03:22:58 UTC 2017 |
| 780952 | Chủ nhật ngày 3 tháng 12 10:28:00 UTC 2017 |
| 797568 | Thứ 3 ngày 2 tháng 1 17:33:02 UTC 2018 |
| 814184 | Thứ 6 ngày 2 tháng 2 00:38:04 UTC 2018 |
| 830800 | Chủ nhật ngày 4 tháng 3 07:43:06 UTC 2018 |
| 847416 | Thứ 3 ngày 3 tháng 4 14:48:08 UTC 2018 |
| 864032 | Thứ 5 ngày 3 tháng 5 21:53:10 UTC 2018 |
| 880648 | Chủ nhật ngày 3 tháng 6 04:58:12 UTC 2018 |
| 897264 | Thứ 3 ngày 3 tháng 7 12:03:14 UTC 2018 |
| 913880 | Thứ 5 ngày 2 tháng 8 19:08:16 UTC 2018 |
| 930496 | Chủ nhật ngày 2 tháng 9 02:13:18 UTC 2018 |
| 947112 | Thứ 3 ngày 2 tháng 10 09:18:20 UTC 2018 |
| 963728 | Thứ 5 ngày 1 tháng 11 16:23:22 UTC 2018 |
| 980344 | Thứ 7 ngày 1 tháng 12 23:28:24 UTC 2018 |
| 996960 | Thứ 3 ngày 1 tháng 1 06:33:26 UTC 2019 |
Bạn có thể xem mã nguồn của tính toán này tại đây GitHub gist
Tạo các đề xuất
Một khi bạn đã chuẩn bị những nội dung cho đề xuất của bạn và thiết lập một website hoặc bài viết trên diễn đàn, thì đây là thời điểm để bạn đăng đề xuất của mình lên blockchain để cho mọi người bỏ phiếu. Trong khi tất cả các công việc liên quan đến việc tạo đề xuất xin ngân sách đều có thể thực hiện từ cửa sổ lệnh trên ví Dash Core, thì có vài công cụ cung cấp một giao diện trực quan hơn được phát triển để làm đơn giản tiến trình xin cấp vốn này.
Công cụ sinh Đề xuất Ngân sách của Dash
Bộ Công cụ tạo sinh đề xuất hỗ trợ việc tạo các đề xuất cả trên mạng chính - mainnet và mạng thử nghiệm - testnet. Ở bước đầu tiên, bạn cần nhập tên ngắn gọn, rõ ràng, và duy nhất cho đề xuất và nó sẽ xuất hiện ở trên blockchain. Tên cảu đề xuất dài tối đa 40 ký tự. Bạn có thể cung cấp đường link đến diễn đàn hoặc DashCentral là nơi bạn có mô tả về đề xuất một cách cụ thể hơn (sử dụng dịch vụ thu gọn đường link như nếu cần), và sau đó là chọn một số lượng cho khoản thanh toán mà bạn yêu cầu, và số lần thanh toán, và ngày của siêu khối mà bạn yêu cầu thanh toán. Điều này cho phép bạn kiểm soát chu kỳ thanh toán nào bạn muốn đề xuất của bạn xuất hiện, và nó cho bạn đủ thời gian để tìm kiếm sự ủng hộ cho đề xuất của mình bằng việc làm cho những người bỏ phiếu cảm thấy quen thuộc với dự án của bạn. Chú ý rằng số tiền thanh toán là một khoản cố định và không thể thay đổi được sau khi đề xuất được đăng lên blockchain.


Bước 1 & 2: Tạo đề xuất và chuẩn bị câu lệnh
Tiếp Theo, bộ sinh đề xuất sẽ cung cấp bạn một câu lệnh để bạn có thể chạy từ cửa sổ debug trên ví Dash Core để chuẩn bị đối tượng quản trị cho đề xuất của bạn. Chạy câu lệnh này sẽ làm bạn tốn mất 5 DASH, nó sẽ bị "đốt" đi mất một cách vĩnh viễn khỏi việc lưu thông. Đây là khoản phí một lần để bảo vệ hệ quản trị khỏi quá tải bởi spam, hoặc những đề xuất không được cân nhắc một cách thấu đáo hoặc người dùng hành động mà không có đức tin tốt. Ngoài ra còn có một khoản phí nhỏ sẽ được áp dụng, do đó hãy chắc chắn rằng trong ví của bạn phải có hơn 5 DASH một chút. Có rất nhiều để xuất thường tính luôn và yêu cầu hệ thống trả lại khoản phí 5 DASH nếu đề xuất của họ chiến thắng.
Đầu tiên là mở khoá ví của bạn bằng cách click vào Thiết lập > Mở khoá ví, sau đó mở cửa sổ lệnh bằng cách click vào Dụng cụ > Cửa sổ gỡ rối và dán câu lệnh đã được sinh. Mã giao dịch sẽ xuất hiện. Copy và dán nó vào cửa sổ tạo đề xuất. Ngay khi bạn làm việc đó, hệ thống sẽ hiển thị thanh tiến trình cho biết bạn phải đợi để có đủ 6 xác thực như dưới đây:


Bước 3: Tạo giao dịch đề xuất và đợi cho giao dịch có 6 xác thực và lấy mã giao dịch
Sau khi đã có đủ 6 xác thực, thì lệnh khác sẽ sẵn sàng để gửi đối tượng quản trị đã chuẩn bị đến mạng cho việc biểu quyết. Hãy copy và dán lệnh này, và mã ID của đối tượng quản trị của bạn sẽ xuất hiện giống như sau:


Bước 4: Gửi đối tượng quản trị lên mạng lưới Dash
Bạn có thể dùng mã ID này để theo dõi việc bỏ phiếu của đề xuất đến khi ngân sách được khép lại và bạn nhận được khoản thanh toán. Bạn cũng có thể đăng mã lên DashCentral để đề xuất của mình có thể được bỏ phiếu bởi các chủ masternode là thành viên trên DashCentral bằng cơ chế bỏ phiếu đơn giản với dịch vụ bỏ phiếu của DashCentral.
Công cụ sinh Đề xuất của DashCentral
DashCentral cũng có các công cụ để tạo đề xuất ngân sách, hoặc trình bày những đề xuất đã được tạo và bạn có thể bổ sung thêm các phần mô tả trên DashCentral và để cộng đồng có thể bắt đầu thảo luận về nó. Các bước tiến hành cũng gần giống với thủ tục được mô tả ở trên đây và tài liệu của nó thì bạn có thể tìm thấy ở đây.
Bỏ phiếu cho các đề xuất
Bạn phải bỏ phiếu ít nhất ba ngày trước khi siêu khối được tạo nếu không thì phiếu của bạn sẽ không được tính. Chính xác thì hạn chót là 1662 khối trước siêu khối.*
Chú ý rằng nếu bạn không vận hành một masternode, bạn vẫn có thể bỏ phiếu cho các đề xuất trên DashBoost. Hãy xem https://www.dashboost.org để biết thêm thông tin.
Bỏ phiếu cho đề xuất DGBB là một phần việc quan trọng đối với việc vận hành một masternode. Do chủ masternode đầu tư rất nhiều vào Dash, do vậy vì lợi ích của mình mà các chủ masternode cần đánh giá và bỏ phiếu mỗi tháng sao cho họ cảm nhận là phù hợp với các lợi ích tốt nhất của mạng lưới. Mỗi một masternode có thể được bỏ phiếu một lần cho mỗi đề xuất, và việc bỏ phiếu đó có thể được thay đổi bất kỳ lúc nào miễn chưa đến hết hạn bỏ phiếu. Những website và công cụ sau đây cho phép chúng ta theo dõi và quản lý các đề xuất và bỏ phiếu:
Thông tin về làm thế nào để tạo một đề xuất, xem tại đây.
DashCentral
Rất nhiều người vận hành masternode lưu khoá riêng của họ với tài khoản được bảo vệ bởi mật khẩu trên DashCentral để có thể bỏ phiếu nhanh và đơn giản với giao diện trực quan. Sự phổ biến của website này làm cho nó trở thành một nơi nhiều người thảo luận về các đề xuất sau khi nó được đăng lên hệ thống quản trị. Để bỏ phiếu trên giao diện web của DashCentral, đầu tiên bạn cần nhập khoá riêng của masternode của bạn trong tài khoản theo hướng dẫn ở đây. Chú ý rằng khoá riêng của masternode không phải là khoá riêng để kiểm soát 1000 DASH, như vậy nếu có rủi ro đánh mất khoá riêng cũng không làm bạn bị mất 1000 DASH đặt cọc cho masternode. Đặt mật khẩu riêng cho khoá riêng của masternode để cho bỏ phiếu, và như vậy cũng giảm rủi ro cho việc người vận hành website này sử dụng khoá riêng của bạn xuống mức tối thiểu.
Khi bạn đã sẵn sàng bỏ phiếu, hãy vào trang ngân sách đề xuất. Chỉ cần click vào để xem các đề xuất rồi click vào một trong các tuỳ chọn Vote YES, Vote ABSTAIN or Vote NO.

Giao diện bỏ phiếu trên DashCentral
Dash Masternode Tool (DMT)
Nếu bạn khởi động masternode của bạn từ ví cứng sử dụng DMT, bạn cũng có thể sử dụng công cụ đó để bỏ phiếu. Bấm vào Tools > Proposals và đợi cho danh sách các đề xuất được tải. Bạn có thể dễ dàng nhìn thấy tình trạng bỏ phiếu của mỗi một đề xuất và chọn một đề xuất để xem thông tin chi tiết trong trang Details ở phần bên dưới của cửa sổ. Chuyển sang trang Vote để Vote Yes, Vote No or Vote Abstain một cách trực tiếp từ DMT.

Giao diện bỏ phiếu trên DMT
Ví Dash Core hoặc masternode
Nếu bạn khởi động masternode của mình sử dụng ví Dash Core (không gợi ý bạn làm vậy), bạn có thể bỏ phiếu bằng tay từ menu Công cụ > Cửa sổ debug, hoặc trực tiếp từ masternode của bạn thông qua SSH bằng việc sử dụng dash-cli. Đầu tiên click vào đề xuất mà bạn muốn bỏ phiếu hoặc trên DashCentral hoặc trên Dash Ninja. Bạn sẽ thấy một câu lệnh cho việc bỏ phiếu bằng tay ở dưới phần mô tả của đề xuất. Copy và dán câu lệnh này và sửa đổi tuỳ theo quyết định đồng ý hay không đồng ý của bạn, nếu cần. Như ví dụ sau, lấy phần này từ đề xuất trên Dash Ninja (hoặc DashCentral). Mã để bỏ phiếu cho ví Dash Core có dạng như sau:
gobject vote-many 6ed7418455e07f4b30b99f0d4a24a2b83282e12b26fe3415673ecbea04ff6c9d funding yes
gobject vote-many 6ed7418455e07f4b30b99f0d4a24a2b83282e12b26fe3415673ecbea04ff6c9d funding no
gobject vote-many 6ed7418455e07f4b30b99f0d4a24a2b83282e12b26fe3415673ecbea04ff6c9d funding abstain
Chú ý rằng việc bỏ phiếu trực tiếp từ masternode của bạn, bạn cần có thêm tiền tố vào câu lệnh với dash-cli, chương trình thường được thấy trong thư mục .dashcore. Câu lệnh sẽ có dạng giống như sau:
~/.dashcore/dash-cli gobject vote-many 6ed7418455e07f4b30b99f0d4a24a2b83282e12b26fe3415673ecbea04ff6c9d funding yes
~/.dashcore/dash-cli gobject vote-many 6ed7418455e07f4b30b99f0d4a24a2b83282e12b26fe3415673ecbea04ff6c9d funding no
~/.dashcore/dash-cli gobject vote-many 6ed7418455e07f4b30b99f0d4a24a2b83282e12b26fe3415673ecbea04ff6c9d funding abstain
Chú ý lệnh này sẽ kích hoạt việc bỏ phiếu từ tất cả các masternode được cấu hình trong file dash.conf. Nếu bạn có nhiều masternode và mỗi masternode một file .conf riêng, hoặc nếu bạn muốn bỏ phiếu chỉ với một vài masternode nào đó, bạn phải thay đổi câu lệnh từ vote-many thành vote. Nếu việc bỏ phiếu của bạn thành công, bạn sẽ thấy thông báo xác nhận việc đó có dạng như sau Voted successfully.

Bỏ phiếu từ cửa sổ lệnh debug trong ví Dash Core
Bạn cũng có thể xem danh sách các đề xuất theo định dạng JSON từ bảng điều khiển để copy và dán mã băm của đề xuất cho việc bỏ phiếu theo cách sau:
gobject list
8 Bước để lập một Đề xuất thành công
Những đề xuất trong hệ thống quản trị của Dash là đối tượng để bỏ phiếu bởi các masternode. Như vậy, cũng giống như các cuộc bỏ phiếu khác, bạn cần phải thuyết phục những cử tri thông qua đề xuất của bạn. Sau đây là một số điểm mà mỗi đề xuất cần quan tâm:
- Giữ cho đề xuất được rõ ràng
- Đề xuất của bạn nên có một tiêu đề rõ ràng, theo sau là một đoạn ngắn và đơn giản mô tả mục đích. Hãy giải thích chính xác về đề xuất của bạn mang lại lợi ích như thế nào với mạng lưới của Dash ngay trong phần đầu để người đọc đỡ mất công, sau đó nói rõ bạn cần bao nhiêu Dash, cách bạn đạt được giá trị này, và cuối cùng là bạn là ai và bạn dự định thực hiện nó như thế nào. Sao cho các chủ masternode nhanh chóng hiểu được ý tưởng mà bạn muốn đề xuất từ một vài dòng đầu trong đề xuất của bạn.
- Mở một phiên thảo luận trước khi đề xuất
- Nhận phản hồi từ cộng đồng trước khi bạn đăng đề xuất lên blockchain. Một chu kỳ thảo luận thường khoảng hai tuần sẽ giúp bạn phát hiện ra liệu có ai đó đã đưa ra một đề xuất tương tự trong quá khứ hay không, và liệu nó có thành công hay sẽ thất bại. Có những kênh thảo luận tiền đề xuất và Dash Nation Discord, và Reddit cũng thu hút được rất nhiều sự quan tâm và thảo luận - hãy cân nhắc về những thảo luận trên các kênh này như là giai đoạn nghiên cứu cho đề xuất của bạn. Sau đó, bạn có thể đăng một link lên diễn đàn thảo luận khi mà đề xuất của bạn đã được đăng để thể hiện bạn muốn nhận được những ý kiến phản hồi từ cộng đồng cho công việc của bạn.
- Quản lý nhận dạng và danh tính của bạn
- Cộng đồng Dash là một trong những tính năng mạnh mẽ nhất của mạng lưới, và những người mới luôn được chào đón. Tuy nhiên, do cách đề xuất hoạt động, nên cần có sự tin tưởng nào đó rằng công việc đã hứa trong đề xuất sẽ được hoàn thành nếu nó được thông qua. Bởi vậy nếu bạn là người mới, hãy cân nhắc việc bắt đầu bằng những đề xuất nhỏ trước để chứng minh khả năng hoàn thành đề xuất của bạn một cách đúng thời gian và phù hợp ngân sách. Hãy đính kèm tên thật của bạn hoặc thông tin của bạn trên Keybase với đề xuất cũng sẽ giúp bạn xây dựng được lòng tin. Nếu bạn muốn đưa ra đề xuất lớn, hãy tập hợp mọt nhóm và chỉ định (hoặc thuê) một người có nhiệm vụ liên lạc với cộng đồng, vì việc đăng thông tin bằng nhiều tài khoản khác nhau có thể gây nhầm lẫn.
- Chạy chiến dịch quảng bá để thu nhận sự ủng hộ cho đề xuất của bạn
- Những đề xuất có video hoặc website sẽ có cơ hội thành công cao hơn! Đăng nội dung video làm cho đề xuất của bạn động chạm đến con người và có cơ hội truyền nhiệt huyết của bạn theo cách mà những văn bản không thể hiện được. Hãy đăng video của bạn lên diễn đàn và DashCentral, và thường xuyên xuất hiện trên Discord hoặc mở các webinar để giải thích về đề xuất của bạn và trả lời các câu hỏi. Hãy thực hiện trước một số công việc trước khi bạn xin cấp vốn để thể hiện sự tham gia của bạn với Dash - đừng nên làm phiền và spam nhiều kênh chỉ yêu cầu bỏ phiếu.
- Thể hiệu sự cam kết của bạn với mạng lưới
- Nếu bạn yêu cầu cho một sự đầu tư lớn để bắt đầu hoặc mở rộng một doanh nghiệp dựa trên Dash, bạn cần phải giải thích tại sao và cần cấp vốn trong bao lâu, và bạn sẽ mang lại điều gì để đổi lại sự cấp vốn đó. Sẽ rất tốt nếu bạn thể hiện rằng bạn sẵn sàng chấp nhận rủi ro về tài chính khi tham gia bằng việc đóng vốn đối ứng của bạn hoặc của các nhà đầu tư của bạn cùng với ngân sách được cấp bởi Dash. Các thỏa thuận về quyền sở hữu hoặc độc quyền có thể đạt được với `Dash Core Group, Inc. <bradley.zastrow@dash.org> `_, nhưng phải được làm rõ bằng văn bản trước khi đề xuất được đăng.
- Đăng đề xuất sớm và sẵn sàng trả lời các câu hỏi
- Phiên bỏ phiếu sẽ đóng trong vòng 1662 block (hoặc gần 3 ngày) trước siêu khối. Để cho những người vận hành masternode có đủ thời gian cân nhắc, thảo luận và bỏ phiếu cho đề xuất của bạn, bạn cần phải đăng nó trước khi đến thời hạn chót - có lẽ sẽ tốt hơn là đợi đến kỳ sau thay vì phải làm một cách vội vã! Hầu hết các masternode sẽ thấy đề xuất của bạn đầu tiên một khi nó xuất hiện trên blockchain hoặc khi bạn đăng trên DashCentral. Trong vài giờ đầu thảo luận với các chủ masternode thường sẽ có rất nhiều câu hỏi và nó có ý nghĩa rất quan trọng đối với những quan điểm và bỏ việc phiếu, bởi vậy hãy chuẩn bị và dành thời gian cho giai đoạn này.
- Thường xuyên cập nhật tình hình cho cộng đồng khi đề xuất được thông qua
- Đề xuất của bạn nên bao gồm chi tiết về việc bạn lập kế hoạch ra sao để giữ cho cộng đồng và mạng lưới được cập nhật về những thông tin làm việc của bạn. Nên giữ cam kết và thường xuyên đăng báo cáo và sẵn sàng trên các kênh trực tuyến để trả lời các câu hỏi của cộng đồng. Nên nhớ rằng, những đề xuất của bạn trong tương lai có được chấp thuận hay không tuỳ thuộc vào khả năng bạn giữ cam kết và khả năng giao tiếp với cộng đồng.
- Hãy cân nhắc những sắp xếp cho những yêu cầu lớn
- Nếu bạn xin cấp vốn một khoản ngân sách lớn, thì sẽ có những quan tâm dễ hiểu rằng liệu bạn có giữ được cam kết của mình với mạng lưới không. Hãy tìm đến các bên trung gian được tin cậy như Dash Core Group, Inc. hoặc Green Candle, Inc. trước để có lời khuyên về việc ký quỹ, và lập các điều kiện cho ký quỹ và công bố phát hành công khai đề xuất. Nếu đề xuất của bạn rất lớn và nó sử dụng phần lớn ngân sách thì sẽ có một nguy cơ rằng việc chấp nhận đề xuất của bạn sẽ đẩy mất những đề xuất nhỏ hơn ra khỏi ngân sách. Hãy cân nhắc việc chia nhỏ đề xuất của bạn ra các phần thanh toán nhỏ hơn mỗi tháng.
Hãy xem tài liệu này để có hướng dẫn cụ thể về việc làm thế nào để tạo một đề xuất khi bạn đã sẵn sàng. Chúc may mắn!
Ví dụ về một báo cáo tốt, quản lý danh tiếng và sử dụng một video để xin cấp kinh phí trong một tiền đề xuất, hãy xem video đề xuất rất nổi tiếng có tên DASH: Detailed từ Amada B. Johnson
Một vài điểm bổ sung:
- Hiện tại thì mạng lưới chưa thể trả được ngân sách của đề xuất vào địa chỉ ví đa chữ ký, hay việc thay đổi địa chỉ thanh toán sau khi đề xuất đã được đăng lên trên blockchain.
- Để tránh bị cáo buộc là thiên vị và giao dịch tay trong, Dash Core không thể quảng bá cho những đề xuất của bạn. Nếu đề xuất của bạn là một giải pháp tích hợp, hãy liên hệ với nhóm phát triển thị trường trước. Một khi sản phẩm của bạn được chạy, nó có thể được công bố trên các kênh của Dash Core.
- Nếu đề xuất của bạn là về tin tức, quảng bá, hay marketing, hãy chắc chắn rằng bạn đồng bộ những nỗ lực của mình với những tổ chức lớn trên mạng lưới Dash như Dash News hoặc các hãng tiếp thị được ký hợp đồng với Dash Core.
- Bạn có trách nhiệm cho kế hoạch dự phòng rủi ro trước những biến động về tỷ giá. Nếu đề xuất của bạn có liên quan đến việc chi trả những khoản lớn cho đối tác thứ ba bằng tiền thông thường, hãy tiếp cận Dash Core Group, Inc. hoặc Green Candle, Inc. để có được sự tư vấn về giải pháp uỷ thác, bảo đảm tỷ giá, chuyển đổi tiền tệ và bảo hiểm rủi ro biến động tỷ giá.
- Vì lý do tương tự, không nên yêu cầu tài trợ trong thời gian dài hơn ba tháng. Masternode không muốn nhìn thấy và bỏ phiếu trên cùng một đề xuất mà không cập nhật vài tháng liên tiếp, và sự biến động giá làm cho nó trở thành một đề rủi ro cả cho mạng lưới và cho bản thân bạn.
- Trước khi nhập đề xuất ngân sách của bạn lên blockchain, hãy kiểm tra xem có bao nhiêu đề xuất đã đang tồn tại cho chu kỳ ngân sách hiện tại. Nếu nó có vẻ rất đông rồi hoặc có một vài đề xuất yêu cầu một phần lớn ngân sách, thì việc thắng được trở nên rất cạnh tranh và những dự án yếu hơn sẽ bị đẩy khỏi ngân sách, thậm chí nó có thu thập được đủ lượng bỏ phiếu ủng hộ vượt ngưỡng 10%. Hãy xem ở đây để biết thêm chi tiết.
Masternodes
Dash được biết nhiều nhất là loại tiền điện tử đầu tiên mà tập trung vào tính ẩn danh và tốc độ giao dịch. Có điều mà nhiều người không biết đó là những tính năng như vậy được thực hiện trên những máy chủ chuyên biệt của mạng lưới được biết đến như là các masternode, chúng cho rất nhiều những tính năng thú vị mà không thể có được trên các nền tảng blockchain thông thường. Những tính năng này bao gồm tính ẩn danh và giao dịch tức thời, cũng như khả năng quản trị qúa trình phát triển của mạng lưới thông qua một cơ chế bỏ phiếu cho việc cấp vốn hàng tháng. Đây chính là lần đầu tiên trên thế giới tiền số, và các masternode được dùng để đạt được tính riêng tư và tốc độ cho các giao dịch mà Dash cung cấp.
Tài liệu này tập trung về việc giúp bạn hiểu về các dịch vụ mà masternode mang đến cho mạng lưới, nhưng nó cũng gồm có các hướng dẫn về làm thế nào để chạy một masternode, sử dụng dịch vụ đặt chỗ hoặc giải pháp tự cài đặt và bảo trì masternode của mình. Yêu cầu cơ bản để chạy một masternode trên mạng lưới Dash là cần có 1000 DASH. Khoản này được biết như là khoản đặt cọc, và không thể chi tiêu nếu không nó sẽ làm gián đoạn hoạt động của masternode. Yêu cầu thứ hai là cần có một máy chủ để chạy phần mềm masternode của Dash.
Tuỳ chọn 1: Thuê đặt masternode
Since operating your own server requires a certain level knowledge of blockchains and Linux server operating systems, several community members offer dedicated hosting solutions for a fee. Taking advantage of these services means the user only needs to provide the masternode collateral and pay the hosting fee in order to receive payment from the block reward. See these pages for information on how to set up a hosted masternode.
Tuỳ chọn 2: Tự vận hành masternode
Những người dùng hiểu sâu (hoặc tò mò) về hoạt động bên trong của mạng lưới Dash có thể chọn cách tự vận hành masternode của mình trên máy chủ riêng. Những bước cần thiết sau đây, và người dùng cần phải chịu trách nhiệm cho việc thiết lập, bảo đảm an toàn và bảo trì cả máy chủ lẫn khoản đặt cọc. Hãy xem những trang sau đây để có thông tin làm thế nào để cài đặt và tự vận hành một masternode.
Hiểu về Masternode
Masternode, đã từng là độc nhất cho mạng lưới Dash, nhưng bây giờ trở nên một công nghệ phổ biến và được đưa lên những nền tảng blockchain khác. Phần tài liệu này sẽ mô tả những nguyên tắc và cơ chế của masternode và các dịch vụ mà chúng cung cấp đặc biệt cho mạng lưới Dash.
Simply put, a masternode is a server with a full copy of the Dash blockchain, which guarantees a certain minimum level of performance and functionality to perform certain tasks related to block validation, as well as PrivateSend and InstantSend, as the anonymity and instant transaction features in Dash are called. The masternodes are paid for this service, using a concept known as Proof of Service. This is in addition to the Proof of Work done by miners to secure the blockchain. Masternodes are also allowed to vote on governance and funding proposals, with each masternode receiving one vote (yes/no/abstain) on each proposal submitted to the system.
Bất cứ ai cũng có thể chạy một masternode. Mục đích của việc này là có được sự phi tập trung cần thiết để đảm bảo rằng không một ai có thể kiểm soát phần lớn các masternode. Tuy nhiên, để tránh làm đầy mạng lưới với nhiều masternode không cần thiết hoặc khuyến khích những người thiếu thận trọng, thì có một điều kiện cần phải thực hiện: đó là chứng minh việc sở hữu 1000 DASH. Coin không cần thiết phải ở trong masternode, nhưng nó cần phải được giữ trong một cách nào đó mà làm minh bạch cho toàn bộ mạng lưới. Nếu chủ sở hữu di chuyển hoặc tiêu đi những coin đó, thì masternode sẽ dừng hoạt động và việc thanh toán sẽ dừng lại.
Masternode được trả công bởi mạng lưới cho việc cung cấp dịch vụ PrivateSend, InstantSend và dịch vụ quản trị. 45% Phần thưởng khối được trả cho các masternode, 45% trả cho các thợ mỏ và 10% sẽ đưa vào ngân sách. Trong thực tế, một nửa phần thưởng từ các khối bình thường sẽ trả cho thợ mỏ và một nửa sẽ trả cho masternode. Sau đó, cứ mỗi 16,616 khối (xấp xỉ 30.29 ngày), một siêu khối được tạo và nó có chứa toàn bộ 10% phần chi trả cho những người dành được đề xuất ngân sách. Các masternode được chọn một cách ngẫu nhiên để thanh toán trong mỗi khối (xấp xỉ cứ mỗi 2.6 phút) từ một danh sách một khi chúng đạt tới top 10% của tổng số các masternode, và sau đó quay trở lại cuối hàng đợi sau khi đã được thanh toán. Khi càng có nhiều masternode được tạo, thì thời gian giữa các đợt thanh toán này sẽ được tăng lên. Do thuật toán lựa chọn, luôn có một khía cạnh ngẫu nhiên để lựa chọn thanh toán, nhưng về lâu dài, tất cả các chủ sở hữu masternode sẽ nhận được các khoản thanh toán tương tự nhau. Nếu khoản đặt cọc của masternode đã bị tiêu, hoặc một masternode dừng cung cấp dịch vụ cho mạng trong khoảng hơn một giờ, nó được đưa ra khỏi danh sách cho đến khi dịch vụ được cung cấp trở lại. Theo cách này, các masternode có động lực để cung cấp dịch vụ một cách hiệu quả và tin cậy cho mạng lưới.
Việc có nhiều máy chủ lưu giữ toàn bộ bản sao của blockchain và làm việc cho đồng coin làm cho nó trở nên cực kỳ hữu ích. Nhờ có hệ thống phần thường này, làm cho không còn rủi ro do việc thiếu masternode, và do đó các nhà phảt triển có thể dựa vào đó để nhanh chóng triển khai những tính năng phi tập trung mới mà họ muốn thực hiện. Đây thực sự là điểm mạnh của Dash - một hệ thống tạo động lực cho hàng ngàn máy chủ nằm phân tán hoạt động 24x7 có nghĩa là Dash có thể mở rộng một cách hiệu quả hơn và triển khai các dịch vụ nhanh chóng hơn các blockchain mà chạy hoàn toàn bởi những người tình nguyện không được trả công. Càng có nhiều masternode mạng lưới của Dash càng tốt hơn và an toàn hơn.
As of March 2018, the Dash network has over 4700 masternodes located in over 41 countries and hosted on over 100 ISPs. The block reward is approximately 3.34 Dash, so the selected masternode receives 1.67 Dash per payment or approximately 6 Dash per month. The block reward decreases by 7.14% approximately once per year, so the annual earnings for a masternode owner is approximately 7% of the collateral, and will decrease over time as calculated here. See this tool to calculate real-time payment rates, and this site for various real-time statistics on the masternode network.
Masternodes so với đào coin
Dash, cũng giống như Bitcoin và hầu hết các loại tiền kỹ thuật số, là dựa trên một sổ cái phi tập trung chứa tất cả các giao dịch, được biết là một blockchain. Blockchain này được đảm bảo thông qua một cơ chế đồng thuận; trong trường hợp của cả Dash và Bitcoin, cơ chế đồng thuận đó là Proof of Work (PoW). Các thợ mỏ cố gắng giải quyết bài toán khó, họ nhận quyền tạo một khối mới vào blockchain. Nếu tất cả những người khác đang chạy phần mềm đó đồng ý rằng bài toán đã dược giải một cách chính xác, khối sẽ được tạo vào blockchain và thợ mỏ đó nhận được phần thưởng.
Dash hoạt đông khác một chút so với Bitcoin, tuy nhiên, bởi vì nó có mạng lưới hai tầng. Tầng thứ hai được tạo bởi các masternode (các Full node), nó cho phép giao dịch tài chính riêng tư (PrivateSend), giao dịch tức thời (InstantSend), và hệ thống quản trị và cấp vốn phi tập trung. Bởi tầng thứ hai này là rất quan trọng, masternode cũng được trả thưởng khi các thợ mỏ tạo ra những khối mới. Nó chia phần thưởng khối như sau: 45% phần thưởng khối được trả cho thợ mỏ, 45% trả cho masternode và 10% dự trữ lại cho hệ thống ngân sách (được tạo ra bởi các siêu khối cứ mỗi tháng một lần).
Hệ thống masternode được gọi là Proof of Service (PoSe), từ khi masternode cung cấp những dịch vụ quan trọng cho mạng lưới. Thực ra, toàn bộ mạng lưới được giám sát bởi các masternode, nó có khả năng từ chối những khối được tạo không đúng bởi các thợ mỏ. Nếu một thợ mỏ cố gắng chiếm đoạt toàn bộ phần thưởng khối cho mình hoặc cố gắng chạy một phiên bản cũ của phần mềm Dash, thì mạng lưới masternode sẽ làm cho khối đó trở nên mồ côi, và nó sẽ không được đưa vào blockchain.
Nói một cách ngắn gọn, các thợ mỏ tạo nên tầng thứ nhất, nó cơ bản là gửi và nhận tiền và ngăn ngừa việc tiêu lặp. Masternode thì tạo nên tầng thứ hai, nó cung cấp những tính năng bổ sung làm cho Dash trở nên khác biệt với các loại tiền điện tử khác. Masternode không đào coin, và các máy đào không thể phục vụ như các masternode. Hơn nữa, mỗi masternode được "đảm bảo" bởi 1000 DASH. Những DASH đó vẫn luôn thuộc quyền quản lý của người chủ nó, và vẫn có thể được tự do chi tiêu. Khoản tiền này không bị khoá theo bất cứ cách thức nào. Tuy nhiên, nếu khoản tiền này được di chuyển hoặc chi tiêu, masternode gắn cùng với nó sẽ không được kích hoạt và sẽ dừng nhận phần thưởng.
Logic thanh toán
Việc thanh toán cho masternode trong phiên bản 12 của Dash được xác định bằng việc sử dụng hàng đợi xác định phi tập trung với việc lựa chọn xác xuất.
Danh sách toàn cục
Mỗi masternode xuất hiện trong một danh sách chung. Vị trí của chúng trong danh sách này xác định bởi thời gian của chúng kể từ lần thanh toán cuối cùng theo mạng chứ không phải là blockchain. Một masternode mới tham gia mạng lưới và các masternode mới nhận thanh toán được đưa vào cuối của danh sách. Các masternode đang chạy và dược kích hoạt được sử dụng bởi câu lệnh rpc 'masternode start' or 'masternode start-alias' cũng được đặt vào cuối của danh sách. Sử dụng câu lệnh mới 'masternode start-missing' để tránh điều này. Khi các masternode được đưa xuống cuối của danh sách chung, những masternode còn lại sẽ dần dần được di cuyển về phía đầu của danh sách. Khi một masternode đạt đến 10% trên cùng của danh sách chung, nó sẽ đủ điều kiện để được lựa chọn từ bể lựa chọn.
Pool lựa chọn
Bể lựa chọn là 10% đầu tiên của danh sách chung. Kích thước của chúng được xác định bởi tổng số masternode. Ví dụ, nếu có 4500 masternode hoạt động thì 450 masternode đầu tiên trong danh sách chung là đủ điều kiện cho việc chọn lựa. Khi ở trong bể chọn lựa, việc chọn lựa thanh toán được xác định bởi entropy của mã băm của khối. Mã băm của 100 khối trước xác định masternode nào sẽ được chọn để thanh toán. Một giá trị băm kép SHA256 của mã băm và chỉ số giao dịch cấp vốn cho tất cả các masternode trong bể lựa chọn được so sánh với mã băm Proof of Work của 100 khối trước đó. Masternode có giá trị băm gần nhất với mã băm của khối thì được chọn để thanh toán.
Xác xuất
Bởi vì việc lựa chọn được xác định bởi entropy của mã băm khối, nên không thể đoán được khi nào thì thanh toán sẽ xảy ra. Người vận hành masternode sẽ thấy có những khác nhau về khoảng thời gian cho mỗi đợt thanh toán. Khi một masternode đi vào bể chọn, việc thanh toán xảy ra như là một xác xuất. Xác xuất trong trường hợp này được tính bằng cách sử dụng kích thước bể chọn hiện tại là 450 (với 4500 masternode). Các nút trong bể chọn được lựa chọn trả thưởng một cách ngẫu nhiên. Trong trường hợp này xác suất được chọn trên bất kỳ khối nhất định nào là 1/450.
Bảng dưới đây cho thấy xác suất của một nút đủ điều kiện được chọn để thanh toán trong một khoảng thời gian cụ thể. Ví dụ, xác suất mà một nút đủ điều kiện được chọn trong vòng 12 giờ là khoảng 46%. Bảng này không (và không thể) cho chúng ta biết xác suất được chọn sau một khoảng thời gian nhất định. Ví dụ: nếu bạn chưa được chọn trong vòng 12 giờ qua -- và chúng ta biết từ bảng này có khoảng 54% cơ hội xảy ra -- xác suất được chọn trên khối tiếp theo không là 46%. Nó vẫn là 1/450. Đặt những thứ này lại với nhau, nếu bạn có nút đủ điều kiện và giả sử 48 giờ đã trôi qua mà không được thanh toán, thì bạn đã rất không may mắn vì có ít hơn 10% khả năng đó xảy ra. Nhưng, cơ hội được chọn của bạn trên khối tiếp theo vẫn giữ nguyên như đối với bất kỳ khối nào, tức là 1/450.
Một khi một nút được chọn để thanh toán, nó được đưa xuống cuối của danh sách và không thể được chọn lại lần nữa cho đến khi nó được đưa vào bể chọn lựa.
| Giờ | Khối | Xác xuất |
|---|---|---|
| 1 | 23.07 | 5.00% |
| 2 | 46.14 | 9.76% |
| 3 | 69.21 | 14.27% |
| 4 | 92.28 | 18.56% |
| 6 | 138.42 | 26.50% |
| 8 | 184.56 | 33.67% |
| 10 | 230.70 | 40.14% |
| 12 | 276.84 | 45.98% |
| 18 | 415.26 | 60.30% |
| 24 | 553.68 | 70.82% |
| 30 | 692.10 | 78.56% |
| 36 | 830.52 | 84.24% |
| 42 | 968.94 | 88.42% |
| 48 | 1107.36 | 91.49% |
| 72 | 1661.04 | 97.52% |
| 96 | 2214.72 | 99.28% |
Bạn có thể chạy đoạn mã (được viết bởi thành viên cộng đồng là moocowmoo dùng để tạo ra bảng trên đây.
Lựa chọn Quorum
Giao dịch InstantSend trong Dash phiên bản 12 được đảm bảo an toàn bằng việc đồng thuận của các masternode đã được chọn nhất định. Tập hợp các masternode này được gọi chính thức là một quorum và phải ở trong sự chấp thuận của đa số, ít nhất là sáu trên mười, để có thể khoá thành công các đầu vào của một giao dịch. Có nhiều quorum được tự chọn cho mỗi đầu vào và trong một giao dịch InstantSend sử dụng một khoảng cách toán học giữa giá trị băm của mỗi đầu vào và của tập hợp các giao dịch cấp vốn cho masternode.
Mỗi masternode nhận yêu cầu khóa giao dịch InstantSend so sánh giá trị băm của giao dịch cấp vốn của masternode với giá trị băm của đầu vào yêu cầu khóa. Sau khi kiểm tra tính hợp lệ của các đầu vào không được chi tiêu, mười masternodes xa nhất từ mã băm này phát tán việc chấp nhận của chúng về việc khóa.
Tất cả các đầu vào cho InstantSend phải có ít nhất qua 6 block nếu không giao dịch sẽ bị từ chối.
Các yêu cầu cho masternode
- 1000 Dash: Thường được cho rằng là phần khó nhất. Có thể có được Dash bằng việc mua nó trên các sàn giao dịch như Poloniex, Bittrẽ, Kraken và LiveCoin. Sử dụng dịch vụ của Shapeshift cũng là một cách hay.
- Một máy chủ hoặc VPS chạy Linux: Hầu hết các hướng dẫn gần đây sử dụng Ubuntu 16.04 LTS. Chúng tôi gợi ý dùng dịch vụ VPS như Vultr và DigitalOcean, mặc dù bất kỳ nhà cung cấp tốt nào cũng đều có thể làm được. Nói chung một cấu hình cỡ thấp và vừa cũng có thể chạy được, tuy nhiên yêu cầu về năng lực sẽ tăng lên theo lộ trình này.
- Có một địa chỉ IP dành riêng: Thường được đi cùng với một máy chủ/máy chủ ảo.
- Trong thời gian ngắn ban đầu (và cốt lõi): Các masternode thường yêu cầu việc cài đặt phức tạp, nhưng công cụ như Dashman hiện nay đã đơn giản hoá rất nhiều cho công đoạn này.
Bên cạnh việc phải dành riêng 1000 DASH làm đặt cọc, các masternode cũng phải có phần cứng đạt mức yêu cầu tối thiểu. Trong phiên bản 12.1 thì yêu cầu cho masternode là như sau:
| Tối thiểu | Đề xuất | |
|---|---|---|
| CPU | 1x 1 GHz | 1x 2 GHz |
| RAM | 1 GB | 2 GB |
| Ổ Đĩa | 8 GB | 16 GB |
| Mạng | 400 GB/mth | 1 TB/mth |
Masternode sử dụng băng thông vào khoảng 300-500 GB cho mỗi tháng và sẽ tăng lên khi mạng lưới phát triển.
Dash Evolution
Yêu cầu về phần cứng cụ thể cho masternode của Dash Evolution chưa được xác định, tuy nhiên có một số điểm có thể được lấy từ lộ trình và bài viết trên blog này. Sẽ có thể chạy masternode cho Dash trên các máy chủ ảo thông thường đến tận khi kích thước block tăng lên xấp xỉ 20 MB, sau dó thì cần phải có những phần cứng riêng như GPU và thậm chí cần đến cả chip ASIC.
Hosting Services
Several Dash community members offer masternode hosting services. This service can be realized securely without the customer ever giving up control of the 1000 DASH required for collateral. For security reasons, it is highly recommended to keep the collateral on a hardware wallet when taking advantage of a hosting service. A list of currently available masternode hosting services is available below.
List of hosting services
Disclaimer: Dash Core may be affiliated with these community members, but is not involved in the provision of any of these services.
Masternode.me

Splawik's Hosting Service


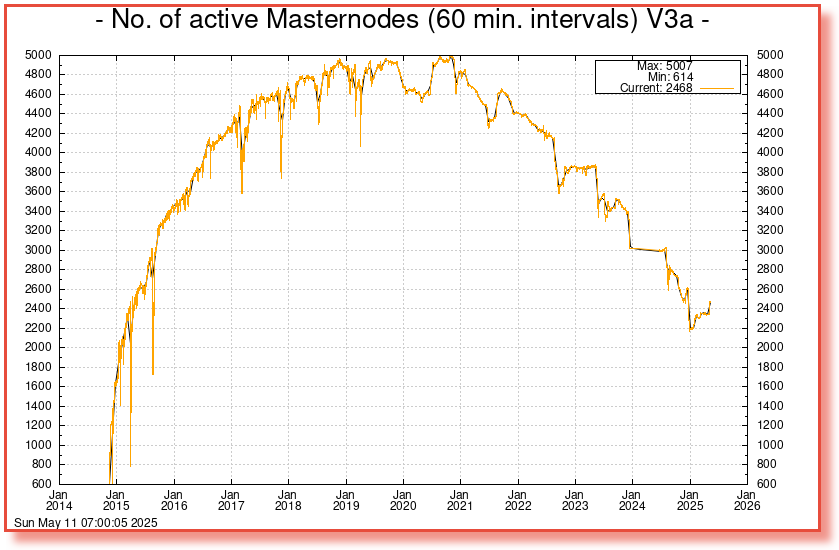
Node40

币舫 (Bifun)

Masternodehosting
Starting a hosted masternode
Starting a hosted masternode is done in just a few easy steps:
- Send 1000 DASH to an address you control in a single transaction and wait for 15 confirmations
- Communicate the address to your hosting provider, who will provide you with a masternode IP address and private key
- Enter this information in your wallet and start the masternode
It is highly recommended to store the keys to your masternode collateral on a hardware wallet for added security against hackers. This documentation will use a Trezor as an example, but KeepKey and Ledger are also supported. For instructions on using Dash Core wallet to start the masternode (no longer recommended), contact your hosting provider.
Send the collateral
Set up your Trezor using the Trezor wallet at https://wallet.trezor.io, update the firmware if necessary and send a test transaction to verify that it is working properly. For help on this, see this guide. Create a new account in your Trezor wallet by clicking Add account. Then click the Receive tab and send exactly 1000 DASH to the address displayed. You should see the transaction as soon as the first confirmation arrives, usually within a few minutes.

Trezor Wallet Receive tab showing successfully received collateral of 1000 DASH
Once the transaction appears, click the QR code on the right to view the transaction on the blockchain. Keep this window open as we complete the following steps, since we will soon need to confirm that 15 confirmations exist, as shown in the following screenshot.

Trezor blockchain explorer showing 15 confirmations for collateral transfer
Correspond with your hosting provider
Once 15 confirmations exist, send the address holding the 1000 DASH to your hosting provider. Payment for operating the masternode will generally also be requested at this point - if paying in Dash, be careful not to pay from the address holding the collateral. You will receive a reply with the following data:
- A server IP address
- A masternode private key
- The collateral transaction ID (optional)
Start the masternode
The Dash Masternode Tool (DMT) is required to combine all of this data and issue the command to the network to start the masternode. Download the appropriate version of DMT for your computer from the GitHub releases page here. Unzip the file and run the executable. The following window appears.

Dash Masternode Tool startup screen
We will now do the final preparation in Dash DMT. Carry out the following sequence of steps as shown in this screenshot from DMT developer Bertrand256:

Dash Masternode Tool configuration steps
- Enter the name of your masternode here.
- Enter the IP address of your masternode, as provided by your host.
- Enter the TCP port number. This should be 9999.
- Instead of clicking Generate new, simply enter the masternode private key provided by your host.
- Copy the collateral address where you sent the 1000 DASH collateral from your Trezor Wallet and paste it in this field.
- Click the arrow → to derive the BIP32 path from your collateral address. You can verify this against the BIP32 path shown on the receive tab in your Trezor Wallet for the transaction.
- Click Lookup to find the collateral TX ID for the transaction which transferred the collateral to the address. You can verify this against the TXID shown on the confirmation page of the blockchain explorer for your collateral address.

Dash Masternode Tool with configuration ready to start masternode
Click Start Masternode using Hardware Wallet. Enter your PIN and confirm on your hardware wallet that you want to transmit this command. The following messages will appear, confirm each one:


Dash Masternode Tool confirmation dialogs to start a masternode
That's it! Your masternode is now running, and you should receive regular payments to your masternode address. You can monitor your masternode's acceptance by the network by entering the collateral address to search the masternode list at https://www.dashninja.pl. For information on how to withdraw masternode payments without affecting operation of the masternode, see here.
Setup
Setting up a masternode requires a basic understanding of Linux and blockchain technology, as well as an ability to follow instructions closely. It also requires regular maintenance and careful security, particularly if you are not storing your Dash on a hardware wallet. There are some decisions to be made along the way, and optional extra steps to take for increased security.
If you prefer to use a masternode hosting service, several community members provide hosting at masternode.me, node40.com, dashmasternode.io or masternodehosting. When using these hosting services, all you have to do is send a single transaction of 1000 DASH to a specific address and communicate the transaction ID to the hosting service. Simply follow the steps here.
This guide is heavily based on previous guides written by Bertrand256, moocowmoo, tao, BolehVPN and tungfa. Tao's hugely popular original guide and support thread is available here, as well many more guides for specific cases in this forum.
Before you begin
This guide assumes you are setting up a single masternode for the first time. If you are updating a masternode, see here instead. You will need:
- 1000 Dash
- A wallet to store your Dash, preferably a hardware wallet, although Dash Core wallet is also supported
- A Linux server, preferably a Virtual Private Server (VPS)
We also assume you will be working from a Windows computer. However, since most of the work is done on your Linux VPS, alternative steps for using macOS or Linux will be indicated where necessary.
Set up your VPS
A VPS, more commonly known as a cloud server, is fully functional installation of an operating system (usually Linux) operating within a virtual machine. The virtual machine allows the VPS provider to run multiple systems on one physical server, making it more efficient and much cheaper than having a single operating system running on the "bare metal " of each server. A VPS is ideal for hosting a Dash masternode because they typically offer guaranteed uptime, redundancy in the case of hardware failure and a static IP address that is required to ensure you remain in the masternode payment queue. While running a masternode from home on a desktop computer is technically possible, it will most likely not work reliably because most ISPs allocate dynamic IP addresses to home users.
We will use Vultr hosting as an example of a VPS, although DigitalOcean, Amazon EC2, Google Cloud, Choopa and OVH are also popular choices. First create an account and add credit. Then go to the Servers menu item on the left and click + to add a new server. Select a location for your new server on the following screen:

Vultr server location selection screen
Select Ubuntu 16.04 x64 as the server type. We use 16.04 instead of the latest version because 16.04 is an LTS release of Ubuntu, which will be supported with security updates for 5 years instead of the usual 9 months.

Vultr server type selection screen
Select a server size offering at least 2GB of memory.

Vultr server size selection screen
Enter a hostname and label for your server. In this example we will use
dashmn1 as the hostname.

Vultr server hostname & label selection screen
Vultr will now install your server. This process may take a few minutes.

Vultr server installation screen
Click Manage when installation is complete and take note of the IP address, username and password.

Vultr server management screen
Set up your operating system
We will begin by connecting to your newly provisioned server. On
Windows, we will first download an app called PuTTY to connect to the
server. Go to the PuTTY download page
and select the appropriate MSI installer for your system.
On Mac or Linux you can ssh directly from
the terminal - simply type ssh root@<server_ip> and enter your
password when prompted.

PuTTY download page
Double-click the downloaded file to install PuTTY, then run the app from your Start menu. Enter the IP address of the server in the Host Name field and click Open. You may see a certificate warning, since this is the first time you are connecting to this server. You can safely click Yes to trust this server in the future.

PuTTY security alert when connecting to a new server
You are now connected to your server and should see a terminal
window. Begin by logging in to your server with the user root and
password supplied by your hosting provider.

Password challenge when connecting to your VPS for the first time
You should immediately change the root password and store it in a safe place for security. You can copy and paste any of the following commands by selecting them in your browser, pressing Ctrl + C, then switching to the PuTTY window and right-clicking in the window. The text will paste at the current cursor location:
passwd root
Enter and confirm a new password (preferably long and randomly
generated). Next we will create a new user with the following command,
replacing <username> with a username of your choice:
adduser <username>
You will be prompted for a password. Enter and confirm using a new password (different to your root password) and store it in a safe place. You will also see prompts for user information, but this can be left blank. Once the user has been created, we will add them to the sudo group so they can perform commands as root:
usermod -aG sudo <username>
Now, while still as root, we will update the system from the Ubuntu package repository:
apt update
apt upgrade
The system will show a list of upgradable packages. Press Y and Enter to install the packages. We will now install a firewall (and some other packages we will use later), add swap memory and reboot the server to apply any necessary kernel updates, and then login to our newly secured environment as the new user:
apt install ufw python virtualenv git unzip pv
(press Y and Enter to confirm)
ufw allow ssh/tcp
ufw limit ssh/tcp
ufw allow 9999/tcp
ufw logging on
ufw enable
(press Y and Enter to confirm)
fallocate -l 4G /swapfile
chmod 600 /swapfile
mkswap /swapfile
swapon /swapfile
nano /etc/fstab
Add the following line at the end of the file (press tab to separate each word/number), then press Ctrl + X to close the editor, then Y and Enter save the file.
/swapfile none swap sw 0 0
Finally, in order to prevent brute force password hacking attacks, open the SSH configuration file to disable root login over SSH:
nano /etc/ssh/sshd_config
Locate the line that reads PermitRootLogin yes and set it to
PermitRootLogin no. Directly below this, add a line which reads
AllowUsers <username>, replacing <username> with the username
you selected above. The press Ctrl + X to close the editor, then
Y and Enter save the file.
Then reboot the server:
reboot now
PuTTY will disconnect when the server reboots.
While this setup includes basic steps to protect your server against attacks, much more can be done. In particular, authenticating with a public key instead of a username/password combination, installing fail2ban to block login brute force attacks and enabling automatic security updates is advisable. More tips are available here. However, since the masternode does not actually store the keys to any Dash, these steps are considered beyond the scope of this guide.
Send the collateral
A Dash address with a single unspent transaction output (UTXO) of exactly 1000 DASH is required to operate a masternode. Once it has been sent, various keys regarding the transaction must be extracted for later entry in a configuration file as proof that the transaction was completed successfully. A masternode can be started from a hardware wallet or the official Dash Core wallet, although a hardware wallet is highly recommended to enhance security and protect yourself against hacking. This guide will describe the steps for both hardware wallets and Dash Core.
Option 1: Sending from a hardware wallet
Set up your Trezor using the Trezor wallet at https://wallet.trezor.io/ and send a test transaction to verify that it is working properly. For help on this, see this guide - you may also choose to (carefully!) add a passphrase to your Trezor to further protect your collateral. Create a new account in your Trezor wallet by clicking Add account. Then click the Receive tab and send exactly 1000 DASH to the address displayed. If you are setting up multiple masternodes, send 1000 DASH to consecutive addresses within the same new account. You should see the transaction as soon as the first confirmation arrives, usually within a few minutes.
Trezor Wallet Receive tab showing successfully received collateral of 1000 DASH
Once the transaction appears, click the QR code on the right to view the transaction on the blockchain. Keep this window open as we complete the following steps, since we will soon need to confirm that 15 confirmations exist, as shown in the following screenshot.
Trezor blockchain explorer showing 15 confirmations for collateral transfer
While we are waiting for 15 confirmations, download the latest version of the Dash Masternode Tool (DMT) from the GitHub releases page here. Unzip and run the file. The following window appears.
Dash Masternode Tool startup screen
Click Check RPC connection in the top left corner of the main window to verify that the connection is working. Then connect your Trezor device and click Test HW to verify the Trezor connection is working.


Dash Masternode Tool successful connection confirmations
We will now use DMT to extract the transaction ID. Carry out the following sequence of steps as shown in this screenshot from DMT developer Bertrand256:
Dash Masternode Tool configuration steps
- Enter the name of your masternode here. This should match the hostname as defined when setting up your server, dashmn1 in this case. You can view this in the first line of the output of dashman/dashman status.
- Enter the IP address of your masternode here. This was given to you by the VPS provider when you set up the server.
- Enter the TCP port number. This should be 9999.
- Click Generate new to generate a new masternode private key.
- Copy the collateral address where you sent the 1000 DASH collateral from your Trezor Wallet and paste it in this field.
- Click the arrow → to derive the BIP32 path from your collateral address. You can verify this against the BIP32 path shown on the receive tab in your Trezor Wallet for the transaction.
- Click Lookup to find the collateral TX ID for the transaction which transferred the collateral to the address. You can verify this against the TX ID shown on the confirmation page of the blockchain explorer for your collateral address.
Dash Masternode Tool with configuration ready to start masternode
Leave DMT open, take note of the masternode private key and collateral address and continue with the next step: installing Dash Core on your VPS.
Option 2: Sending from Dash Core wallet
Open Dash Core wallet and wait for it to synchronize with the network. It should look like this when ready:

Fully synchronized Dash Core wallet
Click Tools > Debug console to open the console. Type the following two commands into the console to generate a masternode key and get a fresh address:
masternode genkey
getaccountaddress 0

Generating a masternode private key in Dash Core wallet
Take note of the masternode private key and collateral address, since we will need it later. The next step is to secure your wallet (if you have not already done so). First, encrypt the wallet by selecting Settings > Encrypt wallet. You should use a strong, new password that you have never used somewhere else. Take note of your password and store it somewhere safe or you will be permanently locked out of your wallet and lose access to your funds. Next, back up your wallet file by selecting File > Backup Wallet. Save the file to a secure location physically separate to your computer, since this will be the only way you can access our funds if anything happens to your computer. For more details on these steps, see here.
Now send exactly 1000 DASH in a single transaction to the account address you generated in the previous step. This may be sent from another wallet, or from funds already held in your current wallet. Once the transaction is complete, view the transaction in a blockchain explorer by searching for the address. You will need 15 confirmations before you can start the masternode, but you can continue with the next step at this point already: installing Dash Core on your VPS.
Trezor blockchain explorer showing 15 confirmations for collateral transfer
Install Dash Core
Dash Core is the software behind both the Dash Core GUI wallet and Dash masternodes. If not displaying a GUI, it runs as a daemon on your VPS (dashd), controlled by a simple command interface (dash-cli).
Open PuTTY or a console again and connect using the username and password you just created for your new, non-root user. There are two options to install Dash Core, an automated option using a script utility called dashman by Dash Core Team member moocowmoo, and a more complicated option which will allow you to understand all of the key steps involved in preparing your masternode.
Option 1: Automated installation using dashman
To install Dash using dashman, enter the following commands after logging in:
cd ~
git clone https://github.com/moocowmoo/dashman
~/dashman/dashman install
(press Y and Enter to confirm)
dashman will download the latest version of Dash Core for your system, as well as an initial snapshot of the blockchain to speed up the bootstrapping process. Next download and install sentinel, which is required for masternodes at version 12.1 or higher:
~/dashman/dashman install sentinel
Your system is now running as a standard Dash node, and is busy completing synchronisation with the blockchain. We now need to enter the masternode private key generated in the previous step. Edit the configuration file using the following command:
nano ~/.dashcore/dash.conf
Uncomment the last two lines by deleting the # symbol at the start of
the line, then paste the masternode private key you generated after
masternodeprivkey=. You can simply click the right mouse button to
paste into the terminal window. Press Ctrl + X to close the editor
and Y and Enter save the file.

Entering masternodeprivkey in dash.conf on the masternode
At this point you should restart dashd to load the new configuration file by typing the following:
~/dashman/dashman restart
Press Y and Enter to confirm. Then check the sync status and wait until all blockchain synchronisation and the 15 confirmations for the collateral transaction are complete:
~/dashman/dashman status

dashman status output showing masternode ready to be started
dashman does not automatically restart your masternode in the event of a system error. Add a check function to crontab to make sure it checks every minute to ensure your masternode is still running:
crontab -e
Choose nano as your editor and enter the following line at the end of the file, after the line for sentinel:
* * * * * pidof dashd || ~/.dashcore/dashd
Press enter to make sure there is a blank line at the end of the file, then press Ctrl + X to close the editor and Y and Enter save the file.
Continue with the next step to start your masternode.
Option 2: Manual installation
To manually download and install the components of your Dash masternode, visit https://www.dash.org/wallets on your computer to find the link to the latest Dash Core wallet. Click Linux, then right-click on Download TGZ for Dash Core Linux 64 Bit and select Copy link address. Go back to your terminal window and enter the following command, pasting in the address to the latest version of Dash Core by right clicking or pressing Ctrl + V:
cd ~
wget https://github.com/dashpay/dash/releases/download/v0.12.3.3/dashcore-0.12.3.3-x86_64-linux-gnu.tar.gz
You can optionally verify the integrity of your download by running the following command and comparing the output against the value for the file as shown on the Dash website under Hash File:
sha256sum dashcore-0.12.3.3-x86_64-linux-gnu.tar.gz

Link to the hash file to verify download integrity
You can also optionally verify the authenticity of your download as an
official release by Dash Core Team. All releases of Dash are signed
using GPG by UdjinM6 with the key 8359 2BD1 400D 58D9, verifiable
here on Keybase. Import the key, download
the ASC file for the current release of Dash and verify the signature as
follows:
curl https://keybase.io/udjinm6/pgp_keys.asc | gpg --import
wget https://github.com/dashpay/dash/releases/download/v0.12.3.3/SHA256SUMS.asc
gpg --verify SHA256SUMS.asc

Downloading the PGP key and verifying the signed binary
Create a working directory for Dash, extract the compressed archive, copy the necessary files to the directory and set them as executable:
mkdir .dashcore
tar xfvz dashcore-0.12.3.3-x86_64-linux-gnu.tar.gz
cp dashcore-0.12.3/bin/dashd .dashcore/
cp dashcore-0.12.3/bin/dash-cli .dashcore/
chmod 777 .dashcore/dash*
Clean up unneeded files:
rm dashcore-0.12.3.3-x86_64-linux-gnu.tar.gz
rm -r dashcore-0.12.3/
Create a configuration file using the following command:
nano ~/.dashcore/dash.conf
An editor window will appear. We now need to create a configuration file specifying several variables. Copy and paste the following text to get started, then replace the variables specific to your configuration as follows:
#----
rpcuser=XXXXXXXXXXXXX
rpcpassword=XXXXXXXXXXXXXXXXXXXXXXXXXXXX
rpcallowip=127.0.0.1
#----
listen=1
server=1
daemon=1
maxconnections=64
#----
masternode=1
masternodeprivkey=XXXXXXXXXXXXXXXXXXXXXXX
externalip=XXX.XXX.XXX.XXX
#----
Replace the fields marked with XXXXXXX as follows:
rpcuser: enter any string of numbers or letters, no special characters allowedrpcpassword: enter any string of numbers or letters, no special characters allowedmasternodeprivkey: this is the private key you generated in the previous stepexternalip: this is the IP address of your VPS
The result should look something like this:

Entering key data in dash.conf on the masternode
Press Ctrl + X to close the editor and Y and Enter save the file. You can now start running Dash on the masternode to begin synchronization with the blockchain:
~/.dashcore/dashd
You will see a message reading Dash Core server starting. We will now install Sentinel, a piece of software which operates as a watchdog to communicate to the network that your node is working properly:
cd ~/.dashcore
git clone https://github.com/dashpay/sentinel.git
cd sentinel
virtualenv venv
venv/bin/pip install -r requirements.txt
venv/bin/python bin/sentinel.py
You will see a message reading dashd not synced with network! Awaiting full sync before running Sentinel. Add dashd and sentinel to crontab to make sure it runs every minute to check on your masternode:
crontab -e
Choose nano as your editor and enter the following lines at the end of the file:
* * * * * cd ~/.dashcore/sentinel && ./venv/bin/python bin/sentinel.py 2>&1 >> sentinel-cron.log
* * * * * pidof dashd || ~/.dashcore/dashd
Press enter to make sure there is a blank line at the end of the file, then press Ctrl + X to close the editor and Y and Enter save the file. We now need to wait for 15 confirmations of the collateral transaction to complete, and wait for the blockchain to finish synchronizing on the masternode. You can use the following commands to monitor progress:
~/.dashcore/dash-cli mnsync status
When synchronisation is complete, you should see the following response:
{
"AssetID": 999,
"AssetName": "MASTERNODE_SYNC_FINISHED",
"Attempt": 0,
"IsBlockchainSynced": true,
"IsMasternodeListSynced": true,
"IsWinnersListSynced": true,
"IsSynced": true,
"IsFailed": false
}
Continue with the next step to start your masternode.
Start your masternode
Depending on how you sent your masternode collateral, you will need to start your masternode with a command sent either by your hardware wallet or by Dash Core wallet. Before you continue, you must ensure that your 1000 DASH collateral transaction has at least 15 confirmation, and that dashd is running and fully synchronized with the blockchain on your masternode. See the previous step for details on how to do this. During the startup process, your masternode may pass through the following states:
- MASTERNODE_SYNC: This indicates the data currently being synchronised in the masternode
- MASTERNODE_SYNC_FAILED: Synchronisation could not complete, check your firewall and restart dashd
- WATCHDOG_EXPIRED: Waiting for sentinel to restart, make sure it is entered in crontab
- NEW_START_REQUIRED: Start command must be sent from wallet
- PRE_ENABLED: Waiting for network to recognize started masternode
- ENABLED: Masternode successfully started
If you masternode does not seem to start immediately, do not arbitrarily issue more start commands. Each time you do so, you will reset your position in the payment queue.
Option 1: Starting from a hardware wallet
Go back to DMT and ensure that all fields are filled out correctly. Click Lookup to find the collateral TX ID for the transaction which transferred the collateral to the address if you were not able to do so earlier. Then click Start Masternode using Hardware Wallet and confirm the following two messages:
Dash Masternode Tool confirmation dialogs to start a masternode
At this point you can monitor your masternode using dashman/dashman
status, by entering ~/.dashcore/dash-cli masternode status or
using the Get status function in DMT. You will probably need to wait
around 30 minutes as the node passes through the PRE_ENABLED stage and
finally reaches ENABLED. Give it some time, the final result should
appear as follows:

dashman status output showing successfully started masternode
At this point you can safely log out of your server by typing exit. Congratulations! Your masternode is now running.
Option 2: Starting from Dash Core wallet
If you used an address in Dash Core wallet for your collateral transaction, you now need to find the txid of the transaction. Click Tools > Debug console and enter the following command:
masternode outputs
This should return a string of characters similar to this:
{
"06e38868bb8f9958e34d5155437d009b72dff33fc28874c87fd42e51c0f74fdb" : "0",
}
The first long string is your transaction hash, while the last number is the index. We now need to create a file called masternode.conf for this wallet in order to be able to use it to issue the command to start your masternode on the network. Open a new text file in Notepad (or TextEdit on macOS, gedit on Linux) and enter the following information:
- Label: Any single word used to identify your masternode, e.g. MN1
- IP and port: The IP address and port (usually 9999) configured in the dash.conf file, separated by a colon (:)
- Masternode private key: This is the result of your masternode genkey command earlier, also the same as configured in the dash.conf file
- Transaction hash: The txid we just identified using masternode outputs
- Index: The index we just identified using masternode outputs
Enter all of this information on a single line with each item separated by a space, for example:
MN1 52.14.2.67:9999 XrxSr3fXpX3dZcU7CoiFuFWqeHYw83r28btCFfIHqf6zkMp1PZ4 06e38868bb8f9958e34d5155437d009b72dff33fc28874c87fd42e51c0f74fdb 0
Save this file in the DashCore data folder on the PC running the Dash Core wallet using the filename masternode.conf. You may need to enable View hidden items to view this folder. Be sure to select All files if using Notepad so you don't end up with a .conf.txt file extension by mistake. For different operating systems, the DashCore folder can be found in the following locations (copy and paste the shortcut text into the Save dialog to find it quickly):
| Nền tảng | Path | Shortcut |
|---|---|---|
| Linux | /home/yourusername/.dashcore |
~/.dashcore |
| macOS | /Macintosh HD/Library/Application Support |
~/Library/Application Support/DashCore |
| Windows | C:\Users\yourusername\AppData\Roaming\Dash Core |
%APPDATA%\DashCore |
Now close your text editor and also shut down and restart Dash Core wallet. Dash Core will recognize masternode.conf during startup, and is now ready to activate your masternode. Go to Settings > Unlock Wallet and enter your wallet passphrase. Then click Tools > Debug console again and enter the following command to start your masternode (replace MN1 with the label for your masternode):
masternode start-alias MN1
At this point you can go back to your terminal window and monitor your
masternode using dashman/dashman status, by entering
~/.dashcore/dash- cli masternode status or using the Get status
function in DMT. You will probably need to wait around 30 minutes as the
node passes through the PRE_ENABLED stage and finally reaches ENABLED.
Give it some time, the final result should appear as follows:
dashman status output showing successfully started masternode
At this point you can safely log out of your server by typing exit.
Congratulations! Your masternode is now running.
Maintenance
Masternodes require regular maintenance to ensure you do not drop off the payment queue. This includes promptly installing updates to Dash, as well as maintaining the security and performance of the server. In addition, masternodes should vote on proposals and perform other tasks in the interest of the network and the value of the Dash they hold.
Payment withdrawals
Once your masternode has been accepted by the network, it will enter the masternode payment queue and slowly begin moving up. A masternode within the top 10% of the list is selected and receives a payment each time a new Dash block is mined. For more details on this process, see here. These payments are sent to the same address you used to start your masternode, which means you need to be careful when withdrawing the payments. The original 1000 DASH payment you used to start your masternode must remain untouched in a single unspent transaction output (utxo) or your masternode will drop off the payment list - you may have seen this ID when preparing to send the start masternode command. Payments appear in separate UTXOs, so we need a method of only spending those UTXOs and not the one containing the 1000 DASH. Note that masternode payouts can only be spent after 100 confirmations.
Option 1: Withdrawals using a hardware wallet
If you used a hardware wallet such as Trezor to start your masternode, you must also use this process to make payout withdrawals. Once again, we will be using Bertrand256's Dash Masternode Tool (DMT) to select the correct outputs. With DMT, we can select specific UTXOs to withdraw the payments without touching the original collateral transaction. This is not possible using the Trezor web wallet alone.
Open DMT and verify the RPC and HW connections are working. From the Tools menu, select Transfer funds from current masternode's address or Transfer funds from all masternode's addresses, if you use DMT to control multiple masternodes.

Selecting the transfer funds function in DMT
DMT will load for a moment, then display a window showing the available UTXOs you can use in your withdrawal. By default, all UTXOs not used as masternode collateral are checked. The masternode collateral UTXOs are not only unchecked but also hidden in order to avoid unintentionally sending funds associated with collateral and stopping your masternode. You can show these hidden entries by unchecking the Hide collateral utxos option. Enter your destination address for the transaction. The window should appear as follows:

Selecting the UTXOs to use as inputs in the withdrawal transaction
Verify the transaction fee and click Send. Your Trezor will prompt to enter your PIN and confirm the transaction on the device. Once this is done, confirm one more time to DMT that you want to broadcast the transaction to the network by clicking Yes. A confirmation with the transaction ID will appear.


Confirming broadcast of the transaction to the network
Option 2: Withdrawals from Dash Core wallet
Similar to DMT as described above, we need a method in Dash Core wallet to restrict which UTXOs are spent when making withdrawals from a masternode address to ensure that the collateral UTXO is not touched. In Dash Core wallet, this feature is known as Coin Control, and it must be enabled before you can use it. Click Settings > Options > Wallet > Enable coin control features. Now, when you go to the Send tab in your wallet, a new button labelled Inputs... will appear. Click this button to select which UTXOs can be used as input for any transactions you create. The following window appears:

Coin Selection window in Dash Core wallet, showing two masternodes (testnet)
Right click on the transaction(s) showing an amount of 1000 DASH, then select Lock unspent. A small lock will appear next to the transaction. Then click OK. You can now safely create transactions with your remaining funds without affecting the original collateral UTXOs.


Locking UTXOs in Dash Core wallet
How to update a masternode
Periodically, the Dash Core development team will release updates to Dash. Since normal nodes rely on them for services and copies of the blockchain, masternodes are expected to update to new versions of Dash and Sentinel promptly. In some cases, hardware upgrades (more CPU, RAM or disk space, or even custom GPU/ASIC hardware) may also be necessary. Not updating will eventually result in your masternode being removed from the payment queue. If you run a hosted masternode, your host will take care of updates for you. If not, the method of updating depends on how you installed Dash.
Minor version updates to Dash (e.g. from 0.12.3.1 to 0.12.3.2) do not make changes to the protocol version, while major version updates (e.g. from 0.12.2.3 to 0.12.3.0) will usually increase the network protocol version. If the protocol version did not change, you DO NOT need to restart your masternode if you complete the update within 60 minutes. If the protocol version did change, you must issue a start command from your wallet. Do not send start commands to your masternode if not necessary, as it will send you to the back of the payment queue.
Option 1: Automated update using dashman
To update Dash using dashman, log in to your server and enter the following commands:
~/dashman/dashman sync
~/dashman/dashman update
Check the status of your masternode:
~/dashman/dashman status
If you are doing a major version update and need to restart your masternode, update the software version of the wallet holding the collateral to the latest version now by following the instructions here. Continue monitoring your masternode. After some time, all statuses should turn green, in particular masternode started: YES and masternode network state: ENABLED.
Option 2: Manual update
To update Dash manually, log in to your server using ssh or PuTTY. First we need to stop Dash running:
~/.dashcore/dash-cli stop
To manually download and install the components of your Dash masternode, visit https://www.dash.org/wallets/ on your computer to find the link to the latest Dash Core wallet. Click Linux, then right-click on Download TGZ for Dash Core Linux 64 Bit and select Copy link address. Go back to your terminal window and enter the following command, pasting in the address to the latest version of Dash Core by right clicking or pressing Ctrl + V:
cd ~
wget https://github.com/dashpay/dash/releases/download/v0.12.3.3/dashcore-0.12.3.3-x86_64-linux-gnu.tar.gz
Verify the integrity of your download by running the following command and comparing the output against the value for the file as shown on the Dash website under Hash File:
sha256sum dashcore-0.12.3.3-x86_64-linux-gnu.tar.gz
Link to the hash file to verify download integrity
Remove the old binaries from the working directory, extract the compressed archive, copy the new files to the directory and set them as executable:
rm ~/.dashcore/dashd
rm ~/.dashcore/dash-cli
tar xfvz dashcore-0.12.3.3-x86_64-linux-gnu.tar.gz
cp dashcore-0.12.3/bin/dashd ~/.dashcore/
cp dashcore-0.12.3/bin/dash-cli ~/.dashcore/
Clean up unneeded files:
rm dashcore-0.12.3.3-x86_64-linux-gnu.tar.gz
rm -r dashcore-0.12.3/
Restart Dash:
~/.dashcore/dashd
You will see a message reading "Dash Core server starting". We will now update Sentinel:
cd ~/.dashcore/sentinel/
git pull
If the protocol version changed during this update, you will need to issue a start command from your wallet. If you are using a hardware wallet, you can issue the start command by simply clicking the button in DMT. If you are using Dash Core wallet, update it to the latest version, then open the debug console and enter this command, where MN1 is the alias for your masternode:
masternode start-alias MN1
Monitor the status of your masternode as it starts up:
~/.dashcore/dash-cli getblockcount
~/.dashcore/dash-cli getnetworkinfo
~/.dashcore/dash-cli mnsync status
~/.dashcore/dash-cli masternode status
In particular, the last command should return the status Masternode successfully started. If you see an error similar to Invalid protocol version, then the protocol version has changed and you must send a start command from your wallet again. You can also monitor the status of your masternode from Sentinel. If Sentinel detects a functioning masternode, the following command should return nothing:
cd ~/.dashcore/sentinel
venv/bin/python bin/sentinel.py
Finally, you can check for your masternode by its collateral address using DashNinja, or search the consensus list of masternodes using this command and entering your masternode IP address:
~/.dashcore/dash-cli masternode list full | grep <your ip address>
Finding your position in the payment queue
Prior to Dash 0.12.4, each masternode may have a slightly different view of the network. In addition, selection from the top 10% of masternodes in the list in the selection pool is random. This means that there is no definite answer to when your masternode will be selected for payment. However, it is possible to make an approximation based on the time your masternode entered the back of the queue.
Community members xkcd, Bertrand256 and moocowmoo have all published various tools you can run to determine your approximate position in the payment queue, and bots are available on Discord and Slack as well.
DashCentral voting, verification and monitoring
DashCentral is a community-supported website managed by community member Rango. It has become a de facto site for discussion of budget proposals and to facilitate voting from a graphical user interface, but also offers functions to monitor masternodes.
Adding your masternode to DashCentral
Dashcentral allows you to vote on proposals from the comfort of your browser. After completing registration, go to the masternodes page and click the Add masternode now button. Enter your collateral address on the following screen:

Adding a masternode to DashCentral
Click Add masternode. Your masternode has now been added to DashCentral.
Enabling voting from DashCentral
Click Edit under Voting privkeys to enter your masternode private key to enable voting through the DashCentral web interface. Enter a voting passphrase (not the same as your login password, but equally important to remember!) and enter the private key (the same key you used in the dash.conf file on your masternode) on the following screen:

Adding voting privkeys to DashCentral
It is important to note that the private key to start your masternode is unrelated to the private keys to the collateral address storing your 1000 DASH. These keys can be used to issue commands on behalf of the masternode, such as voting, but cannot be used to access the collateral. The keys are encrypted on your device and never stored as plain text on DashCentral servers. Once you have entered the key, click Store encrypted voting privkeys on server. You can now vote on proposals from the DashCentral web interface.
Verifying ownership
You can also issue a message from your address to verify ownership of your masternode to DashCentral. Click Unverified under Ownership and the following screen will appear:

Verifying ownership of your masternode to DashCentral
Instructions on how to sign your collateral address using a software wallet appear. If you are using a hardware wallet other than Trezor, you will need to use the DMT app to sign the address. If you are using the Trezor hardware wallet, go to your Trezor wallet, copy the collateral address and click Sign & Verify. The following screen will appear, where you can enter the message provided by DashCentral and the address you wish to sign:

Signing a message from the Trezor Wallet
Click Sign, confirm on your Trezor device and enter your PIN to sign the message. A message signature will appear in the Signature box. Copy this signature and paste it into the box on DashCentral and click Verify ownership. Verification is now complete.

Masternode ownership has been successfully verified
Installing the DashCentral monitoring script
DashCentral offers a service to monitor your masternode, automatically restart dashd in the event of a crash and send email in the event of an error. Go to the Account settings page and generate a new API key, adding a PIN to your account if necessary. Scroll to the following screen:

Setting up the DashCentral monitoring script
Copy the link to the current version of the dashcentral script by right- click and selecting Copy link address. Open PuTTY and connect to your masternode, then type:
wget https://www.dashcentral.org/downloads/dashcentral-updater-v6.tgz
Replace the link with the current version of dashcentral-updater as necessary. Decompress the archive using the following command:
tar xvzf dashcentral-updater-v6.tgz
View your masternode configuration details by typing:
cat .dashcore/dash.conf
Copy the values for rpcuser and rpcpassword. Then edit the
dashcentral configuration by typing:
nano dashcentral-updater/dashcentral.conf
Replace the values for api_key, your masternode collateral address,
rpc_user, rpc_password, daemon_binary and daemon_datadir
according to your system. A common configuration, where lwhite is
the name of the Linux user, may look like this:

DashCentral updater configuration file
################
# dashcentral-updater configuration
################
our %settings = (
# Enter your DashCentral api key here
'api_key' => 'api_key_from_dashcentral'
);
our %masternodes = (
'masternode_collateral_address' => {
'rpc_host' => 'localhost',
'rpc_port' => 9998,
'rpc_user' => 'rpc_user_from_dash.conf',
'rpc_password' => 'rpc_password_from_dash.conf',
'daemon_autorestart' => 'enabled',
'daemon_binary' => '/home/<username>/.dashcore/dashd',
'daemon_datadir' => '/home/<username>/.dashcore'
}
);
Press Ctrl + X to exit, confirm you want save with Y and press Enter. Test your configuration by running the dashcentral script, then check the website. If it was successful, you will see that an update has been sent:
dashcentral-updater/dcupdater

Manually testing the DashCentral updater

DashCentral updater has successfully sent data to the DashCentral site
Once you have verified your configuration is working, we can edit the crontab on your system to schedule the dcupdater script to run every 2 minutes. This allows the system to give you early warning in the event of a fault and will even restart the dashd daemon if it hangs or crashes. This is an effective way to make sure you do not drop off the payment queue. Type the following command:
crontab -e
Select an editor if necessary and add the following line to your crontab after the line for sentinel, replacing lwhite with your username on your system:
*/2 * * * * /home/lwhite/dashcentral-updater/dcupdater

Editing crontab to run the DashCentral updater automatically
Press Ctrl + X to exit, confirm you want save with Y and press Enter. The dcupdater script will now run every two minutes, restart dashd whenever necessary and email you in the event of an error.
Masternode monitoring tools
Several sites operated by community members are available to monitor key information and statistics relating to the masternode network.
Block Explorers
Since Dash is a public blockchain, it is possible to use block explorers to view the balances of any Dash public address, as well as examine the transactions entered in any given block. Each unique transaction is also searchable by its txid. A number of block explorers are available for the Dash network.
- CryptoID offers a Dash blockchain explorer and a function to view and map Dash masternodes.
- BitInfoCharts offers a page of price statistics and information and a blockchain explorer.
- CoinCheckup offers a range of statistics and data on most blockchains, including Dash.
- CoinPayments offers a simple Dash blockchain explorer.
- Dash.org includes two blockchain explorers at explorer.dash.org and insight.dash.org.
- Trezor operates a blockchain explorer powered by a Dash fork of insight, an advanced blockchain API tool
Dash Masternode Tool
https://github.com/Bertrand256/dash-masternode-tool
Written and maintained by community member Bertrand256, Dash Masternode Tool (DMT) allows you to start a masternode from all major hardware wallets such as Trezor, Ledger and KeepKey. It also supports functions to vote on proposals and withdraw masternode payments without affecting the collateral transaction.
DASH Ninja
DASH Ninja, operated by forum member and Dash Core developer elbereth, offers key statistics on the adoption of different versions of Dash across the masternode network. Several features to monitor governance of the Dash, the masternode payment schedule and the geographic distribution of masternodes are also available, as well as a simple blockchain explorer.
DashCentral
DashCentral, operated by forum member rango, offers an advanced service to monitor masternodes and vote on budget proposals through an advanced web interface. An Android app is also available.
Masternode.me
Masternode.me, operated by forum member and Dash Core developer moocowmoo, offers sequential reports on the price, generation rate, blockchain information and some information on masternodes.
Dash Masternode Information
http://178.254.23.111/~pub/Dash/Dash_Info.html
This site, operated by forum member and Dash Core developer crowning, offers a visual representation of many key statistics of the Dash masternode network, including graphs of the total masternode count over time, price information and network distribution.
Các chủ đề nâng cao
Cài đặt Dash trên Fedora Linux
Lập trình viên của Dash là t0dd đã phát triển những đóng gói và viết những hướng dẫn tuyệt vời cho việc cài và chạy Dash như là một nút, masternode hoặc trên testnet.
Cài đặt Dash trên Ubuntu Linux
Phiên bản được biên dịch ra mã máy đang được phát triển và phân phối qua hệ thống phân phối Ubuntu Linux Launchpad. Hãy quay lại kiểm tra ở đây để có được chi tiết một khi có phiên bản mới được công bố.
Đào coin
Mining in the context of cryptocurrency such as Dash refers to the process of searching for solutions to cryptographically difficult problems as a method of securing blocks on the blockchain. The process of mining creates new currency tokens as a reward to the miner. Mining is possible on a range of hardware. Dash implements an algorithm known as X11, which the miner must solve in order to earn rewards.
The simplest and most general hardware available for mining is the general purpose CPU present in every computer. A CPU is designed to be versatile but offers less efficiency than a GPU, which is designed to rapidly calculate millions of vectors in parallel. While specific CPU instruction enhancements related to cryptography such as AES or AVX can provide a decent boost, GPUs offer a significant performance increase due to their multiple pipelines capable of processing the predictably repetitive calculations associated with cryptocurrency mining. Finally, ASICs are relatively inflexible and can only process the specific function(s) for which they were designed, but at an even faster rate than the more general purpose GPUs and CPUs. A number of X11 ASICs are now available on the market, which have quickly made CPU and GPU mining uneconomic due to the increased difficulty of hashing arising from the rapidly increasing hash rate. The result is a currency which is more secure against brute force attacks on the Dash blockchain.
The profitability of mining is determined by the hashrate of your mining device, the current network difficulty and the costs of your hardware and electricity. The following links provide up to date information:
Masternodes vs. Mining
Dash, like Bitcoin and most other cryptocurrencies, is based on a decentralized ledger of all transactions, known as a blockchain. This blockchain is secured through a consensus mechanism; in the case of both Dash and Bitcoin, the consensus mechanism is Proof of Work (PoW). Miners attempt to solve difficult problems with specialized computers, and when they solve the problem, they receive the right to add a new block to the blockchain. If all the other people running the software agree that the problem was solved correctly, the block is added to the blockchain and the miner is rewarded.
Dash works a little differently from Bitcoin, however, because it has a two-tier network. The second tier is powered by masternodes (Full Nodes), which enable financial privacy (PrivateSend), instant transactions (InstantSend), and the decentralized governance and budget system. Because this second tier is so important, masternodes are also rewarded when miners discover new blocks. The breakdown is as follows: 45% of the block reward goes to the miner, 45% goes to masternodes, and 10% is reserved for the budget system (created by superblocks every month).
Hệ thống masternode được gọi là Proof of Service (PoSe), từ khi masternode cung cấp những dịch vụ quan trọng cho mạng lưới. Thực ra, toàn bộ mạng lưới được giám sát bởi các masternode, nó có khả năng từ chối những khối được tạo không đúng bởi các thợ mỏ. Nếu một thợ mỏ cố gắng chiếm đoạt toàn bộ phần thưởng khối cho mình hoặc cố gắng chạy một phiên bản cũ của phần mềm Dash, thì mạng lưới masternode sẽ làm cho khối đó trở nên mồ côi, và nó sẽ không được đưa vào blockchain.
Nói một cách ngắn gọn, các thợ mỏ tạo nên tầng thứ nhất, nó cơ bản là gửi và nhận tiền và ngăn ngừa việc tiêu lặp. Masternode thì tạo nên tầng thứ hai, nó cung cấp những tính năng bổ sung làm cho Dash trở nên khác biệt với các loại tiền điện tử khác. Masternode không đào coin, và các máy đào không thể phục vụ như các masternode. Hơn nữa, mỗi masternode được "đảm bảo" bởi 1000 DASH. Những DASH đó vẫn luôn thuộc quyền quản lý của người chủ nó, và vẫn có thể được tự do chi tiêu. Khoản tiền này không bị khoá theo bất cứ cách thức nào. Tuy nhiên, nếu khoản tiền này được di chuyển hoặc chi tiêu, masternode gắn cùng với nó sẽ không được kích hoạt và sẽ dừng nhận phần thưởng.
Mining Pools
Mining Dash in pools is more likely to generate rewards than solo mining directly on the blockchain. Mining dash using P2Pool is strongly encouraged, since it is a good way to distribute, rather than centralize, the hashing power. The following site lists Dash P2Pool mining pools near you, simply choose a pool with favourable fees and ping time and enter your Dash payment address as username and anything as password.
If you would like to set up your own P2Pool, documentation of the process is available here and the code for p2pool-dash is available on GitHub.
Other pools are also available and may be advantageous for different reasons such as ping latency, uptime, fee, users, etc.:
- https://coinfoundry.org
- https://dash.suprnova.cc
- https://www.nicehash.com
- https://www.coinotron.com
- https://dash.miningpoolhub.com
- https://www.multipool.us
- https://www.f2pool.com
- https://www2.coinmine.pl/dash
- https://aikapool.com/dash
- https://www.antpool.com
- https://avalon-life.io
- https://www.genesis-mining.com
- https://pool.viabtc.com/pool/dash/state
- http://dash.cybtc.info
- http://zpool.ca
DISCLAIMER: This list is provided for informational purposes only. Services listed here have not been evaluated or endorsed by the Dash developers and no guarantees are made as to the accuracy of this information. Please exercise discretion when using third-party services. If you’d like to be added to this list please reach out to leon.white@dash.org
In addition to joining a pool, you will also need to create a Dash address to receive your payout. To do this in Dash Core wallet, see here.
Dash P2Pool Node Setup
This guide describes how to set up a Dash P2Pool node to manage a pool of miners. Unlike centralized mining pools, P2Pool is based on the same peer-2-peer (P2P) model as Dash, making the pool as a whole highly resistant to malicious attacks, and preserving and protecting the decentralized nature of Dash. When you launch a P2Pool node, it seeks out, connects with, and shares data with a decentralized network of other P2Pool nodes (also known as peers). P2Pool nodes share a cryptographic chain of data representing value, similar to Dash's blockchain. The P2Pool version is called the sharechain. The decentralized and fair nature of this mining model means mining with P2Pool is strongly encouraged. P2Pool for Dash uses the p2pool-dash software on GitHub, which is a fork of p2pool for Bitcoin. For more information, see here.
Because of the way P2Pool manages difficulty adjustments on the sharechain, it is important to maintain low latency between the miners and the P2Pool node to avoid miners submitting shares too late to enter the sharechain. When setting up your node, you need to consider its physical and network location relative to the miners you intend to connect to the node. If you operate a mining farm, your P2Pool node should probably be a physical machine on the same local network as your miners. If you plan to operate a public node, it may be best to set up your P2Pool node as a virtual machine in a data center with a high speed connection so geographically close miners can mine to your pool with relatively low latency.
This following section describes the steps to setup an Ubuntu Server running P2Pool for Dash. It has been tested with Ubuntu 16.04 LTS and 18.04 LTS and Dash 0.12.2.3. While a reasonable effort will be made to keep it up to date, it should be possible to modify the instructions slightly to support different versions or operating systems as necessary.
Setting up the host server
Download a copy of Ubuntu Server LTS from
https://www.ubuntu.com/download/server and install it on your system
according to the steps described here. If you are using a VPS such as Vultr or AWS, your provider
will most likely provide an option to install this system during
provisioning. Ensure you enable OpenSSH server during setup so you can
control your server from a remote console. Once you have access to your
server, create a new non-root user if you have not already done so using
the following command, replacing <username> with a username of your
choice:
adduser <username>
You will be prompted for a password. Enter and confirm using a new password (different to your root password) and store it in a safe place. You will also see prompts for user information, but this can be left blank. Once the user has been created, we will add them to the sudo group so they can perform commands as root:
usermod -aG sudo <username>
Reboot your server and log in as the new user. At this point it is recommended to connect remotely using PuTTY (for Windows) or ssh (for Linux and macOS) if you have not already done so.
Setting up port forwarding
If you are on a private network behind a router, you will need to set up port forwarding for at least port 8999 (UDP/TCP) for access to the sharechain, as well as port 7903 (UDP/TCP) if you want your node to be accessible to the public. How this is done depends on your particular network router and is therefore beyond the scope of this documentation. An example from the popular DD-WRT open source router distribution is shown below. Guides to setting up port forwarding can be found here and here.
Take note of your IP address either from your router management interface or by visiting https://www.whatismyip.com/

Setting up port forwarding under DD-WRT
Option 1: Automated script setup
Dash community member dracocephalum has generously donated a script to automatically deploy everything required to run a p2pool-dash node under Ubuntu Server 16.04 and higher. For more details, see this forum post, or simply follow these instructions to get the script. To get fetch the script and get started, type:
sudo apt install git
git clone https://github.com/strophy/p2pool-dash-deploy
The files will be created in the p2pool-dash-deploy folder. We now need to configure a few variables specific to your system:
nano ./p2pool-dash-deploy/p2pool.deploy.sh
Scroll down to the section labeled #Variables and enter the
following information, replacing the <xxx> placeholders after the
= sign. Note that it may also be necessary to update the
DASH_WALLET_URL, DASH_WALLET_ZIP and DASH_WALLET_LOCAL
values if they do not match the current version of Dash:
PUBLIC_IP= <your public IP address from the previous step>EMAIL= <your email address>PAYOUT_ADDRESS= <your DASH wallet address to receive fees>USER_NAME= <linux user name>RPCUSER= <enter a random alphanumeric rpc user name>RPCPASSWORD= <enter a random alphanumeric rpc password>
Press Ctrl + X to close the editor and Y and Enter save the file. Then run the script:
bash ./p2pool-dash-deploy/p2pool.deploy.sh
The script will carry out all steps necessary to set up P2pool on Ubuntu Server and start dashd synchronisation. When setup is complete, you should see a message reading Installation Completed. You can now run a second script to start p2pool-dash:
bash ~/p2pool.start.sh
Your P2Pool node is now running. If you see errors similar to Error
getting work from dashd or -10 Dash Core is downloading blocks...
then you must wait until Dash finishes synchronisation. Once this is
done, you can point your miners to <ip_address>:7903 to begin
mining.


Example configuration showing a single Bitmain Antminer D3 connected to a p2pool-dash node on the local network
Option 2: Manual setup
First update your operating system as follows:
sudo apt update
sudo apt upgrade
P2Pool requires a full Dash node to be running to get block and transaction data. To download and install Dash, visit https://www.dash.org/wallets/ on your computer to find the link to the latest Dash Core wallet. Click Linu, then right-click on Download TGZ for Dash Core Linux 64 Bit and select Copy link address. Go back to your terminal window and enter the following command, pasting in the address to the latest version of Dash Core by right clicking or pressing Ctrl + V:
cd ~
wget https://github.com/dashpay/dash/releases/download/v0.12.2.3/dashcore-0.12.2.3-linux64.tar.gz
Verify the integrity of your download by running the following command and comparing the output against the value for the file as shown on the Dash website under Hash File:
sha256sum dashcore-0.12.2.3-linux64.tar.gz

Link to the hash file to verify download integrity
Create a working directory for Dash, extract the compressed archive, copy the necessary files to the directory and set them as executable:
mkdir .dashcore
tar xfvz dashcore-0.12.2.3-linux64.tar.gz
cp dashcore-0.12.2/bin/dashd .dashcore/
cp dashcore-0.12.2/bin/dash-cli .dashcore/
chmod 777 .dashcore/dash*
Clean up unneeded files:
rm dashcore-0.12.2.3-linux64.tar.gz
rm -r dashcore-0.12.2/
Create a configuration file using the following command:
nano ~/.dashcore/dash.conf
An editor window will appear. We now need to create a configuration file specifying several variables. Copy and paste the following text to get started, then replace the variables specific to your configuration as follows:
#----
rpcuser=XXXXXXXXXXXXX
rpcpassword=XXXXXXXXXXXXXXXXXXXXXXXXXXXX
rpcallowip=127.0.0.1
#----
listen=1
server=1
daemon=1
maxconnections=64
#----
Replace the fields marked with XXXXXXX as follows:
rpcuser: enter any string of numbers or letters, no special characters allowedrpcpassword: enter any string of numbers or letters, no special characters allowed
The result should look something like this:

Entering key data in dash.conf on the P2Pool node
Press Ctrl + X to close the editor and Y and Enter save the file. You can now start running Dash on the masternode to begin synchronization with the blockchain:
~/.dashcore/dashd
You will see a message reading Dash Core server starting. You can
continue with the following steps and check synchronization periodically
using the following command. Synchronization is complete when the number
of blocks is equal to the current number of blocks in the Dash
blockchain, as can be seen from any synchronized Dash wallet or block
explorer:
~/.dashcore/dash-cli getblockcount
We will now set up the P2Pool software and its dependencies. Begin with the dependencies:
sudo apt install python-zope.interface python-twisted python-twisted-web python-dev
sudo apt install gcc g++ git
Create working directories and set up p2pool-dash:
mkdir git
cd git
git clone https://github.com/dashpay/p2pool-dash
cd p2pool-dash
git submodule init
git submodule update
cd dash_hash
python setup.py install --user
We will add some optional extra interfaces to the control panel:
cd ..
mv web-static web-static.old
git clone https://github.com/justino/p2pool-ui-punchy web-static
mv web-static.old web-static/legacy
cd web-static
git clone https://github.com/johndoe75/p2pool-node-status status
git clone https://github.com/hardcpp/P2PoolExtendedFrontEnd ext
You can now start p2pool and optionally specify the payout address, external IP (if necessary), fee and donation as follows:
python ~/git/p2pool-dash/run_p2pool.py --external-ip <public_ip> -f <fee> --give-author <donation> -a <payout_address>
You can then monitor your node by browsing to the following addresses,
replacing <ip_address> with the IP address of your P2Pool node:
- Punchy interface: http://<ip_address>:7903/static/
- Legacy interface: http://<ip_address>:7903/static/legacy/
- Status interface: http://<ip_address>:7903/static/status/
- Extended interface: http://<ip_address>:7903/static/ext/
Example configuration showing a single Bitmain Antminer D3 connected to a p2pool-dash node on the local network
CPU Mining
This documentation describes how to mine Dash under the Windows operating system using just the CPU in your computer. Please note that the prevalence of GPU and ASIC miners mean that unless you have free electricity, this is highly unlikely to be profitable! Since this is the case, the software in this guide has not been updated in several years, and is intended for experimental purposes and testnet only.
This is a fairly simple procedure and examples will be given in order to achieve the fastest possible hash rate for your CPU, but remember that more optimized miners do exist, so we advise you to keep an eye out on mining sites such as these in order to keep up with the latest information and releases.
Mining software
The first step is to download appropriate mining software. A good basic miner for modern CPUs can be found here:
This software depends on your CPU supporting the AES-NI and AVX instruction sets. You can use CPU-Z to check if this is the case for your CPU:

CPU-Z showing details for an Intel i7 Haswell CPU
If your CPU does not support AES-NI and AVX, then you can try more generalized software which does not require specific instruction sets, such as these:
Our goal here is to choose mining software that supports the maximum possible instruction sets available on your CPU, and then try to increase the hash speed. Once you have made your choice, click Releases and download and extract the zip file. The different *.exe files indicate which specific processor optimizations they support. The folder should look something like this:

Executable CPU miners for Dash
Cấu hình
Begin by selecting a mining pool and generating a Dash address as described in the Mining Pools section above. Keep all your mining files in a single folder. In this example we will work from the Desktop. The node selected for this example is from the p2poolming.us list and is located in China:
http://118.184.180.43:7903/static/
Next, open Notepad and type in on one line the command we will use to start the miner, followed by pause on the second line. The general format is as follows:
<minerd> -a <algorithm> -o <url> -u <username> -p <password> -t <threads>
pause
Where:
- minerd = the executable miner daemon file you choose to use
- a = algorithm, which is X11 for Dash
- o = URL of your mining pool, including the protocol and port
- u = username, usually the Dash receiving address of your wallet or worker
- p = password, can often be set to x
- t = number of threads used
- pause = keeps the window open in the case of errors
For the CPU in the example above, the command may be:
minerd-avx-aes-sse2-sss3.exe -a X11 -o stratum+tcp://118.184.180.43:7903 -u XwZRjo1f6gmq3LCv7X1Hi5h3NkvDMHvu8G -p x -t 8
pause

Notepad file showing an example command to start a CPU miner
Click File, then Save As. Change Save as type to All Files, then type the file name as startminer.bat and save it in the same folder as the unzipped minerd files.
Testing
You are now ready to start! Keep an eye on your CPU usage in Task
Manager (right click the taskbar to open this) and be careful that the
CPU temperature does not exceed your maximum rating (around 64°C). If
you have temperature or desktop stability problems, reduce t to ~2
threads and try that first. If t is left out, the machine will
default to the maximum number of threads. After running the miner for a
while, take a look at the hash speed and payouts in your mining pool.
You can identify your miner by the wallet address on the page.

Example of CPU mining using DarkCoin CPUMiner 1.3 on Intel Core i7
Tips
Reduce the number of threads for added desktop usability and heat reduction. If the CPU temperature is too high, consider fitting a new fan and check that the heat sink thermal paste on the CPU is adequate. Tweak the processor clock speed for added performance using a motherboard controller like AI Suite for Asus motherboards. Reduction of CPU core voltage will result in lower temperature but increased instability.
Try to select a pool that is nearby to reduce network latency. If the node appears slow, switch to another location. Please distribute the hashing power globally to different pools to avoid forking.
GPU Mining
This guide consolidates several other guides on how to use your GPU (the processor on your graphics card) to mine Dash using the X11 algorithm on Windows. Please note that the growing market for ASIC miners means that this if probably not going to be profitable! A lot of the software and binaries described here also have not been updated for several years, so this guide should be used for experimental purposes only.
This guide will cover the process of downloading and configuring the mining software, followed by some suggestions for optimizations. This technology can change rapidly, so we advise you to keep an eye out on mining sites such as these in order to keep up with the latest information and releases.
Mining software
As for CPU mining, a range of mining software is available for GPU mining. Most of it based on sgminer compiled with different optimizations specific to different hardware. A good approach is to identify your graphics hardware, then choose an appropriate build of sgminer. You can use GPU-Z to identify your GPU hardware:

GPU-Z showing details for AMD Radeon Turks and NVIDIA Quadro GK104 class GPUs
Next, download the mining software. Most of these are based on the original sgminer, but this is not suitable for the X11 algorithm, offers no compiled binaries and hasn't been updated in years. We will describe using pre-compiled binary software maintained by newer developers only.
AMD
NVIDIA
- https://github.com/tpruvot/ccminer/releases (focus on core application)
- https://github.com/sp-hash/ccminer/releases (sp-mod, optimized CUDA kernels for Windows)
- https://github.com/KlausT/ccminer/releases (similar to SP version, more clean)
Download your chosen release and extract the zip file to a known location. The folder should look something like this:

Executable GPU miners for Dash
The sgminer file is the executable file, while the various files with .cl extensions define the various algorithms supported by sgminer. In this case, we are interested in the darkcoin.cl and darkcoin-mod.cl implementations of X11. Note that the name of the executable file may be different for miners with different optimizations, for example ccminer for NVIDIA cards.
Cấu hình
Begin by selecting a mining pool and generating a Dash address as described in the Mining Pools section above. Keep all your mining files in a single folder. In this example we will work from the Desktop. The node selected for this example is from the p2poolming.us list and is located in China:
http://118.184.180.43:7903/static/
Next, open Notepad and create the basic configuration. The general format is as follows:
{
"pools" : [
{
"url" : "stratum+tcp://pooladdress:7903",
"user" : "walletaddress",
"pass" : "x",
"algorithm":"darkcoin"
}
]
}
Where:
- pools = defines a list of pools (in this case, only one) towards which the hashing power is directed
- url = URL of your mining pool, including the protocol and port
- user = username, usually the Dash receiving address of your wallet or worker
- pass = password, can often be set to x
- algorithm = hashing algorithm to use, in this case darkcoin (for historic reasons) or darkcoin-mod
For the pool above, the configuration may be:

Configuration file for a Dash GPU miner
Click File, then Save As. Change Save as type to All Files, then type the file name as sgminer.conf and save it in the same folder as the unzipped sgminer files.
Testing
Double click your sgminer.exe and a Command Prompt window should appear immediately. If it disappears too quickly, check your configuration for missing commas, unclosed brackets or incorrect file name. The program will compile a special binary specific to your GPU and store it in the folder, then begin hashing.

Example of GPU mining using sgminer 5.6.1-nicehash-51 on Intel HD Graphics 4600
Optimization
Wolf0 binaries
In 2015, a user named Wolf0 created special binary files (*.bin) for certain AMD graphics cards using the following GPU families:
- Cape Verde: 7730/7750/7770
- Pitcairn: 7850/7870/R9 270/R9 270X
- Tahiti: 7870XT/7950/7970/R9 280/R9 280X
- Hawaii: R9 290/R9 290X/R9 295X2
If this matches your GPU hardware, you can try to replace the file generated automatically the first time you ran sgminer with these special binaries. Take careful note of the algorithm and GPU model, find the right file from Wolf0's Reddit thread, and place it in the sgminer folder with the exact same name as the automatically generated file, overwriting it.
Thuật toán
A simple change is to replace the darkcoin algorithm with
darkcoin-mod in your sgminer.conf file and compare performance.
Monitor the hashrate and GPU temperature over some time and choose the
algorithm that works best on your hardware.
xintensity
This is the main option to play around with to improve performance. Intensity correlates with the size of work being submitted at any one time to a GPU. The higher the number the larger the size of work. Generally speaking, finding an optimal value rather than the highest value is the correct approach as hash rate rises up to a point with higher intensities but above that, the device may be very slow to return responses, or produce errors
xintensity is a new setting that replaces the older intensity
setting. It should be inserted together with the worksize setting after
the pools : [ ] section as follows:
{
"pools" : [
{
"url" : "stratum+tcp://pooladdress:7903",
"user" : "walletaddress",
"pass" : "x",
"algorithm":"darkcoin"
}
],
"xintensity" : "64",
"worksize": "64"
}
From the documentation:
This new setting allows for a much finer grained intensity setting and also opens up for dual GPU threads on devices not previously able to. Note: make sure to use lower thread-concurrency values when you increase CPU threads. It is simply a shader multiplier, obviously based on the amount of shaders you got on a card, this should allow the same value to scale with different card models.
- 6970 with 1536 shaders: xI:64 = 98304 threads
- R9 280X with 2048 shaders: xI:64 = 131072 threads
- R9 290 with 2560 shaders: xI:64 = 180224 threads
- R9 290X with 2816 shaders: xI:64 = 163840 threads
- 6970 with 1536 shaders: xI:300 = 460800 threads
- R9 280X with 2048 shaders: xI:300 = 614400 threads
- R9 290 with 2560 shaders: xI:300 = 768000 threads
- R9 290X with 2816 shaders: xI:300 = 844800 threads
Try xintensity = 64 first and play around with the number to see
which gives you the best performance with the lowest error rate. The
higher the number the larger the size of work. Generally speaking
finding an optimal value rather than the highest value is the correct
approach as hash rate rises up to a point with higher intensities but
above that, the device may be very slow to return responses, or produce
errors. Or you can Google around for your card with the recommended
xintensity setting. Do not change the worksize setting, particularly if
using Wolf0's binaries. Save sgminer.conf in the same folder as your
sgminer.exe.
Tips
- Installing the latest display drivers can often improve performance. These can be found here for NVIDIA and AMD.
- If you have problems with old driver versions, try to use a Display Driver Uninstaller tool in safe mode to make sure there is no trace of previous versions.
- If you are feeling adventurous, you can try to overclock your GPU to squeeze out some more performance (at your own risk) using Afterburner. You can do this both by increasing the clock rate and decreasing the voltage to manage heat. Be aware of your maximum GPU temperature, anything above 90 °C risks permanent damage to your GPU.
- If you have a Crossfire setup, disable Crossfire in your ATI Catalyst settings or things will be funky.
- Changing the graphics driver version can influence performance. Some report for AMD cards suggest that Catalyst 14.7-RC3 may offer increased performance.
- You can also try mining under Linux, or compiling your own mining binary from source with specific optimisations for your hardware under either Windows or Linux.
ASIC Mining
ASIC stands for Application-Specific Integrated Circuit and describes a type of processor that is designed for one purpose only. ASICs are a popular choice for mining cryptocurrency because they can offer a higher efficiency than CPU or GPU miners, resulting in higher profit.
Please note that the information on this page may become obsolete very quickly due to the rapidly changing market and difficulty of mining Dash. You are responsible for carrying out your own research and any listing on this page should not be considered an endorsement of any particular product. A good place to begin your research is the mining section of the Dash Forums.
The following X11 ASIC miners are available on the market today, click the product name to visit the manufacturer's website:
| Tên | Hash rate | Power | Weight | Dimensions (mm) | Price |
|---|---|---|---|---|---|
| Baikal BK-X | 10 GH/s ±5% | 800 W | 3.8 kg | 312 x 125 x 130 | $999 |
| Bitmain Antminer D3 | 17 GH/s ±5% | 970 W | 6.5 kg | 320 x 130 x 190 | $133 |
| iBelink DM56G | 56 GH/s ±5% | 2100 W | 17 kg | 490 x 390 x 180 | $1,800 |
| Innosilicon A5 | 32 GH/s ±8% | 750 W | 3.1 kg | 400 x 135 x 158 | $990 |
| Spondoolies SPx36 | 540 GH/s ±10% | 4400 W | 19.5 kg | 640 X 525 X 185 | $15,500 |
The following ASIC miners are either no longer easily available or obsolete due to the increase in difficulty on the network.
| Tên | Hash rate | Power | Weight | Dimensions (mm) |
|---|---|---|---|---|
| Baikal Mini | 150 MH/s ±10% | 40 W | .475 kg | 140 x 100 x 95 |
| Baikal Giant+ A2000 | 2000 MH/s ±10% | 430 W | 3 kg | 300 x 140 x 125 |
| Baikal Giant A900 | 900 MH/s ±5% | 217 W | 2.5 kg | 300 x 123 x 123 |
| Baikal Quad Cube | 1200 MH/s ±10% | 300 W | 3 kg | 135 x 135 x 425 |
| iBelink DM384M | 384 MH/s ±10% | 715 W | 21 kg | 490 x 350 x 180 |
| iBelink DM11G | 11 GH/s ±5% | 810 W | 22 kg | 490 x 350 x 180 |
| iBelink DM22G | 22 GH/s ±5% | 810 W | 19 kg | 490 x 350 x 180 |
| Pinidea DR-1 | 500 MH/s ±10% | 320 W | 4.5 kg | 290 x 130 x 150 |
| Pinidea DR-2 | 450 MH/s ±5% | 335 W | 4.5 kg | 200 x 165 x 135 |
| Pinidea DR-3 | 600 MH/s ±5% | 345 W | 4.5 kg | 200 x 165 x 135 |
| Pinidea DU-1 | 9 MH/s ±5% | 7 W | 50 x 50 x 30 | |
| Pinidea DRX-Kuznetsov | 900 MH/s ±5% | 650 W | 280 x 180 x 150 | |
| Pinidea DRX-Varyag | 1200 MH/s ±5% | 850 W | 280 x 180 x 150 |
Các nhà phát triển
Dash Core has published an extensive Developer Guide to help new developers get started with the Dash code base, and as a reference for experienced developers. This guide can be leveraged to quickly and efficiently integrate external applications with the Dash ecosystem. Anyone can contribute to the guide by submitting an issue or pull request on GitHub. The documentation is available at: https://dash-docs.github.io/en/
The Dash Core Team also maintains the Dash Roadmap, which sets out delivery milestones for future releases of Dash and includes specific technical details describing how the development team plans to realise each challenge. The Dash Roadmap is complemented by the Dash Improvement Proposals, which contain detailed technical explanations of proposed changes to the Dash protocol itself.
The remaining sections available below describe practical steps to carry out common development tasks in Dash.
Translating Dash
Translations of all Dash products are managed courtesy of Transifex, which offers its own detailed documentation of all functions and features. Within Transifex, Dash maintains an organization which contains multiple projects and one team of translators assigned to all of the projects. Each project is assigned with one or more target languages for translation by the project maintainer. When a translator joins the team, they are able to choose the languages they feel able to translate. They can then work on any projects specifying this language as a target language.
In general, languages with minimal regional variation are to be
translated into the common language (rather than regional) target.
Portuguese, for example, is simply translated into the pt target
language, rather than two separate target languages pt_BR and
pt_PT, for Portuguese as spoken in Brazil and Portugal,
respectively. As Dash grows, these languages may be separated out into
their regional variants by proofreaders, depending on demand. Exceptions
to this rule apply where the same spoken language is written
differently, such as zh_CN and zh_TW for Simplified Chinese and
Traditional Chinese.
Keeping translations consistent over time as multiple translators work on each target language is a very important part of delivering a quality user experience. For this reason, if you come across any Dash-specific terminology such as masternodes, you should use the Concordance search function to see how the term has been translated in the past. Transifex will also provide Suggestions and History if it recognizes a similar string in the database of past translations. Stay consistent with past language use, but also ensure your terminology is up to date with current use!


The following documentation describes the various projects and any special features specific to the programming language in which the product is written.
Dash Core
https://www.transifex.com/dash/dash/
This project contains a file named dash_en.ts, which is an export of
all translatable user-facing content in the Dash Core Wallet. Languages with 80% or more of the translations
complete will be integrated in the next release. Note that the software
will often replace placeholders in the text with actual numbers,
addresses or usernames. If you see a placeholder in the source text, it
must also appear in the target text. If it does not, your translation
cannot be used. The Copy source string button can help you copy
everything over, so all you need to do is replace the English words
surrounding the placeholders. You can change the order of the
placeholders as necessary, according to the grammar of your target
language.
- Placeholders
Source:
E&xitTarget:
&BeendenNote that the
&character is placeholder used to indicate a keyboard shortcut in a program menu, and must appear next to the appropriate character in your target language with no adjacent space. Placeholders such as%1or%swill be replaced by the software as it is running to indicate a name or number of something relating to the message. You must insert these placeholders in the grammatically appropriate position in your target text.- Punctuation
Source:
change from %1 (%2)Target:
Wechselgeld von %1 (%2)Note that any brackets
()and punctuation such as full stops.at the end of a sentence must also exist in the target text.
Dash Docs
https://www.transifex.com/dash/dash-docs
This project contains all content from the Dash Documentation hosted at
https://docs.dash.org (probably the site you are reading now). Each
.html page in the documentation appears as a file in the resources
section, named according to the navigation steps required to open the
page. The Dash Documentation is written in a documentation language
called reStructuredText
and built using the open-source Sphinx Documentation Generator. To simplify layout, most of the text has
no markup or code marks at all, but hyperlinks and certain formatting
must be reproduced in the target language as follows:
- Inline literals
Source: Type ``./dash-qt`` to run the file.
Target: Escriba ``./dash-qt`` para correr el archivo.
Note that two backticks
``before and after a word or phrase will cause that text to appear as aninline literal. This is commonly used to highlight code or commands to be typed by the user.- Bold and italic
Source:
To encrypt your wallet, click **Settings** > **Encrypt** wallet.Target:
Para encriptar su billetera, haga click en **Settings** > **Encrypt** billetera.A single
*before and after a word or phrase will render it in an italic font, while a double**will render it in bold.- Internal hyperlinks
Source:
See :ref:`here <sporks>` for a brief introduction to sporks.Target:
Ver :ref:`aquí <sporks>` para una breve introducción a sporksAn internal hyperlink consists of the phrase
:ref:, followed by a single backtick`, followed by some text which must be translated, followed by angle brackets with the link target< >, followed by another backtick`. Translate the text, but do not translate the text inside the angle brackets.- External hyperlinks
Source:
The `official Dash website <https://www.dash.org>`_ also provides a list of major exchanges offering Dash.Target:
El `sitio web oficial de Dash <https://www.dash.org>`_ también proporciona una lista de las principales Casas de cambio o Exchanges que ofrecen Dash.An external hyperlink consists of a single backtick
`, followed by some text which must be translated, followed by angle brackets with the link target< >, followed by another backtick and a single or double underscore:`_or`__. Translate the text, but do not translate the hyperlink (unless you want to link to a version of the page in the target language).
Dash Graphics
https://www.transifex.com/dash/dash-graphics
Dash visual products such as infographics, flyers and conference handouts are produced using Adobe InDesign, Adobe Illustrator or Microsoft Word and are available for use in the Marketing section of the Dash Documentation. It is important to view the finished English layout during translation in order to understand the context of the text you are translating. For example, many words should be translated differently depending if they are a heading, a sentence or an item in a diagram.
Because these proprietary file formats are not easily handled by Transifex, the language content is exported to a text or Microsoft Excel file and uploaded to Transifex for processing. If you translate Dash Graphics, please send an email to leon.white@dash.org or @strophy on Discord when you are finished to request layout in the visual design.
Ví Dash cho iOS
https://www.transifex.com/dash/dash-ios-wallet
All language content from the Dash iOS Wallet are available for translation in this project. Please have a device running the iOS wallet available during translation to understand the context of the text you are translating. Note that any placeholders in the source text segment must also appear in the target language, similar to the instructions above for Dash Core Wallet.
Ví Dash cho Android
https://www.transifex.com/dash/dash-wallet
All language content from the Dash Android Wallet are available for translation in this project. Please have a device running the Android wallet available during translation to understand the context of the text you are translating. Note that any placeholders in the source text segment must also appear in the target language, similar to the instructions above for Dash Core Wallet.
Dash Videos
https://www.transifex.com/dash/dash-videos
This section primarily contains language content from Amanda B. Johnson's popular Dash School video series. Please translate with the videos open in YouTube to properly understand the context of the source text. Once your translation is complete, please send an email to leon.white@dash.org or @strophy on Discord to request inclusion of the subtitles on YouTube.
Dash Website
https://www.transifex.com/dash/dash-website
The Dash website at https://www.dash.org is available for translation in Transifex. Please have the website open while you translate to correctly understand the context of the source text. Once your translation is complete, please send an email to leon.white@dash.org or @strophy on Discord to request a build of your translation onto the website.
Biên dịch Dash Core
While Dash offers stable binary builds on the website and on GitHub, and development builds using Jenkins, many users will also be interested in building Dash binaries for themselves. The following guides are available:
These guides describe how to build the current stable version. To build
the latest version from the develop branch, replace the normal git
clone command with the following command when pulling from GitHub:
git clone https://github.com/dashpay/dash.git -b develop
Linux
This guide describes how to build Dash Core wallet without the GUI from source under Ubuntu Linux. For a more detailed guide, see the Unix Build Notes. The content on this page is intended to serve as a simple guide for general compilation of non-deterministic binary files from the stable source code. A standard installation of Ubuntu Linux 18.04 LTS will be used as an environment for the build. We assume you are running as a user with sudo permissions. First add the necessary extra repository and update all packages:
sudo add-apt-repository ppa:bitcoin/bitcoin
sudo apt update
sudo apt upgrade
Now install the dependencies as described in the installation documentation:
sudo apt install build-essential libtool autotools-dev automake pkg-config libssl-dev libevent-dev bsdmainutils git libdb4.8-dev libdb4.8++-dev curl
sudo apt install libboost-system-dev libboost-filesystem-dev libboost-chrono-dev libboost-program-options-dev libboost-test-dev libboost-thread-dev libzmq3-dev
Optionally install the Qt dependencies if you want to build the Dash GUI:
sudo apt install libqt5gui5 libqt5core5a libqt5dbus5 qttools5-dev qttools5-dev-tools libprotobuf-dev protobuf-compiler
Tải bản ổn định của Dash
git clone https://github.com/dashpay/dash.git
Và build:
cd dash
./autogen.sh
./configure
make
make install
/usr/local/bin now contains the compiled Dash binaries.
macOS
Dash can be built for macOS either using a cross-compiler under Linux or natively under macOS.
Linux cross-compile
This guide describes how to build Dash Core wallet from source under Ubuntu Linux. It is intended to serve as a simple guide for general compilation of non-deterministic binary files from the stable source code. For a more detailed guide, see the macOS Build Notes. A standard installation of Ubuntu Linux 18.04 LTS will be used as an environment for the build. We assume you are running as a user with sudo permissions. First add the necessary extra repository and update all packages:
sudo add-apt-repository ppa:bitcoin/bitcoin
sudo apt update
sudo apt upgrade
Now install the dependencies as described in the installation documentation:
sudo apt install build-essential libtool autotools-dev automake pkg-config libssl-dev libevent-dev bsdmainutils git libdb4.8-dev libdb4.8++-dev curl
sudo apt install libboost-system-dev libboost-filesystem-dev libboost-chrono-dev libboost-program-options-dev libboost-test-dev libboost-thread-dev libzmq3-dev
sudo apt install ca-certificates curl g++ git-core pkg-config autoconf librsvg2-bin libtiff-tools libtool automake faketime bsdmainutils cmake imagemagick libcap-dev libz-dev libbz2-dev python python-dev python-setuptools fonts-tuffy p7zip-full sleuthkit
Optionally install the Qt dependencies if you want to build the Dash GUI:
sudo apt install libqt5gui5 libqt5core5a libqt5dbus5 qttools5-dev qttools5-dev-tools libprotobuf-dev protobuf-compiler
Tải bản ổn định của Dash
git clone https://github.com/dashpay/dash.git
cd dash
A copy of the macOS SDK is required during the build process. To download this, use a Google Chrome in a desktop environment to go to https://appleid.apple.com and create or sign in to your Apple account. Then go to https://developer.apple.com and open the Chrome Developer Tools from the Menu -> More tools -> Developer tools. Click on the Network tab, then go back to your main browser window and copy in the following URL:
https://developer.apple.com/services-account/download?path=/Developer_Tools/Xcode_7.3.1/Xcode_7.3.1.dmg
Cancel the download as soon as it begins and go back to your the
Network tab in the developer tools. Right click on the network
request at the bottom of the list labeled Xcode_7.3.1.dmg and select
Copy -> Copy as cURL (bash). Paste this long string of text into
your Linux terminal, append -o Xcode_7.3.1.dmg at the end and then
press enter to begin the download. Once it is complete, extract the
required files from the disc image as follows:
contrib/macdeploy/extract-osx-sdk.sh
rm -rf 5.hfs MacOSX10.11.sdk
mkdir depends/SDKs
mv MacOSX10.11.sdk/ depends/SDKs/
Và build:
make -C depends HOST=x86_64-apple-darwin11
./autogen.sh
./configure --prefix=`pwd`/depends/x86_64-apple-darwin11
make
~/dash/src now contains the compiled Dash binaries, and
~/dash/src/qt contains the Dash GUI wallet.
macOS Native
This guide describes how to build Dash Core wallet from source under macOS. It is intended to serve as a simple guide for general compilation of non-deterministic binary files from the stable source code. For a more detailed guide, see the macOS Build Notes. A standard installation of macOS 10.13 High Sierra will be used as an environment for the build. We assume you are running as a user with sudo permissions. First, open a the Terminal app and enter the following command to install the OS X command line tools:
xcode-select --install
When the popup appears, click Install. Then install Homebrew:
/usr/bin/ruby -e "$(curl -fsSL https://raw.githubusercontent.com/Homebrew/install/master/install)"
Install dependencies:
brew install automake berkeley-db4 libtool boost --c++11 miniupnpc openssl pkg-config protobuf qt libevent librsvg
Clone the Dash Core source code and change to the dash directory:
git clone https://github.com/dashpay/dash
cd dash
Build Dash Core. Configure and build the headless dash binaries as well
as the GUI (if Qt is found). You can disable the GUI build by passing
--without-gui to configure:
./autogen.sh
./configure
make
It is recommended to build and run the unit tests:
make check
You can also create a .dmg that contains the .app bundle
(optional):
make deploy
Dash Core is now available at ./src/dashd.
Windows
This guide describes how to build Dash Core wallet from source for 64-bit Windows. Most developers use cross-compilation from Linux to build executables for Windows. The content on this page is intended to serve as a simple guide for general compilation of non-deterministic binary files from the stable source code. For a more detailed guide, see the Windows Build Notes. A standard installation of Ubuntu Linux 18.04 LTS will be used as an environment for the build. We assume you are running as a user with sudo permissions. First add the necessary extra repository and update all packages:
sudo add-apt-repository ppa:bitcoin/bitcoin
sudo apt update
sudo apt upgrade
Now install the dependencies as described in the installation documentation:
sudo apt install build-essential libtool autotools-dev automake pkg-config libssl-dev libevent-dev bsdmainutils git libdb4.8-dev libdb4.8++-dev curl
sudo apt install libboost-system-dev libboost-filesystem-dev libboost-chrono-dev libboost-program-options-dev libboost-test-dev libboost-thread-dev libzmq3-dev
sudo apt-get install g++-mingw-w64-x86-64 mingw-w64-x86-64-dev
Optionally install the Qt dependencies if you want to build the Dash GUI:
sudo apt install libqt5gui5 libqt5core5a libqt5dbus5 qttools5-dev qttools5-dev-tools libprotobuf-dev protobuf-compiler
Tải bản ổn định của Dash
git clone https://github.com/dashpay/dash.git
Build and link the depends system:
cd dash/depends
make HOST=x86_64-w64-mingw32
cd ..
sudo update-alternatives --set x86_64-w64-mingw32-gcc /usr/bin/x86_64-w64-mingw32-gcc-posix
sudo update-alternatives --set x86_64-w64-mingw32-g++ /usr/bin/x86_64-w64-mingw32-g++-posix
Và build:
./autogen.sh
CONFIG_SITE=$PWD/depends/x86_64-w64-mingw32/share/config.site ./configure --prefix=/
make
~/dash/src now contains the compiled Dash binaries, and
~/dash/src/qt contains the Dash GUI wallet.
Gitian
Gitian is the deterministic build process that is used to build the Dash Core executables. It provides a way to be reasonably sure that the executables are really built from the source on GitHub. It also makes sure that the same, tested dependencies are used and statically built into the executable. Multiple developers build the source code by following a specific descriptor ("recipe"), cryptographically sign the result, and upload the resulting signature. These results are compared and only if they match, the build is accepted and uploaded to dash.org.
More independent Gitian builders are needed, which is why this guide exists. It is preferred you follow these steps yourself instead of using someone else's VM image to avoid 'contaminating' the build.
Thiết lập môi trường cho máy
Gitian builds are known to be working on Debian 8.x. If your machine is
already running this system, you can perform Gitian builds on the actual
hardware. Alternatively, you can install it in a virtual machine. Follow
the guide for setting up a VPS for masternodes,
selecting a Debian 8.x image during the installation process and naming
your non-root user gitianuser. Selecting a VPS with two processors
will also greatly speed up the build process. If you cannot login to
your VPS over SSH as root, access the terminal and issue the following
command:
sed -i 's/^PermitRootLogin.*/PermitRootLogin yes/' /etc/ssh/sshd_config
/etc/init.d/ssh restart
Log in to your new environment by SSH as root. Set up the dependencies first by pasting the following in the terminal:
apt-get install git ruby sudo apt-cacher-ng qemu-utils debootstrap lxc python-cheetah parted kpartx bridge-utils make ubuntu-archive-keyring curl
adduser gitianuser sudo
Then set up LXC and the rest with the following, which is a complex jumble of settings and workarounds:
# the version of lxc-start in Debian needs to run as root, so make sure
# that the build script can execute it without providing a password
echo "%sudo ALL=NOPASSWD: /usr/bin/lxc-start" > /etc/sudoers.d/gitian-lxc
echo "%sudo ALL=NOPASSWD: /usr/bin/lxc-execute" >> /etc/sudoers.d/gitian-lxc
# make /etc/rc.local script that sets up bridge between guest and host
echo '#!/bin/sh -e' > /etc/rc.local
echo 'brctl addbr br0' >> /etc/rc.local
echo 'ifconfig br0 10.0.3.2/24 up' >> /etc/rc.local
echo 'iptables -t nat -A POSTROUTING -o eth0 -j MASQUERADE' >> /etc/rc.local
echo 'echo 1 > /proc/sys/net/ipv4/ip_forward' >> /etc/rc.local
echo 'exit 0' >> /etc/rc.local
# make sure that USE_LXC is always set when logging in as gitianuser,
# and configure LXC IP addresses
echo 'export USE_LXC=1' >> /home/gitianuser/.profile
echo 'export GITIAN_HOST_IP=10.0.3.2' >> /home/gitianuser/.profile
echo 'export LXC_GUEST_IP=10.0.3.5' >> /home/gitianuser/.profile
reboot
At the end Debian is rebooted to make sure that the changes take effect. Re-login as the user gitianuser that was created during installation. The rest of the steps in this guide will be performed as that user.
There is no python-vm-builder package in Debian, so we need to
install it from source ourselves:
wget http://archive.ubuntu.com/ubuntu/pool/universe/v/vm-builder/vm-builder_0.12.4+bzr494.orig.tar.gz
echo "76cbf8c52c391160b2641e7120dbade5afded713afaa6032f733a261f13e6a8e vm-builder_0.12.4+bzr494.orig.tar.gz" | sha256sum -c
# (verification -- must return OK)
tar -zxvf vm-builder_0.12.4+bzr494.orig.tar.gz
cd vm-builder-0.12.4+bzr494
sudo python setup.py install
cd ..
Set up the environment and compile
Clone the Dash Core repository to your home directory:
git clone https://github.com/dashpay/dash.git
Then create the script file:
nano dash/contrib/gitian-build.sh
And paste the following script in place (this will be automatic if/when the script is pulled into Dash Core):
https://github.com/strophy/dash/blob/master/contrib/gitian-build.sh
Save the file and set it executable:
sudo chmod +x dash/contrib/gitian-build.sh
Set up the environment, replacing the name and version with your name and target version:
dash/contrib/gitian-build.sh --setup strophy 0.12.1.5
Run the compilation script:
dash/contrib/gitian-build.sh --build strophy 0.12.1.5
Your system will build all dependencies and Dash Core from scratch for Windows and Linux platforms (macOS if the dependencies were installed according to these instructions). This can take some time. When complete, you will see the SHA256 checksums, which you can compare against the hashes available on the Dash website. In this way, you can be sure that you are running original and untampered builds of the code as it exists on GitHub.
Testnet and devnets
With the release of Dash Core 12.3, Dash added support for a great new feature — named devnets. Devnets are developer networks that combine some aspects of testnet (the global and public testing network) and some aspects of regtest (the local-only regression testing mode that provides controlled block generation). Unlike testnet, multiple independent devnets can be created and coexist without interference. For practical documentation on how to use devnets, see the developer documentation or this blog post.
Testnet is a fully functioning Dash blockchain with the one key exception that because the Dash on the network can be created freely, it has no value. This currency, known as tDASH, can be requested from a faucet to help developers test new versions of Dash, as well as test network operations using identical versions of the software before they are carried out on the mainnet. There are a few other key differences:
- Testnet operates on port 19999 (instead of 9999)
- Testnet addresses start with "y" instead of "X", ADDRESSVERSION is 140 (instead of 76)
- Testnet balances are denominated in tDASH (instead of DASH)
- Protocol message header bytes are 0xcee2caff (instead of 0xbf0c6bbd)
- Bootstrapping uses different DNS seeds: test.dnsseed.masternode.io, testnet-seed.darkcoin.qa, testnet-seed.dashpay.io
- Launching Dash Core in testnet mode shows an orange splash screen
To start Dash Core in testnet mode, find your dash.conf file and enter the following line:
testnet = 1
Tools and links
The links below were collected from various community sources and may not necessarily be online or functioning at any given time. Please join Dash Nation Discord or the Dash Forum if you have a question relating to a specific service.
- Test builds: https://jenkins.dash.org/blue/
- Bugtracker: https://github.com/dashpay/dash/issues/new
- Discussion and help: https://www.dash.org/forum/topic/testing.53/
- Masternode tools: https://test.dashninja.pl/masternodes.html
- Android wallet: https://www.dash.org/forum/threads/dash-wallet-for-android-v5-testnet.14775/
- Testnet for Bitcoin: https://en.bitcoin.it/wiki/Testnet
Faucets
- https://test.faucet.dash.org - by flare
- http://test.faucet.dashninja.pl - by elbereth
- http://t.f.masternode.io - by coingun
- http://test.faucet.masternode.io - by coingun
- http://faucet.test.dash.crowdnode.io - ndrezza
Explorers
- https://test.explorer.dash.org - by flare
- https://test.insight.dash.siampm.com - by thelazier
- https://test.explorer.dashninja.pl - by elbereth
- http://test.insight.masternode.io:3001 - by coingun
- http://insight.test.dash.crowdnode.io
- https://testnet-insight.dashevo.org/insight
Pools
- https://test.pool.dash.org [stratum+tcp://test.stratum.dash.org] - by flare
- http://test.p2pool.dash.siampm.com [stratum+tcp://test.p2pool.dash.siampm.com:17903] by thelazier
- http://p2pool.dashninja.pl:17903/static - by elbereth
- http://test.p2pool.masternode.io:18998/static - by coingun
Masternodes
Installing a masternode under testnet generally follows the same steps as the mainnet masternode installation guide, but with a few key differences:
- You will probably be running a development version of Dash instead of the stable release. See here for a list of builds, then choose the latest successful build and click Artifacts to view a list of binaries.
- When opening the firewall, port 19999 must be opened instead of (or in
addition to) 9999. Use this command:
ufw allow 19999/tcp - Your desktop wallet must be running in testnet mode. Add the following
line to dash.conf:
testnet = 1 - When sending the collateral, you can get the 1000 tDASH for free from a faucet (see above)
- You cannot use dashman to install development versions of Dash. See the link to downloadable builds above.
- Your masternode configuration file must also specify testnet mode. Add
the following line when setting up dash.conf on the masternode:
testnet = 1 - As for mainnet masternodes, the RPC username and password must contain alphanumeric characters only
- When cloning sentinel, you may need to clone the development branch
using the
-boption, for example:git clone -b core-v0.12.2.x https://github.com/dashpay/sentinel.git - Once sentinel is installed, modify
~/.dashcore/sentinel/sentinel.conf, comment the mainnet line and uncomment:network=testnet - The wallet holding the masternode collateral will expect to find the
masternode.conffile in~/.dashcore/testnet3/masternode.confinstead of~/.dashcore/masternode.conf.
Testnet 12.3
In June 2018, the Dash team announced the start of testing of the upcoming Dash 12.3 release. Extensive internal testing has already been done on the 12.2 code, but there are numerous bugs that can only be revealed with actual use by real people. The Dash team invites anybody who is interested to download the software and become active on testnet. This release includes:
- Named Devnets, to help developers quickly create multiple independent devnets
- New format of network message signatures
- Governance system improvements
- PrivateSend improvements
- Additional indexes cover P2PK now
- Support for pruned nodes in Lite Mode
- New Masternode Information Dialog
Discussion:
- https://www.dash.org/forum/threads/v12-3-testing.38475
- Testnet tools: https://docs.dash.org/en/latest/developers/testnet.html
- Issue tracking: https://github.com/dashpay/dash/issues/new
Latest test binaries:
Testnet 12.2
In October 2017, the Dash team announced the launch of a testnet for public testing of the upcoming 12.2 release of the Dash software. Extensive internal testing has already been done on the 12.2 code, but there are numerous bugs that can only be revealed with actual use by real people. The Dash team invites anybody who is interested to download the software and become active on testnet. This release includes:
- DIP0001 implementation https://github.com/dashpay/dips/blob/master/dip-0001.md
- 10x transaction fee reduction (including InstantSend fee)
- InstantSend vulnerability fix
- Lots of other bug fixes and performance improvements
- Experimental BIP39/BIP44 complaint HD wallet (disabled by default, should be fully functional but there is no GUI yet)
Discussion:
- Testnet 12.2 discussion: https://www.dash.org/forum/threads/v12-2-testing.17412/
- Testnet tools: https://www.dash.org/forum/threads/testnet-tools-resources.1768/
- Issue tracking: https://github.com/dashpay/dash/issues/new
Latest successfully built develop branch binaries:
Sporks
A multi-phased fork, colloquially known as a "spork", is a mechanism unique to Dash used to safely deploy new features to the network through network-level variables to avoid the risk of unintended network forking during upgrades. It can also be used to disable certain features if a security vulnerability is discovered - see here for a brief introduction to sporks. This documentation describes the meaning of each spork currently existing on the network, and how to check their respective statuses.
Spork functions
Sporks are set using integer values. Many sporks may be set to a particular epoch datetime (number of seconds that have elapsed since January 1, 1970) to specify the time at which they will active. Enabled sporks are set to 0 (seconds until activation). This function is often used to set a spork enable date so far in the future that it is effectively disabled until changed. The following sporks currently exist on the network and serve functions as described below:
- SPORK_2_INSTANTSEND_ENABLED
- Governs the ability of Dash clients to use InstandSend functionality.
- SPORK_3_INSTANTSEND_BLOCK_FILTERING
- If enabled, masternodes will reject blocks containing transactions in conflict with locked but unconfirmed InstandSend transactions.
- SPORK_5_INSTANTSEND_MAX_VALUE
- Enforces the maximum value in Dash that can be included in an InstantSend transaction.
- SPORK_6_NEW_SIGS
- Enables a new signature format for Dash-specific network messages introduced in Dash 12.3. For more information, see here and here.
- SPORK_8_MASTERNODE_PAYMENT_ENFORCEMENT
- If enabled, miners must pay 50% of the block reward to a masternode currently pending selection or the block will be considered invalid.
- SPORK_9_SUPERBLOCKS_ENABLED
- If enabled, superblocks are verified and issued to pay proposal winners.
- SPORK_10_MASTERNODE_PAY_UPDATED_NODES
- Controls whether masternodes running an older protocol version are considered eligible for payment. This can be used as an incentive to encourage masternodes to update.
- SPORK_12_RECONSIDER_BLOCKS
- Forces reindex of a specified number of blocks to recover from unintentional network forks.
- SPORK_13_OLD_SUPERBLOCK_FLAG
- Deprecated. No network function since block 614820.
- SPORK_14_REQUIRE_SENTINEL_FLAG
- Toggles whether masternodes with status are eligible for payment if status is WATCHDOG_EXPIRED, i.e. Sentinel is not running properly.
- SPORK_15_DETERMINISTIC_MNS_ENABLED
- Controls whether deterministic masternodes are required. When activated, the legacy masternode list logic will no longer run and non-updated masternodes will not be eligible for payment.
- SPORK_16_INSTANTSEND_AUTOLOCKS
- Enables automatic transaction locking for transactions with less than a specified number of inputs, and removes the legacy InstantSend fee. Allows any node to request the transaction lock, not just the sending node.
Viewing spork status
The spork show and spork active commands issued in the debug
window (or from dash-cli on a masternode) allow you to interact with
sporks. You can open the debug window by selecting Tools > Debug
console.

spork show and spork active output in the Dash Core debug console
Version History
Full release notes and the version history of Dash are available here:
Marketing
Trang web này bao gồm nơi để tải xuống rất nhiều mẫu và thiết kế với mục đích sử dụng cho các văn bản và các bản trình diễn. Để có một cái nhìn tổng quan về trang web hiện thời và các thiết kế đề can, hãy xem trong những đường link sau đây.
Dash sử dụng bảng màu sau để đảm bảo tính thống nhất trong cách thể hiện
| Màu | RGB | CMYK | Hex | Pantone |
|---|---|---|---|---|
| Dash Blue | 0,141,228 | 76,38,0,0 | #008de4 | 2925c |
| Xanh thẫm | 1,32,96 | 100,94,31,29 | #012060 | 534c |
| Midnight Blue | 11,15,59 | 100,96,41,53 | #0b0f3b | 5255c |
| Trắng | 255,255,255 | 0,0,0,0 | #ffffff | - |
| Xám | 120,120,120 | 54,46,45,11 | #787878 | Cool Gray 9 C |
| Đen | 17,25,33 | 82,71,59,75 | #111921 | Black 6 C |
Tài liệu thiết kế
Brochures
An attractive brochure about Dash, designed for handing out at conferences and events. Prepared by community member Essra in 2018 following proposal sponsorship for the German Dash Embassy D-A-CH.
This design can be translated into your language at Transifex here. For more information on translating Dash products on Transifex, see here. Please contact leon.white@dash.org once translation is complete to request layout of the completed translation.
| Ngôn ngữ | Tải xuống |
|---|---|
| Tiếng Anh | |
| Tiếng Pháp | |
| Tiếng Đức | |
| Tiếng Tây Ban Nha | |
| Thai |
Flyers
An attractive flyer about Dash, designed to be folded in half and placed on flat surfaces at conferences and events. Prepared by community member Essra in 2018 following proposal sponsorship for the German Dash Embassy D-A-CH.
This design can be translated into your language at Transifex here. For more information on translating Dash products on Transifex, see here. Please contact leon.white@dash.org once translation is complete to request layout of the completed translation.
| Ngôn ngữ | Tải xuống |
|---|---|
| Tiếng Anh | |
| Tiếng Arập | |
| Trung Quốc (Truyền thống) | |
| Tiếng Hà Lan | |
| Tiếng Pháp | |
| Tiếng Đức | |
| Tiếng Tây Ban Nha | |
| Thai |
Tờ rơi
This handout is ideal for dual-sided printing as a handout for conferences. The current version is v3.1; previous versions are available below.
Thiết kế này có thể được dịch sang ngôn ngũ của bạn tại Transifex đây. Để có thêm thông tin về việc dịch sản phẩm của Dash trên Transifex, xem tại đây. Vui lòng liên hệ leon.white@dash.org sau khi bản dịch được hoàn thành để nhận được layout của bản dịch hoàn chỉnh
| Ngôn ngữ | Tải xuống |
|---|---|
| Tiếng Anh | PDF DOCX |
| Tiếng Arập | PDF DOCX |
| Tiếng Séc | PDF DOCX |
| Tiếng Hà Lan | PDF DOCX |
| Tiếng Đức | PDF DOCX |
| Tiếng Nga | PDF DOCX |
| Tiếng Slovak | PDF DOCX |
| Thai | PDF DOCX |
| Tiếng Việt | PDF DOCX |
Các phiên bản trước (chỉ bằng tiếng Anh)
| Phiên Bản | Tải xuống |
|---|---|
| 2.0 | PDF DOCX |
| 1.0 | PDF DOCX |
Infographics
Sự Khác Biệt Của Dash
Infographic hấp dẫn này mô tả chi tiết về những cải tiến của mạng lưới Dash cung cấp dựa trên nền tảng mã nguồn của Bitcoin. Nó được dựa trên thiết kế ban đầu của thành viên của cộng đồng là J. Arroyo.
Thiết kế này có thể được dịch sang ngôn ngữ của bạn tại đây trên Transifex. Để có thêm thông tin về việc dịch các tài liệu Dash trên Transifex, hãy xem ở đây. Hãy liên hệ với leon.white@dash.org khi bạn đã dịch xong và yêu cầu sắp xếp việc trình bày cho bản dịch hoàn chỉnh.
| Ngôn ngữ | Tải xuống |
|---|---|
| Tiếng Anh | PDF PNG |
| Tiếng Arập | PDF PNG |
| Tiếng Bun-ga-ri | PDF PNG |
| Trung Quốc (Giản lược) | PDF PNG |
| Trung Quốc (Truyền thống) | PDF PNG |
| Tiếng Séc | PDF PNG |
| Tiếng Pháp | PDF PNG |
| Tiếng Đức | PDF PNG |
| Tiếng Hy Lạp | PDF PNG |
| Tiếng Ý | PDF PNG |
| Tiếng Ba Lan | PDF PNG |
| Tiếng Nga | PDF PNG |
| Tiếng Slovak | PDF PNG |
| Tiếng Tây Ban Nha | PDF PNG |
| Tiếng Việt | PDF PNG |
Mười nhận thức sai lầm về Dash
Infographich này bác bỏ nhiều thông tin tranh cãi thiếu chính xác để chống lại Dash. Nó được dựa trên thiết kế bởi thành viên của cộng đồng là DashDude.
Thiết kế này có thể được dịch sang ngôn ngữ của bạn tại Đây trên Transifex. Để có thêm thông tin về việc dịch các tài liệu của Dash trên Transifex, hãy xem ở đây. Hãy liên hệ với leon.white@dash.org một khi bạn đã dịch xong và yêu cầu sắp xếp việc trình bày cho bản dịch hoàn chỉnh.
| Ngôn ngữ | Tải xuống |
|---|---|
| Tiếng Anh | PDF PNG |
| Tiếng Arập | PDF PNG |
| Tiếng Bun-ga-ri | PDF PNG |
| Trung Quốc (Truyền thống) | PDF PNG |
| Tiếng Séc | PDF PNG |
| Tiếng Pháp | PDF PNG |
| Tiếng Đức | PDF PNG |
| Tiếng Hy Lạp | PDF PNG |
| Tiếng Ba Lan | PDF PNG |
| Tiếng Nga | PDF PNG |
| Tiếng Slovak | PDF PNG |
| Tiếng Tây Ban Nha | PDF PNG |
| Thai | PDF PNG |
| Tiếng Việt | PDF PNG |
Bản trình chiếu
Dash Meetup

An attractive presentation about Dash, designed to guide the audience through the basics of cryptocurrency and advantages of Dash. Prepared by community member Essra in 2018 following proposal sponsorship for the German Dash Embassy D-A-CH.
| Ngôn ngữ | Tải xuống |
|---|---|
| Tiếng Anh | PPTX PDF |
| Tiếng Đức | PPTX PDF |
Trình diễn đơn giản

Bản trình diễn đơn giản về Dash, có sẵn với 5 ngôn ngữ, 3 kiểu kích cỡ, và 2 định dạng. Chỉ cần click vào những đường link dưới đây để tải. Chú ý rằng kiểu chữ Noto Sans UI cần phải được cài đặt trước nếu sử dụng file PowerPoint.
Xem tất cả các files trên Dropbox
| Ngôn ngữ | Định dạng | Tải xuống |
|---|---|---|
| Tiếng Anh | 16:9 4:3 A4 | |
| PPTX | 16:9 4:3 A4 | |
| Trung Quốc (Giản lược) | 16:9 4:3 A4 | |
| PPTX | 16:9 4:3 A4 | |
| Tiếng Bồ Đào Nha | 16:9 4:3 A4 | |
| PPTX | 16:9 4:3 A4 | |
| Tiếng Nga | 16:9 4:3 A4 | |
| PPTX | 16:9 4:3 A4 | |
| Tiếng Tây Ban Nha | 16:9 4:3 A4 | |
| PPTX | 16:9 4:3 A4 |
Các mẫu cho kinh doanh
Các mẫu tài liệu
Các mẫu tài liệu chính thức của Dash
| Tên | Tải xuống |
|---|---|
| Tài liệu cho Word với trang bìa và theo kiểu phân đoạn | DOCX |
| Mẫu tài liệu cho Word với logo chìm màu xanh | DOTX |
| Mẫu tài liệu cho Word với logo chìm màu xám | DOTX |
Các mẫu cho bản trình chiếu
Các mẫu trình diễn chính thức của Dash. Chúng tôi nhấn mạnh việc sử dụng những biểu mẫu theo trình bày xây dựng sẵn (xem ở đây để có những hướng dẫn).
| Tên | Tải xuống |
|---|---|
| Mẫu cho PowerPoint với màu xanh trắng đơn giản | POTX |
| Mẫu cho PowerPoint với cách trình bày, kiểu dáng và hình minh hoạ mẫu | POTX |
| Các biểu tượng cho trình diễn | PPTX |
Danh thiếp
Các mẫu danh thiếp độ phân giải cao để in ra. Tốt nhất là để mặt sau của danh thiếp như một dạng tờ rơi để giải thích và quảng bá cho Dash.
| Tên | Tải phiên bản |
|---|---|
| Tờ rơi | Tiếng Anh |
| Tiếng A-Rập | |
| Tiếng Trung Quốc (giản lược) | |
| Tiếng Séc | |
| Tiếng Pháp | |
| Tiếng Ba Lan | |
| Tiếng Bồ Đào Nha | |
| Tiếng Nga | |
| Tiếng Tây Ban Nha |
Pháp lý
Luật pháp áp dụng cho Dash như thế nào
The purpose of the Dash DAO is to promote, protect and standardize Dash. In the course of our mission, we have received inquiries into how some aspects of Dash are treated under United States law. The purpose of this document is to address the most common of these inquiries and explain how we believe the laws apply to Dash. This is not meant as a legal opinion, and you should consult your own attorneys before relying upon it. However, it is meant to state our position on the law, and how the law should be properly interpreted.
One of the most common questions we receive is How are masternode operators treated under the US tax laws?
Áp dụng thuế
Phần thưởng khối
Như nhiều người đã biết, phần thưởng khối được trả cho những người chạy masternode để đổi lại việc kiểm tra giao dịch trên mạng lưới Dash. IRS - cơ quan thuế ở Mỹ đã tuyên bố một cách rõ ràng rằng “khi một người đào được tiền ảo, và thì thuế thu nhập sẽ được tính dựa trên giá thị trường ở thời điểm tiền ảo được đào đó“. Chắc chắn rẳng, masternode thì không "đào", nhưng IRS cho rằng dùng các tài nguyên máy tính để kiểm tra giao dịch tiền số và duy trì các sổ cái giao dịch tiền số được xem như là "đào". Một cách tương tự là một người chạy masternode thì được coi như khoản thu nhập bình thường theo giá thị trường của phần thưởng khối nhận được.
Khoản Dash ký quỹ
A Dash user may demonstrate to the network his or her control over 1,000 DASH in order to run a masternode. These tokens never leave the user’s control. If at any point during the user’s tenure as a masternode operator, the user disposes of any or all of the 1,000 DASH, the network automatically strips the user of his or her status as a masternode. Under the US Internal Revenue Code, gain or loss is realized only on the “sale or exchange” of property. The term “sale” generally means the transfer of all right, title, and interest in the property transferred. A number of factors typically are considered to determine whether a sale has occurred, the most important being whether the benefits and burdens of ownership of the transferred property have passed from the transferor to the transferee. In Dash, the masternode operator retains control of the 1,000 DASH and simply demonstrates that control to the network. Therefore, the holding of the 1,000 DASH for purposes of qualifying as a masternode operator should not cause a taxable event to occur because the user has not transferred any of the benefits and burdens of ownership.
Lợi nhuận tài chính
Assuming that the 1,000 DASH are sold, whether that Dash is a “capital asset” will determine the tax treatment of the sale. Stocks, bonds and other investment property for example, are generally treated as capital assets. Inventory, depreciable property, and stock in trade, though, are not. Assuming the masternode operator held the 1,000 DASH either for investment purposes or for purposes of qualifying as a masternode operator, the IRS would likely treat gain or loss on the sale of those Dash tokens as capital in nature. Therefore, Dash held for a long enough period of time could be subject to the lower “long term capital gains” tax rate.
Trách nhiệm pháp lý
As with cash or any other currency system, users may use Dash in connection with illegal activity. A common question we receive is whether masternode operators can also be liable for criminal activity, simply by relaying transactions related to that activity. The fundamental legal requirement of mens rea makes criminal liability unlikely for masternode operators.
Trách nhiệm chính
Almost all crimes require that a defendant have a defined mens rea at the time of an offense. Mens rea is a mental state like purposefulness, knowledge, recklessness or negligence. For example, to act with “purpose” is commonly understood as desiring as your “conscious object” the result of a crime. “Knowledge” is a less culpable mindset than “purpose” – acting with “knowledge” requires general awareness that your actions will bring about a particular crime. “Recklessness” requires disregard of a substantial risk. Finally, a person acts “negligently” if they should have been aware of a substantial and unjustifiable risk of a particular consequence of their actions, but were not.
Most masternodes have no awareness, while relaying Dash transactions, of the identity of the users involved, the ultimate destination of users’ funds, or any other circumstances of Dash transactions. As such, it would be difficult for a prosecutor to demonstrate that a masternode operator who facilitated an illegal transaction merely by relaying the transaction would have a culpable mens rea.
Trách nhiệm thứ cấp
Even if someone is not the principal actor in the commission of a crime, that person can be secondarily liable for their involvement in it. As such, we are sometimes asked whether masternode operators, by their involvement in relaying Dash transactions, could be “aiding and abetting” or “conspiring” to commit a crime that might involve Dash. Generally speaking, aiding and abetting requires that the defendant (i) seek by his action to make the crime succeed and (ii) act with the same mens rea as required for the principal offense.
No matter the requisite mens rea of a particular principal offense committed by a Dash user, it is unlikely that a mere masternode operator, without more, could be found to have “aided and abetted." To be sure, the masternodes do provide assistance in the principal offense – in that masternode action is required to process all Dash transactions. However, the masternodes would not have the requisite mens rea to satisfy the requirements of aiding and abetting liability. Masternode operators have no readily available information about the purpose or consequences of users’ Dash transactions, or even the originating identity of the sender of funds. As such, so long as a sufficient diversity of non-criminal transactions occur on the Dash network, they would not harbor even the least culpable mens rea (i.e. negligence) with respect to a user relaying or receiving Dash in furtherance of a particular crime.
“Conspiracy” liability is even less likely. Conspiracy generally requires i) an agreement to commit a crime, ii) knowledge of the unlawful purpose of the agreement, iii) intent to further the unlawful purpose, and iv) an act in furtherance of the conspiracy. None of these requirements are met by mere masternode operators.
Trách nhiệm của sàn giao dịch
Exchanges have asked whether they can be held liable for criminal activity connected with Dash PrivateSend transactions.
The Bank Secrecy Act (BSA) is the law that primarily governs exchanges in the United States. The BSA does not contain any prohibition on supporting Dash transactions. Indeed, the BSA take a flexible, risk- based approach to regulation and contemplate that financial institutions will enter into lines of business with new risks. This risk-based approach requires, at the outset, an independent risk assessment. By and large, the risks faced by exchanges who begin to support Dash will be similar to the risks associated with other virtual currencies. One significant difference concerns PrivateSend transactions, and we focus on this difference below:
- PrivateSend transactions obfuscate the source and destination addresses of funds, thus blockchain forensic techniques like clustering analysis may be less effective. To the extent that exchanges rely on such blockchain forensics tools for their information collection, reporting and reporting obligations under the BSA, they should consider alternative means.
- PrivateSend transactions are used for legitimate purposes and are often required to achieve personal or commercial privacy for sensitive transactions. The use of PrivateSend transactions is not inherently suspicious. Combination with other factors, including those identified in the exchange’s own risk assessment, may raise PrivateSend transactions to the level of suspicious activity.
- Exchanges should consider revising their risk assessments and AML policies to account for the unique characteristics of Dash. For example, including blockchain addresses in Suspicious Activity Reports (SARs) will be less descriptive and effective for investigations based on such addresses. Exchanges might consider adding additional context and explanation in SARs.
- When conducting Enhanced Due Diligence on customers and transactions, exchanges should account for the presence of PrivateSend transactions and update their AML policies accordingly. For example, identifying counterparties to a PrivateSend transaction may be more difficult than identifying counterparties to transactions in other virtual currencies when relying on blockchain forensics.
ATM & việc tuân thủ về tiền Fiat
Giới thiệu
An aspect that required legal research is what are the compliance requirements to facilitate Dash-fiat exchange. This can be in the form of running ATM kiosks or using other mechanisms to personally offer Dash to fiat exchange services.
For this purpose we hired Cogent Law, who have a lot of experience working in compliance for digital money services. They have put together a compliance program that will be shared with anyone launching a Dash service if they require it. This includes:
- A finCEN BSA compliant written Principal MSB/KYC AML Program designed to prevent the Principal MSB from being used to facilitate money laundering and the financing of terrorist activities
- A comprehensive risk based assessment by a third party compliance consultant expert
Our lawyer for this project is Adella Toulon-Foerster who has extensive experience in this field including:
- Banking Secrecy Act (BSA), Anti-Money Laundering (AML), and Know Your Customer (KYC) regulations
- Những yêu cầu và hướng dẫn của FinCEN
- Written and on-going AML compliance programs
- State-by-state money transmitter laws and licensure requirements
We now have full documentation of the program from Cogent Law, the package includes:
- BSA AML Compliance training
- Chính sách KYC CDD
- Chương trình AML
- Đánh giá rủi ro
- Surveillance and Monitoring Policy
- Different Reports to file in different situations
The documents have a format as if they were created for the fictional company “Initech” and then the interested Dash entrepreneur would have to replace it with their real corporation. We believe that some counsel would still be advisable for an investor launching a service but this will help provide a solid understanding of the requirements and get them 80% of the way. This should also be highly educational and help the Dash investor be more at ease as it enlightens a typically obscure topic for most crypto enthusiasts.
This program is directed at Dash investors that are interested in running a compliant service in regulated markets. If some users prefer to run services without a compliance program or don't need one, we completely respect that too.
Dash ATM Compliance Program
- Please first read the Quick Guide To Operating a Virtual Currency Kiosk. This guide will guide you through the initial steps of registering as an MSB. It is crucial you start here.
- Listen to the Audio Guides on BSA AML and read the BSA AML Training Manual
- Get familiar with the documentation you will need by looking at the following templates
- Get familiar with some of the reports you may need to file as part of operations. In the Quick Guide in Step 1, we go through registration on the E - BSA filing system. This step also provides example CTR (Currency Transaction Report) and SAR (Suspicious Activity Report) report samples. Dash operators should be familiar with these as they may need to file them as part of operations. Sample reports:
- If you would now like to move forward with your project, we recommend getting in contact with Cogent Law, our recommended legal counsel. Preferential rates are available for Dash users. Please email: atoulon@cogentlaw.co
Mạng xã hội