الصيانة
يتطلب ماسترنود إجراء صيانة دورية لضمان عدم إسقاط قائمة انتظار الدفع. ويتضمن ذلك تثبيت التحديثات على الفور ، بالإضافة إلى الحفاظ على أمان الخادم وأدائه. بالإضافة إلى ذلك ، يجب أن تصوت ماسترنود على مقترحات وأداء مهام أخرى في مصلحة الشبكة وقيمة داش يحملونها.
Masternode Software Update
The Dash Core software requires regular updates in order to remain consistent with the current network consensus. Follow the procedure described below to manually update your masternode. If you are still using the legacy dashman installer, see the legacy update documentation here.
Manual update
To update Dash manually, log in to your server using ssh or PuTTY. If
your crontab contains an entry to automatically restart dashd, invoke
crontab -e and comment out the appropriate line by adding the #
character. It should look something like this:
# * * * * * pidof dashd || ~/.dashcore/dashd
Then stop Dash running:
~/.dashcore/dash-cli stop
Visit the GitHub releases page and copy the link to the latest x86_64-linux-gnu version. Go back to your terminal window and enter the following command, pasting in the address to the latest version of Dash Core by right clicking or pressing Ctrl + V:
cd /tmp
wget https://github.com/dashpay/dash/releases/download/v0.16.1.1/dashcore-0.16.1.1-x86_64-linux-gnu.tar.gz
Verify the integrity of your download by running the following command
and comparing the output against the value for the file as shown in the
SHA256SUMS.asc file:
sha256sum dashcore-0.16.1.1-x86_64-linux-gnu.tar.gz
Extract the compressed archive and copy the new files to the directory:
tar xfv dashcore-0.16.1.1-x86_64-linux-gnu.tar.gz
cp -f dashcore-0.16.1/bin/dashd ~/.dashcore/
cp -f dashcore-0.16.1/bin/dash-cli ~/.dashcore/
إعادت داش:
~/.dashcore/dashd
سترى رسالة تنص على "بدء تشغيل وحدة خدمة الأساسية الأساسية". سنقوم الآن بتحديث الأمان
cd ~/.dashcore/sentinel/
git checkout master
git pull
Finally, uncomment the line to automatically restart Dash in your
crontab by invoking crontab -e again and deleting the #
character.
The Dash software on the masternode is now updated.
Updating Masternode Information
Periodically, it may be necessary to update masternode information if any information relating to the owner or operator changes. Examples may include a change in IP address, change in owner/operator payout address or changes to the nominated voting/operator keys. It is also possible to revoke a masternode's registered status (in the event of a security breach, for example) to force both owner and operator to update their details.
Changing the BLS operator key or creating a new ProTx based on the same collateral transaction will reset your position in the payment queue. Changing your IP address or making changes to the voting or various payout addresses will not reset your position in the payment queue.
ProUpServTx
A Provider Update Service Transaction (ProUpServTx) is used to update
information relating to the operator. An operator can update the IP
address and port fields of a masternode entry. If a non-zero
operatorReward was set in the initial ProRegTx, the operator may
also set the operatorPayoutAddress field in the ProUpServTx. If
operatorPayoutAddress is not set and operatorReward is non-zero,
the owner gets the full masternode reward. A ProUpServTx can be created
from DMT by clicking the Update service button, or from Dash Core
using the following syntax:
protx update_service proTxHash ipAndPort operatorKey (operatorPayoutAddress feeSourceAddress)
أين:
proTxHash: The transaction id of the initial ProRegTxipAndPort: IP and port in the form "ip:port"operatorKey: The operator BLS private key associated with the registered operator public keyoperatorPayoutAddress(optional): The address used for operator reward payments. Only allowed when the ProRegTx had a non-zerooperatorRewardvalue. Enter""to use the last on-chain operator payout address, or as a placeholder when specifying afeeSourceAddress.feeSourceAddress(optional): An address used to fund ProTx fee.operatorPayoutAddresswill be used if not specified.
Example:
protx update_service d6ec9a03e1251ac8c34178f47b6d763dc4ea6d96fd6eddb3c7aae2359e0f474a 140.82.59.51:10002 4308daa8de099d3d5f81694f6b618381e04311b9e0345b4f8b025392c33b0696 yf6Cj6VcCfDxU5yweAT3NKKvm278rVbkhu

fad61c5f21cf3c0832f782c1444d3d2e2a8dbff39c5925c38033730e64ecc598
The masternode is now removed from the PoSe-banned list, and the IP:port and operator reward addresses are updated.
ProUpRegTx
A Provider Update Registrar Transaction (ProUpRegTx) is used to update information relating to the owner. An owner can update the operator's BLS public key (e.g. to nominate a new operator), the voting address and their own payout address. A ProUpRegTx can be created from DMT by clicking the Update operator key, Update voting key or Update payout addr. buttons, or from Dash Core using the following syntax:
protx update_registrar proTxHash operatorKeyAddr votingKeyAddr payoutAddress (feeSourceAddress)
أين:
proTxHash: The transaction id of the initial ProRegTxoperatorKeyAddr: An updated BLS public key, or""to use the last on-chain operator keyvotingKeyAddr: An updated voting key address, or""to use the last on-chain voting keypayoutAddress: An updated Dash address for owner payments, or""to use the last on-chain operator keyfeeSourceAddress(optional): An address used to fund ProTx fee.PayoutAddresswill be used if not specified.
Example to update payout address:
protx update_registrar cedce432ebabc9366f5eb1e3abc219558de9fbd2530a13589b698e4bf917b8ae "" "" yi5kVoPQQ8xaVoriytJFzpvKomAQxg6zea
ProUpRevTx
A Provider Update Revocation Transaction (ProUpRevTx) is used by the operator to terminate service or signal the owner that a new BLS key is required. It will immediately put the masternode in the PoSe-banned state. The owner must then issue a ProUpRegTx to set a new operator key. After the ProUpRegTx is mined to a block, the new operator must issue a ProUpServTx to update the service-related metadata and clear the PoSe- banned state (revive the masternode). A ProUpRevTx can be created from DMT by clicking the Revoke operator button, or from Dash Core using the following syntax:
protx revoke proTxHash operatorKey reason (feeSourceAddress)
أين:
proTxHash: The transaction id of the initial ProRegTxoperatorKey: The operator BLS private key associated with the registered operator public keyreason: Integer value indicating the revocation reasonfeeSourceAddress(optional): An address used to fund ProTx fee.operatorPayoutAddresswill be used if not specified.
Example:
protx revoke 9f5ec7540baeefc4b7581d88d236792851f26b4b754684a31ee35d09bdfb7fb6 565950700d7bdc6a9dbc9963920bc756551b02de6e4711eff9ba6d4af59c0101 0
Proof of Service Bans
If your masternode fails to provide service to the network in accordance
with the current consensus rules, it will receive a Proof of Service Ban.
If your masternode is in the POSE_BANNED status, you should check
the following settings are configured correctly:
Ensure you are running the latest version of Dash
Ensure your masternode has sufficient memory, swap, processing power and hard drive space
Ensure you are fully synced to the correct blockheight, and that you are on the correct chain and not forked off
Ensure that a BLS private key is specified using the
masternodeblsprivkeyoption in the masternode'sdash.conffileEnsure that the BLS private key on the masternode is unique on the network and not shared with any other masternodes
Ensure that the BLS private key on the masternode corresponds to the BLS public key registered on the blockchain in the
ProRegTxorProUpRegTxEnsure that the
externalip(andportif using testnet) are specified correctly and not blocked by a firewall or port forwarding serviceEnsure that Sentinel is installed, updated, not exiting with an error and is entered in your crontab to run every 1-2 minutes
Once you are certain these settings are correct, you can update your
service status on the network and return to the valid set of masternodes
by creating a ProUpServTx. Monitor your
masternode closely using masternode status and/or the debug.log
file after restoring service. This information can help you pinpoint the
specific misconfiguration that is causing the masternode to be banned.
The masternode will be banned again if it continues to fail to provide
service.
داش سنترال و التصويت والتحقق والرصد
داش سنترال هو موقع مدعوم من قبل المجتمع المدار من قبل عضو المجتمع رانجو. لقد أصبح موقعًا * واقعيًا * لمناقشة مقترحات الميزانية وتسهيل عملية التصويت من واجهة مستخدم رسومية ، ولكنه يوفر أيضًا وظائف لمراقبة الأعداد.
إضافة ماستؤنود الخاص بك إلى داش سنترال
داش سنترال يسمح لك بالتصويت على المقترحات من راحة متصفحك. بعد الانتهاء التسجيل, إدخب إلى ماسترنود الصفحة وانقر على زر إضافة ماسترنود الآن. أدخل عنوان الضمان الخاص بك على الشاشة التالية:
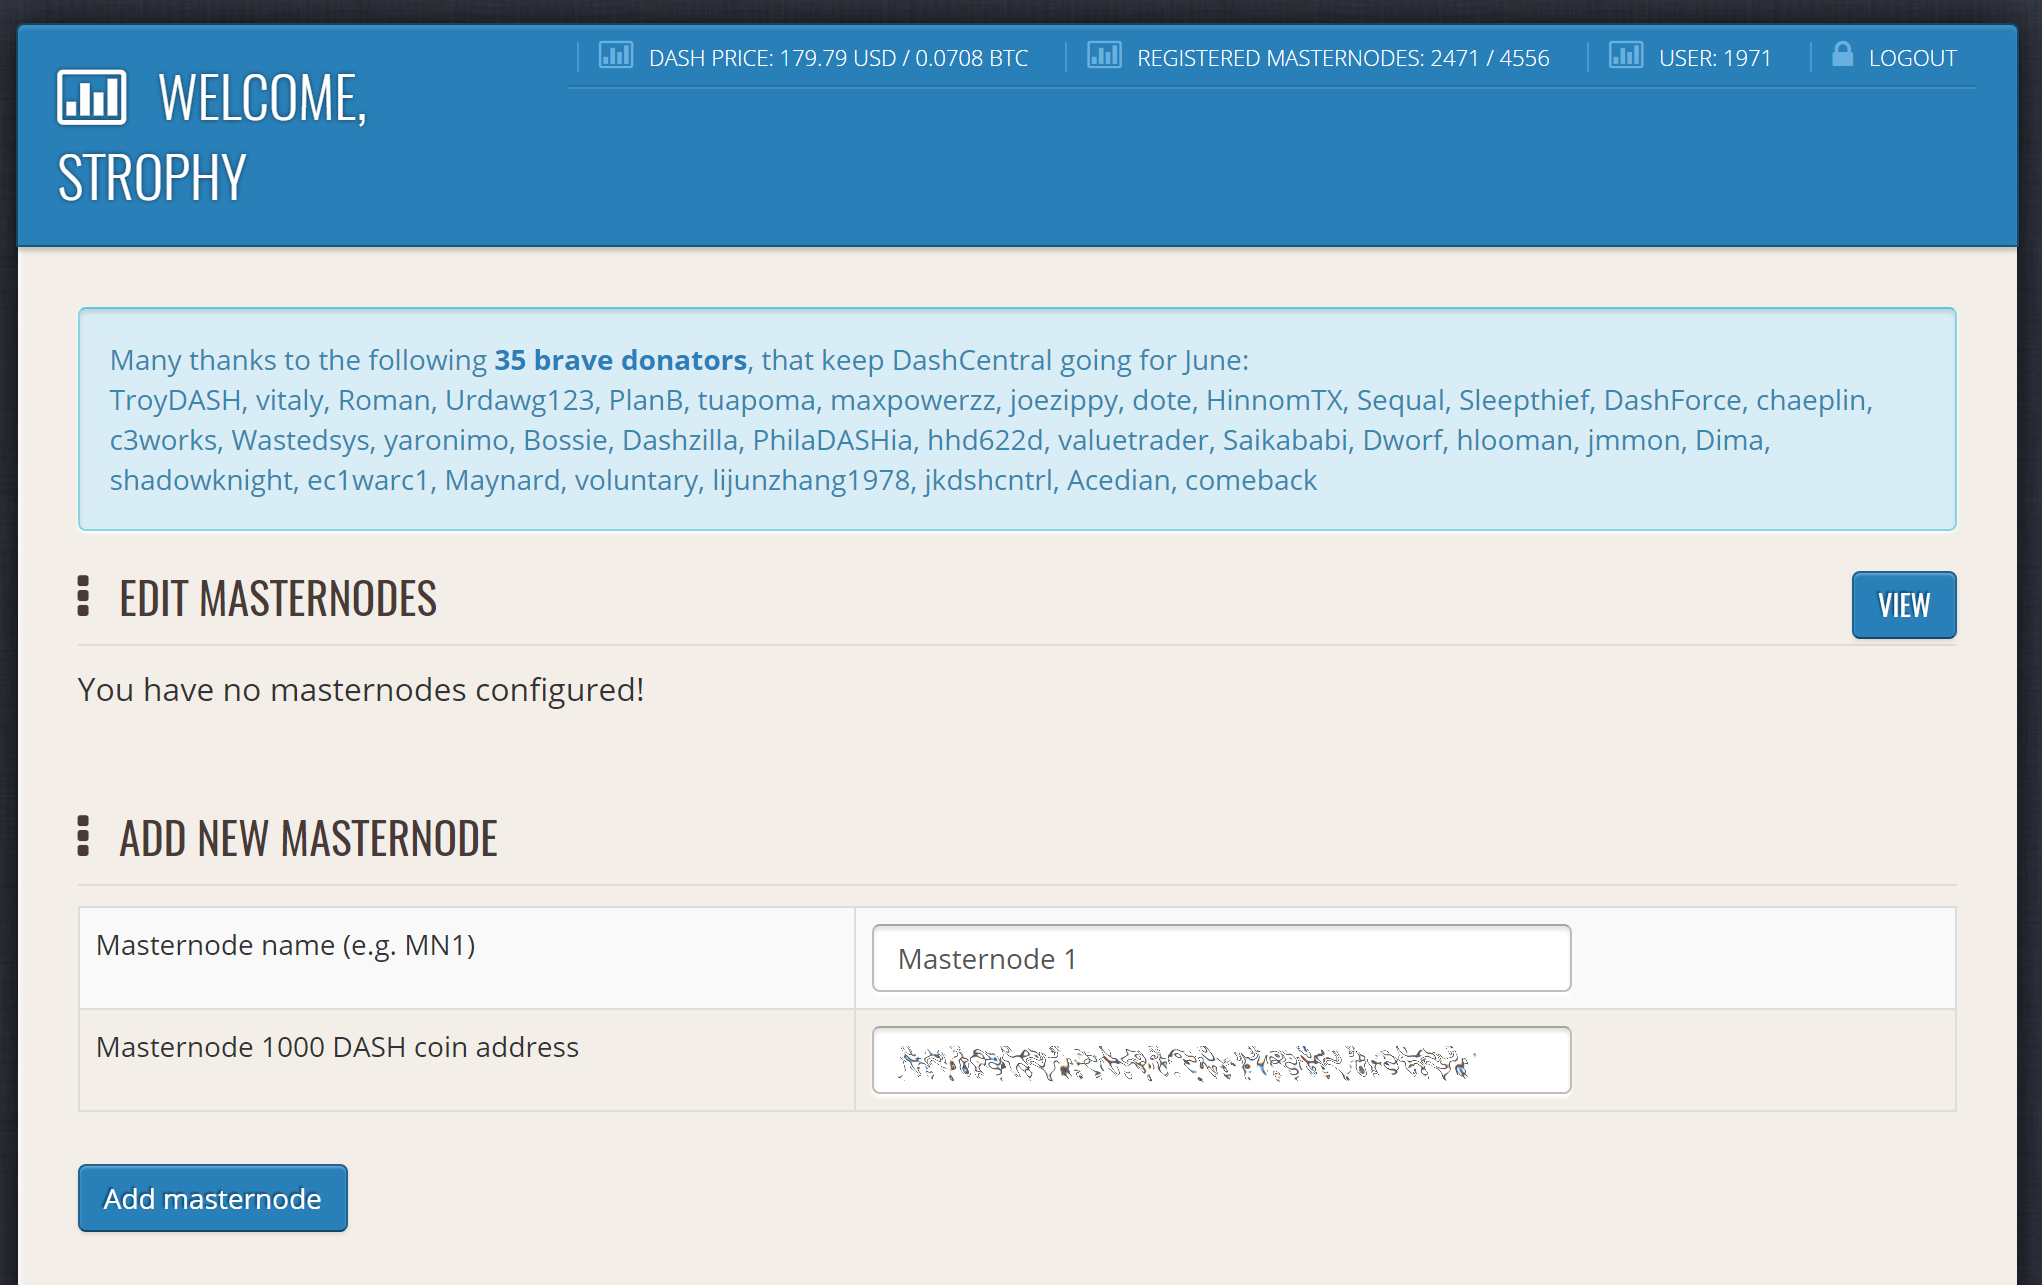
اضافة ماسترنود فب داش سنترال
انقر إضافة ماسترنود. تمت إضافة ماسترنود الخاص بك الآن إلى داش سنترال.
تمكين التصويت من داش سنترال
انقر فوق تحرير تحت مفاتيح الخصوصية الخاصة بالتصويت لإدخال مفتاحك الخاص الرئيسي لتمكين التصويت عبر واجهة الويب داش سنترال. أدخل عبارة مرور التصويت (ليست هي نفسها كلمة مرور تسجيل الدخول الخاصة بك ، ولكن من المهم تذكرها أيضًا!) وأدخل المفتاح الخاص (نفس المفتاح الذي استخدمته في ملف dash.conf الموجود على ماسترنوظ الخاص بك) على الشاشة التالية:

إضافة مفاتيح حرة للتصويت إلى داش سنترال
من المهم ملاحظة أن المفتاح الخاص لبدء تشغيل ماسترنود لا يرتبط بالمفاتيح الخاصة لعنوان الضمان الذي يخزن 1000 داش. يمكن استخدام هذه المفاتيح لإصدار الأوامر نيابة عن ماسترنود ، مثل التصويت ، ولكن لا يمكن استخدامها للوصول إلى الضمانات. يتم تشفير المفاتيح على جهازك ولا يتم تخزينها كنص عادي على خوادم داش سنترال. بمجرد إدخال المفتاح ، انقر فوق قم بتخزين مفاتيح تجزئة التصويت المشفرة على الخادم. يمكنك الآن التصويت على المقترحات من واجهة الويب داش سنترال
التحقق من الملكية
يمكنك أيضًا إصدار رسالة من عنوانك لإثبات ملكية الرمز الخاص بك إلى داش سنترال. انقر غير محقق تحت الملكية وستظهر الشاشة التالية:
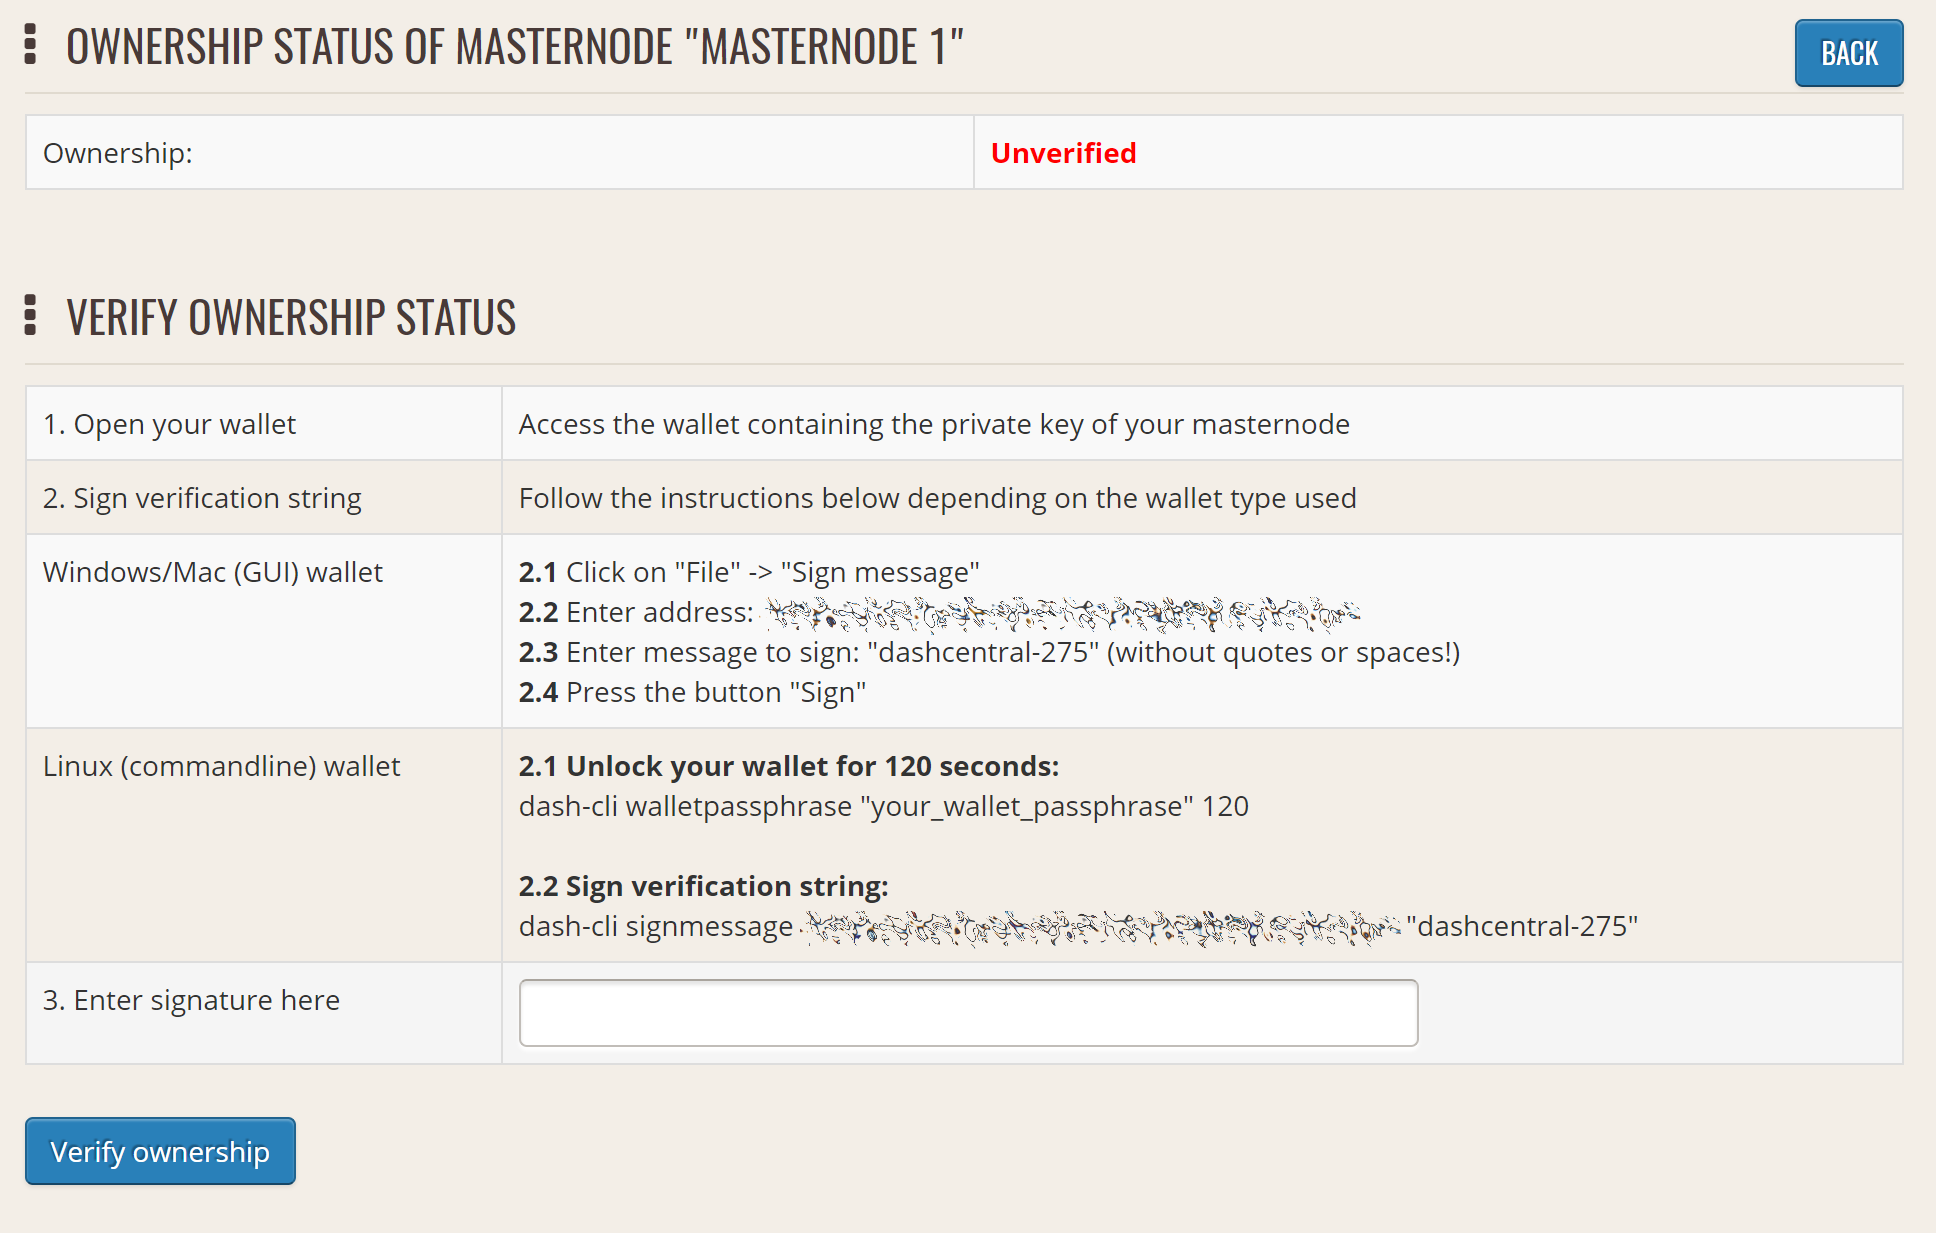
التحقق من ملكية ماسترنود الخاص بك إلى داش سنترال
تظهر تعليمات حول كيفية توقيع عنوان الضمان الخاص بك باستخدام محفظة برامج. إذا كنت تستخدم محفظة أجهزة أخرى غير Trezor ، فستحتاج إلى استخدام تطبيق DMT لتوقيع العنوان. إذا كنت تستخدم محفظة الأجهزة Trezor ، انتقل إلى الخاص بك محفظة تريزو, انسخ عنوان الضمانات وانقر على تسجيل والتحقق. ستظهر الشاشة التالية ، حيث يمكنك إدخال الرسالة المقدمة من داش سنترال والعنوان الذي ترغب في توقيعه:
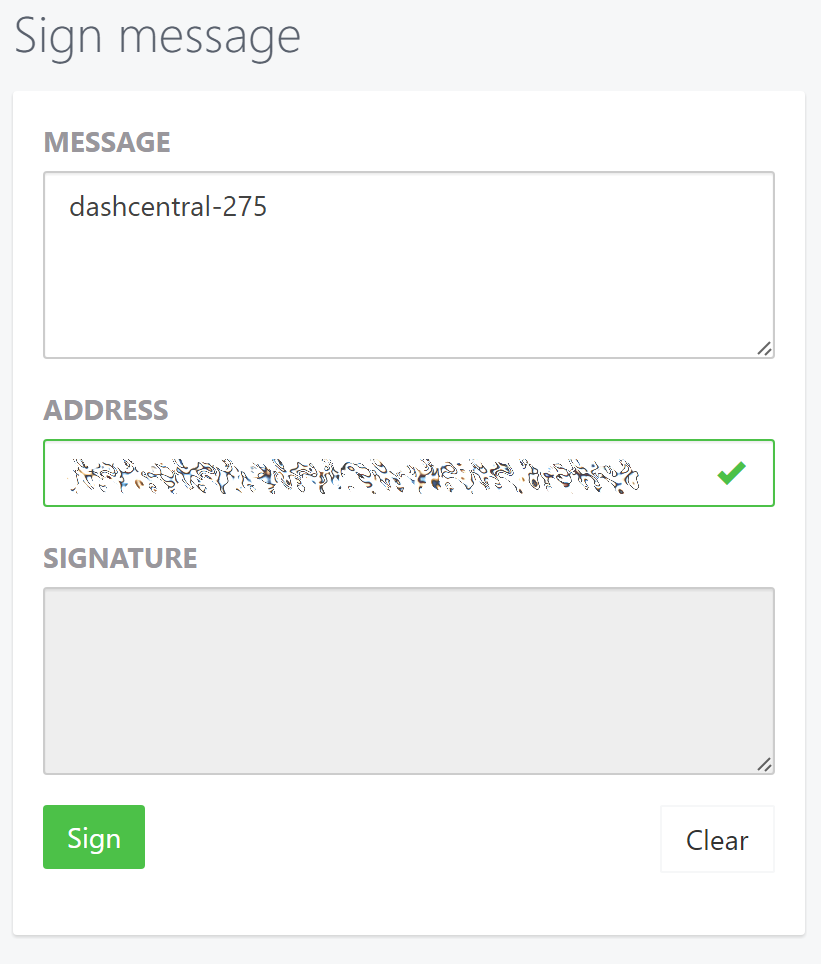
توقيع رسالة من محفظة Trezor
انقر فوق تسجيل ، قم بالتأكيد على جهاز Trezor وأدخل رقم التعريف الشخصي الخاص بك لتوقيع الرسالة. سيظهر توقيع الرسالة في المربع الإمظاء. انسخ هذا التوقيع والصقه في المربع الموجود على داش سنترال وانقر على التحقق من الملكية. اكتمل التحقق الآن.
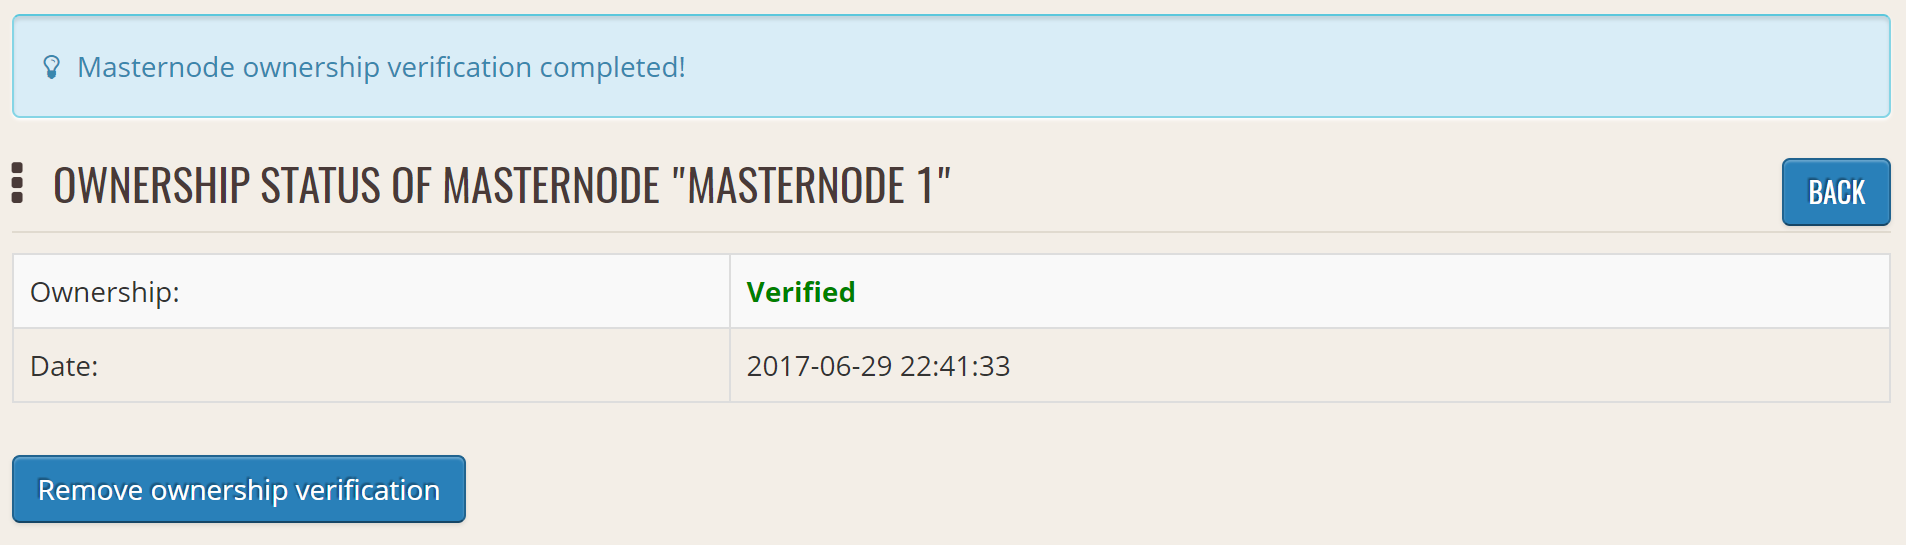
تم التحقق من ملكية ماسترنود بنجاح
تثبيت البرنامج النصي لمراقبة داش سنترال
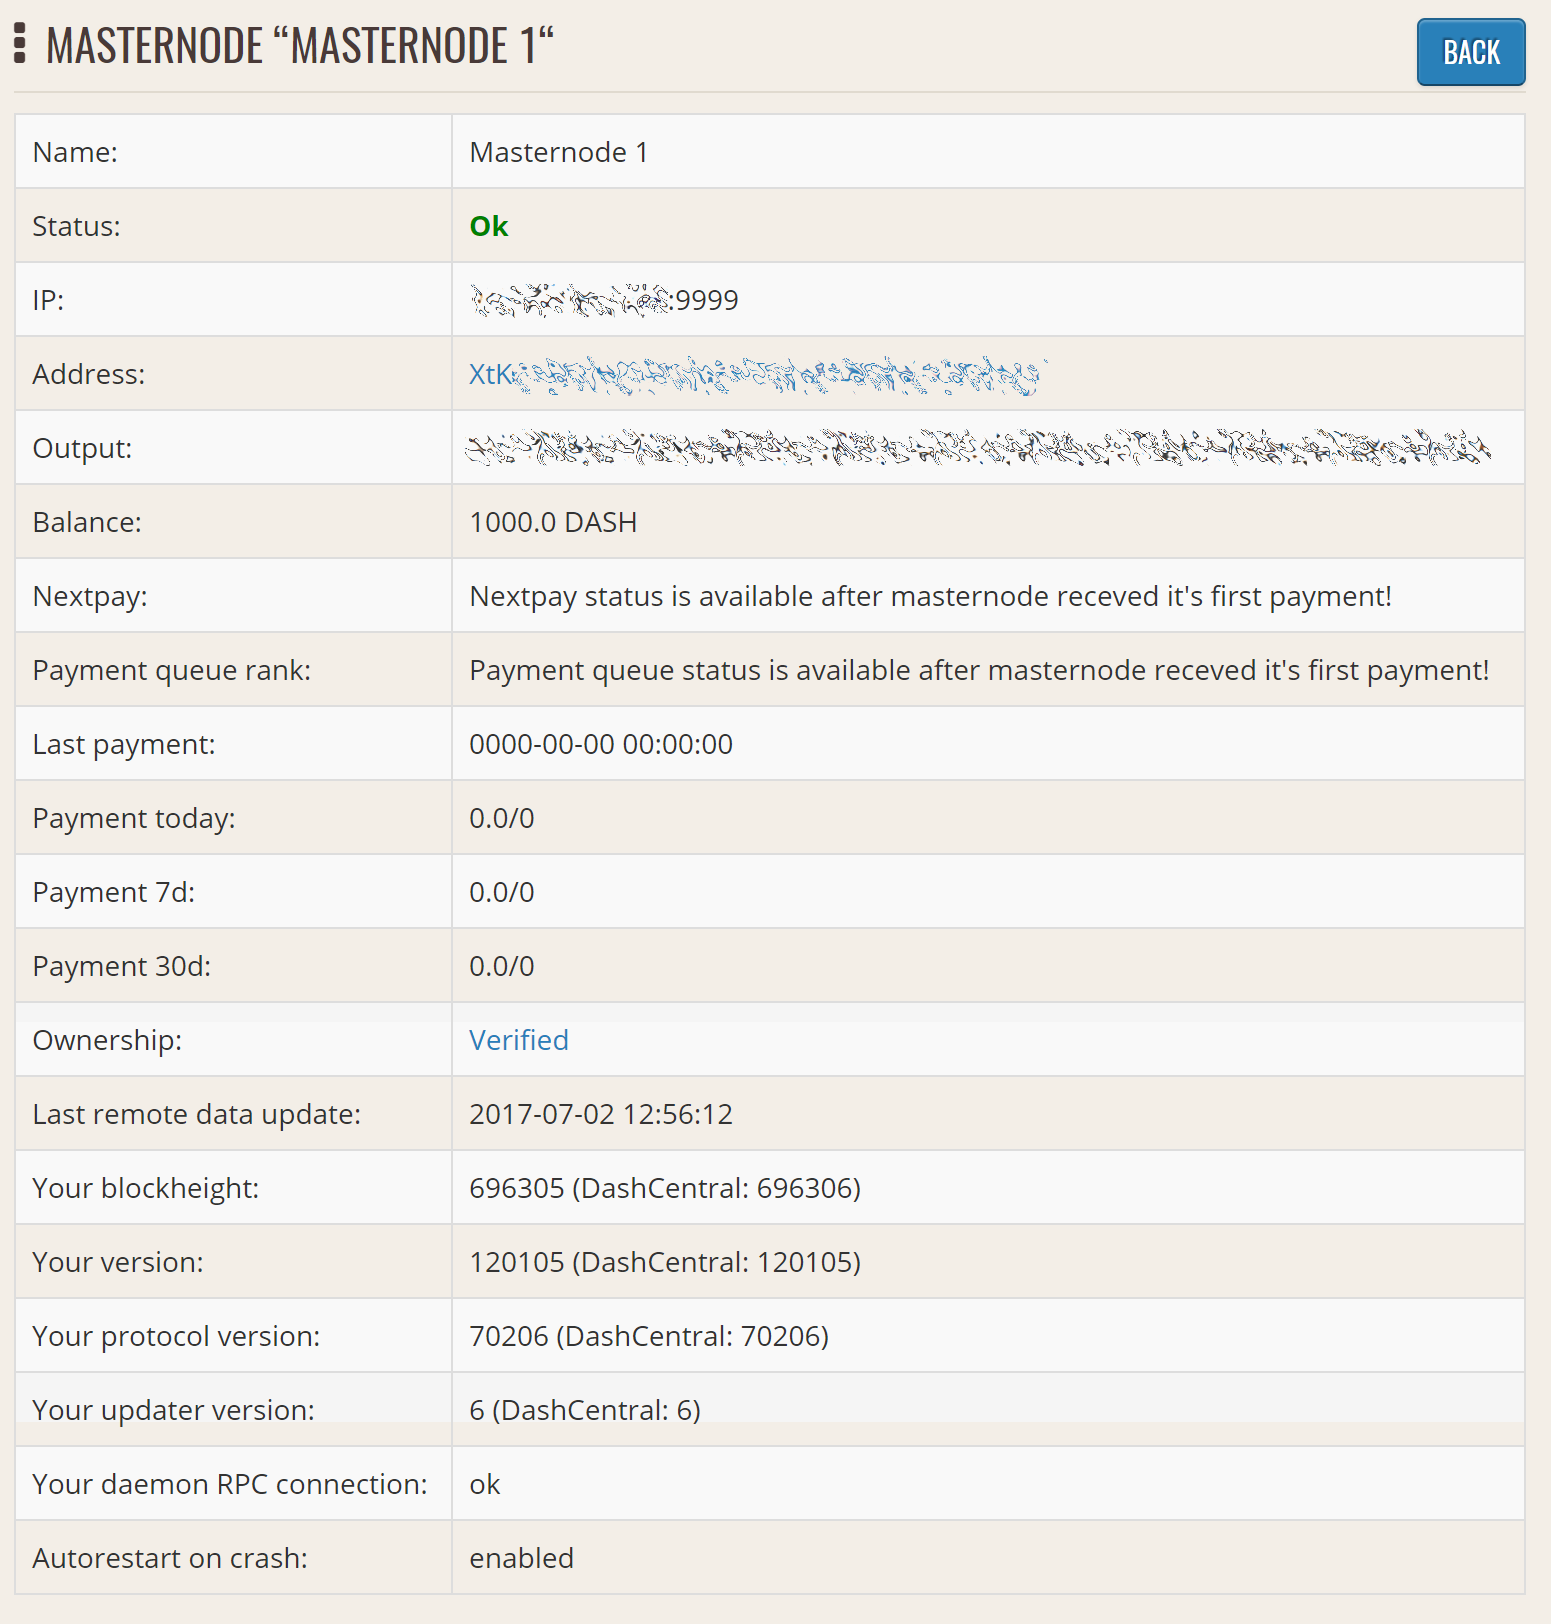
يقدم داش سنترال خدمة لمراقبة ماسترنود الخاص بك ، إعادة تشغيل داش تلقائيا في حالة حدوث تعطل وإرسال البريد الإلكتروني في حالة حدوث خطأ. اذهب الى إعدادات الحساب الصفحة وإنشاء مفتاح جديد لواجهة برمجة التطبيقات ، مع إضافة رقم تعريف شخصي إلى حسابك إذا لزم الأمر. قم بالتمرير إلى الشاشة التالية:
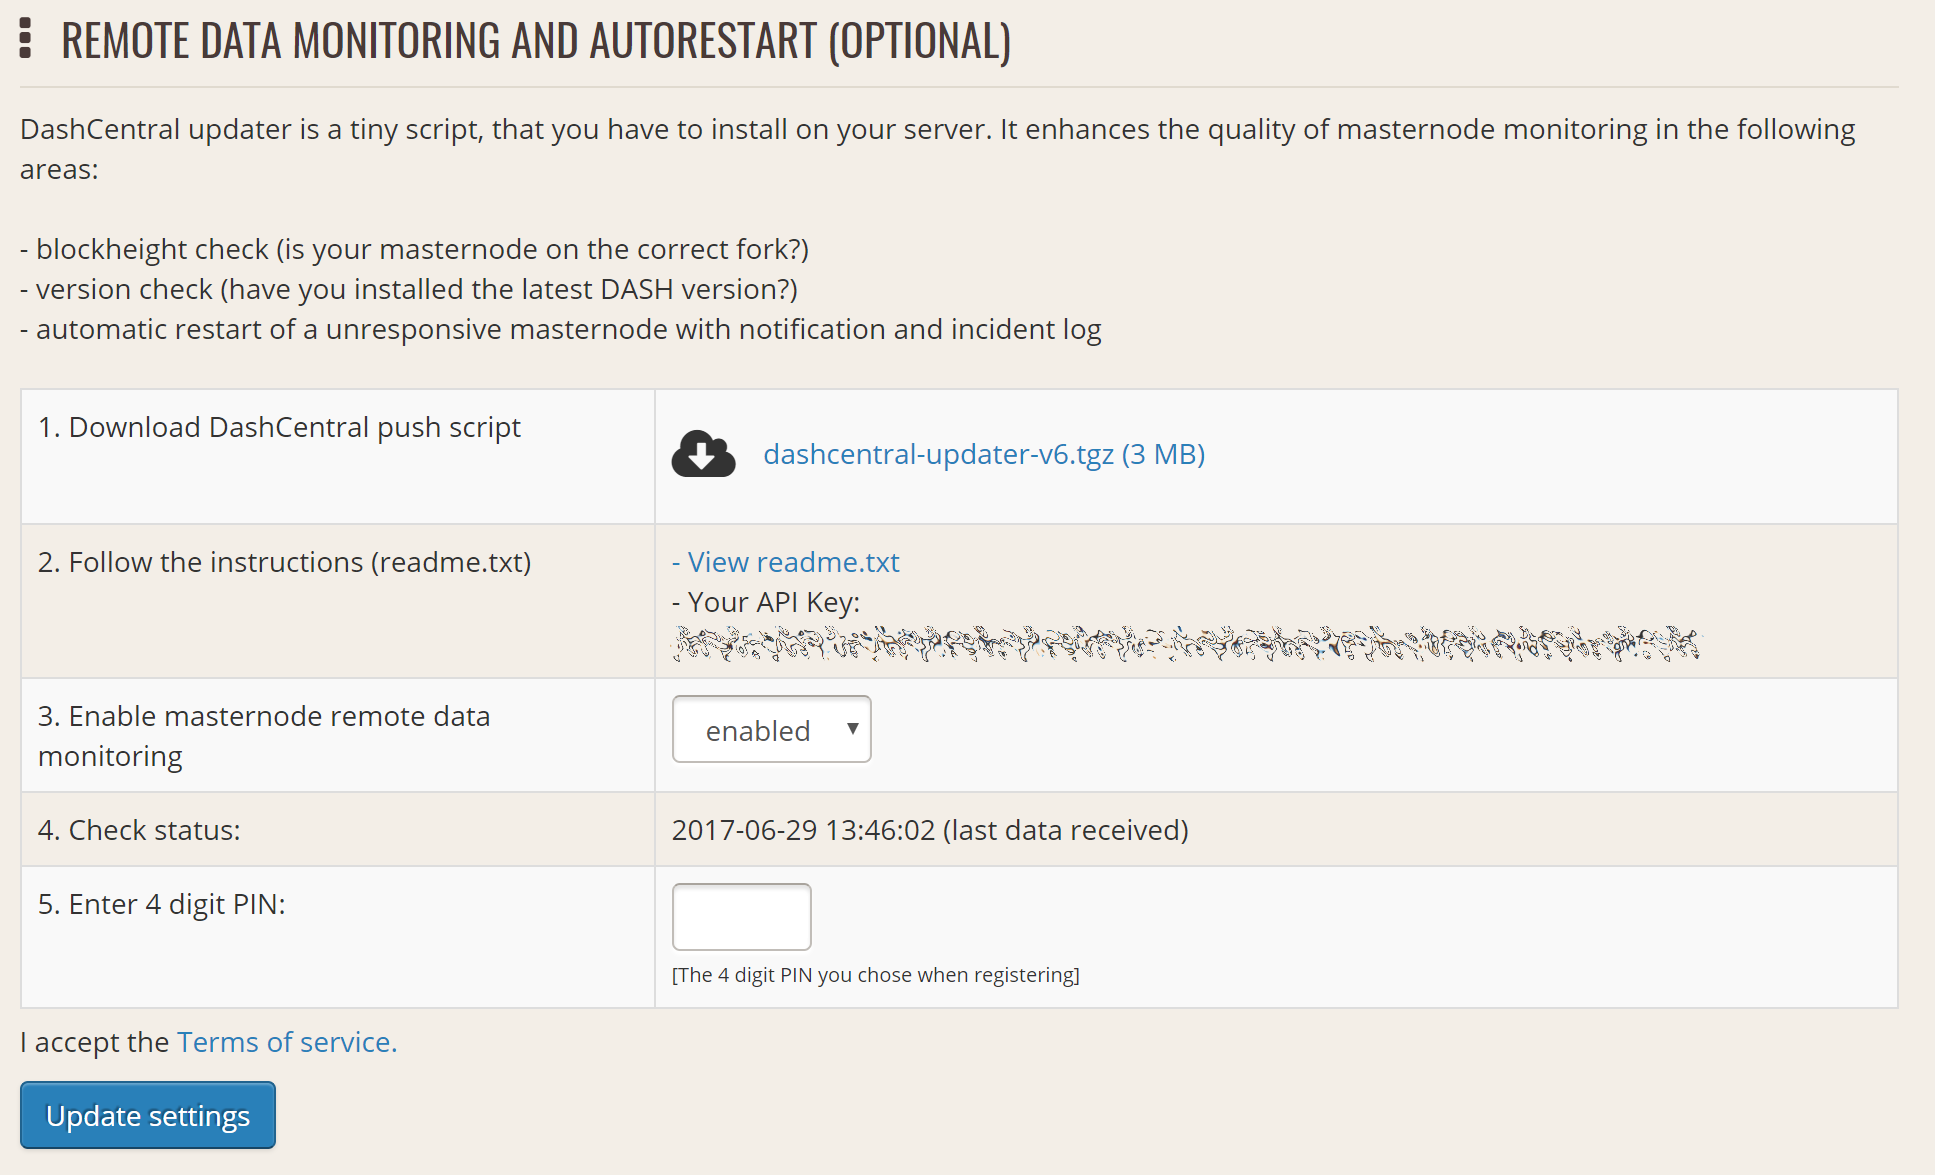
إعداد البرنامج النصي لمراقبة داش سنترال
انسخ الرابط إلى الإصدار الحالي من البرنامج النصي داش سنترال بالنقر بزر الماوس الأيمن وتحديد نسخ عنوان الرابط. فتح PuTTY والاتصال بك ماسترنود ، ثم اكتب
wget https://www.dashcentral.org/downloads/dashcentral-updater-v6.tgz
استبدال الارتباط مع الإصدار الحالي من المحدث داش سنترال حسب الضرورة. قم بإلغاء ضغط الأرشيف باستخدام الأمر التالي:
tar xvzf dashcentral-updater-v6.tgz
عرض تفاصيل تهيئة ماسترنود بكتابة
cat .dashcore/dash.conf
انسخ قيم rpcuser و rpcpassword. ثم تحرير التكوين داش سنترال بكتابة
nano dashcentral-updater/dashcentral.conf
استبدل القيم الخاصة بـ api_key ، والعنوان الضمني لرنايتك البريدية ، و rpc_user ، و rpc_password ، و daemon_binary ، و daemon_datadir وفقًا للنظام الخاص بك. قد يبدو الشكل الشائع ، حيث lwhite اسم مستخدم لينكس ، كما يلي:

داش سنترال ملف التكوين التحديث
################
# dashcentral-updater configuration
################

our %settings = (
    # Enter your DashCentral api key here
    'api_key' => 'api_key_from_dashcentral'
);

our %masternodes = (
    'masternode_collateral_address' => {
        'rpc_host'           => 'localhost',
        'rpc_port'           => 9998,
        'rpc_user'           => 'rpc_user_from_dash.conf',
        'rpc_password'       => 'rpc_password_from_dash.conf',
        'daemon_autorestart' => 'enabled',
        'daemon_binary'      => '/home/<username>/.dashcore/dashd',
        'daemon_datadir'     => '/home/<username>/.dashcore'
    }
);
اضغط على Ctrl + X للخروج ، وتأكد من أنك تريد الحفظ مع Y ثم اضغط على اضغط. اختبار التكوين الخاص بك عن طريق تشغيل البرنامج النصي داش سنترال ، ثم تحقق من الموقع. إذا نجحت ، سترى أنه قد تم إرسال تحديث
dashcentral-updater/dcupdater
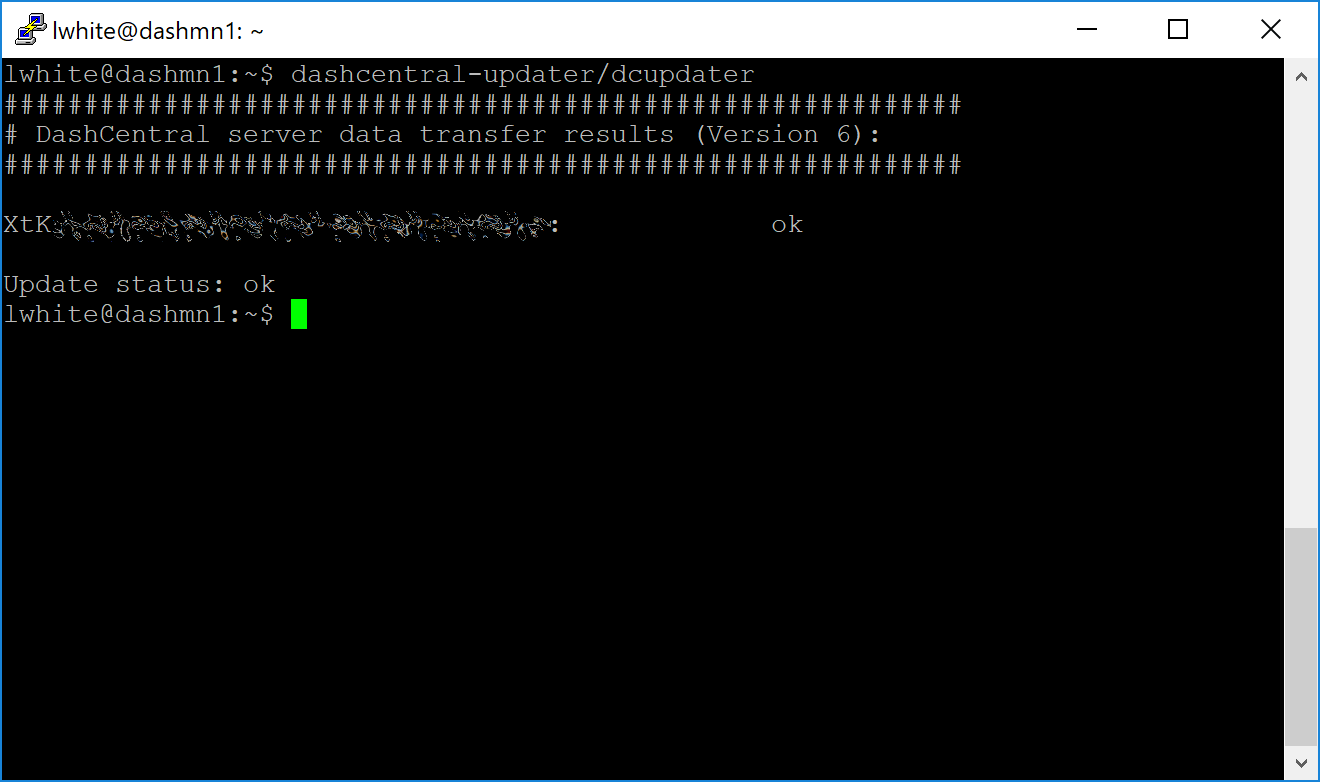
قم باختبار أداة التحديث داش سنترال يدويًا
لقد قام محدث داش سنترال بإرسال البيانات بنجاح إلى موقع داش سنترال
بمجرد التحقق من عمل التهيئة ، يمكننا تحرير crontab على النظام الخاص بك لجدولة البرنامج النصي dcupdater لتشغيل كل 2 دقائق. وهذا يسمح للنظام بإعطائك إنذارًا مبكرًا في حالة حدوث خطأ وسيعيد تشغيل البرنامج الخفي إذا تم تعليقه أو تعطله. هذه طريقة فعالة للتأكد من عدم قيامك بإسقاط قائمة انتظار الدفع. اكتب الأمر التالي
crontab -e
حدد محررًا إذا لزم الأمر وأضف السطر التالي إلى ملف crontab بعد سطر الحارس ، واستبدل lwhite باسم المستخدم على نظامك:
*/2 * * * * /home/lwhite/dashcentral-updater/dcupdater
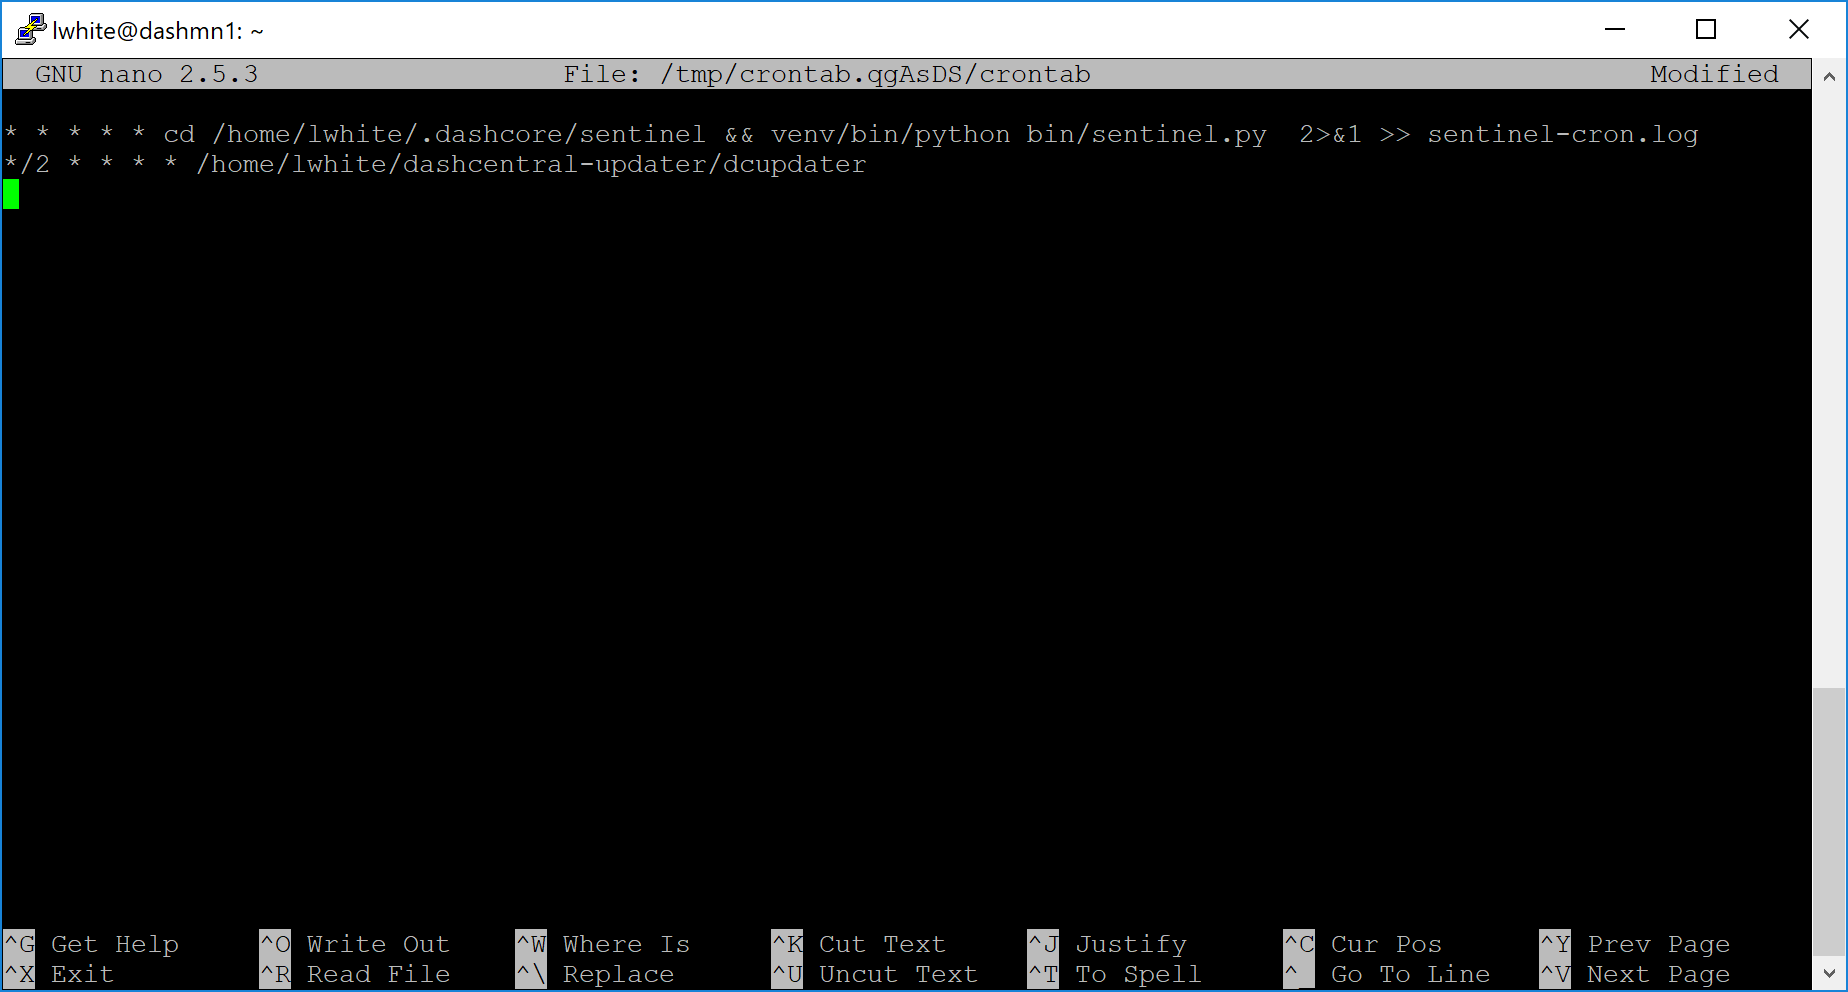
تحرير crontab لتشغيل المحدث داش سنترال تلقائياً
اضغط على Ctrl + X للخروج ، وتأكد من أنك تريد الحفظ مع Y ثم اضغط على اضغط. سيتم تشغيل البرنامج النصي لـ dcupdater الآن كل دقيقتين ، وأعد تشغيل dashd عند الضرورة ، ثم أرسل رسالة بريد إلكتروني إليك في حالة حدوث خطأ.
الأدوات مراقبة ماسترنود
تتوفر العديد من المواقع التي يديرها أعضاء المجتمع لمراقبة المعلومات والإحصاءات الرئيسية المتعلقة بشبكة ماسترنود.
مستكشف الكتلة
بما أن داش عبارة عن بلوكشين عام ، فمن الممكن استخدام مستكشفين مستعرضين لعرض أرصدة أي عنوان عام من داش ، بالإضافة إلى فحص المعاملات التي تم إدخالها في أي كتلة معينة. كل معاملة فريدة من نوعها هي أيضا قابلة للبحث عن طريق سداسي. يتوفر عدد من المستكشفين المحظورين لشبكة داش.
Blockchair offers a block explorer with detailed visualizations to analyse the Dash blockchain.
CryptoID . يقدم مستكشف داش و وظيفة لعرض وتعيين ماسترنود داش.
BitInfoCharts يقدم صفحة من إحصاءات الأسعار والمعلومات و مستكشف بلوكشين.
CoinCheckup يقدم مجموعة من الإحصاءات والبيانات حول معظم بلوكشين ، بما في ذلك داش.
Dash.org includes a blockchain explorer at explorer.dash.org and insight.dash.org.
Trezor operates a blockchain explorer powered by a Dash fork of insight, an advanced blockchain API tool
ادوات ماسترنود داش
https://github.com/Bertrand256/dash-masternode-tool
يتيح لك ادوات ماسترنود داش (DMT) ، الذي قام بكتابته وصيانته من قبل عضو المجتمع Bertrand256 ، بدء تشغيل رمز حديث من جميع محافظ الأجهزة الرئيسية مثل Trezor و Ledger و KeepKey. كما يدعم الوظائف للتصويت على المقترحات وسحب المدفوعات ماسترنود دون التأثير على الصفقة الضمانات.
داش نينجا
يقدم داش نينجا ، الذي يديره عضو في المنتدى ومطور داش كور elbereth ، إحصائيات أساسية حول اعتماد إصدارات مختلفة من داش عبر شبكة ماسترنود. تتوفر أيضًا العديد من الميزات لمراقبة حوكمة داش والجدول الزمني للدفع في ماسترنود والتوزيع الجغرافي للغة ماسترنود ، بالإضافة إلى مستكشف بلوكشين بسيط.
داش سنترال
DashCentral, operated by forum member rango, offers an advanced service to monitor masternodes and vote on budget proposals through an advanced web interface. A mobile monitoring interface is also available.
Masternode.me
Masternode.me, operated by Dash community member moocowmoo, offers sequential reports on the price, generation rate, blockchain information and some information on masternodes.
معلومات عن ماسترنود داش
http://178.254.23.111/~pub/Dash/Dash_Info.html
يقدم هذا الموقع ، الذي يديره عضو في المنتدى وتتويج مطور داش كور ، تمثيلًا مرئيًا للعديد من الإحصاءات الرئيسية لشبكة ماسترنود داش ، بما في ذلك الرسوم البيانية لإجمالي عدد ماسترنود مع مرور الوقت ، ومعلومات عن الأسعار وتوزيع الشبكة.