Mining
Der Begriff Mining bezieht sich im Kryptowährungs-Kontext auf das Finden einer Lösung für kryptographische Probleme, die geschaffen werden, um die Blockchain zu sichern. Während des Minings werden neue Währungseinheiten geschaffen, die der Miner erhält, wenn er erfolgreich ist. Für Mining kann auf verschiedene Hardware zurückgegriffen werden. Der Algorithmus, den Dash verwendet, wird X11 genannt und er ist dafür verantwortlich das kryptographische Problem zu kreieren.
Die am weitesten verbreitete Hardware, die zum Mining verwendet werden kann, ist die normale CPU eines Computers. Eine CPU ist dazu designet vielseitige Aufgaben zu übernehmen, ist dadurch aber nicht so leistungsstark wie eine GPU, die Parallel mehrere Millionen Vektoren berechnen muss. Auch wenn verschiedene kryptographische Verbesserungen wie AES oder AVX die Leistung einer CPU erhöhen können, so ist sie dennoch generell weniger leistungsstark als eine GPU, die mehrere Berechnungen der Art, die fürs Mining notwendig sind, gleichzeitig durchführen kann. Zudem gibt es auch ASICs, die nur fürs Mining geschaffen sind. Seitdem verschiedene X11-ASICs auf dem Markt sind, wurde CPU- und GPU-Mining zunehmend unökonomisch, da sich die Schwierigkeit durch die wachsende Hashrate sehr schnell erhöht hat. Je höher die Hashrate ist, desto sicherer ist eine Kryptowährung gegen leistungsstarke Angriffe auf die Blockchain geschützt.
Die Profitabilität des Minings hängt von der Hashrate der Geräte, der Schwierigkeit des Netzwerks sowie der Hardware- und Stromkosten ab. Die folgenden Tools sind nützlich, um aktuelle Informationen zu analysieren.
Masternodes vs. Mining
Dash basiert, wie Bitcoin und andere Kryptowährungen auch, auf einer dezentralisierten Datenbank, die Blockchain genannt wird. Diese Blockchain wird durch einen Konsensmechanismus gesichert, wobei dieser Konsensmechanismus sowohl bei Dash, als auch bei Bitcoin, Proof of Work (PoW) genannt wird. Die Miner versuchen spezielle Aufgaben mit ihrer Rechenleistung zu lösen und derjenige, der es schafft die Aufgabe zu lösen, erhält das Recht den nächsten Block an die Blockchain anzuhängen. Dafür müssen jedoch zunächst die anderen Miner bestätigen, dass die Aufgabe korrekt gelöst wurde. Ist dies der Fall, wird der Miner entlohnt und der Block wird zur Blockchain hinzugefügt.
Dash unterscheidet sich von Bitcoin durch seine zweite Ebene. Die zweite Ebene besteht aus den Masternodes (Full Nodes), die für Funktionen wie schnelle (InstantSend) und anonyme (PrivateSend) Transaktionen notwendig sind und die Grundlage des dezentralen Governance- und Treasury-Systems darstellen. Weil diese zweite Ebene so wichtig ist, wird ihre Funktion vom Netzwerk finanziert und sie erhalten einen Teil der Blockrewards. Diese teilen sich nach folgendem Muster auf: 45% an die Miner, 45% an die Masternodes und 10% für die Treasury (dies wird jeden Monat in einem Superblock ausgezahlt).
Die Masternodes operieren nach einem „Proof of Service“-System (PoSe), durch welches die wichtigen Funktionen berücksichtigt werden, die sie für das Netzwerk ausüben. Die Masternodes überwachen das Netzwerk und lehnen fehlerhafte Blöcke ab. Sollte ein Miner versuchen die gesamten Blockrewards zu beanspruchen oder eine veraltete Version der Software verwenden, so würden die Masternodes diesen Block ablehnen.
Kurz gefasst: Die Miner stellen die erste Ebene da, und ihre Aufgabe ist es das Versenden und Empfangen von Guthaben abzusichern sowie Doppel-Zahlungen zu verhindern. Die Masternodes sind die zweite Stufe, welche die Sonderfunktionen von Dash absichert, die es von anderen Kryptowährungen unterscheidet. Masternodes können nicht gleichzeitig Mining betreiben und Mining-Hardware kann nicht zum Aufsetzen einer Masternode verwendet werden. Zudem ist für eine Masternode ein Pfand von 1000 Dash nötig. Dieses Pfand bleibt weiterhin unter der Kontrolle des Besitzers und er kann es jederzeit an eine andere Adresse senden. Entscheidet er sich jedoch dazu wird seine Masternode abgeschaltet und es werden keine weiteren Blockrewards an ihn ausgezahlt.
Mining Pools
Wer Mining nicht alleine betreibt, sondern einem Pool beitritt, hat eine höhere Aussicht auf Erfolg. P2Pools sind etwas positives für Dash, da sie dabei helfen eine weniger zentralisierte Mining-Landschaft zu schaffen, da die Hashing-Power breiter verteilt ist. Die folgende Liste beinhaltet die meisten ernstzunehmenden Pools. Bevor ein Miner sich für einen davon entscheidet sollte er sich über die verlangten Gebühren und die Pingzeit informieren. Meistens muss als Nutzername die Dash-Auszahlungsadresse und als Passwort ein beliebiges Passwort gewählt werden.
If you would like to set up your own P2Pool, documentation of the process is available here and the code for p2pool-dash is available on GitHub. Other mining pools are listed below and may be advantageous for different reasons such as ping latency, uptime, fee, users, etc. A guide to using a typical mining pool can be found here.
- https://coinfoundry.org
- https://mining.luxor.tech
- https://dash.suprnova.cc
- https://www.nicehash.com
- https://www.coinotron.com
- https://dash.miningpoolhub.com
- https://www.multipool.us
- https://www.f2pool.com
- https://www2.coinmine.pl/dash
- https://aikapool.com/dash
- https://www.antpool.com
- https://avalon-life.io
- https://www.genesis-mining.com
- https://www.viabtc.com
- http://zpool.ca
ACHTUNG: Diese Liste dient nur zu Informationszwecken. Die angebotenen Dienste wurden nicht von den Dash-Entwicklern getestet und es wird keine Empfehlung ausgesprochen. Ein Nutzer sollte sich genau informieren, bevor er sich entscheidet. Ein Pool-Betreiber kann sich an leon.white@dash.org wenden, damit sein Pool zu der Liste hinzugefügt wird.
Bevor ein Miner einem Pool beitreten kann, muss er eine Dash-Adresse erstellen, an die er seine Auszahlung erhalten will. An dieser Stelle findet sich eine Erklärung, wie dies mithilfe der Dash Core erledigen kann.
CPU Mining
This documentation describes how to mine Dash under the Windows operating system using just the CPU in your computer. Please note that the prevalence of GPU and ASIC miners mean that unless you have free electricity, this is highly unlikely to be profitable! Since this is the case, the software in this guide has not been updated in several years, and is intended for experimental purposes and testnet only.
This is a fairly simple procedure and examples will be given in order to achieve the fastest possible hash rate for your CPU, but remember that more optimized miners do exist, so we advise you to keep an eye out on mining sites such as these in order to keep up with the latest information and releases.
Mining software
The first step is to download appropriate mining software. A good basic miner for modern CPUs can be found here:
This software depends on your CPU supporting the AES-NI and AVX instruction sets. You can use CPU-Z to check if this is the case for your CPU:
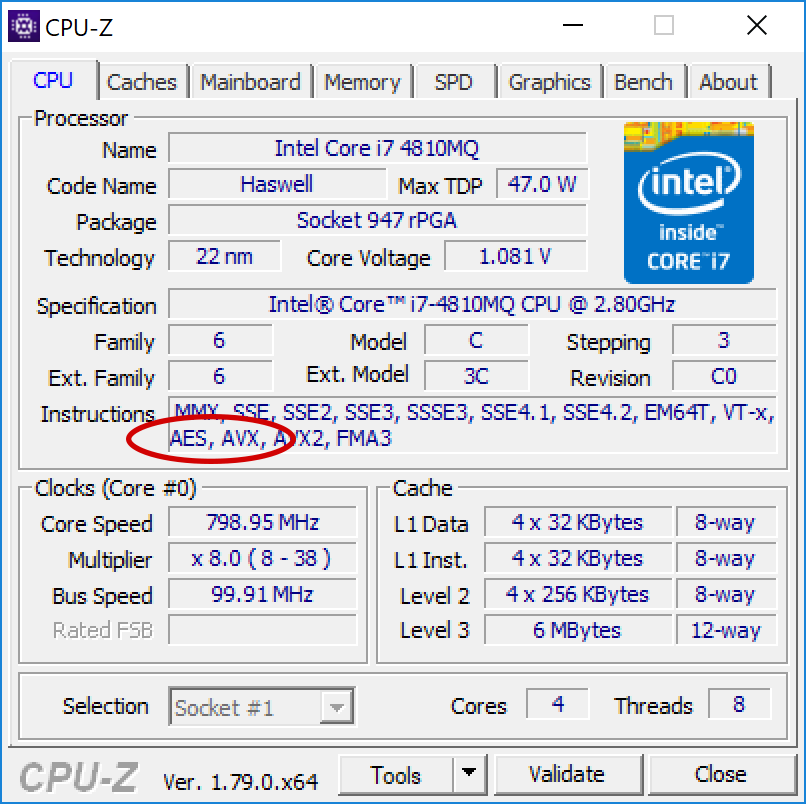
CPU-Z showing details for an Intel i7 Haswell CPU
If your CPU does not support AES-NI and AVX, then you can try more generalized software which does not require specific instruction sets, such as these:
Our goal here is to choose mining software that supports the maximum possible instruction sets available on your CPU, and then try to increase the hash speed. Once you have made your choice, click Releases and download and extract the zip file. The different *.exe files indicate which specific processor optimizations they support. The folder should look something like this:
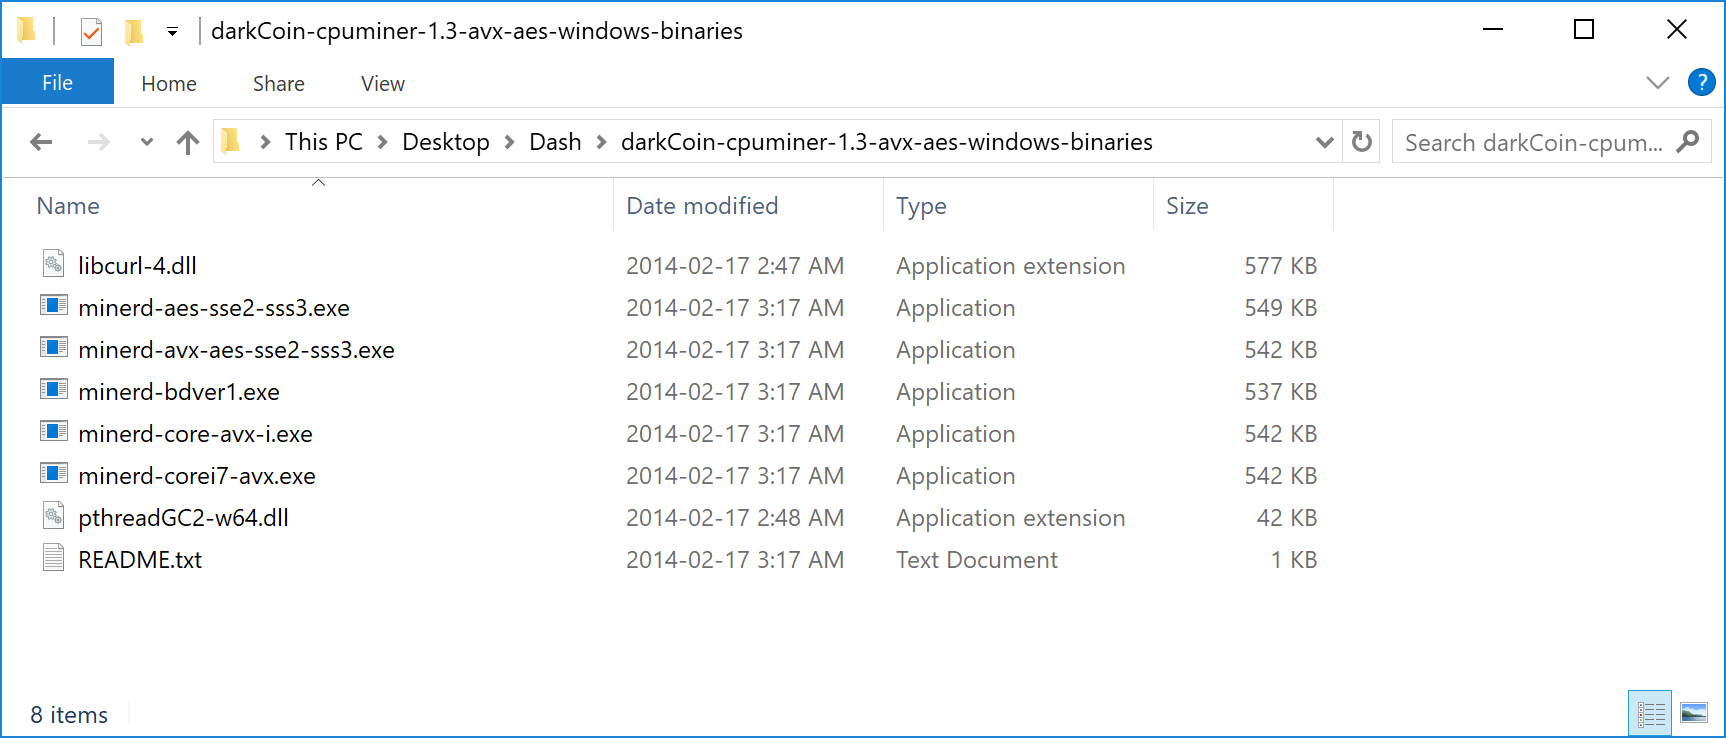
Executable CPU miners for Dash
Konfiguration
Begin by selecting a mining pool and generating a Dash address as described in the Mining Pools section above. Keep all your mining files in a single folder. In this example we will work from the Desktop. The node selected for this example is from the p2poolming.us list and is located in China:
http://118.184.180.43:7903/static/
Next, open Notepad and type in on one line the command we will use to start the miner, followed by pause on the second line. The general format is as follows:
<minerd> -a <algorithm> -o <url> -u <username> -p <password> -t <threads>
pause
Where:
- minerd = the executable miner daemon file you choose to use
- a = algorithm, which is X11 for Dash
- o = URL of your mining pool, including the protocol and port
- u = username, usually the Dash receiving address of your wallet or worker
- p = password, can often be set to x
- t = number of threads used
- pause = keeps the window open in the case of errors
For the CPU in the example above, the command may be:
minerd-avx-aes-sse2-sss3.exe -a X11 -o stratum+tcp://118.184.180.43:7903 -u XwZRjo1f6gmq3LCv7X1Hi5h3NkvDMHvu8G -p x -t 8
pause

Notepad file showing an example command to start a CPU miner
Click File, then Save As. Change Save as type to All Files, then type the file name as startminer.bat and save it in the same folder as the unzipped minerd files.
Testing
You are now ready to start! Keep an eye on your CPU usage in Task
Manager (right click the taskbar to open this) and be careful that the
CPU temperature does not exceed your maximum rating (around 64°C). If
you have temperature or desktop stability problems, reduce t to ~2
threads and try that first. If t is left out, the machine will
default to the maximum number of threads. After running the miner for a
while, take a look at the hash speed and payouts in your mining pool.
You can identify your miner by the wallet address on the page.

Example of CPU mining using DarkCoin CPUMiner 1.3 on Intel Core i7
Tips
Reduce the number of threads for added desktop usability and heat reduction. If the CPU temperature is too high, consider fitting a new fan and check that the heat sink thermal paste on the CPU is adequate. Tweak the processor clock speed for added performance using a motherboard controller like AI Suite for Asus motherboards. Reduction of CPU core voltage will result in lower temperature but increased instability.
Try to select a pool that is nearby to reduce network latency. If the node appears slow, switch to another location. Please distribute the hashing power globally to different pools to avoid forking.
GPU Mining
This guide consolidates several other guides on how to use your GPU (the processor on your graphics card) to mine Dash using the X11 algorithm on Windows. Please note that the growing market for ASIC miners means that this if probably not going to be profitable! A lot of the software and binaries described here also have not been updated for several years, so this guide should be used for experimental purposes only.
This guide will cover the process of downloading and configuring the mining software, followed by some suggestions for optimizations. This technology can change rapidly, so we advise you to keep an eye out on mining sites such as these in order to keep up with the latest information and releases.
Mining software
As for CPU mining, a range of mining software is available for GPU mining. Most of it based on sgminer compiled with different optimizations specific to different hardware. A good approach is to identify your graphics hardware, then choose an appropriate build of sgminer. You can use GPU-Z to identify your GPU hardware:
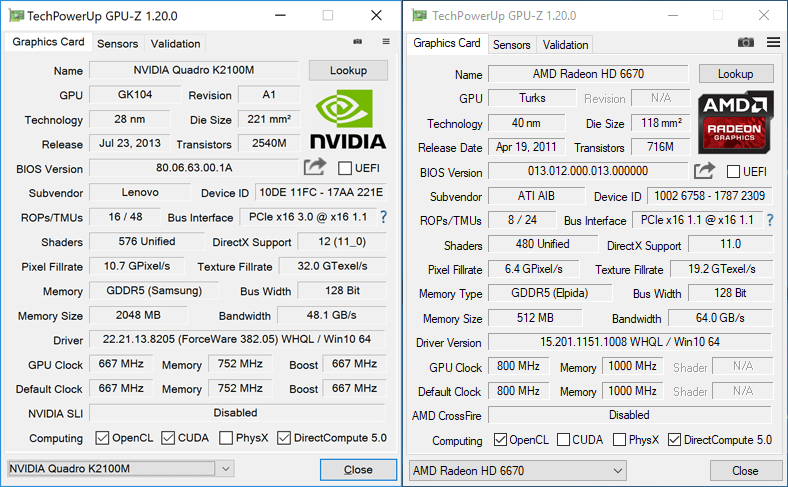
GPU-Z showing details for AMD Radeon Turks and NVIDIA Quadro GK104 class GPUs
Next, download the mining software. Most of these are based on the original sgminer, but this is not suitable for the X11 algorithm, offers no compiled binaries and hasn’t been updated in years. We will describe using pre-compiled binary software maintained by newer developers only.
AMD
NVIDIA
- https://github.com/tpruvot/ccminer/releases (focus on core application)
- https://github.com/sp-hash/ccminer/releases (sp-mod, optimized CUDA kernels for Windows)
- https://github.com/KlausT/ccminer/releases (similar to SP version, more clean)
Download your chosen release and extract the zip file to a known location. The folder should look something like this:
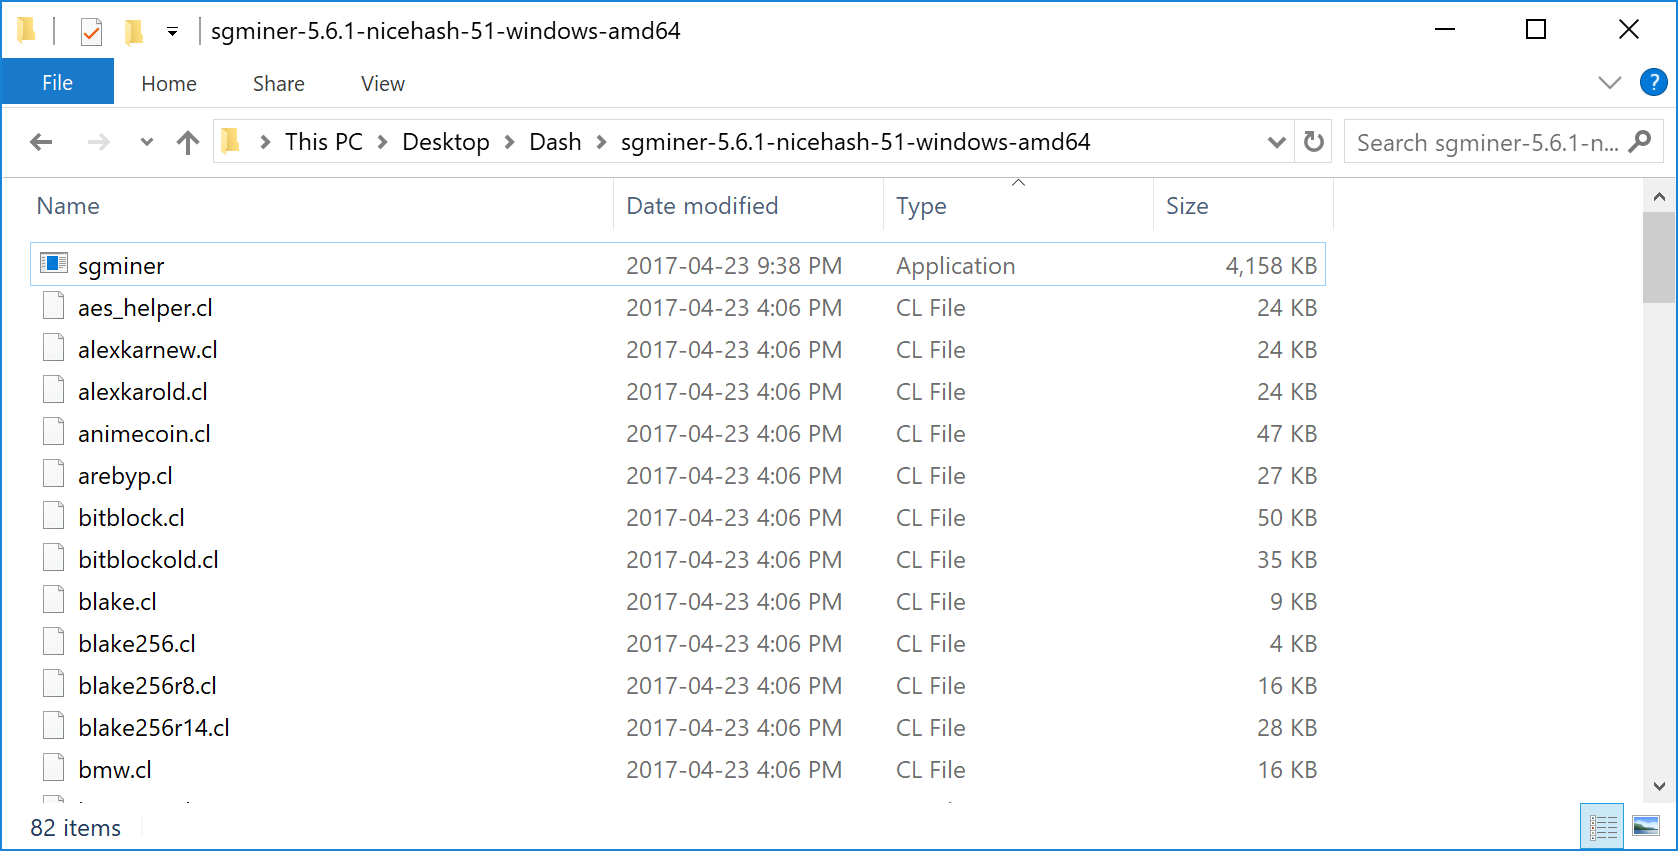
Executable GPU miners for Dash
The sgminer file is the executable file, while the various files with .cl extensions define the various algorithms supported by sgminer. In this case, we are interested in the darkcoin.cl and darkcoin-mod.cl implementations of X11. Note that the name of the executable file may be different for miners with different optimizations, for example ccminer for NVIDIA cards.
Konfiguration
Begin by selecting a mining pool and generating a Dash address as described in the Mining Pools section above. Keep all your mining files in a single folder. In this example we will work from the Desktop. The node selected for this example is from the p2poolming.us list and is located in China:
http://118.184.180.43:7903/static/
Next, open Notepad and create the basic configuration. The general format is as follows:
{
  "pools" : [
    {
      "url" : "stratum+tcp://pooladdress:7903",
      "user" : "walletaddress",
      "pass" : "x",
      "algorithm":"darkcoin"
    }
  ]
}
Where:
- pools = defines a list of pools (in this case, only one) towards which the hashing power is directed
- url = URL of your mining pool, including the protocol and port
- user = username, usually the Dash receiving address of your wallet or worker
- pass = password, can often be set to x
- algorithm = hashing algorithm to use, in this case darkcoin (for historic reasons) or darkcoin-mod
For the pool above, the configuration may be:
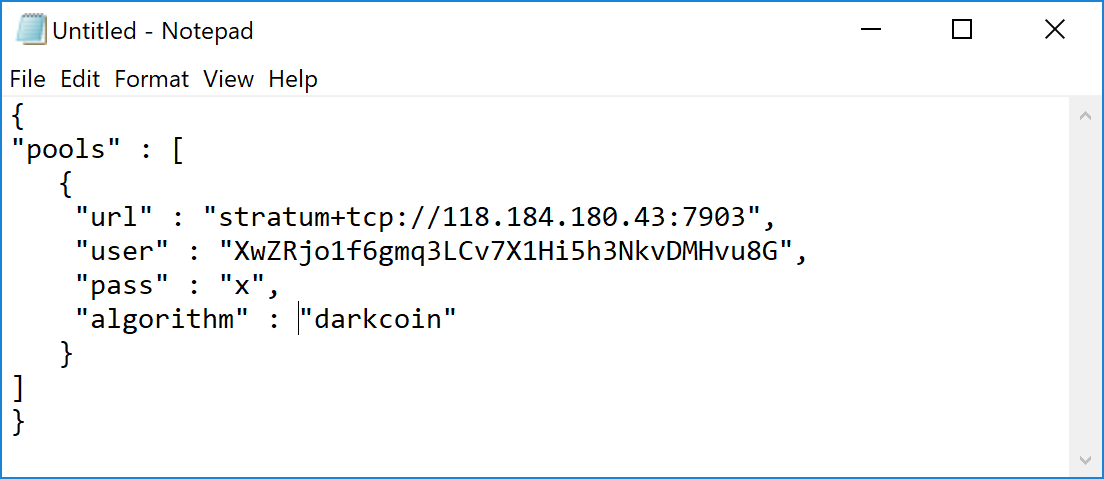
Configuration file for a Dash GPU miner
Click File, then Save As. Change Save as type to All Files, then type the file name as sgminer.conf and save it in the same folder as the unzipped sgminer files.
Testing
Double click your sgminer.exe and a Command Prompt window should appear immediately. If it disappears too quickly, check your configuration for missing commas, unclosed brackets or incorrect file name. The program will compile a special binary specific to your GPU and store it in the folder, then begin hashing.
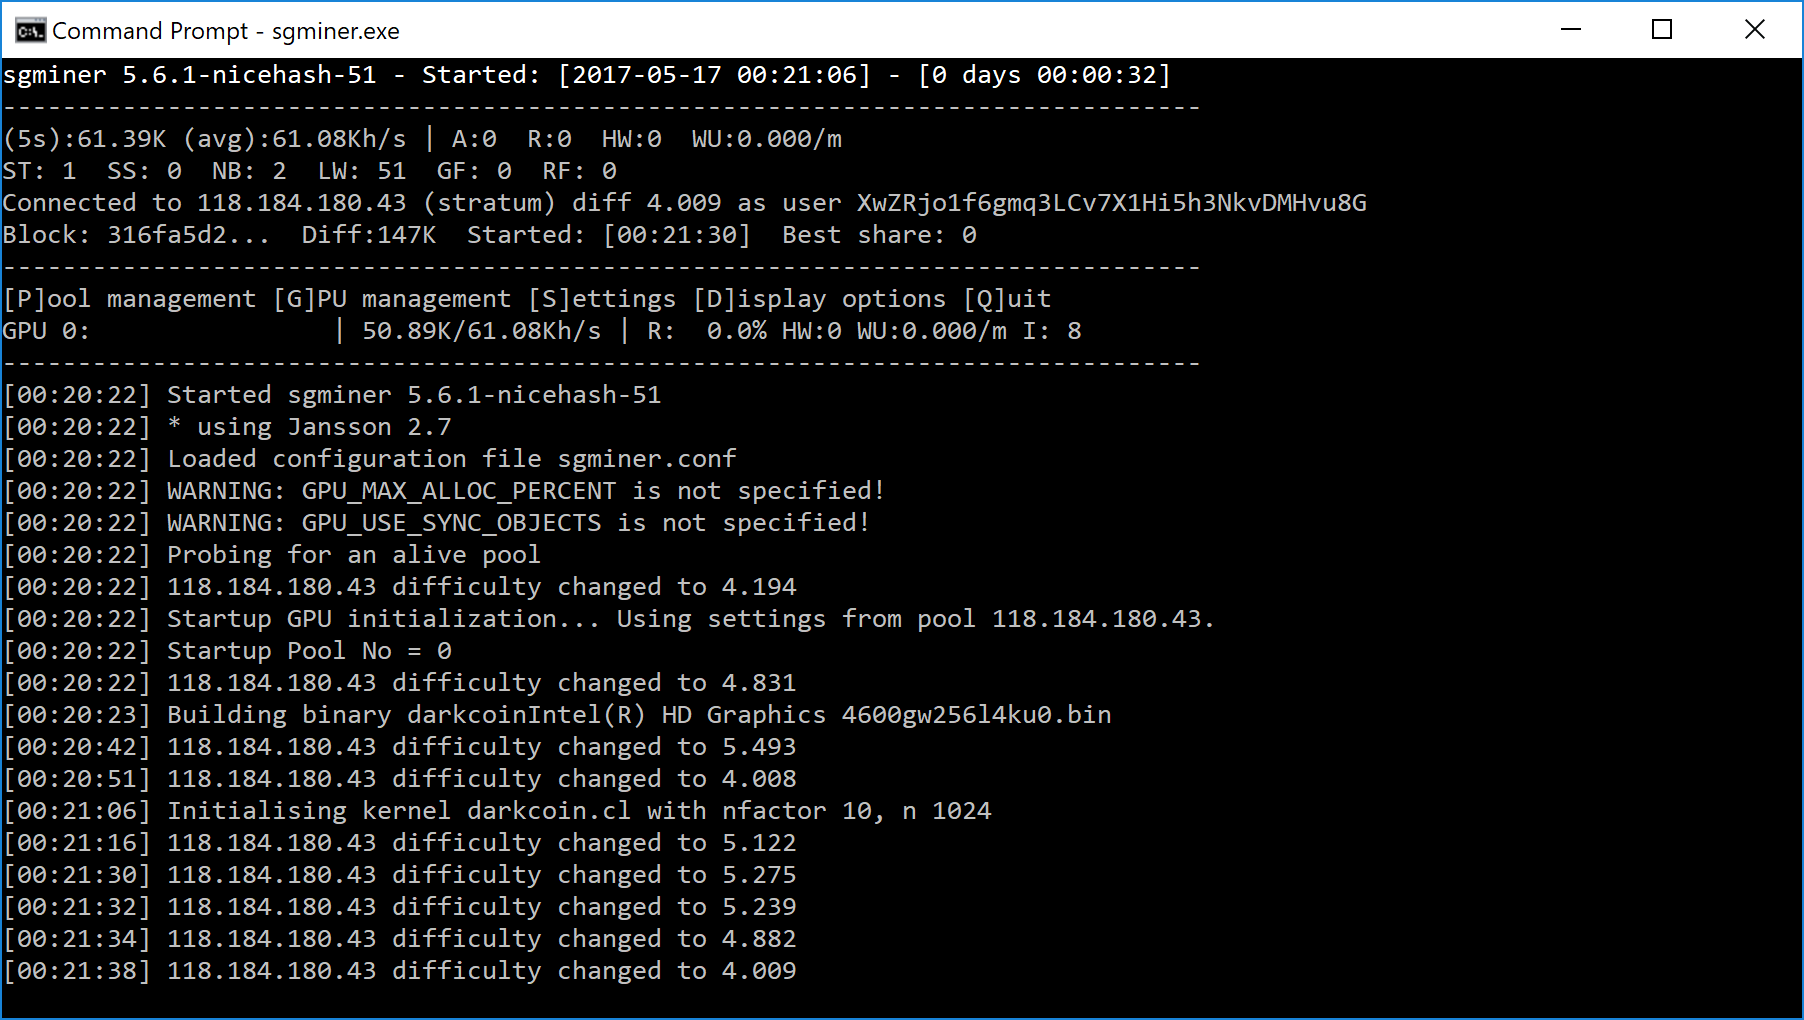
Example of GPU mining using sgminer 5.6.1-nicehash-51 on Intel HD Graphics 4600
ASIC Mining
ASIC stands for Application-Specific Integrated Circuit and describes a type of processor that is designed for one purpose only. ASICs are a popular choice for mining cryptocurrency because they can offer a higher efficiency than CPU or GPU miners, resulting in higher profit.
Please note that the information on this page may become obsolete very quickly due to the rapidly changing market and difficulty of mining Dash. You are responsible for carrying out your own research and any listing on this page should not be considered an endorsement of any particular product. A good place to begin your research is the mining section of the Dash Forums.
The following X11 ASIC miners are available on the market today, click the product name to visit the manufacturer’s website:
| Name | Hash rate | Power | Weight | Dimensions (mm) | Price |
|---|---|---|---|---|---|
| Bitmain Antminer D5 | 119 GH/s ±5% | 1566 W | 7.5 kg | 486 x 265 x 388 | $1,180 |
| FusionSilicon X7 | 262 GH/s | 1420 W | 4.8 kg | 130 x 198 x 340 | $500 |
| FusionSilicon X7+ | 320 GH/s | 2000 W | 4.9 kg | 130 x 198 x 340 | $750 |
| Spondoolies SPx36 | 540 GH/s ±10% | 4400 W | 19.5 kg | 640 x 525 x 185 | $7,000 |
| StrongU STU-U6 | 420 GH/s ±8% | 2100 W | 8.5 kg | 370 x 135 x 208 |
ASIC resellers may also have miners avaiable:
The following ASIC miners are either no longer easily available or obsolete due to the increase in difficulty on the network.
| Name | Hash rate | Power | Weight | Dimensions (mm) |
|---|---|---|---|---|
| Baikal BK-X | 10 GH/s ±5% | 800 W | 3.8 kg | 312 x 125 x 130 |
| Baikal Mini | 150 MH/s ±10% | 40 W | .475 kg | 140 x 100 x 95 |
| Baikal Giant+ A2000 | 2000 MH/s ±10% | 430 W | 3 kg | 300 x 140 x 125 |
| Baikal Giant A900 | 900 MH/s ±5% | 217 W | 2.5 kg | 300 x 123 x 123 |
| Baikal Quad Cube | 1200 MH/s ±10% | 300 W | 3 kg | 135 x 135 x 425 |
| Bitmain Antminer D3 | 17 GH/s ±5% | 970 W | 6.5 kg | 320 x 130 x 190 |
| iBelink DM384M | 384 MH/s ±10% | 715 W | 21 kg | 490 x 350 x 180 |
| iBelink DM11G | 11 GH/s ±5% | 810 W | 22 kg | 490 x 350 x 180 |
| iBelink DM22G | 22 GH/s ±5% | 810 W | 19 kg | 490 x 350 x 180 |
| Pinidea DR-1 | 500 MH/s ±10% | 320 W | 4.5 kg | 290 x 130 x 150 |
| Pinidea DR-2 | 450 MH/s ±5% | 335 W | 4.5 kg | 200 x 165 x 135 |
| Pinidea DR-3 | 600 MH/s ±5% | 345 W | 4.5 kg | 200 x 165 x 135 |
| Pinidea DU-1 | 9 MH/s ±5% | 7 W | 50 x 50 x 30 | |
| Pinidea DRX-Kuznetsov | 900 MH/s ±5% | 650 W | 280 x 180 x 150 | |
| Pinidea DRX-Varyag | 1200 MH/s ±5% | 850 W | 280 x 180 x 150 | |
| iBelink DM56G | 56 GH/s ±5% | 2100 W | 17 kg | 490 x 390 x 180 |
| Innosilicon A5 | 32 GH/s ±8% | 750 W | 3.1 kg | 400 x 135 x 158 |