架设
架设一个主节点需要对Linux和区块链技术有基本的理解,并且需要能够严格遵循指令。主节点也需要定期的维护和谨慎的安全部署,特别是当您没有把您的达世币存储在硬件钱包上的时候。在此过程中,需要做出一些选择,并采取可选的额外步骤来提高安全性。
Commercial masternode hosting services are available if you prefer to delegate day-to-day operation of your masternode to a professional operator. When using these hosting services, you retain full control of the 1000 DASH collateral and pay an agreed percentage of your reward to the operator. It is also possible to delegate your voting keys to a representative, see the governance documentation for more information.
在您开始之前
This guide assumes you are setting up a single masternode for the first time. If you are updating a masternode, see here instead. If Spork 15 is not yet enabled, it is not possible to directly set up a DIP003 masternode. You will need to set up the masternode following the old process and then work through the upgrade procedure. You will need:
- 1000个达世币
- 存储您达世币的钱包,最好是硬件钱包,当然也支持Dash Core钱包
- Linux服务器,最好是虚拟专用服务器(VPS)
Dash 0.13.0 implements DIP003, which introduces several changes to how a Dash masternode is set up and operated. A list of available documentation appears below:
- DIP003 Deterministic Masternode Lists
- DIP003 Masternode Changes
- Dash 0.13 Upgrade Procedure
- Full masternode setup guide (you are here)
- Information for users of hosted masternodes
- Information for operators of hosted masternodes
It is highly recommended to first read at least the list of changes
before continuing in order to familiarize yourself with the new concepts
in DIP003. This documentation describes the commands as if they were
entered in the Dash Core GUI by opening the console from Tools > Debug
console, but the same result can be achieved on a masternode by
entering the same commands and adding the prefix
~/.dashcore/dash-cli to each command.
设置您的VPS
A VPS, more commonly known as a cloud server, is fully functional installation of an operating system (usually Linux) operating within a virtual machine. The virtual machine allows the VPS provider to run multiple systems on one physical server, making it more efficient and much cheaper than having a single operating system running on the “bare metal” of each server. A VPS is ideal for hosting a Dash masternode because they typically offer guaranteed uptime, redundancy in the case of hardware failure and a static IP address that is required to ensure you remain in the masternode payment queue. While running a masternode from home on a desktop computer is technically possible, it will most likely not work reliably because most ISPs allocate dynamic IP addresses to home users.
We will use Vultr hosting as an example of a VPS, although DigitalOcean, Amazon EC2, Google Cloud, Choopa and OVH are also popular choices. First create an account and add credit. Then go to the Servers menu item on the left and click + to add a new server. Select a location for your new server on the following screen:
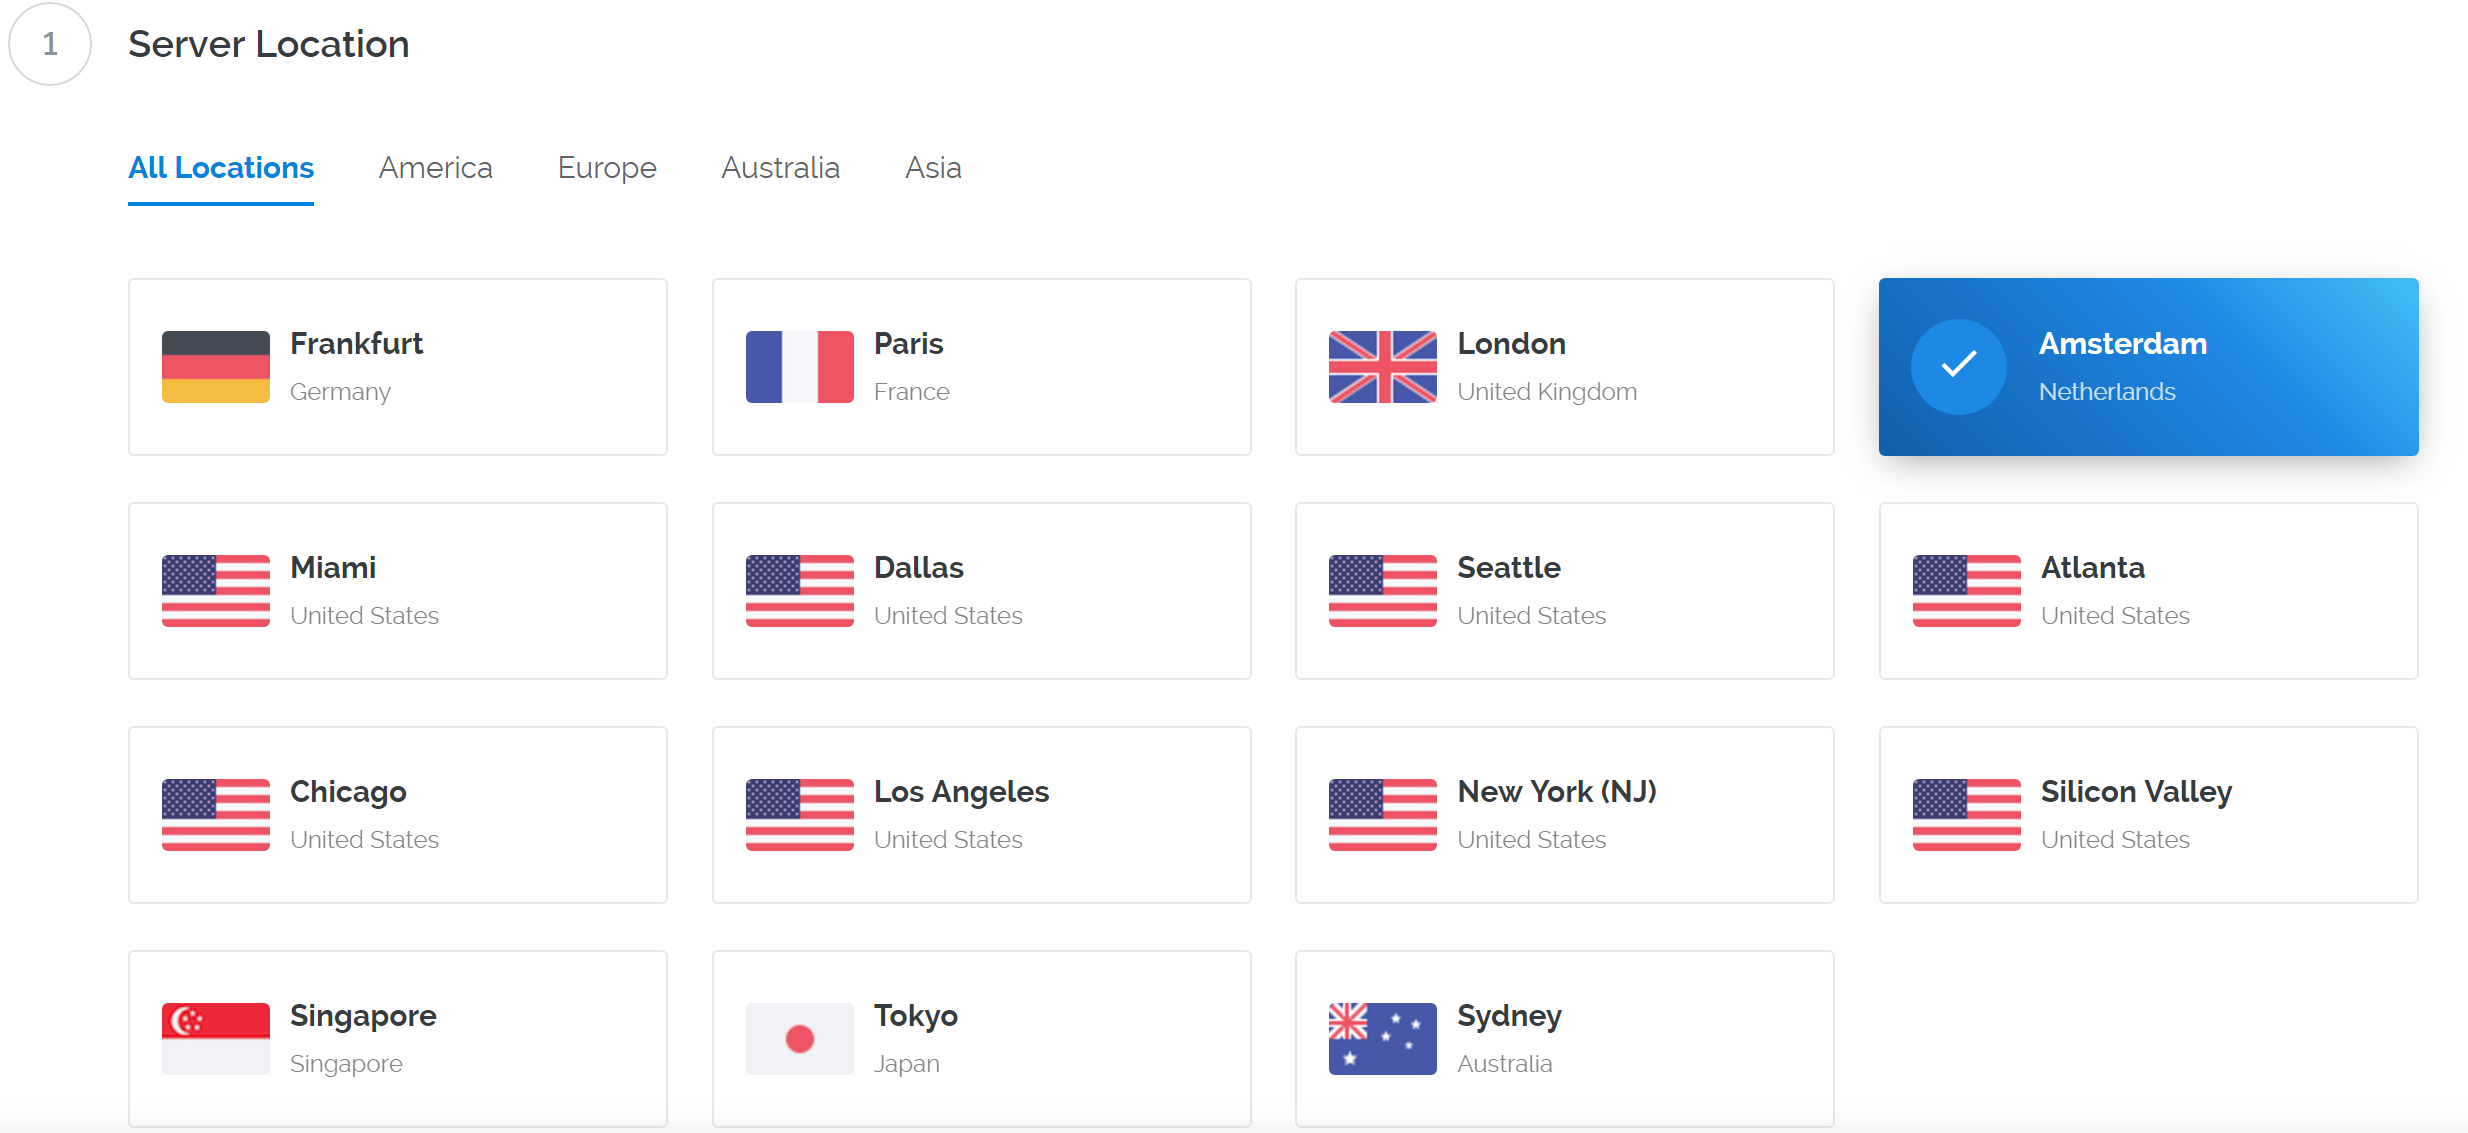
Vultr服务器位置选择屏幕
Select Ubuntu 18.04 x64 as the server type. We use this LTS release of Ubuntu instead of the latest version because LTS releases are supported with security updates for 5 years, instead of the usual 9 months.
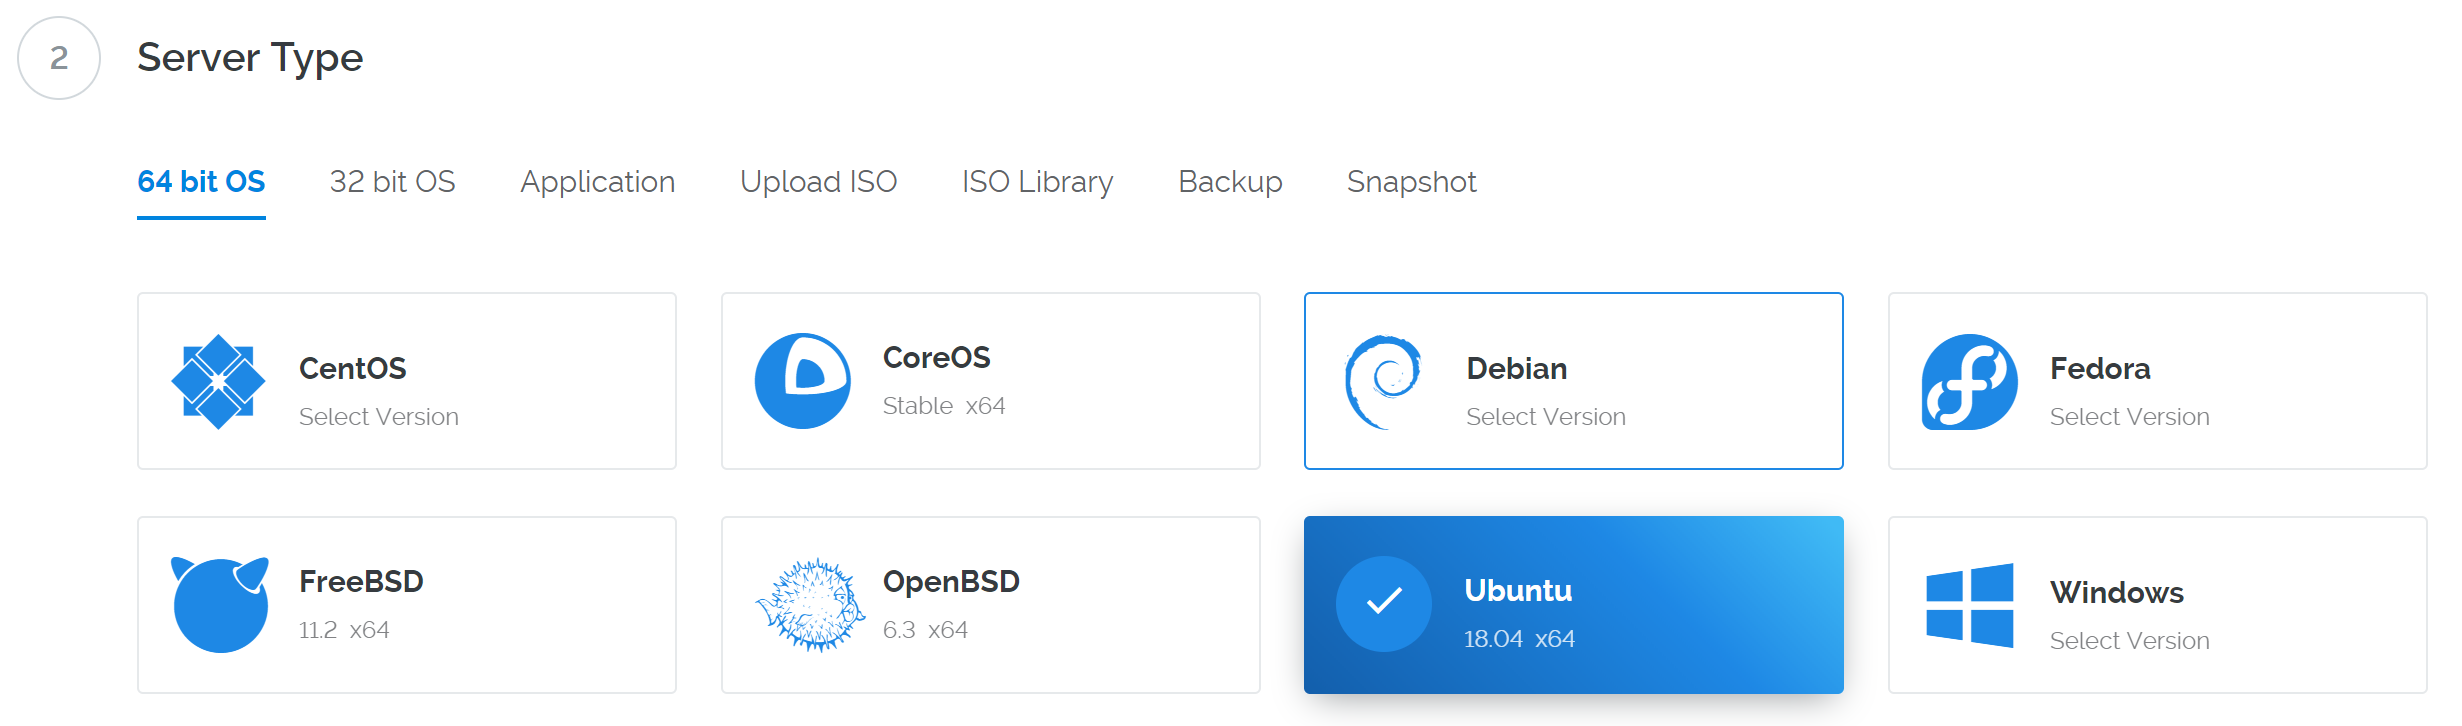
Vultr服务器类型选择屏幕
选择至少提供2GB内存的服务器。
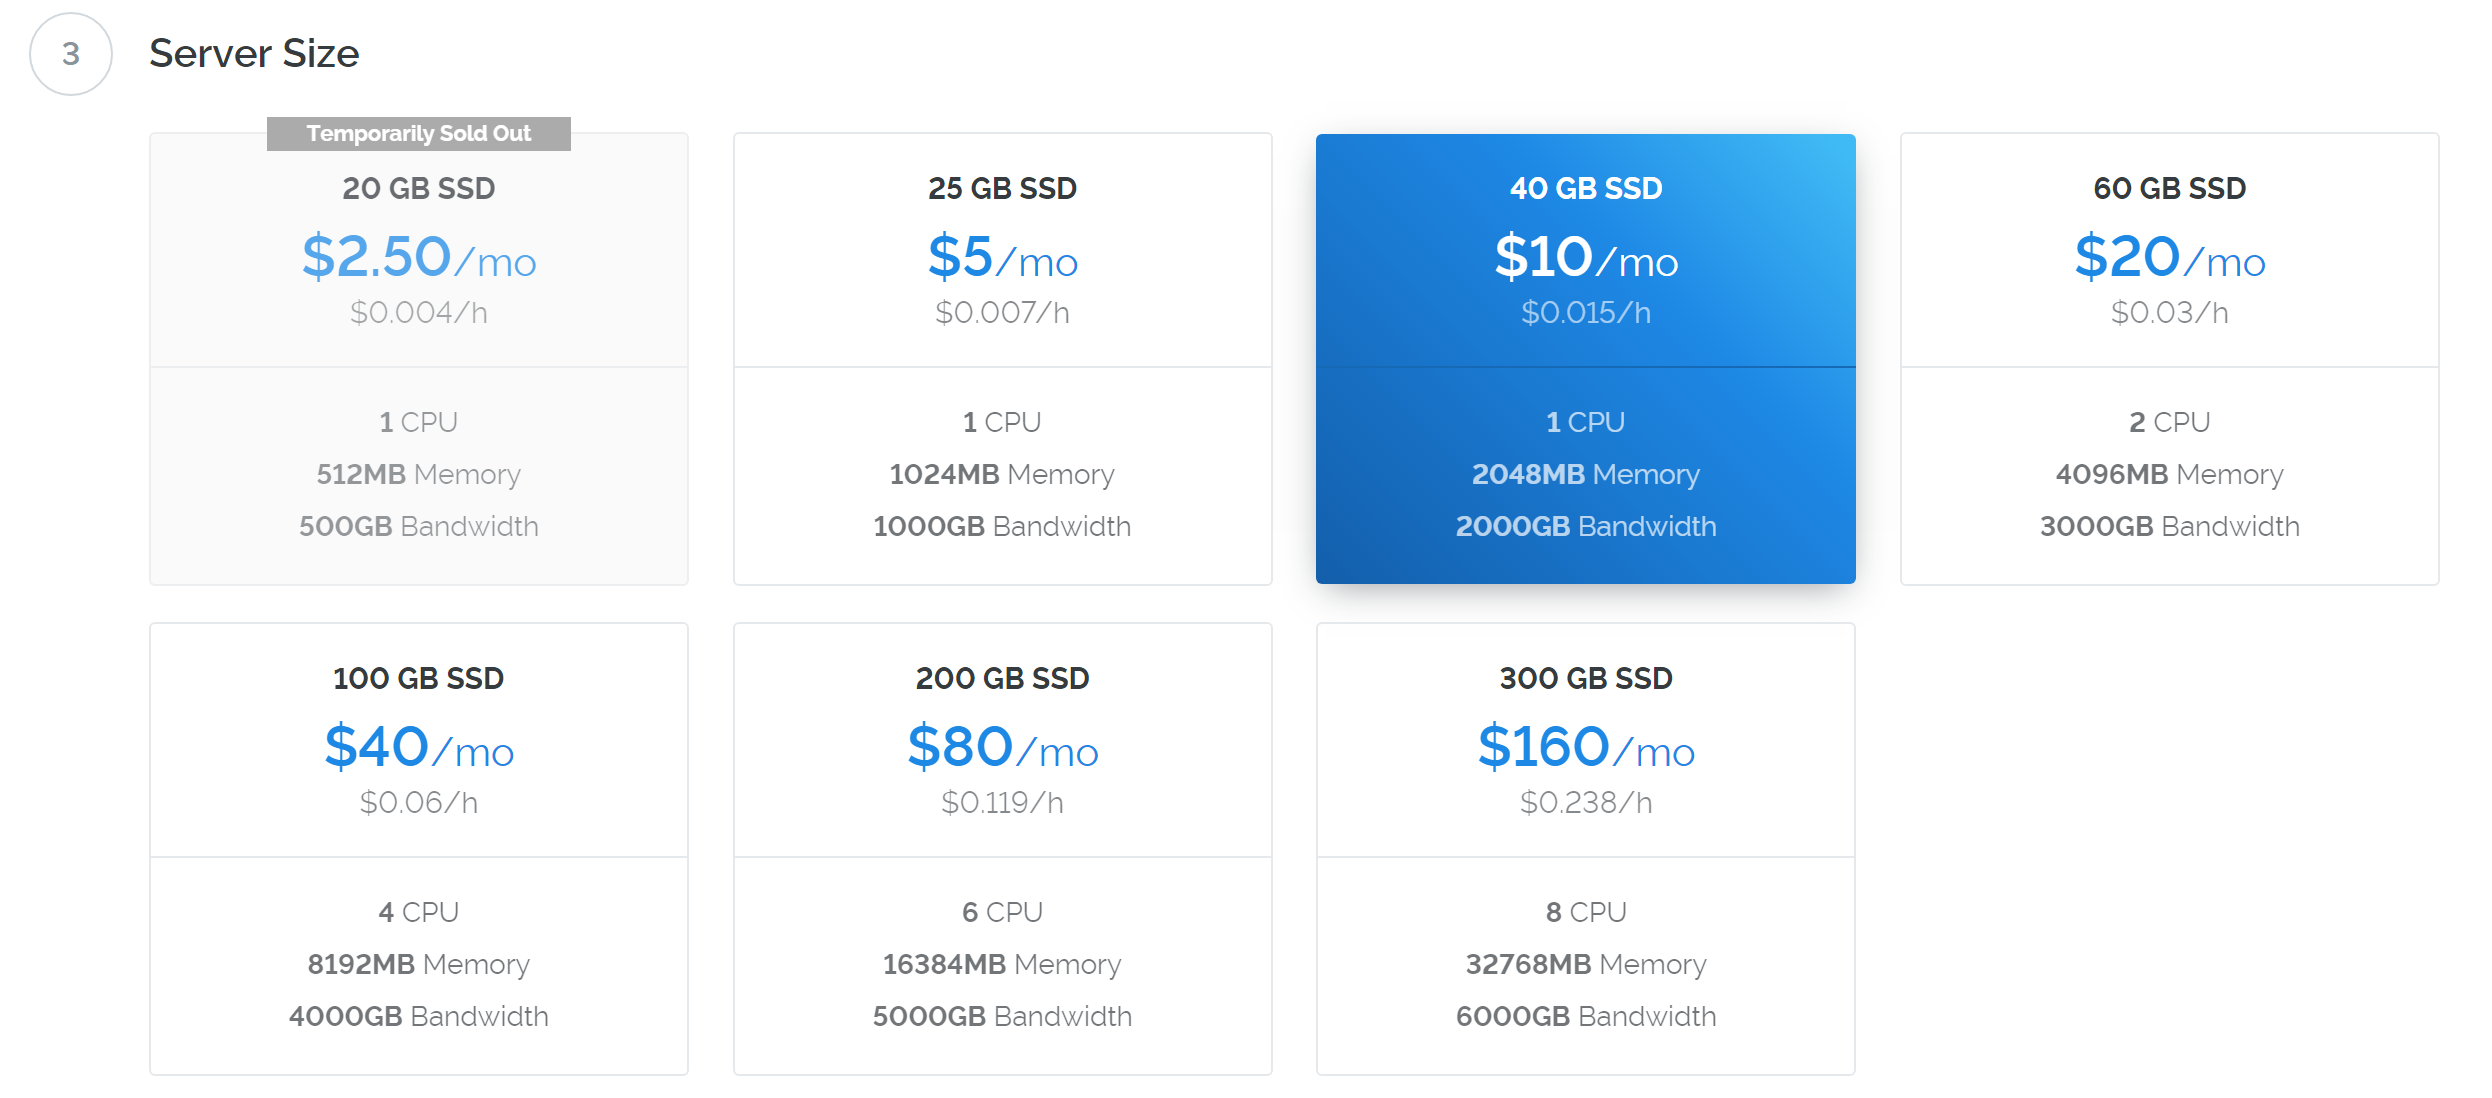
Vultr服务器大小选择屏幕
为您的服务器输入主机名和标签。在本例中,我们将使用dashmn1作为主机名。

Vultr服务器主机名和标签选择屏幕
Vultr现在将安装您的服务器。这个过程可能需要几分钟。

Vultr服务器安装屏幕
在安装完成后,单击 Manage ,并记下IP地址、用户名和密码。
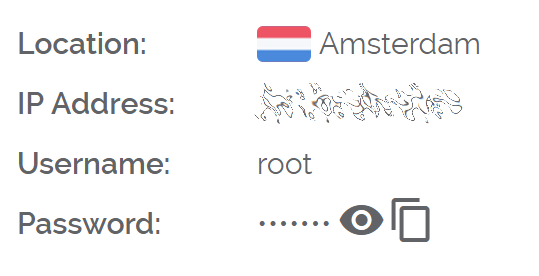
Vultr服务器管理屏幕
设置您的操作系统
我们将从连接到您新提供的服务器开始。在Windows上,我们将首先下载一个名为PuTTY的应用程序来连接到服务器。转到PuTTY下载页面并为您的系统选择适当的MSI安装程序。在Mac或Linux上,您可以直接从终端中 -只需键入ssh root@<server_ip> ,然后在提示时输入密码。
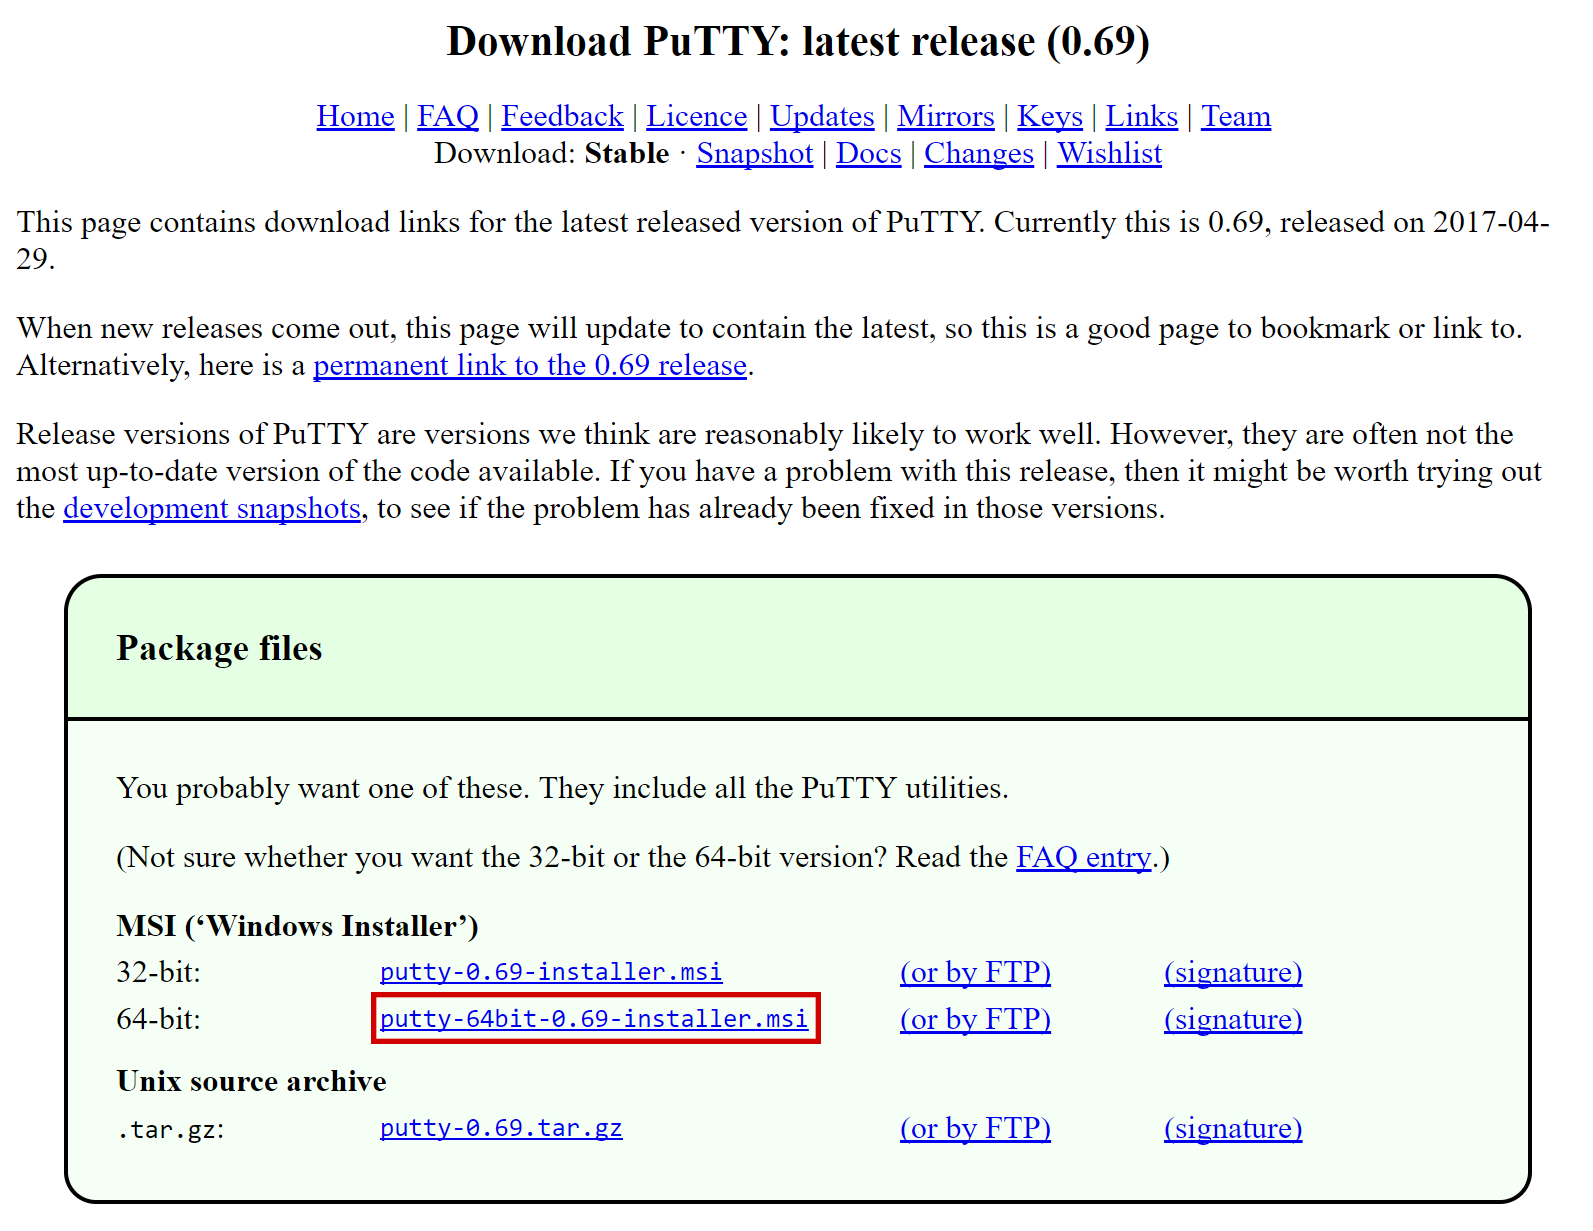
PuTTY下载页面
双击下载的文件安装PuTTY,然后从您的开始菜单中运行该应用程序。在主机名字段中输入服务器的IP地址,然后单击打开。您可能会看到证书警告,因为这是您第一次连接到此服务器。之后您可以安全地单击是来信任服务器。
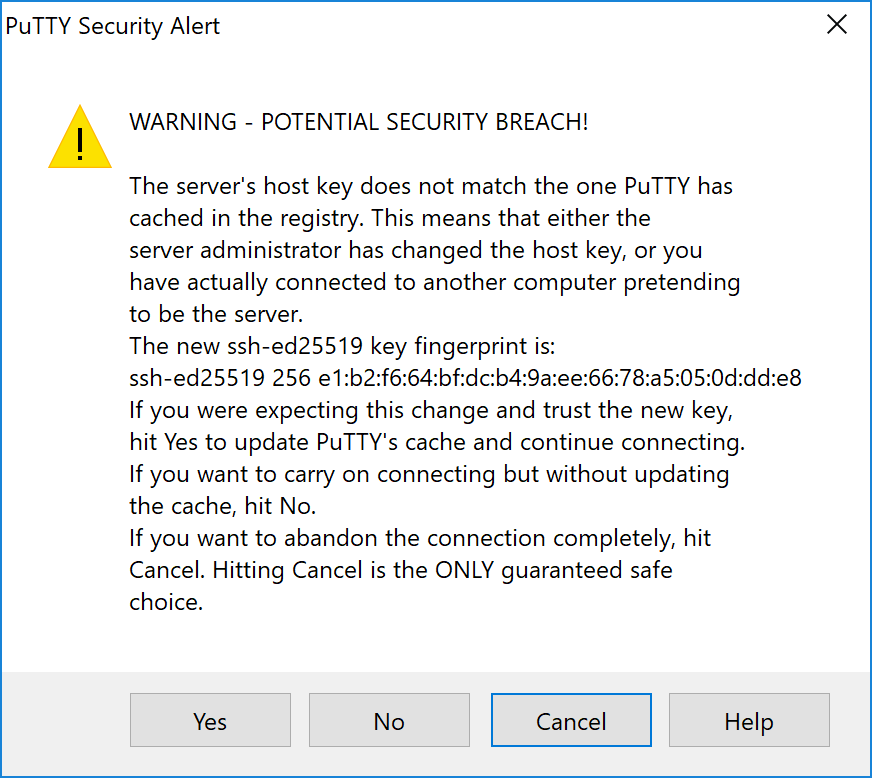
连接到新服务器时的PuTTY安全警告
您现在已连接到您的服务器,并且应该会看到一个终端窗口。 首先,使用您的主机提供商提供的用户root和密码登录到您的服务器。
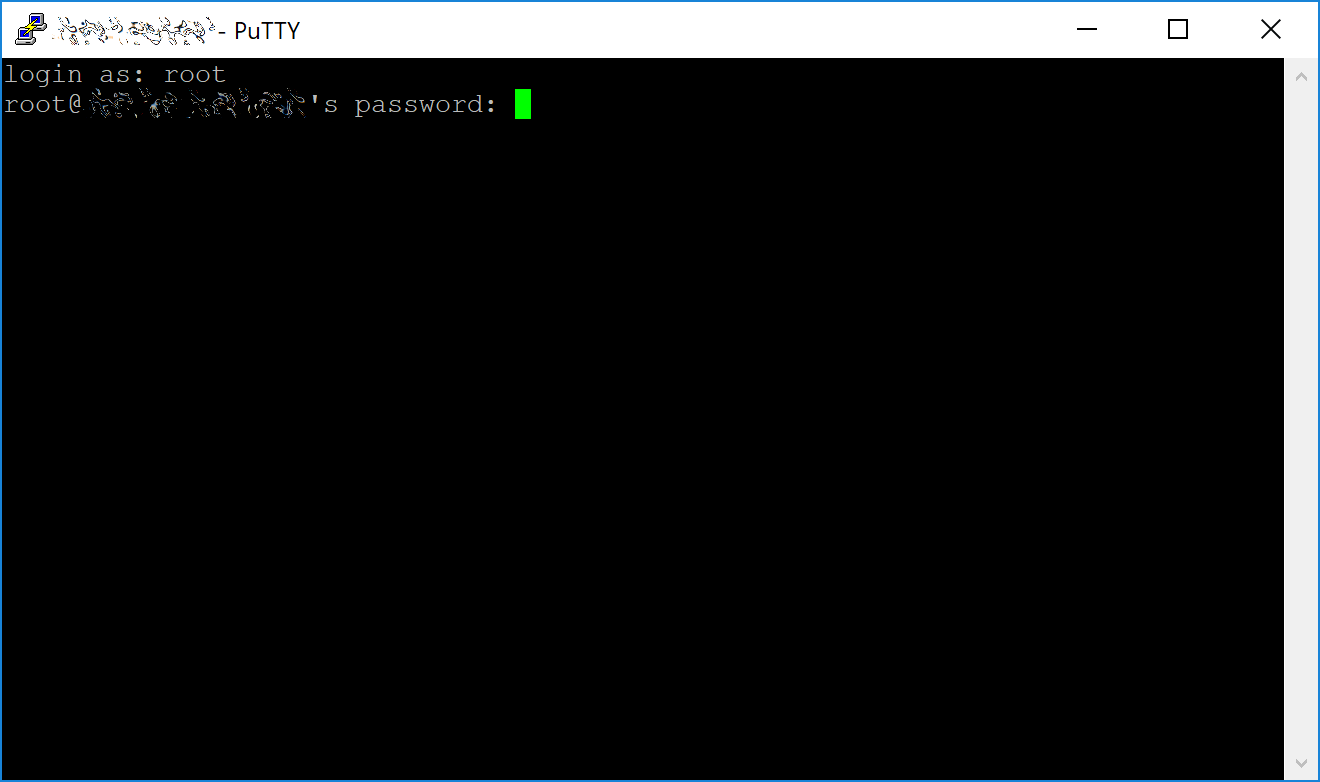
第一次连接到您的VPS时会遇到密码问题
为了确保安全,您应该立即更改root密码,并将其存储在安全的地方。您可以复制和粘贴以下任何命令,方法是在您的浏览器中选择这些命令,按下Ctrl + C,然后切换到PuTTY窗口,并在窗口中右键单击。文本将粘贴在当前光标位置:
passwd root
输入并确认一个新密码(最好是长的和随机生成的)。接下来,我们将使用以下命令,将<username>替换为您喜欢的用户名来创建一个新用户:
adduser <username>
您将被提示输入密码。输入并确认使用新密码(与您的root密码不同),并将其存储在安全的地方。您还将看到有关用户信息的提示,但可以将其保留为空白。一旦创建了用户,我们将把它们添加到sudo组中,这样它们就能以root用户的身份执行命令:
usermod -aG sudo <username>
现在,在仍是root用户时,我们将从Ubuntu软件包存储库更新系统:
apt update
apt upgrade
系统将显示可升级软件包的列表。按Y和Enter来安装软件包。现在我们将安装防火墙(以及稍后使用的其他软件包),添加交换内存和重新启动服务器以应用任何必要的内核更新,然后以新用户的身份登录到我们新的安全环境:
apt install ufw python virtualenv git unzip pv
(按Y和Enter以确认)
ufw allow ssh/tcp
ufw limit ssh/tcp
ufw allow 9999/tcp
ufw logging on
ufw enable
(按Y和Enter以确认)
fallocate -l 4G /swapfile
chmod 600 /swapfile
mkswap /swapfile
swapon /swapfile
nano /etc/fstab
在文件末尾添加以下行(按tab键来分隔每个单词/数字),然后按Ctrl + X来关闭编辑器,再按Y和Enter保存该文件。
/swapfile none swap sw 0 0
最后,为了防止暴力密码黑客攻击,请打开SSH配置文件以禁用SSH上的root登录:
nano /etc/ssh/sshd_config
找到一行PermitRootLogin Yes,并将其设置为PermitRootLogin no。在此下面,添加一行内容为AllowUser <username>,将<username>替换为您在上面选择的用户名。按下Ctrl + X来关闭编辑器,然后按Y和Enter保存该文件。
然后重新启动服务器:
reboot now
当服务器重新启动时,PuTTY将断开连接。
While this setup includes basic steps to protect your server against attacks, much more can be done. In particular, authenticating with a public key instead of a username/password combination, installing fail2ban to block login brute force attacks and enabling automatic security updates is advisable. More tips are available here. However, since the masternode does not actually store the keys to any Dash, these steps are considered beyond the scope of this guide.
发送保证金
A Dash address with a single unspent transaction output (UTXO) of exactly 1000 DASH is required to operate a masternode. Once it has been sent, various keys regarding the transaction must be extracted for later entry in a configuration file and registration transaction as proof to write the configuration to the blockchain so the masternode can be included in the deterministic list. A masternode can be started from a hardware wallet or the official Dash Core wallet, although a hardware wallet is highly recommended to enhance security and protect yourself against hacking. This guide will describe the steps for both hardware wallets and Dash Core.
选项1:从硬件钱包发送
Set up your Trezor using the Trezor wallet at https://wallet.trezor.io/ and send a test transaction to verify that it is working properly. For help on this, see this guide - you may also choose to (carefully!) add a passphrase to your Trezor to further protect your collateral. Create a new account in your Trezor wallet by clicking Add account. Then click the Receive tab and send exactly 1000 DASH to the address displayed. If you are setting up multiple masternodes, send 1000 DASH to consecutive addresses within the same new account. You should see the transaction as soon as the first confirmation arrives, usually within a few minutes.
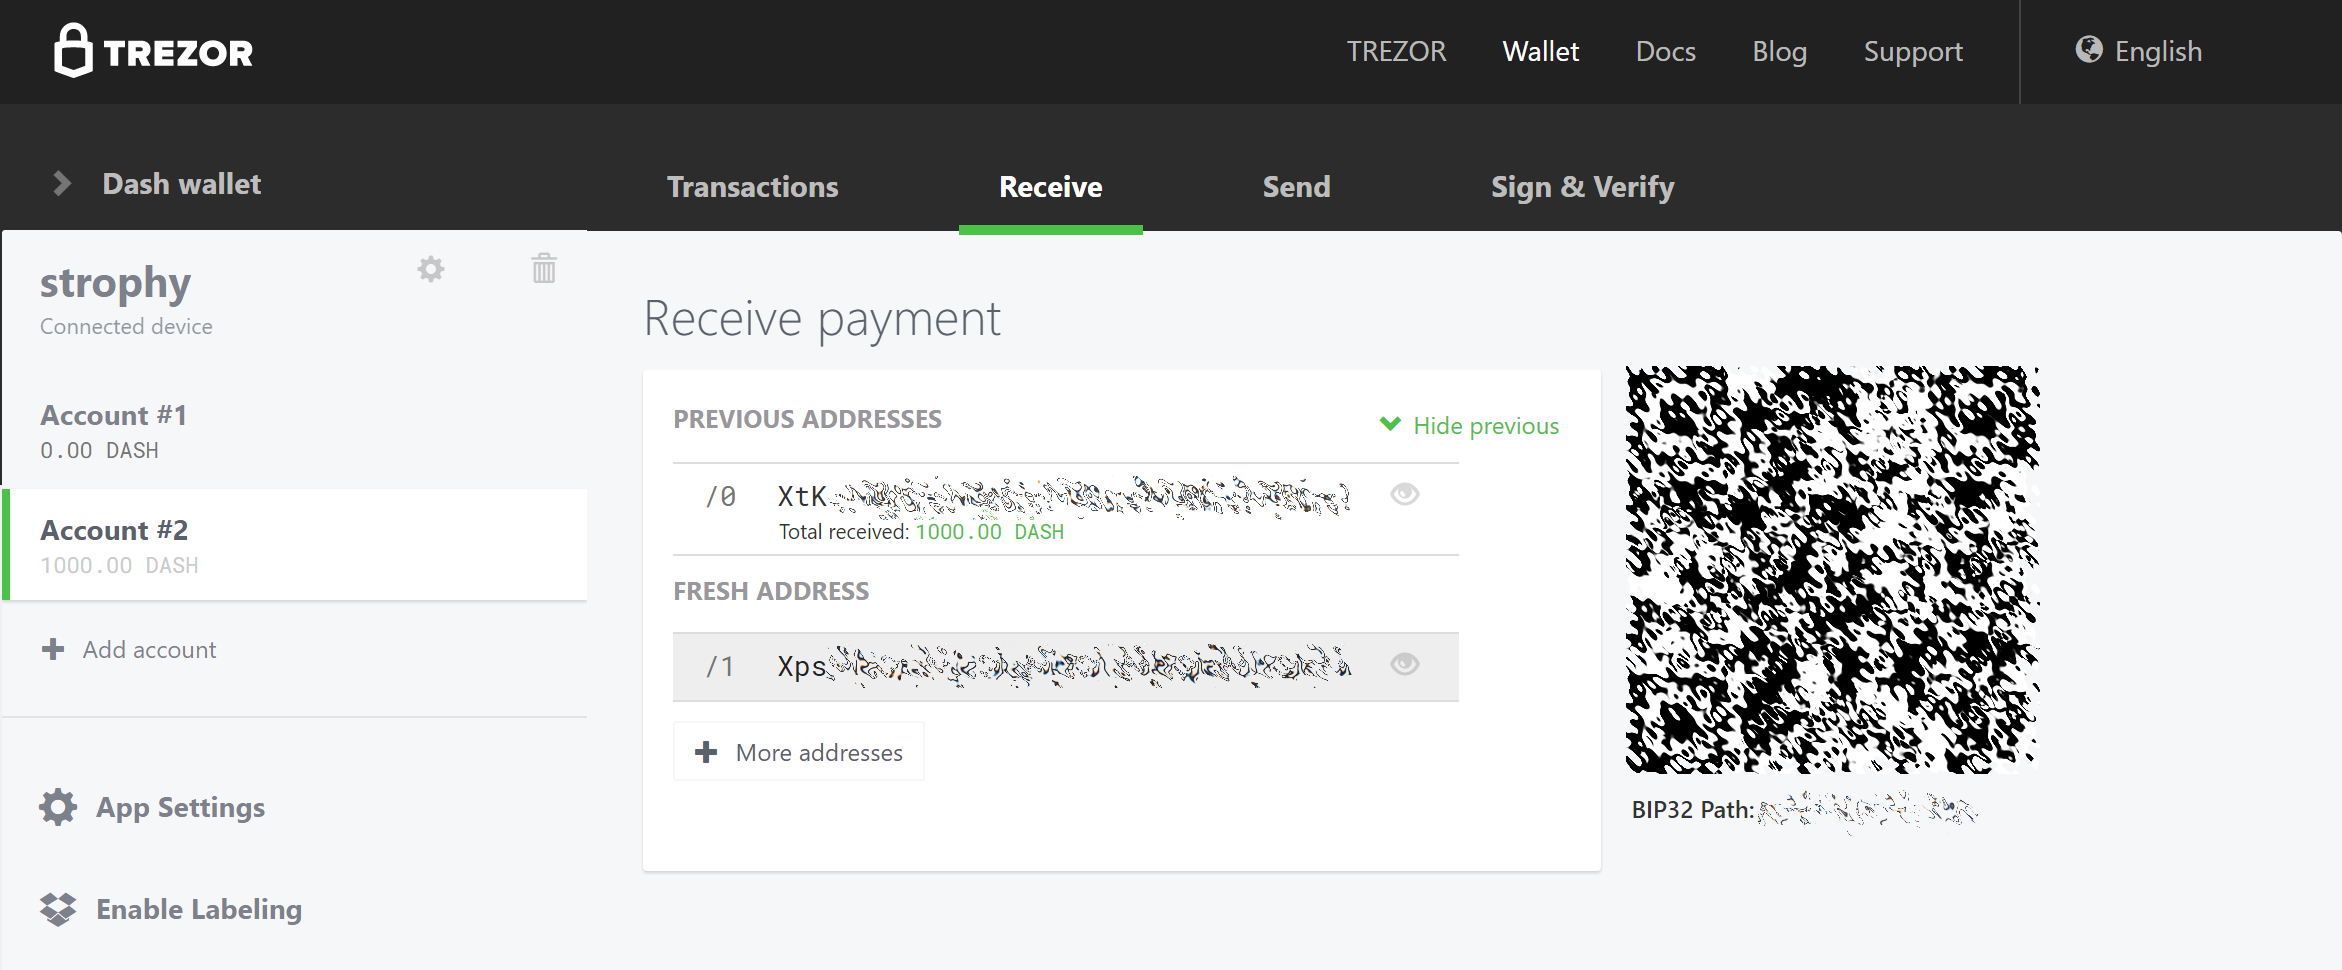
Trezor钱包接收选项卡显示成功接收到1000个达世币的保证金
交易出现后,单击右侧的QR代码,查看区块链上的交易。在我们完成以下步骤时,请保持此窗口打开,因为我们很快将需要确认是否存在如以下屏幕截图所示的15次确认。
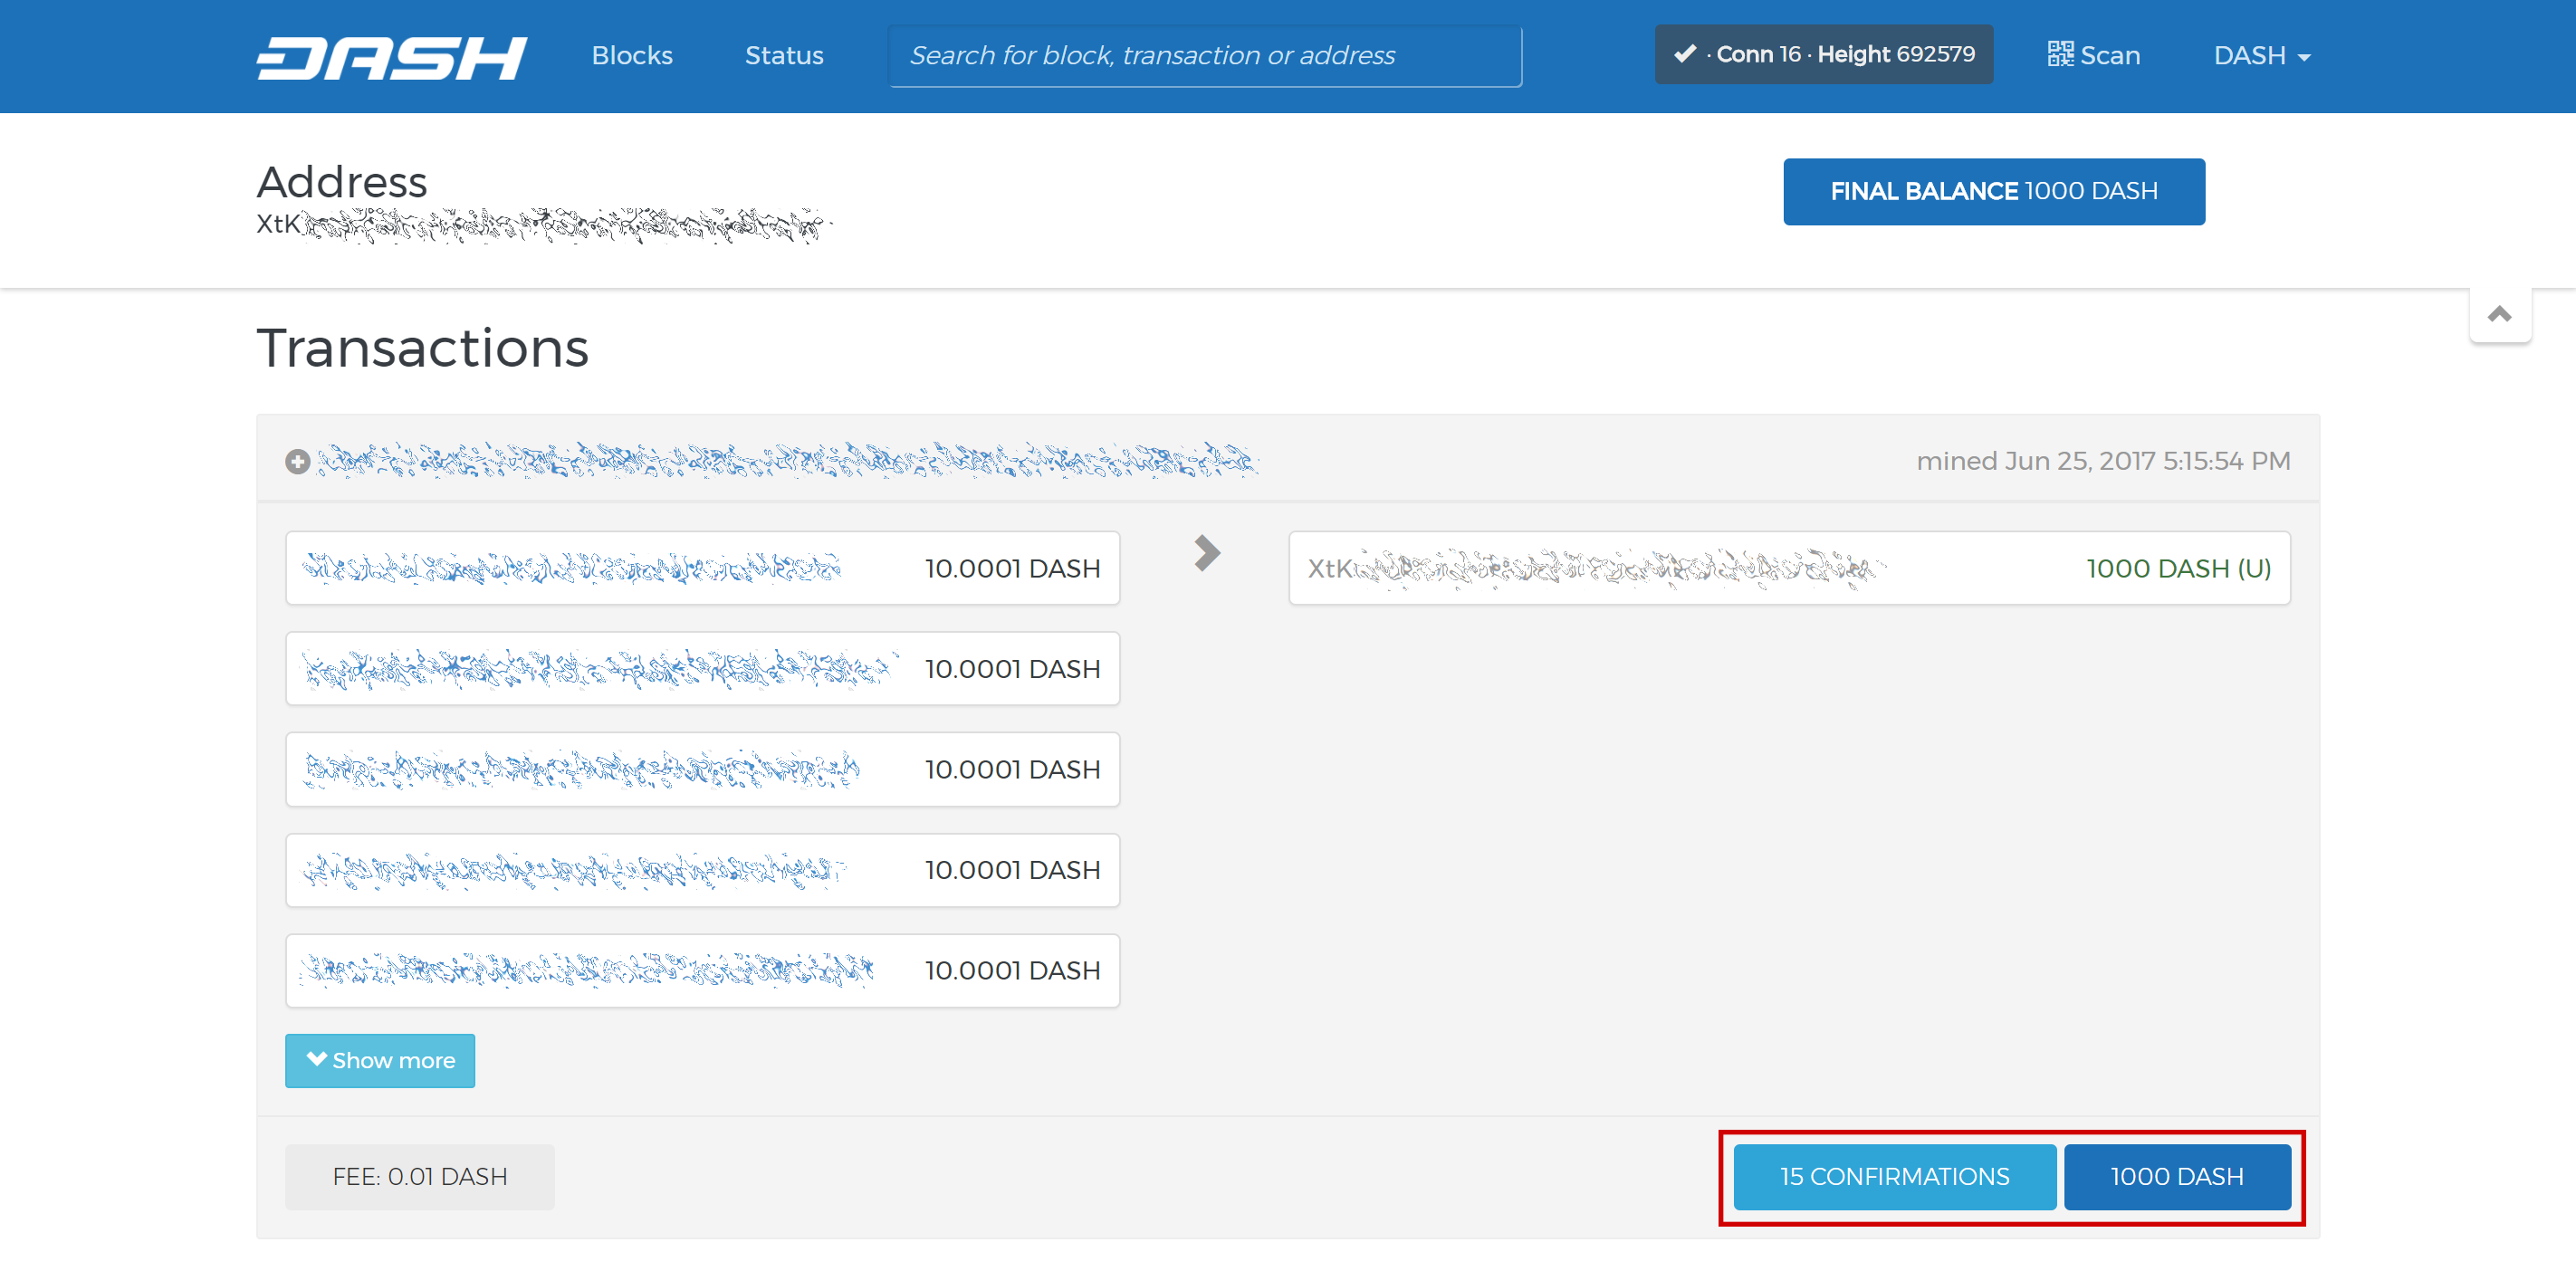
Trezor区块链浏览器为保证金转移显示了15次确认
在我们等待15次确认时,从GitHub发布页面下载达世币主节点工具(DMT)的最新版本。解压并运行该文件。以下窗口将出现。
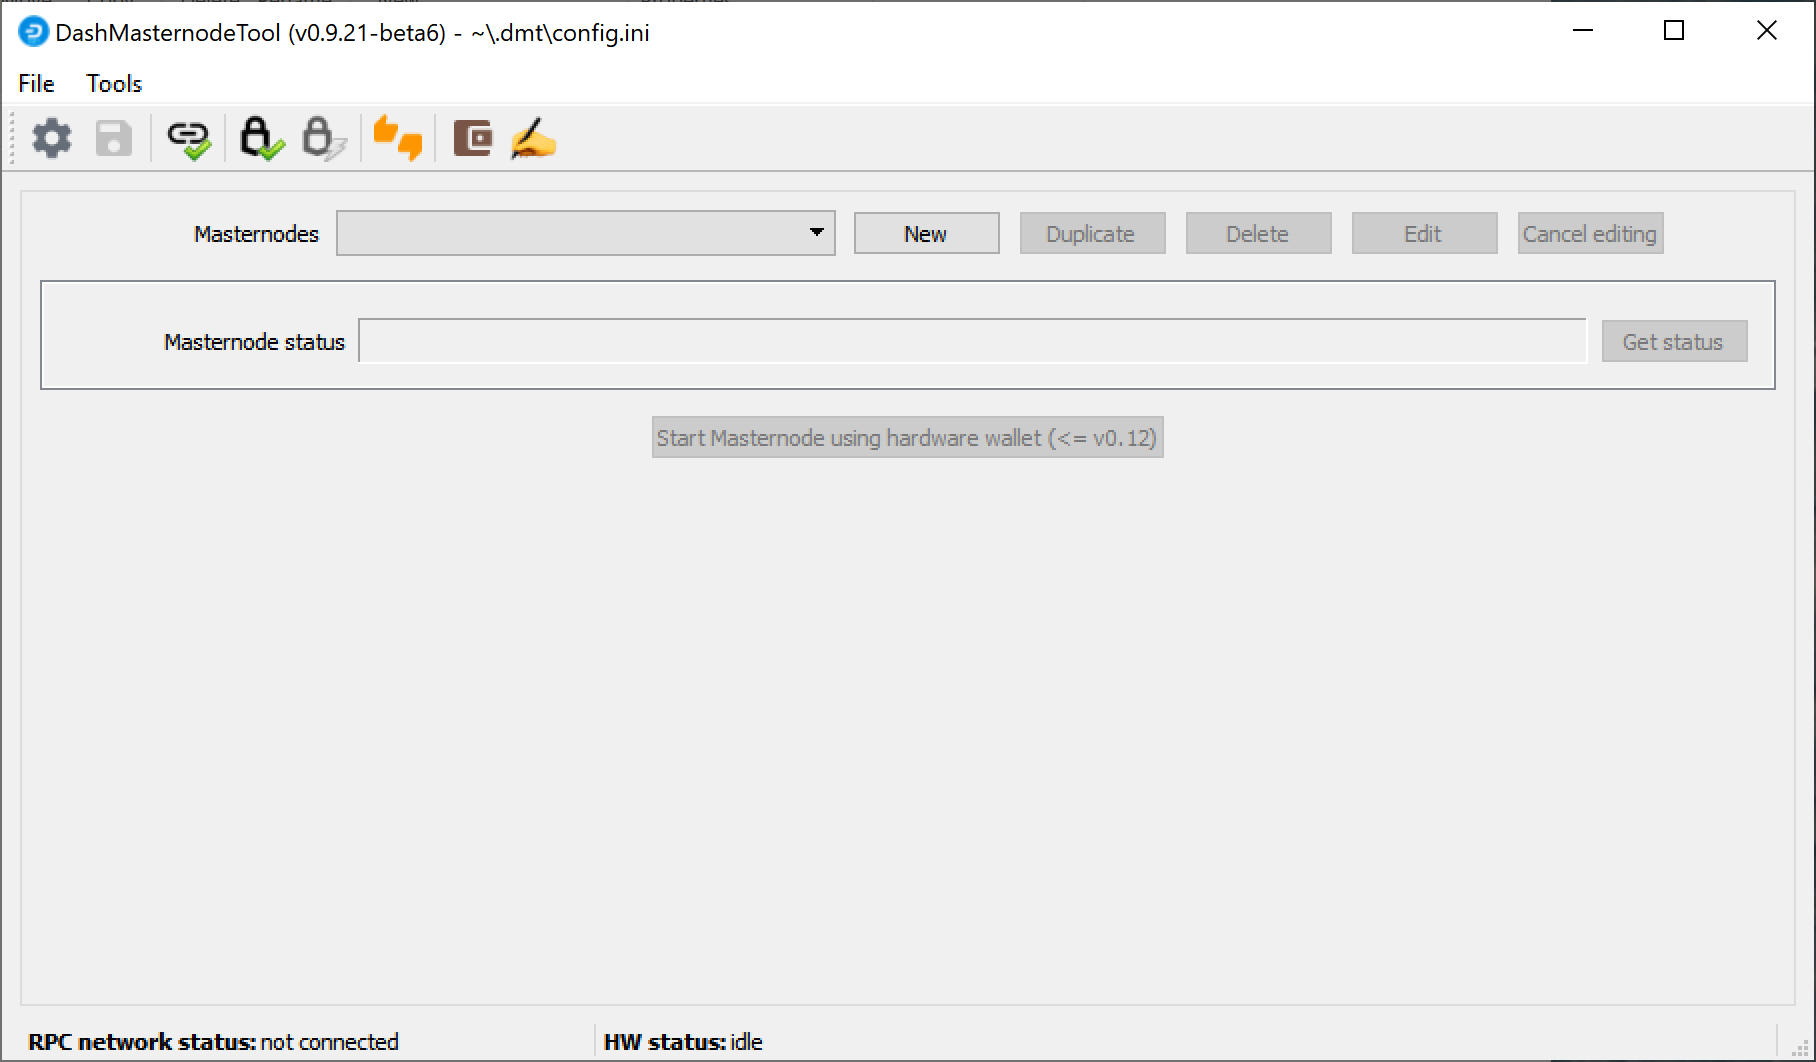
达世币主节点工具启动屏幕
Click the third button from the left Check Dash Network Connection in the top left corner of the main window to verify that the connection is working. Then connect your Trezor device and click the next button Test Hardware Wallet Connection to verify the Trezor connection is working.
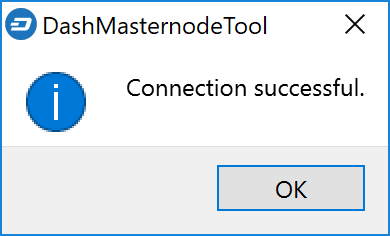
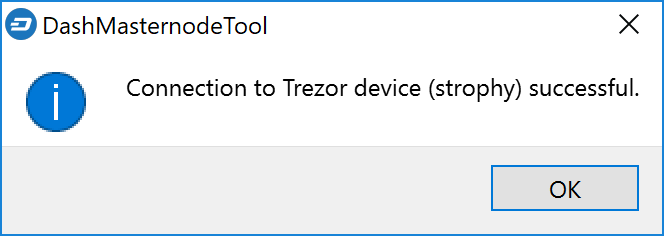
达世币主节点工具成功连接确认
We will now use DMT to extract the transaction ID and legacy masternode key (necessary for successful startup during the DIP003 transition period). Carry out the following sequence of steps as shown in this screenshot:
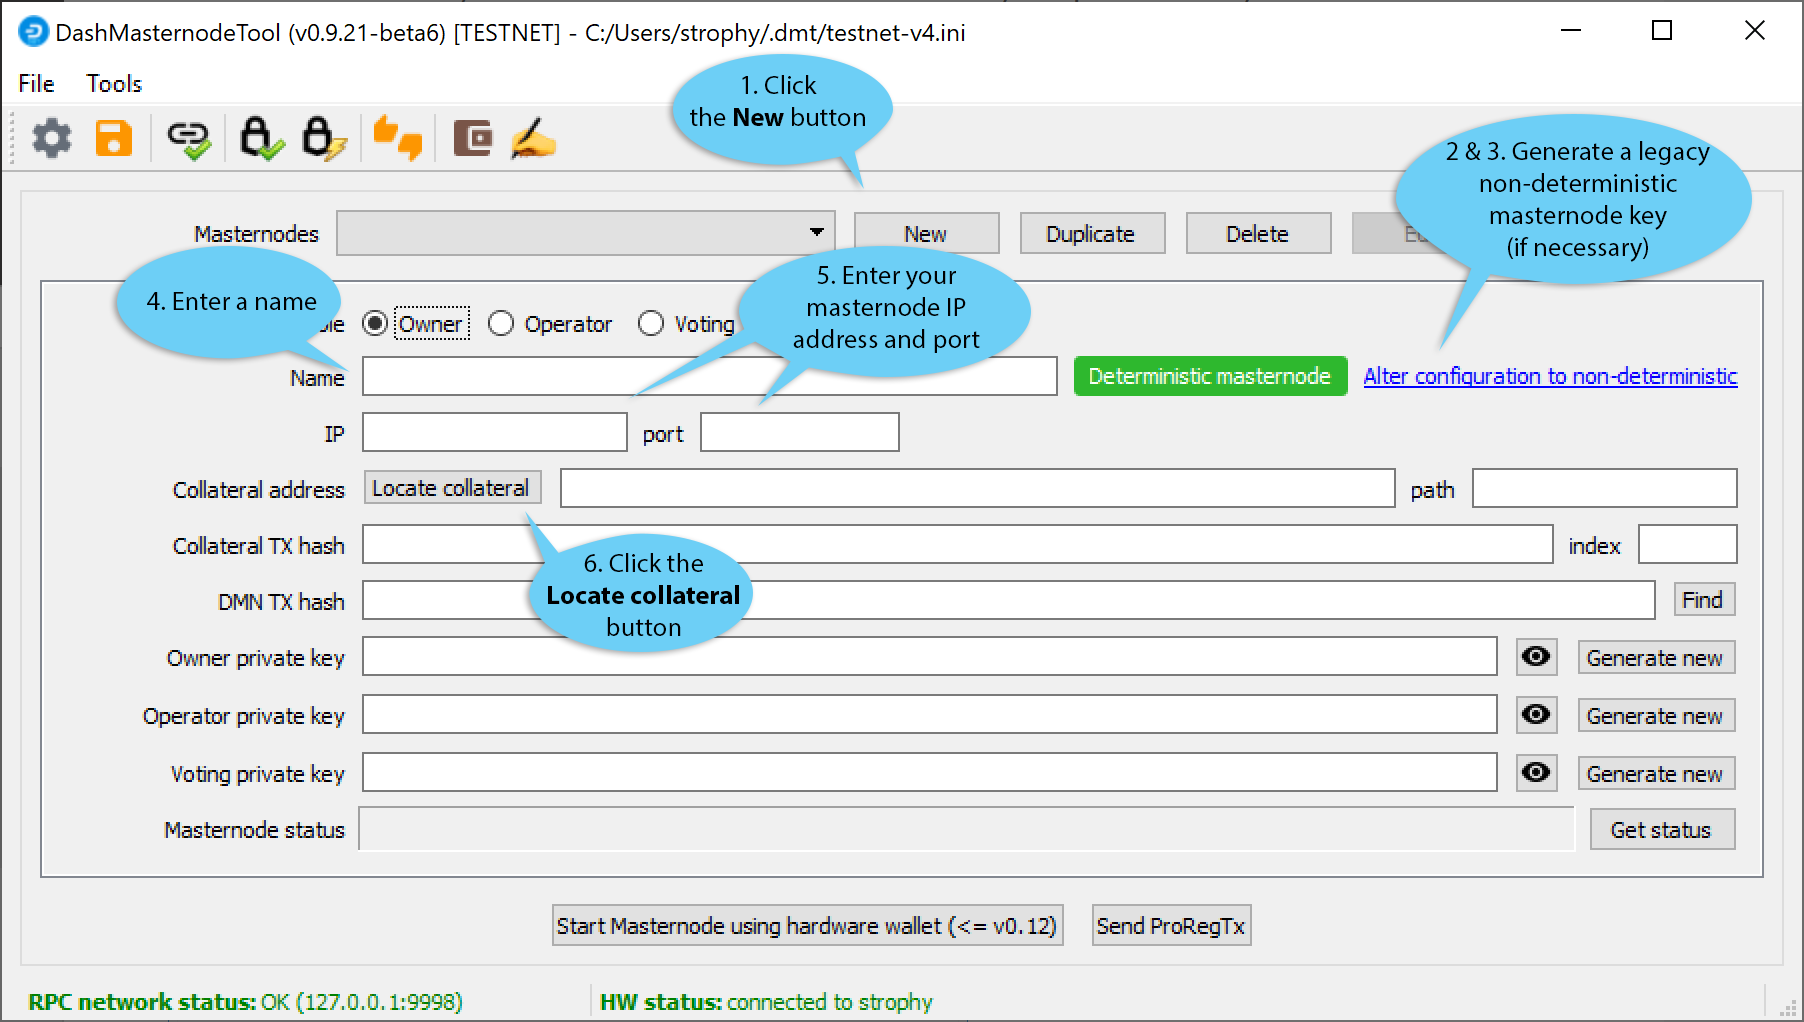
达世币工具配置步骤
- Click the New button.
- Ensure you are on the settings page for a Non-deterministic masternode and click Generate new to generate a legacy masternode key. Copy this key into a text editor.
- Click Alter configuration to deterministic
- Enter a name for your masternode. The host name you specified for your VPS above is a good choice.
- Enter the IP address of your masternode. This was given to you by the VPS provider when you set up the server.
- 输入TCP端口号。该端口号应该是9999。
- Click Locate collateral to view unused collateral funding transactions available on the connected hardware wallet. The Collateral address, index and Collateral TX hash fields should be filled automatically
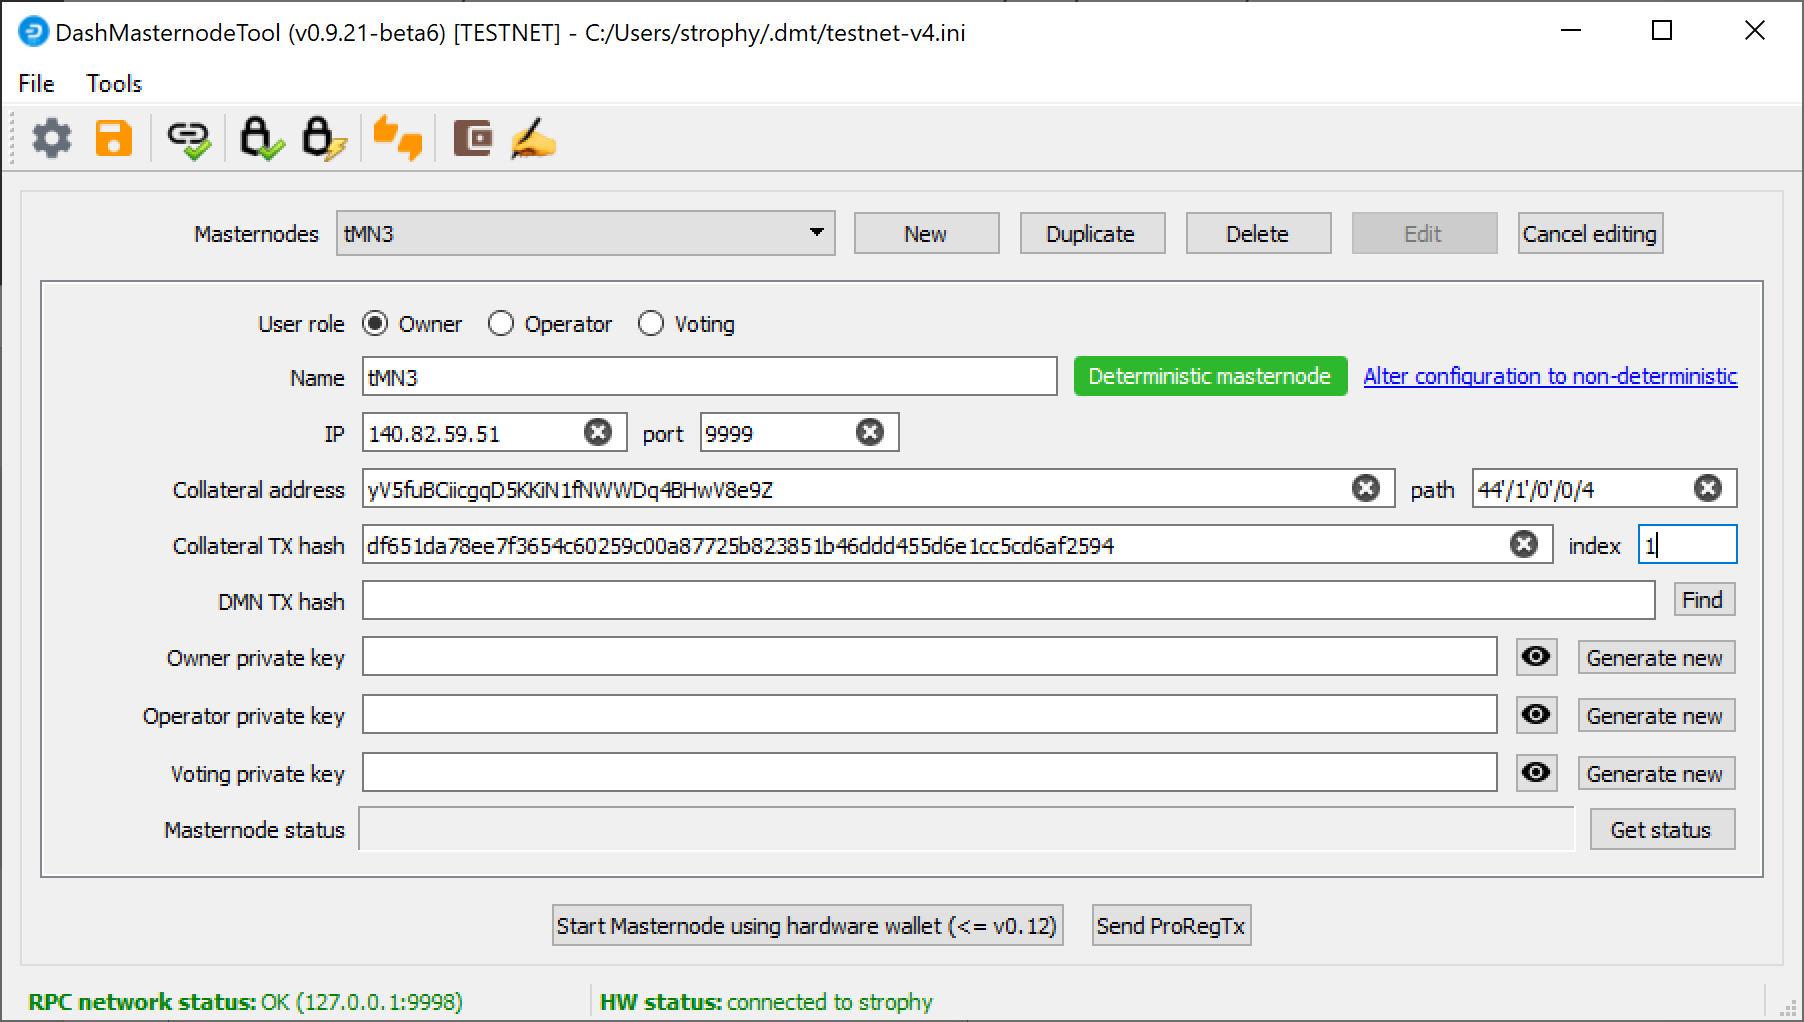
配置就绪的达世币主节点工具可以启动主节点
Leave DMT open and continue with the next step: installing Dash Core on your VPS.
选项2:从Dash Core钱包发送
打开Dash Core钱包,并等待它与网络同步。当Dash Core钱包准备好的时候应该是这样的:
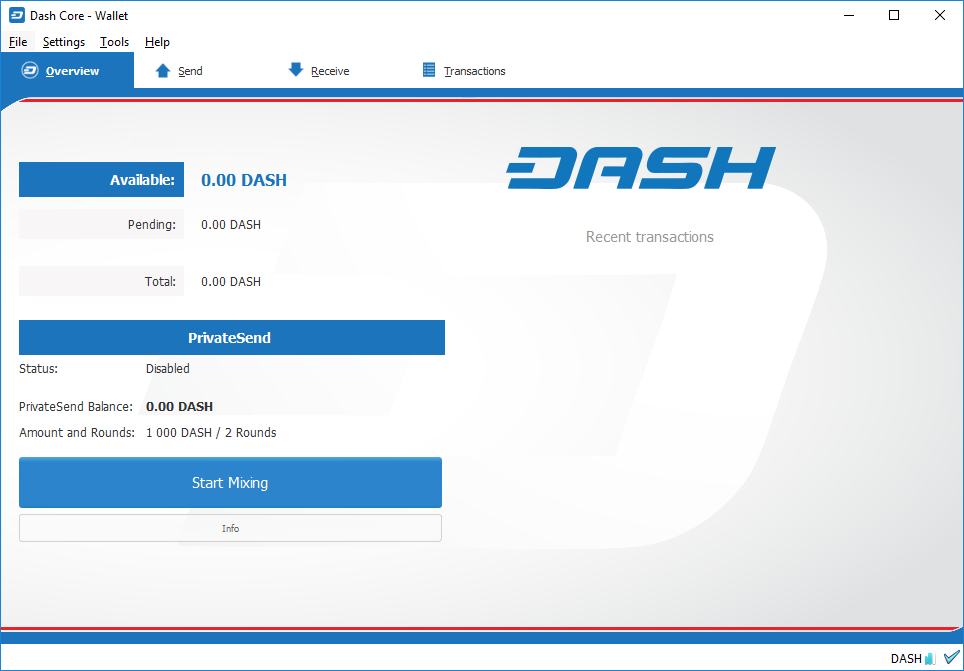
完全同步后的Dash Core钱包
Click Tools > Debug console to open the console. Type the following two commands into the console to generate a legacy masternode key (necessary for successful startup during the DIP003 transition period) and a new Dash address for the collateral:
masternode genkey
93PAqQsDjcVdYJHRfQPjsSt5338GCswMnUaSxoCD8J6fiLk4NHL

getnewaddress
yiFfzbwiN9oneftd7cEfr3kQLRwQ4kp7ue
Take note of the legacy masternode private key and collateral address, since we will need it later. The next step is to secure your wallet (if you have not already done so). First, encrypt the wallet by selecting Settings > Encrypt wallet. You should use a strong, new password that you have never used somewhere else. Take note of your password and store it somewhere safe or you will be permanently locked out of your wallet and lose access to your funds. Next, back up your wallet file by selecting File > Backup Wallet. Save the file to a secure location physically separate to your computer, since this will be the only way you can access our funds if anything happens to your computer. For more details on these steps, see here.
Now send exactly 1000 DASH in a single transaction to the new address you generated in the previous step. This may be sent from another wallet, or from funds already held in your current wallet. Once the transaction is complete, view the transaction in a blockchain explorer by searching for the address. You will need 15 confirmations before you can start the masternode, but you can continue with the next step at this point already: installing Dash Core on your VPS.
Trezor区块链浏览器为保证金转移显示了15次确认
安装Dash Core
Dash Core是Dash Core GUI钱包和达世币主节点工具后的软件。如果不显示GUI,它将在您的VPS上作为守护进程运行(dashd),由一个简单的命令接口(dash-cli)控制。
再次打开PuTTY或控制台,并使用您刚刚为您的新的、non-root用户创建的用户名和密码进行连接。有两种选项可以安装Dash Core,一种是使用脚本实用工具的自动选项,它被Dash Core团队成员moocowmoo称为dashman,另一种选项更复杂,该选项将允许您理解在准备您的主节点过程中所涉及的所有关键步骤。
选项1:使用dashman自动安装
若要使用dashman安装Dash,请在登录后输入以下命令:
cd ~
git clone https://github.com/moocowmoo/dashman
~/dashman/dashman install
(按Y和Enter以确认)
dashman will download the latest version of Dash Core for your system, as well as an initial snapshot of the blockchain to speed up the bootstrapping process. Next download and install Sentinel, which is required for masternodes at version 0.12.1 or higher:
~/dashman/dashman install sentinel
Your system is now running as a standard Dash node, and is busy completing synchronisation with the blockchain. Since dashman does not automatically restart your masternode in the event of a system error, add a check function to crontab to make sure it checks every minute to ensure your masternode is still running:
crontab -e
选择nano作为编辑器,并在 sentinel行后面的文件末尾输入以下行:
* * * * * pidof dashd || ~/.dashcore/dashd
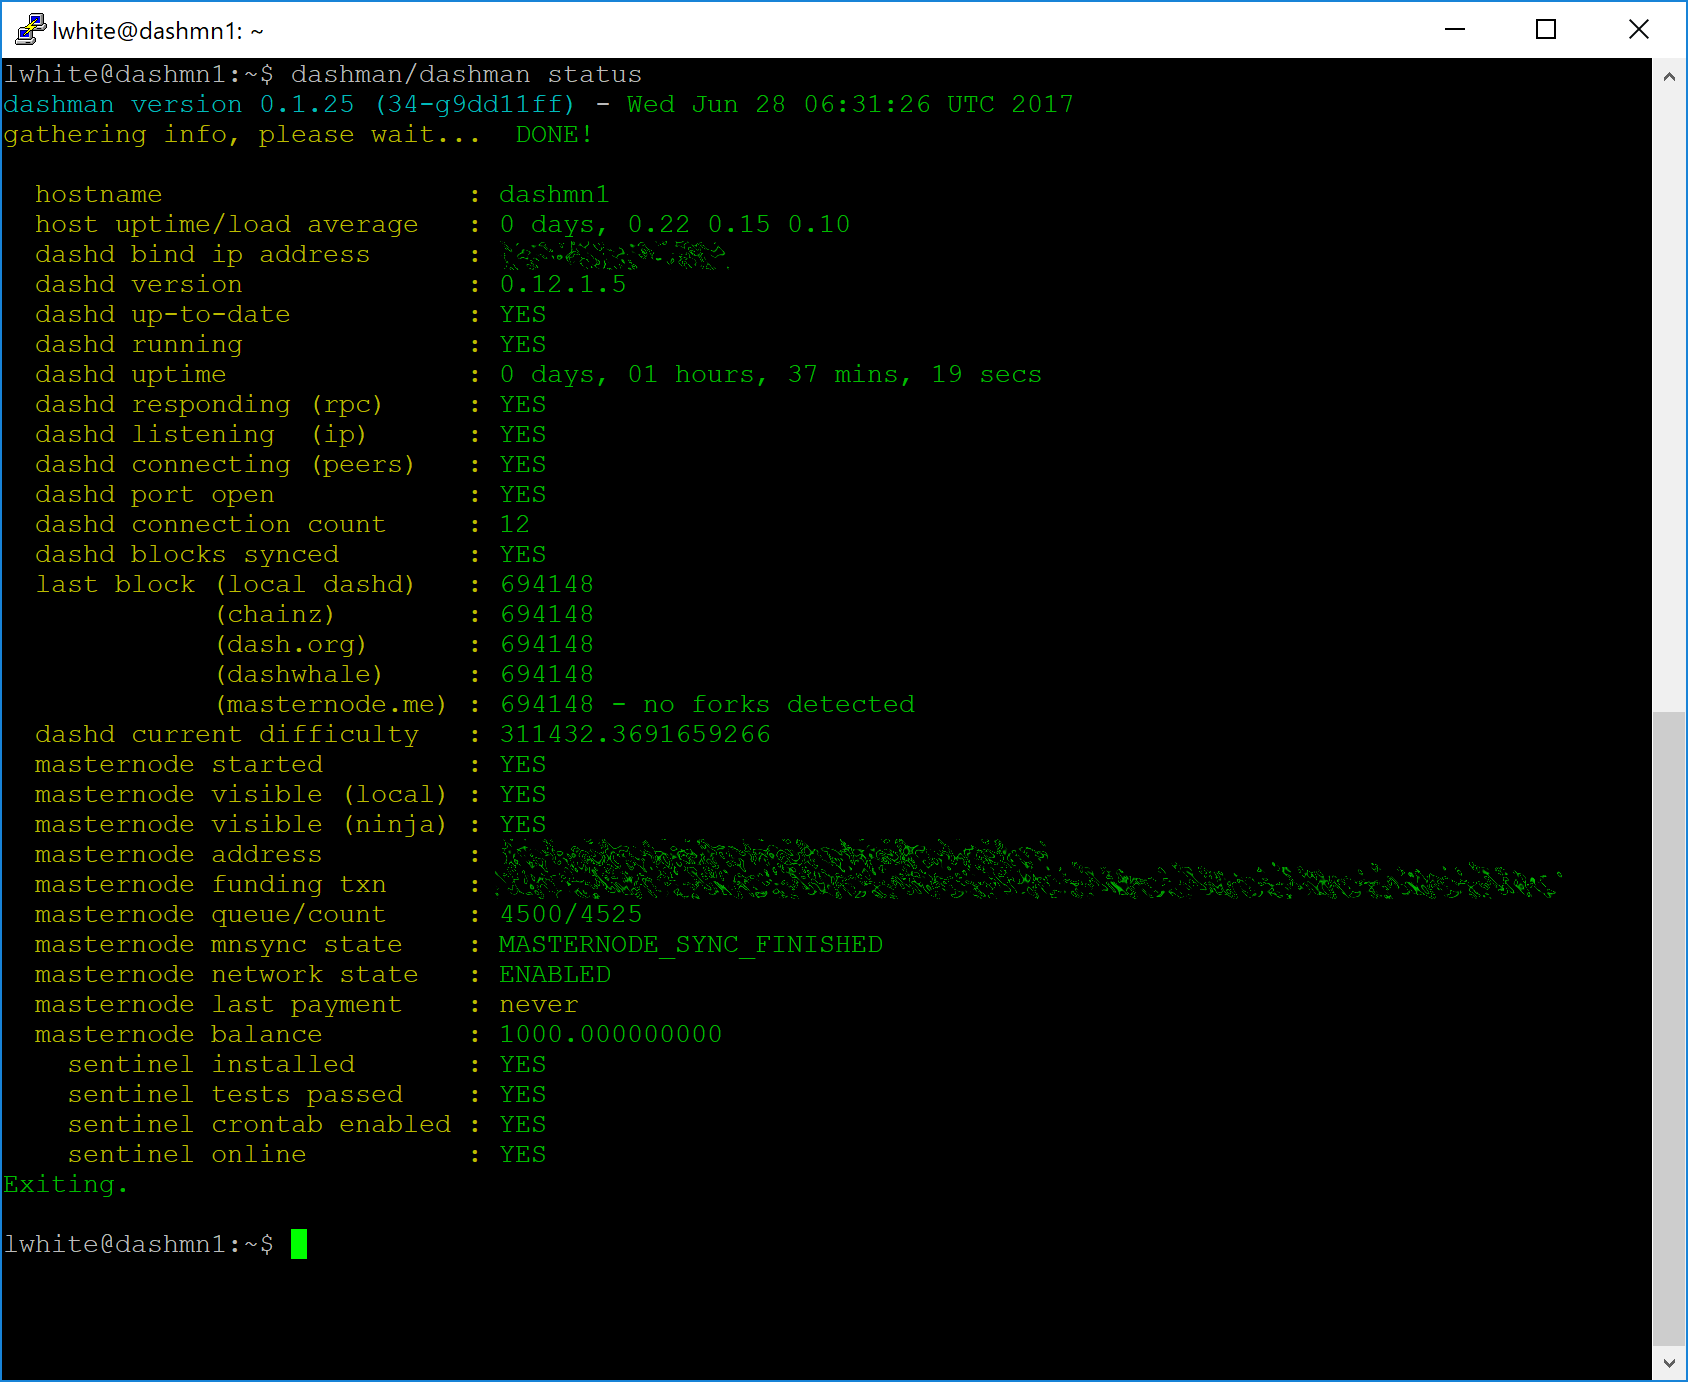
Press enter to make sure there is a blank line at the end of the file, then press Ctrl + X to close the editor and Y and Enter save the file. Check the sync status and wait until all blockchain synchronisation and the 15 confirmations for the collateral transaction are complete:
~/dashman/dashman status
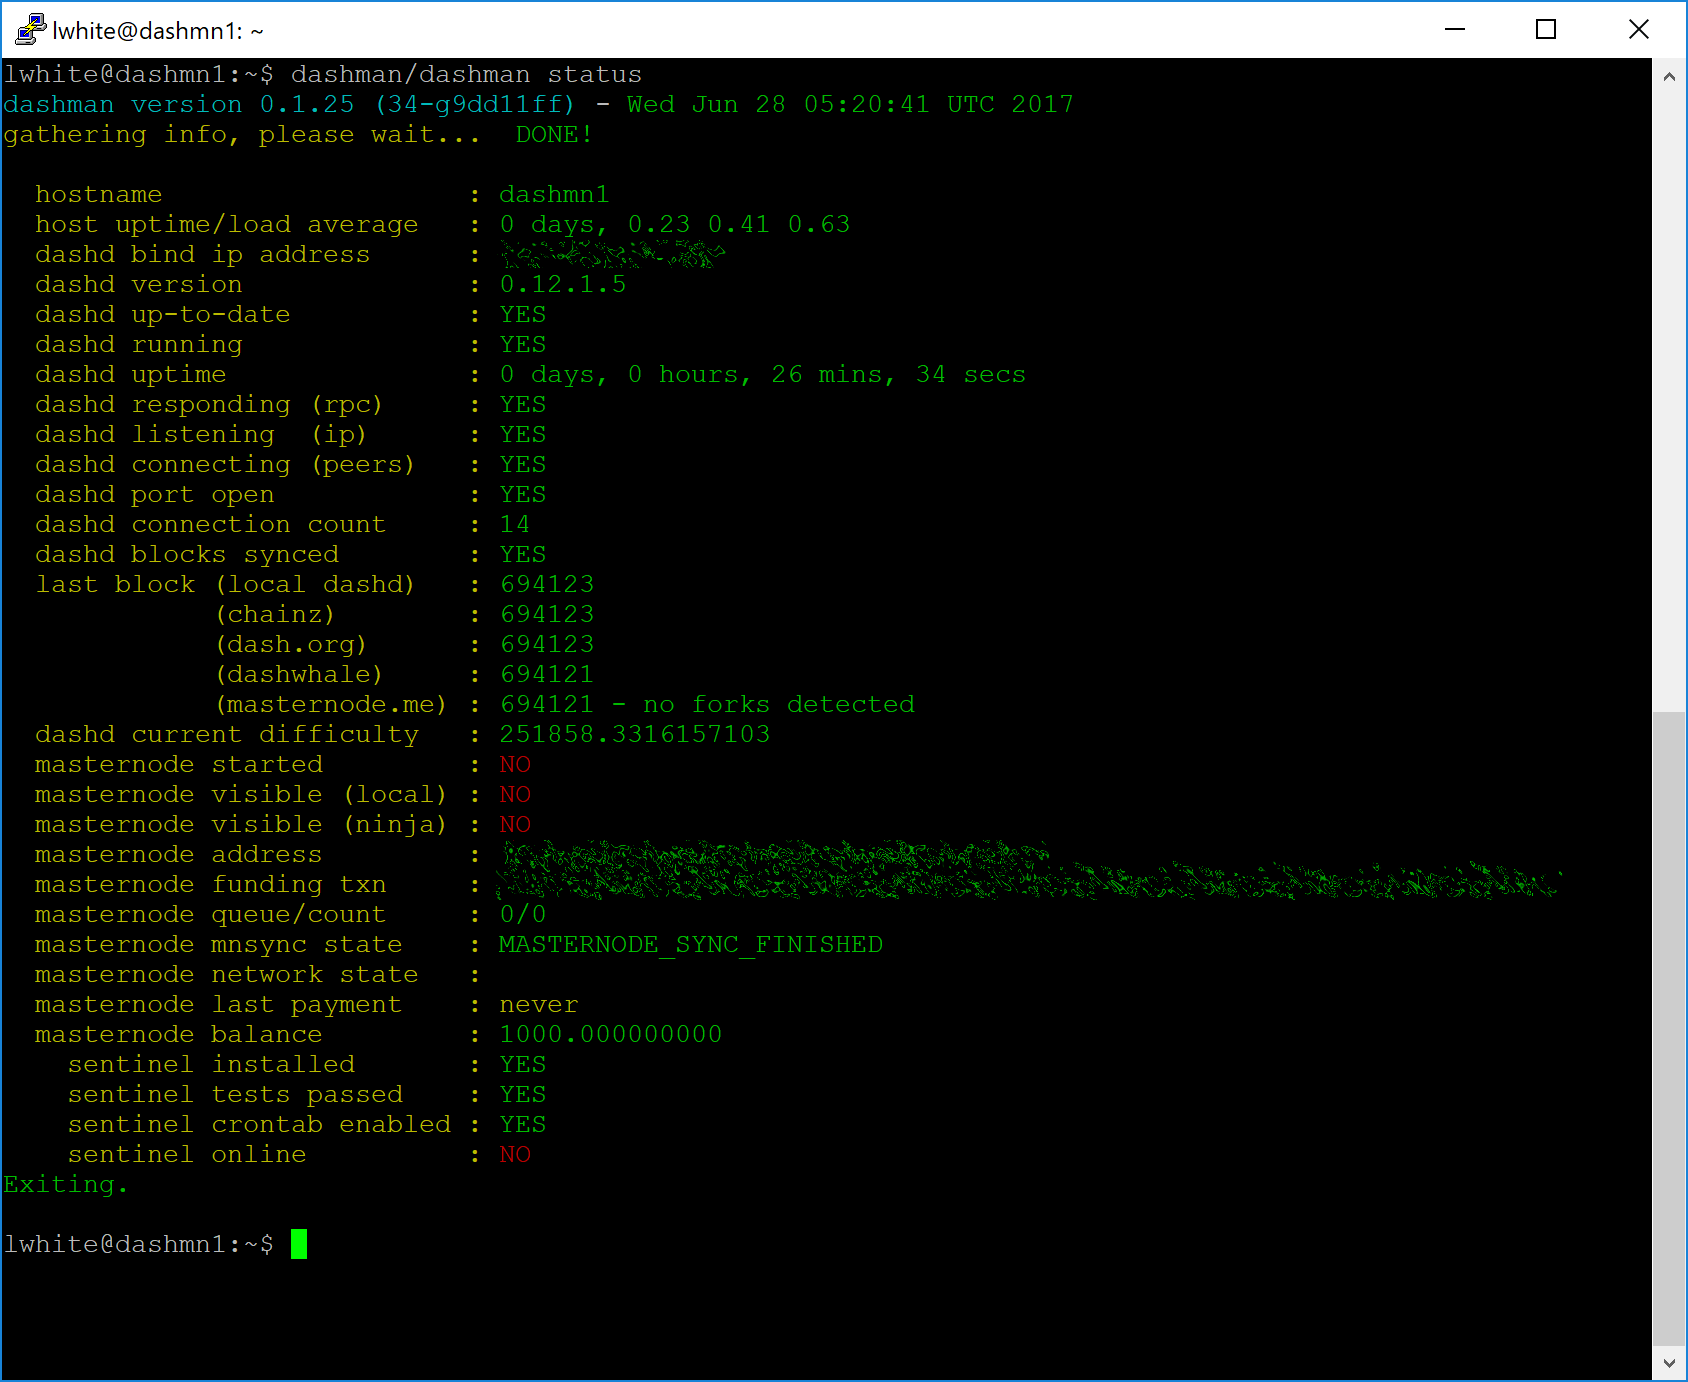
Dashman状态输出显示即将被启动的主节点
Continue with the next step to register your masternode.
选项2:手动安装
To manually download and install the components of your Dash masternode,
visit the GitHub releases page
and copy the link to the latest x86_64-linux-gnu version. Go back to
your terminal window and enter the following command, pasting in the
address to the latest version of Dash Core by right clicking or pressing
Ctrl + V:
cd /tmp
wget https://github.com/dashpay/dash/releases/download/v0.13.0.0-rc10/dashcore-0.13.0.0-rc10-x86_64-linux-gnu.tar.gz
Verify the integrity of your download by running the following command
and comparing the output against the value for the file as shown in the
SHA256SUMS.asc file:
wget https://github.com/dashpay/dash/releases/download/v0.13.0.0-rc10/SHA256SUMS.asc
sha256sum dashcore-0.13.0.0-rc10-x86_64-linux-gnu.tar.gz
cat SHA256SUMS.asc
您还可以选择验证您的下载作为Dash Core团队发布官方版本的真实性。所有达世币版本的发布都由UdjinM6使用GPG签署,密钥为8359 2BD1 400D 58D9,可以在这里Keybase验证。按如下所示导入密钥,下载达世币当前版本的ASC文件并验证签名:
curl https://keybase.io/udjinm6/pgp_keys.asc | gpg --import
gpg --verify SHA256SUMS.asc
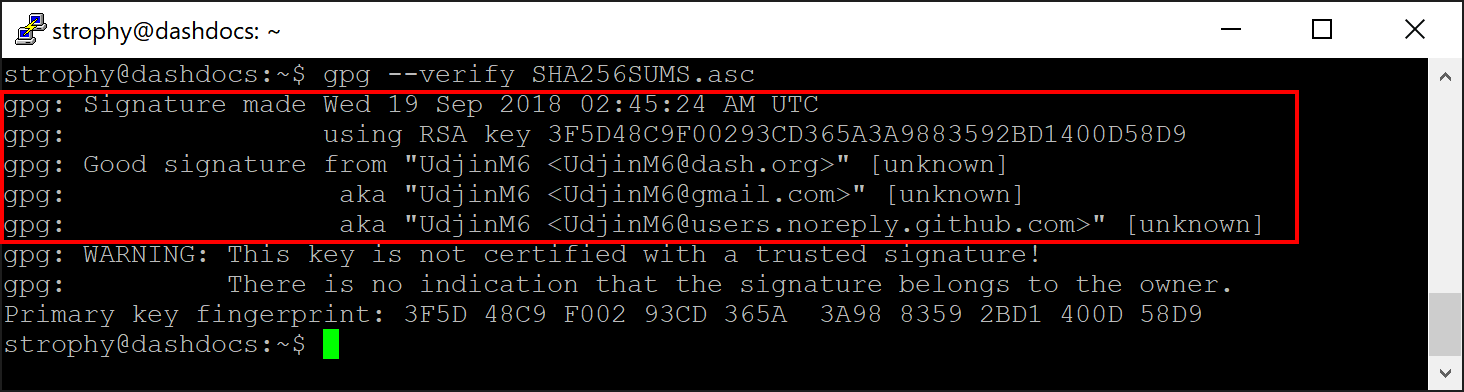
下载PGP密钥并验证已签名的二进制文件
Create a working directory for Dash, extract the compressed archive and copy the necessary files to the directory:
mkdir ~/.dashcore
tar xfv dashcore-0.13.0.0-rc10-x86_64-linux-gnu.tar.gz
cp -f dashcore-0.13.0/bin/dashd ~/.dashcore/
cp -f dashcore-0.13.0/bin/dash-cli ~/.dashcore/
使用以下命令创建配置文件:
nano ~/.dashcore/dash.conf
一个编辑器窗口将会出现。现在我们需要指定几个变量来创建一个配置文件。复制并粘贴以下文本以开始创建,然后按如下所示替换您配置中的具体变量:
#----
rpcuser=XXXXXXXXXXXXX
rpcpassword=XXXXXXXXXXXXXXXXXXXXXXXXXXXX
rpcallowip=127.0.0.1
#----
listen=1
server=1
daemon=1
maxconnections=64
#----
masternode=1
masternodeprivkey=XXXXXXXXXXXXXXXXXXXXXXX
externalip=XXX.XXX.XXX.XXX
#----
按如下所示替换标记为XXXXXXX的字段:
rpcuser:输入任何数字或字母字符串,不允许有特殊字符rpcpassword:输入任何数字或字母字符串,不允许有特殊字符masternodeprivkey: this is the legacy masternode private key you generated in the previous stepexternalip:这是您VPS的IP地址
结果应该是这样的:
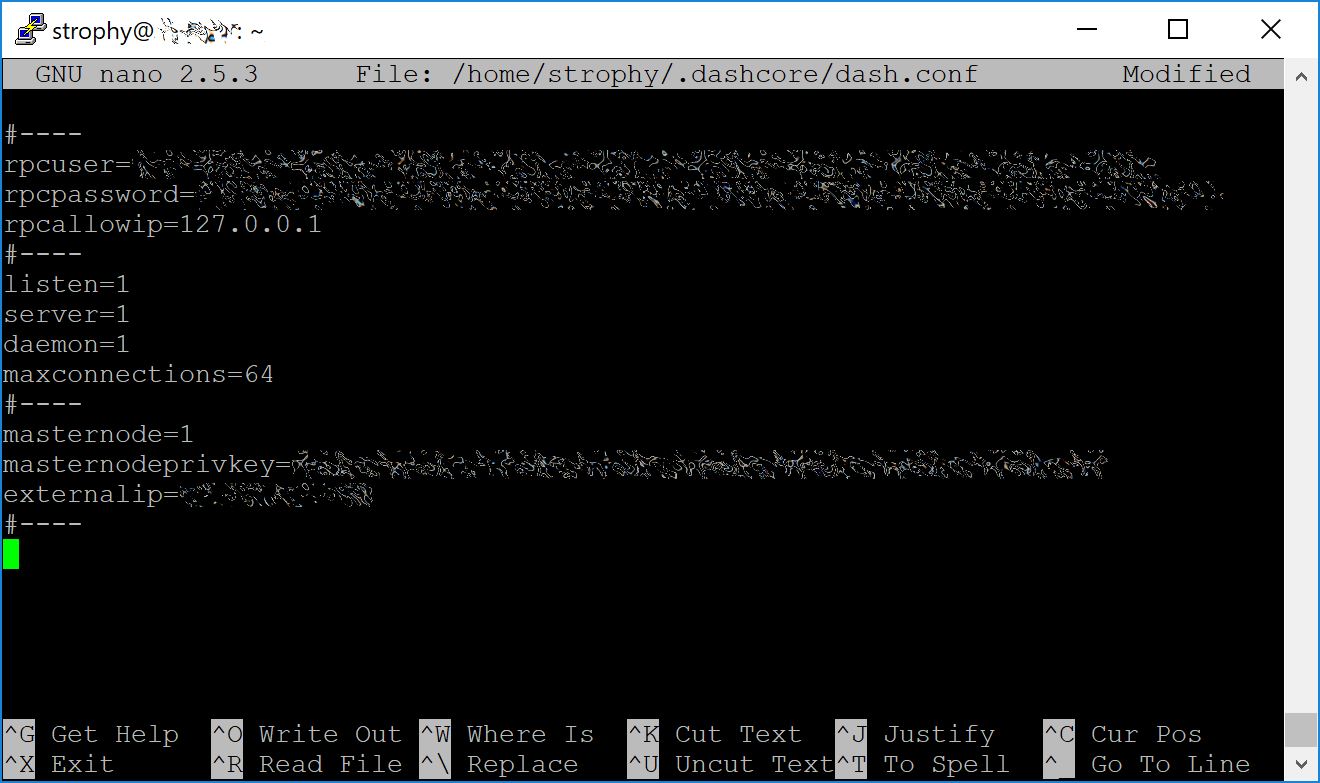
在主节点上的dash.conf中输入主要数据
按Ctrl + X以关闭编辑器,并按Y和Enter保存该文件。您现在可以开始在主节点上运行达世币,以便开始与区块链同步:
~/.dashcore/dashd
您将看到一条显示Dash Core server starting的消息。我们现在将安装Sentinel,这是一个以看门狗的方式运行的软件,以和网络进行通信,从而说明您的节点正在正常工作:
cd ~/.dashcore
git clone https://github.com/dashpay/sentinel.git
cd sentinel
virtualenv venv
venv/bin/pip install -r requirements.txt
venv/bin/python bin/sentinel.py
您将看到一条显示dashd not synced with network! Awaiting full sync before running Sentinel.的消息。将dashd和sentinel添加到crontab以确保它每分钟运行一次,来对您的主节点进行检查:
crontab -e
选择nano作为您的编辑器,并在文件末尾输入以下行:
* * * * * cd ~/.dashcore/sentinel && ./venv/bin/python bin/sentinel.py 2>&1 >> sentinel-cron.log
* * * * * pidof dashd || ~/.dashcore/dashd
按enter键以确保文件末尾有空行,然后按Ctrl + X关闭编辑器,并按Y和Enter保存该文件。现在,我们需要等待要完成的15次保证金交易的确认,并等待区块链在主节点上完成同步。您可以使用以下命令来监测进度:
~/.dashcore/dash-cli mnsync status
完成同步后,您应该看到以下响应:
{
 "AssetID": 999,
 "AssetName": "MASTERNODE_SYNC_FINISHED",
 "Attempt": 0,
 "IsBlockchainSynced": true,
 "IsMasternodeListSynced": true,
 "IsWinnersListSynced": true,
 "IsSynced": true,
 "IsFailed": false
}
Continue with the next step to construct the ProTx transaction required to enable your masternode.
Register your masternode
DIP003 introduces several changes to how a masternode is set up and operated. These are described briefly under DIP003 Masternode Changes in this documentation, or in full detail in DIP003 itself. It is highly recommended to first read at least the brief documentation before continuing in order to familiarize yourself with the new concepts in DIP003.
Option 1: Registering from a hardware wallet
Go back to DMT and ensure that all fields from the previous step are still filled out correctly. Click Generate new for the three private keys required for a DIP003 deterministic masternode:
- Owner private key
- Operator private key
- Voting private key
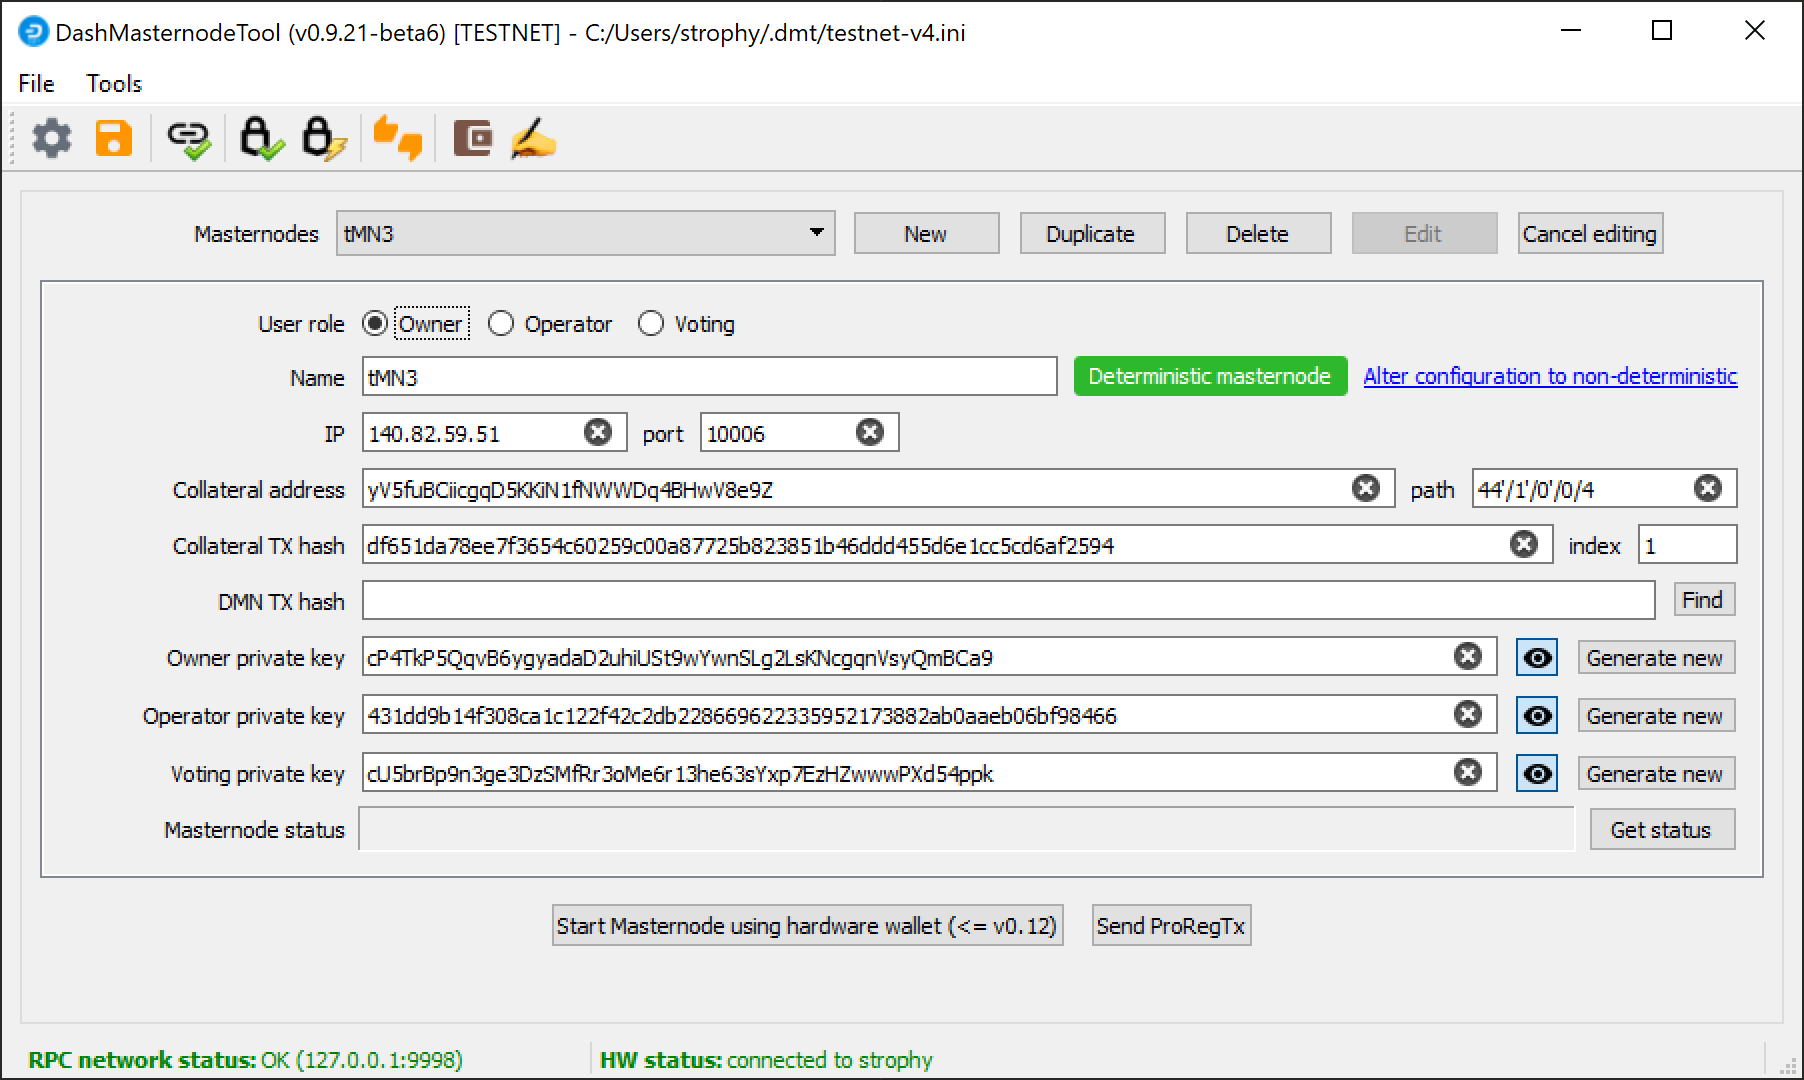
Dash Masternode Tool ready to register a new masternode
Then click Send ProRegTx and confirm the following two messages:

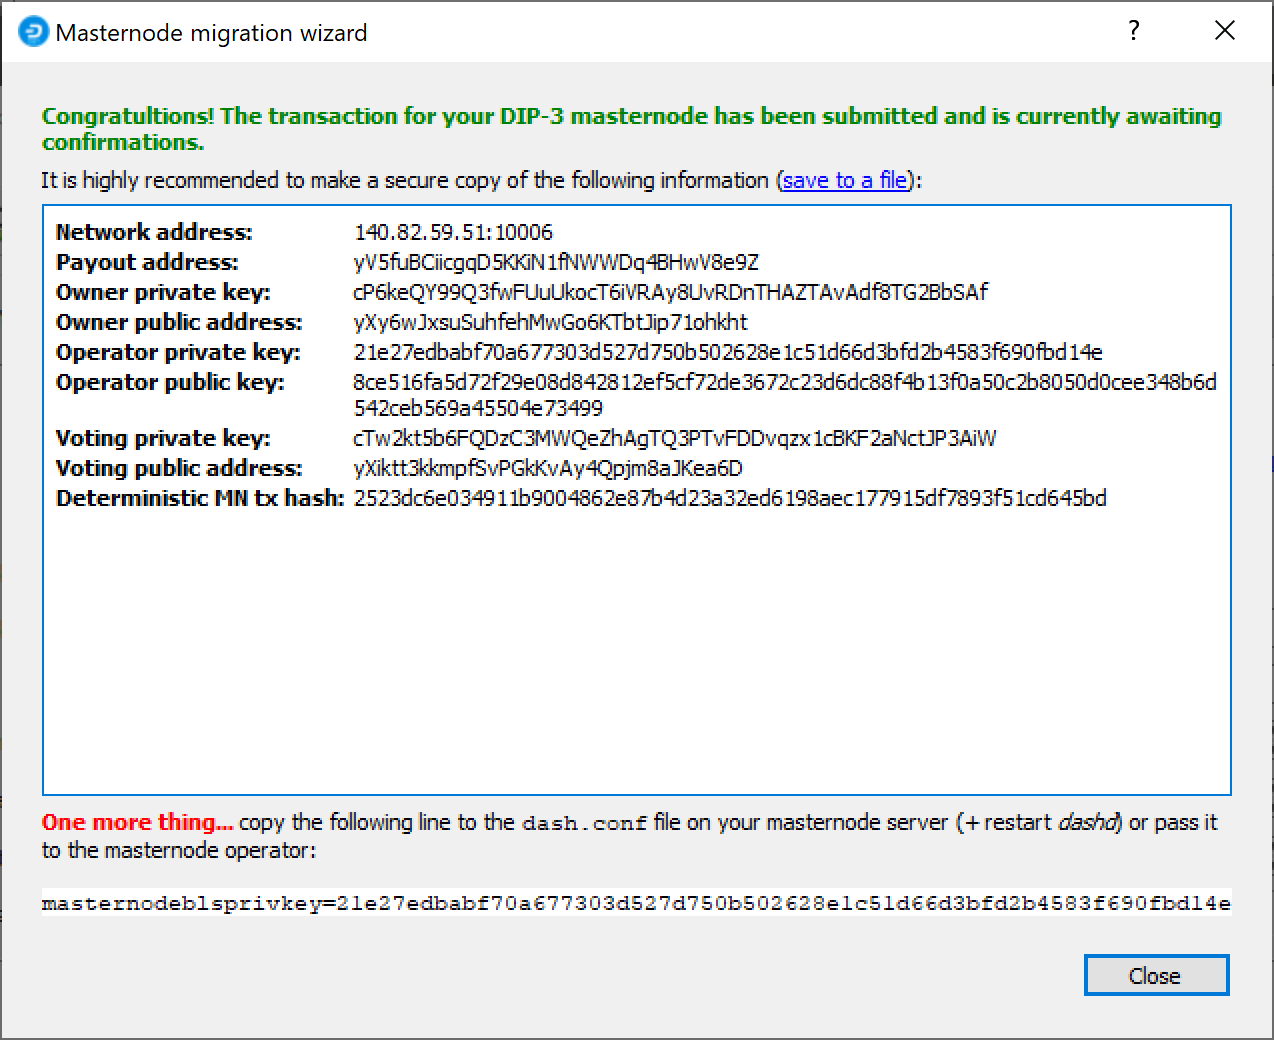
Dash Masternode Tool confirmation dialogs to register a masternode
The BLS secret key must be entered in the dash.conf file on the
masternode. This allows the masternode to watch the blockchain for
relevant Pro*Tx transactions, and will cause it to start serving as a
masternode when the signed ProRegTx is broadcast by the owner, as we
just did above. Edit the configuration file on your masternode as
follows:
nano ~/.dashcore/dash.conf
The editor appears with the existing masternode configuration. Add this line to the end of the file, replacing the key with your BLS secret key generated above:
masternodeblsprivkey=21e27edbabf70a677303d527d750b502628e1c51d66d3bfd2b4583f690fbd14e
Press enter to make sure there is a blank line at the end of the file, then press Ctrl + X to close the editor and Y and Enter save the file. We now need to restart the masternode for this change to take effect. Enter the following commands, waiting a few seconds in between to give Dash Core time to shut down:
~/.dashcore/dash-cli stop
~/.dashcore/dashd
At this point you can monitor your masternode using
dashman/dashman status, by entering
~/.dashcore/dash-cli masternode status or using the Get status
function in DMT. The final result should appear as follows:
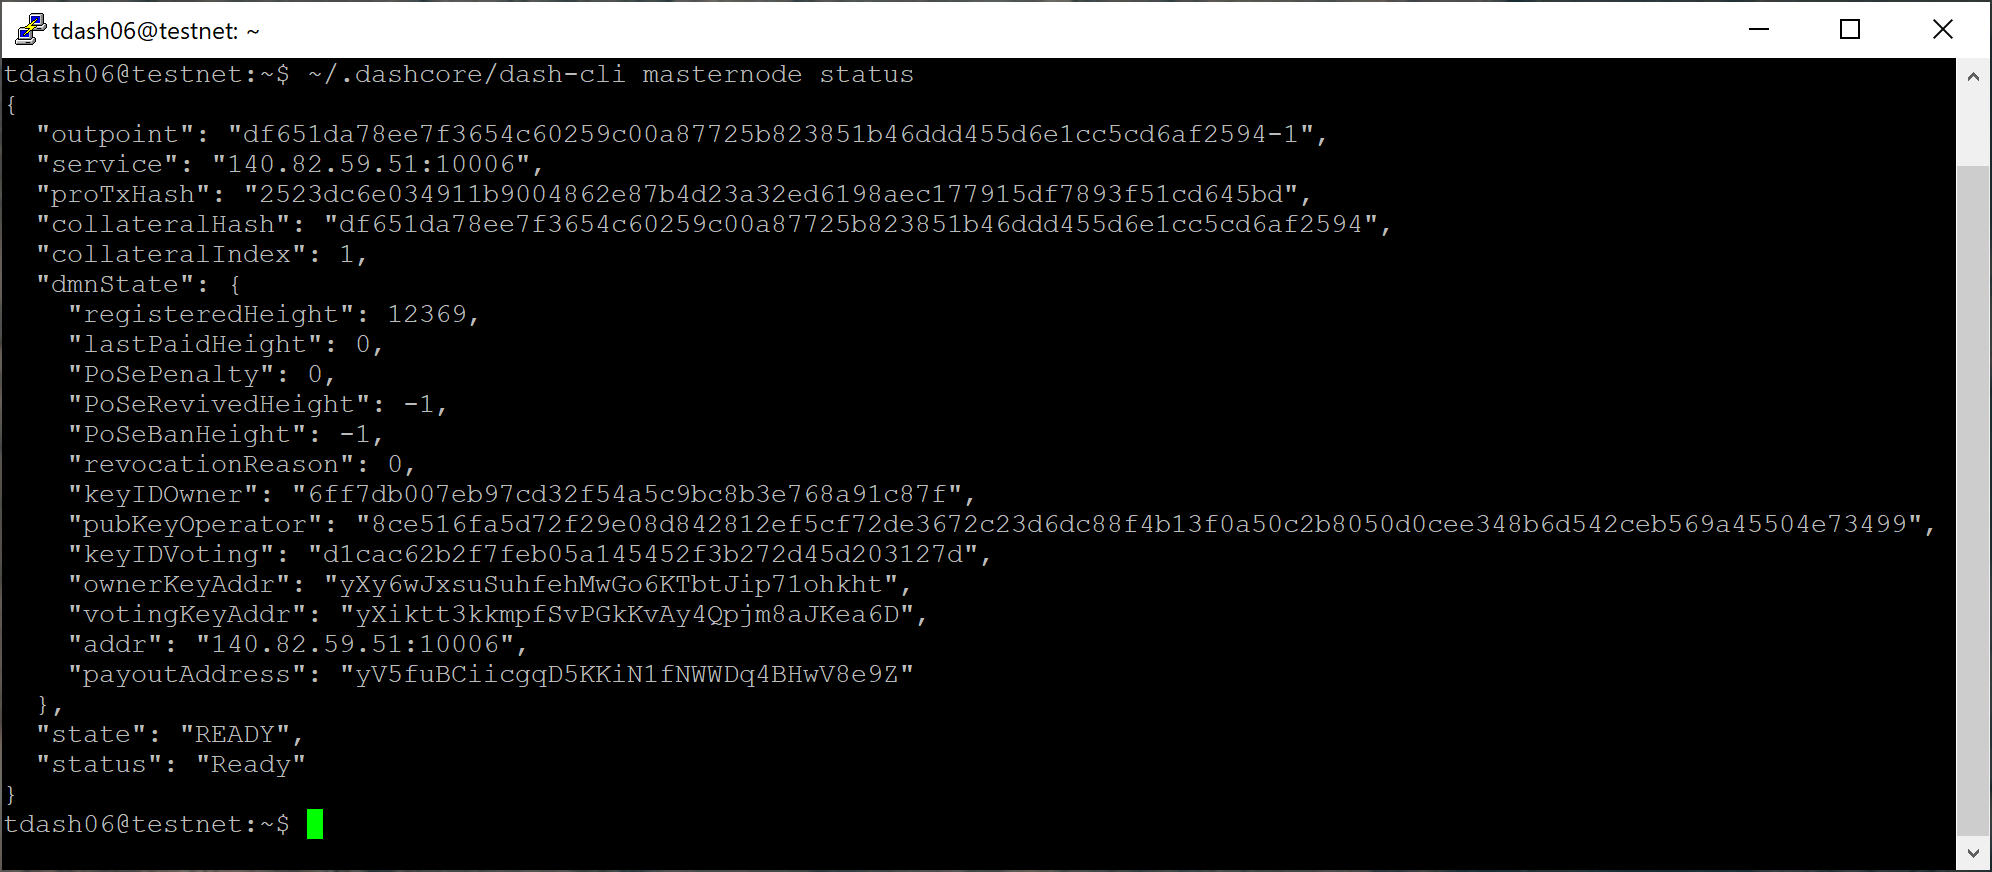
dash-cli masternode status output showing successfully started masternode
此时,您可以通过键入exit来安全地注销您的服务器。祝贺您!您的主节点现在正在运行。
Option 2: Registering from Dash Core wallet
Identify the funding transaction
如果您使用Dash Core钱包中的地址用于您的保证金交易,现在您则需要找到该交易的txid。单击工具 > 调试控制台并输入以下命令:
masternode outputs
这时应该返回类似于以下内容的字符串:
{
"ad308ec104bdf113444be609eb3dce9474a5550424204c6538843e3ccd3d4e78" : "1",
}
The first long string is your transaction hash, while the last number is the index.
Generate a BLS key pair
A public/private BLS key pair is required for the operator of the masternode. If you are using a hosting service, they may provide you with their public key, and you can skip this step. If you are hosting your own masternode or have agreed to provide your host with the BLS private key, generate a BLS public/private keypair as follows:
bls generate

{
  "secret": "28a85abb5aa8e820f65e33974cef0ab0bf06195f61454d2feb7fa578612d2228",
  "public": "144cbf4d472716b9504a54c7ca26906a3346253b787ffeb1a4999325049f5b2c51ef2e7c215d85f0a9142ec1c78db99b"
}
These keys are NOT stored by the wallet and must be kept secure,
similar to the value provided in the past by the masternode genkey
command.
Add the private key to your masternode configuration
The public key will be used in following steps. The private key must be
entered in the dash.conf file on the masternode. This allows the
masternode to watch the network for relevant Pro*Tx transactions, and
will cause it to start serving as a masternode when the signed ProRegTx
is broadcast by the owner (final step below). Log in to your masternode
using ssh or PuTTY and edit the configuration file on your
masternode as follows:
nano ~/.dashcore/dash.conf
The editor appears with the existing masternode configuration. Add this line to the end of the file, replacing the key with your BLS secret key generated above:
masternodeblsprivkey=28a85abb5aa8e820f65e33974cef0ab0bf06195f61454d2feb7fa578612d2228
Press enter to make sure there is a blank line at the end of the file, then press Ctrl + X to close the editor and Y and Enter save the file. We now need to restart the masternode for this change to take effect. Enter the following commands, waiting a few seconds in between to give Dash Core time to shut down:
~/.dashcore/dash-cli stop
~/.dashcore/dashd
We will now prepare the transaction used to register a DIP003 masternode on the network.
Prepare a ProRegTx transaction
First, we need to get a new, unused address from the wallet to serve as the owner address. This is different to the collateral address. It must also be used as the voting address if Spork 15 is not yet active. Generate a new address as follows:
getnewaddress

yMwR1zf2Cv9gcMdHULRVbTTMGw7arvpbM5
Then either generate or choose an existing second address to receive the owner’s masternode payouts:
getnewaddress

yLqyR8PHEB7Fp1ue8nSuLfuxQhrj5PSTDv
You can also optionally generate and fund a third address to pay the
transaction fee. The private key to this address must be available to
the wallet submitting the transaction to the network. We will now
prepare an unsigned ProRegTx special transaction using the protx
register_prepare command. This command has the following syntax:
protx register_prepare collateralHash collateralIndex ipAndPort ownerKeyAddr
operatorPubKey votingKeyAddr operatorReward payoutAddress (feeSourceAddress)
Open a text editor such as notepad to prepare this command. Replace each argument to the command as follows:
collateralHash: The txid of the 1000 Dash collateral funding transactioncollateralIndex: The output index of the 1000 Dash funding transactionipAndPort: Masternode IP address and port, in the formatx.x.x.x:yyyyownerKeyAddr: The new Dash address generated above for the owner/voting addressoperatorPubKey: The BLS public key generated above (or provided by your hosting service)votingKeyAddr: The new Dash address generated above, or the address of a delegate, used for proposal votingoperatorReward: The percentage of the block reward allocated to the operator as paymentpayoutAddress: A new or existing Dash address to receive the owner’s masternode rewardsfeeSourceAddress: An (optional) address used to fund ProTx fee.payoutAddresswill be used if not specified.
Note that the operator is responsible for specifying their own
reward address in a separate update_service
transaction if you specify a non-zero operatorReward. The owner of
the masternode collateral does not specify the operator’s payout
address.
Example (remove line breaks if copying):
protx register_prepare
  ad308ec104bdf113444be609eb3dce9474a5550424204c6538843e3ccd3d4e78
  1
  140.82.59.51:10004
  yMwR1zf2Cv9gcMdHULRVbTTMGw7arvpbM5
  144cbf4d472716b9504a54c7ca26906a3346253b787ffeb1a4999325049f5b2c51ef2e7c215d85f0a9142ec1c78db99b
  yMwR1zf2Cv9gcMdHULRVbTTMGw7arvpbM5
  0
  yLqyR8PHEB7Fp1ue8nSuLfuxQhrj5PSTDv
Output:
{
   "tx": "0300010001784e3dcd3c3e8438654c20240455a57494ce3deb09e64b4413f1bd04c18e30ad0000000000feffffff01cccfa204000000001976a9141ea44ced396667eb7d1c5b3699e04b5b3046ecfb88ac00000000d1010000000000784e3dcd3c3e8438654c20240455a57494ce3deb09e64b4413f1bd04c18e30ad0100000000000000000000000000ffff8c523b33271411c59262c9633a1bb810a7fc2b833c43cfa852ab144cbf4d472716b9504a54c7ca26906a3346253b787ffeb1a4999325049f5b2c51ef2e7c215d85f0a9142ec1c78db99b11c59262c9633a1bb810a7fc2b833c43cfa852ab00001976a91405c5fed6a3eb0b92ea5119039efae7a8dee5456488ac4e6cc5451440a6044dbd04d33a11f4cddc9021532ede3012ebbc31c0bb4ceb9c00",
  "collateralAddress": "yiFfzbwiN9oneftd7cEfr3kQLRwQ4kp7ue",
  "signMessage": "yLqyR8PHEB7Fp1ue8nSuLfuxQhrj5PSTDv|0|yMwR1zf2Cv9gcMdHULRVbTTMGw7arvpbM5|yMwR1zf2Cv9gcMdHULRVbTTMGw7arvpbM5|4e00de34ee03d28adb4e1fdaec966ae239c11da7e6115f566fc4b3f75c8a5503"
}
Next we will use the collateralAddress and signMessage fields to
sign the transaction, and the output of the tx field to submit the
transaction.
Sign the ProRegTx transaction
We will now sign the content of the signMessage field using the
private key for the collateral address as specified in
collateralAddress. Note that no internet connection is required for
this step, meaning that the wallet can remain disconnected from the
internet in cold storage to sign the message. In this example we will
again use Dash Core, but it is equally possible to use the signing
function of a hardware wallet. The command takes the following syntax:
signmessage address message
Example:
signmessage yiFfzbwiN9oneftd7cEfr3kQLRwQ4kp7ue yLqyR8PHEB7Fp1ue8nSuLfuxQhrj5PSTDv|0|yMwR1zf2Cv9gcMdHULRVbTTMGw7arvpbM5|yMwR1zf2Cv9gcMdHULRVbTTMGw7arvpbM5|4e00de34ee03d28adb4e1fdaec966ae239c11da7e6115f566fc4b3f75c8a5503
Output:
H3ub9BATtvuV+zDGdkUQNoUGpaYFr/O1FypmrSmH5WJ0KFRi8T10FSew0EJO/+Ij+OLv4r0rt+HS9pQFsZgc2dE=
Submit the signed message
We will now submit the ProRegTx special transaction to the blockchain to register the masternode. This command must be sent from a Dash Core wallet holding a balance, since a standard transaction fee is involved. The command takes the following syntax:
protx register_submit tx sig
Where:
tx: The serialized transaction previously returned in thetxoutput field from theprotx register_preparecommandsig: The message signed with the collateral key from thesignmessagecommand
Example:
protx register_submit 0300010001784e3dcd3c3e8438654c20240455a57494ce3deb09e64b4413f1bd04c18e30ad0000000000feffffff01cccfa204000000001976a9141ea44ced396667eb7d1c5b3699e04b5b3046ecfb88ac00000000d1010000000000784e3dcd3c3e8438654c20240455a57494ce3deb09e64b4413f1bd04c18e30ad0100000000000000000000000000ffff8c523b33271411c59262c9633a1bb810a7fc2b833c43cfa852ab144cbf4d472716b9504a54c7ca26906a3346253b787ffeb1a4999325049f5b2c51ef2e7c215d85f0a9142ec1c78db99b11c59262c9633a1bb810a7fc2b833c43cfa852ab00001976a91405c5fed6a3eb0b92ea5119039efae7a8dee5456488ac4e6cc5451440a6044dbd04d33a11f4cddc9021532ede3012ebbc31c0bb4ceb9c00 H3ub9BATtvuV+zDGdkUQNoUGpaYFr/O1FypmrSmH5WJ0KFRi8T10FSew0EJO/+Ij+OLv4r0rt+HS9pQFsZgc2dE=
Output:
b823338301e47875493c20361a23aef034578030c639480203b394669ab05e09
Your masternode is now registered and will appear on the Deterministic
Masternode List after the transaction is mined to a block. You can view
this list on the Masternodes -> DIP3 Masternodes tab of the Dash
Core wallet, or in the console using the command protx list valid,
where the txid of the final protx register_submit transaction
identifies your DIP003 masternode. Note again that all functions related
to DIP003 will only take effect once Spork 15 is enabled on the network.
You can view the spork status using the spork active command.
At this point you can go back to your terminal window and monitor your
masternode using dashman/dashman status, by entering
~/.dashcore/dash-cli masternode status or using the Get status
function in DMT. The final result should appear as follows:
dashman状态输出显示成功启动主节点
此时,您可以通过键入exit来安全地注销您的服务器。祝贺您!您的主节点现在正在运行。