Maintenance
Masternodes require regular maintenance to ensure you do not drop off the payment queue. This includes promptly installing updates to Dash, as well as maintaining the security and performance of the server. In addition, masternodes should vote on proposals and perform other tasks in the interest of the network and the value of the Dash they hold.
Payment withdrawals
Once your masternode has been accepted by the network, it will enter the masternode payment queue and slowly begin moving up. A masternode within the top 10% of the list is selected and receives a payment each time a new Dash block is mined. For more details on this process, see here. These payments are sent to the same address you used to start your masternode, which means you need to be careful when withdrawing the payments. The original 1000 DASH payment you used to start your masternode must remain untouched in a single unspent transaction output (utxo) or your masternode will drop off the payment list - you may have seen this ID when preparing to send the start masternode command. Payments appear in separate UTXOs, so we need a method of only spending those UTXOs and not the one containing the 1000 DASH. Note that masternode payouts can only be spent after 100 confirmations.
Option 1: Withdrawals using a hardware wallet
If you used a hardware wallet such as Trezor to start your masternode, you must also use this process to make payout withdrawals. Once again, we will be using Bertrand256's Dash Masternode Tool (DMT) to select the correct outputs. With DMT, we can select specific UTXOs to withdraw the payments without touching the original collateral transaction. This is not possible using the Trezor web wallet alone.
Open DMT and verify the RPC and HW connections are working. From the Tools menu, select Transfer funds from current masternode's address or Transfer funds from all masternode's addresses, if you use DMT to control multiple masternodes.
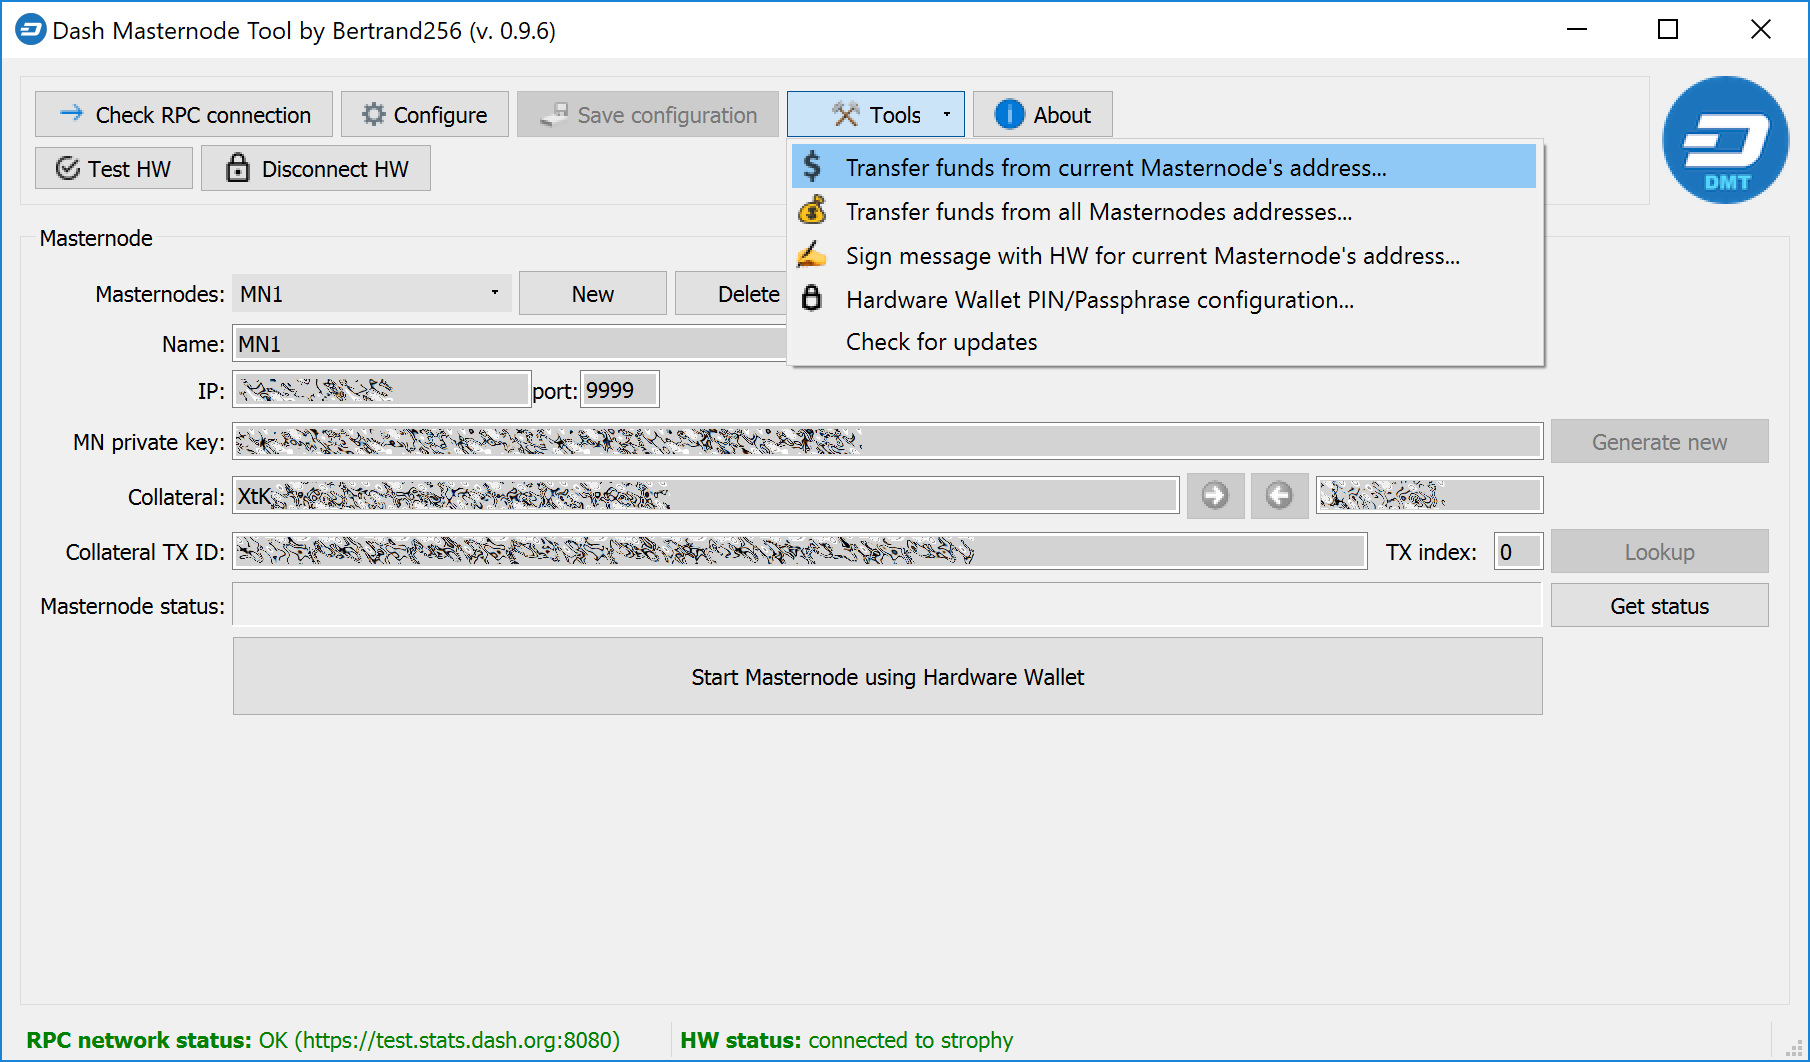
Selecting the transfer funds function in DMT
DMT will load for a moment, then display a window showing the available UTXOs you can use in your withdrawal. By default, all UTXOs not used as masternode collateral are checked. The masternode collateral UTXOs are not only unchecked but also hidden in order to avoid unintentionally sending funds associated with collateral and stopping your masternode. You can show these hidden entries by unchecking the Hide collateral utxos option. Enter your destination address for the transaction. The window should appear as follows:
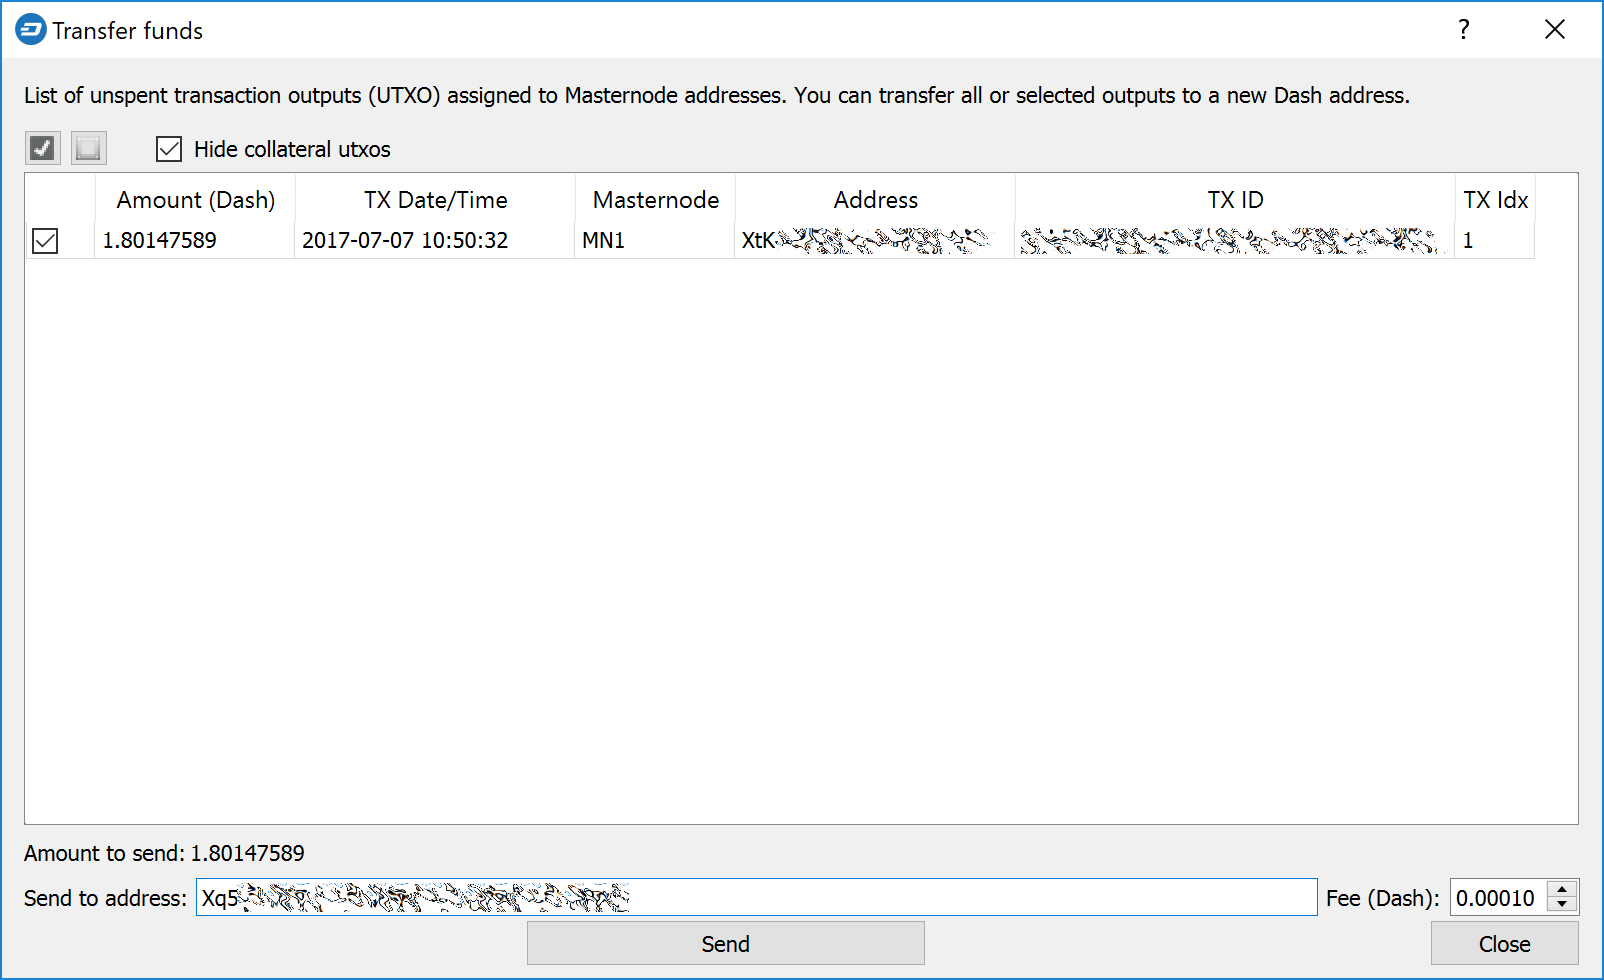
Selecting the UTXOs to use as inputs in the withdrawal transaction
Verify the transaction fee and click Send. Your Trezor will prompt to enter your PIN and confirm the transaction on the device. Once this is done, confirm one more time to DMT that you want to broadcast the transaction to the network by clicking Yes. A confirmation with the transaction ID will appear.


Confirming broadcast of the transaction to the network
Option 2: Withdrawals from Dash Core wallet
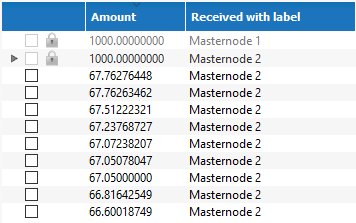
Similar to DMT as described above, we need a method in Dash Core wallet to restrict which UTXOs are spent when making withdrawals from a masternode address to ensure that the collateral UTXO is not touched. In Dash Core wallet, this feature is known as Coin Control, and it must be enabled before you can use it. Click Settings > Options > Wallet > Enable coin control features. Now, when you go to the Send tab in your wallet, a new button labelled Inputs... will appear. Click this button to select which UTXOs can be used as input for any transactions you create. The following window appears:
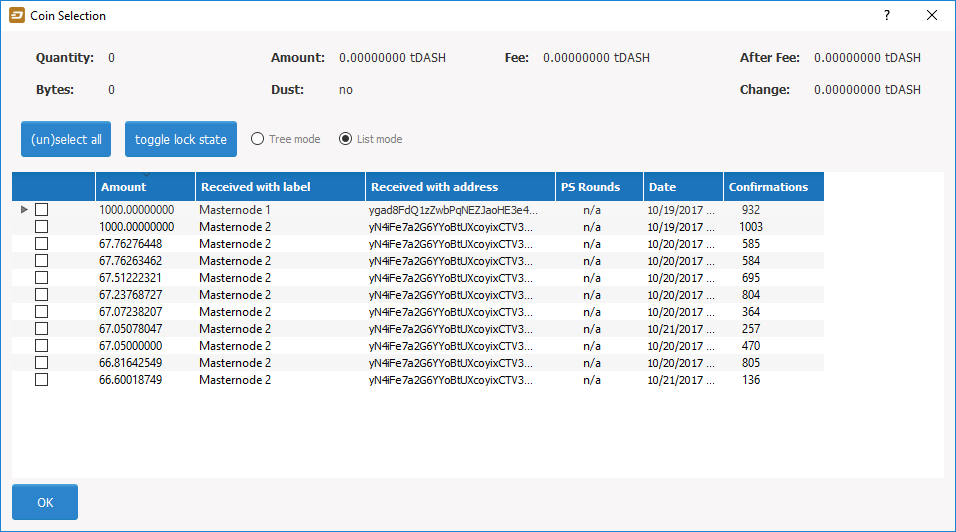
Coin Selection window in Dash Core wallet, showing two masternodes (testnet)
Right click on the transaction(s) showing an amount of 1000 DASH, then select Lock unspent. A small lock will appear next to the transaction. Then click OK. You can now safely create transactions with your remaining funds without affecting the original collateral UTXOs.
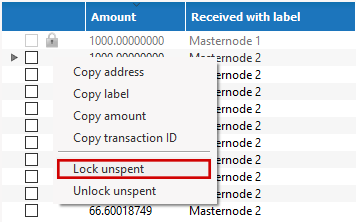
Locking UTXOs in Dash Core wallet
How to update a masternode
Periodically, the Dash Core development team will release updates to Dash. Since normal nodes rely on them for services and copies of the blockchain, masternodes are expected to update to new versions of Dash and Sentinel promptly. In some cases, hardware upgrades (more CPU, RAM or disk space, or even custom GPU/ASIC hardware) may also be necessary. Not updating will eventually result in your masternode being removed from the payment queue. If you run a hosted masternode, your host will take care of updates for you. If not, the method of updating depends on how you installed Dash.
Minor version updates to Dash (e.g. from 0.12.3.1 to 0.12.3.2) do not make changes to the protocol version, while major version updates (e.g. from 0.12.2.3 to 0.12.3.0) will usually increase the network protocol version. If the protocol version did not change, you DO NOT need to restart your masternode if you complete the update within 60 minutes. If the protocol version did change, you must issue a start command from your wallet. Do not send start commands to your masternode if not necessary, as it will send you to the back of the payment queue.
Option 1: Automated update using dashman
To update Dash using dashman, log in to your server and enter the following commands:
~/dashman/dashman sync
~/dashman/dashman update
Check the status of your masternode:
~/dashman/dashman status
If you are doing a major version update and need to restart your masternode, update the software version of the wallet holding the collateral to the latest version now by following the instructions here. Continue monitoring your masternode. After some time, all statuses should turn green, in particular masternode started: YES and masternode network state: ENABLED.
Option 2: Manual update
To update Dash manually, log in to your server using ssh or PuTTY. First we need to stop Dash running:
~/.dashcore/dash-cli stop
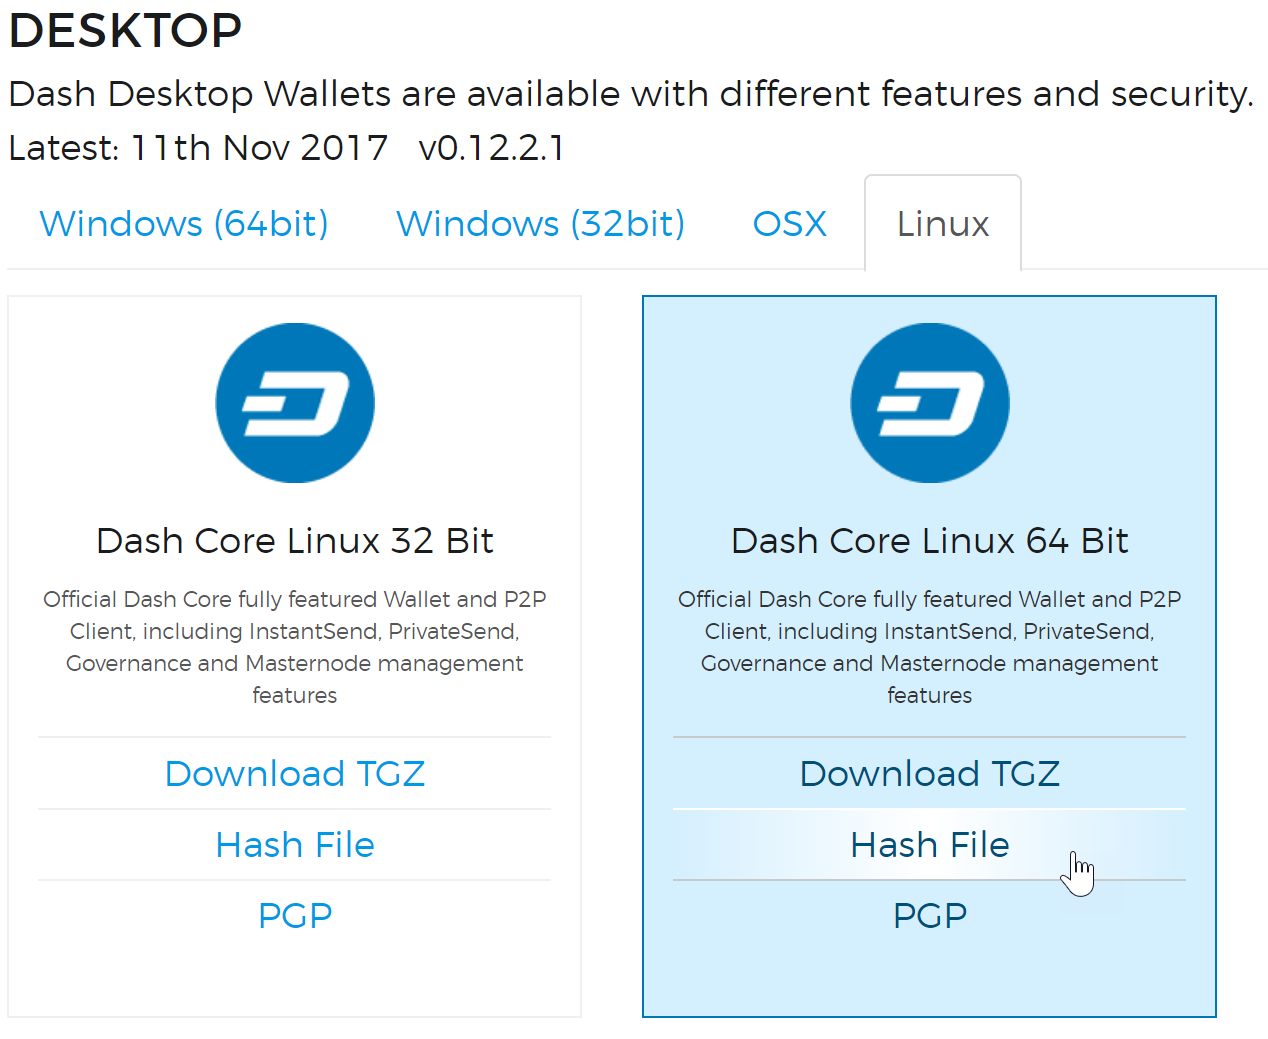
To manually download and install the components of your Dash masternode, visit https://www.dash.org/wallets/ on your computer to find the link to the latest Dash Core wallet. Click Linux, then right-click on Download TGZ for Dash Core Linux 64 Bit and select Copy link address. Go back to your terminal window and enter the following command, pasting in the address to the latest version of Dash Core by right clicking or pressing Ctrl + V:
cd ~
wget https://github.com/dashpay/dash/releases/download/v0.12.3.3/dashcore-0.12.3.3-x86_64-linux-gnu.tar.gz
Verify the integrity of your download by running the following command and comparing the output against the value for the file as shown on the Dash website under Hash File:
sha256sum dashcore-0.12.3.3-x86_64-linux-gnu.tar.gz
Link to the hash file to verify download integrity
Remove the old binaries from the working directory, extract the compressed archive, copy the new files to the directory and set them as executable:
rm ~/.dashcore/dashd
rm ~/.dashcore/dash-cli
tar xfvz dashcore-0.12.3.3-x86_64-linux-gnu.tar.gz
cp dashcore-0.12.3/bin/dashd ~/.dashcore/
cp dashcore-0.12.3/bin/dash-cli ~/.dashcore/
Clean up unneeded files:
rm dashcore-0.12.3.3-x86_64-linux-gnu.tar.gz
rm -r dashcore-0.12.3/
Restart Dash:
~/.dashcore/dashd
You will see a message reading "Dash Core server starting". We will now update Sentinel:
cd ~/.dashcore/sentinel/
git pull
If the protocol version changed during this update, you will need to issue a start command from your wallet. If you are using a hardware wallet, you can issue the start command by simply clicking the button in DMT. If you are using Dash Core wallet, update it to the latest version, then open the debug console and enter this command, where MN1 is the alias for your masternode:
masternode start-alias MN1
Monitor the status of your masternode as it starts up:
~/.dashcore/dash-cli getblockcount
~/.dashcore/dash-cli getnetworkinfo
~/.dashcore/dash-cli mnsync status
~/.dashcore/dash-cli masternode status
In particular, the last command should return the status Masternode successfully started. If you see an error similar to Invalid protocol version, then the protocol version has changed and you must send a start command from your wallet again. You can also monitor the status of your masternode from Sentinel. If Sentinel detects a functioning masternode, the following command should return nothing:
cd ~/.dashcore/sentinel
venv/bin/python bin/sentinel.py
Finally, you can check for your masternode by its collateral address using DashNinja, or search the consensus list of masternodes using this command and entering your masternode IP address:
~/.dashcore/dash-cli masternode list full | grep <your ip address>
Finding your position in the payment queue
Prior to Dash 0.12.4, each masternode may have a slightly different view of the network. In addition, selection from the top 10% of masternodes in the list in the selection pool is random. This means that there is no definite answer to when your masternode will be selected for payment. However, it is possible to make an approximation based on the time your masternode entered the back of the queue.
Community members xkcd, Bertrand256 and moocowmoo have all published various tools you can run to determine your approximate position in the payment queue, and bots are available on Discord and Slack as well.
DashCentral voting, verification and monitoring
DashCentral is a community-supported website managed by community member Rango. It has become a de facto site for discussion of budget proposals and to facilitate voting from a graphical user interface, but also offers functions to monitor masternodes.
Adding your masternode to DashCentral
Dashcentral allows you to vote on proposals from the comfort of your browser. After completing registration, go to the masternodes page and click the Add masternode now button. Enter your collateral address on the following screen:
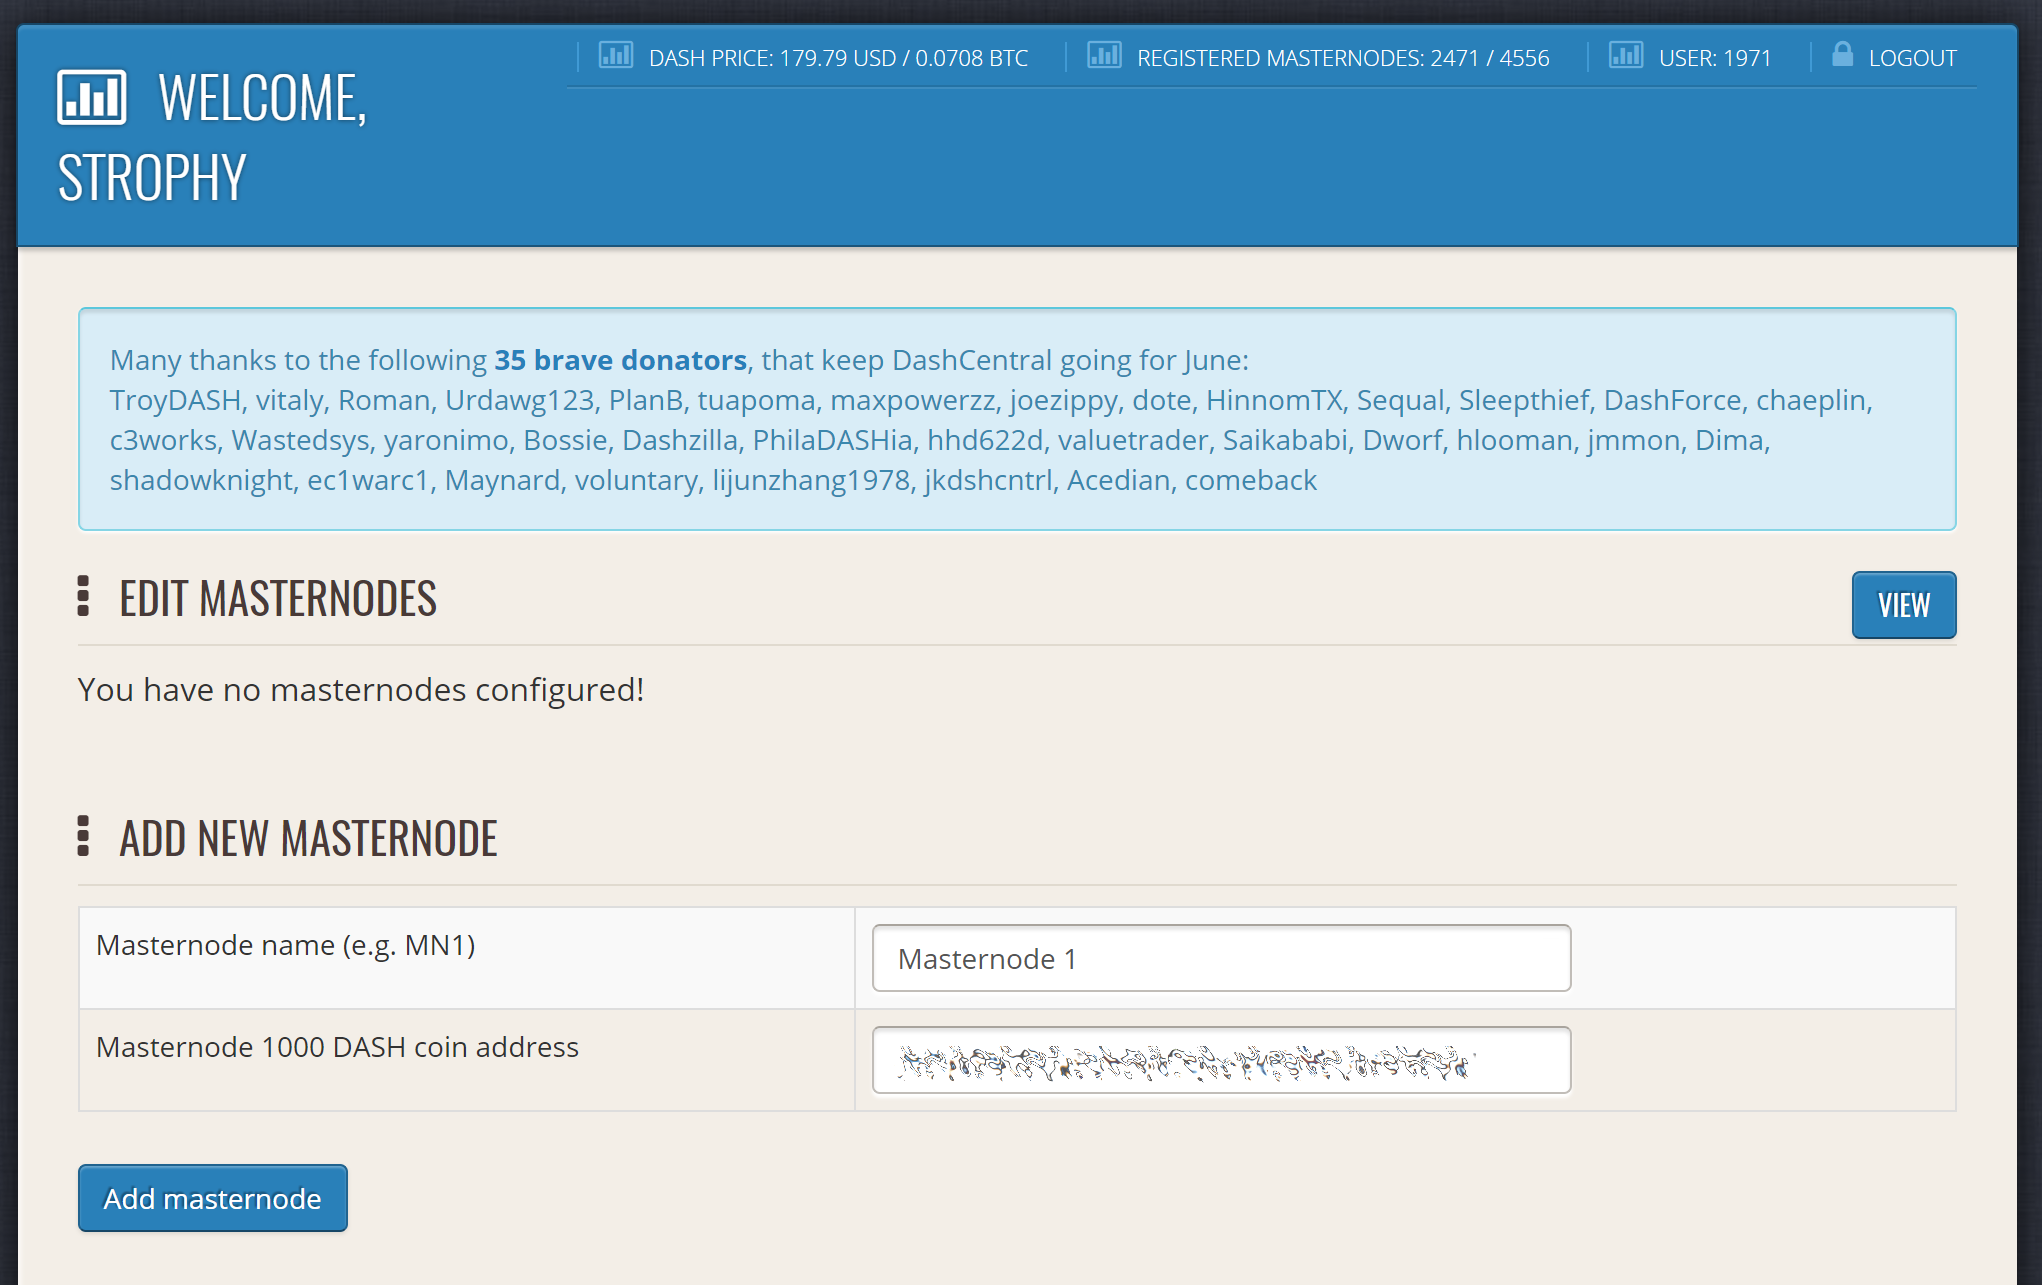
Adding a masternode to DashCentral
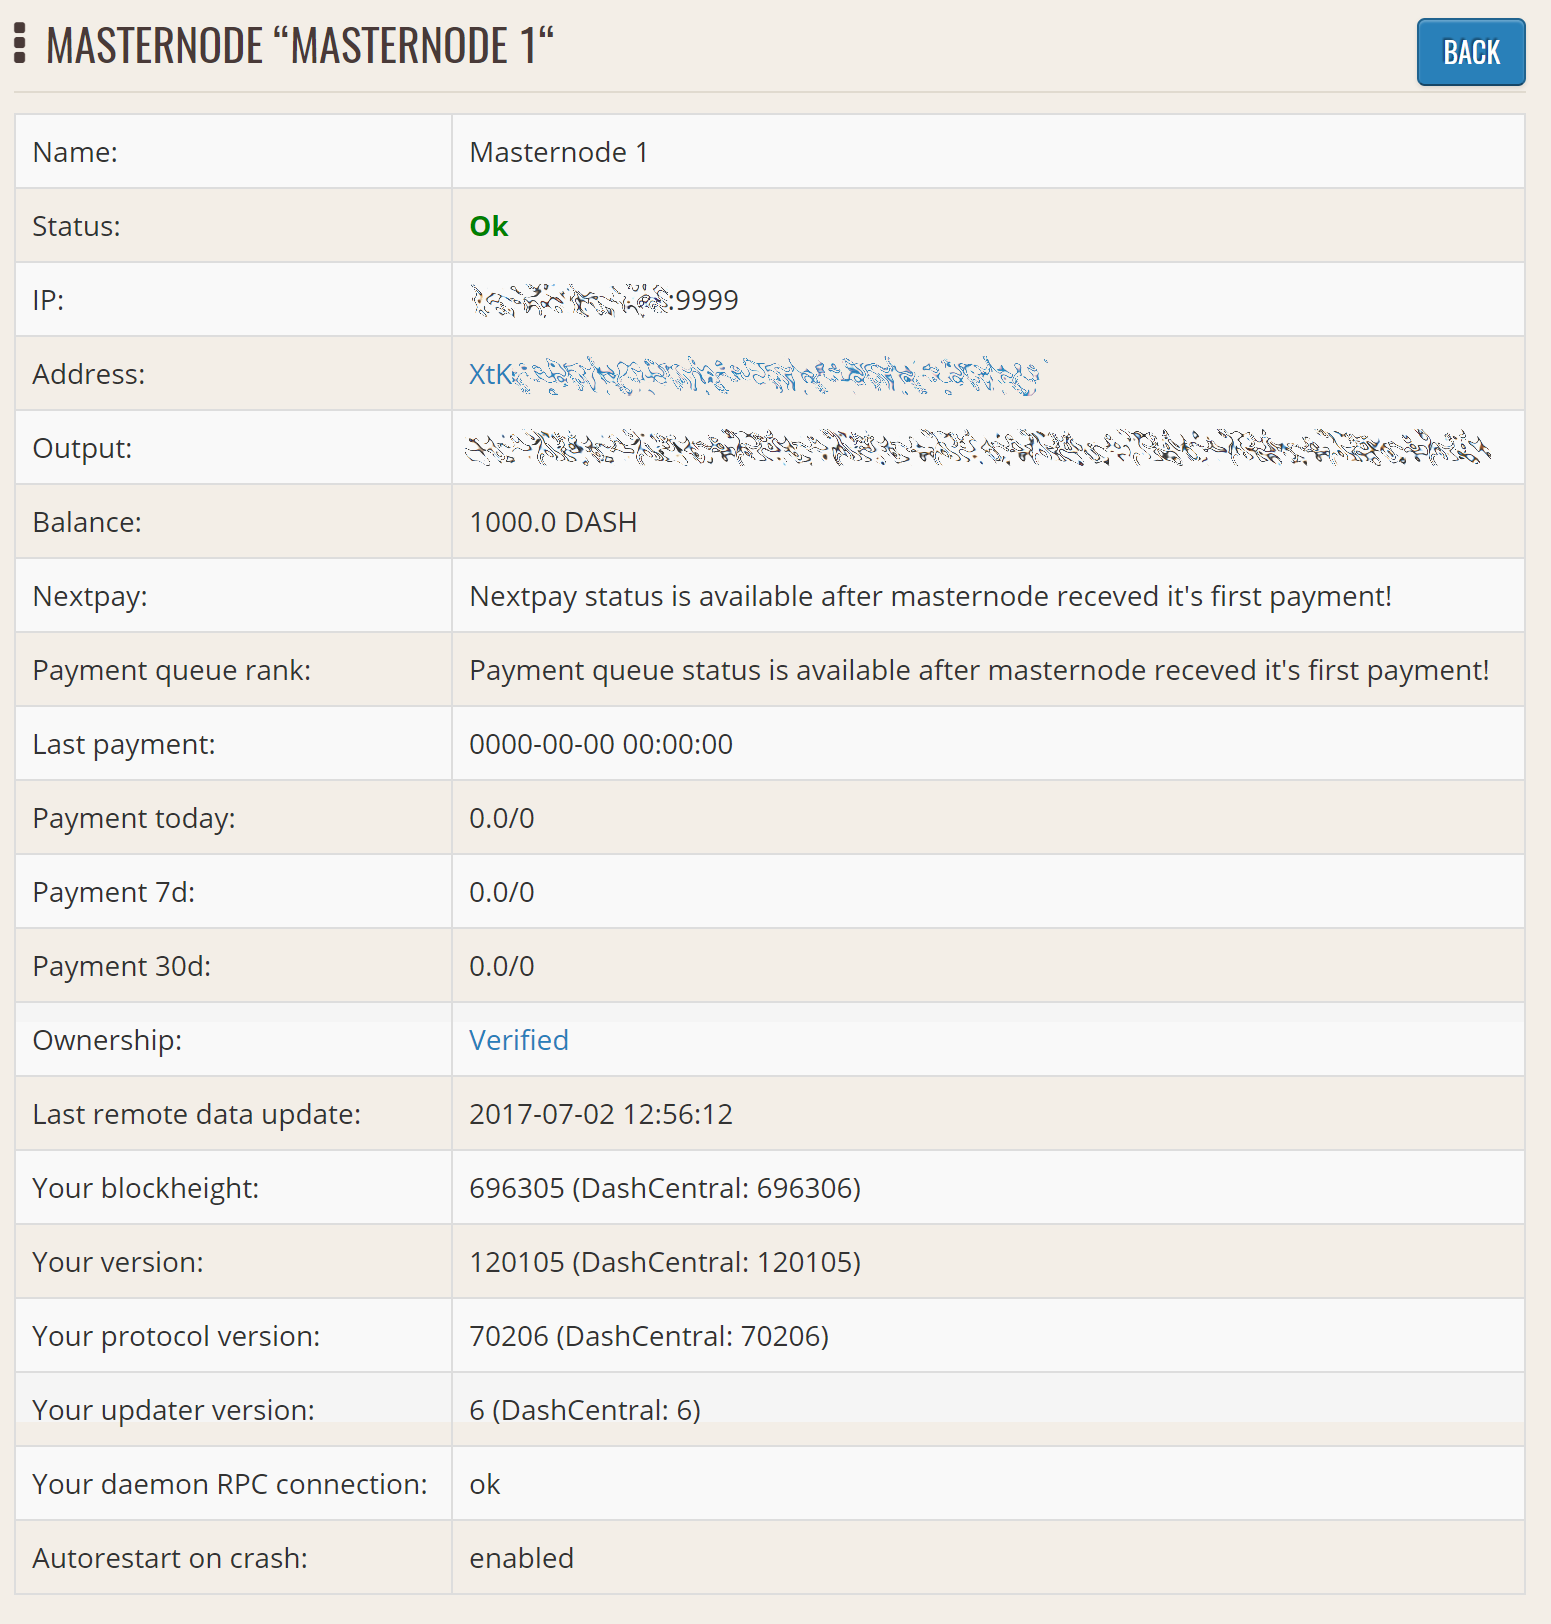
Click Add masternode. Your masternode has now been added to DashCentral.
Enabling voting from DashCentral
Click Edit under Voting privkeys to enter your masternode private key to enable voting through the DashCentral web interface. Enter a voting passphrase (not the same as your login password, but equally important to remember!) and enter the private key (the same key you used in the dash.conf file on your masternode) on the following screen:

Adding voting privkeys to DashCentral
It is important to note that the private key to start your masternode is unrelated to the private keys to the collateral address storing your 1000 DASH. These keys can be used to issue commands on behalf of the masternode, such as voting, but cannot be used to access the collateral. The keys are encrypted on your device and never stored as plain text on DashCentral servers. Once you have entered the key, click Store encrypted voting privkeys on server. You can now vote on proposals from the DashCentral web interface.
Verifying ownership
You can also issue a message from your address to verify ownership of your masternode to DashCentral. Click Unverified under Ownership and the following screen will appear:
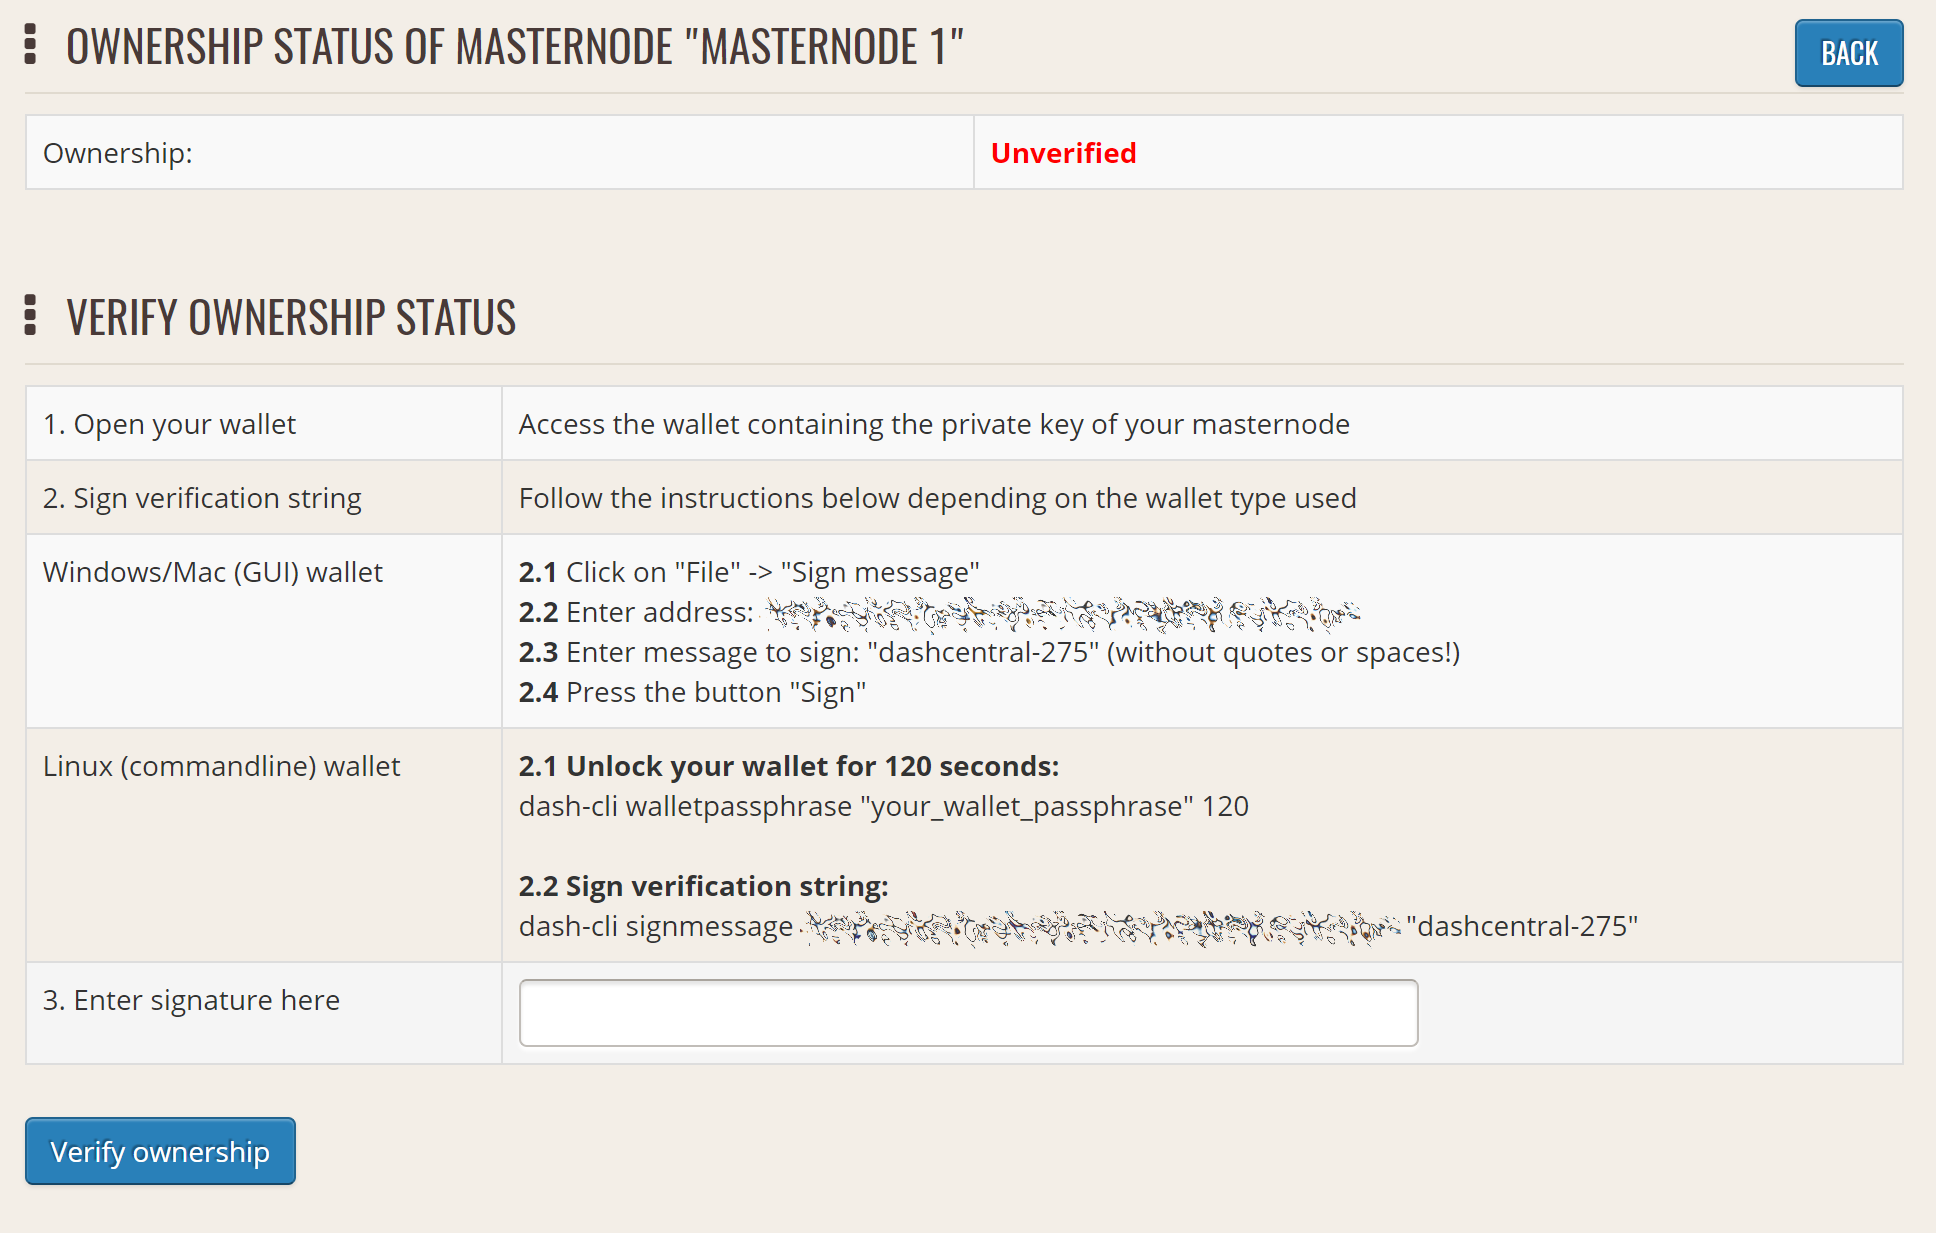
Verifying ownership of your masternode to DashCentral
Instructions on how to sign your collateral address using a software wallet appear. If you are using a hardware wallet other than Trezor, you will need to use the DMT app to sign the address. If you are using the Trezor hardware wallet, go to your Trezor wallet, copy the collateral address and click Sign & Verify. The following screen will appear, where you can enter the message provided by DashCentral and the address you wish to sign:
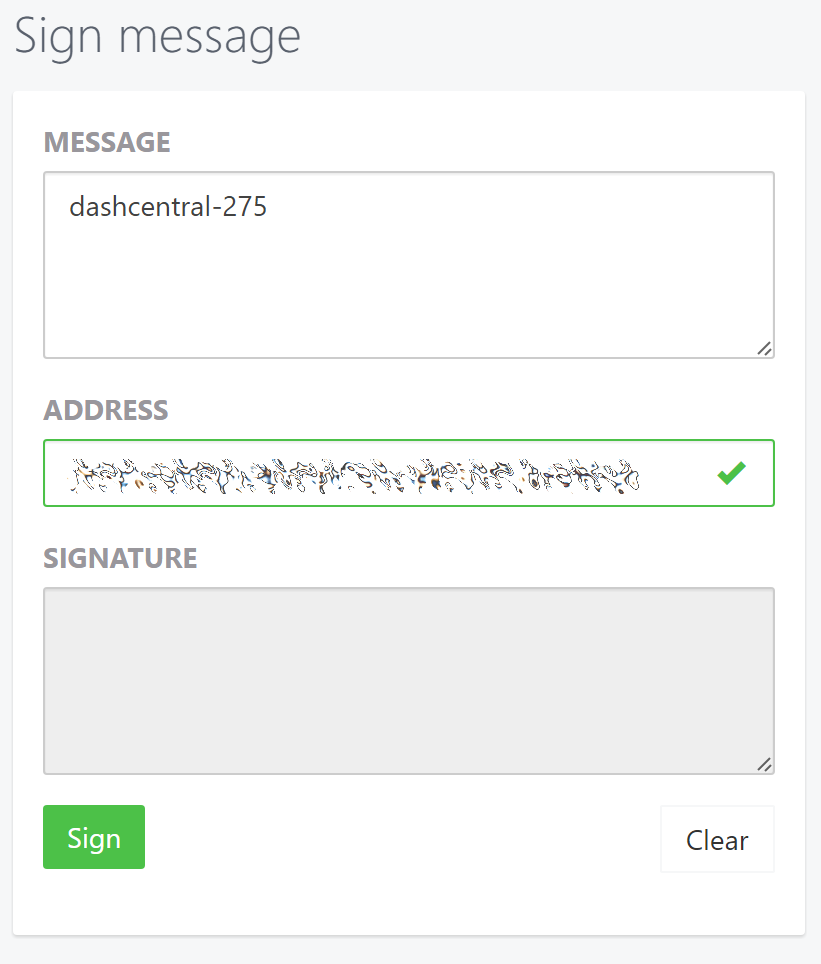
Signing a message from the Trezor Wallet
Click Sign, confirm on your Trezor device and enter your PIN to sign the message. A message signature will appear in the Signature box. Copy this signature and paste it into the box on DashCentral and click Verify ownership. Verification is now complete.
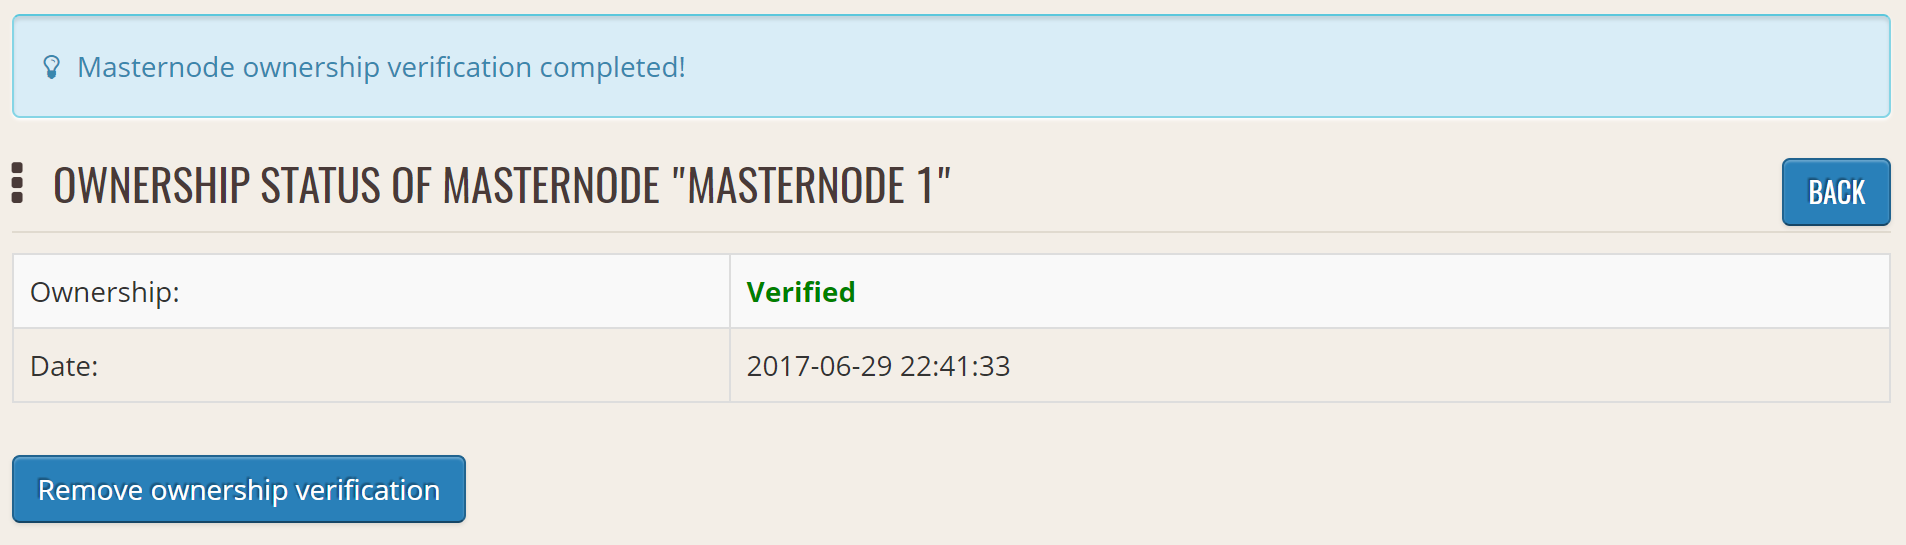
Masternode ownership has been successfully verified
Installing the DashCentral monitoring script
DashCentral offers a service to monitor your masternode, automatically restart dashd in the event of a crash and send email in the event of an error. Go to the Account settings page and generate a new API key, adding a PIN to your account if necessary. Scroll to the following screen:
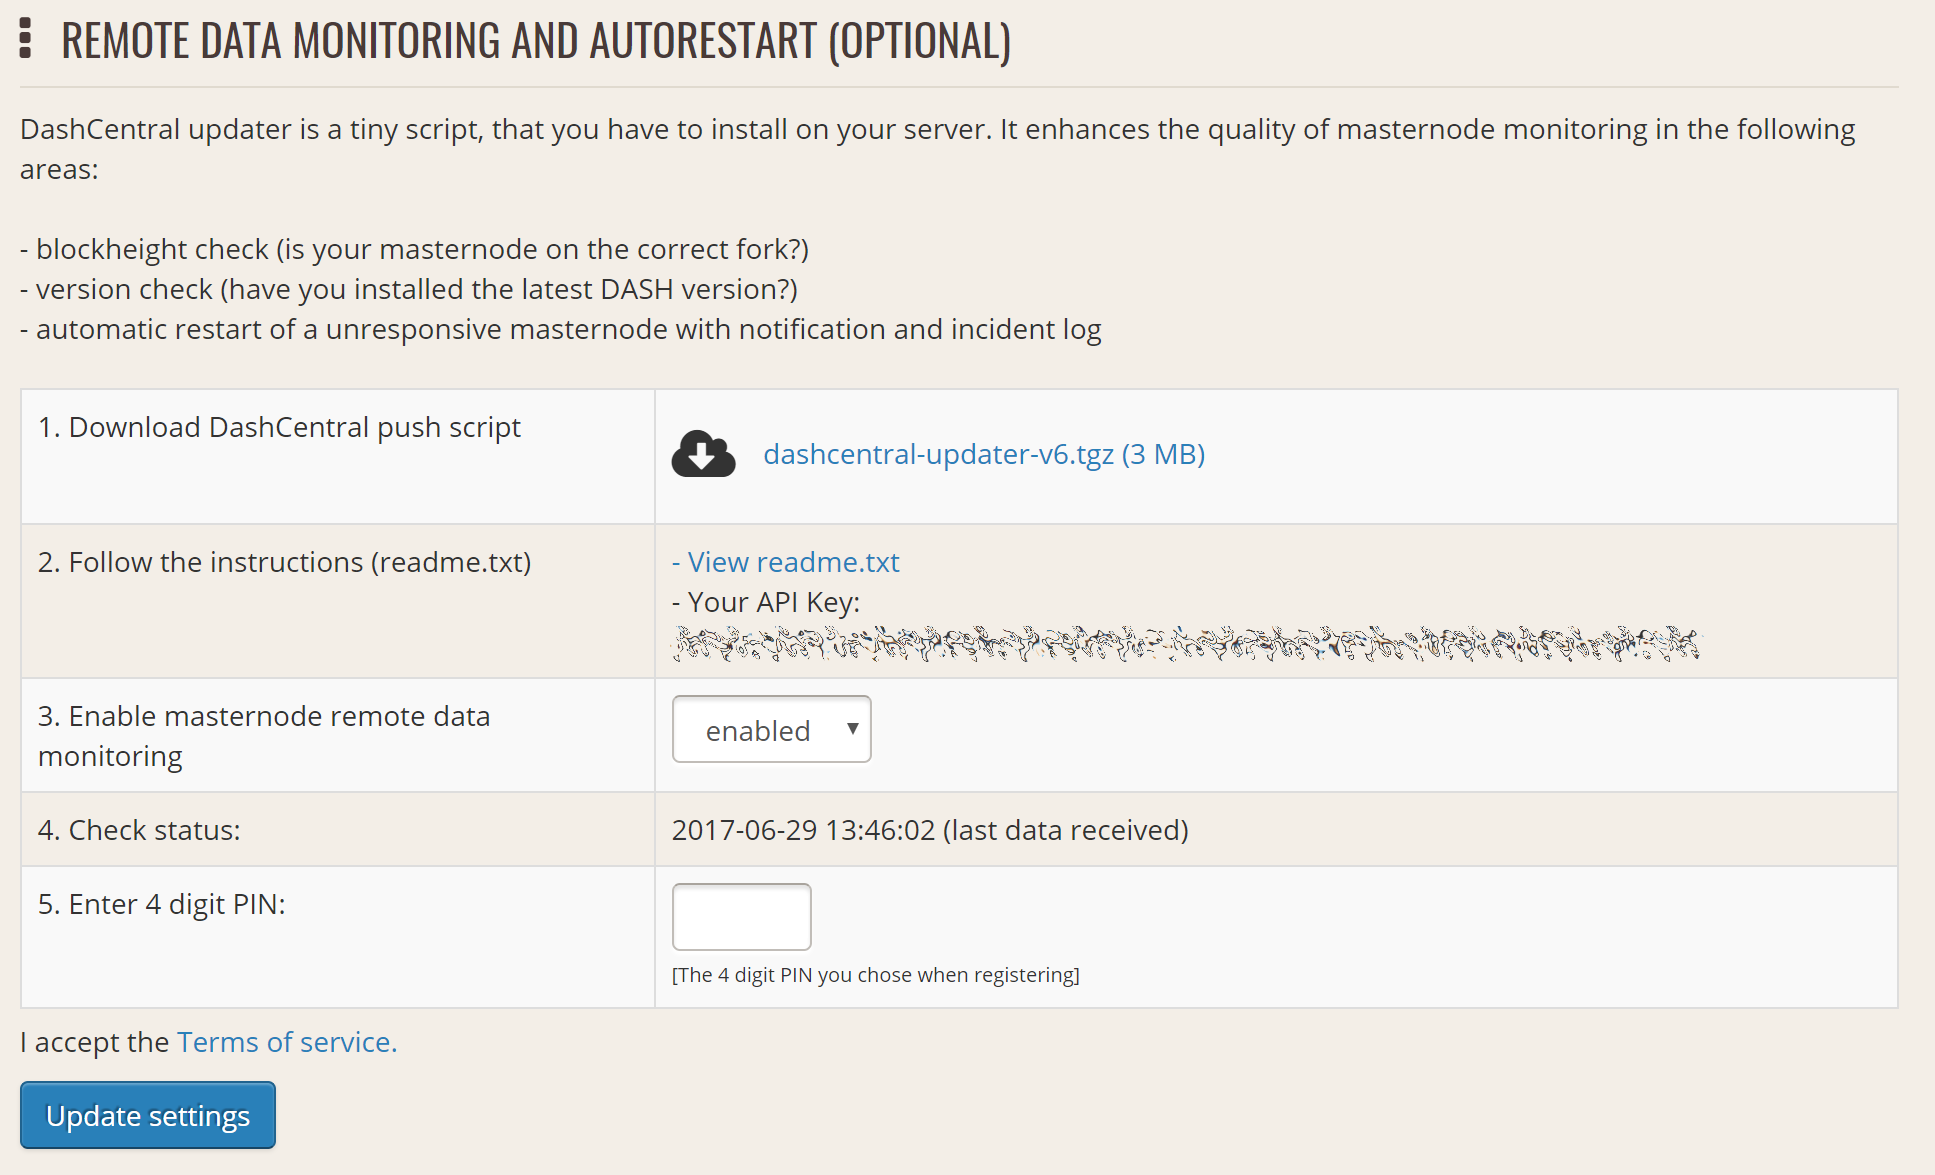
Setting up the DashCentral monitoring script
Copy the link to the current version of the dashcentral script by right- click and selecting Copy link address. Open PuTTY and connect to your masternode, then type:
wget https://www.dashcentral.org/downloads/dashcentral-updater-v6.tgz
Replace the link with the current version of dashcentral-updater as necessary. Decompress the archive using the following command:
tar xvzf dashcentral-updater-v6.tgz
View your masternode configuration details by typing:
cat .dashcore/dash.conf
Copy the values for rpcuser and rpcpassword. Then edit the
dashcentral configuration by typing:
nano dashcentral-updater/dashcentral.conf
Replace the values for api_key, your masternode collateral address,
rpc_user, rpc_password, daemon_binary and daemon_datadir
according to your system. A common configuration, where lwhite is
the name of the Linux user, may look like this:
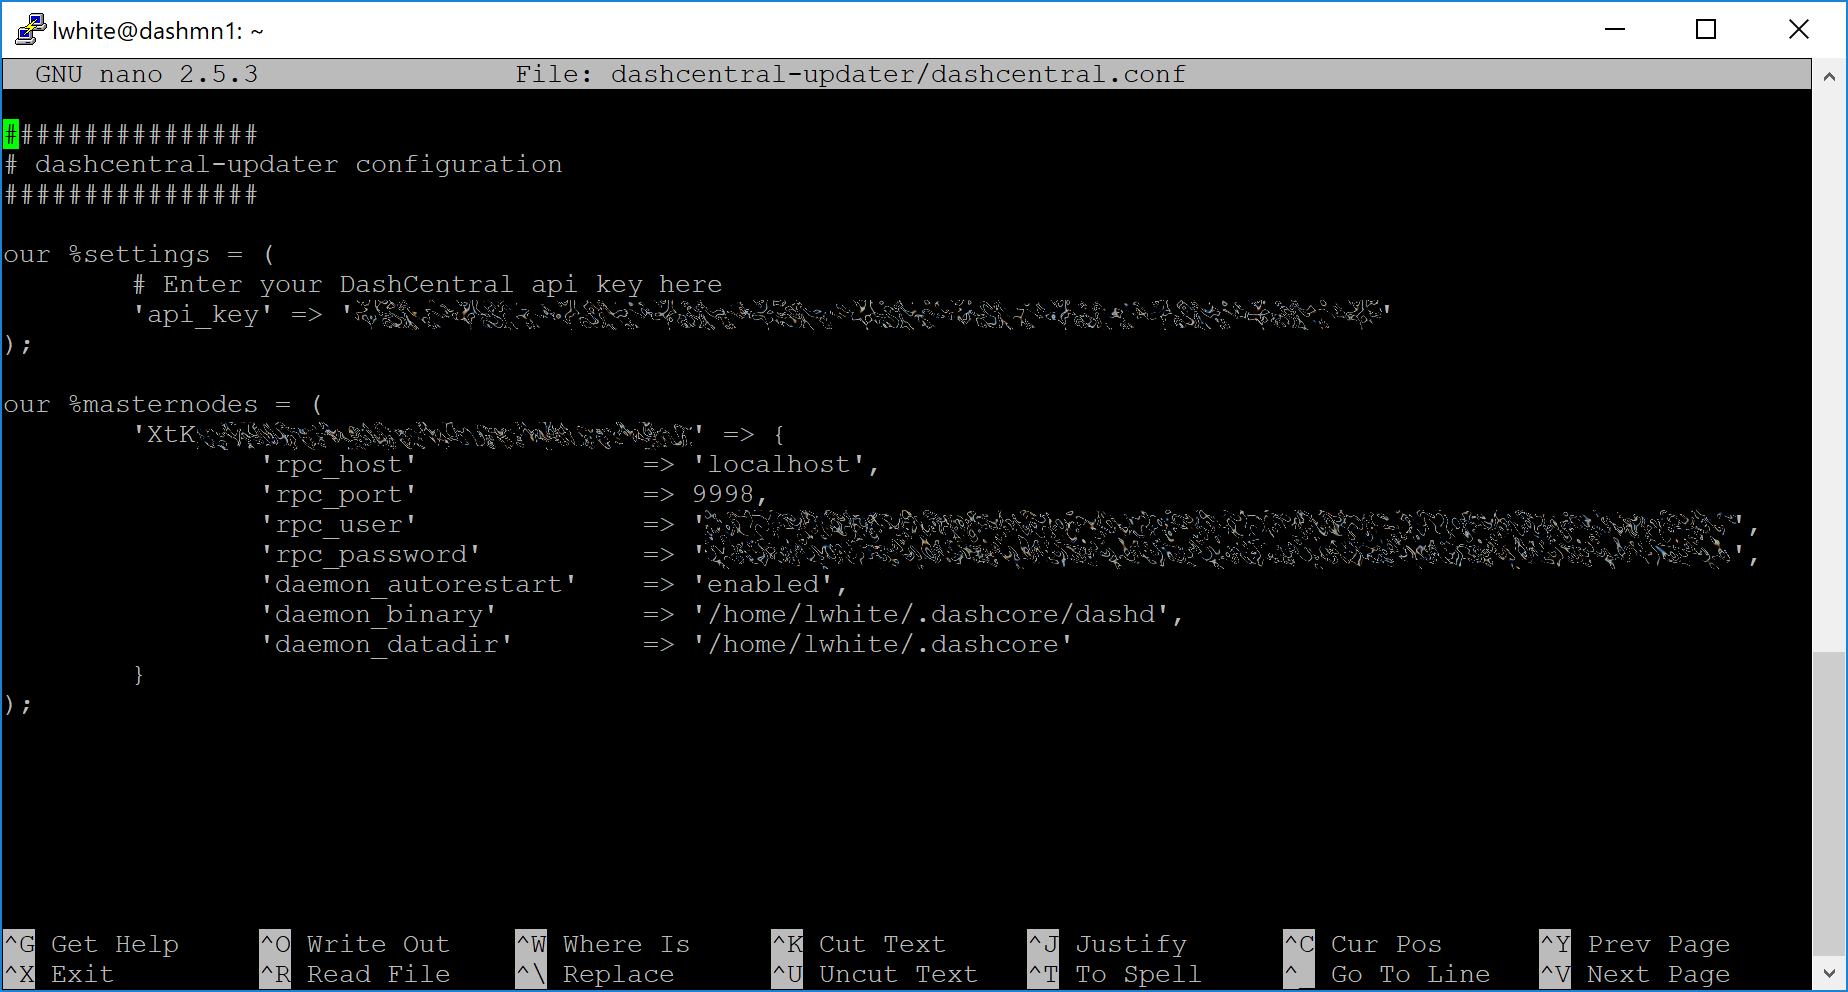
DashCentral updater configuration file
################
# dashcentral-updater configuration
################

our %settings = (
    # Enter your DashCentral api key here
    'api_key' => 'api_key_from_dashcentral'
);

our %masternodes = (
    'masternode_collateral_address' => {
        'rpc_host'           => 'localhost',
        'rpc_port'           => 9998,
        'rpc_user'           => 'rpc_user_from_dash.conf',
        'rpc_password'       => 'rpc_password_from_dash.conf',
        'daemon_autorestart' => 'enabled',
        'daemon_binary'      => '/home/<username>/.dashcore/dashd',
        'daemon_datadir'     => '/home/<username>/.dashcore'
    }
);
Press Ctrl + X to exit, confirm you want save with Y and press Enter. Test your configuration by running the dashcentral script, then check the website. If it was successful, you will see that an update has been sent:
dashcentral-updater/dcupdater
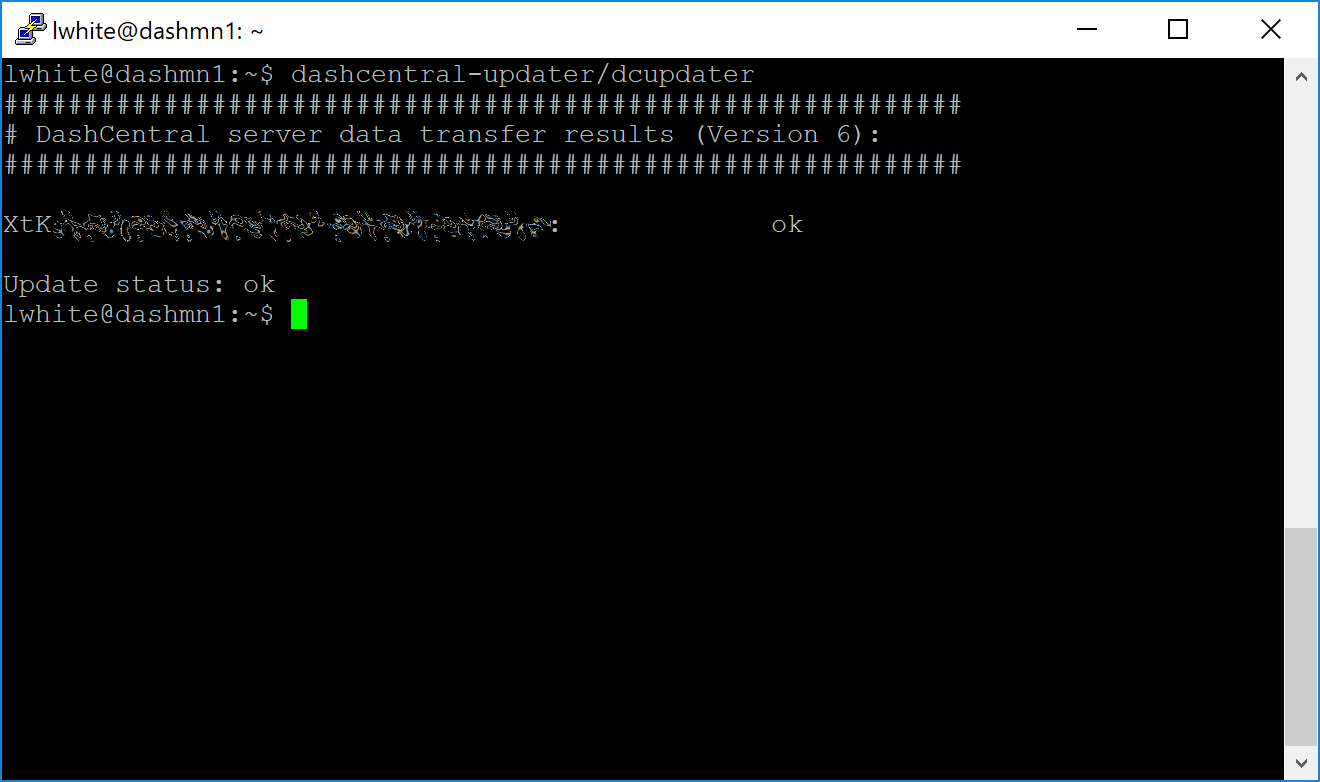
Manually testing the DashCentral updater
DashCentral updater has successfully sent data to the DashCentral site
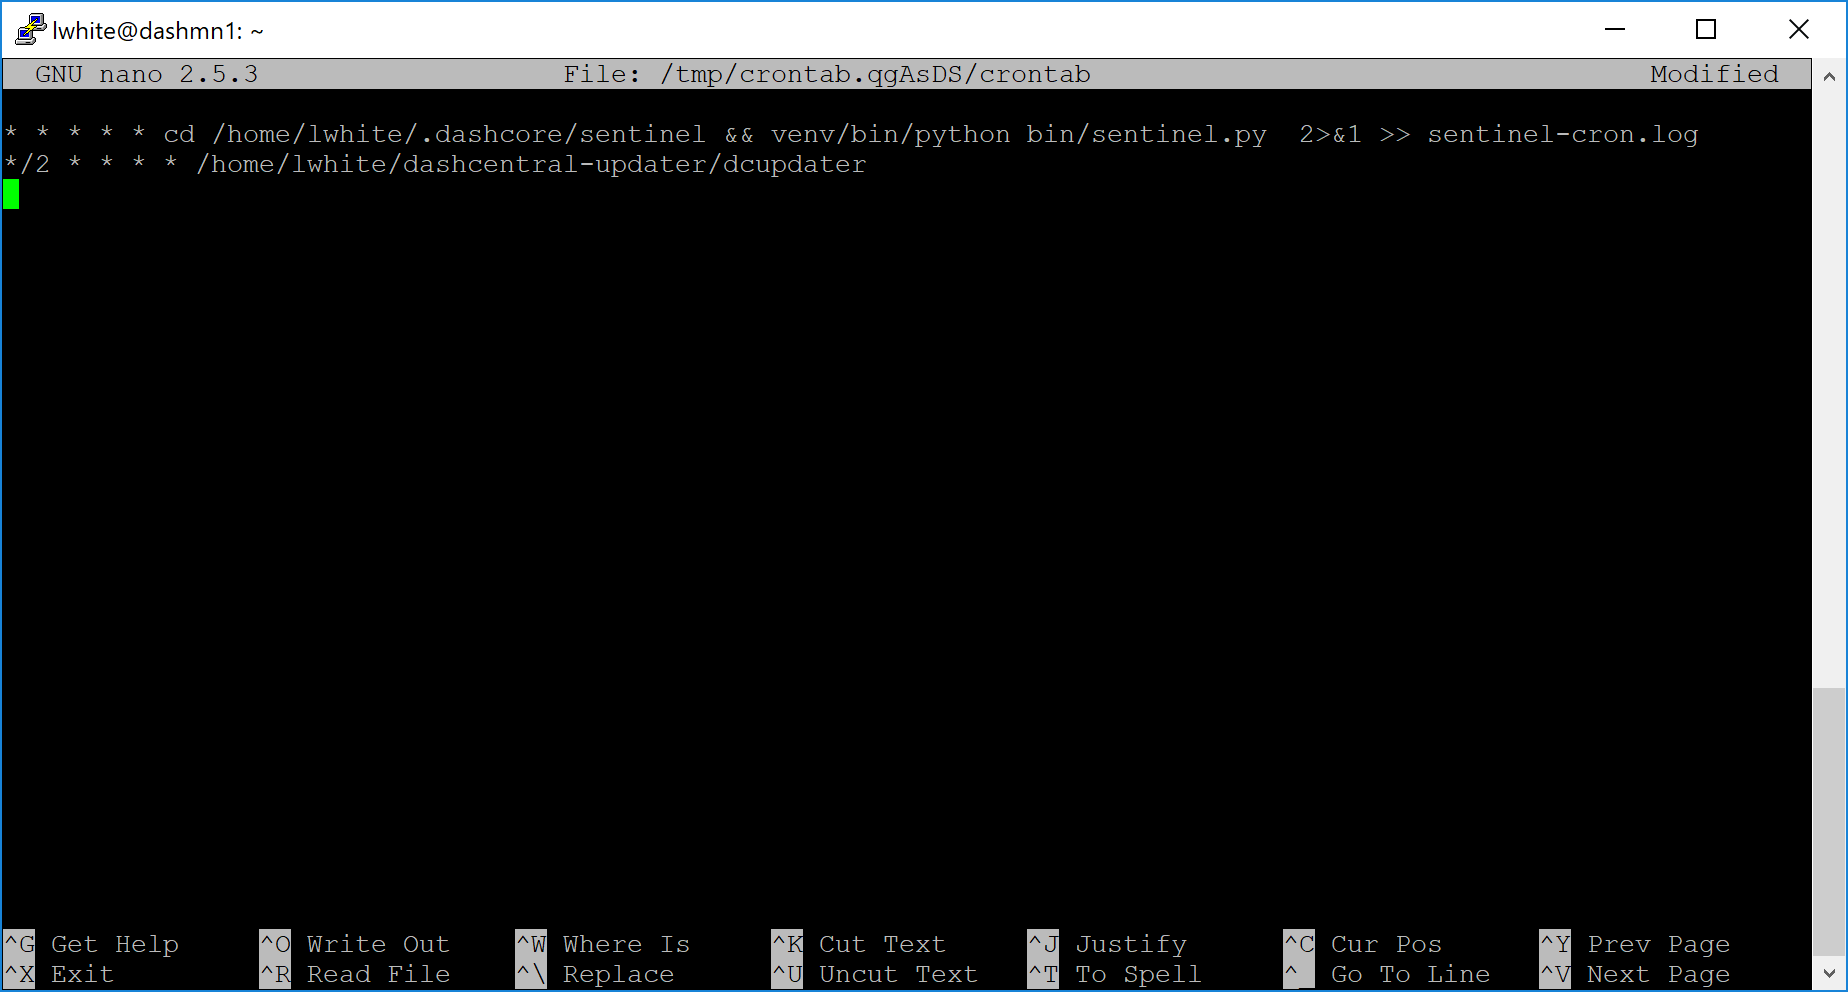
Once you have verified your configuration is working, we can edit the crontab on your system to schedule the dcupdater script to run every 2 minutes. This allows the system to give you early warning in the event of a fault and will even restart the dashd daemon if it hangs or crashes. This is an effective way to make sure you do not drop off the payment queue. Type the following command:
crontab -e
Select an editor if necessary and add the following line to your crontab after the line for sentinel, replacing lwhite with your username on your system:
*/2 * * * * /home/lwhite/dashcentral-updater/dcupdater
Editing crontab to run the DashCentral updater automatically
Press Ctrl + X to exit, confirm you want save with Y and press Enter. The dcupdater script will now run every two minutes, restart dashd whenever necessary and email you in the event of an error.
Masternode monitoring tools
Several sites operated by community members are available to monitor key information and statistics relating to the masternode network.
Block Explorers
Since Dash is a public blockchain, it is possible to use block explorers to view the balances of any Dash public address, as well as examine the transactions entered in any given block. Each unique transaction is also searchable by its txid. A number of block explorers are available for the Dash network.
- CryptoID offers a Dash blockchain explorer and a function to view and map Dash masternodes.
- BitInfoCharts offers a page of price statistics and information and a blockchain explorer.
- CoinCheckup offers a range of statistics and data on most blockchains, including Dash.
- CoinPayments offers a simple Dash blockchain explorer.
- Dash.org includes two blockchain explorers at explorer.dash.org and insight.dash.org.
- Trezor operates a blockchain explorer powered by a Dash fork of insight, an advanced blockchain API tool
Dash Masternode Tool
https://github.com/Bertrand256/dash-masternode-tool
Written and maintained by community member Bertrand256, Dash Masternode Tool (DMT) allows you to start a masternode from all major hardware wallets such as Trezor, Ledger and KeepKey. It also supports functions to vote on proposals and withdraw masternode payments without affecting the collateral transaction.
DASH Ninja
DASH Ninja, operated by forum member and Dash Core developer elbereth, offers key statistics on the adoption of different versions of Dash across the masternode network. Several features to monitor governance of the Dash, the masternode payment schedule and the geographic distribution of masternodes are also available, as well as a simple blockchain explorer.
DashCentral
DashCentral, operated by forum member rango, offers an advanced service to monitor masternodes and vote on budget proposals through an advanced web interface. An Android app is also available.
Masternode.me
Masternode.me, operated by forum member and Dash Core developer moocowmoo, offers sequential reports on the price, generation rate, blockchain information and some information on masternodes.
Dash Masternode Information
http://178.254.23.111/~pub/Dash/Dash_Info.html
This site, operated by forum member and Dash Core developer crowning, offers a visual representation of many key statistics of the Dash masternode network, including graphs of the total masternode count over time, price information and network distribution.