التنصيب
يتطلب إعداد ماسترنود فهمًا أساسيًا لتكنولوجيا لينكس و بلوكشين ، بالإضافة إلى القدرة على اتباع الإرشادات عن كثب. كما يتطلب صيانة دورية وأمنًا دقيقًا ، خاصةً إذا كنت لا تقوم بتخزين داش على محفظة الأجهزة. هناك بعض القرارات التي يجب اتخاذها على طول الطريق ، والخطوات الإضافية الاختيارية التي يجب اتخاذها لزيادة الأمان.
Commercial masternode hosting services are available if you prefer to delegate day-to-day operation of your masternode to a professional operator. When using these hosting services, you retain full control of the 1000 DASH collateral and pay an agreed percentage of your reward to the operator. It is also possible to delegate your voting keys to a representative, see the governance documentation for more information.
قبل البدأ
This guide assumes you are setting up a single masternode for the first time. If you are updating a masternode, see here instead. If Spork 15 is not yet enabled, it is not possible to directly set up a DIP003 masternode. You will need to set up the masternode following the old process and then work through the upgrade procedure. You will need:
- 1000 داش
- محفظة لتخزين داش الخاص بك ، ويفضل أن تكون محفظة الأجهزة ، على الرغم من أن محفظة داش كور تدعم أيضا
- خادم لينكس ، يفضل أن يكون خادمًا خاصًا افتراضيًا (VPS)
Dash 0.13.0 implements DIP003, which introduces several changes to how a Dash masternode is set up and operated. A list of available documentation appears below:
- DIP003 Deterministic Masternode Lists
- DIP003 Masternode Changes
- Dash 0.13 Upgrade Procedure
- Full masternode setup guide (you are here)
- Information for users of hosted masternodes
- Information for operators of hosted masternodes
It is highly recommended to first read at least the list of changes
before continuing in order to familiarize yourself with the new concepts
in DIP003. This documentation describes the commands as if they were
entered in the Dash Core GUI by opening the console from Tools > Debug
console, but the same result can be achieved on a masternode by
entering the same commands and adding the prefix
~/.dashcore/dash-cli to each command.
تتبيث VPS الخاصة بك
A VPS, more commonly known as a cloud server, is fully functional installation of an operating system (usually Linux) operating within a virtual machine. The virtual machine allows the VPS provider to run multiple systems on one physical server, making it more efficient and much cheaper than having a single operating system running on the "bare metal" of each server. A VPS is ideal for hosting a Dash masternode because they typically offer guaranteed uptime, redundancy in the case of hardware failure and a static IP address that is required to ensure you remain in the masternode payment queue. While running a masternode from home on a desktop computer is technically possible, it will most likely not work reliably because most ISPs allocate dynamic IP addresses to home users.
We will use Vultr hosting as an example of a VPS, although DigitalOcean, Amazon EC2, Google Cloud, Choopa and OVH are also popular choices. First create an account and add credit. Then go to the Servers menu item on the left and click + to add a new server. Select a location for your new server on the following screen:

شاشة اختيار موقع خادم Vultr
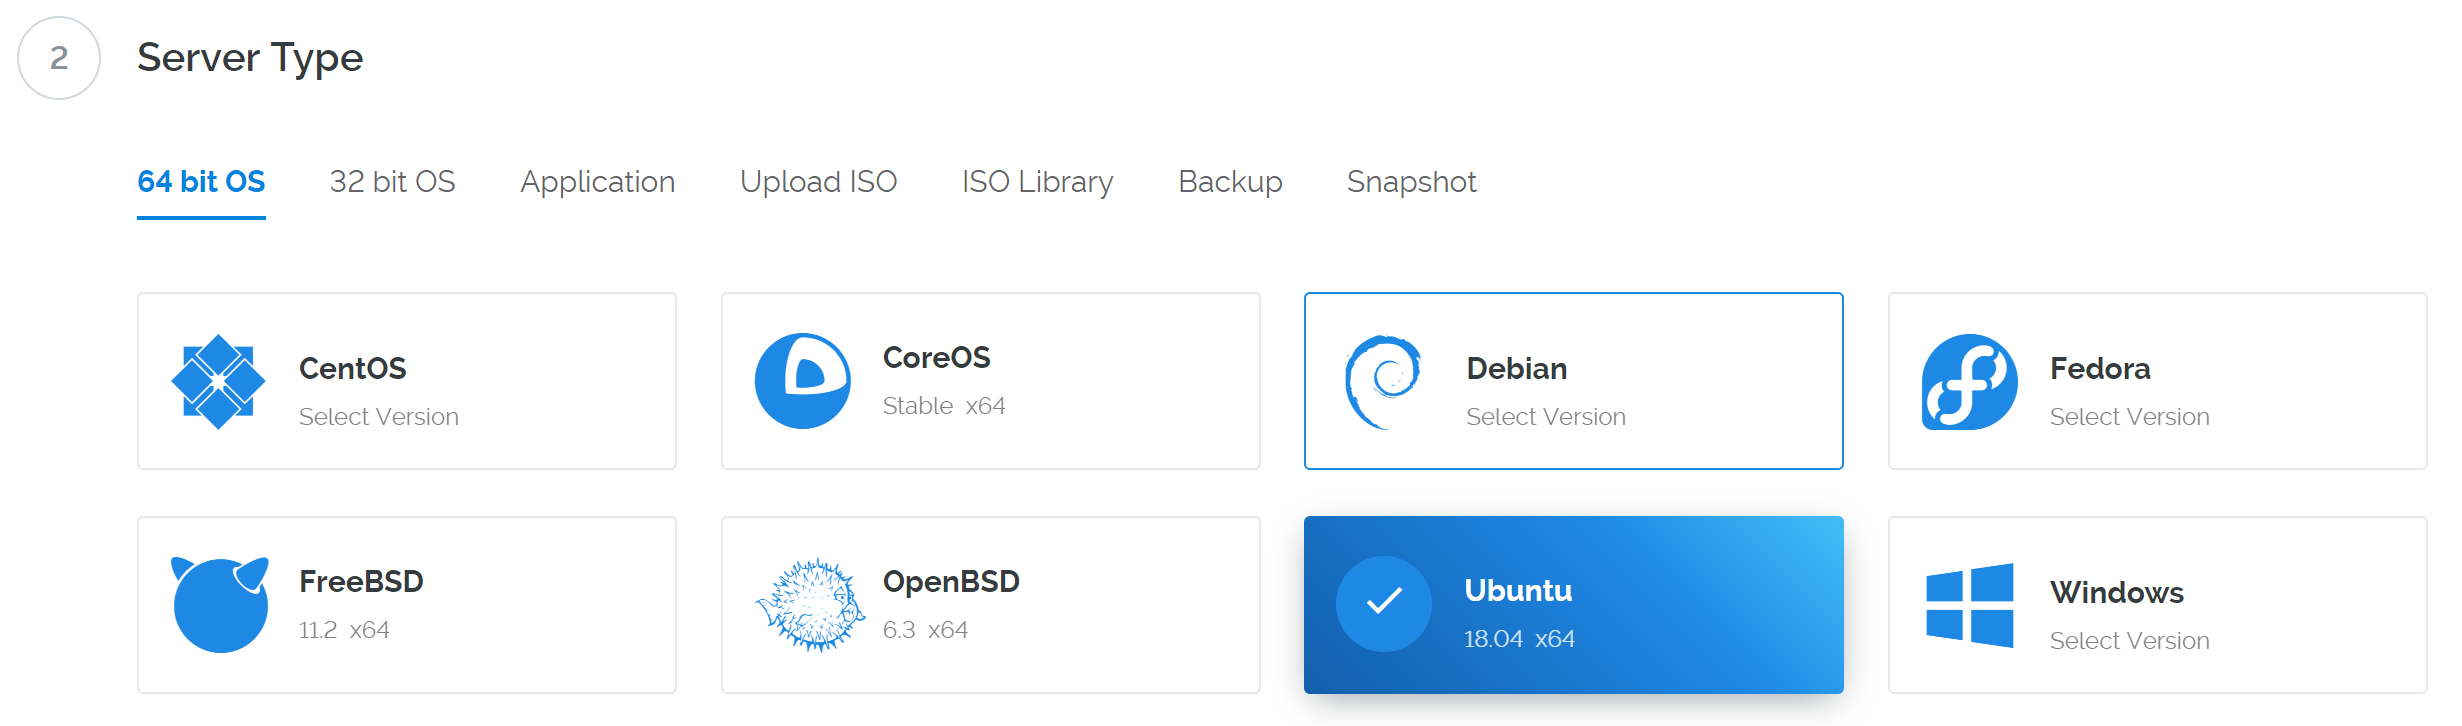
Select Ubuntu 18.04 x64 as the server type. We use this LTS release of Ubuntu instead of the latest version because LTS releases are supported with security updates for 5 years, instead of the usual 9 months.
شاشة اختيار نوع الخادم Vultr
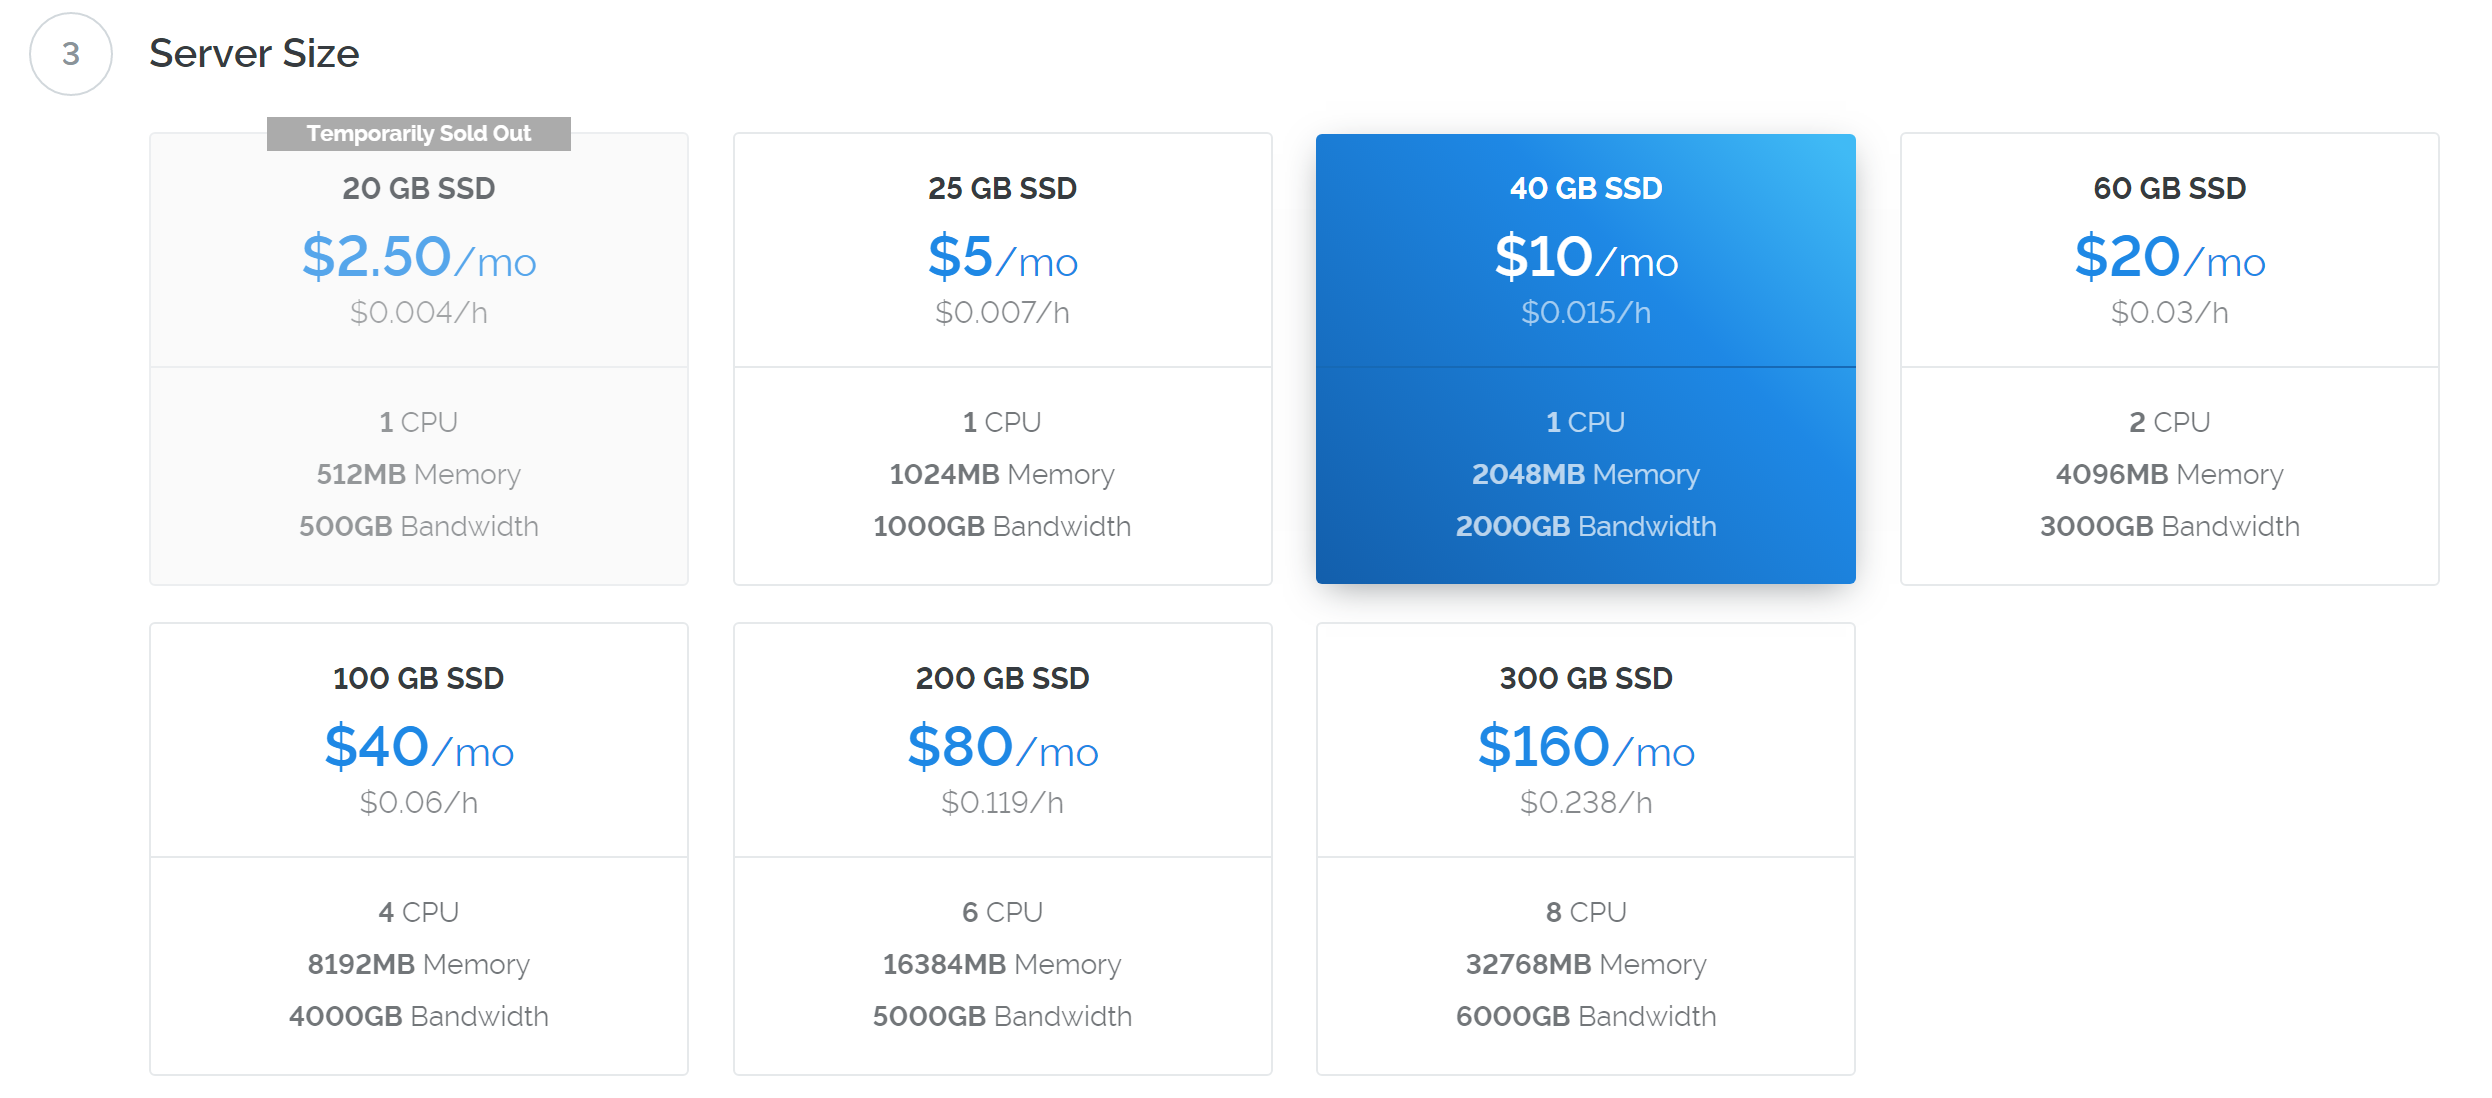
حدد حجم خادم يوفر ذاكرة 2 غيغابايت على الأقل.
شاشة اختيار حجم الخادم Vultr
أدخل اسم المضيف وتسمية الخادم الخاص بك. في هذا المثال ، سنستخدم dashmn1 كاسم مضيف.

شاشة اختيار تسمية مضيف خادم Vultr
سوف Vultr الآن تثبيت الخادم الخاص بك. قد تستغرق هذه العملية بضع دقائق.

شاشة تثبيت خادم Vultr
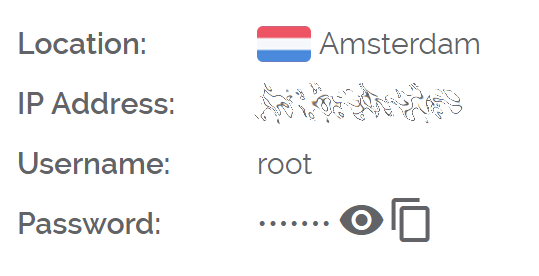
انقر فوق ادارة عند اكتمال التثبيت وتحيط علما بعنوان IP واسم المستخدم وكلمة المرور.
شاشة إدارة خادم Vultr
قم بإعداد نظام التشغيل الخاص بك
سنبدأ بالاتصال بخادمك الجديد الذي تم توفيره. على ويندوز ، سنقوم أولاً بتنزيل تطبيق يسمى PuTTY للاتصال بالخادم. اذهب الى تحميل وحدد مثبت MSI المناسب لنظامك. على ماك أو لينكس يمكنك ssh مباشرة من المحطة - ببساطة اكتب ssh root@ <server_ip> و ادخل الرقم السري للإنتهاء.
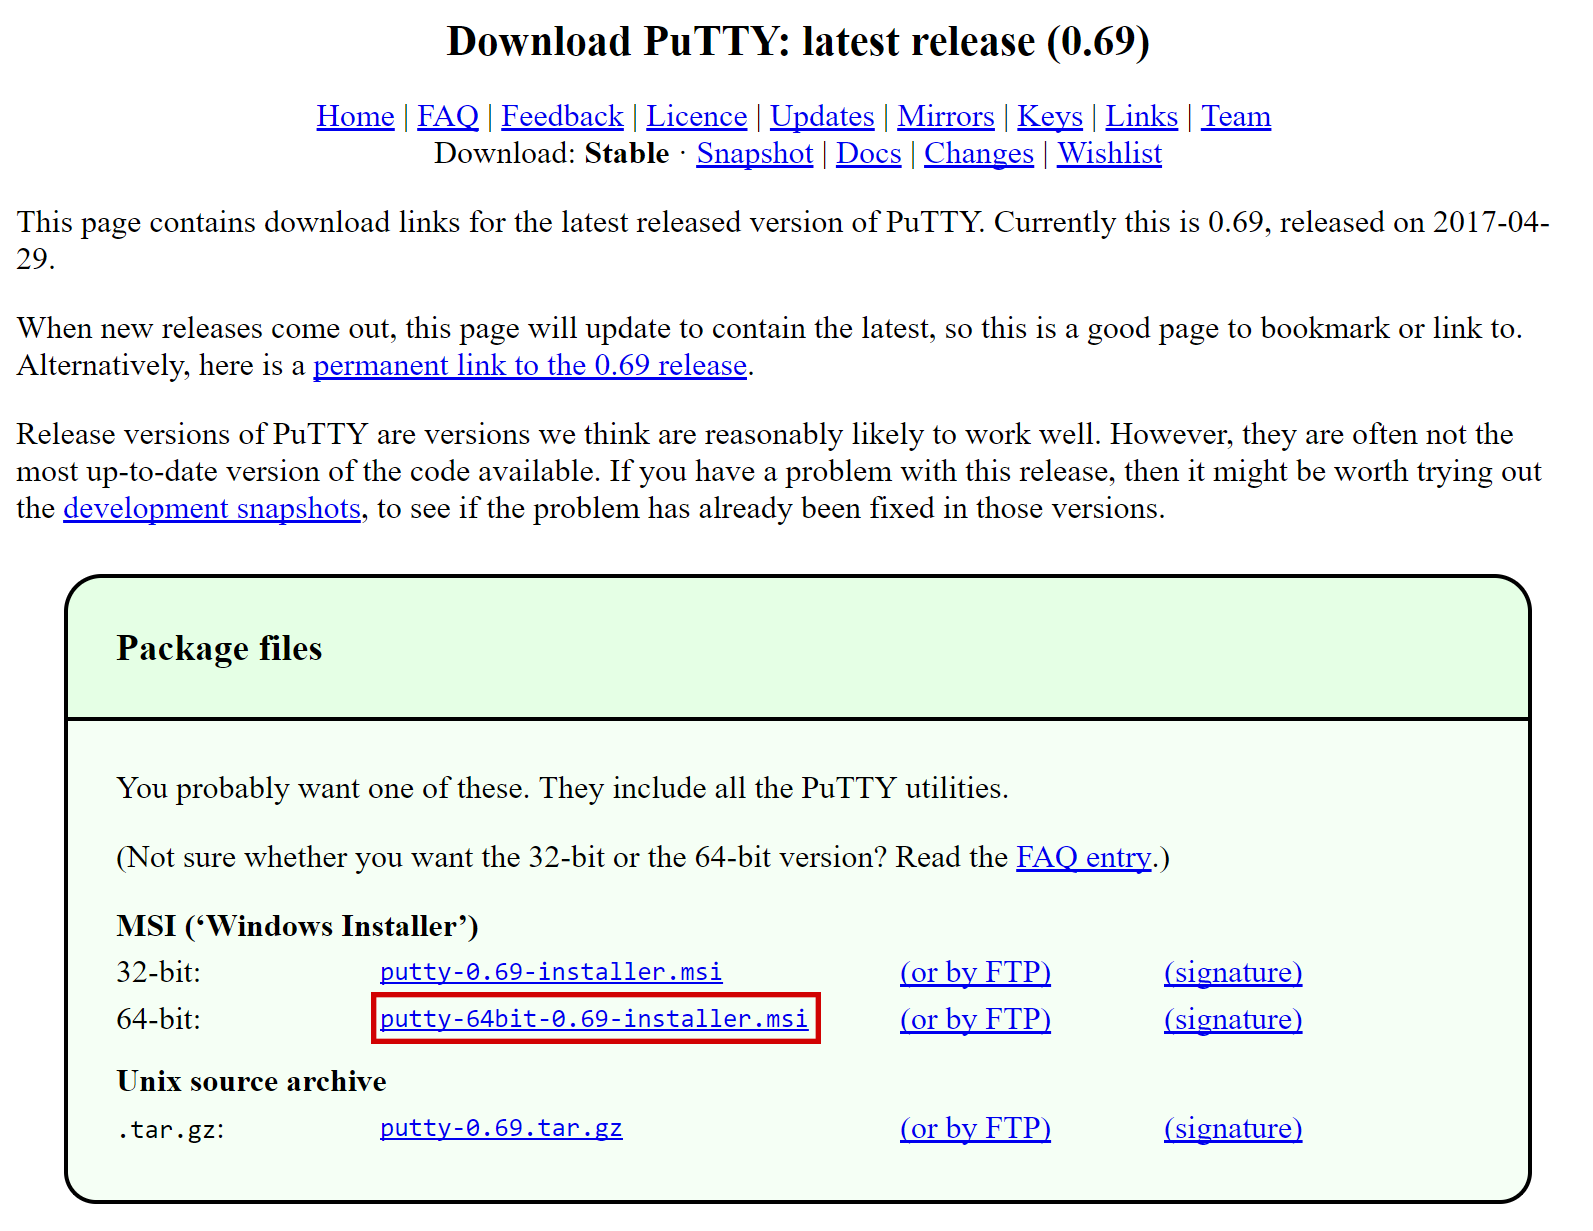
صفحة التحميل PuTTY
انقر نقرًا مزدوجًا فوق الملف الذي تم تنزيله لتثبيت PuTTY ، ثم قم بتشغيل التطبيق من قائمة بدأ ادخل عنوان IP الخاص بالخادم في الحقل اسم المضيف وانقر فوق فتح. قد تشاهد تحذيرًا بوجود شهادة ، نظرًا لأن هذه هي المرة الأولى التي تتصل فيها بهذا الخادم. يمكنك النقر بأمان نعم للوثوق بهذا الخادم في المستقبل.
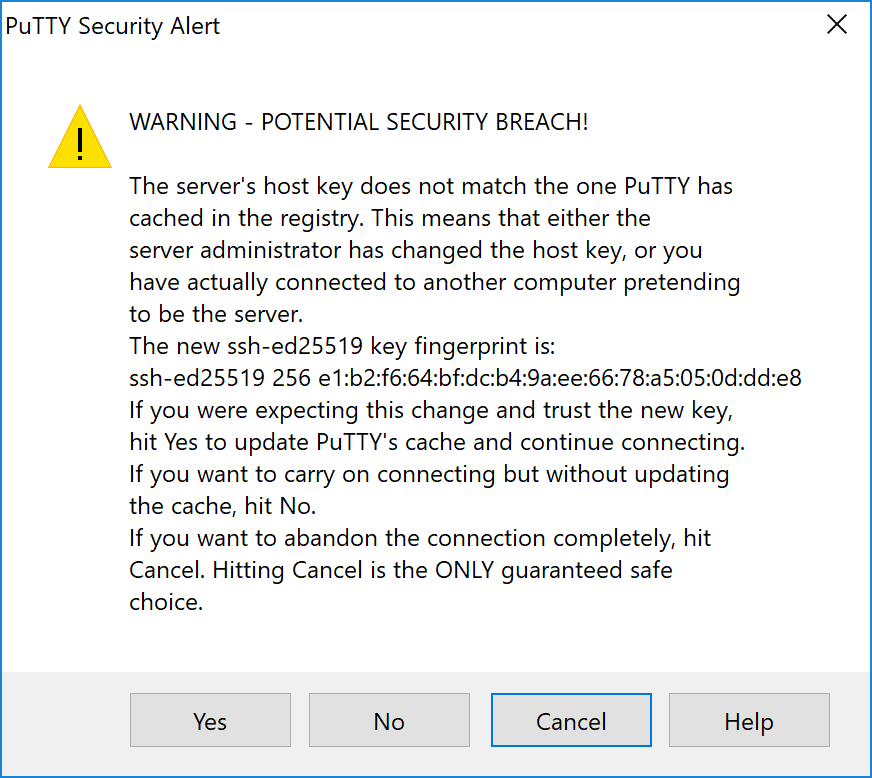
تنبيه الأمان PuTTY عند الاتصال بخادم جديد
أنت الآن متصل بخادمك ويجب أن تشاهد نافذة طرفية. قم بتسجيل الدخول إلى الخادم الخاص بك باستخدام المستخدم root وكلمة المرور التي قدمها مزود خدمة الاستضافة الخاص بك.
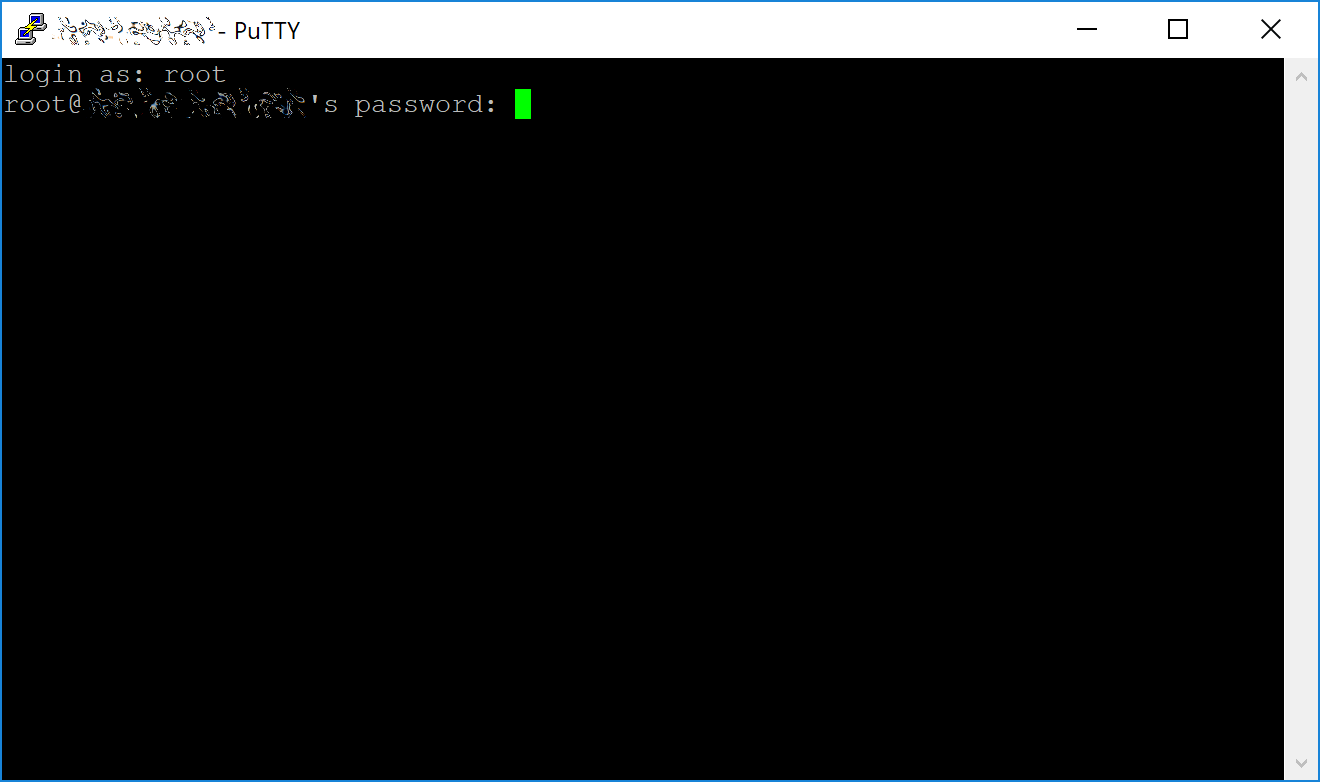
تحديت كلمة المرور عند الاتصال بـ VPS الخاص بك لأول مرة
يجب تغيير كلمة مرور الجذر فوراً وتخزينها في مكان آمن للأمان. يمكنك نسخ أي من الأوامر التالية ولصقها من خلال تحديدها في المستعرض الخاص بك ، بالضغط على Ctrl + C ، ثم التبديل إلى نافذة PuTTY والنقر بزر الماوس الأيمن في النافذة. سيتم لصق النص في موقع المؤشر الحالي
passwd root
أدخل كلمة مرور جديدة وقم بتأكيدها (يفضل أن تكون طويلة ومولدة بشكل عشوائي). بعد ذلك سننشئ مستخدمًا جديدًا باستخدام الأمر التالي ، مع استبداله <username> مع اسم مستخدم من اختيارك
adduser <username>
ستتم مطالبتك بكلمة مرور. أدخل وتأكد باستخدام كلمة مرور جديدة (مختلفة عن كلمة مرور الجذر) وقم بتخزينها في مكان آمن. سترى أيضًا مطالبات بمعلومات المستخدم ، ولكن يمكن ترك هذا فارغًا. بمجرد أن يتم إنشاء المستخدم ، سنقوم بإضافتهم إلى المجموعة sudo بحيث يمكنهم تنفيذ الأوامر كجذر
usermod -aG sudo <username>
الآن ، بينما لا يزال الجذر ، سنقوم بتحديث النظام من مستودع حزمة أوبونتو
apt update
apt upgrade
سيعرض النظام قائمة الحزم القابلة للترقية. اضغط على Y و اضغط لتثبيت الحزم. سنقوم الآن بتثبيت جدار حماية (وبعض الحزم الأخرى التي سنستخدمها لاحقًا) ، وإضافة ذاكرة مبادلة وإعادة تشغيل الخادم لتطبيق أي تحديثات ضرورية للنواة ، ثم تسجيل الدخول إلى البيئة المؤمنة حديثًا لدينا كمستخدم جديد:
apt install ufw python virtualenv git unzip pv
(اضغط Y و ادخل للتأكيد)
ufw allow ssh/tcp
ufw limit ssh/tcp
ufw allow 9999/tcp
ufw logging on
ufw enable
(اضغط Y و ادخل للتأكيد)
fallocate -l 4G /swapfile
chmod 600 /swapfile
mkswap /swapfile
swapon /swapfile
nano /etc/fstab
أضف السطر التالي في نهاية الملف (اضغط على Tab لفصل كل كلمة / رقم) ، ثم اضغط Ctrl + X لإغلاق المحرر ، ثم Y و ادخل احفظ الملف .
/swapfile none swap sw 0 0
أخيرا ، من أجل منع هجمات القرصنة بكلمات القوة الغاشمة ، قم بفتح ملف إعدادات SSH لتعطيل دخول الجذر عبر SSH
nano /etc/ssh/sshd_config
حدد السطر الذي يقرأ PermitRootLogin yes وقم بتعيينه على PermitRootLogin no. مباشرة أدناه ، إضافة خط ما يقرأ AllowUsers <username>، تبديل <username> مع اسم المستخدم الذي حددته أعلاه. اضغط على Ctrl + X لإغلاق المحرر ، ثم Y و ادخل قم بحفظ الملف.
ثم أعد تشغيل الخادم:
reboot now
سوف PuTTY فصل عند إعادة تمهيد الخادم.
While this setup includes basic steps to protect your server against attacks, much more can be done. In particular, authenticating with a public key instead of a username/password combination, installing fail2ban to block login brute force attacks and enabling automatic security updates is advisable. More tips are available here. However, since the masternode does not actually store the keys to any Dash, these steps are considered beyond the scope of this guide.
أرسل الضمانات
A Dash address with a single unspent transaction output (UTXO) of exactly 1000 DASH is required to operate a masternode. Once it has been sent, various keys regarding the transaction must be extracted for later entry in a configuration file and registration transaction as proof to write the configuration to the blockchain so the masternode can be included in the deterministic list. A masternode can be started from a hardware wallet or the official Dash Core wallet, although a hardware wallet is highly recommended to enhance security and protect yourself against hacking. This guide will describe the steps for both hardware wallets and Dash Core.
الخيار 1: الإرسال من محفظة الأجهزة
Set up your Trezor using the Trezor wallet at https://wallet.trezor.io/ and send a test transaction to verify that it is working properly. For help on this, see this guide - you may also choose to (carefully!) add a passphrase to your Trezor to further protect your collateral. Create a new account in your Trezor wallet by clicking Add account. Then click the Receive tab and send exactly 1000 DASH to the address displayed. If you are setting up multiple masternodes, send 1000 DASH to consecutive addresses within the same new account. You should see the transaction as soon as the first confirmation arrives, usually within a few minutes.
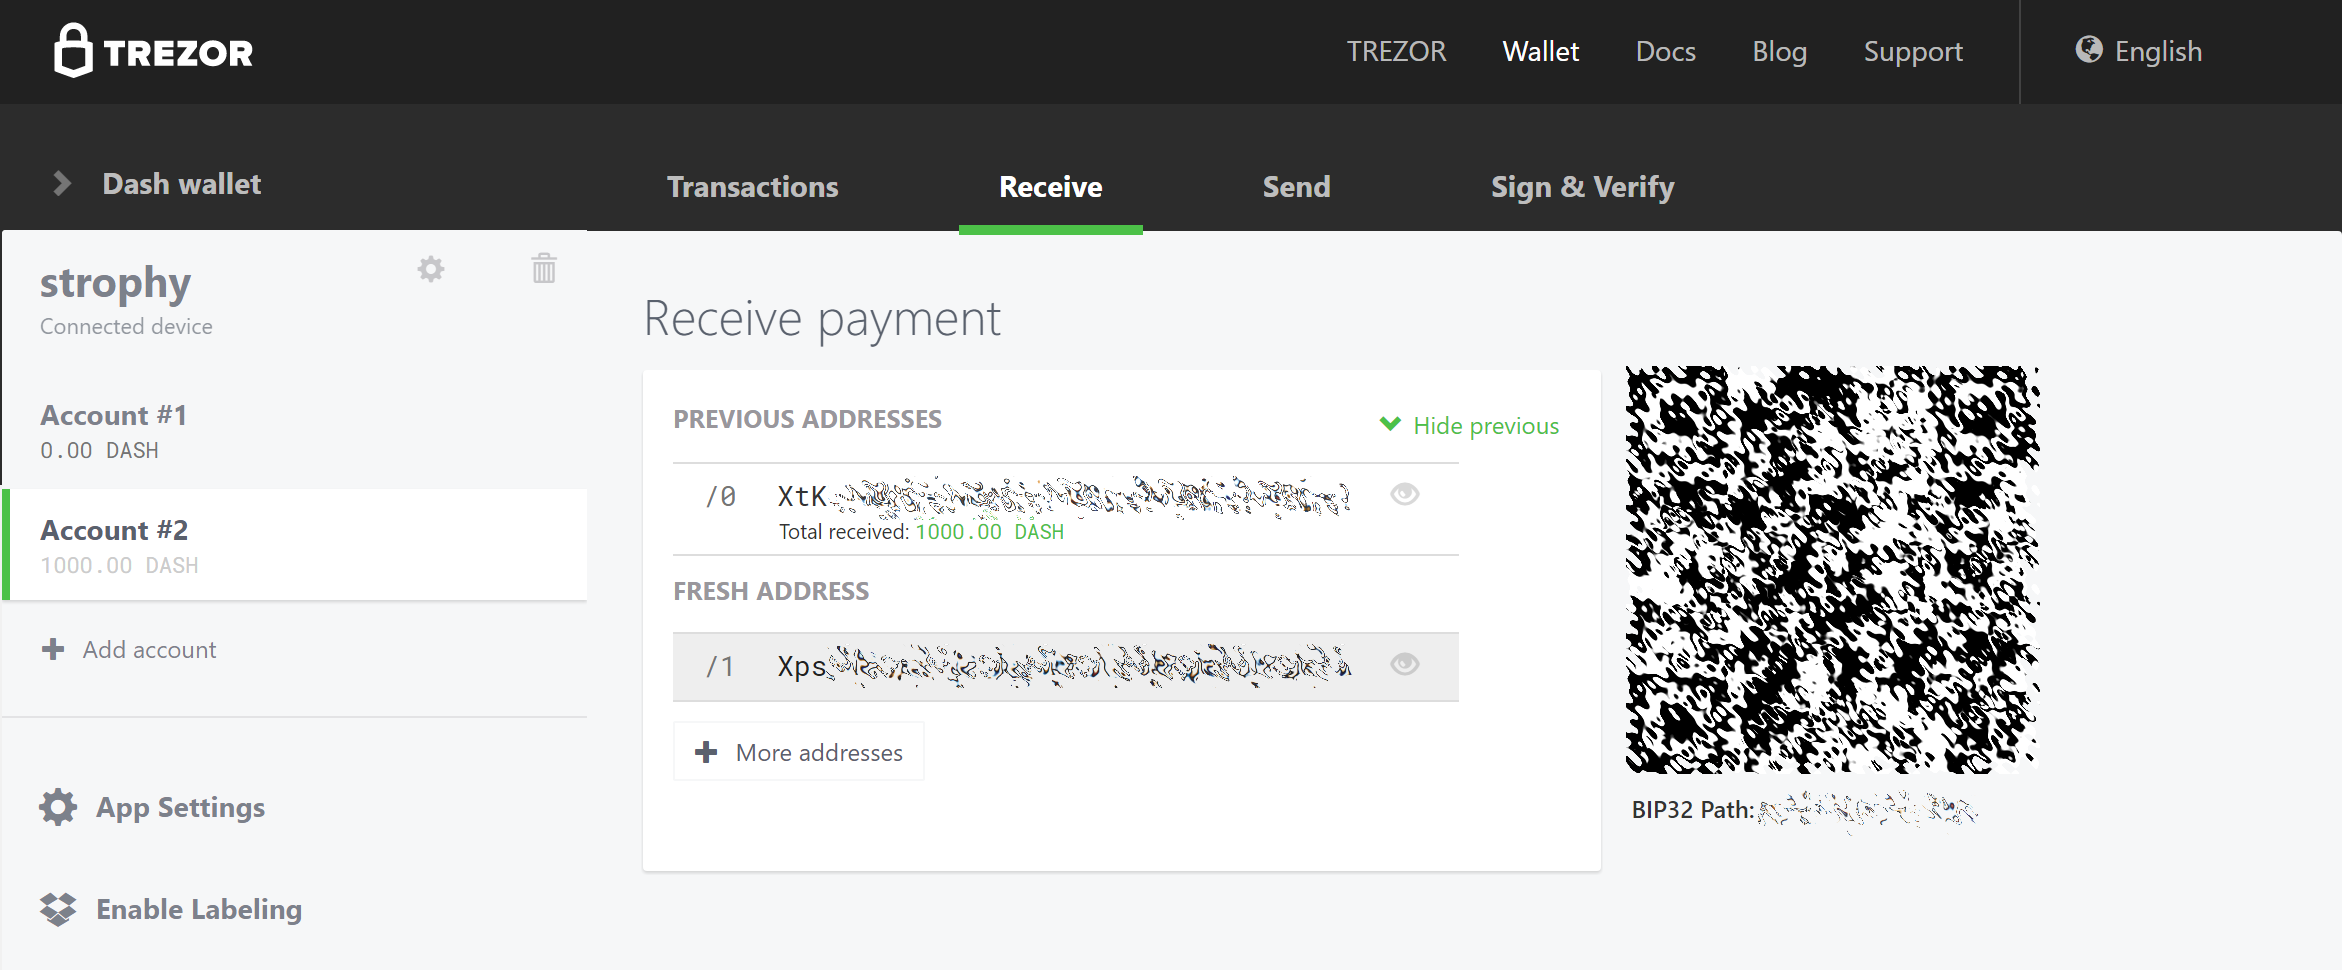
تريزور محفظة تلقي علامة التبويب تظهر بنجاح تلقى ضمانات من 1000 داش
بمجرد ظهور المعاملة ، انقر فوق رمز QR الموجود على اليسار لعرض المعاملة على بلوكشين. أبقِ هذه النافذة مفتوحة عندما نكمل الخطوات التالية ، حيث سنحتاج قريبًا إلى تأكيد وجود 15 تأكيدًا ، كما هو موضح في الصورة التالية.

مستكشف Trezor بلوكشين يعرض 15 تأكيدًا لنقل الضمانات
بينما ننتظر 15 تأكيدًا ، نزّل أحدث إصدار من أداة ماسترنود داش (DMT) من صفحة إصدارات GitHub هنا. بفك وتشغيل الملف. النافذة التالية تظهر.
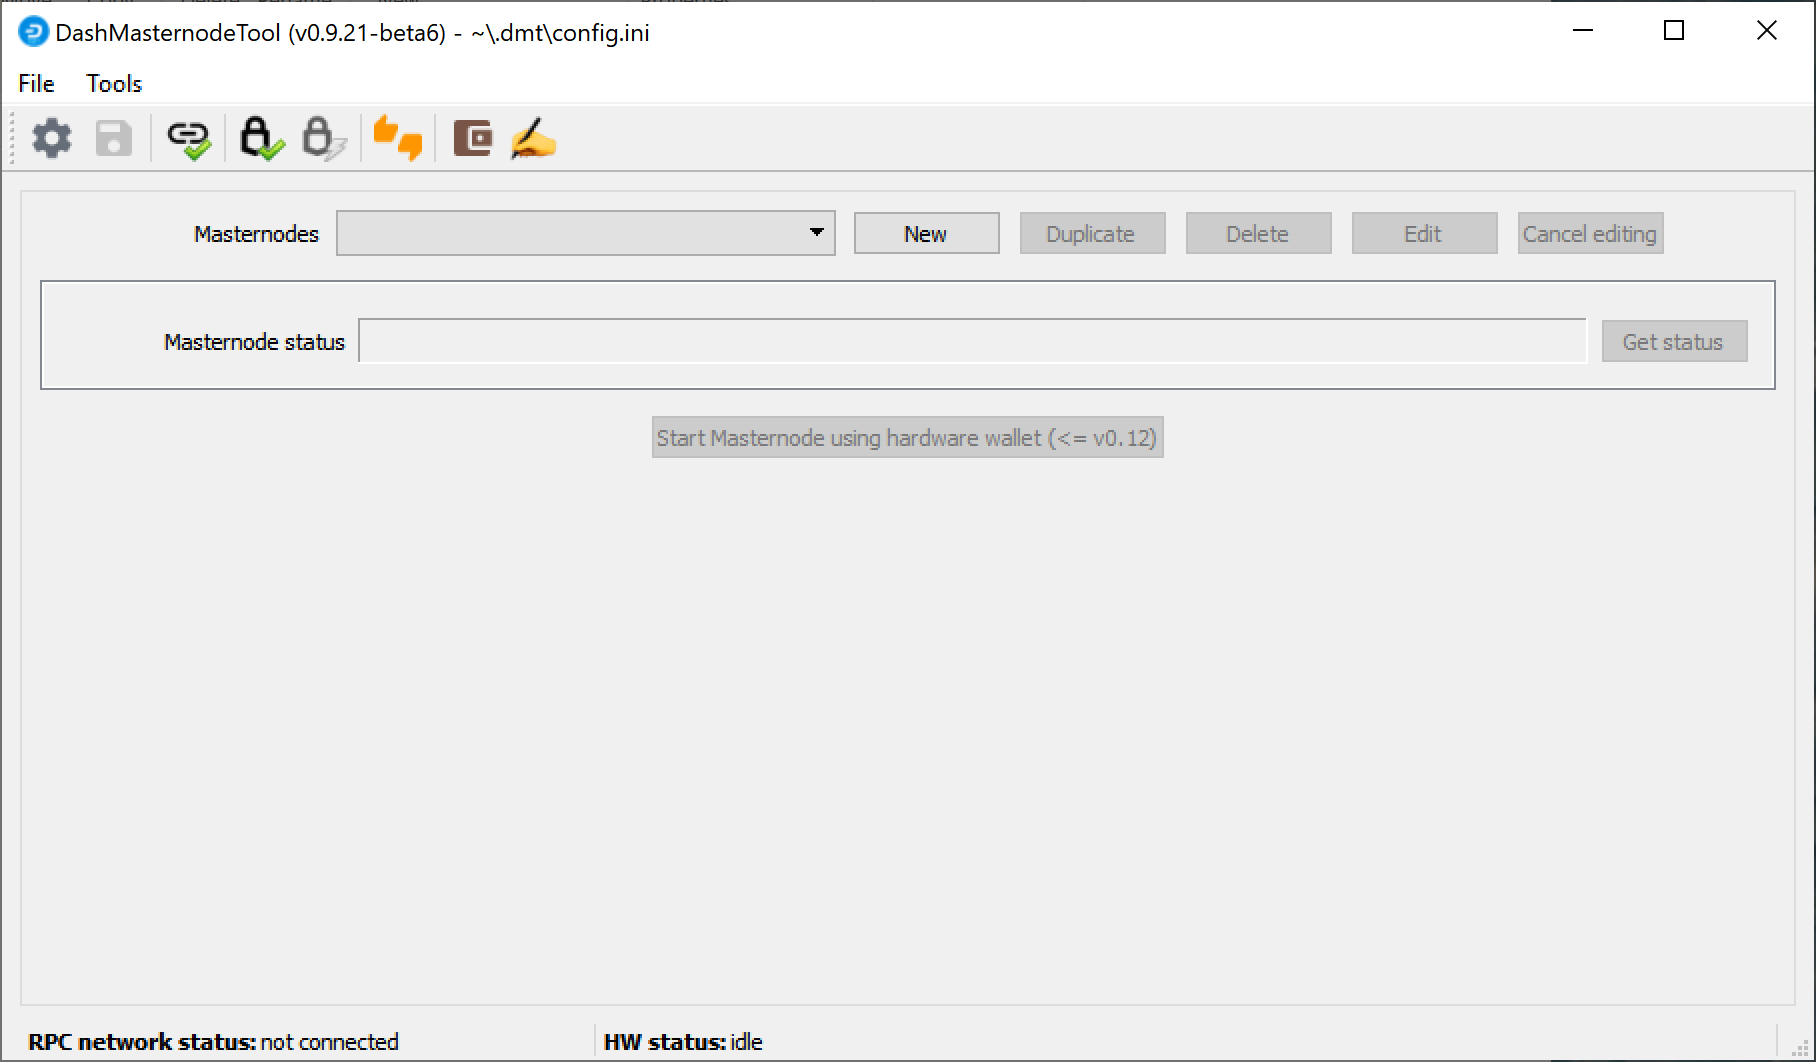
شاشة بدء تشغيل أداة ماسترنود داش
Click the third button from the left Check Dash Network Connection in the top left corner of the main window to verify that the connection is working. Then connect your Trezor device and click the next button Test Hardware Wallet Connection to verify the Trezor connection is working.

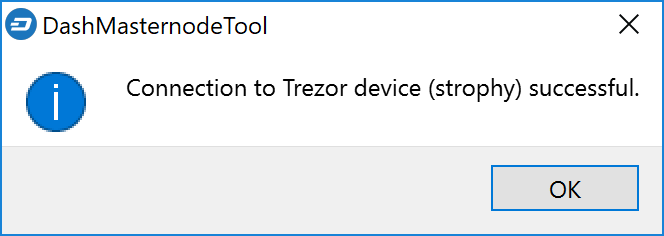
ماسترنود داش أداة تأكيد الاتصال ناجحة
We will now use DMT to extract the transaction ID and legacy masternode key (necessary for successful startup during the DIP003 transition period). Carry out the following sequence of steps as shown in this screenshot:

خطوات تهيئة أداة ماسترنود داش
- Click the New button.
- Ensure you are on the settings page for a Non-deterministic masternode and click Generate new to generate a legacy masternode key. Copy this key into a text editor.
- Click Alter configuration to deterministic
- Enter a name for your masternode. The host name you specified for your VPS above is a good choice.
- Enter the IP address of your masternode. This was given to you by the VPS provider when you set up the server.
- أدخل رقم منفذ TCP. يجب أن يكون هذا 9999.
- Click Locate collateral to view unused collateral funding transactions available on the connected hardware wallet. The Collateral address, index and Collateral TX hash fields should be filled automatically
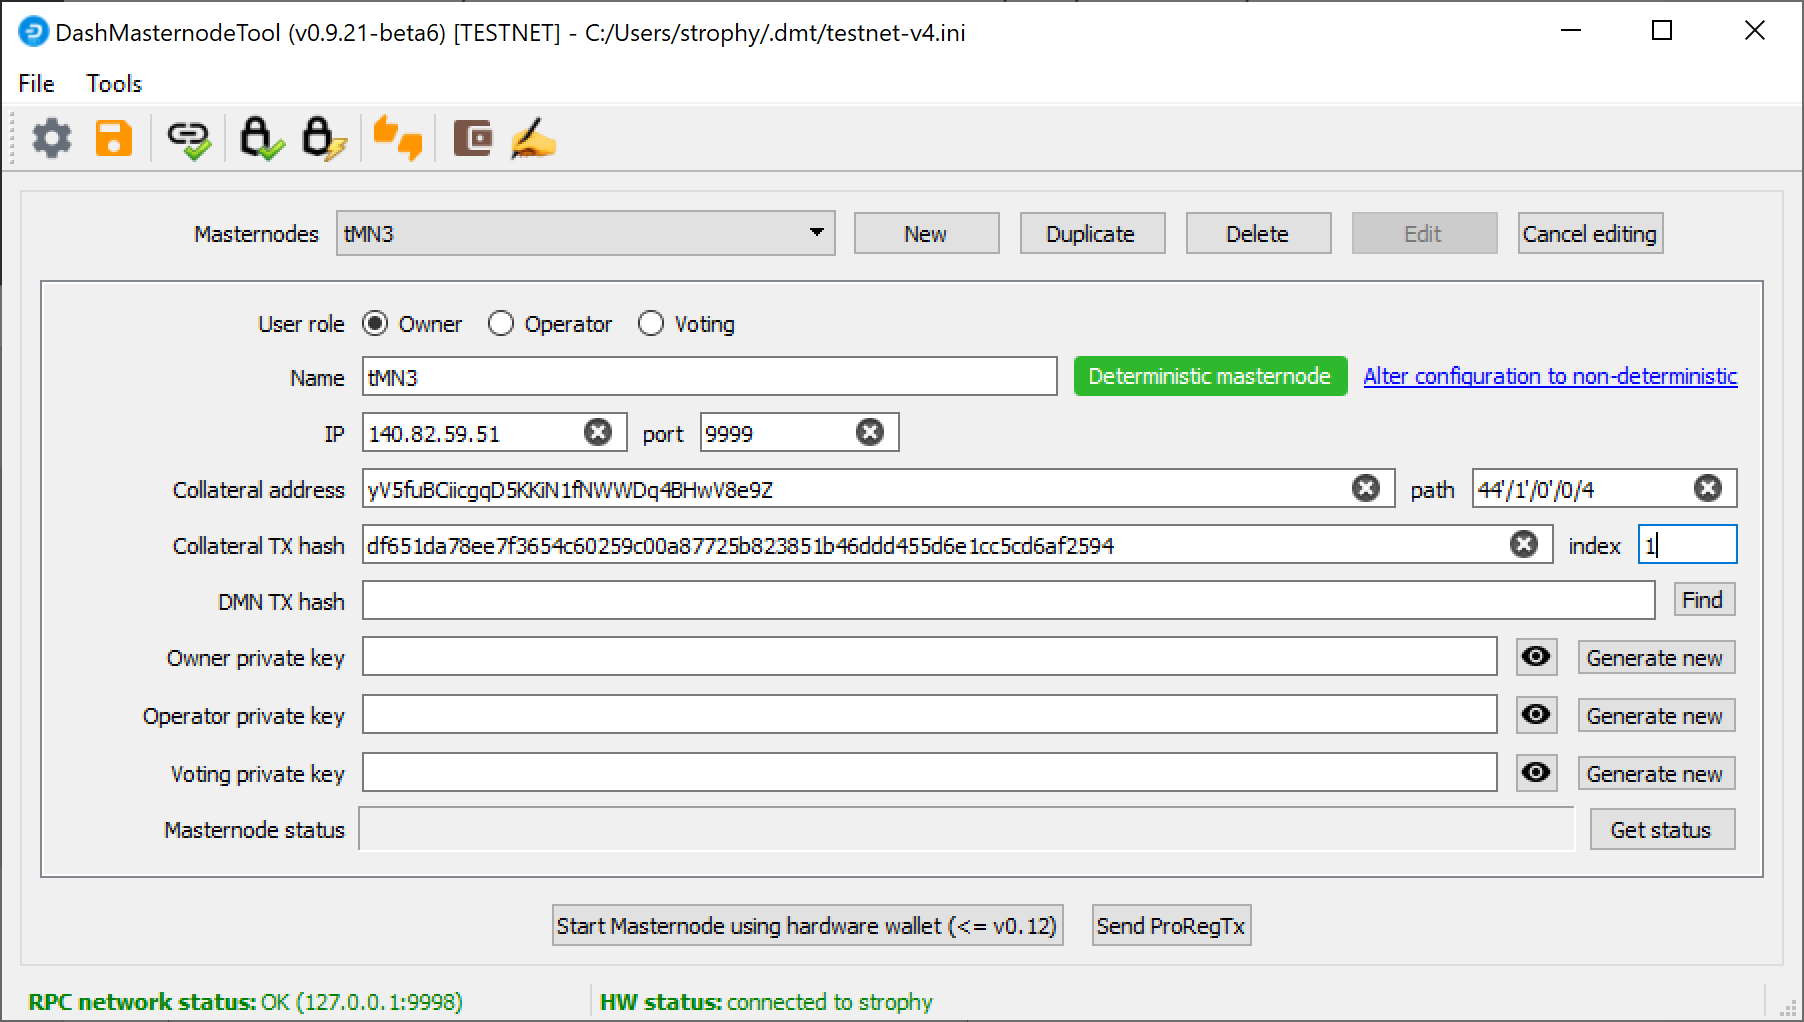
داش ماسترنود أداة مع التكوين على استعداد لبدء ماسترنود
Leave DMT open and continue with the next step: installing Dash Core on your VPS.
الخيار 2: إرسال من محفظة داش كور
افتح محفظة داش كور وانتظر حتى تتم مزامنتها مع الشبكة. يجب أن تبدو مثل هذه عندما تكون جاهزة:
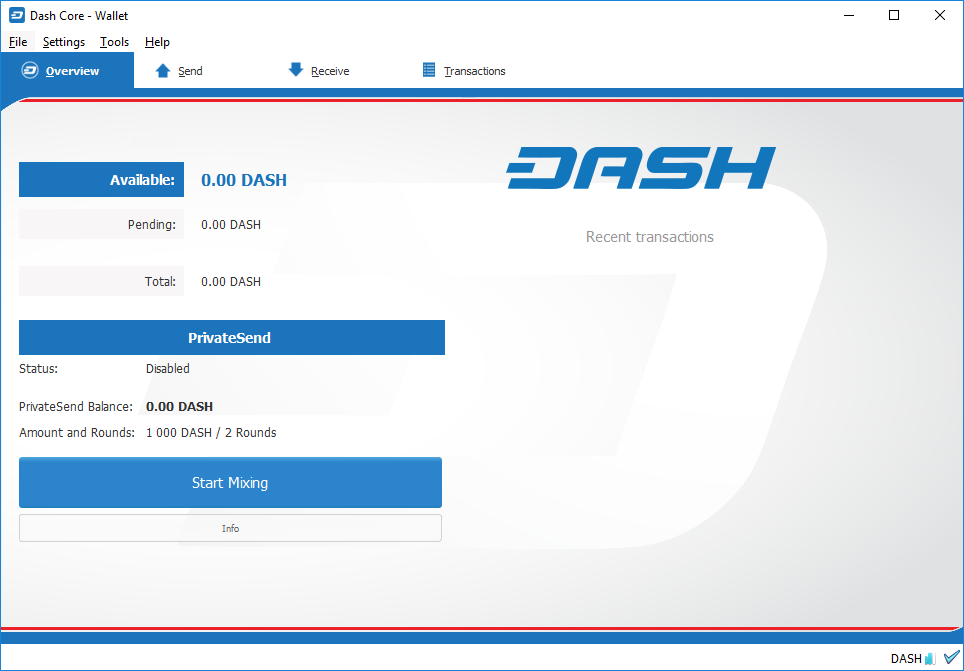
متزامن تماما داش كور المحفظة
Click Tools > Debug console to open the console. Type the following two commands into the console to generate a legacy masternode key (necessary for successful startup during the DIP003 transition period) and a new Dash address for the collateral:
masternode genkey
93PAqQsDjcVdYJHRfQPjsSt5338GCswMnUaSxoCD8J6fiLk4NHL

getnewaddress
yiFfzbwiN9oneftd7cEfr3kQLRwQ4kp7ue
Take note of the legacy masternode private key and collateral address, since we will need it later. The next step is to secure your wallet (if you have not already done so). First, encrypt the wallet by selecting Settings > Encrypt wallet. You should use a strong, new password that you have never used somewhere else. Take note of your password and store it somewhere safe or you will be permanently locked out of your wallet and lose access to your funds. Next, back up your wallet file by selecting File > Backup Wallet. Save the file to a secure location physically separate to your computer, since this will be the only way you can access our funds if anything happens to your computer. For more details on these steps, see here.
Now send exactly 1000 DASH in a single transaction to the new address you generated in the previous step. This may be sent from another wallet, or from funds already held in your current wallet. Once the transaction is complete, view the transaction in a blockchain explorer by searching for the address. You will need 15 confirmations before you can start the masternode, but you can continue with the next step at this point already: installing Dash Core on your VPS.
مستكشف Trezor بلوكشين يعرض 15 تأكيدًا لنقل الضمانات
تتبيت داش كور
داش كور هو البرنامج وراء كل من محفظة و داش ماسترنود. إذا لم يتم عرض واجهة المستخدم الرسومية ، فإنه يعمل كخادم على (VPS (dashd ، يتم التحكم فيه بواسطة واجهة أوامر بسيطة (dash-cli).
افتح PuTTY أو وحدة تحكم مرة أخرى وتواصل باستخدام اسم المستخدم وكلمة المرور اللذين أنشأتهما للتو لمستخدمك الجديد غير الأساسي. هناك خياران لتثبيت داش كور ، وهو خيار تلقائي باستخدام أداة مساعدة نصية تسمى dashman من قِبل moocowmoo من أعضاء فريق داش كور ، وخيار أكثر تعقيدًا يسمح لك بفهم جميع الخطوات الأساسية المتضمنة في إعداد ماسترنود الخاص بك.
الخيار 1: التثبيت التلقائي باستخدام dashman
لتثبيت داش باستخدام dashman ، أدخل الأوامر التالية بعد تسجيل الدخول
cd ~
git clone https://github.com/moocowmoo/dashman
~/dashman/dashman install
(اضغط Y و ادخل للتأكيد)
dashman will download the latest version of Dash Core for your system, as well as an initial snapshot of the blockchain to speed up the bootstrapping process. Next download and install Sentinel, which is required for masternodes at version 0.12.1 or higher:
~/dashman/dashman install sentinel
Your system is now running as a standard Dash node, and is busy completing synchronisation with the blockchain. Since dashman does not automatically restart your masternode in the event of a system error, add a check function to crontab to make sure it checks every minute to ensure your masternode is still running:
crontab -e
اختر nano كمحرر وأدخل السطر التالي في نهاية الملف ، بعد السطر للحماية
* * * * * pidof dashd || ~/.dashcore/dashd
Press enter to make sure there is a blank line at the end of the file, then press Ctrl + X to close the editor and Y and Enter save the file. Check the sync status and wait until all blockchain synchronisation and the 15 confirmations for the collateral transaction are complete:
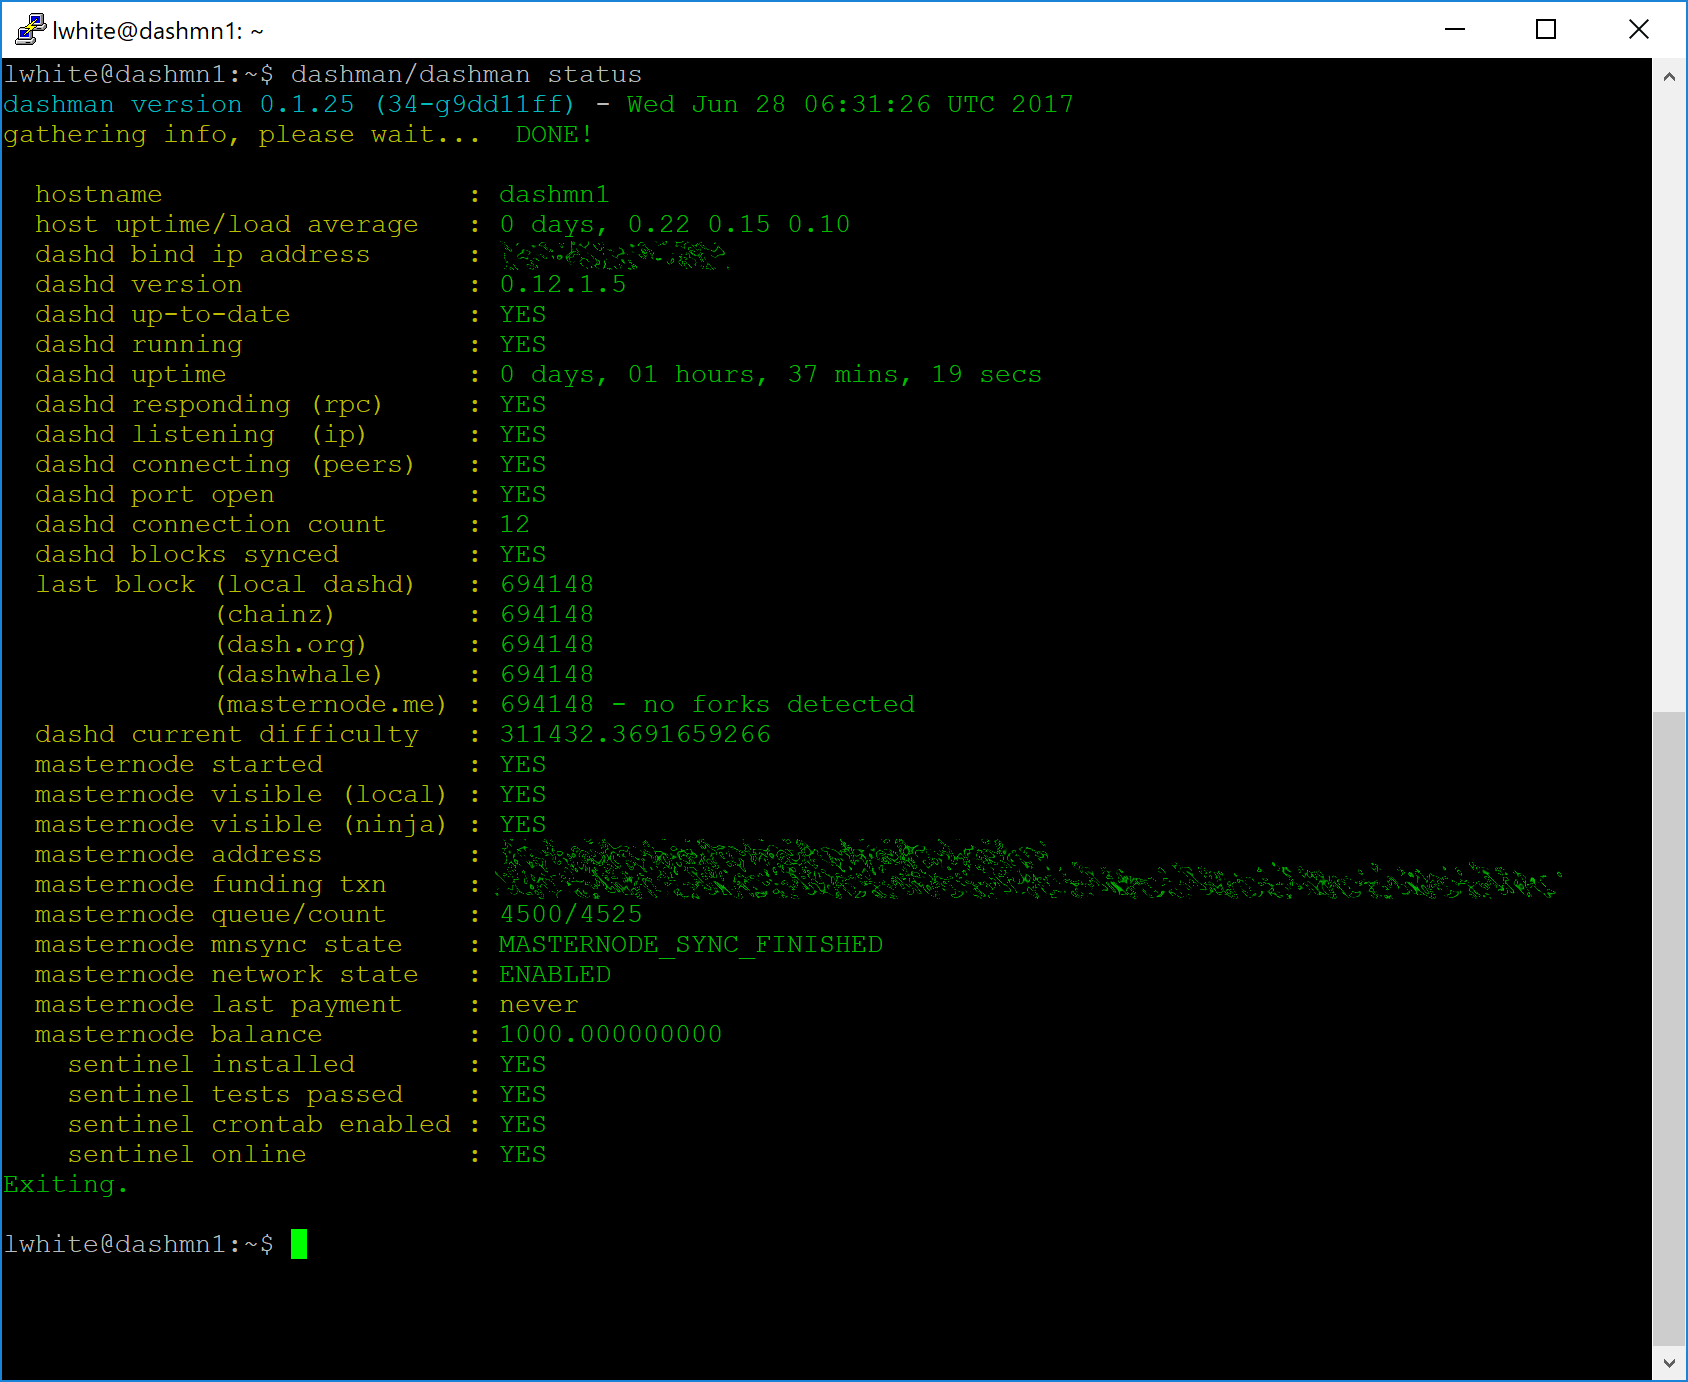
~/dashman/dashman status
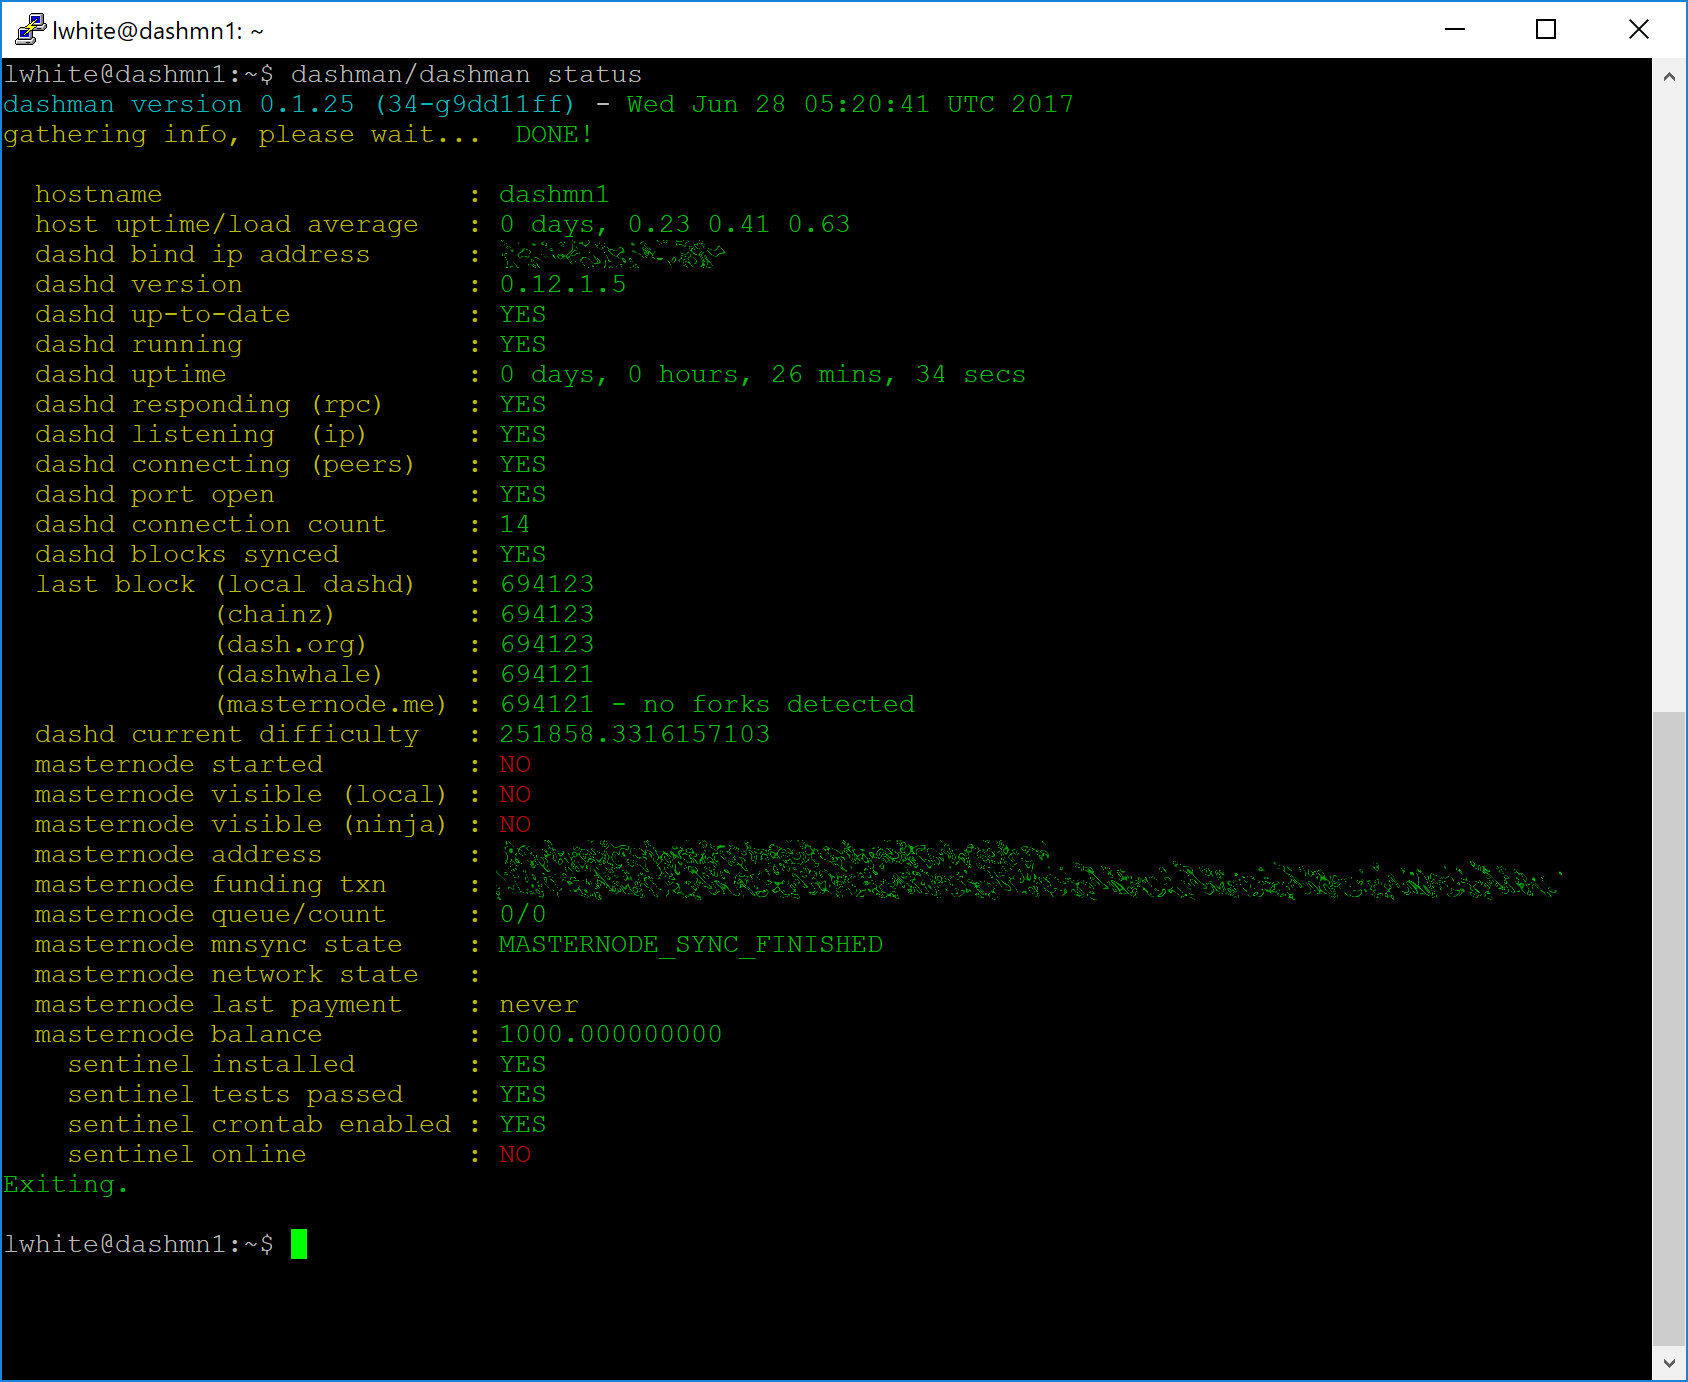
خرج حالة dashman تظهر ماسترنود جاهزة للبدء
Continue with the next step to register your masternode.
الخيار 2: التثبيت اليدوي
To manually download and install the components of your Dash masternode,
visit the GitHub releases page
and copy the link to the latest x86_64-linux-gnu version. Go back to
your terminal window and enter the following command, pasting in the
address to the latest version of Dash Core by right clicking or pressing
Ctrl + V:
cd /tmp
wget https://github.com/dashpay/dash/releases/download/v0.13.0.0-rc10/dashcore-0.13.0.0-rc10-x86_64-linux-gnu.tar.gz
Verify the integrity of your download by running the following command
and comparing the output against the value for the file as shown in the
SHA256SUMS.asc file:
wget https://github.com/dashpay/dash/releases/download/v0.13.0.0-rc10/SHA256SUMS.asc
sha256sum dashcore-0.13.0.0-rc10-x86_64-linux-gnu.tar.gz
cat SHA256SUMS.asc
يمكنك أيضًا بشكل اختياري التحقق من صحة تنزيلك كإصدار رسمي من فريق داش كور. يتم توقيع جميع إصدارات داش باستخدام GPG بواسطة UdjinM6 مع المفتاح 8359 2BD1 400D 58D9 ، يمكن التحقق منها هنا. استيراد المفتاح ، قم بتنزيل ملف ASC للإصدار الحالي من داش وتحقق من التوقيع كما يلي
curl https://keybase.io/udjinm6/pgp_keys.asc | gpg --import
gpg --verify SHA256SUMS.asc
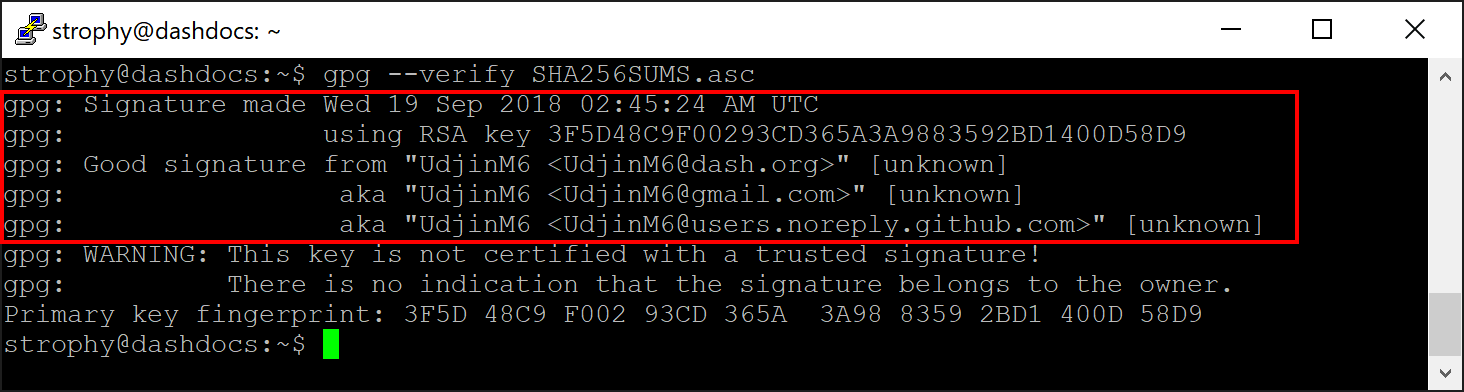
تحميل مفتاح PGP والتحقق من الثنائي الموقع
Create a working directory for Dash, extract the compressed archive and copy the necessary files to the directory:
mkdir ~/.dashcore
tar xfv dashcore-0.13.0.0-rc10-x86_64-linux-gnu.tar.gz
cp -f dashcore-0.13.0/bin/dashd ~/.dashcore/
cp -f dashcore-0.13.0/bin/dash-cli ~/.dashcore/
قم بإنشاء ملف تكوين باستخدام الأمر التالي:
nano ~/.dashcore/dash.conf
سوف تظهر نافذة المحرر. نحتاج الآن إلى إنشاء ملف تكوين يحدد عدة متغيرات. قم بنسخ النص التالي ولصقه للبدء ، ثم استبدل المتغيرات الخاصة بالتكوين كما يلي:
#----
rpcuser=XXXXXXXXXXXXX
rpcpassword=XXXXXXXXXXXXXXXXXXXXXXXXXXXX
rpcallowip=127.0.0.1
#----
listen=1
server=1
daemon=1
maxconnections=64
#----
masternode=1
masternodeprivkey=XXXXXXXXXXXXXXXXXXXXXXX
externalip=XXX.XXX.XXX.XXX
#----
استبدل الحقول التي تحمل علامة XXXXXXX كما يلي:
rpcuser: أدخل أي سلسلة من الأرقام أو الحروف ، لا يسمح بالحروف الخاصةrpcpassword: أدخل أي سلسلة من الأرقام أو الحروف ، لا يسمح بالحروف الخاصةmasternodeprivkey: this is the legacy masternode private key you generated in the previous stepexternalip: هذا هو عنوان IP الخاص بـ VPS الخاص بك
يجب أن تبدو النتيجة شيء من هذا القبيل:
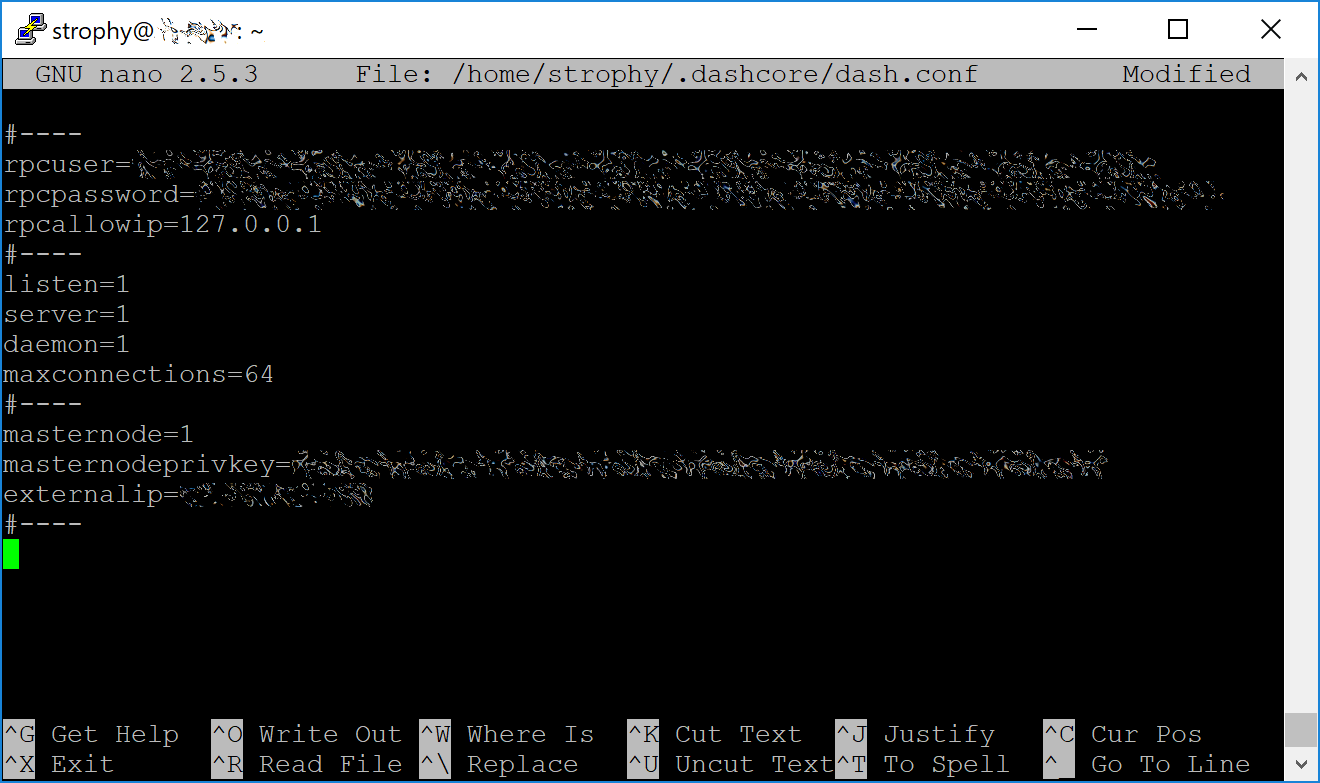
إدخال بيانات المفتاح في dash.conf على ماسترنود
اضغط على Ctrl + X لإغلاق المحرر و Y و ادخل احفظ الملف. يمكنك الآن بدء تشغيل داش على ماسترنود لتبدأ التزامن مع بلوكشين
~/.dashcore/dashd
سترى رسالة تقرأ خوادم داش كور تبدأ. سنقوم الآن بتركيب الحماية ، وهو عبارة عن برنامج يعمل كجهاز مراقبة للاتصال بالشبكة التي تعمل بها العقدة بشكل صحيح
cd ~/.dashcore
git clone https://github.com/dashpay/sentinel.git
cd sentinel
virtualenv venv
venv/bin/pip install -r requirements.txt
venv/bin/python bin/sentinel.py
سترى رسالة تقرأ dashd لم تتم مزامنتها مع الشبكة! في انتظار المزامنة الكاملة قبل تشغيل Sentinel أضف dashd إلى crontab للتأكد من أنه يعمل كل دقيقة للتحقق من ماسترنود الخاص بك
crontab -e
اختر nano كمحرر وأدخل الأسطر التالية في نهاية الملف
* * * * * cd ~/.dashcore/sentinel && ./venv/bin/python bin/sentinel.py 2>&1 >> sentinel-cron.log
* * * * * pidof dashd || ~/.dashcore/dashd
اضغط على ادخل لتتأكد من وجود سطر فارغ في نهاية الملف ، ثم اضغط Ctrl + X لإغلاق المحرر و Y و ادخل احفظ الملف. نحتاج الآن إلى الانتظار للحصول على 15 تأكيدًا لمعاملة الضمانات لإكمالها ، والانتظار حتى تنتهي عملية بلوكشين من المزامنة على ماسترنود. يمكنك استخدام الأوامر التالية لمراقبة التقدم
~/.dashcore/dash-cli mnsync status
عند اكتمال المزامنة ، سترى الاستجابة التالية:
{
 "AssetID": 999,
 "AssetName": "MASTERNODE_SYNC_FINISHED",
 "Attempt": 0,
 "IsBlockchainSynced": true,
 "IsMasternodeListSynced": true,
 "IsWinnersListSynced": true,
 "IsSynced": true,
 "IsFailed": false
}
Continue with the next step to construct the ProTx transaction required to enable your masternode.
Register your masternode
DIP003 introduces several changes to how a masternode is set up and operated. These are described briefly under DIP003 Masternode Changes in this documentation, or in full detail in DIP003 itself. It is highly recommended to first read at least the brief documentation before continuing in order to familiarize yourself with the new concepts in DIP003.
Option 1: Registering from a hardware wallet
Go back to DMT and ensure that all fields from the previous step are still filled out correctly. Click Generate new for the three private keys required for a DIP003 deterministic masternode:
- Owner private key
- Operator private key
- Voting private key
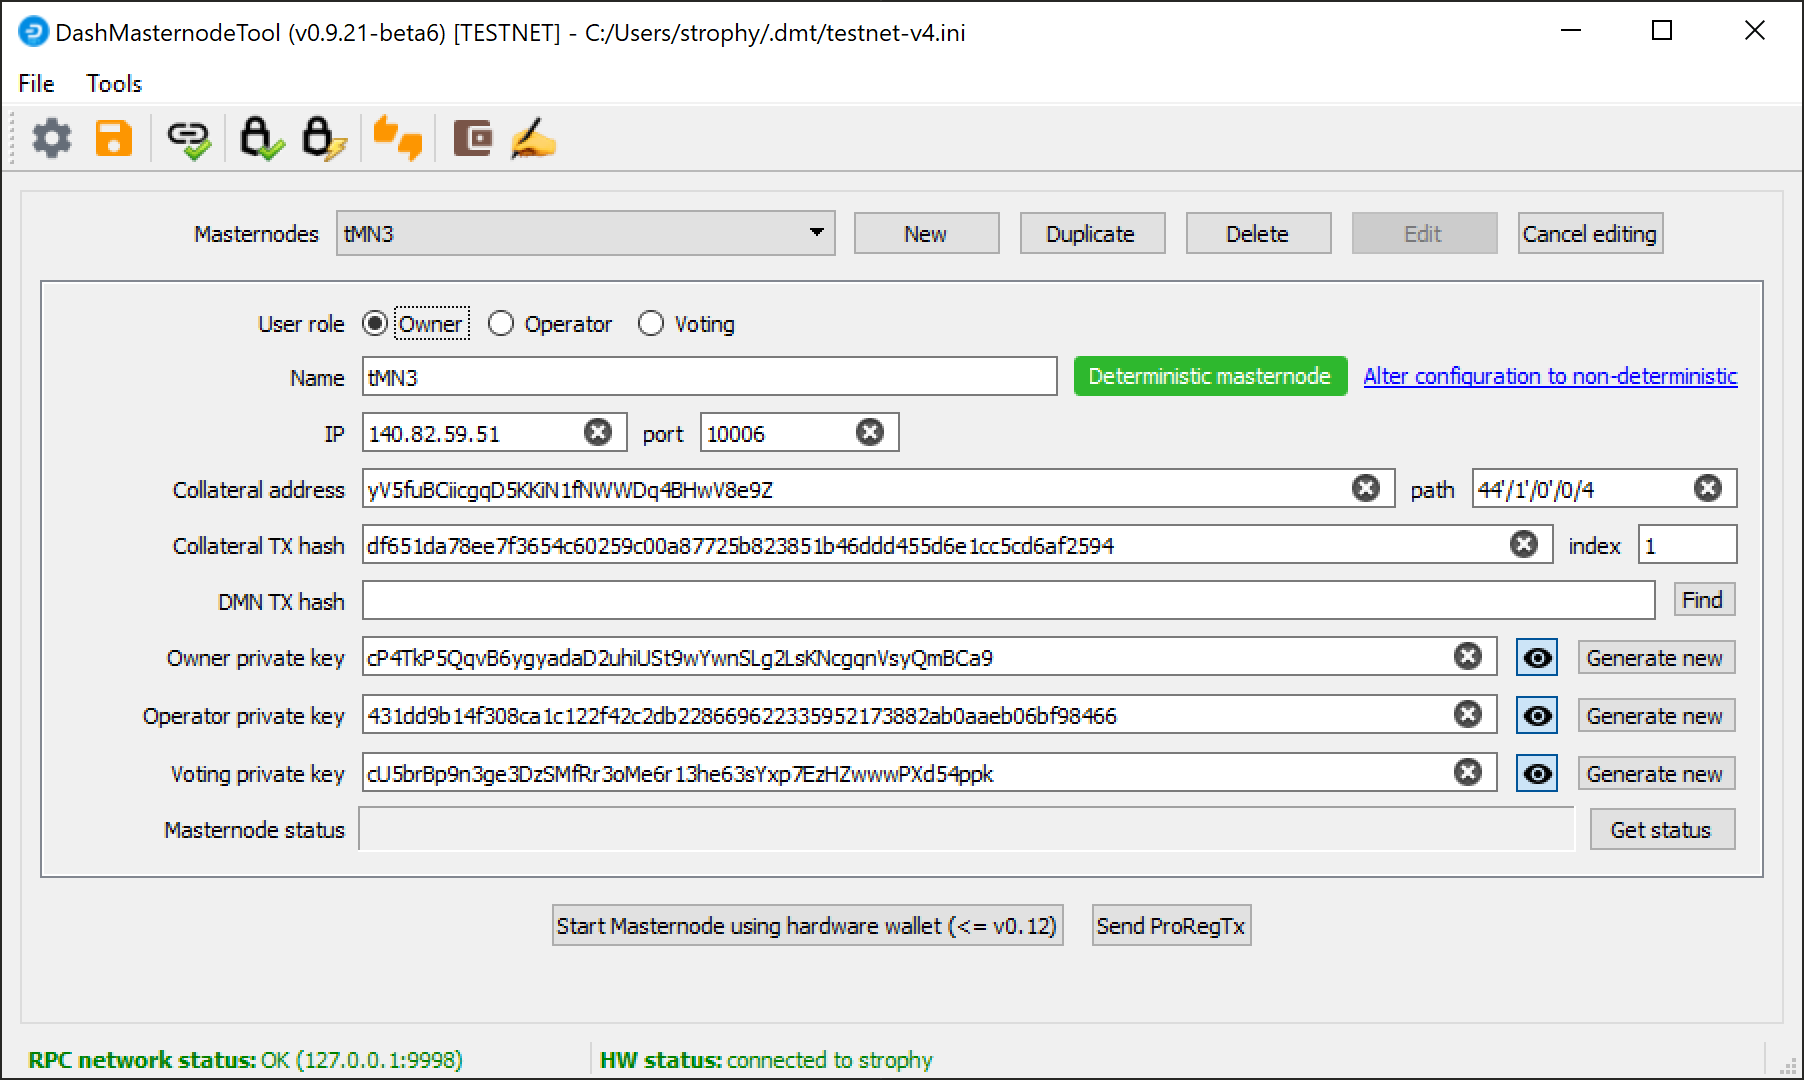
Dash Masternode Tool ready to register a new masternode
Then click Send ProRegTx and confirm the following two messages:

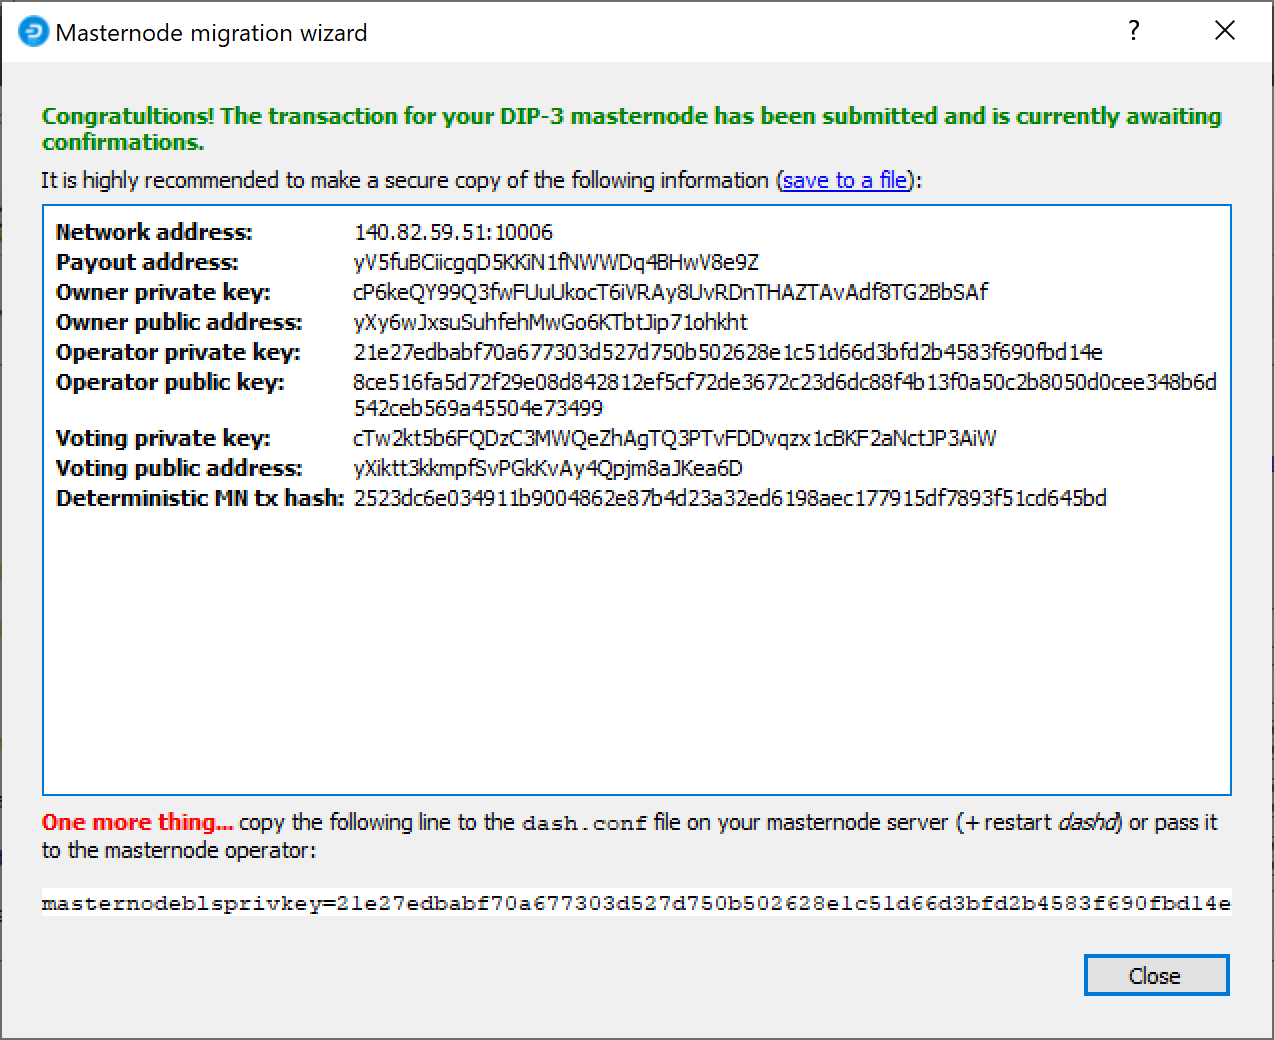
Dash Masternode Tool confirmation dialogs to register a masternode
The BLS secret key must be entered in the dash.conf file on the
masternode. This allows the masternode to watch the blockchain for
relevant Pro*Tx transactions, and will cause it to start serving as a
masternode when the signed ProRegTx is broadcast by the owner, as we
just did above. Edit the configuration file on your masternode as
follows:
nano ~/.dashcore/dash.conf
The editor appears with the existing masternode configuration. Add this line to the end of the file, replacing the key with your BLS secret key generated above:
masternodeblsprivkey=21e27edbabf70a677303d527d750b502628e1c51d66d3bfd2b4583f690fbd14e
Press enter to make sure there is a blank line at the end of the file, then press Ctrl + X to close the editor and Y and Enter save the file. We now need to restart the masternode for this change to take effect. Enter the following commands, waiting a few seconds in between to give Dash Core time to shut down:
~/.dashcore/dash-cli stop
~/.dashcore/dashd
At this point you can monitor your masternode using
dashman/dashman status, by entering
~/.dashcore/dash-cli masternode status or using the Get status
function in DMT. The final result should appear as follows:
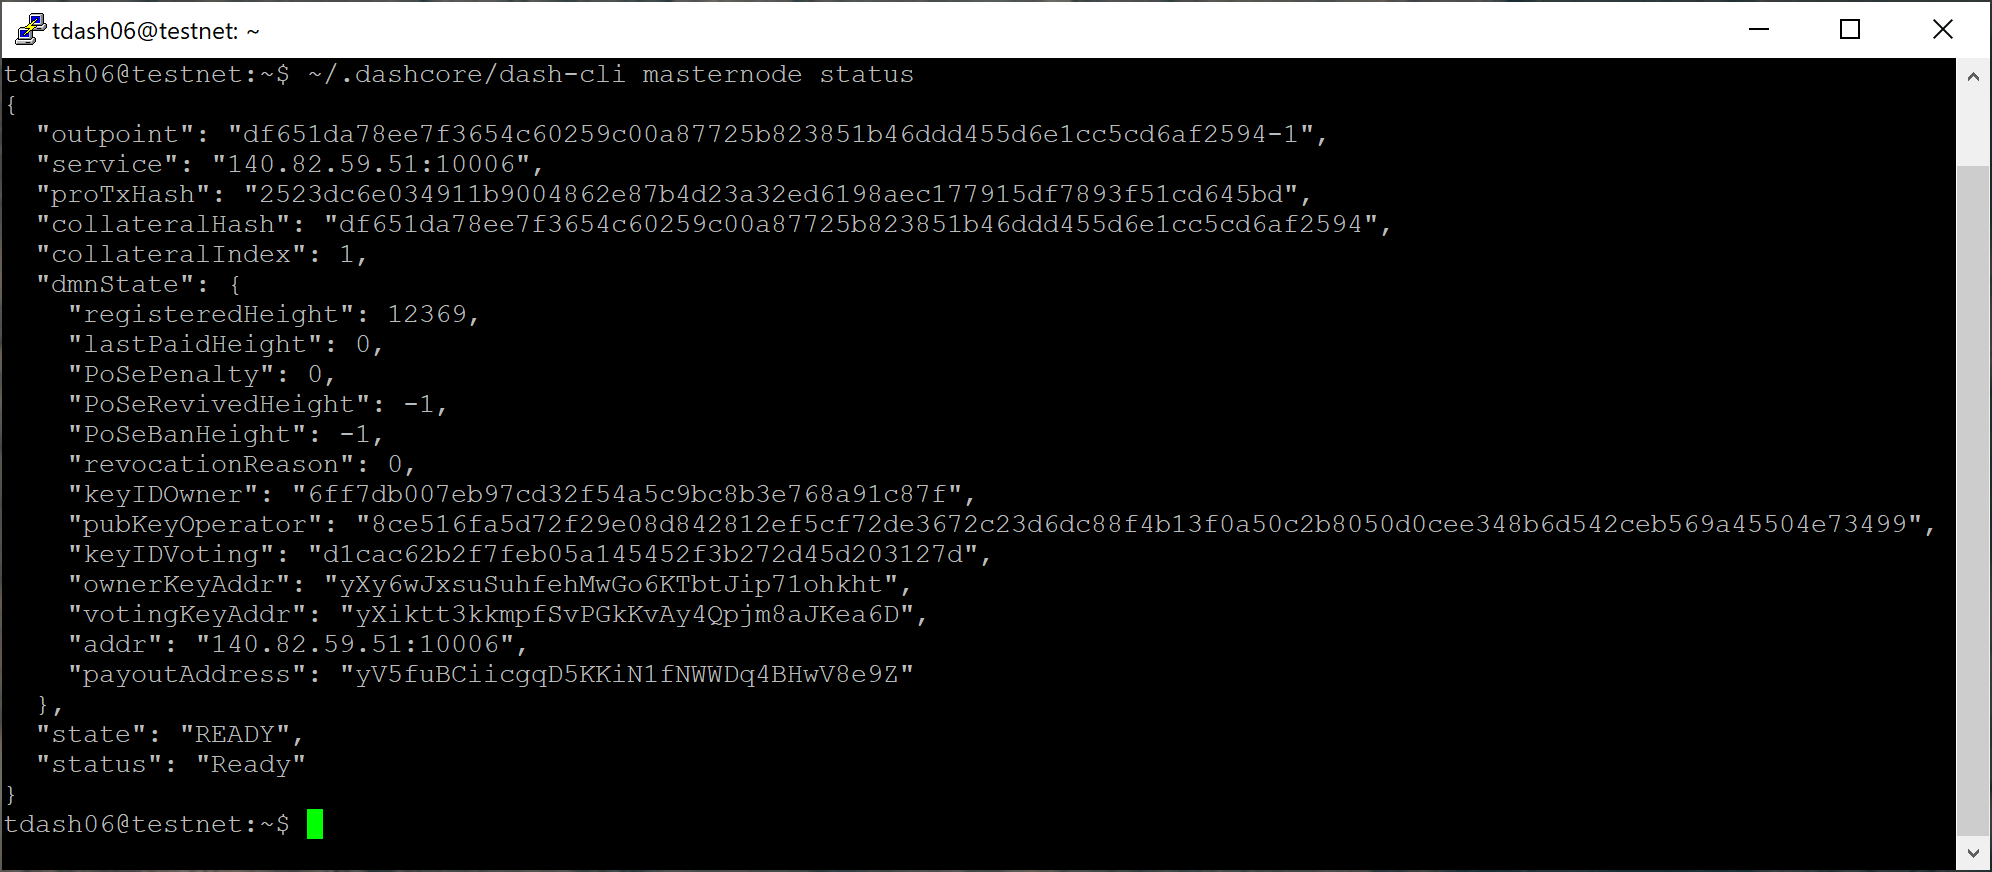
dash-cli masternode status output showing successfully started masternode
في هذه المرحلة ، يمكنك الخروج من الخادم بأمان عن طريق كتابة exit . تهانينا! الخاص بك ماسترنود قيد التشغيل الآن.
Option 2: Registering from Dash Core wallet
Identify the funding transaction
إذا استخدمت عنوانًا في محفظة داش كور للمعاملات الضمانية ، فستحتاج الآن إلى العثور على txid في المعاملة. انقر على الأدوات > وحدة تحكم التصحيح وأدخل الأمر التالي:
masternode outputs
هذا يجب إرجاع سلسلة من الأحرف مشابهة لهذه
{
"ad308ec104bdf113444be609eb3dce9474a5550424204c6538843e3ccd3d4e78" : "1",
}
The first long string is your transaction hash, while the last number is the index.
Generate a BLS key pair
A public/private BLS key pair is required for the operator of the masternode. If you are using a hosting service, they may provide you with their public key, and you can skip this step. If you are hosting your own masternode or have agreed to provide your host with the BLS private key, generate a BLS public/private keypair as follows:
bls generate

{
  "secret": "28a85abb5aa8e820f65e33974cef0ab0bf06195f61454d2feb7fa578612d2228",
  "public": "144cbf4d472716b9504a54c7ca26906a3346253b787ffeb1a4999325049f5b2c51ef2e7c215d85f0a9142ec1c78db99b"
}
These keys are NOT stored by the wallet and must be kept secure,
similar to the value provided in the past by the masternode genkey
command.
Add the private key to your masternode configuration
The public key will be used in following steps. The private key must be
entered in the dash.conf file on the masternode. This allows the
masternode to watch the network for relevant Pro*Tx transactions, and
will cause it to start serving as a masternode when the signed ProRegTx
is broadcast by the owner (final step below). Log in to your masternode
using ssh or PuTTY and edit the configuration file on your
masternode as follows:
nano ~/.dashcore/dash.conf
The editor appears with the existing masternode configuration. Add this line to the end of the file, replacing the key with your BLS secret key generated above:
masternodeblsprivkey=28a85abb5aa8e820f65e33974cef0ab0bf06195f61454d2feb7fa578612d2228
Press enter to make sure there is a blank line at the end of the file, then press Ctrl + X to close the editor and Y and Enter save the file. We now need to restart the masternode for this change to take effect. Enter the following commands, waiting a few seconds in between to give Dash Core time to shut down:
~/.dashcore/dash-cli stop
~/.dashcore/dashd
We will now prepare the transaction used to register a DIP003 masternode on the network.
Prepare a ProRegTx transaction
First, we need to get a new, unused address from the wallet to serve as the owner address. This is different to the collateral address. It must also be used as the voting address if Spork 15 is not yet active. Generate a new address as follows:
getnewaddress

yMwR1zf2Cv9gcMdHULRVbTTMGw7arvpbM5
Then either generate or choose an existing second address to receive the owner's masternode payouts:
getnewaddress

yLqyR8PHEB7Fp1ue8nSuLfuxQhrj5PSTDv
You can also optionally generate and fund a third address to pay the
transaction fee. The private key to this address must be available to
the wallet submitting the transaction to the network. We will now
prepare an unsigned ProRegTx special transaction using the protx
register_prepare command. This command has the following syntax:
protx register_prepare collateralHash collateralIndex ipAndPort ownerKeyAddr
operatorPubKey votingKeyAddr operatorReward payoutAddress (feeSourceAddress)
Open a text editor such as notepad to prepare this command. Replace each argument to the command as follows:
collateralHash: The txid of the 1000 Dash collateral funding transactioncollateralIndex: The output index of the 1000 Dash funding transactionipAndPort: Masternode IP address and port, in the formatx.x.x.x:yyyyownerKeyAddr: The new Dash address generated above for the owner/voting addressoperatorPubKey: The BLS public key generated above (or provided by your hosting service)votingKeyAddr: The new Dash address generated above, or the address of a delegate, used for proposal votingoperatorReward: The percentage of the block reward allocated to the operator as paymentpayoutAddress: A new or existing Dash address to receive the owner's masternode rewardsfeeSourceAddress: An (optional) address used to fund ProTx fee.payoutAddresswill be used if not specified.
Note that the operator is responsible for specifying their own
reward address in a separate update_service
transaction if you specify a non-zero operatorReward. The owner of
the masternode collateral does not specify the operator's payout
address.
Example (remove line breaks if copying):
protx register_prepare
  ad308ec104bdf113444be609eb3dce9474a5550424204c6538843e3ccd3d4e78
  1
  140.82.59.51:10004
  yMwR1zf2Cv9gcMdHULRVbTTMGw7arvpbM5
  144cbf4d472716b9504a54c7ca26906a3346253b787ffeb1a4999325049f5b2c51ef2e7c215d85f0a9142ec1c78db99b
  yMwR1zf2Cv9gcMdHULRVbTTMGw7arvpbM5
  0
  yLqyR8PHEB7Fp1ue8nSuLfuxQhrj5PSTDv
Output:
{
   "tx": "0300010001784e3dcd3c3e8438654c20240455a57494ce3deb09e64b4413f1bd04c18e30ad0000000000feffffff01cccfa204000000001976a9141ea44ced396667eb7d1c5b3699e04b5b3046ecfb88ac00000000d1010000000000784e3dcd3c3e8438654c20240455a57494ce3deb09e64b4413f1bd04c18e30ad0100000000000000000000000000ffff8c523b33271411c59262c9633a1bb810a7fc2b833c43cfa852ab144cbf4d472716b9504a54c7ca26906a3346253b787ffeb1a4999325049f5b2c51ef2e7c215d85f0a9142ec1c78db99b11c59262c9633a1bb810a7fc2b833c43cfa852ab00001976a91405c5fed6a3eb0b92ea5119039efae7a8dee5456488ac4e6cc5451440a6044dbd04d33a11f4cddc9021532ede3012ebbc31c0bb4ceb9c00",
  "collateralAddress": "yiFfzbwiN9oneftd7cEfr3kQLRwQ4kp7ue",
  "signMessage": "yLqyR8PHEB7Fp1ue8nSuLfuxQhrj5PSTDv|0|yMwR1zf2Cv9gcMdHULRVbTTMGw7arvpbM5|yMwR1zf2Cv9gcMdHULRVbTTMGw7arvpbM5|4e00de34ee03d28adb4e1fdaec966ae239c11da7e6115f566fc4b3f75c8a5503"
}
Next we will use the collateralAddress and signMessage fields to
sign the transaction, and the output of the tx field to submit the
transaction.
Sign the ProRegTx transaction
We will now sign the content of the signMessage field using the
private key for the collateral address as specified in
collateralAddress. Note that no internet connection is required for
this step, meaning that the wallet can remain disconnected from the
internet in cold storage to sign the message. In this example we will
again use Dash Core, but it is equally possible to use the signing
function of a hardware wallet. The command takes the following syntax:
signmessage address message
Example:
signmessage yiFfzbwiN9oneftd7cEfr3kQLRwQ4kp7ue yLqyR8PHEB7Fp1ue8nSuLfuxQhrj5PSTDv|0|yMwR1zf2Cv9gcMdHULRVbTTMGw7arvpbM5|yMwR1zf2Cv9gcMdHULRVbTTMGw7arvpbM5|4e00de34ee03d28adb4e1fdaec966ae239c11da7e6115f566fc4b3f75c8a5503
Output:
H3ub9BATtvuV+zDGdkUQNoUGpaYFr/O1FypmrSmH5WJ0KFRi8T10FSew0EJO/+Ij+OLv4r0rt+HS9pQFsZgc2dE=
Submit the signed message
We will now submit the ProRegTx special transaction to the blockchain to register the masternode. This command must be sent from a Dash Core wallet holding a balance, since a standard transaction fee is involved. The command takes the following syntax:
protx register_submit tx sig
Where:
tx: The serialized transaction previously returned in thetxoutput field from theprotx register_preparecommandsig: The message signed with the collateral key from thesignmessagecommand
Example:
protx register_submit 0300010001784e3dcd3c3e8438654c20240455a57494ce3deb09e64b4413f1bd04c18e30ad0000000000feffffff01cccfa204000000001976a9141ea44ced396667eb7d1c5b3699e04b5b3046ecfb88ac00000000d1010000000000784e3dcd3c3e8438654c20240455a57494ce3deb09e64b4413f1bd04c18e30ad0100000000000000000000000000ffff8c523b33271411c59262c9633a1bb810a7fc2b833c43cfa852ab144cbf4d472716b9504a54c7ca26906a3346253b787ffeb1a4999325049f5b2c51ef2e7c215d85f0a9142ec1c78db99b11c59262c9633a1bb810a7fc2b833c43cfa852ab00001976a91405c5fed6a3eb0b92ea5119039efae7a8dee5456488ac4e6cc5451440a6044dbd04d33a11f4cddc9021532ede3012ebbc31c0bb4ceb9c00 H3ub9BATtvuV+zDGdkUQNoUGpaYFr/O1FypmrSmH5WJ0KFRi8T10FSew0EJO/+Ij+OLv4r0rt+HS9pQFsZgc2dE=
Output:
b823338301e47875493c20361a23aef034578030c639480203b394669ab05e09
Your masternode is now registered and will appear on the Deterministic
Masternode List after the transaction is mined to a block. You can view
this list on the Masternodes -> DIP3 Masternodes tab of the Dash
Core wallet, or in the console using the command protx list valid,
where the txid of the final protx register_submit transaction
identifies your DIP003 masternode. Note again that all functions related
to DIP003 will only take effect once Spork 15 is enabled on the network.
You can view the spork status using the spork active command.
At this point you can go back to your terminal window and monitor your
masternode using dashman/dashman status, by entering
~/.dashcore/dash-cli masternode status or using the Get status
function in DMT. The final result should appear as follows:
خرج حالة dashman تظهر بنجاح ماسترنود
في هذه المرحلة ، يمكنك الخروج من الخادم بأمان عن طريق كتابة exit . تهانينا! الخاص بك ماسترنود قيد التشغيل الآن.