Настройка
Настройка и запуск мастерноды подразумевают наличие базового понимания Linux и технологии блокчейн, а также способности внимательно следовать инструкциям. Этот процесс также требует регулярного обслуживания и тщательной защиты, особенно если вы не храните DASH на аппаратном кошельке. Во время настройки необходимо будет принять некоторые решения и дополнительные меры для повышения безопасности.
Commercial masternode hosting services are available if you prefer to delegate day-to-day operation of your masternode to a professional operator. When using these hosting services, you retain full control of the 1000 DASH collateral and pay an agreed percentage of your reward to the operator. It is also possible to delegate your voting keys to a representative, see the governance documentation for more information.
Прежде чем начать
This guide assumes you are setting up a single masternode for the first time. If you are updating a masternode, see here instead. If Spork 15 is not yet enabled, it is not possible to directly set up a DIP003 masternode. You will need to set up the masternode following the old process and then work through the upgrade procedure. You will need:
- 1000 DASH
- Кошелёк для хранения DASH, предпочтительно аппаратный кошелёк, хотя кошелёк Dash Core также поддерживается
- Сервер Linux, предпочтительно виртуальный выделенный сервер (VPS)
Dash 0.13.0 implements DIP003, which introduces several changes to how a Dash masternode is set up and operated. A list of available documentation appears below:
- DIP003 Deterministic Masternode Lists
- DIP003 Masternode Changes
- Dash 0.13 Upgrade Procedure
- Full masternode setup guide (you are here)
- Information for users of hosted masternodes
- Information for operators of hosted masternodes
It is highly recommended to first read at least the list of changes
before continuing in order to familiarize yourself with the new concepts
in DIP003. This documentation describes the commands as if they were
entered in the Dash Core GUI by opening the console from Tools > Debug
console, but the same result can be achieved on a masternode by
entering the same commands and adding the prefix
~/.dashcore/dash-cli to each command.
Настройка VPS
A VPS, more commonly known as a cloud server, is fully functional installation of an operating system (usually Linux) operating within a virtual machine. The virtual machine allows the VPS provider to run multiple systems on one physical server, making it more efficient and much cheaper than having a single operating system running on the «bare metal» of each server. A VPS is ideal for hosting a Dash masternode because they typically offer guaranteed uptime, redundancy in the case of hardware failure and a static IP address that is required to ensure you remain in the masternode payment queue. While running a masternode from home on a desktop computer is technically possible, it will most likely not work reliably because most ISPs allocate dynamic IP addresses to home users.
We will use Vultr hosting as an example of a VPS, although DigitalOcean, Amazon EC2, Google Cloud, Choopa and OVH are also popular choices. First create an account and add credit. Then go to the Servers menu item on the left and click + to add a new server. Select a location for your new server on the following screen:
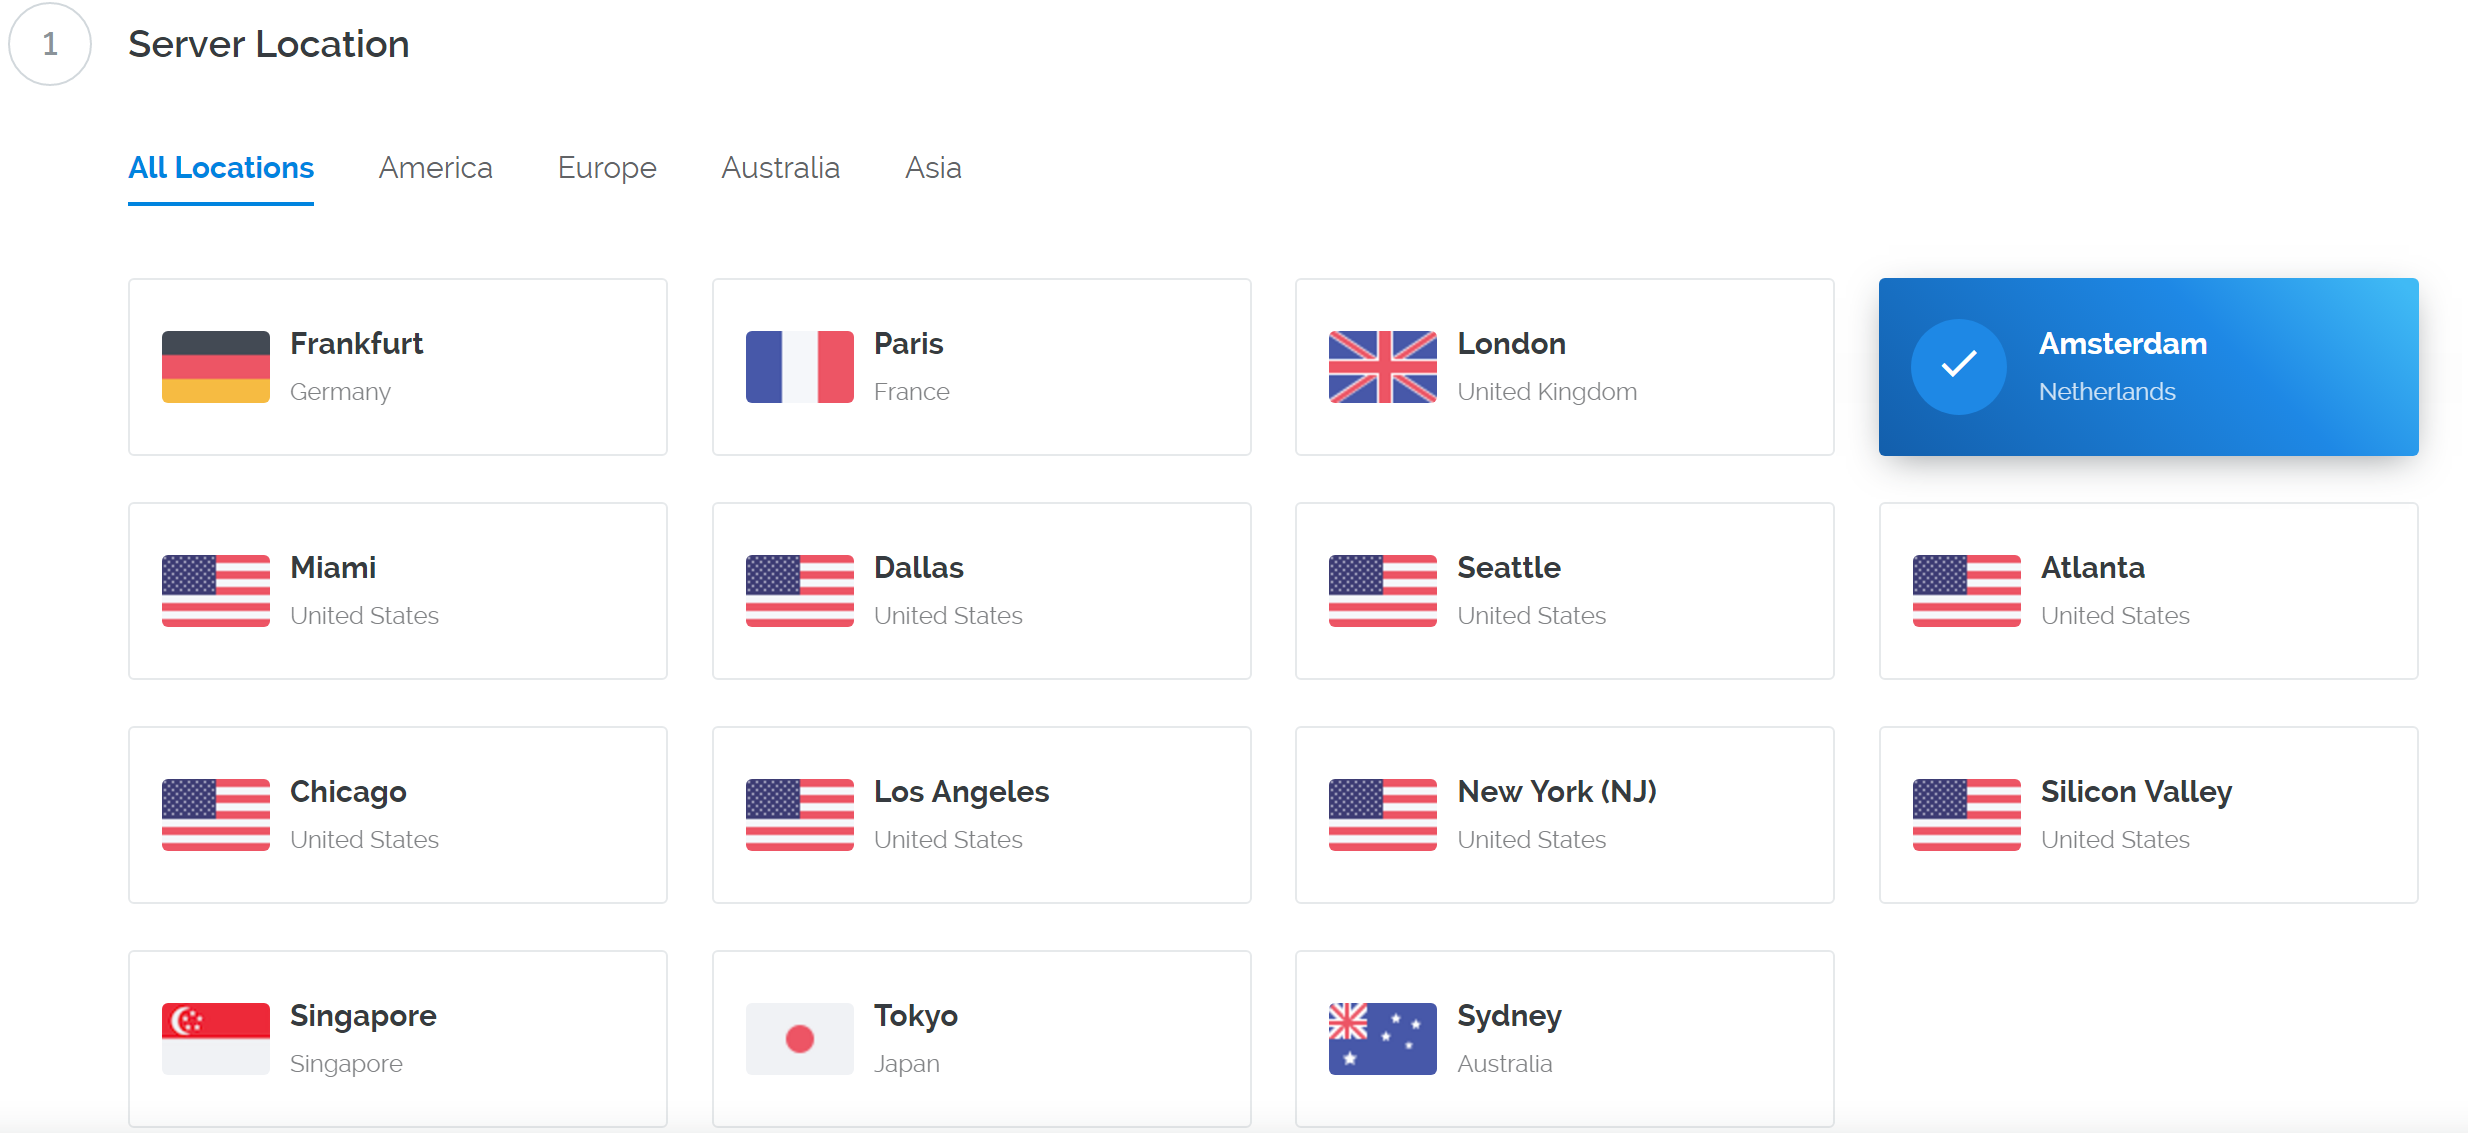
Экран выбора расположения Vultr-сервера
Select Ubuntu 18.04 x64 as the server type. We use this LTS release of Ubuntu instead of the latest version because LTS releases are supported with security updates for 5 years, instead of the usual 9 months.
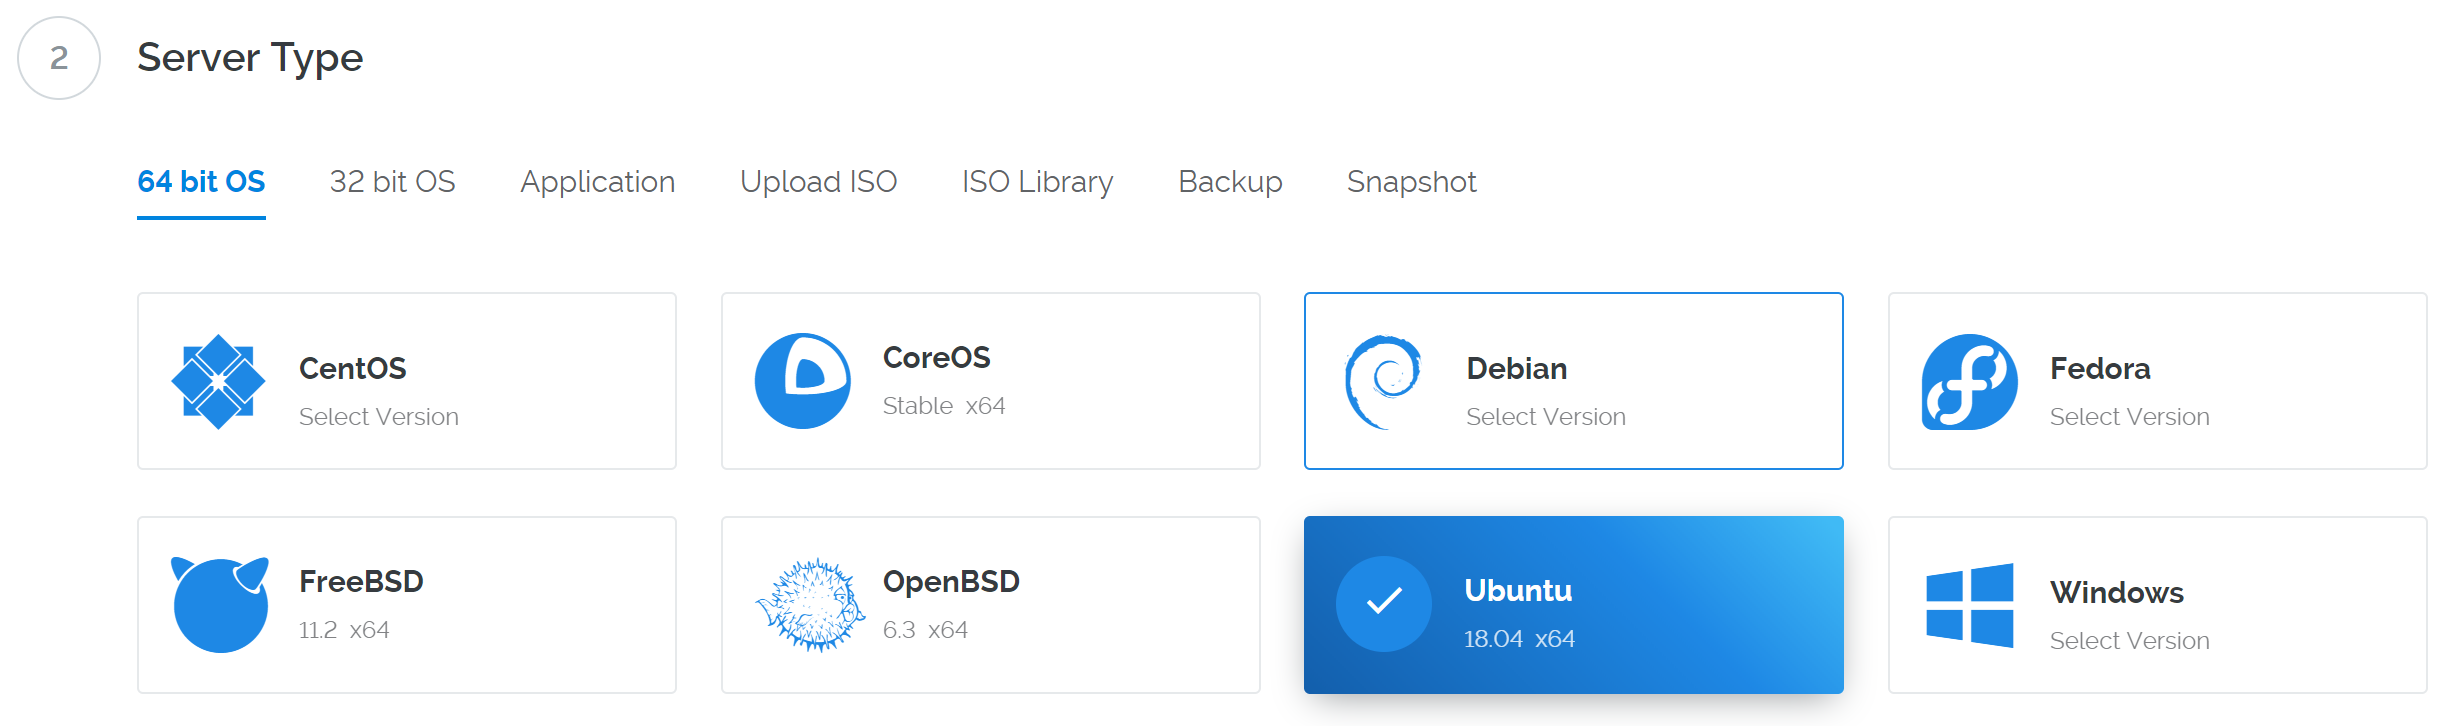
Экран выбора типа Vultr-сервера
Выберите размер сервера, которому необходимо как минимум 2ГБ памяти.
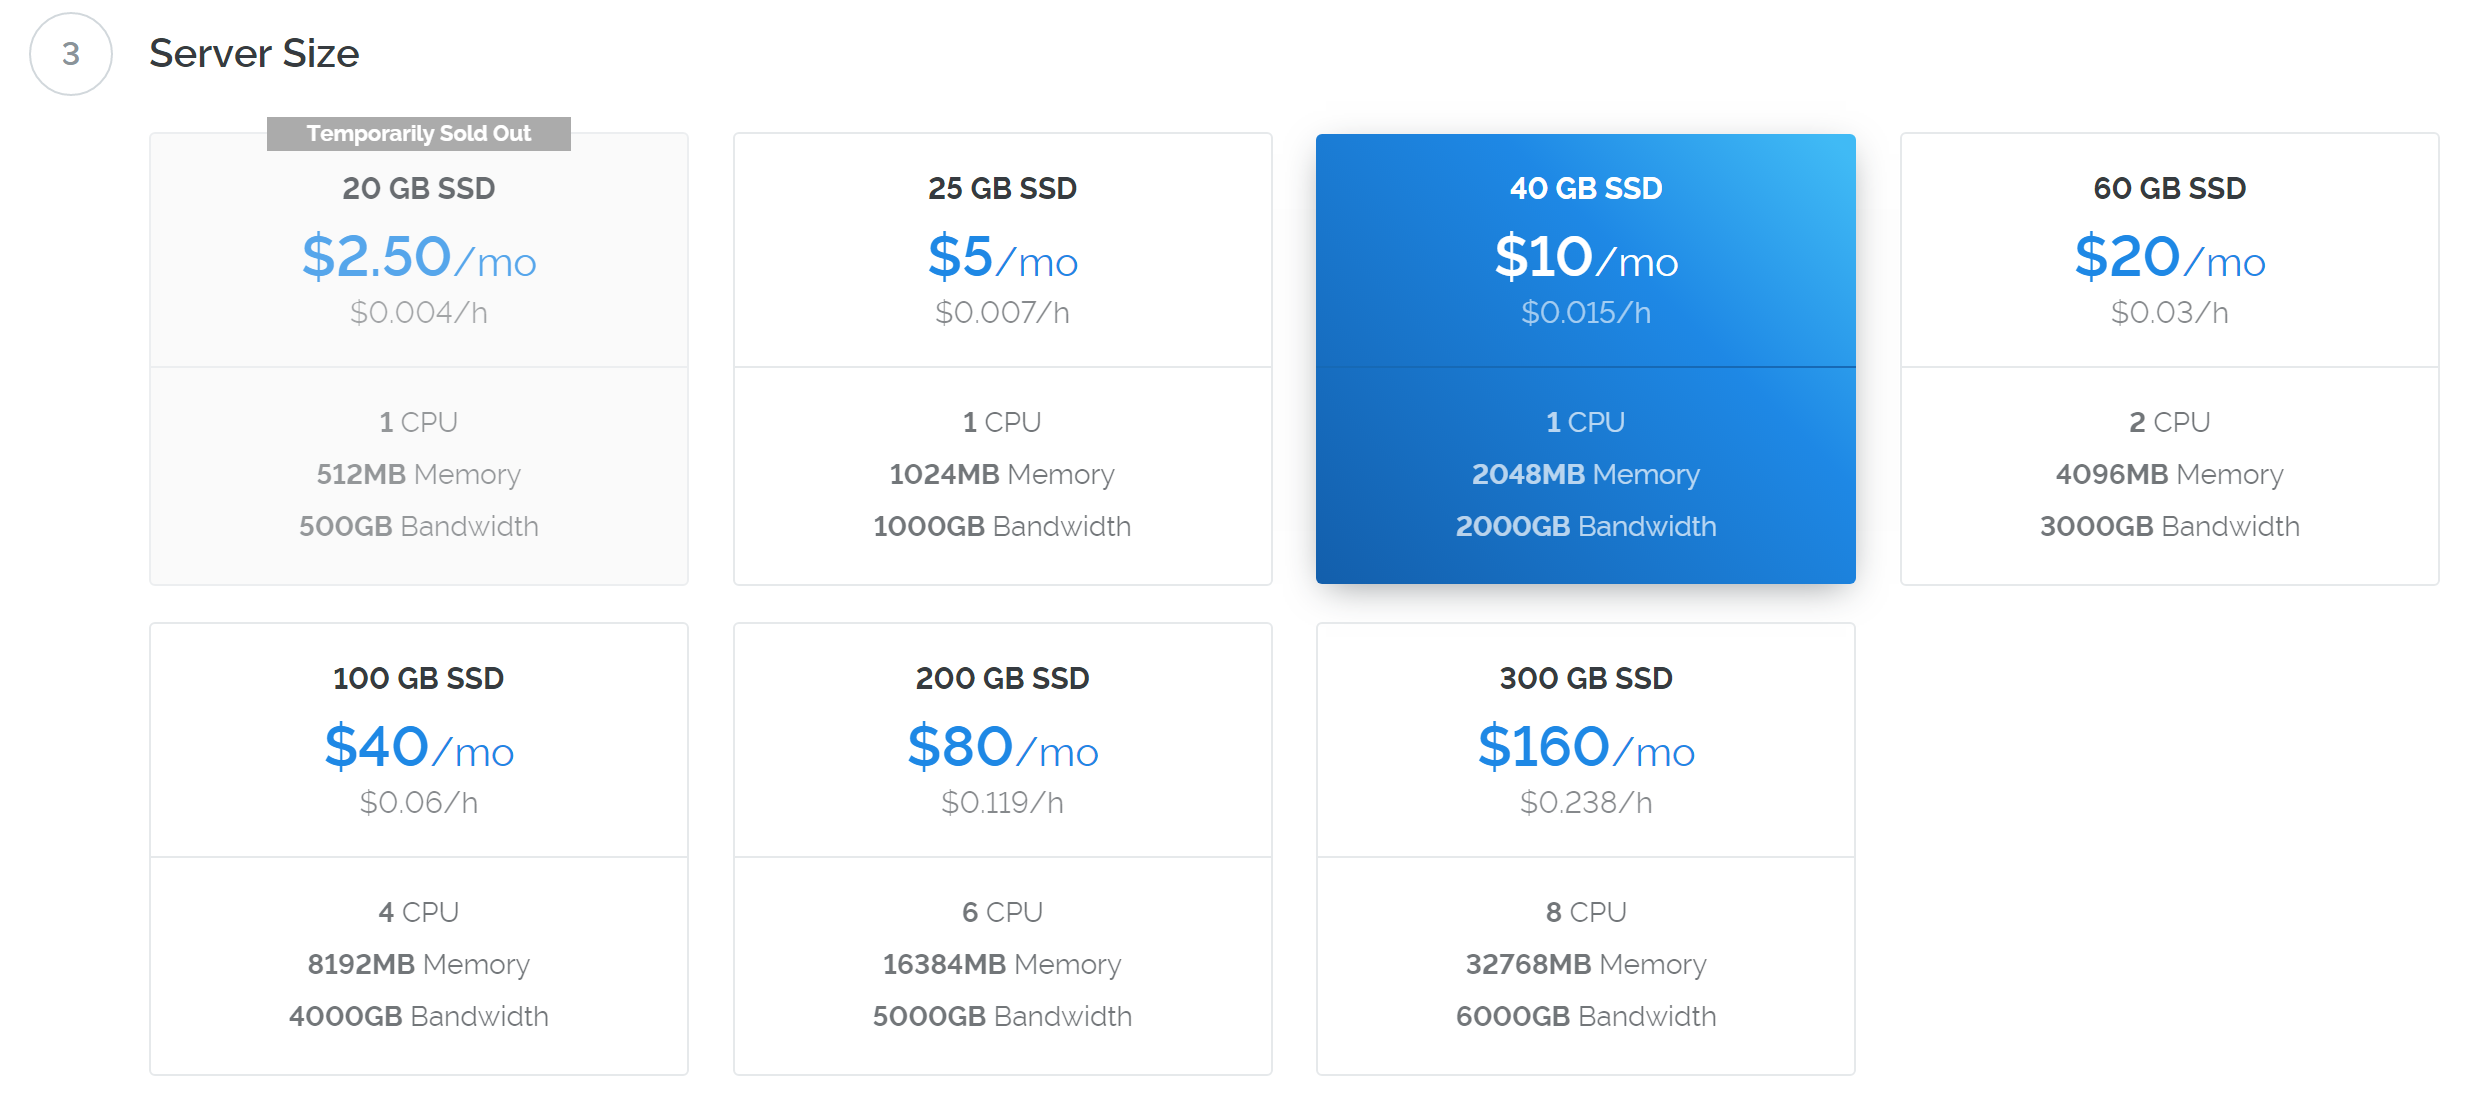
Экран выбора размера Vultr-сервера
Введите имя хоста и метку для вашего сервера. В данном примере в качестве имени хоста мы будем использовать dashmn1.

Экран выбора имени хоста и метки для Vultr-сервера
Vultr теперь выполнит установку вашего сервера. Этот процесс может занять несколько минут.

Экран инсталляции Vultr-сервера
Когда инсталляция будет завершена, кликните Manage и обратите внимание на IP-адрес, имя пользователя и пароль.
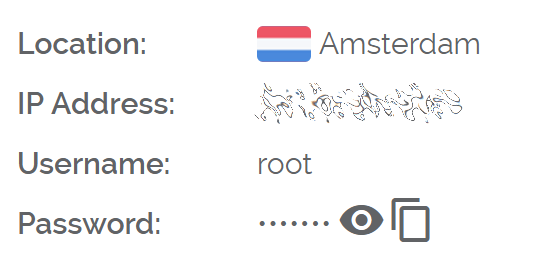
Экран управления Vultr-сервера
Настройте вашу операционную систему
Начнём с подключения к вашему вновь подготовленному серверу. На Windows для начала скачаем приложение для соединения с сервером, которое называется PuTTY. Отправляйтесь на страницу загрузки PuTTY и выберите там соответствующий вашей системе MSI-установщик. Для Mac или Linux вы можете использовать команду ssh прямо из терминала - просто набрав ssh root@<server_ip> после чего по запросу ввести пароль.
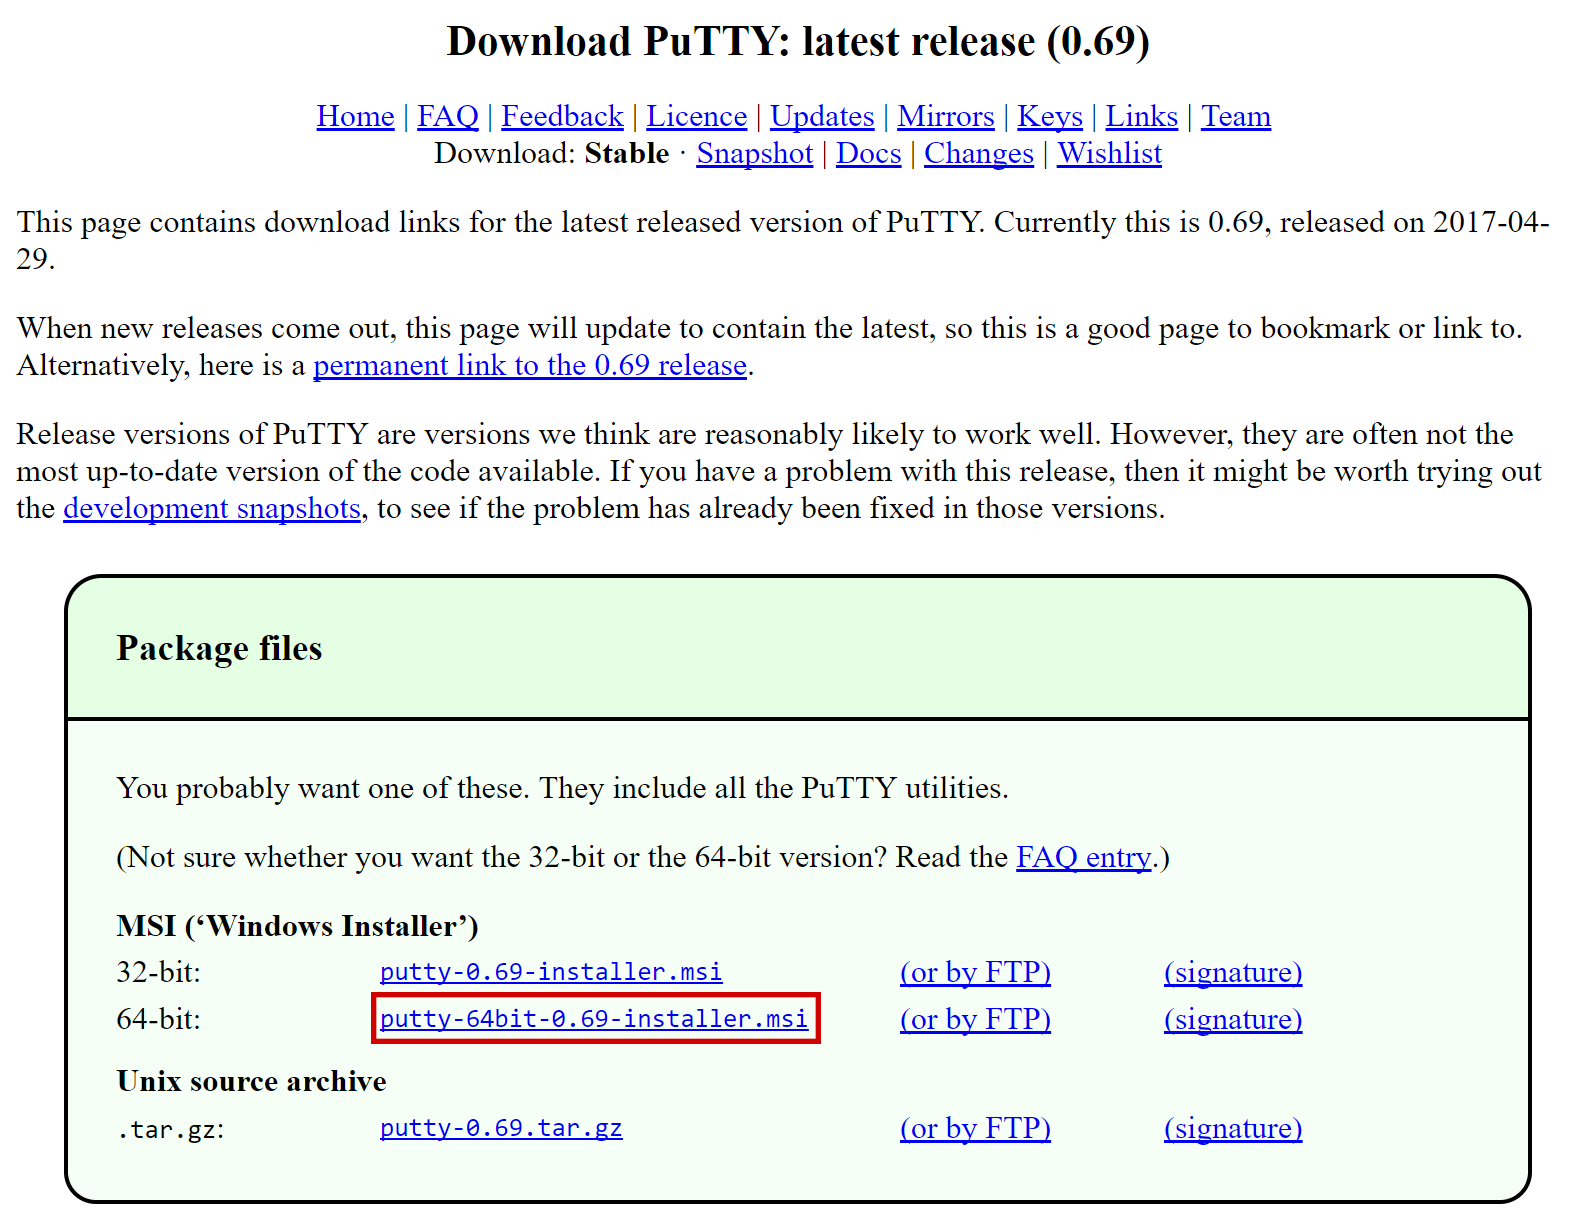
Страница загрузки PuTTY
Выполните двойной щелчок по скачанному файлу и установите PuTTY, затем запустите приложение из меню Пуск. Введите IP-адрес сервера в поле Host Name и кликните Open. Вы увидите свидетельство, предупреждающее о том, что к этому серверу вы подсоединяетесь впервые. Будет вполне безопасно, если вы кликните Yes, этим вы доверите подсоединение к этому серверу в будущем.
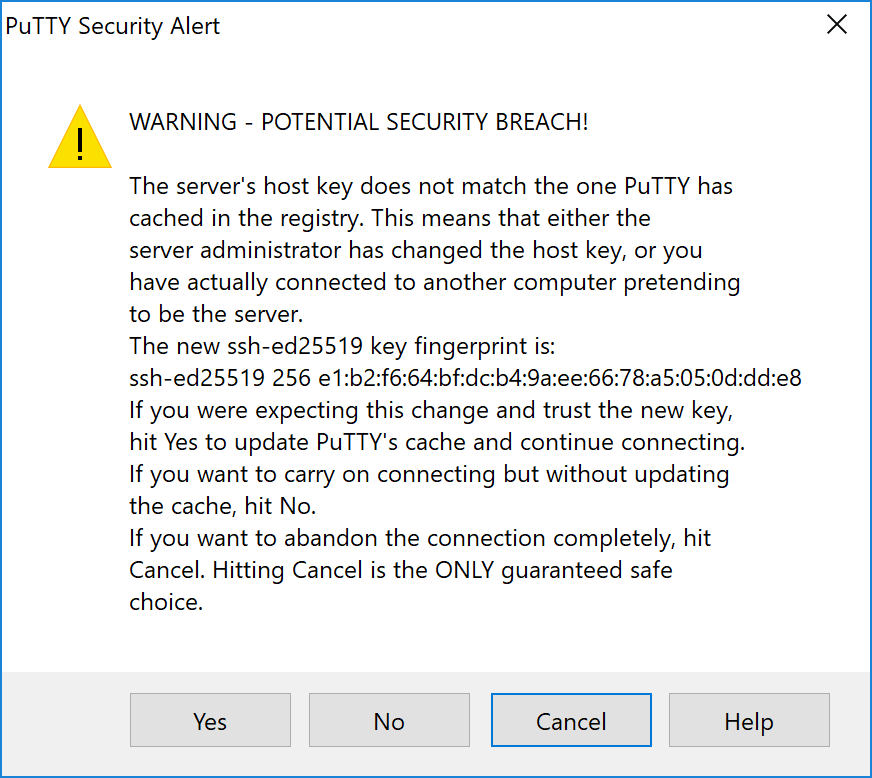
Оповещение безопасности PuTTY при подсоединении к новому серверу
Теперь вы подсоединены к серверу и должны увидеть окно терминала. Начните с авторизации на сервере с root правами, введите логин и пароль, предложенные вашим хостинг-провайдером.
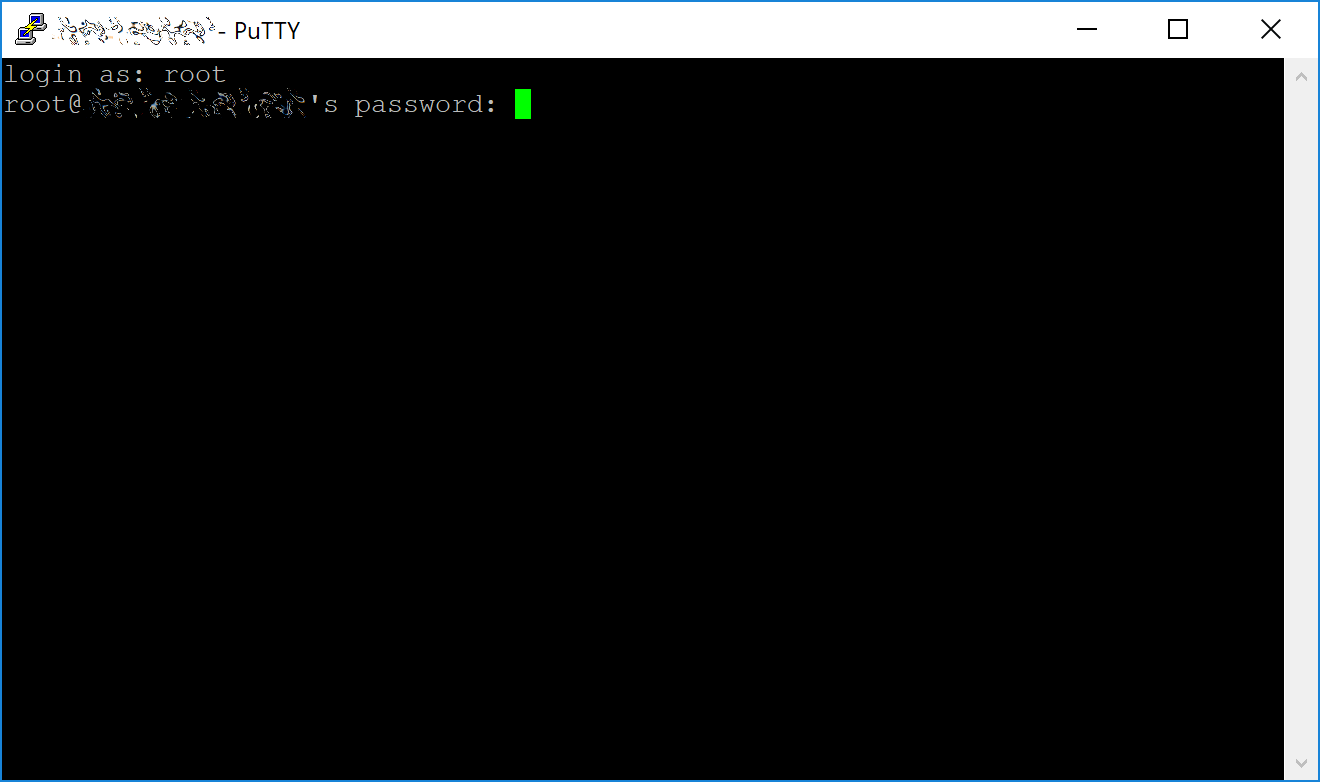
Проверка пароля при первом соединении с VPS
Вам необходимо немедленно сменить свой рут-пароль и в целях безопасности сохранить его в надёжном месте. Можно скопировать и вставить любую из следующих команд, выбрав её в браузере и нажав Ctrl + C, затем перейти в окно PuTTY и кликнуть правой кнопкой мыши в этом окне. Текст будет вставлен на текущем месте расположения курсора:
passwd root
Введите и подтвердите новый пароль (предпочтительно, чтобы он был длинным и сгенерированным случайным образом). Далее произойдёт создание нового пользователя с использованием следующей команды, заменяющей <username> выбранное вами имя пользователя:
adduser <username>
Вам будет предложено задать пароль. Введите и подтвердите новый пароль (он должен отличаться от вашего рут-пароля) и сохраните его в безопасном месте. Также вы можете ввести информацию о пользователе, но эти поля можно не заполнять. После создания пользователя, мы добавим их в sudo-группу, чтобы они могли выполнять команды в качестве рут-пользователей:
usermod -aG sudo <username>
Теперь, пока мы все ещё с правами администратора, обновим систему с помощью пакета репозитория Ubuntu:
apt update
apt upgrade
Система покажет список обновляемых пакетов. Нажмите Y и Enter, чтобы установить пакеты. Теперь установим брандмауэр (и некоторые другие пакеты, которые будем использовать позже), добавим память подкачки и перезагрузим сервер, чтобы применить все необходимые обновления ядра, а затем войдем в нашу новую защищённую среду, как новый пользователь:
apt install ufw python virtualenv git unzip pv
(нажмите Y и Enter для подтверждения)
ufw allow ssh/tcp
ufw limit ssh/tcp
ufw allow 9999/tcp
ufw logging on
ufw enable
(нажмите Y и Enter для подтверждения)
fallocate -l 4G /swapfile
chmod 600 /swapfile
mkswap /swapfile
swapon /swapfile
nano /etc/fstab
В конце файла добавьте следующую строку (чтобы разделить каждое слово/цифру, нажмите tab), затем нажмите Ctrl + X, чтобы закрыть редактор и потом Y и Enter для сохранения файла.
/swapfile none swap sw 0 0
Наконец, чтобы предотвратить атаки взлома паролей методом «грубой силы», откройте файл конфигурации SSH, чтобы отключить root-авторизацию через SSH:
nano /etc/ssh/sshd_config
Найдите строку с надписью PermitRootLogin yes и измените её на PermitRootLogin no. Прямо под ней добавьте строку с надписью AllowUsers <username>, заменив <username> с именем пользователя, которое вы задали выше. Затем нажмите Ctrl + X, чтобы закрыть редактор, далее Y и Enter, чтобы сохранить файл.
Затем перезагрузите сервер:
reboot now
При перезагрузке сервера PuTTY отсоединится.
While this setup includes basic steps to protect your server against attacks, much more can be done. In particular, authenticating with a public key instead of a username/password combination, installing fail2ban to block login brute force attacks and enabling automatic security updates is advisable. More tips are available here. However, since the masternode does not actually store the keys to any Dash, these steps are considered beyond the scope of this guide.
Отправьте залог
A Dash address with a single unspent transaction output (UTXO) of exactly 1000 DASH is required to operate a masternode. Once it has been sent, various keys regarding the transaction must be extracted for later entry in a configuration file and registration transaction as proof to write the configuration to the blockchain so the masternode can be included in the deterministic list. A masternode can be started from a hardware wallet or the official Dash Core wallet, although a hardware wallet is highly recommended to enhance security and protect yourself against hacking. This guide will describe the steps for both hardware wallets and Dash Core.
Способ 1: Отправка из аппаратного кошелька
Set up your Trezor using the Trezor wallet at https://wallet.trezor.io/ and send a test transaction to verify that it is working properly. For help on this, see this guide - you may also choose to (carefully!) add a passphrase to your Trezor to further protect your collateral. Create a new account in your Trezor wallet by clicking Add account. Then click the Receive tab and send exactly 1000 DASH to the address displayed. If you are setting up multiple masternodes, send 1000 DASH to consecutive addresses within the same new account. You should see the transaction as soon as the first confirmation arrives, usually within a few minutes.

Вкладка Receive из Trezor Wallet, в которой отображаются успешно переведённый залог в размере 1000 DASH
Когда перевод появится, кликните на QR-код справа, чтобы увидеть транзакцию в блокчейне. Не закрывайте это окно, пока выполеняете дальнейшие шаги, поскольку скоро нам понадобится доказать, что существует 15 подтверждений транзакции, как показано на скриншоте ниже.
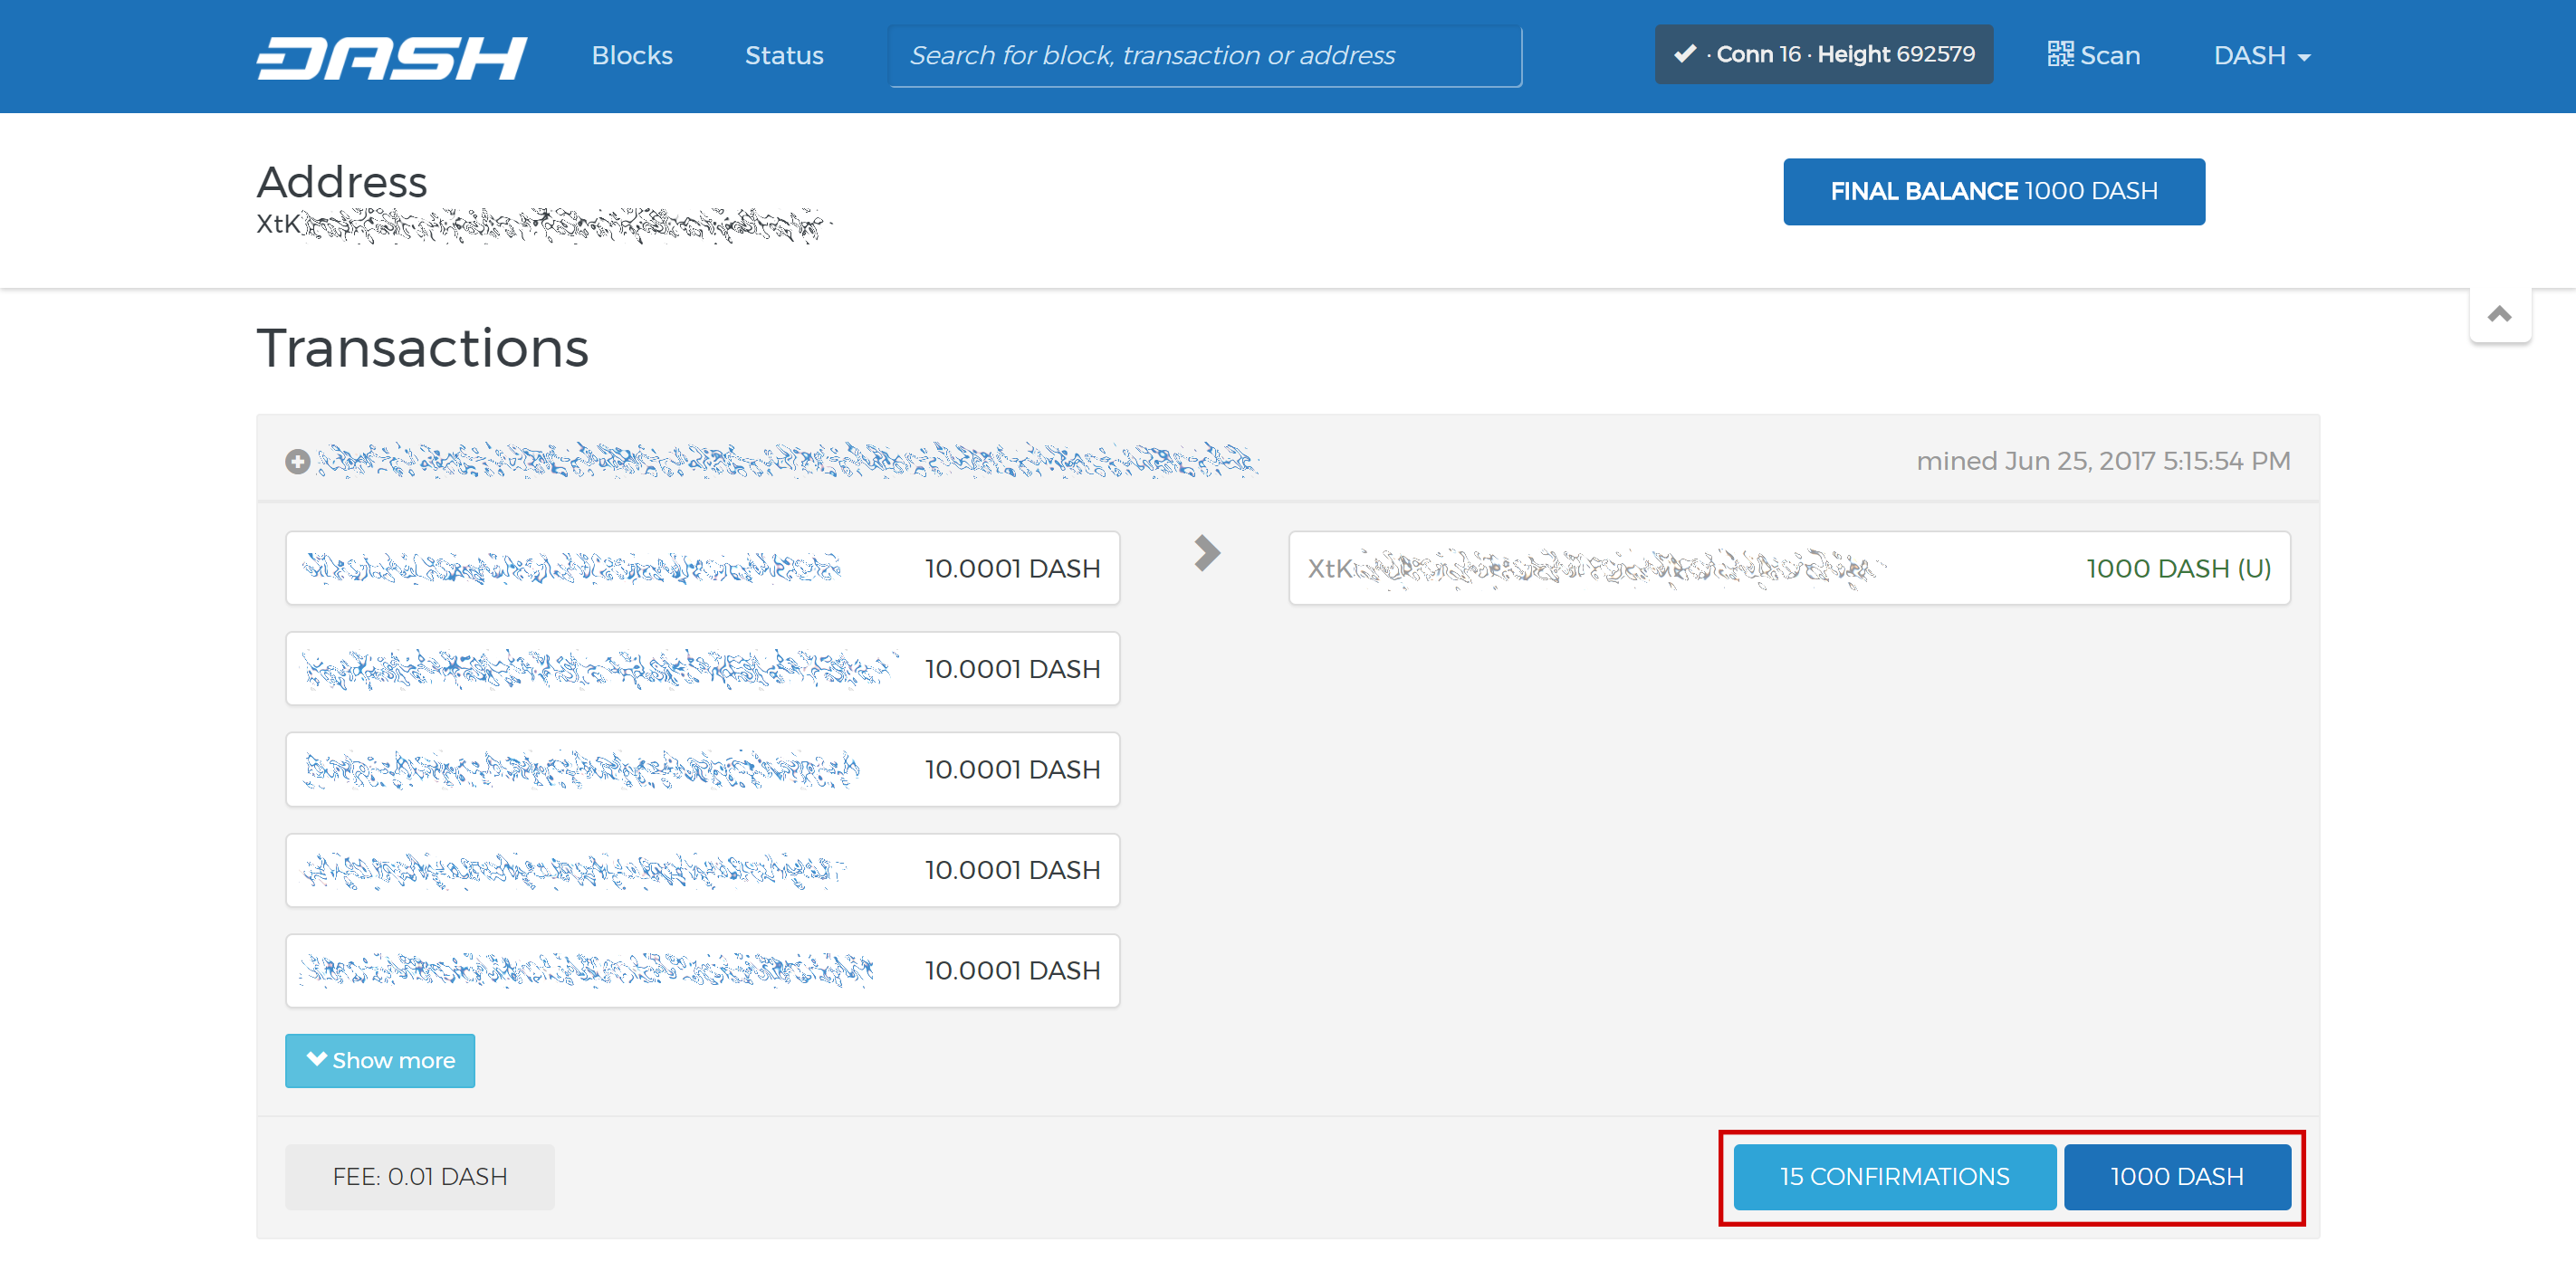
Обозреватель блокчейна Trezor показывает, что прошло 15 подтверждений залоговой транзакции
Во время ожидания завершения 15 подтверждений, загрузите последнюю версию Dash Masternode Tool (DMT) со страницы релизов GitHub здесь. Распакуйте и запустите файл. Появится следующее окно.
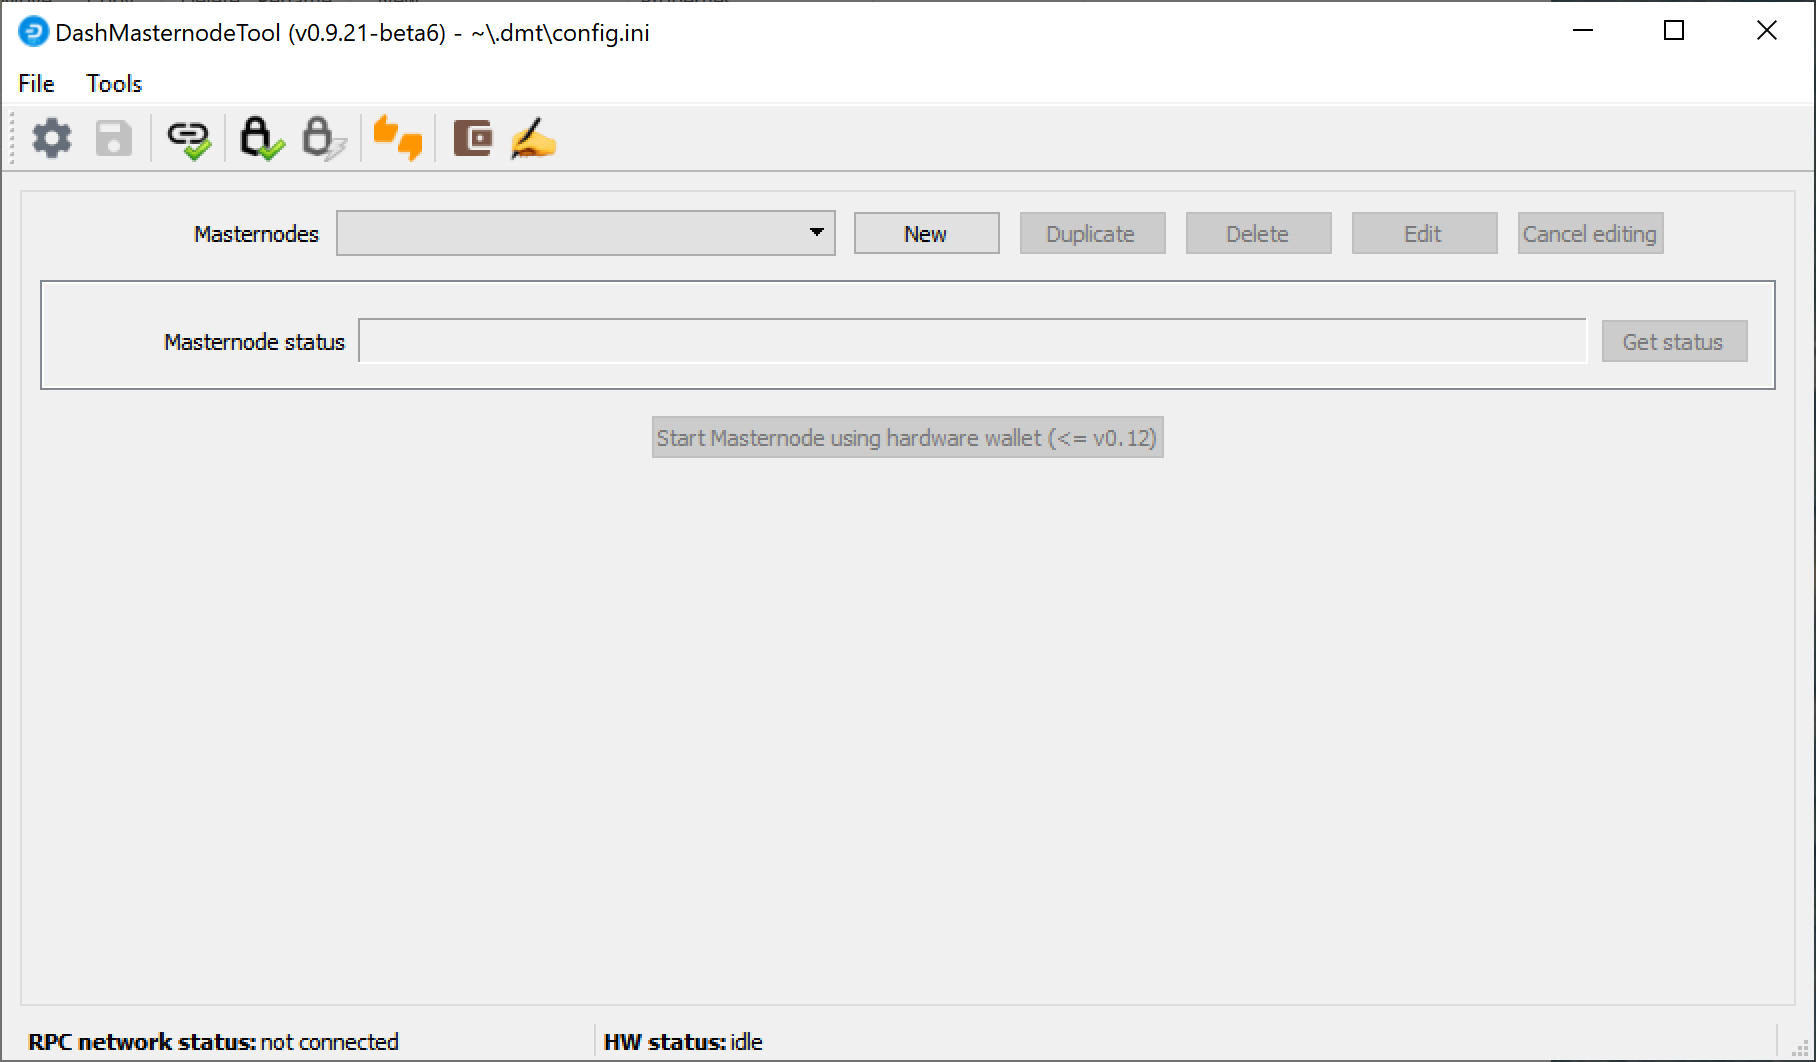
Экран запуска Dash Masternode Tool
Click the third button from the left Check Dash Network Connection in the top left corner of the main window to verify that the connection is working. Then connect your Trezor device and click the next button Test Hardware Wallet Connection to verify the Trezor connection is working.
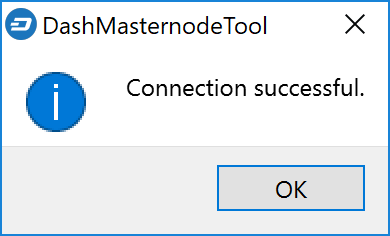

Подтверждения успешного соединения Dash Masternode Tool
We will now use DMT to extract the transaction ID and legacy masternode key (necessary for successful startup during the DIP003 transition period). Carry out the following sequence of steps as shown in this screenshot:
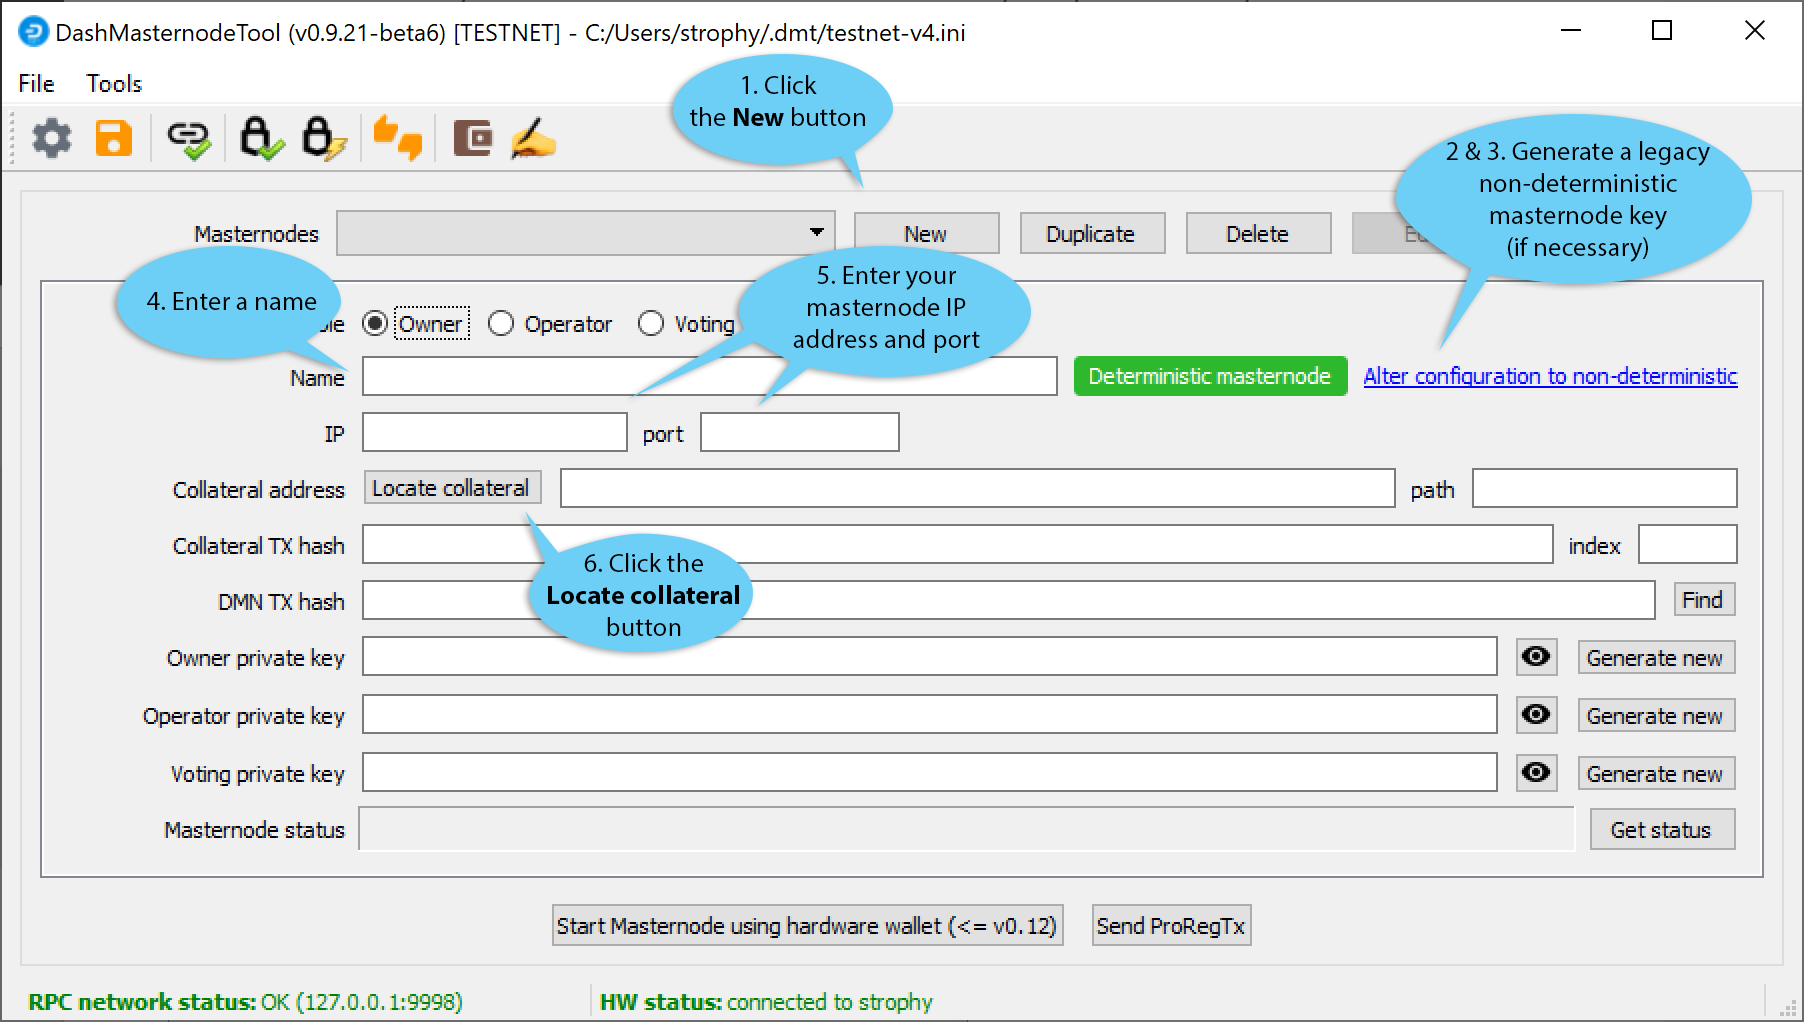
Шаги настройки Dash Masternode Tool
- Click the New button.
- Ensure you are on the settings page for a Non-deterministic masternode and click Generate new to generate a legacy masternode key. Copy this key into a text editor.
- Click Alter configuration to deterministic
- Enter a name for your masternode. The host name you specified for your VPS above is a good choice.
- Enter the IP address of your masternode. This was given to you by the VPS provider when you set up the server.
- Введите номер TCP порта. Он должен быть 9999.
- Click Locate collateral to view unused collateral funding transactions available on the connected hardware wallet. The Collateral address, index and Collateral TX hash fields should be filled automatically
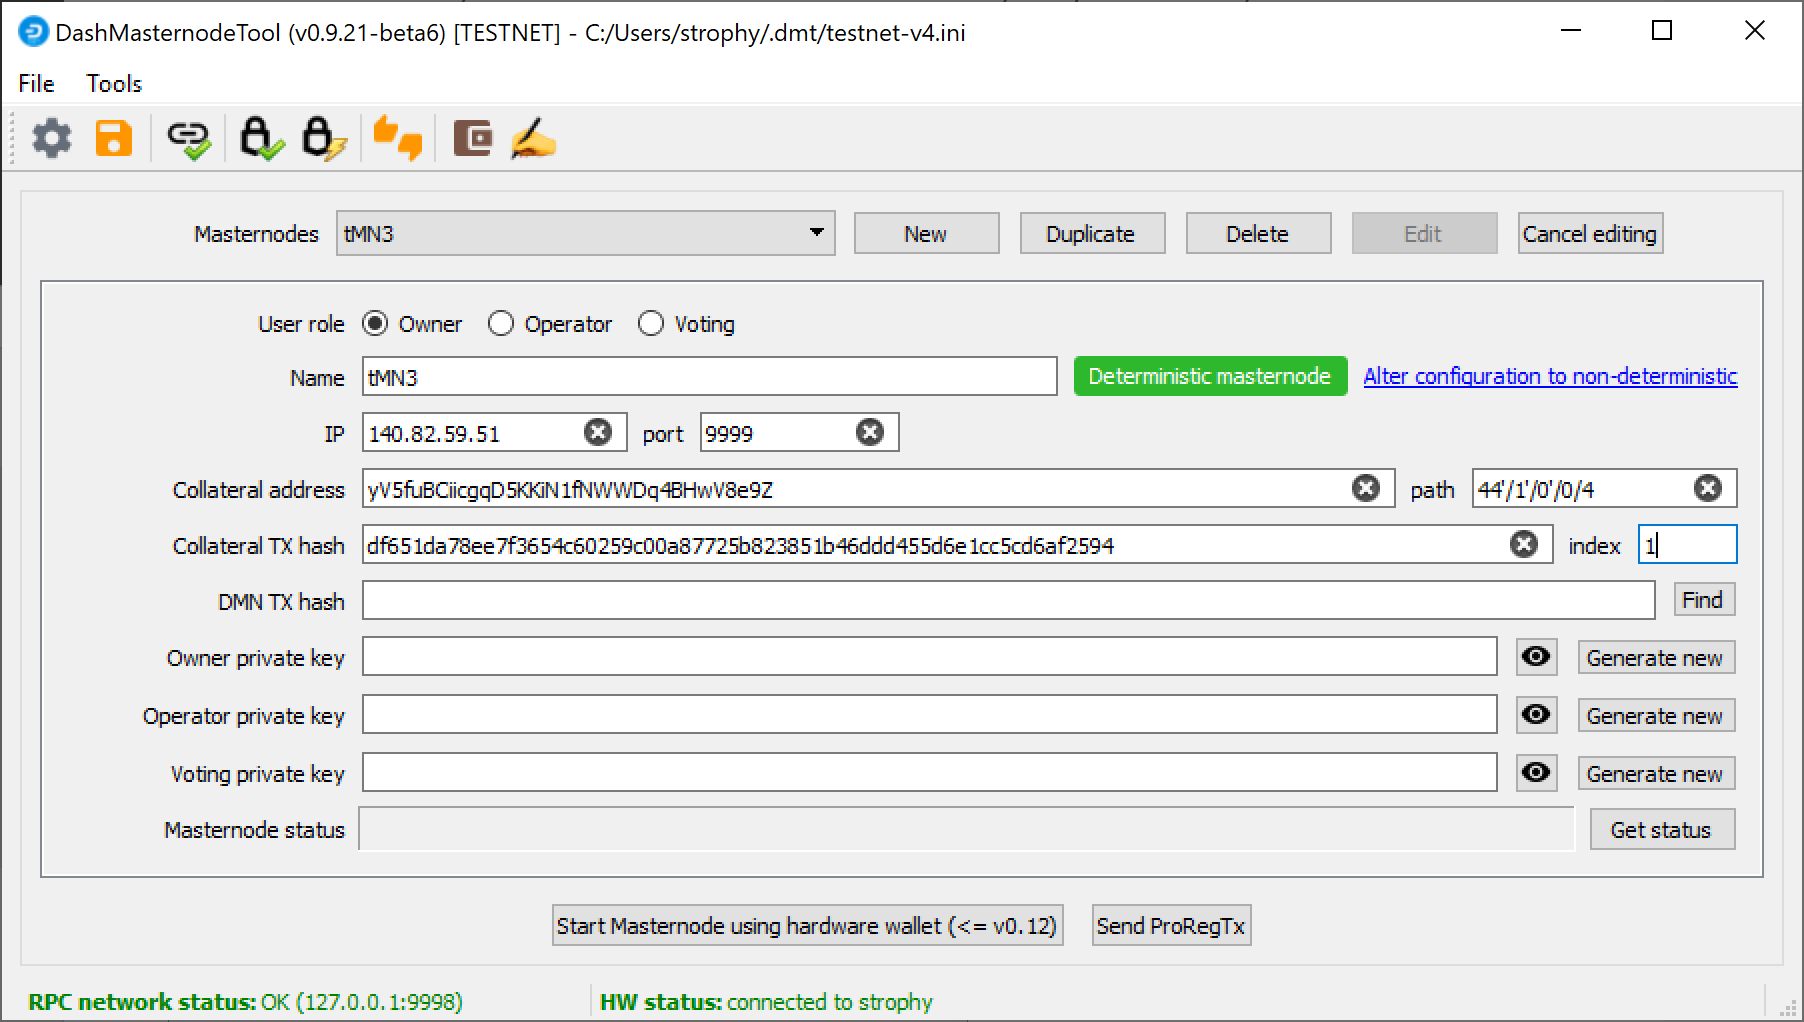
Теперь Dash Masternode Tool настроен и готов к запуску мастерноды.
Leave DMT open and continue with the next step: installing Dash Core on your VPS.
Способ 2: Отправка из кошелька Dash Core
Откройте кошелёк Dash Core и дождитесь пока он синхронизируется с сетью. По завершении это должно выглядеть вот так:
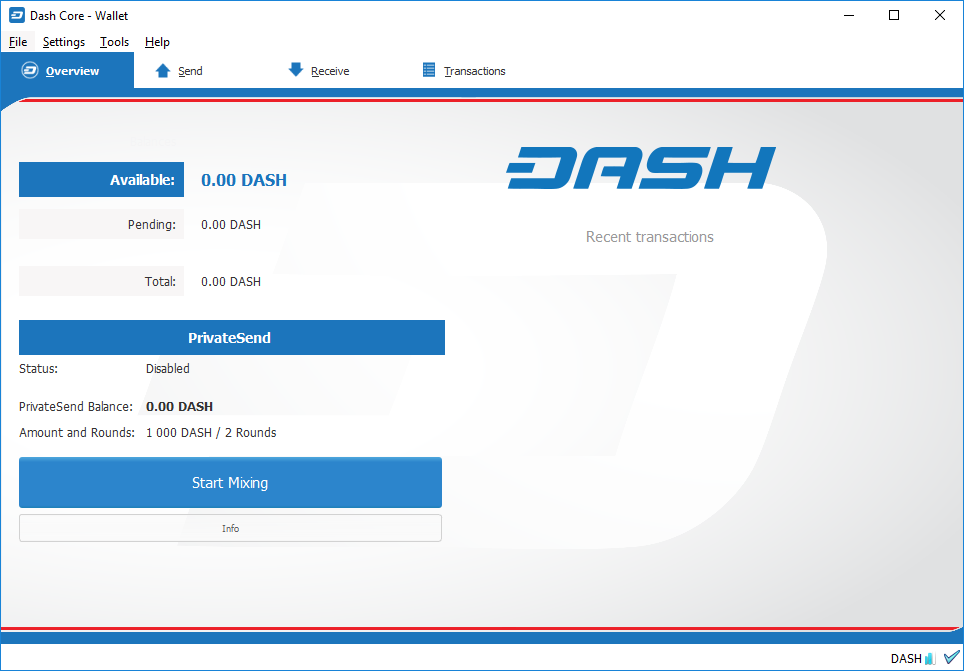
Полностью синхрониируйте кошелёк Dash Core
Click Tools > Debug console to open the console. Type the following two commands into the console to generate a legacy masternode key (necessary for successful startup during the DIP003 transition period) and a new Dash address for the collateral:
masternode genkey
93PAqQsDjcVdYJHRfQPjsSt5338GCswMnUaSxoCD8J6fiLk4NHL

getnewaddress
yiFfzbwiN9oneftd7cEfr3kQLRwQ4kp7ue
Take note of the legacy masternode private key and collateral address, since we will need it later. The next step is to secure your wallet (if you have not already done so). First, encrypt the wallet by selecting Settings > Encrypt wallet. You should use a strong, new password that you have never used somewhere else. Take note of your password and store it somewhere safe or you will be permanently locked out of your wallet and lose access to your funds. Next, back up your wallet file by selecting File > Backup Wallet. Save the file to a secure location physically separate to your computer, since this will be the only way you can access our funds if anything happens to your computer. For more details on these steps, see here.
Now send exactly 1000 DASH in a single transaction to the new address you generated in the previous step. This may be sent from another wallet, or from funds already held in your current wallet. Once the transaction is complete, view the transaction in a blockchain explorer by searching for the address. You will need 15 confirmations before you can start the masternode, but you can continue with the next step at this point already: installing Dash Core on your VPS.
Обозреватель блокчейна Trezor показывает, что прошло 15 подтверждений залоговой транзакции
Установка Dash Core
Dash Core это ПО, которое объединяет в себе кошелёк с графическим интерфейсом Dash Core и мастерноды Dash. Если графический интерфейс не отображается, то приложение запущено, как демон на VPS (dashd) и контролируется простым командным интерфейсом (dash-cli).
шагиСнова откройте PuTTY или консоль и подключитесь, используя имя пользователя и пароль, которые вы только что создали для своего нового пользователя без root-прав. Существует два варианта установки Dash Core: автоматический вариант с использованием утилиты сценариев dashman от участника команды Dash Core moocowmoo и более сложный вариант, который позволит вам понять все ключевые шаги подготовки вашей мастерноды.
Способ 1: Автоматическая инсталляция с использованием dashman
Чтобы установить Dash, используя dashman, после входа в систему введите следующие команды:
cd ~
git clone https://github.com/moocowmoo/dashman
~/dashman/dashman install
(нажмите Y и Enter для подтверждения)
dashman will download the latest version of Dash Core for your system, as well as an initial snapshot of the blockchain to speed up the bootstrapping process. Next download and install Sentinel, which is required for masternodes at version 0.12.1 or higher:
~/dashman/dashman install sentinel
Your system is now running as a standard Dash node, and is busy completing synchronisation with the blockchain. Since dashman does not automatically restart your masternode in the event of a system error, add a check function to crontab to make sure it checks every minute to ensure your masternode is still running:
crontab -e
В качестве редактора выберите nano и в конце файла введите следующую строку, после строки Sentinel:
* * * * * pidof dashd || ~/.dashcore/dashd
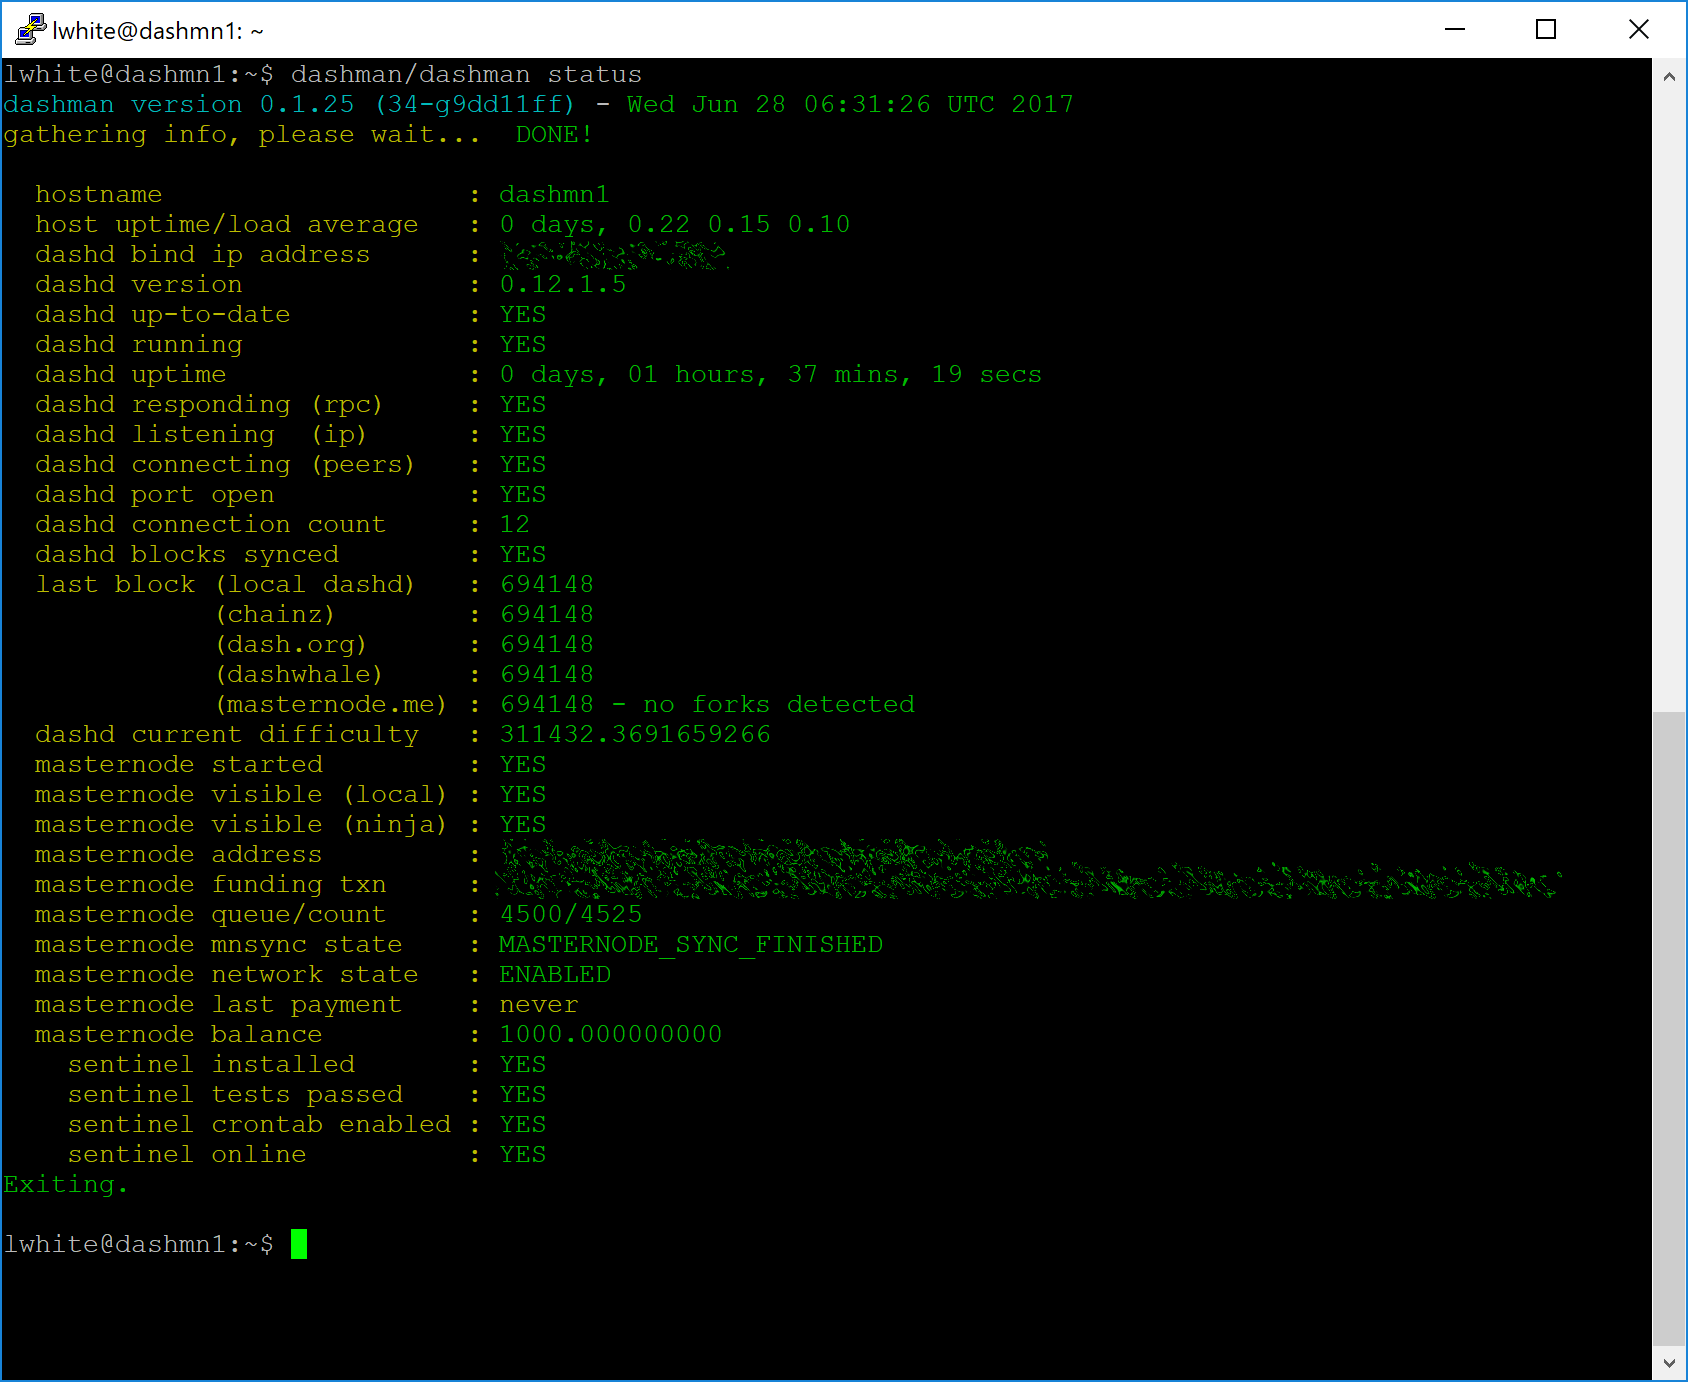
Press enter to make sure there is a blank line at the end of the file, then press Ctrl + X to close the editor and Y and Enter save the file. Check the sync status and wait until all blockchain synchronisation and the 15 confirmations for the collateral transaction are complete:
~/dashman/dashman status
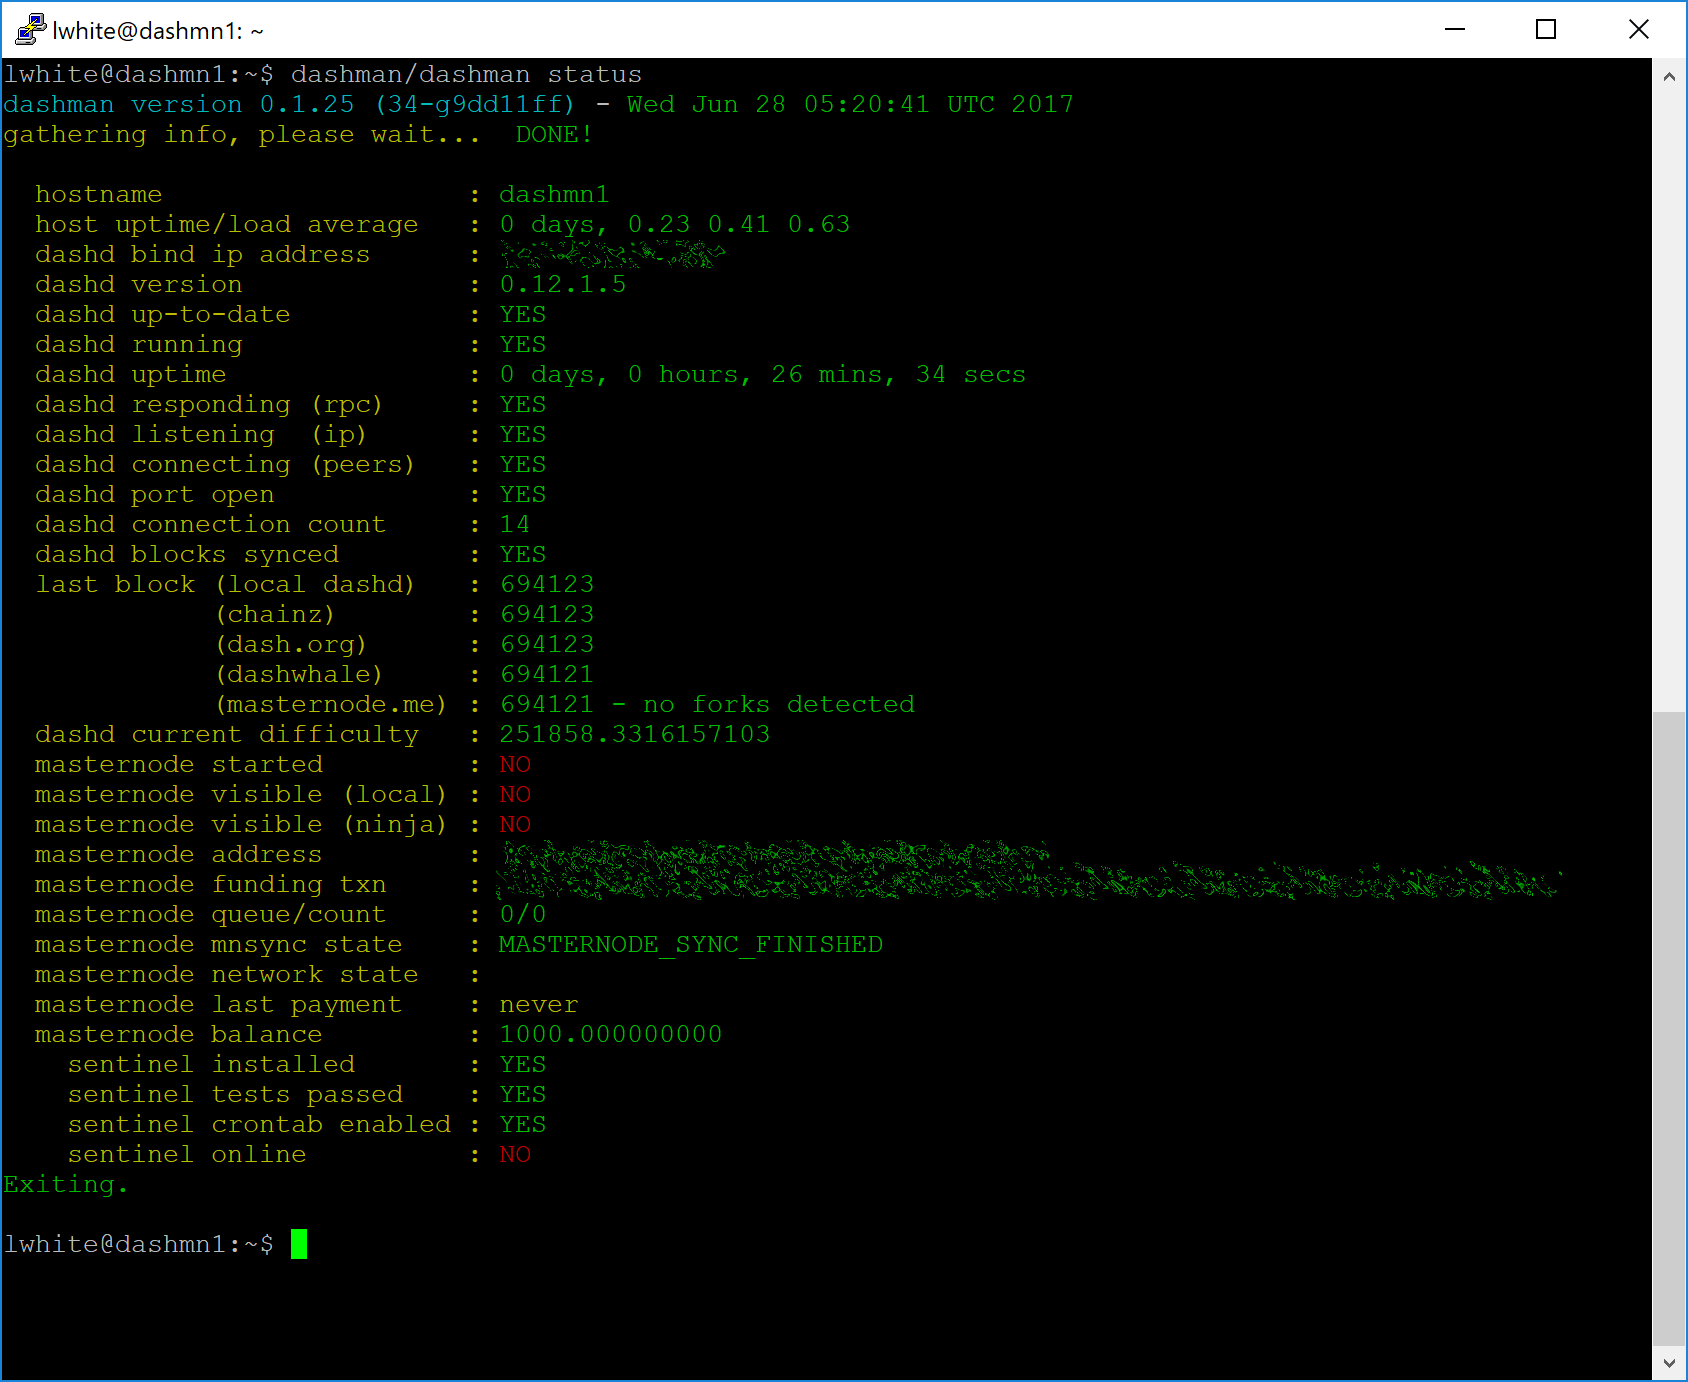
Выведенный статус dashman, который показывает, что мастернода готова к запуску
Continue with the next step to register your masternode.
Способ 2: Установка вручную
To manually download and install the components of your Dash masternode,
visit the GitHub releases page
and copy the link to the latest x86_64-linux-gnu version. Go back to
your terminal window and enter the following command, pasting in the
address to the latest version of Dash Core by right clicking or pressing
Ctrl + V:
cd /tmp
wget https://github.com/dashpay/dash/releases/download/v0.13.0.0-rc10/dashcore-0.13.0.0-rc10-x86_64-linux-gnu.tar.gz
Verify the integrity of your download by running the following command
and comparing the output against the value for the file as shown in the
SHA256SUMS.asc file:
wget https://github.com/dashpay/dash/releases/download/v0.13.0.0-rc10/SHA256SUMS.asc
sha256sum dashcore-0.13.0.0-rc10-x86_64-linux-gnu.tar.gz
cat SHA256SUMS.asc
При желании вы также можете сверить подлинность загруженного файла с официальным релизом команды Dash Core. Все релизы Dash с использованием GPG пользователя UdjinM6 с ключом 8359 2BD1 400D 58D9, поддаются проверке на Keybase. Импортируйте ключ, для текущего релиза Dash, скачайте файл ASC и проверьте подпись, как показано ниже:
curl https://keybase.io/udjinm6/pgp_keys.asc | gpg --import
gpg --verify SHA256SUMS.asc
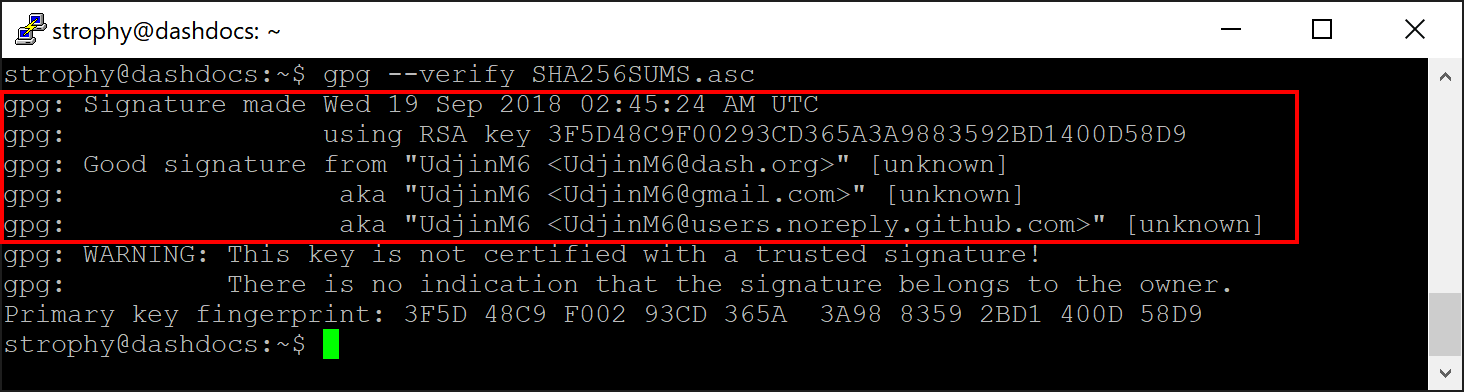
Скачивание PGP-ключа и верификация подписанных двоичных файлов
Create a working directory for Dash, extract the compressed archive and copy the necessary files to the directory:
mkdir ~/.dashcore
tar xfv dashcore-0.13.0.0-rc10-x86_64-linux-gnu.tar.gz
cp -f dashcore-0.13.0/bin/dashd ~/.dashcore/
cp -f dashcore-0.13.0/bin/dash-cli ~/.dashcore/
С помощью следующей команды создайте файл настроек:
nano ~/.dashcore/dash.conf
Появится окно редактора. Теперь нам нужно создать конфигурационный файл, в котором будут описаны некоторые параметры. Для начала, скопируйте и вставьте в него следующий текст, а затем замените параметры на те, которые удовлетвоярют вашей конфигурации:
#----
rpcuser=XXXXXXXXXXXXX
rpcpassword=XXXXXXXXXXXXXXXXXXXXXXXXXXXX
rpcallowip=127.0.0.1
#----
listen=1
server=1
daemon=1
maxconnections=64
#----
masternode=1
masternodeprivkey=XXXXXXXXXXXXXXXXXXXXXXX
externalip=XXX.XXX.XXX.XXX
#----
Замените все поля с XXXXXXX следующим образом:
rpcuser: введите любой набор цифр или букв, без специальных символовrpcpassword: введите любой набор цифр или букв, без специальных символовmasternodeprivkey: this is the legacy masternode private key you generated in the previous stepexternalip: это IP-адрес вашего VPS
В результате должно получиться что-то похожее:
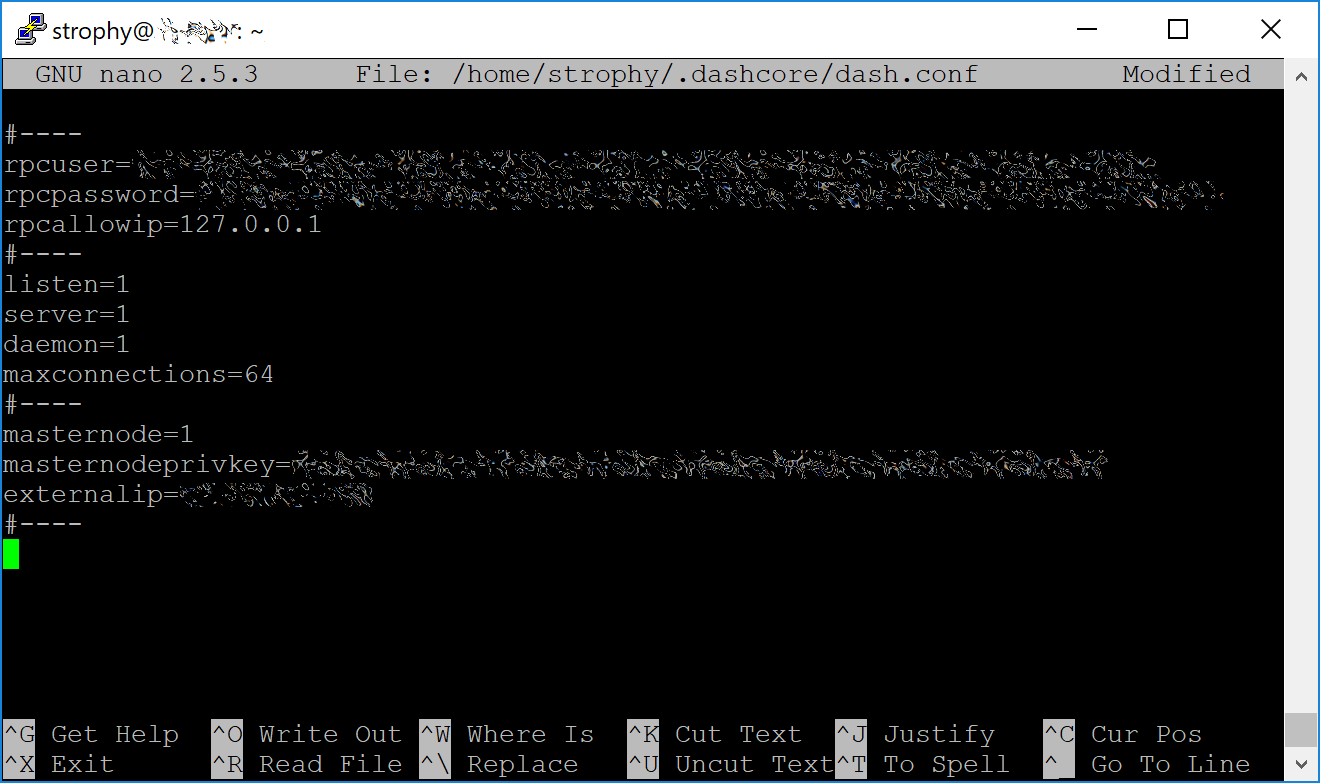
Ввод ключевых данных в dash.conf для мастерноды
Нажмите Ctrl + X и закройте редактор, а затем нажмите Y и Enter, чтобы сохранить файл. Теперь вы можете запустить Dash в режиме мастерноды и начать синхронизацию с блокчейном:
~/.dashcore/dashd
Появится сообщение с текстом Dash Core server starting. Теперь установим Sentinel, ту часть ПО, которая работает в режиме сторожевого таймера общаясь с сетью и сообщая ей, что ваша нода работает нормально:
cd ~/.dashcore
git clone https://github.com/dashpay/sentinel.git
cd sentinel
virtualenv venv
venv/bin/pip install -r requirements.txt
venv/bin/python bin/sentinel.py
Появится сообщение с текстом dashd not synced with network! Awaiting full sync before running Sentinel. Добавьте dashd и Sentinel в файл crontab, чтобы иметь возможность получать ежеминутные подтверждения того, что ваша мастерноды запущена и работает:
crontab -e
В качестве редактора выберите nano и в конце файла введите следующие строки:
* * * * * cd ~/.dashcore/sentinel && ./venv/bin/python bin/sentinel.py 2>&1 >> sentinel-cron.log
* * * * * pidof dashd || ~/.dashcore/dashd
Нажмите Enter, чтобы убедиться, что в конце файла есть пустая строка, затем нажмите Ctrl + X, чтобы закрыть редактор, а затем Y и Enter, чтобы сохранить файл. Теперь для залоговой транзакции, чтобы она считалась завершённой, следует дождаться 15 подтверждений сети, а также дождаться пока мастернода завершит процес синхронизации с блокчейном. Для мониторинга за процессом можно использовать следующие команды:
~/.dashcore/dash-cli mnsync status
По завершении синхронизации вы увидите следующий ответ:
{
 "AssetID": 999,
 "AssetName": "MASTERNODE_SYNC_FINISHED",
 "Attempt": 0,
 "IsBlockchainSynced": true,
 "IsMasternodeListSynced": true,
 "IsWinnersListSynced": true,
 "IsSynced": true,
 "IsFailed": false
}
Continue with the next step to construct the ProTx transaction required to enable your masternode.
Register your masternode
DIP003 introduces several changes to how a masternode is set up and operated. These are described briefly under DIP003 Masternode Changes in this documentation, or in full detail in DIP003 itself. It is highly recommended to first read at least the brief documentation before continuing in order to familiarize yourself with the new concepts in DIP003.
Option 1: Registering from a hardware wallet
Go back to DMT and ensure that all fields from the previous step are still filled out correctly. Click Generate new for the three private keys required for a DIP003 deterministic masternode:
- Owner private key
- Operator private key
- Voting private key
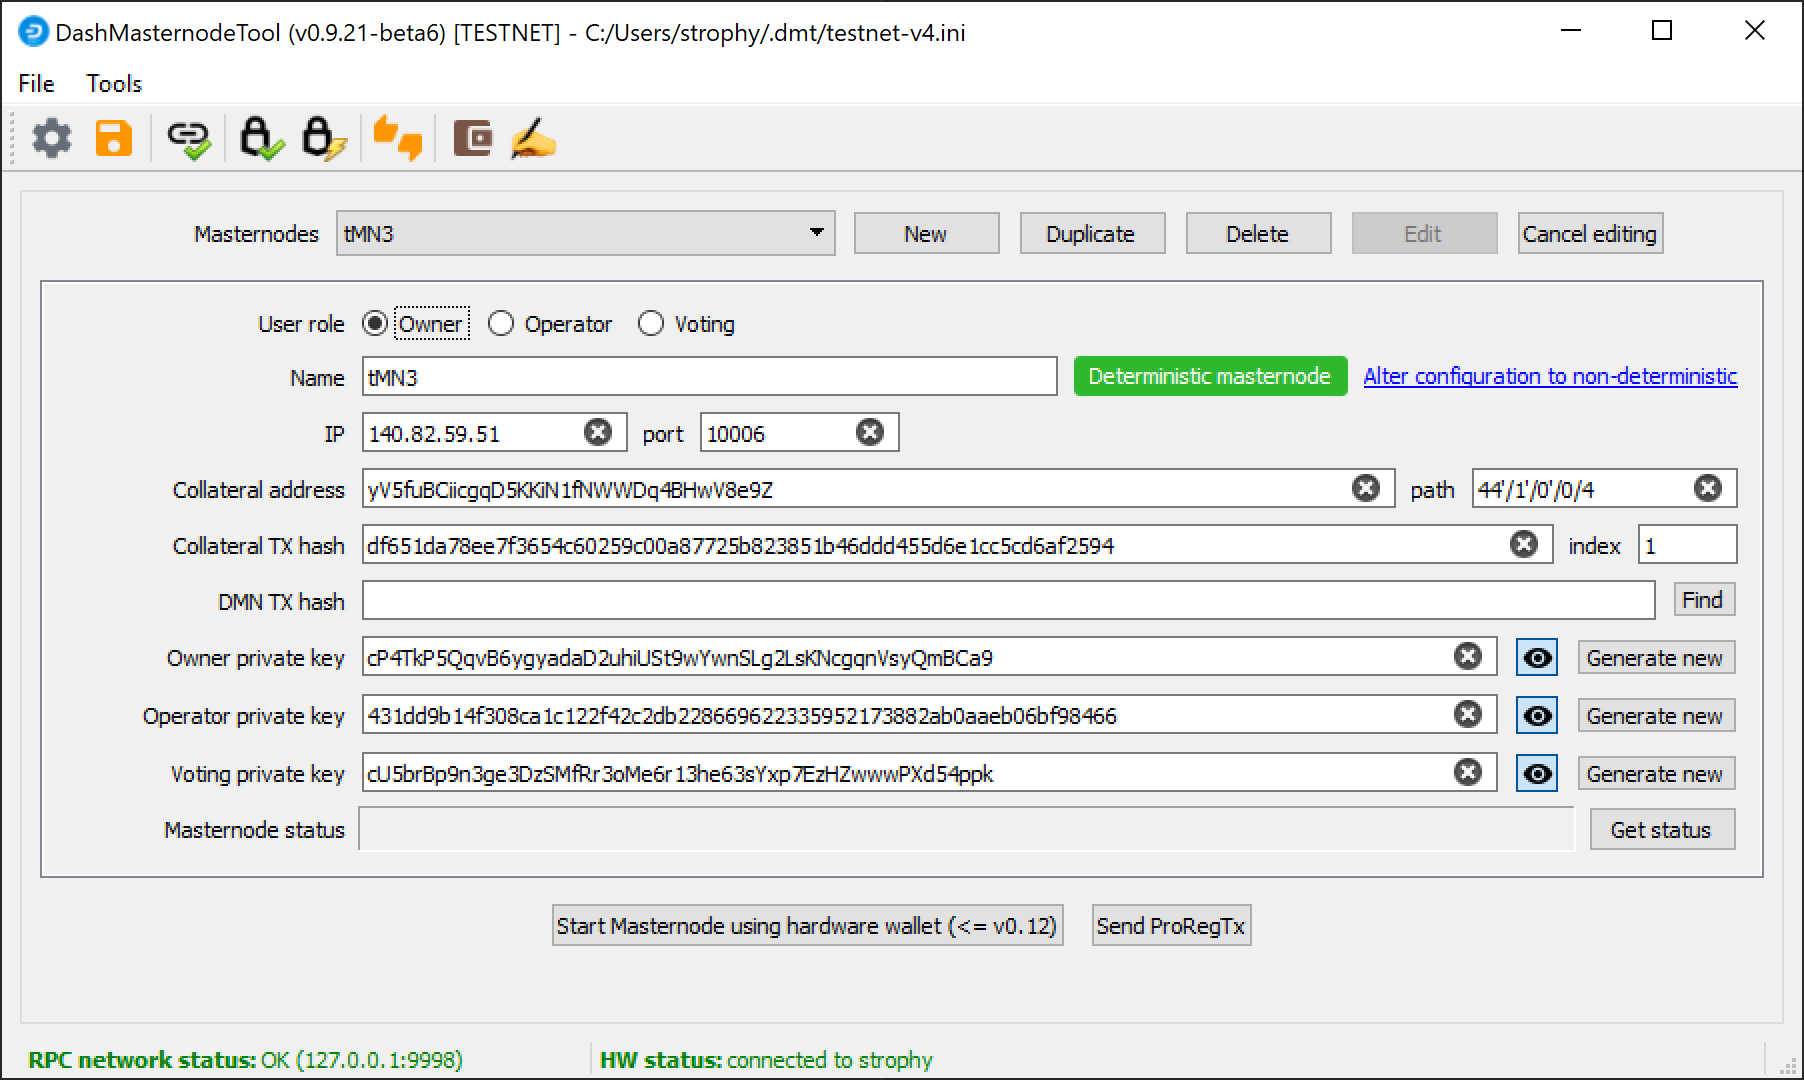
Dash Masternode Tool ready to register a new masternode
Then click Send ProRegTx and confirm the following two messages:

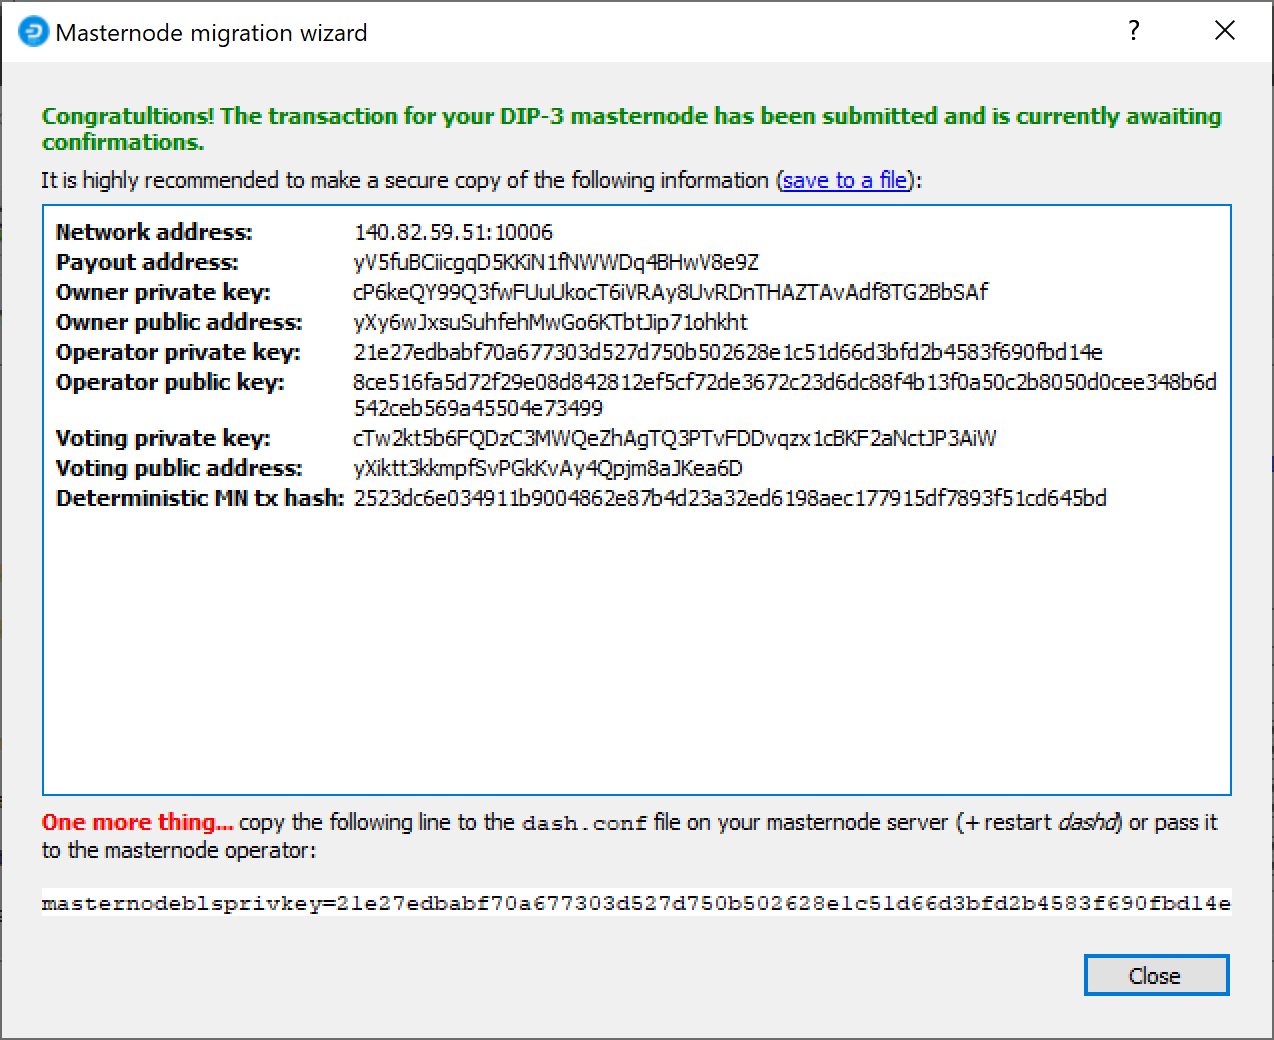
Dash Masternode Tool confirmation dialogs to register a masternode
The BLS secret key must be entered in the dash.conf file on the
masternode. This allows the masternode to watch the blockchain for
relevant Pro*Tx transactions, and will cause it to start serving as a
masternode when the signed ProRegTx is broadcast by the owner, as we
just did above. Edit the configuration file on your masternode as
follows:
nano ~/.dashcore/dash.conf
The editor appears with the existing masternode configuration. Add this line to the end of the file, replacing the key with your BLS secret key generated above:
masternodeblsprivkey=21e27edbabf70a677303d527d750b502628e1c51d66d3bfd2b4583f690fbd14e
Press enter to make sure there is a blank line at the end of the file, then press Ctrl + X to close the editor and Y and Enter save the file. We now need to restart the masternode for this change to take effect. Enter the following commands, waiting a few seconds in between to give Dash Core time to shut down:
~/.dashcore/dash-cli stop
~/.dashcore/dashd
At this point you can monitor your masternode using
dashman/dashman status, by entering
~/.dashcore/dash-cli masternode status or using the Get status
function in DMT. The final result should appear as follows:
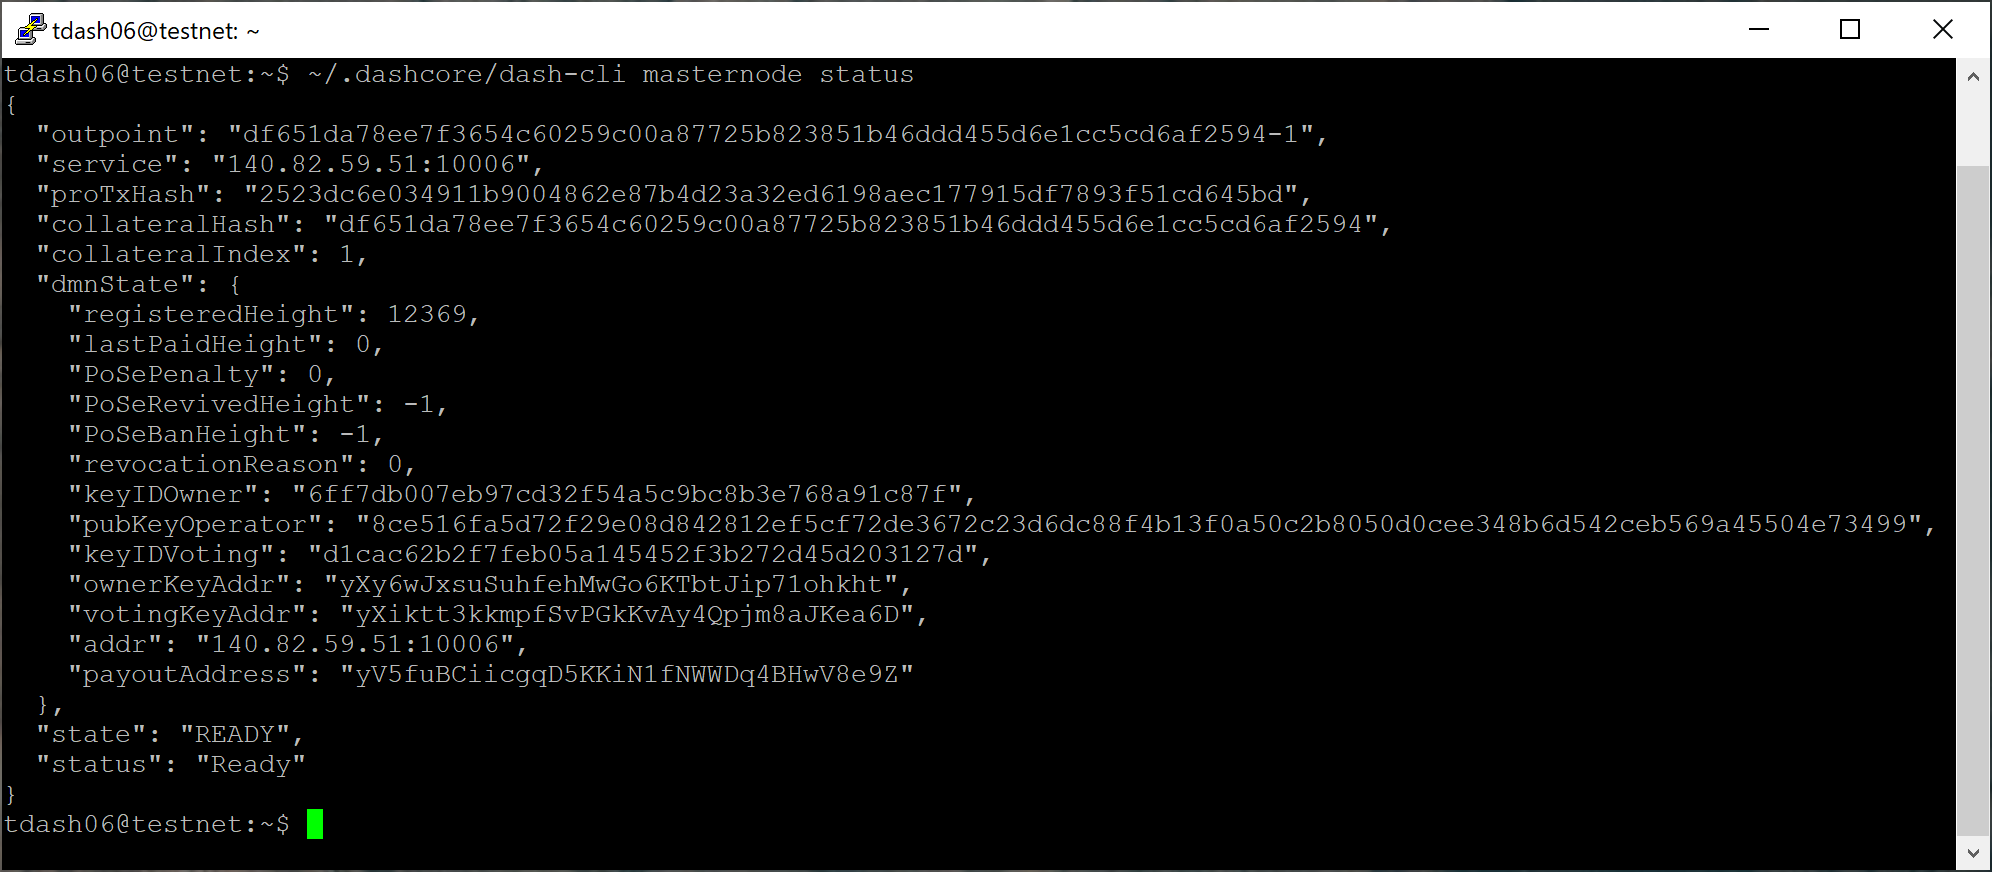
dash-cli masternode status output showing successfully started masternode
На этом этапе можно безопасно совершить выход из сервера, набрав exit. Поздравляем! Ваша мастернода теперь работает.
Option 2: Registering from Dash Core wallet
Identify the funding transaction
Если для совершения залоговой транзакции вы использовали адрес кошелька Dash Core, то теперь необходимо найти txid этой транзакции. Кликните Инструменты > Консоль отладки и введите следующую команду:
masternode outputs
Консоль должна вернуть строку символов, аналогичную этой:
{
"ad308ec104bdf113444be609eb3dce9474a5550424204c6538843e3ccd3d4e78" : "1",
}
The first long string is your transaction hash, while the last number is the index.
Generate a BLS key pair
A public/private BLS key pair is required for the operator of the masternode. If you are using a hosting service, they may provide you with their public key, and you can skip this step. If you are hosting your own masternode or have agreed to provide your host with the BLS private key, generate a BLS public/private keypair as follows:
bls generate

{
  "secret": "28a85abb5aa8e820f65e33974cef0ab0bf06195f61454d2feb7fa578612d2228",
  "public": "144cbf4d472716b9504a54c7ca26906a3346253b787ffeb1a4999325049f5b2c51ef2e7c215d85f0a9142ec1c78db99b"
}
These keys are NOT stored by the wallet and must be kept secure,
similar to the value provided in the past by the masternode genkey
command.
Add the private key to your masternode configuration
The public key will be used in following steps. The private key must be
entered in the dash.conf file on the masternode. This allows the
masternode to watch the network for relevant Pro*Tx transactions, and
will cause it to start serving as a masternode when the signed ProRegTx
is broadcast by the owner (final step below). Log in to your masternode
using ssh or PuTTY and edit the configuration file on your
masternode as follows:
nano ~/.dashcore/dash.conf
The editor appears with the existing masternode configuration. Add this line to the end of the file, replacing the key with your BLS secret key generated above:
masternodeblsprivkey=28a85abb5aa8e820f65e33974cef0ab0bf06195f61454d2feb7fa578612d2228
Press enter to make sure there is a blank line at the end of the file, then press Ctrl + X to close the editor and Y and Enter save the file. We now need to restart the masternode for this change to take effect. Enter the following commands, waiting a few seconds in between to give Dash Core time to shut down:
~/.dashcore/dash-cli stop
~/.dashcore/dashd
We will now prepare the transaction used to register a DIP003 masternode on the network.
Prepare a ProRegTx transaction
First, we need to get a new, unused address from the wallet to serve as the owner address. This is different to the collateral address. It must also be used as the voting address if Spork 15 is not yet active. Generate a new address as follows:
getnewaddress

yMwR1zf2Cv9gcMdHULRVbTTMGw7arvpbM5
Then either generate or choose an existing second address to receive the owner’s masternode payouts:
getnewaddress

yLqyR8PHEB7Fp1ue8nSuLfuxQhrj5PSTDv
You can also optionally generate and fund a third address to pay the
transaction fee. The private key to this address must be available to
the wallet submitting the transaction to the network. We will now
prepare an unsigned ProRegTx special transaction using the protx
register_prepare command. This command has the following syntax:
protx register_prepare collateralHash collateralIndex ipAndPort ownerKeyAddr
operatorPubKey votingKeyAddr operatorReward payoutAddress (feeSourceAddress)
Open a text editor such as notepad to prepare this command. Replace each argument to the command as follows:
collateralHash: The txid of the 1000 Dash collateral funding transactioncollateralIndex: The output index of the 1000 Dash funding transactionipAndPort: Masternode IP address and port, in the formatx.x.x.x:yyyyownerKeyAddr: The new Dash address generated above for the owner/voting addressoperatorPubKey: The BLS public key generated above (or provided by your hosting service)votingKeyAddr: The new Dash address generated above, or the address of a delegate, used for proposal votingoperatorReward: The percentage of the block reward allocated to the operator as paymentpayoutAddress: A new or existing Dash address to receive the owner’s masternode rewardsfeeSourceAddress: An (optional) address used to fund ProTx fee.payoutAddresswill be used if not specified.
Note that the operator is responsible for specifying their own
reward address in a separate update_service
transaction if you specify a non-zero operatorReward. The owner of
the masternode collateral does not specify the operator’s payout
address.
Example (remove line breaks if copying):
protx register_prepare
  ad308ec104bdf113444be609eb3dce9474a5550424204c6538843e3ccd3d4e78
  1
  140.82.59.51:10004
  yMwR1zf2Cv9gcMdHULRVbTTMGw7arvpbM5
  144cbf4d472716b9504a54c7ca26906a3346253b787ffeb1a4999325049f5b2c51ef2e7c215d85f0a9142ec1c78db99b
  yMwR1zf2Cv9gcMdHULRVbTTMGw7arvpbM5
  0
  yLqyR8PHEB7Fp1ue8nSuLfuxQhrj5PSTDv
Output:
{
   "tx": "0300010001784e3dcd3c3e8438654c20240455a57494ce3deb09e64b4413f1bd04c18e30ad0000000000feffffff01cccfa204000000001976a9141ea44ced396667eb7d1c5b3699e04b5b3046ecfb88ac00000000d1010000000000784e3dcd3c3e8438654c20240455a57494ce3deb09e64b4413f1bd04c18e30ad0100000000000000000000000000ffff8c523b33271411c59262c9633a1bb810a7fc2b833c43cfa852ab144cbf4d472716b9504a54c7ca26906a3346253b787ffeb1a4999325049f5b2c51ef2e7c215d85f0a9142ec1c78db99b11c59262c9633a1bb810a7fc2b833c43cfa852ab00001976a91405c5fed6a3eb0b92ea5119039efae7a8dee5456488ac4e6cc5451440a6044dbd04d33a11f4cddc9021532ede3012ebbc31c0bb4ceb9c00",
  "collateralAddress": "yiFfzbwiN9oneftd7cEfr3kQLRwQ4kp7ue",
  "signMessage": "yLqyR8PHEB7Fp1ue8nSuLfuxQhrj5PSTDv|0|yMwR1zf2Cv9gcMdHULRVbTTMGw7arvpbM5|yMwR1zf2Cv9gcMdHULRVbTTMGw7arvpbM5|4e00de34ee03d28adb4e1fdaec966ae239c11da7e6115f566fc4b3f75c8a5503"
}
Next we will use the collateralAddress and signMessage fields to
sign the transaction, and the output of the tx field to submit the
transaction.
Sign the ProRegTx transaction
We will now sign the content of the signMessage field using the
private key for the collateral address as specified in
collateralAddress. Note that no internet connection is required for
this step, meaning that the wallet can remain disconnected from the
internet in cold storage to sign the message. In this example we will
again use Dash Core, but it is equally possible to use the signing
function of a hardware wallet. The command takes the following syntax:
signmessage address message
Example:
signmessage yiFfzbwiN9oneftd7cEfr3kQLRwQ4kp7ue yLqyR8PHEB7Fp1ue8nSuLfuxQhrj5PSTDv|0|yMwR1zf2Cv9gcMdHULRVbTTMGw7arvpbM5|yMwR1zf2Cv9gcMdHULRVbTTMGw7arvpbM5|4e00de34ee03d28adb4e1fdaec966ae239c11da7e6115f566fc4b3f75c8a5503
Output:
H3ub9BATtvuV+zDGdkUQNoUGpaYFr/O1FypmrSmH5WJ0KFRi8T10FSew0EJO/+Ij+OLv4r0rt+HS9pQFsZgc2dE=
Submit the signed message
We will now submit the ProRegTx special transaction to the blockchain to register the masternode. This command must be sent from a Dash Core wallet holding a balance, since a standard transaction fee is involved. The command takes the following syntax:
protx register_submit tx sig
Where:
tx: The serialized transaction previously returned in thetxoutput field from theprotx register_preparecommandsig: The message signed with the collateral key from thesignmessagecommand
Example:
protx register_submit 0300010001784e3dcd3c3e8438654c20240455a57494ce3deb09e64b4413f1bd04c18e30ad0000000000feffffff01cccfa204000000001976a9141ea44ced396667eb7d1c5b3699e04b5b3046ecfb88ac00000000d1010000000000784e3dcd3c3e8438654c20240455a57494ce3deb09e64b4413f1bd04c18e30ad0100000000000000000000000000ffff8c523b33271411c59262c9633a1bb810a7fc2b833c43cfa852ab144cbf4d472716b9504a54c7ca26906a3346253b787ffeb1a4999325049f5b2c51ef2e7c215d85f0a9142ec1c78db99b11c59262c9633a1bb810a7fc2b833c43cfa852ab00001976a91405c5fed6a3eb0b92ea5119039efae7a8dee5456488ac4e6cc5451440a6044dbd04d33a11f4cddc9021532ede3012ebbc31c0bb4ceb9c00 H3ub9BATtvuV+zDGdkUQNoUGpaYFr/O1FypmrSmH5WJ0KFRi8T10FSew0EJO/+Ij+OLv4r0rt+HS9pQFsZgc2dE=
Output:
b823338301e47875493c20361a23aef034578030c639480203b394669ab05e09
Your masternode is now registered and will appear on the Deterministic
Masternode List after the transaction is mined to a block. You can view
this list on the Masternodes -> DIP3 Masternodes tab of the Dash
Core wallet, or in the console using the command protx list valid,
where the txid of the final protx register_submit transaction
identifies your DIP003 masternode. Note again that all functions related
to DIP003 will only take effect once Spork 15 is enabled on the network.
You can view the spork status using the spork active command.
At this point you can go back to your terminal window and monitor your
masternode using dashman/dashman status, by entering
~/.dashcore/dash-cli masternode status or using the Get status
function in DMT. The final result should appear as follows:
Выведенный статус dashman, который сообщает об успешно запущенной мастерноде
На этом этапе можно безопасно совершить выход из сервера, набрав exit. Поздравляем! Ваша мастернода теперь работает.