Dash 0.13 Upgrade Procedure
Dash 0.13.0 implements DIP003, which introduces several changes to how a Dash masternode is set up and operated. A list of available documentation appears below:
- DIP003 Deterministic Masternode Lists
- DIP003 Masternode Changes
- Dash 0.13 Upgrade Procedure (you are here)
- Full masternode setup guide
- Information for users of hosted masternodes
- Information for operators of hosted masternodes
It is highly recommended to first read at least the list of changes before continuing in order to familiarize yourself with the new concepts in DIP003. This documentation describes the upgrade procedure in two steps:
- Update the masternode software
- Register the DIP003 masternode
Step 1 should be done immediately as soon as Dash 0.13.0 is released. Once miners have updated and DIP003 has activated on the network, it will become possible to complete Step 2 and register a DIP003 masternode. After enough masternodes have completed this step, Spork 15 will be enabled and all new network functions will take effect.
Masternode Software Update
Begin by updating the Dash software on your masternode. Depending on whether you installed Dash manually or using dashman, you must follow the procedure appropriate for your masternode, as described below.
Option 1: Updating from dashman
To update Dash using dashman, log in to your server and enter the following commands:
~/dashman/dashman sync
~/dashman/dashman update
Check the status of your masternode:
~/dashman/dashman status
The Dash software on the masternode is now updated. Since Dash 0.13 also
updates the protocol version, it is necessary to issue a masternode start
from Dash Core or DMT command to keep your masternode in the payment
list during the transition period. See the 0.12.3 documentation
for more details.
Option 2: Manual update
To update Dash manually, log in to your server using ssh or PuTTY. If
your crontab contains an entry to automatically restart dashd, invoke
crontab -e and comment out the appropriate line by adding the #
character. It should look something like this:
# * * * * * pidof dashd || ~/.dashcore/dashd
Then stop Dash running:
~/.dashcore/dash-cli stop
Visit the GitHub releases page and copy the link to the latest x86_64-linux-gnu version. Go back to your terminal window and enter the following command, pasting in the address to the latest version of Dash Core by right clicking or pressing Ctrl + V:
cd /tmp
wget https://github.com/dashpay/dash/releases/download/v0.13.0.0-rc10/dashcore-0.13.0.0-rc10-x86_64-linux-gnu.tar.gz
Verify the integrity of your download by running the following command
and comparing the output against the value for the file as shown in the
SHA256SUMS.asc file:
sha256sum dashcore-0.13.0.0-rc10-x86_64-linux-gnu.tar.gz
Extract the compressed archive and copy the new files to the directory:
tar xfv dashcore-0.13.0.0-rc10-x86_64-linux-gnu.tar.gz
cp -f dashcore-0.13.0/bin/dashd ~/.dashcore/
cp -f dashcore-0.13.0/bin/dash-cli ~/.dashcore/
Restart Dash:
~/.dashcore/dashd
You will see a message reading „Dash Core server starting“. We will now update Sentinel:
cd ~/.dashcore/sentinel/
git checkout master
git pull
Finally, uncomment the line to automatically restart Dash in your
crontab by invoking crontab -e again and deleting the #
character.
The Dash software on the masternode is now updated. Since Dash 0.13 also
updates the protocol version, it is necessary to issue a masternode start
from Dash Core or DMT command to keep your masternode in the payment
list during the transition period. See the 0.12.3 documentation
for more details.
Masternode Registration from DMT
This documentation describes the procedure to register an existing masternode for the DIP003 masternode list if the collateral is held on a hardware wallet. DIP003 must be activated and DMT 0.9.21 or higher is required. You can update DMT by downloading the version appropriate for your system from the DMT Releases page. Open DMT and ensure your existing masternode configuration appears.
Configuration
Click the Send ProRegTx button to get started. The Masternode migration wizard appears.
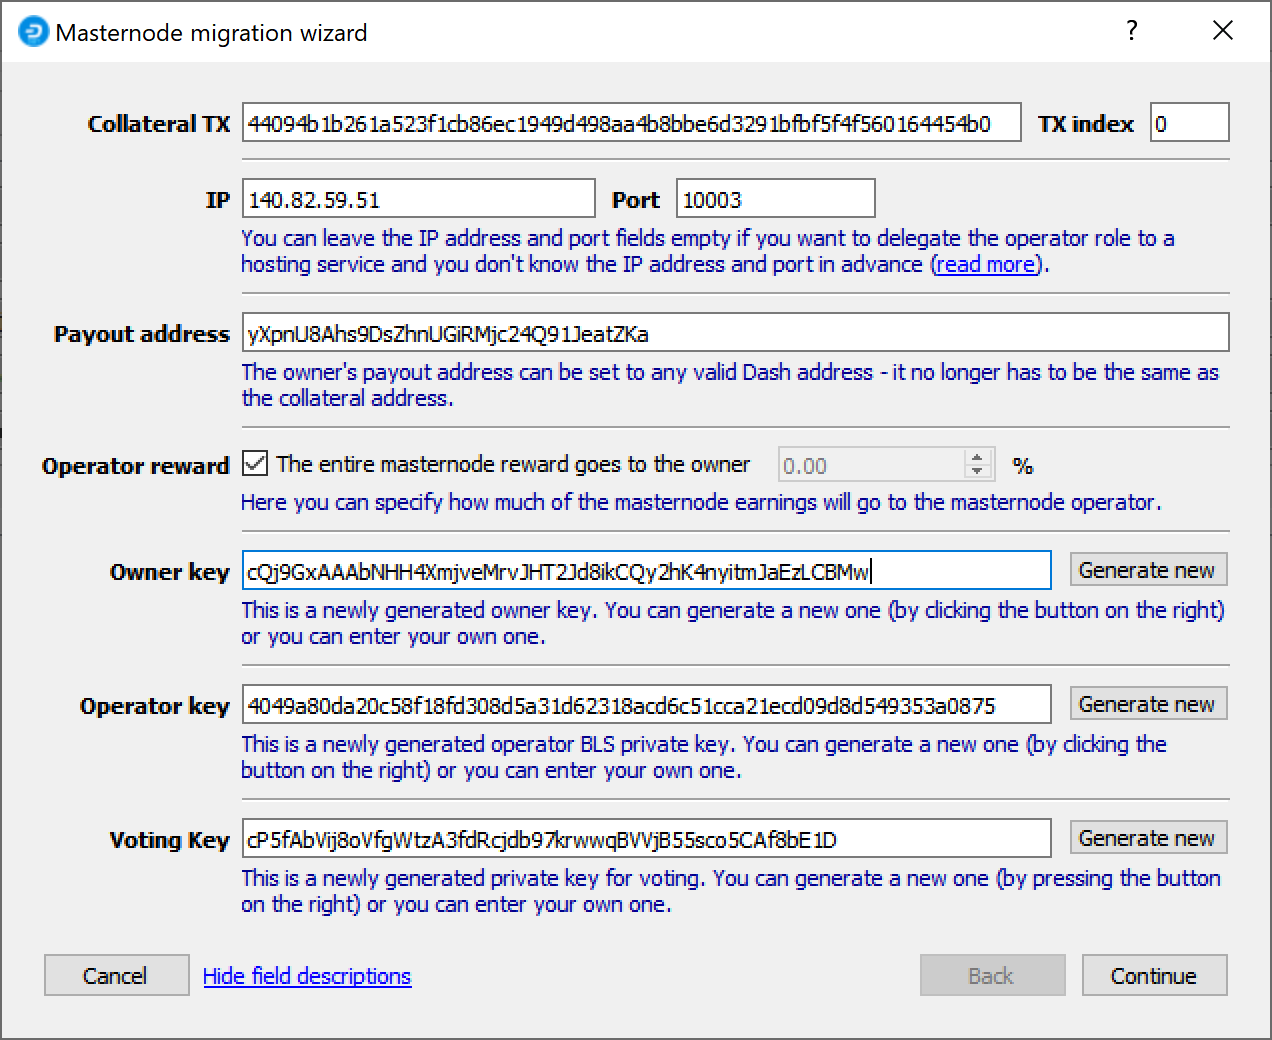
The DMT Masternode migration wizard
All fields are prefilled with suggested values.
- It should not be necessary to change the Collateral Tx or IP/Port fields if you are using your existing collateral and server.
- You can optionally modify the Payout address to any valid existing or new Dash address, since it is no longer mandatory to receive payouts at the collateral address.
- If your masternode is hosted by an external operator, you can specify the percentage of the reward to allocate to the operator in the Operator reward field.
- The three masternode keys (owner, operator, voting) are newly generated and do not need to be changed.
Click Next when you are ready to continue. DMT will verify the collateral is in place and prepare to create the ProRegTx special transaction to register the masternode on the blockchain. This command must be sent from a Dash Core wallet holding a balance, since a standard transaction fee is involved. You can choose to send this from the DMT developer’s remote RPC node (automatic method), or use your own Dash Core wallet to submit the transaction and specify the source of transaction fees (manual method). Click Continue when you are ready.
Option 1: Automatic method
Note that because Trezor does not yet support Dash special transactions, it is
necessary to transmit your owner private key (NOT the collateral private
key) to the remote server to sign the registration transaction. Only use
the automatic method if you are connected to your own Dash RPC client,
or if you trust the operator of the node. You can see the name of the
node you are connected to in the lower right corner of the main DMT
window. The default nodes in DMT (named alice, luna and
suzy) are maintained by the author of DMT, who has kindly offered to
cover the transaction fees for the DIP003 upgrade.
DMT will prepare a ProTx message and prompt you to confirm signing the message on your hardware wallet. The signed message will be registered on the blockchain immediately. A window appears with the final configuration information. Click Save to a file and enter a new file name. This file contains various private and public keys related to the ownership, operation and voting for the masternode, so keep it in a secure location. Continue below with the final step of entering the BLS key on the masternode.
Option 2: Manual method
The following window appears:
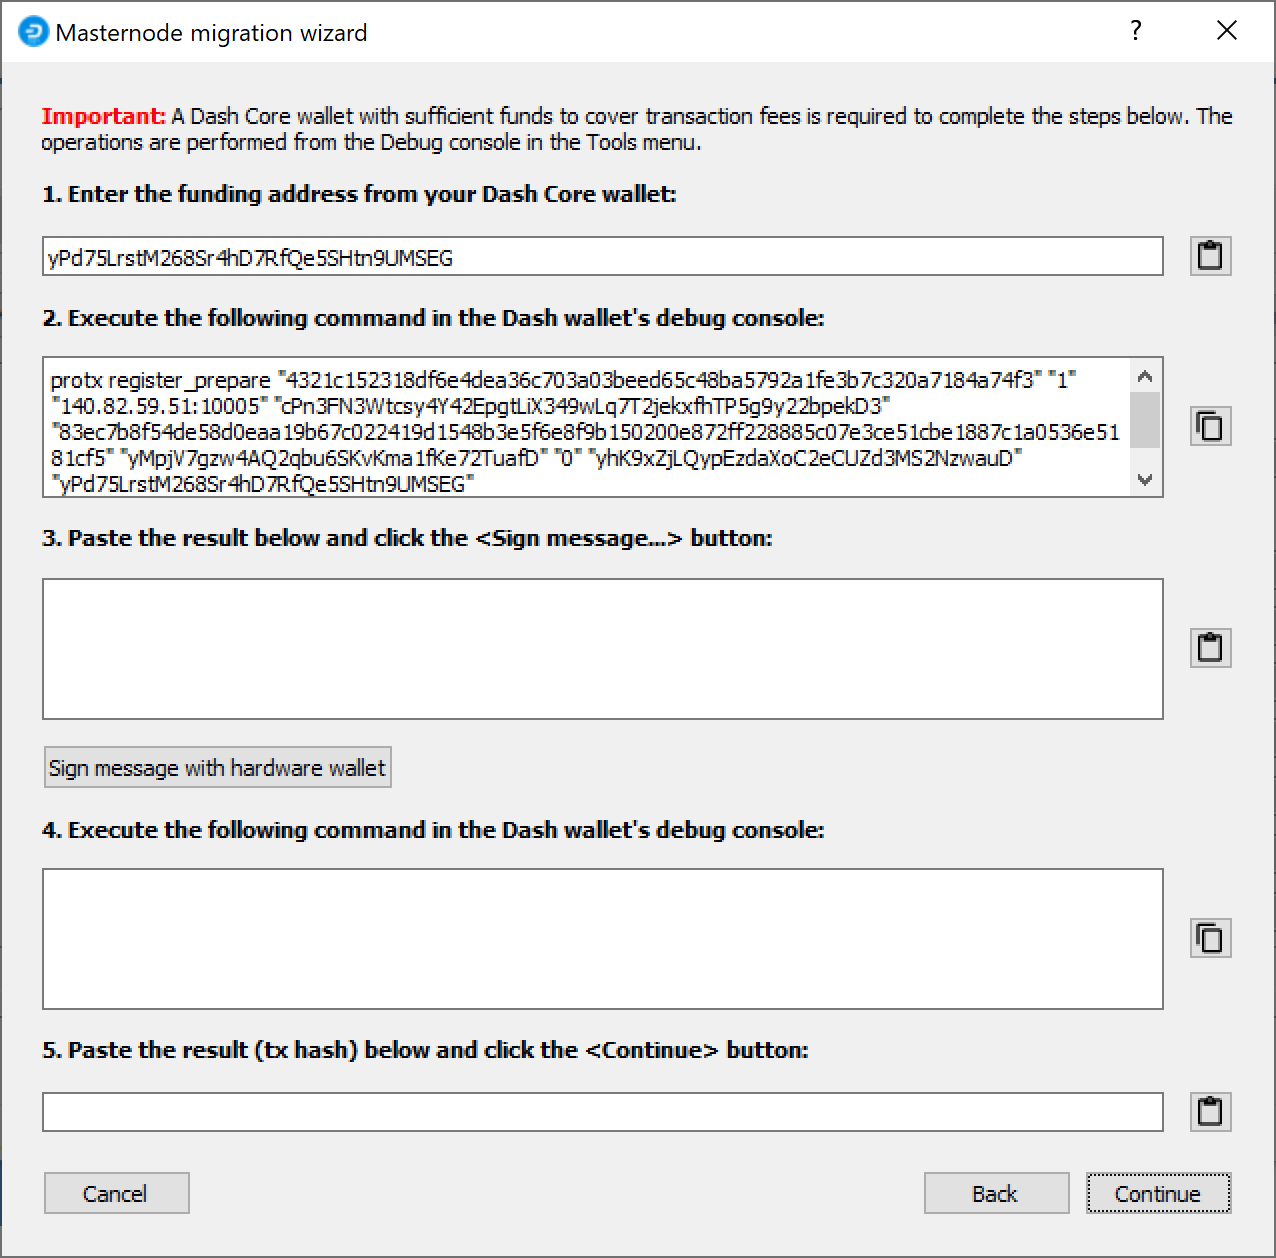
Manual registration commands in the DMT Masternode migration wizard
Open Dash Core and wait for the blockchain to synchronise. Complete the following steps:
- In your Dash Core wallet, select an address to use as the source for the transaction fee and paste it into Field 1.
- Open the Debug console by clicking Tools -> Debug console.
- Copy and paste the command from Field 2 of DMT into the Dash Core debug console and press Enter.
- Copy the output back and paste it into Field 3 field of the DMT Masternode migration wizard.
- Click Sign message with hardware wallet and confirm signing the message on your hardware wallet.
- Copy the command from Field 4 of DMT, paste it into the Dash Core debug console and press Enter. Dash Core will create a registration transaction on the blockchain.
- Copy and paste the transaction hash into Field 5 of the DMT Masternode migration wizard and click Continue.
A window appears with the final configuration information. Click Save to a file and enter a new file name. This file contains various private and public keys related to the ownership, operation and voting for the masternode, so keep it in a secure location.
Enter the BLS key on the masternode
Finally, it is necessary to enter the BLS private key generated by DMT
on the masternode itself, or send it to your hosting operator. If you
are operating the masternode yourself, log in to your masternode using
ssh or PuTTY and edit the configuration file on your masternode as
follows:
nano ~/.dashcore/dash.conf
The editor appears with the existing masternode configuration. Add this line to the end of the file, replacing the key with your BLS secret key generated above:
masternodeblsprivkey=6708c32427c464fc360d76d36b73585b158b46a1f2e24dfce19db4f48d47270b
Press enter to make sure there is a blank line at the end of the file, then press Ctrl + X to close the editor and Y and Enter save the file. We now need to restart the masternode for this change to take effect. Enter the following commands, waiting a few seconds in between to give Dash Core time to shut down:
~/.dashcore/dash-cli stop
~/.dashcore/dashd
Your masternode is now upgraded to DIP003 and will appear on the
Deterministic Masternode List. You can view this list on the
Masternodes -> DIP3 Masternodes tab of the Dash Core wallet, or in
the console using the command protx list valid, where the txid of
the final transaction in Step 5 identifies your DIP003 masternode. Note
again that all functions related to DIP003 will only take effect once
Spork 15 is enabled on the network. You can view the spork status using
the spork active command.
Masternode Registration from Dash Core
This documentation describes the procedure to register an existing
masternode for the DIP003 masternode list if the collateral is held in
the Dash Core software full wallet. DIP003 must be activated. The
commands are shown as if they were entered in the Dash Core GUI by
opening the console from Tools > Debug console, but the same result can
be achieved on a masternode by entering the same commands and adding the
prefix ~/.dashcore/dash-cli to each command.
Generate a BLS key pair
A public/private BLS key pair is required for the operator of the masternode. If you are using a hosting service, they will provide you with their public key, and you can skip this step. If you are hosting your own masternode, generate a BLS public/private keypair as follows:
bls generate

{
  "secret": "565950700d7bdc6a9dbc9963920bc756551b02de6e4711eff9ba6d4af59c0101",
  "public": "01d2c43f022eeceaaf09532d84350feb49d7e72c183e56737c816076d0e803d4f86036bd4151160f5732ab4a461bd127"
}
These keys are NOT stored by the wallet and must be kept secure,
similar to the value provided in the past by the masternode genkey
command.
Add the private key to your masternode configuration
The public key will be used in following steps. The BLS secret key must
be entered in the dash.conf file on the masternode. This allows the
masternode to watch the blockchain for relevant Pro*Tx transactions, and
will cause it to start serving as a masternode when the signed ProRegTx
is broadcast by the owner (final step below). Log in to your masternode
using ssh or PuTTY and edit the configuration file on your
masternode as follows:
nano ~/.dashcore/dash.conf
The editor appears with the existing masternode configuration. Add this line to the end of the file, replacing the key with your BLS secret key generated above:
masternodeblsprivkey=565950700d7bdc6a9dbc9963920bc756551b02de6e4711eff9ba6d4af59c0101
Press enter to make sure there is a blank line at the end of the file, then press Ctrl + X to close the editor and Y and Enter save the file. We now need to restart the masternode for this change to take effect. Enter the following commands, waiting a few seconds in between to give Dash Core time to shut down:
~/.dashcore/dash-cli stop
~/.dashcore/dashd
We will now prepare the transaction used to register a DIP003 masternode on the network.
Prepare a ProRegTx transaction
First, we need to get a new, unused address from the wallet to serve as the owner address. This is different to the collateral address. It must also be used as the voting address if Spork 15 is not yet active. Generate a new address as follows:
getnewaddress

yc98KR6YQRo1qZVBhp2ZwuiNM7hcrMfGfz
Then either generate or choose an existing second address to receive the owner’s masternode payouts:
getnewaddress

ycBFJGv7V95aSs6XvMewFyp1AMngeRHBwy
You can also optionally generate and fund a third address to pay the
transaction fee. The private key to this address must be available to
the wallet submitting the transaction to the network. We will now
prepare an unsigned ProRegTx special transaction using the protx
register_prepare command. This command has the following syntax:
protx register_prepare collateralHash collateralIndex ipAndPort ownerKeyAddr
operatorPubKey votingKeyAddr operatorReward payoutAddress (feeSourceAddress)
Open a text editor such as notepad to prepare this command. Replace each argument to the command as follows:
collateralHash: The txid of the 1000 Dash collateral funding transactioncollateralIndex: The output index of the 1000 Dash funding transactionipAndPort: Masternode IP address and port, in the formatx.x.x.x:yyyyownerKeyAddr: The new Dash address generated above for the owner/voting addressoperatorPubKey: The BLS public key generated above (or provided by your hosting service)votingKeyAddr: The new Dash address generated above, or the address of a delegate, used for proposal votingoperatorReward: The percentage of the block reward allocated to the operator as paymentpayoutAddress: A new or existing Dash address to receive the owner’s masternode rewardsfeeSourceAddress: An (optional) address used to fund ProTx fee.payoutAddresswill be used if not specified.
Note that the operator is responsible for specifying their own
reward address in a separate update_service
transaction if you specify a non-zero operatorReward. The owner of
the masternode collateral does not specify the operator’s payout
address.
Example (remove line breaks if copying):
protx register_prepare
  2c499e3862e5aa5f220278f42f9dfac32566d50f1e70ae0585dd13290227fdc7
  1
  140.82.59.51:19999
  yc98KR6YQRo1qZVBhp2ZwuiNM7hcrMfGfz
  01d2c43f022eeceaaf09532d84350feb49d7e72c183e56737c816076d0e803d4f86036bd4151160f5732ab4a461bd127
  yc98KR6YQRo1qZVBhp2ZwuiNM7hcrMfGfz
  0
  ycBFJGv7V95aSs6XvMewFyp1AMngeRHBwy
Output:
{
  "tx": "030001000191def1f8bb265861f92e9984ac25c5142ebeda44901334e304c447dad5adf6070000000000feffffff0121dff505000000001976a9149e2deda2452b57e999685cb7dabdd6f4c3937f0788ac00000000d1010000000000c7fd27022913dd8505ae701e0fd56625c3fa9d2ff47802225faae562389e492c0100000000000000000000000000ffff8c523b334e1fad8e6259e14db7d05431ef4333d94b70df1391c601d2c43f022eeceaaf09532d84350feb49d7e72c183e56737c816076d0e803d4f86036bd4151160f5732ab4a461bd127ad8e6259e14db7d05431ef4333d94b70df1391c600001976a914adf50b01774202a184a2c7150593442b89c212e788acf8d42b331ae7a29076b464e61fdbcfc0b13f611d3d7f88bbe066e6ebabdfab7700",
  "collateralAddress": "yPd75LrstM268Sr4hD7RfQe5SHtn9UMSEG",
  "signMessage": "ycBFJGv7V95aSs6XvMewFyp1AMngeRHBwy|0|yc98KR6YQRo1qZVBhp2ZwuiNM7hcrMfGfz|yc98KR6YQRo1qZVBhp2ZwuiNM7hcrMfGfz|54e34b8b996839c32f91e28a9e5806ec5ba5a1dadcffe47719f5b808219acf84"
}
Next we will use the collateralAddress and signMessage fields to
sign the transaction, and the output of the tx field to submit the
transaction.
Sign the ProRegTx transaction
Now we will sign the content of the signMessage field using the
private key for the collateral address as specified in
collateralAddress. Note that no internet connection is required for
this step, meaning that the wallet can remain disconnected from the
internet in cold storage to sign the message. In this example we will
again use Dash Core, but it is equally possible to use the signing
function of a hardware wallet. The command takes the following syntax:
signmessage address message
Example:
signmessage yPd75LrstM268Sr4hD7RfQe5SHtn9UMSEG ycBFJGv7V95aSs6XvMewFyp1AMngeRHBwy|0|yc98KR6YQRo1qZVBhp2ZwuiNM7hcrMfGfz|yc98KR6YQRo1qZVBhp2ZwuiNM7hcrMfGfz|54e34b8b996839c32f91e28a9e5806ec5ba5a1dadcffe47719f5b808219acf84
Output:
IMf5P6WT60E+QcA5+ixors38umHuhTxx6TNHMsf9gLTIPcpilXkm1jDglMpK+JND0W3k/Z+NzEWUxvRy71NEDns=
Submit the signed message
We will now create the ProRegTx special transaction to register the masternode on the blockchain. This command must be sent from a Dash Core wallet holding a balance, since a standard transaction fee is involved. The command takes the following syntax:
protx register_submit tx sig
Where:
tx: The serialized transaction previously returned in thetxoutput field fromprotx register_preparein Step 2sig: The message signed with the collateral key from Step 3
Example:
protx register_submit 030001000191def1f8bb265861f92e9984ac25c5142ebeda44901334e304c447dad5adf6070000000000feffffff0121dff505000000001976a9149e2deda2452b57e999685cb7dabdd6f4c3937f0788ac00000000d1010000000000c7fd27022913dd8505ae701e0fd56625c3fa9d2ff47802225faae562389e492c0100000000000000000000000000ffff8c523b334e1fad8e6259e14db7d05431ef4333d94b70df1391c601d2c43f022eeceaaf09532d84350feb49d7e72c183e56737c816076d0e803d4f86036bd4151160f5732ab4a461bd127ad8e6259e14db7d05431ef4333d94b70df1391c600001976a914adf50b01774202a184a2c7150593442b89c212e788acf8d42b331ae7a29076b464e61fdbcfc0b13f611d3d7f88bbe066e6ebabdfab7700 IMf5P6WT60E+QcA5+ixors38umHuhTxx6TNHMsf9gLTIPcpilXkm1jDglMpK+JND0W3k/Z+NzEWUxvRy71NEDns=
Output:
9f5ec7540baeefc4b7581d88d236792851f26b4b754684a31ee35d09bdfb7fb6
Your masternode is now upgraded to DIP003 and will appear on the
Deterministic Masternode List after the transaction is mined to a block.
You can view this list on the Masternodes -> DIP3 Masternodes tab of
the Dash Core wallet, or in the console using the command protx list
valid, where the txid of the final protx register_submit
transaction identifies your DIP003 masternode. Note again that all
functions related to DIP003 will only take effect once Spork 15 is enabled
on the network. You can view the spork status using the spork active
command.