Advanced topics#
Coin Control#
Coin Control allows users of the Dash Core Wallet to specify which addresses and Unspent Transaction Outputs (UTXOs) should be used as inputs in transactions. This allows you to keep a specific balance on certain addresses in your wallet, while spending others freely. In Dash Core Wallet, click Settings > Options > Wallet > Enable coin control features. Now, when you go to the Send tab in your wallet, a new button labelled Inputs… will appear. Click this button to select which UTXOs can be used as input for any transactions you create. The following window appears:
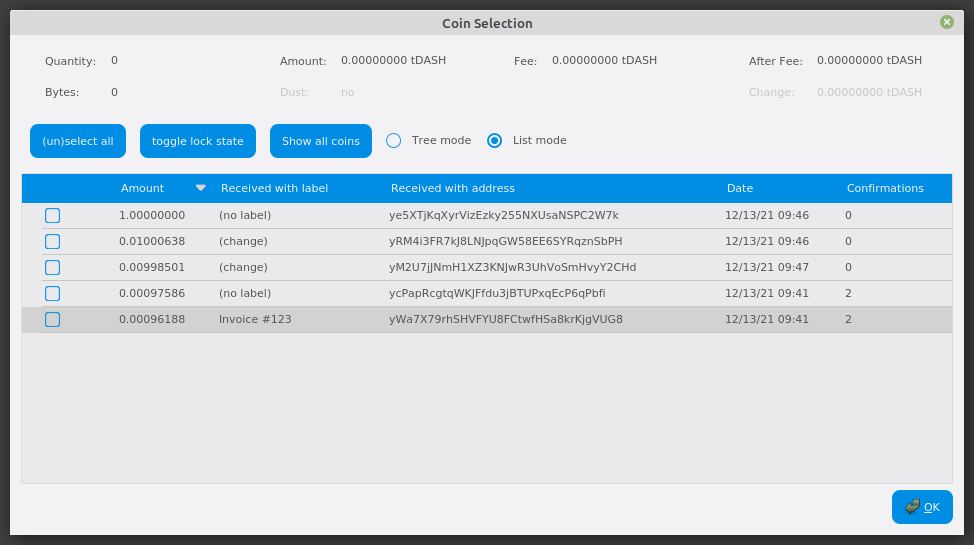
Coin Selection window in Dash Core wallet, showing two masternodes (testnet)#
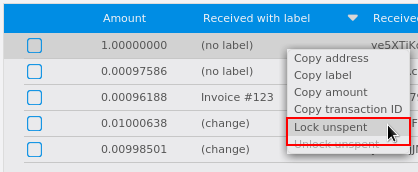
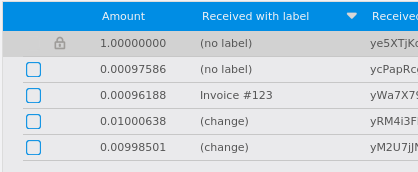
Right click on the transaction(s) you do not want to spend, then select Lock unspent. A small lock will appear next to the transaction. You can click the Toggle lock state button to invert the locked/unlocked state of all UTXOs. When you are ready to continue, click OK. You can now safely create transactions with your remaining funds without affecting the locked UTXOs.
Locking UTXOs in Dash Core wallet#
Running Dash Testnet#
It is recommended to run Dash Core on testnet for your experimentations. To start on testnet via the command line, do the following:
For Linux:
./dash-qt -testnet
For Mac (run from Applications/Dash-Qt.app/Contents/MacOS):
Dash-Qt -testnet
Note: You may need to allow an app from an unknown developer before running this. Cmd+Click on the application and click Open.
Now, open Mac Terminal and run:
cd /Applications/Dash-Qt.app/Contents/MacOS
./Dash-Qt -testnet
You may top up your testnet wallet by accessing the faucet.
HD Wallets#
Added in version v20.1.0: HD wallets are now created by default.
Dash Core includes an implementation of BIP39/BIP44 compatible hierarchical deterministic (HD) key generation.
Upgrade to HD#
Προειδοποίηση
A new backup must be created after upgrading to an HD wallet.
Dash Core includes the ability upgrade a non-hierarchical deterministic (HD)
wallet to an HD wallet via the upgradetohd command. The command can be run
by either opening the console from Window > Console or issuing the following
RPC command from dash-cli:
upgradetohd "" "" <walletpassphrase>
If your wallet is already encrypted you must enter the passphrase as the third parameter to the command. If your wallet is not already encrypted, specifying a wallet passphrase will trigger wallet encryption.
To see full details for the command, run the following from either the console
or dash-cli:
help upgradetohd
View HD wallet information#
Open the console from Window > Console or issue the following RPC command
from dash-cli to view the mnemonic seed:
dumphdinfo
Dash Core will display the HD seed in both hexadecimal and BIP39 mnemonic formats. It will also display the mnemonic passphrase if one was used when creating the wallet.
Restore HD wallet#
To restore an existing HD wallet, or define your own separately generated mnemonic and/or passphrase, create a new blank wallet with following command:
createwallet "enter wallet name" false true "optional wallet password"
Add the HD wallet details to the newly created wallet by running:
upgradetohd "enter mnemonic" "optional mnemonic passphrase" "optional wallet passphrase"
The HD wallet will be restored and your balance will appear once sync is complete.
Note that the wallet passphrase is different to the mnemonic passphrase, which is often also referred to as the «25th word» or «extension word». The wallet passphrase encrypts the wallet file itself, while the mnemonic passphrase is used to specify different derivation branches from the same mnemonic seed.
Enable HD Wallet Creation By Default#
Added in version v20.1.0: HD wallets are now created by default without requiring the steps listed below.
Prior to Dash Core v20.1.0, it was necessary to complete theses steps to make HD
wallet the default. We will use the Windows GUI wallet in this example, but the
commands are similar if using dash-qt or dashd on other operating
systems. Enter the following command to configure Dash Core to generate HD
wallets by default:
dash-qt.exe -usehd
To make this configuration persist between restarts, add usehd=1 to the
dash.conf file.
Multisignature#
This section presents a worked example to demonstrate multisig functionality in Dash Core. While the transactions may no longer be visible on the current testnet blockchain and some address formats or RPC responses may differ slightly from the version shown here, the principle and commands are the same. The example demonstrates how to set up a 2-of-3 multisig address and create a transaction. The example parties involved are a buyer, a seller and an arbiter. This example is based on:
Step 1: Create three addresses#
Seller:
seller@testnet03:~$ ./dash-cli getnewaddress
yfw6wPY5eo6sWxcU93ej3fRD9VXzppEYkm

seller@testnet03:~$ ./dash-cli getaddressinfo yfw6wPY5eo6sWxcU93ej3fRD9VXzppEYkm
{
  "address": "yfw6wPY5eo6sWxcU93ej3fRD9VXzppEYkm",
  "scriptPubKey": "76a914d728be76cd74b5d148eba2a49246b80dac12f73e88ac",
  "ismine": true,
  "solvable": true,
  "desc": "pkh([d728be76]02a862b412ff9e3afd01a2873a02622897f6df92e3fc85597788b898309fec882e)#7y7rcew8",
  "iswatchonly": false,
  "isscript": false,
  "pubkey": "02a862b412ff9e3afd01a2873a02622897f6df92e3fc85597788b898309fec882e",
  "iscompressed": true,
  "ischange": false,
  "timestamp": 1,
  "labels": [
    "seller"
  ]
}

seller@testnet03:~$ ./dash-cli dumpprivkey yfw6wPY5eo6sWxcU93ej3fRD9VXzppEYkm
cVQVgBr8sW4FTPYz16BSCo1PcAfDhpJArgMPdLxKZQWcVFwMXRXx
Buyer:
buyer@testnet03:~$ ./dash-cli getnewaddress
yUtJQSYvqoicEpUiMiaiSy16Fimpjz6Kjj

buyer@testnet03:~$ ./dash-cli getaddressinfo yUtJQSYvqoicEpUiMiaiSy16Fimpjz6Kjj
{
  "address": "yUtJQSYvqoicEpUiMiaiSy16Fimpjz6Kjj",
  "scriptPubKey": "76a9145df7af25fa0654c90f359034ac756de71f5f25dc88ac",
  "ismine": true,
  "solvable": true,
  "desc": "pkh([5df7af25]0315617694c9d93f0ce92769e050a6868ffc74d229077379c0af8bfb193c3d351c)#795y6m9z",
  "iswatchonly": false,
  "isscript": false,
  "pubkey": "0315617694c9d93f0ce92769e050a6868ffc74d229077379c0af8bfb193c3d351c",
  "iscompressed": true,
  "ischange": false,
  "timestamp": 1,
  "labels": [
    "buyer"
  ]
}

buyer@testnet03:~$ ./dash-cli dumpprivkey yUtJQSYvqoicEpUiMiaiSy16Fimpjz6Kjj
cP9DFmEDb11waWbQ8eG1YUoZCGe59BBxJF3kk95PTMXuG9HzcxnU
Arbiter:
arbiter@testnet03:~$ ./dash-cli getnewaddress
ygR4183tHp46oRuEk4RL1Jz7SkNubE7osu

arbiter@testnet03:~$ ./dash-cli getaddressinfo ygR4183tHp46oRuEk4RL1Jz7SkNubE7osu
{
  "address": "ygR4183tHp46oRuEk4RL1Jz7SkNubE7osu",
  "scriptPubKey": "76a914dc71f0bcf448f9198cdbb1e6f5ca7ba96689fbe188ac",
  "ismine": true,
  "solvable": true,
  "desc": "pkh([dc71f0bc]0287ce6cf69b85593ce7db801874c9a2fb1b653dbe5dd9ebfa73e98b710af9e9ce)#3u5h82dc",
  "iswatchonly": false,
  "isscript": false,
  "pubkey": "0287ce6cf69b85593ce7db801874c9a2fb1b653dbe5dd9ebfa73e98b710af9e9ce",
  "iscompressed": true,
  "ischange": false,
  "timestamp": 1,
  "labels": [
    "arbiter"
  ]
}

arbiter@testnet03:~$ ./dash-cli dumpprivkey ygR4183tHp46oRuEk4RL1Jz7SkNubE7osu
cUbDFL81a2w6urAGZf7ecGbdzM82pdHLeCaPXdDp71s96SzDV49M
This results in three keypairs (public/private):
seller:    02a862b412ff9e3afd01a2873a02622897f6df92e3fc85597788b898309fec882e / cVQVgBr8sW4FTPYz16BSCo1PcAfDhpJArgMPdLxKZQWcVFwMXRXx
buyer:     0315617694c9d93f0ce92769e050a6868ffc74d229077379c0af8bfb193c3d351c / cP9DFmEDb11waWbQ8eG1YUoZCGe59BBxJF3kk95PTMXuG9HzcxnU
arbiter:   0287ce6cf69b85593ce7db801874c9a2fb1b653dbe5dd9ebfa73e98b710af9e9ce / cUbDFL81a2w6urAGZf7ecGbdzM82pdHLeCaPXdDp71s96SzDV49M
Step 2: Create multisig address#
The createmultisig command takes as variables the number n
signatures of m keys (supplied as json array) required. In this example,
2 of 3 keys are required to sign the transaction.
Note: The address can be created by anyone, as long as the public keys and their sequence are known (resulting address and redeemScript are identical, see below).
Seller:
seller@testnet03:~$ ./dash-cli createmultisig 2 '["02a862b412ff9e3afd01a2873a02622897f6df92e3fc85597788b898309fec882e","0315617694c9d93f0ce92769e050a6868ffc74d229077379c0af8bfb193c3d351c","0287ce6cf69b85593ce7db801874c9a2fb1b653dbe5dd9ebfa73e98b710af9e9ce"]'
{
  "address": "8gQdvLw7pF7jd8mjGU3nRNESdWi9gkHRZy",
  "redeemScript": "522102a862b412ff9e3afd01a2873a02622897f6df92e3fc85597788b898309fec882e210315617694c9d93f0ce92769e050a6868ffc74d229077379c0af8bfb193c3d351c210287ce6cf69b85593ce7db801874c9a2fb1b653dbe5dd9ebfa73e98b710af9e9ce53ae",
  "descriptor": "sh(multi(2,02a862b412ff9e3afd01a2873a02622897f6df92e3fc85597788b898309fec882e,0315617694c9d93f0ce92769e050a6868ffc74d229077379c0af8bfb193c3d351c,0287ce6cf69b85593ce7db801874c9a2fb1b653dbe5dd9ebfa73e98b710af9e9ce))#36ymhjhs"
}
Buyer:
buyer@testnet03:~$ ./dash-cli createmultisig 2 '["02a862b412ff9e3afd01a2873a02622897f6df92e3fc85597788b898309fec882e","0315617694c9d93f0ce92769e050a6868ffc74d229077379c0af8bfb193c3d351c","0287ce6cf69b85593ce7db801874c9a2fb1b653dbe5dd9ebfa73e98b710af9e9ce"]'
{
  "address": "8gQdvLw7pF7jd8mjGU3nRNESdWi9gkHRZy",
  "redeemScript": "522102a862b412ff9e3afd01a2873a02622897f6df92e3fc85597788b898309fec882e210315617694c9d93f0ce92769e050a6868ffc74d229077379c0af8bfb193c3d351c210287ce6cf69b85593ce7db801874c9a2fb1b653dbe5dd9ebfa73e98b710af9e9ce53ae",
  "descriptor": "sh(multi(2,02a862b412ff9e3afd01a2873a02622897f6df92e3fc85597788b898309fec882e,0315617694c9d93f0ce92769e050a6868ffc74d229077379c0af8bfb193c3d351c,0287ce6cf69b85593ce7db801874c9a2fb1b653dbe5dd9ebfa73e98b710af9e9ce))#36ymhjhs"
}
Arbiter:
arbiter@testnet03:~$ ./dash-cli createmultisig 2 '["02a862b412ff9e3afd01a2873a02622897f6df92e3fc85597788b898309fec882e","0315617694c9d93f0ce92769e050a6868ffc74d229077379c0af8bfb193c3d351c","0287ce6cf69b85593ce7db801874c9a2fb1b653dbe5dd9ebfa73e98b710af9e9ce"]'
{
  "address": "8gQdvLw7pF7jd8mjGU3nRNESdWi9gkHRZy",
  "redeemScript": "522102a862b412ff9e3afd01a2873a02622897f6df92e3fc85597788b898309fec882e210315617694c9d93f0ce92769e050a6868ffc74d229077379c0af8bfb193c3d351c210287ce6cf69b85593ce7db801874c9a2fb1b653dbe5dd9ebfa73e98b710af9e9ce53ae",
  "descriptor": "sh(multi(2,02a862b412ff9e3afd01a2873a02622897f6df92e3fc85597788b898309fec882e,0315617694c9d93f0ce92769e050a6868ffc74d229077379c0af8bfb193c3d351c,0287ce6cf69b85593ce7db801874c9a2fb1b653dbe5dd9ebfa73e98b710af9e9ce))#36ymhjhs"
}
Step 3: Buyer funds the multisig address#
This works the same as a usual transaction.
Buyer:
buyer@testnet03:~$ ./dash-cli sendtoaddress 8gQdvLw7pF7jd8mjGU3nRNESdWi9gkHRZy 0.25
48e6f8f0108549bf932e4d6833fe707d7edafe490788c2ebde688635a995538e
The seller/arbiter can trace the transaction by its txid in the block explorer. Or from the console as follows.
Buyer:
seller@testnet03:~$ ./dash-cli getrawtransaction 48e6f8f0108549bf932e4d6833fe707d7edafe490788c2ebde688635a995538e 1
{
  "hex" : "02000000068ad5c86eae519b0ba11f8314d5cdf50c872331e7c7efa2eece2107d669cc8926010000006a473044022060e3e8a5194adc690a1d39db181214c56596bdcfef67a5deb2c0932112a56c20022043acb1cb88eb590076ac41ec345c491cab8368befd2513bc7d8cebf378559737012103207b3ed8ce5b61e1dbd1b967e9dc5729d096274e41f43ec3dcff897012425e2dfeffffff2d6d9c0d3dafb66744da94676f4e7f76461241e60dc9cba3bcaa9ac6033b052e000000006a47304402207abaa4b6b4c7fdbd41d1885303dd3f0ae6b350ec5af19546f3fe616cbc5b5b7802201868fdda71c29364c52e6359868c22376a1091b19f6e1184de93d95eb61f3289012103e531f14fdace3f41ce041c366413aaabf26ed837ea6483d4a4f36af376c93b42feffffff1bd67d51fb6c6552c7241a6631a0c08c69517f06f84c4921a3130d74fe722475000000006a47304402203dcbbb063efe24b93c4a37b4efcbc22b2def077610810e1659a236922857393502202b034ab74554b79ca34e21d10a7b9dbf2517f1a79e028a6ed11cd4a28a684376012103622883e8029d188581291e26783991a450b2e38a8b832a5924171e961d8fc7affefffffff2c54c61c55079f0e63eed06c0b3c261e640d985690cefb487370b714ef4ca8c000000006a4730440220462da4ec78ab804fc66844615019979273c20b6c3dbd73e58def7539ac47817102201572a458013e29753b87a390ab06eb7ca71789136f8b8183e19897f30bd49847012103900531aa50569ad35a555726d703b8455e53567e3788369d68f47210e771b61bfeffffff435365937ffb7cc39acc1a8a4678a9273fe0c1384a37565f3748293e717333c7000000006a4730440220233497587ae0377eae2aee5c879893bf6eba0a463c67ac2f995370249730d8390220176e9e818e256c653888046a150bdde0f2e99dcc56c4b339a8615af56695b85f0121035c0a7d6e4e95d2e2802f1c8d8cf37b1597b7b67b4e1a277745b982ae4485156afeffffffcc0aa97c5b5e1ab12d808108285a38e54bd2fe98fe9489cb78bb1fde6b740fff000000006a4730440220731f21d1e766e6408e404fcfc317d507cc03ad09b9d63e76abac83b9b512ad5a022073b73bccd272e4d52a4fe0533887c3a7280a9f440ec78c54e484e1c0e8051e6d012103207b3ed8ce5b61e1dbd1b967e9dc5729d096274e41f43ec3dcff897012425e2dfeffffff02a1910f00000000001976a9147ab95aa3133061fbe7ad020cc638b82451c9acdc88ac40787d010000000017a91415c85c2472f5941b60a49462a2cfd0d17ab49d1c8768500f00",
  "txid" : "48e6f8f0108549bf932e4d6833fe707d7edafe490788c2ebde688635a995538e",
  "version" : 2,
  "locktime" : 1003624,
[...]
  "vout" : [
      {
        "value": 0.25000000,
        "valueSat": 25000000,
        "n": 1,
        "scriptPubKey": {
          "asm": "OP_HASH160 15c85c2472f5941b60a49462a2cfd0d17ab49d1c OP_EQUAL",
          "hex": "a91415c85c2472f5941b60a49462a2cfd0d17ab49d1c87",
          "reqSigs": 1,
          "type": "scripthash",
          "addresses": [
            "8gQdvLw7pF7jd8mjGU3nRNESdWi9gkHRZy"
          ]
        }
      }
[...]
    ],
  "blockhash": "000000bd679c0934333da72d25b85df9a120e2a166d945a8ace514ccd894e809",
  "height": 1003625,
  "confirmations": 9,
  "time": 1712596571,
  "blocktime": 1712596571,
  "instantlock": true,
  "instantlock_internal": true,
  "chainlock": true
}
Step 4: Spending the multisig#
Now we assume the deal is complete, the buyer got the goods and everyone is happy. Now the seller wants to get his Dash. As a 2-of-3 multisig was used, the transaction must be signed by 2 parties (seller + buyer or arbiter). The seller creates a transaction (we will reuse his public address from above).
Seller:
seller@testnet03:~$ ./dash-cli createrawtransaction '[{"txid":"48e6f8f0108549bf932e4d6833fe707d7edafe490788c2ebde688635a995538e","vout":1}]' '{"yfw6wPY5eo6sWxcU93ej3fRD9VXzppEYkm":0.249}'
02000000018e5395a9358668deebc2880749feda7e7d70fe33684d2e93bf498510f0f8e6480100000000ffffffff01a0f17b01000000001976a914d728be76cd74b5d148eba2a49246b80dac12f73e88ac00000000
And partially signs it, using the redeemScript, scriptPubKey and his private key
Seller:
seller@testnet03:~$ ./dash-cli signrawtransactionwithkey '02000000018e5395a9358668deebc2880749feda7e7d70fe33684d2e93bf498510f0f8e6480100000000ffffffff01a0f17b01000000001976a914d728be76cd74b5d148eba2a49246b80dac12f73e88ac00000000' '["cVQVgBr8sW4FTPYz16BSCo1PcAfDhpJArgMPdLxKZQWcVFwMXRXx"]' '[{"txid":"a8b3bf5bcace91a8dbbddbf9b7eb027efb9bd001792f043ecf7b558aaa3cb951","vout":0,"scriptPubKey":"a91415c85c2472f5941b60a49462a2cfd0d17ab49d1c87","redeemScript":"522102a862b412ff9e3afd01a2873a02622897f6df92e3fc85597788b898309fec882e210315617694c9d93f0ce92769e050a6868ffc74d229077379c0af8bfb193c3d351c210287ce6cf69b85593ce7db801874c9a2fb1b653dbe5dd9ebfa73e98b710af9e9ce53ae"}]'
{
  "hex": "02000000018e5395a9358668deebc2880749feda7e7d70fe33684d2e93bf498510f0f8e64801000000b50047304402207574d2af348ba67768849fa630dc42af546a382ecc85e941574b04dd419edd3002201c5704eb32d1df724c258e8bc4d6aa607abe4c01b9a295c3fdfca1763a328edd01004c69522102a862b412ff9e3afd01a2873a02622897f6df92e3fc85597788b898309fec882e210315617694c9d93f0ce92769e050a6868ffc74d229077379c0af8bfb193c3d351c210287ce6cf69b85593ce7db801874c9a2fb1b653dbe5dd9ebfa73e98b710af9e9ce53aeffffffff01a0f17b01000000001976a914d728be76cd74b5d148eba2a49246b80dac12f73e88ac00000000",
  "complete": false,
  "errors": [
    {
      "txid": "48e6f8f0108549bf932e4d6833fe707d7edafe490788c2ebde688635a995538e",
      "vout": 1,
      "scriptSig": "0047304402207574d2af348ba67768849fa630dc42af546a382ecc85e941574b04dd419edd3002201c5704eb32d1df724c258e8bc4d6aa607abe4c01b9a295c3fdfca1763a328edd01004c69522102a862b412ff9e3afd01a2873a02622897f6df92e3fc85597788b898309fec882e210315617694c9d93f0ce92769e050a6868ffc74d229077379c0af8bfb193c3d351c210287ce6cf69b85593ce7db801874c9a2fb1b653dbe5dd9ebfa73e98b710af9e9ce53ae",
      "sequence": 4294967295,
      "error": "CHECK(MULTI)SIG failing with non-zero signature (possibly need more signatures)"
    }
  ]
}
Note that the output hex is getting longer, but complete flag is «false» as the transaction needs another signature. So now either the buyer or the arbiter can complete the signature of the transaction, using the output from above and their private key. Let’s assume the buyer is completing the signature.
Buyer:
buyer@testnet03:~$ ./dash-cli signrawtransactionwithkey '02000000018e5395a9358668deebc2880749feda7e7d70fe33684d2e93bf498510f0f8e64801000000b50047304402207574d2af348ba67768849fa630dc42af546a382ecc85e941574b04dd419edd3002201c5704eb32d1df724c258e8bc4d6aa607abe4c01b9a295c3fdfca1763a328edd01004c69522102a862b412ff9e3afd01a2873a02622897f6df92e3fc85597788b898309fec882e210315617694c9d93f0ce92769e050a6868ffc74d229077379c0af8bfb193c3d351c210287ce6cf69b85593ce7db801874c9a2fb1b653dbe5dd9ebfa73e98b710af9e9ce53aeffffffff01a0f17b01000000001976a914d728be76cd74b5d148eba2a49246b80dac12f73e88ac00000000' '["cP9DFmEDb11waWbQ8eG1YUoZCGe59BBxJF3kk95PTMXuG9HzcxnU"]' '[{"txid":"a8b3bf5bcace91a8dbbddbf9b7eb027efb9bd001792f043ecf7b558aaa3cb951","vout":0,"scriptPubKey":"a91415c85c2472f5941b60a49462a2cfd0d17ab49d1c87","redeemScript":"522102a862b412ff9e3afd01a2873a02622897f6df92e3fc85597788b898309fec882e210315617694c9d93f0ce92769e050a6868ffc74d229077379c0af8bfb193c3d351c210287ce6cf69b85593ce7db801874c9a2fb1b653dbe5dd9ebfa73e98b710af9e9ce53ae"}]'
{
  "hex": "02000000018e5395a9358668deebc2880749feda7e7d70fe33684d2e93bf498510f0f8e64801000000fc0047304402207574d2af348ba67768849fa630dc42af546a382ecc85e941574b04dd419edd3002201c5704eb32d1df724c258e8bc4d6aa607abe4c01b9a295c3fdfca1763a328edd014730440220764019282400fab0e3bb431b04fada7daca528054e903f13d08deadee01d7c5a02204c7e4e484820e16af0951bc48371c3d0175de4114cee11dc86707b2489432b15014c69522102a862b412ff9e3afd01a2873a02622897f6df92e3fc85597788b898309fec882e210315617694c9d93f0ce92769e050a6868ffc74d229077379c0af8bfb193c3d351c210287ce6cf69b85593ce7db801874c9a2fb1b653dbe5dd9ebfa73e98b710af9e9ce53aeffffffff01a0f17b01000000001976a914d728be76cd74b5d148eba2a49246b80dac12f73e88ac00000000",
  "complete": true
}
The signature is complete now, and either of the parties can transmit the transaction to the network.
Buyer:
buyer@testnet03:~$ ./dash-cli sendrawtransaction 02000000018e5395a9358668deebc2880749feda7e7d70fe33684d2e93bf498510f0f8e64801000000fc0047304402207574d2af348ba67768849fa630dc42af546a382ecc85e941574b04dd419edd3002201c5704eb32d1df724c258e8bc4d6aa607abe4c01b9a295c3fdfca1763a328edd014730440220764019282400fab0e3bb431b04fada7daca528054e903f13d08deadee01d7c5a02204c7e4e484820e16af0951bc48371c3d0175de4114cee11dc86707b2489432b15014c69522102a862b412ff9e3afd01a2873a02622897f6df92e3fc85597788b898309fec882e210315617694c9d93f0ce92769e050a6868ffc74d229077379c0af8bfb193c3d351c210287ce6cf69b85593ce7db801874c9a2fb1b653dbe5dd9ebfa73e98b710af9e9ce53aeffffffff01a0f17b01000000001976a914d728be76cd74b5d148eba2a49246b80dac12f73e88ac00000000
d6b27fb30be3d79588900c3f2fb433f8a68fdae70bfa9d6dbad5dd33ed25ba2c
Again, this transaction can be traced in a block explorer. And the seller is happy to receive his coins at his public address as follows.
Seller:
seller@testnet03:~$ dash-cli listtransactions "*" 1
[
  {
    "involvesWatchonly": true,
    "address": "yfw6wPY5eo6sWxcU93ej3fRD9VXzppEYkm",
    "category": "receive",
    "amount": 0.24900000,
    "label": "seller",
    "vout": 0,
    "confirmations": 1,
    "instantlock": true,
    "instantlock_internal": true,
    "chainlock": true,
    "blockhash": "000000f25253e46db14c5a0316321ea45e0d7c747d00398fc06becd71e93be44",
    "blockheight": 1003642,
    "blockindex": 4,
    "blocktime": 1712598497,
    "txid": "d6b27fb30be3d79588900c3f2fb433f8a68fdae70bfa9d6dbad5dd33ed25ba2c",
    "walletconflicts": [
    ],
    "time": 1712598489,
    "timereceived": 1712598489
  }
]
Daemon#
Dash can be run as a background process (or daemon) on Linux systems. This is particularly useful if you are running Dash as a server instead of as a GUI node. This guide assumes you have installed Dash Core for Linux as described in the Linux Installation Guide.
Create a user and group to run the daemon:
sudo useradd -m dash -s /bin/bash
Create a data directory for Dash in the new user’s home directory:
sudo -u dash mkdir -p /home/dash/.dashcore
Create a configuration file in the new Dash data directory:
sudo -u dash nano /home/dash/.dashcore/dash.conf
Paste the following basic configuration to your
dash.conffile, replacing the password with a long and random password:listen=1 server=1 daemon=1
Register the
dashddaemon as a system service by creating the following file:sudo nano /etc/systemd/system/dashd.service
Paste the following daemon configuration into the file:
[Unit]
Description=Dash Core Daemon
After=syslog.target network-online.target

[Service]
Type=forking
User=dash
Group=dash
OOMScoreAdjust=-1000
ExecStart=/usr/local/bin/dashd -pid=/home/dash/.dashcore/dashd.pid
TimeoutStartSec=10m
ExecStop=/usr/local/bin/dash-cli stop
TimeoutStopSec=120
Restart=on-failure
RestartSec=120
StartLimitInterval=300
StartLimitBurst=3

[Install]
WantedBy=multi-user.target
Register and start the daemon with systemd:
sudo systemctl daemon-reload
sudo systemctl enable dashd
sudo systemctl start dashd
Dash is now installed as a system daemon. View the status as follows:
systemctl status dashd
View logs as follows:
sudo journalctl -u dashd
Tor#
Tor is free and open-source software for enabling anonymous communication. The name derived from the acronym for the original software project name «The Onion Router». Tor directs Internet traffic through a free, worldwide, volunteer overlay network consisting of more than seven thousand relays to conceal a user’s location and usage from anyone conducting network surveillance or traffic analysis.
Dash Core GUI#
Dash Core traffic can be directed to pass through Tor by specifying a running Tor service as a proxy. First install Tor by visiting https://www.torproject.org/download/ and downloading the appropriate Tor Browser bundle for your system. Set up the Tor browser by following the documentation on Installation and Running Tor Browser for the First Time.
Once Tor Browser is running, you have two options to configure Dash Core to use Tor for network traffic.
Using the GUI: Start Dash Core and go to Settings > Options > Network and enable the Connect through SOCKS5 proxy setting. Specify
127.0.0.1for the Proxy IP and9150for the Port. Click OK and restart Dash Core.Using dash.conf: Ensure Dash Core is not running and edit your
dash.confsettings file. Add the lineproxy=127.0.0.1:9150, save the file and start Dash Core.
You are now connected through the Tor network. You will need to remember to start the Tor Browser each time before you start Dash Core or you will not be able to sync.
Tor onion service#
Tor onion services allows other users to connect to your Dash node using an onion address, providing further anonymity by concealing your IP address. Follow these steps to set up an onion service under Ubuntu Linux:
Install tor:
sudo apt install tor
Add the following line to the
torrcfile:sudo bash -c "echo -e 'ControlPort 9051\nCookieAuthentication 1\nCookieAuthFileGroupReadable 1' >> /etc/tor/torrc"
Restart Tor:
sudo systemctl restart tor
Determine the group Tor is running under (usually the last entry in your groups file):
tail /etc/group
The group is usually
debian-torunder Debian-based Linux distributions.Add the user running Dash to the Tor group:
sudo usermod -aG debian-tor dash
Add the following two lines to
dash.conf:proxy=127.0.0.1:9050 torcontrol=127.0.0.1:9051
Restart Dash and monitor
debug.logfor onion informatoin:grep -i onion ~/.dashcore/debug.log
You should see a line similar to the following:
2020-06-29 03:43:57 tor: Got service ID knup3fvr6fyvypu7, advertising service knup3fvr6fyvypu7.onion:19999
Your onion service is now available at the shown address.
Multiple wallets#
Since version 18.0.0, Dash Core has included the ability work with multiple wallets from the File menu in addition to the previously available options.
Προειδοποίηση
Wallet-related RPCs require using the -rpcwallet option when more than
one wallet file is loaded. This is to ensure the RPC command is executed
using the correct wallet. See the Core developer documentation
for additional information.
Open a wallet#
To open a wallet, click File -> Open Wallet and then click the name of wallet file.
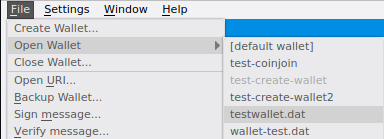
Open wallet#
Select the active wallet#
When multiple wallets are open, a wallet selection dropbox is shown to the left of the Dash logo on the tab bar. Click the dropdown box and select a wallet to set it as the active wallet.
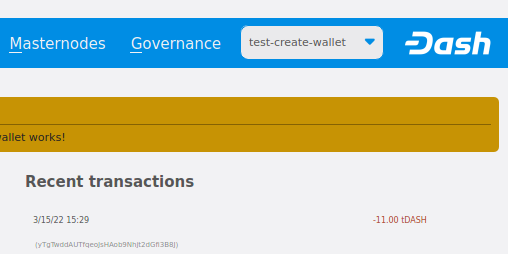
Wallet selection dropdown box#
Close a wallet#
To close a wallet, set it as the active wallet using the wallet selection dropdown box. Next, click File -> Close Wallet… and then click Yes on the Close wallet confirmation screen.

Close wallet confirmation#
Σημείωση
If the only open wallet is closed, wallet-related items on the tab bar will be disabled.
Close all wallets#
To close all wallets, click File -> Close All Wallets… and then click Yes on the Close all wallets confirmation screen.
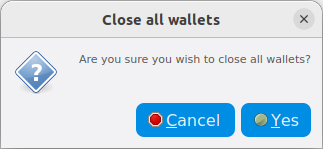
Close wallet confirmation#
Once all wallets are closed, wallet-related items on the tab bar will be disabled.
Alternative methods#
It is also possible to select between different Dash wallets when starting
Dash Core by specifying the wallet argument, or even run multiple
instances of Dash Core simultaneously by specifying separate data
directories using the datadir argument.
To begin, install the Dash Core wallet for your system according to the
installation instructions. When you get
to the step Running Dash Core for the first time, you can decide
whether you want to maintain separate wallet.dat files in the
default location (simpler if you do not need to run the wallets
simultaneously), or specify entirely separate data directories such as
e.g. C:\Dash1 (simpler if you do want to run the wallets
simultaneously).
Separate wallet.dat files#
For this scenario, we will create two shortcuts on the desktop, each
using a different wallet file. Navigate to the binary file used to start
Dash Core (typically locatd at C:\Program Files\DashCore\dash-qt.exe
or similar) and create two shortcuts on the desktop. Then open the
Properties window for each of these shortcuts.
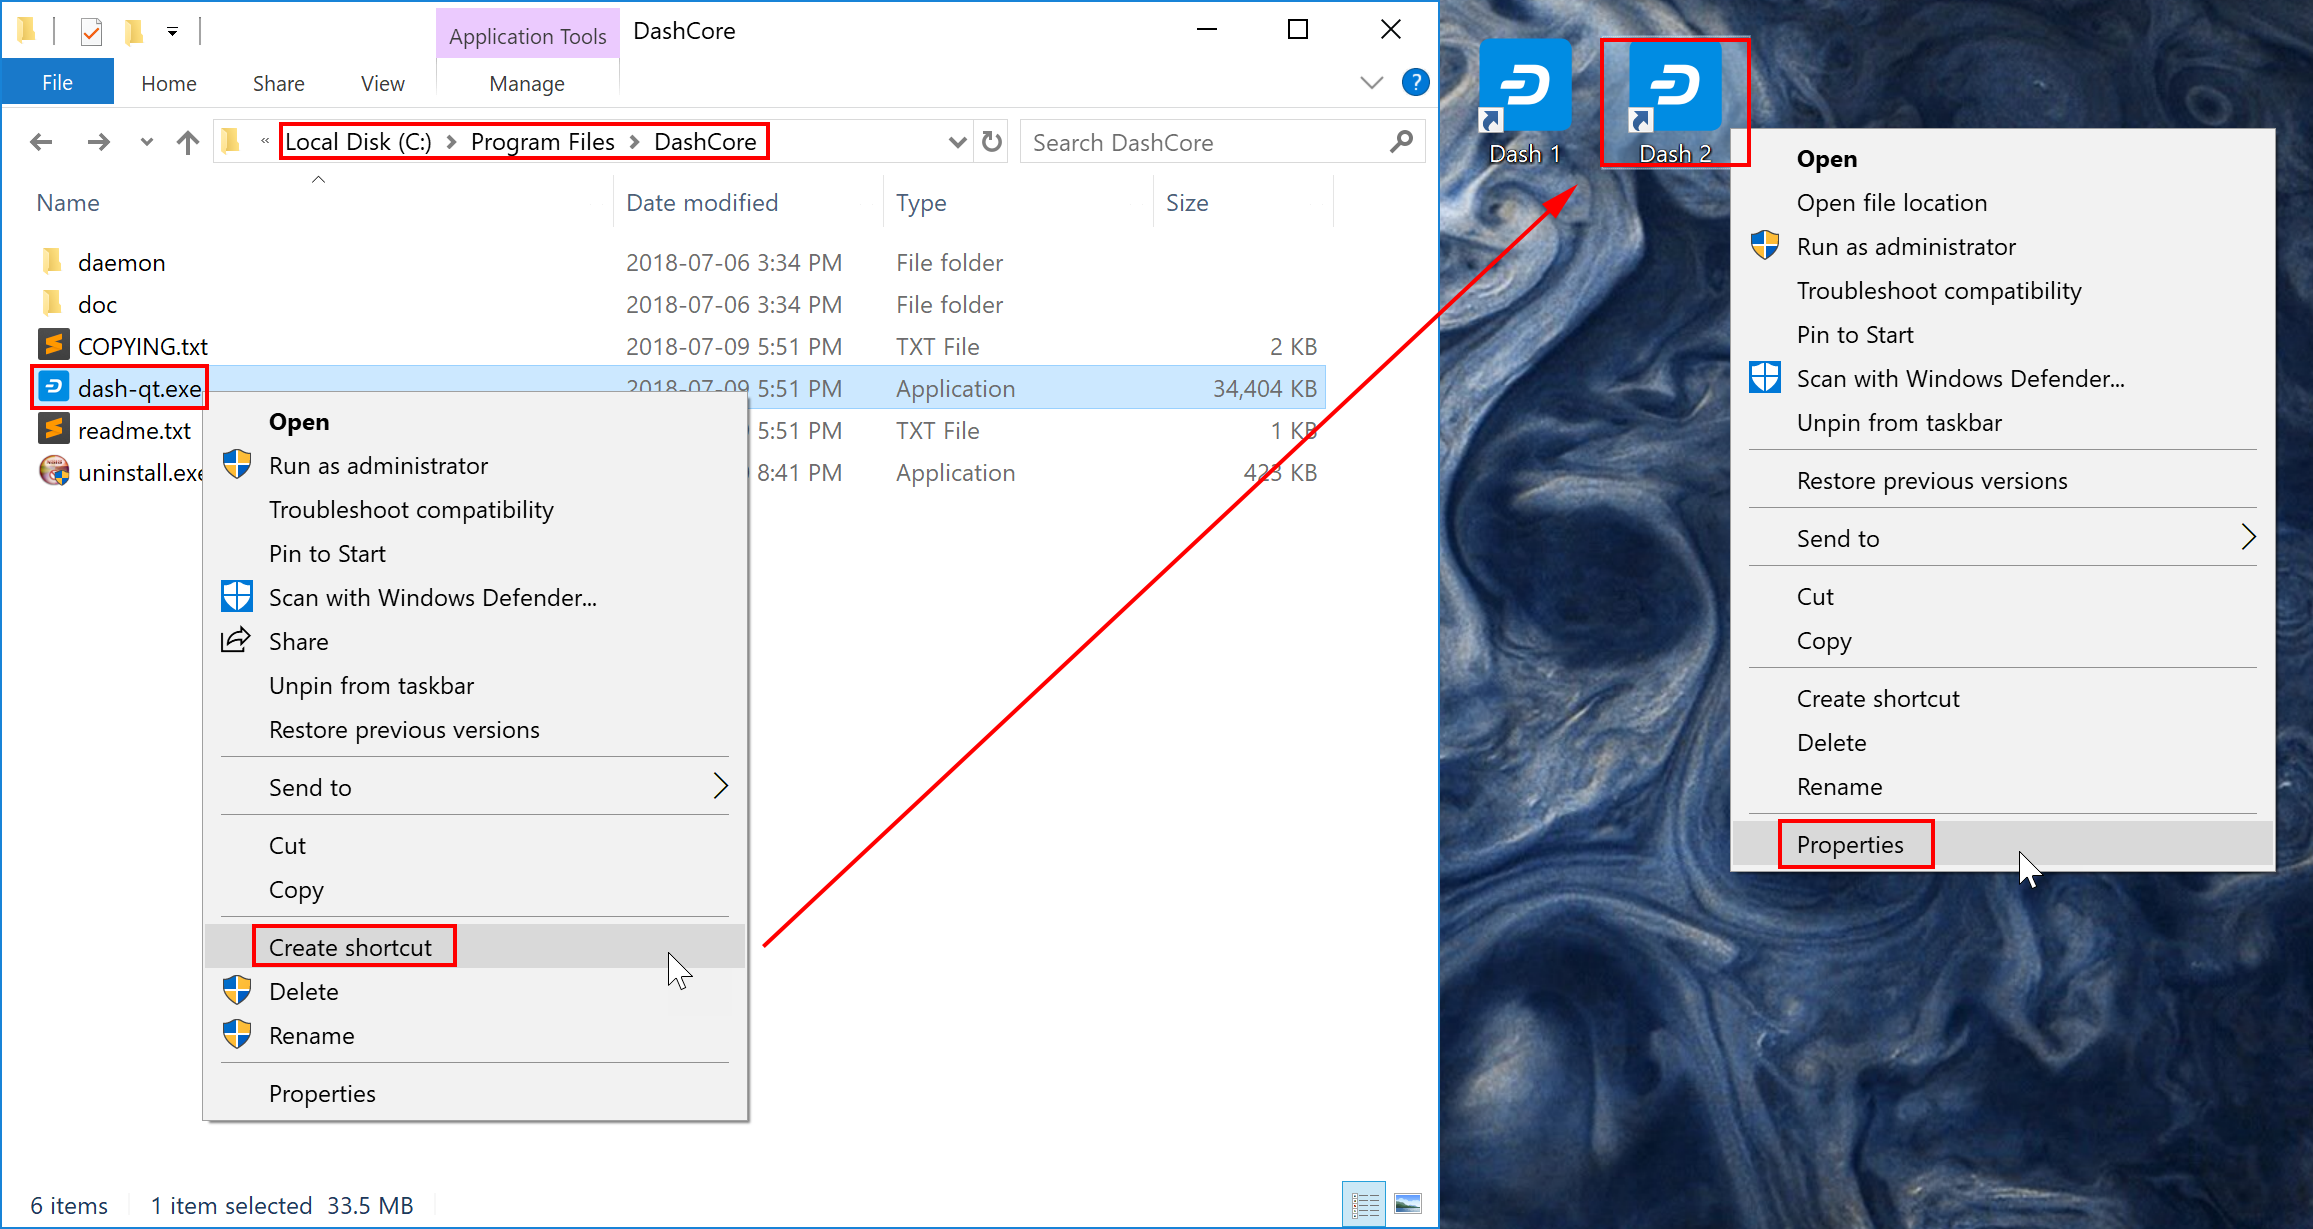
Creating desktop shortcuts using Windows 10#
Modify the Target property of each shortcut to point to a different
wallet file by specifying the wallet argument when starting the
wallet. If you do not specify a wallet argument, wallet.dat will
be used by default. The specified wallet file will be created if it does
not exist. The following example demonstrates two wallets named
workwallet.dat and homewallet.dat:
Wallet Target 1:
"C:\Program Files\DashCore\dash-qt.exe" -wallet=workwallet.datWallet Target 2:
"C:\Program Files\DashCore\dash-qt.exe" -wallet=homewallet.dat
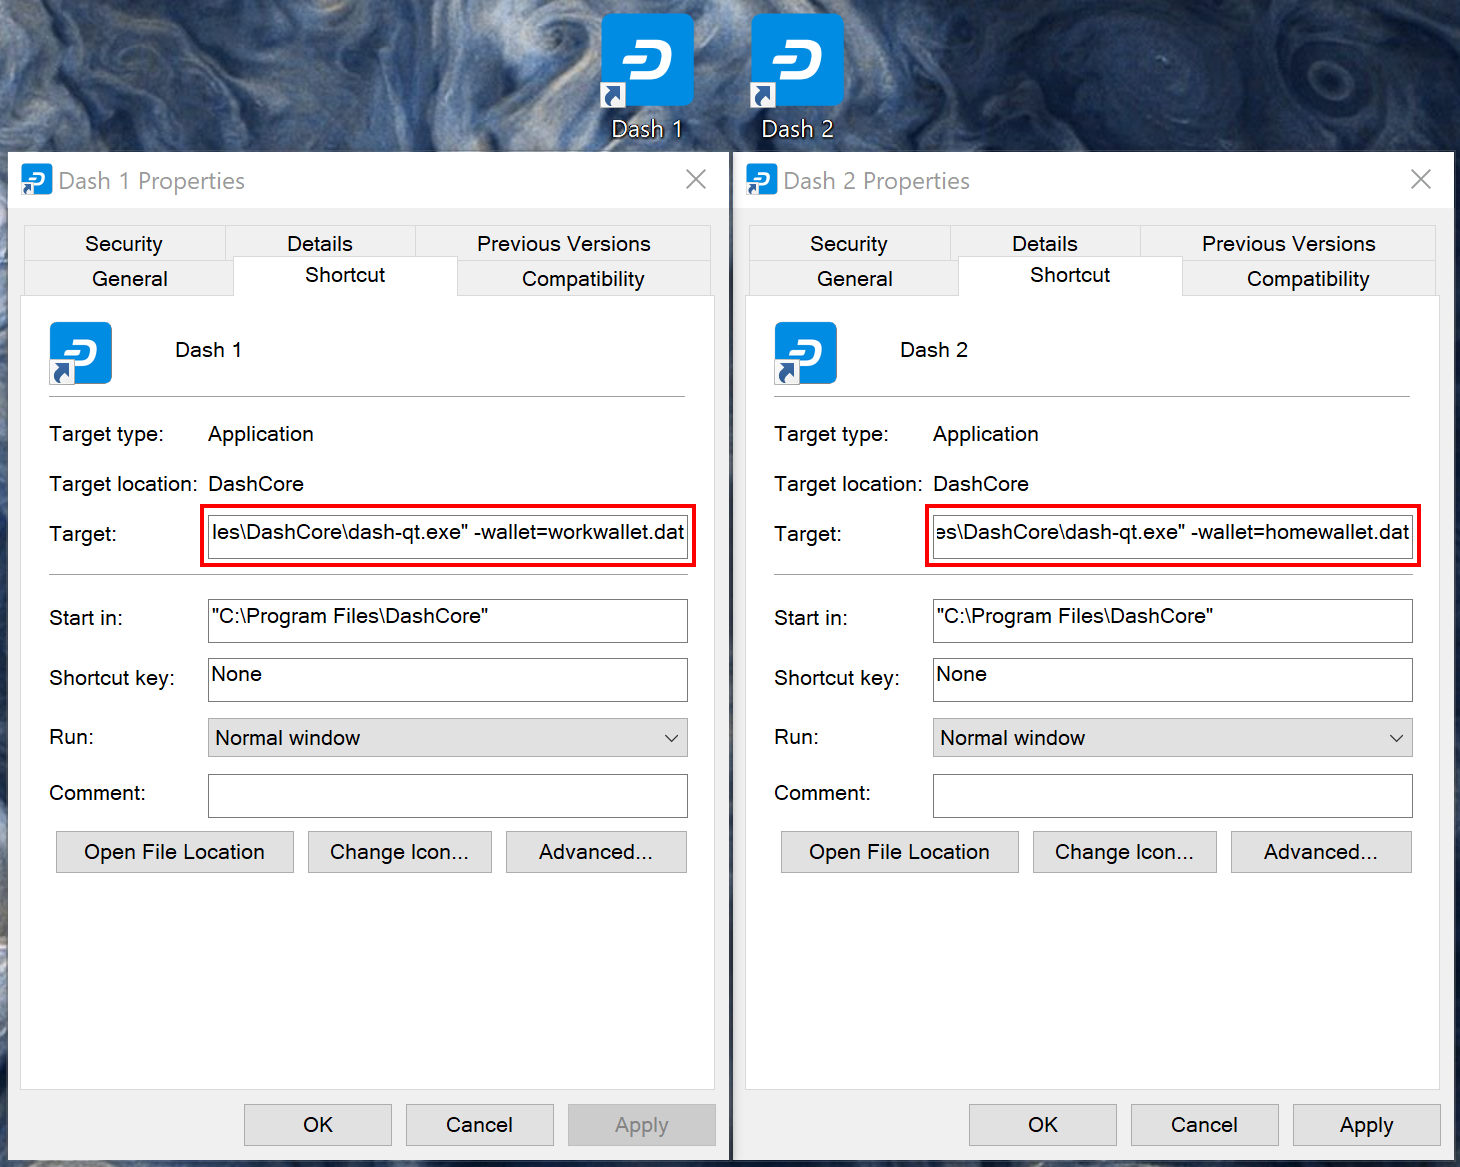
Specifying separate wallet files#
You can now use the two icons to quickly and easily open different wallets from your desktop. Note that you cannot open both wallets simultaneously. To do this, you will need two separate data directories, as described below.
Separate data directories#
Start Dash Core and allow it to synchronize with the network, then close
Dash Core again. You can now create two directories at e.g. C:\Dash1
and C:\Dash2 and copy the blocks and chainstate directories
from the synchronized data directory into the new directories. Each of
these will serve as a separate data directory, allowing you to run two
instances of Dash Core simultaneously. Create two (or more) shortcuts on
your desktop as described above, then specify arguments for datadir
as shown below:
Datadir Target 1:
"C:\Program Files\DashCore\dash-qt.exe" -datadir=C:\Dash1 -listen=0Datadir Target 2:
"C:\Program Files\DashCore\dash-qt.exe" -datadir=C:\Dash2 -listen=0
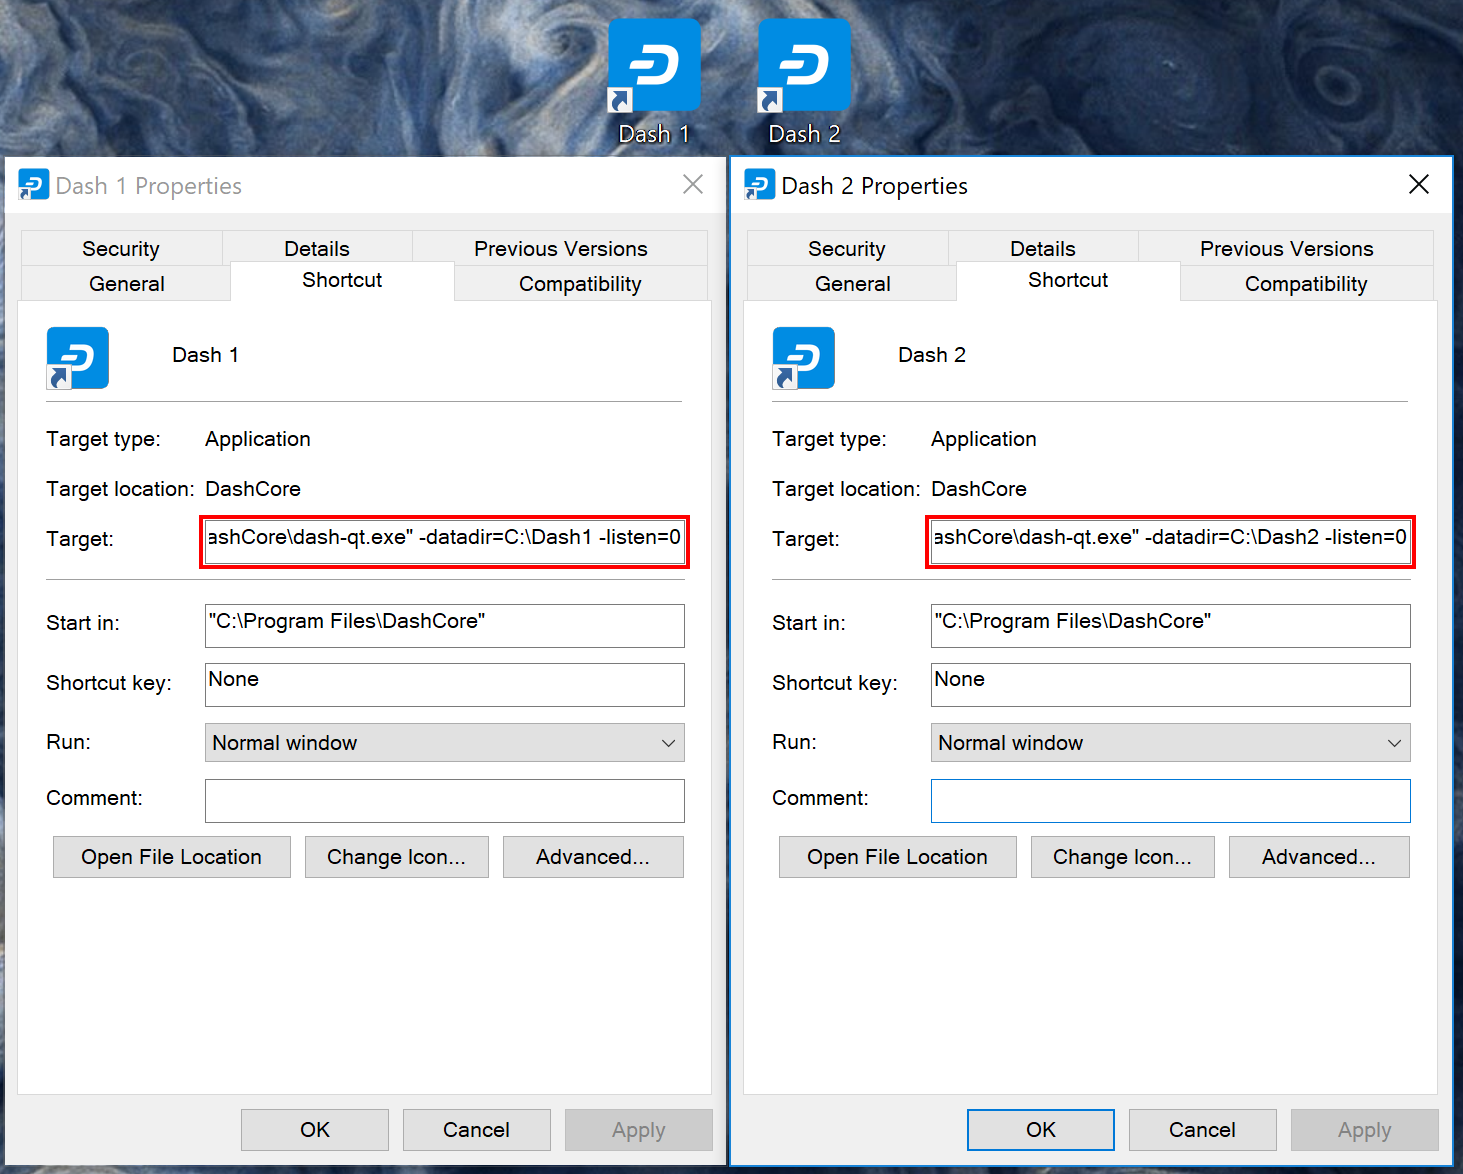
Specifying separate datadirs#
You can now use the two icons to quickly and easily open different wallets simultaneously from your desktop. Both wallets maintain separate and full copies of the blockchain, which may use a lot of drive space. For more efficient use of drive space, consider using an SPV or «light» wallet such as Dash Electrum to maintain multiple separate wallets without keeping a full copy of the blockchain.
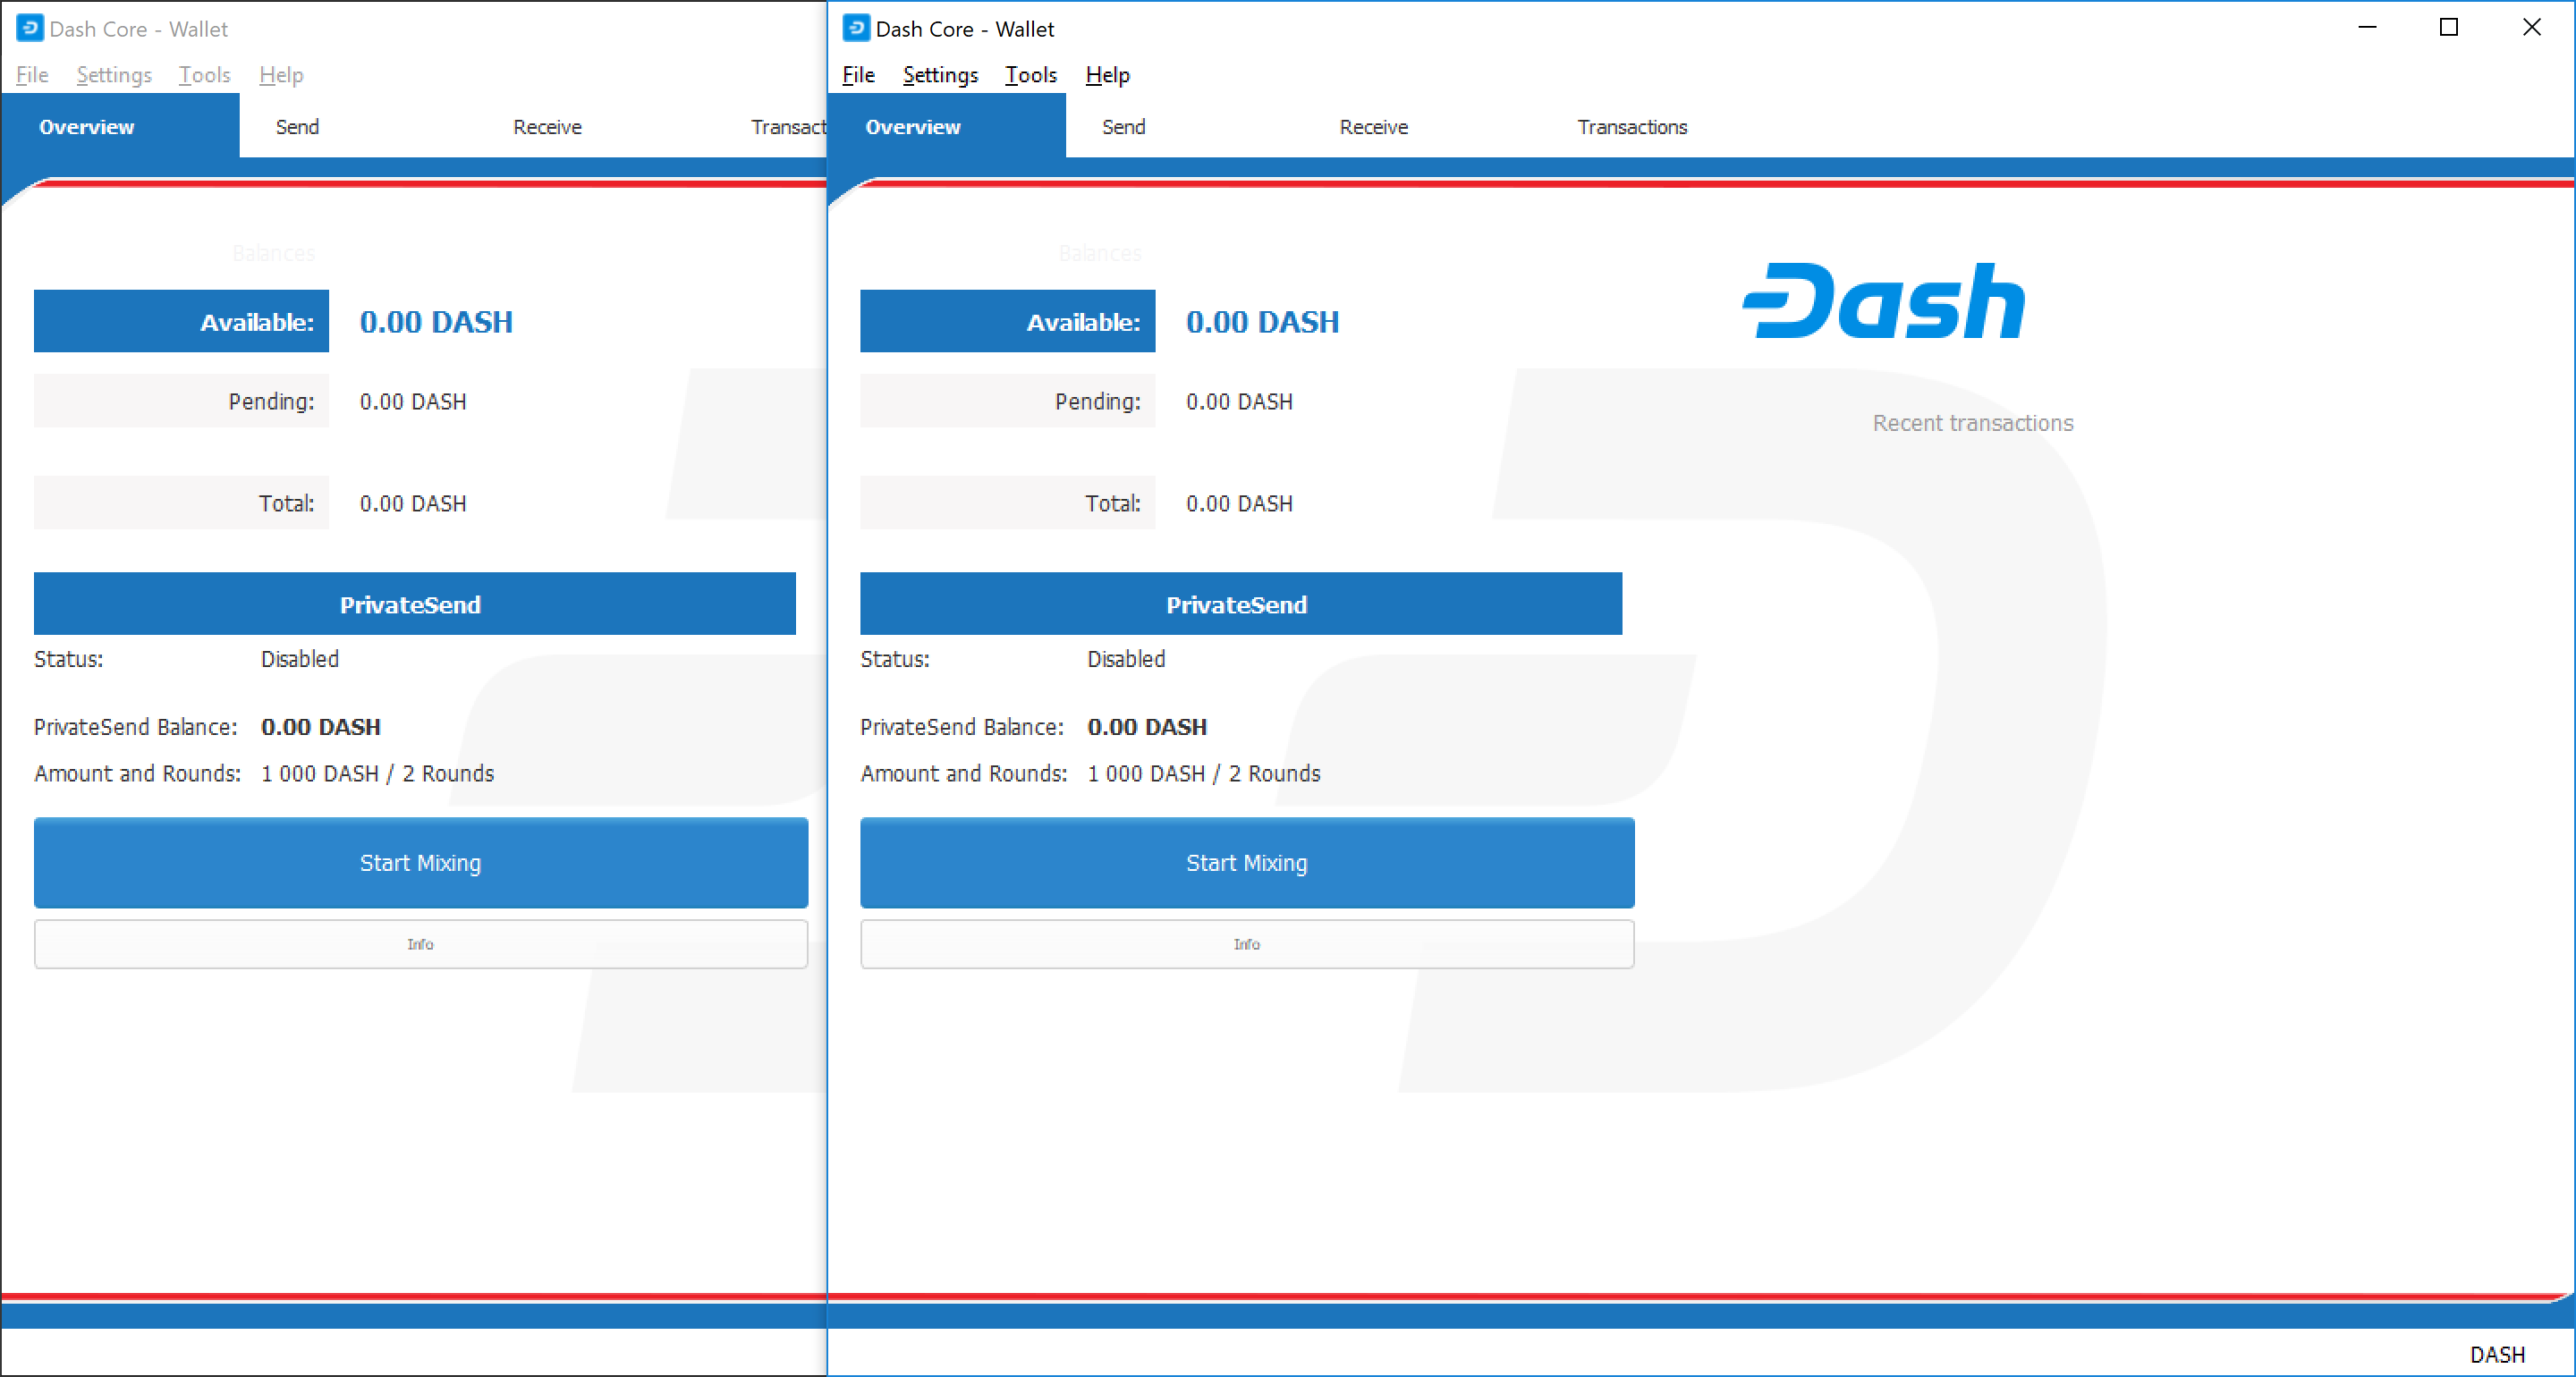
Two instances of Dash Core running simultaneously#
KeePass#
Προειδοποίηση
KeePass support was removed in Dash Core 18.0.0. Details can still be found in previous versions of this documentation.