Funções Avançadas
Dash Electrum is based on Electrum, a Bitcoin wallet. Most functions are identical, which means it is not necessary to reproduce the entirety of the Electrum documentation here. The following sections describe some frequently used advanced functions. For further details on other advanced functions in Electrum for both Bitcoin and Dash, please click the links below.
- Electrum documentation
- Electrum seed version system
- Electrum protocol specification
- Serialization of unsigned or partially signed transactions
- Simple Payment Verification
- The Python Console
- Using Electrum Through Tor
Masternodes in Dash Electrum
Dash Electrum supports masternode creation through an interface called the Masternode Manager. The functionality is available starting from the protocol version 70201.
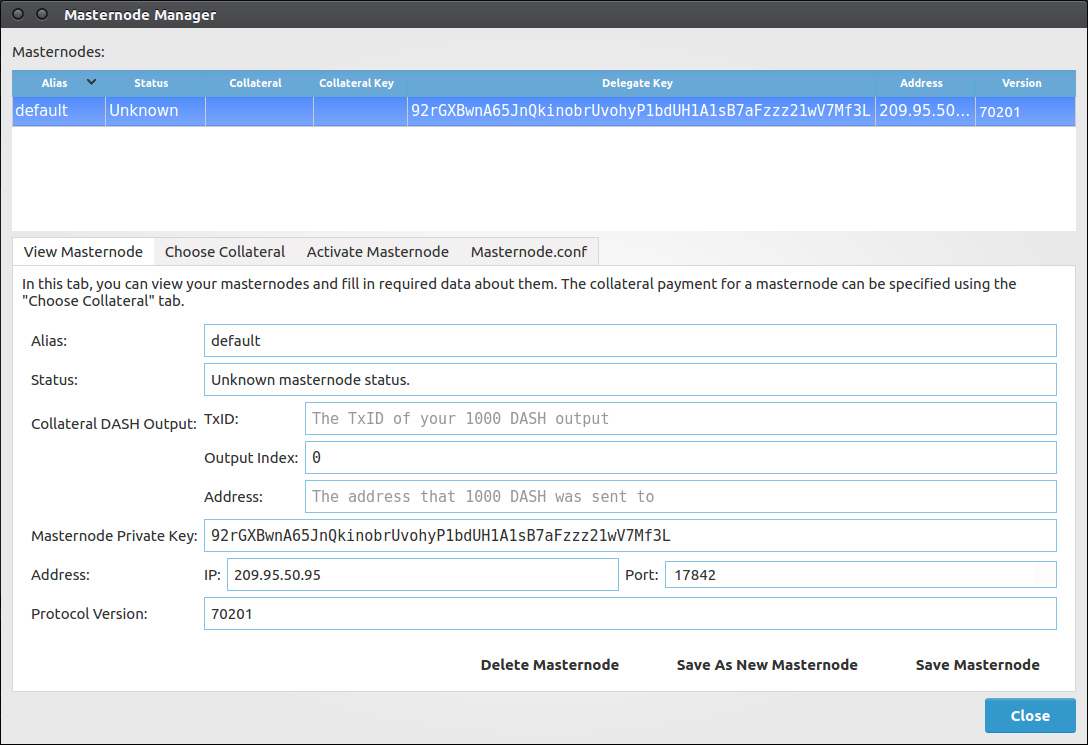
Masternode Manager
The Masternode Manager can be accessed either from the Wallet > Masternodes menu or by pressing Ctrl+M. This manager displays the status of your masternode(s). A wallet with no masternodes will begin with a default masternode for which you can fill in the necessary information.
The manager displays the following data about each masternode you have set up:
- The alias (name) of the masternode.
- The status of the masternode (e.g. whether it has been activated).
- The collateral payment of the masternode.
- The private delegate key.
- The IP address and port that your masternode can be reached at.
- The protocol version that your masternode supports.
Masternode setup
A masternode requires a «delegate» key, which is known to both Dash Electrum and your masternode. Your masternode will use this key to sign messages, and the Dash network will know that you authorized it to. A delegate key can either be one of your Dash Electrum keys, or an imported key. Either way, your masternode and Dash Electrum will both need to know the private key.
To use one of your Dash Electrum keys as a delegate key, put its private key in the Masternode Private Key field of the View Masternode tab.
IP address and protocol version
Certain information about your masternode is required. The IP address and port that your masternode uses must be supplied. Also, the protocol version that your masternode supports is required. This information is filled in automatically if you import a «masternode.conf» file.
Entering IP and protocol information
Collateral
To start a masternode, you must have a 1000 DASH payment available in your wallet. You can scan your wallet for 1000 DASH payments in the Choose Collateral tab of the Masternode Manager.
After scanning, a list of available 1000 DASH collateral payments will be displayed. Selecting one of them will cause the selected masternode’s data to be filled in, though these changes won’t be saved until you click the Save button in the lower-right corner of the tab.

Entering IP and protocol information
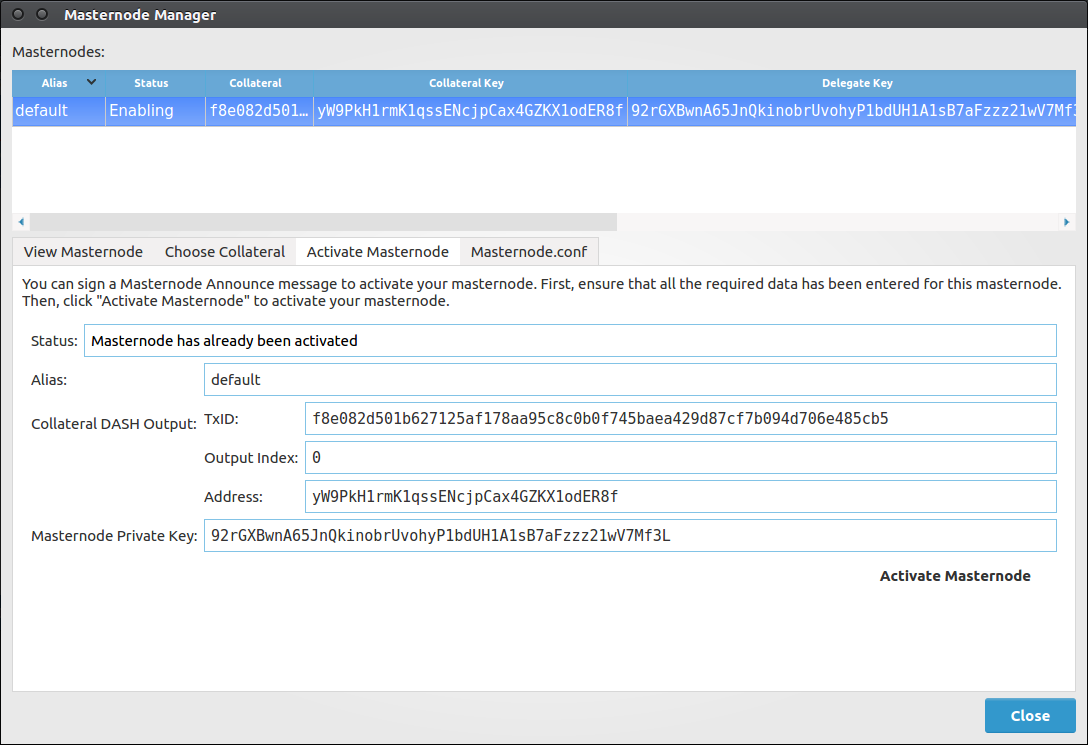
Activating your masternode
After selecting a collateral payment and specifying a delegate key, you can activate your masternode. Do this by clicking Activate Masternode in the Activate Masternode tab of the Masternode Manager. If the Activate Masternode button cannot be clicked, look at the message in the Status bar. It will show you why your masternode cannot be activated.
Activation will require your password if your wallet is encrypted, because a message must be signed. After waiting for Dash Electrum to sign and broadcast your masternode announcement, you will be presented with a message detailing the result. The status of your masternode will be updated in the table and the View Masternode tab.
Entering IP and protocol information
Importing masternode.conf
You can import a masternode.conf file using the Masternode.conf tab of the Masternode Manager. This is the recommended way of setting up masternodes, as it allows you to configure masternodes for Dash Core and Dash Electrum in the same way. Importing a masternode.conf file will automatically set up one or more masternode configurations in the Masternode Manager.
Multisig wallets
This tutorial shows how to create a 2 of 2 multisig wallet. A 2 of 2 multisig consists of 2 separate wallets (usually on separate machines and potentially controlled by separate people) that have to be used in conjunction in order to access the funds. Both wallets have the same set of addresses.
- A common use-case for this is if you want to collaboratively control funds: maybe you and your friend run a company together and certain funds should only be spendable if you both agree.
- Another one is security: one of the wallets can be on your main machine, while the other one is on a offline machine. That way you make it very hard for an attacker or malware to steal your coins.
Create a pair of 2-of-2 wallets
Each cosigner needs to do this: In the menu select File > New, then select Multi-signature wallet. On the next screen, select 2 of 2.
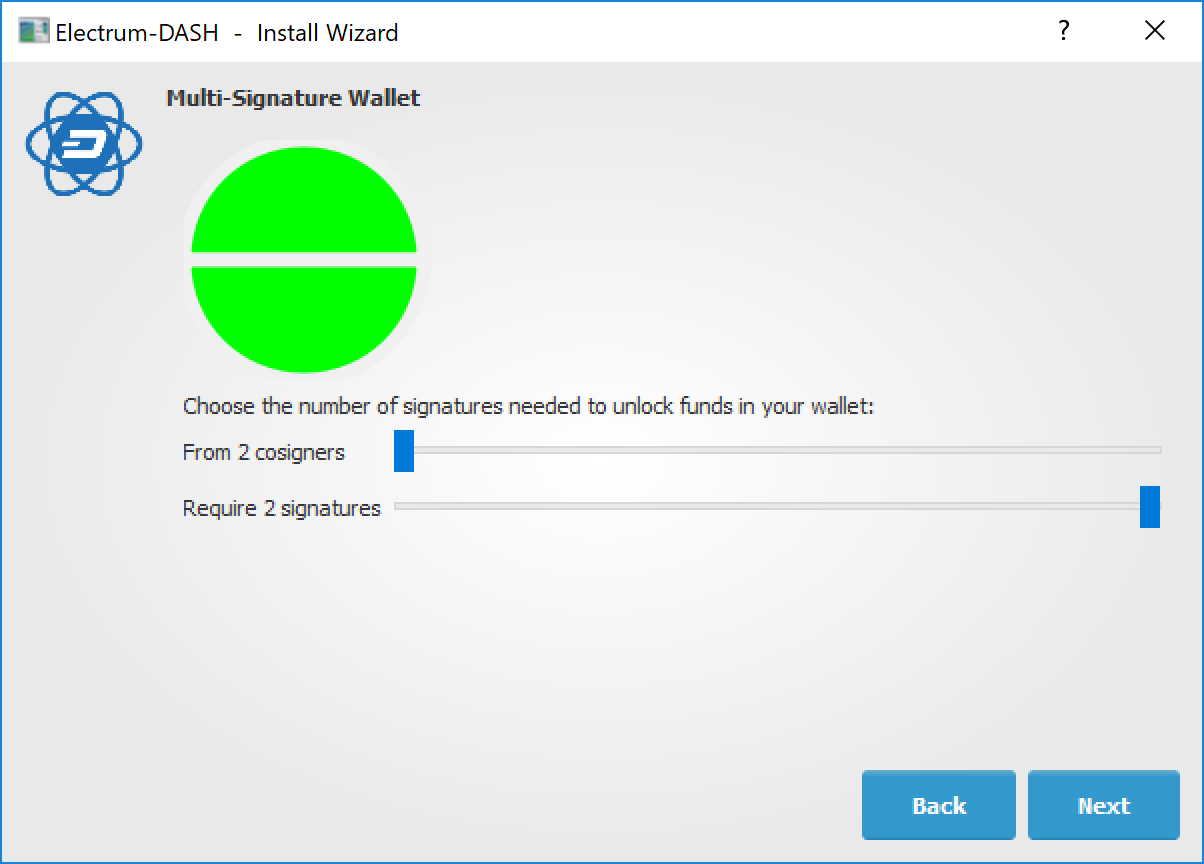
Selecting x of y signatures for a multi-signature wallet
After generating and confirming your recovery seed, you will be shown the xpub address for this wallet.
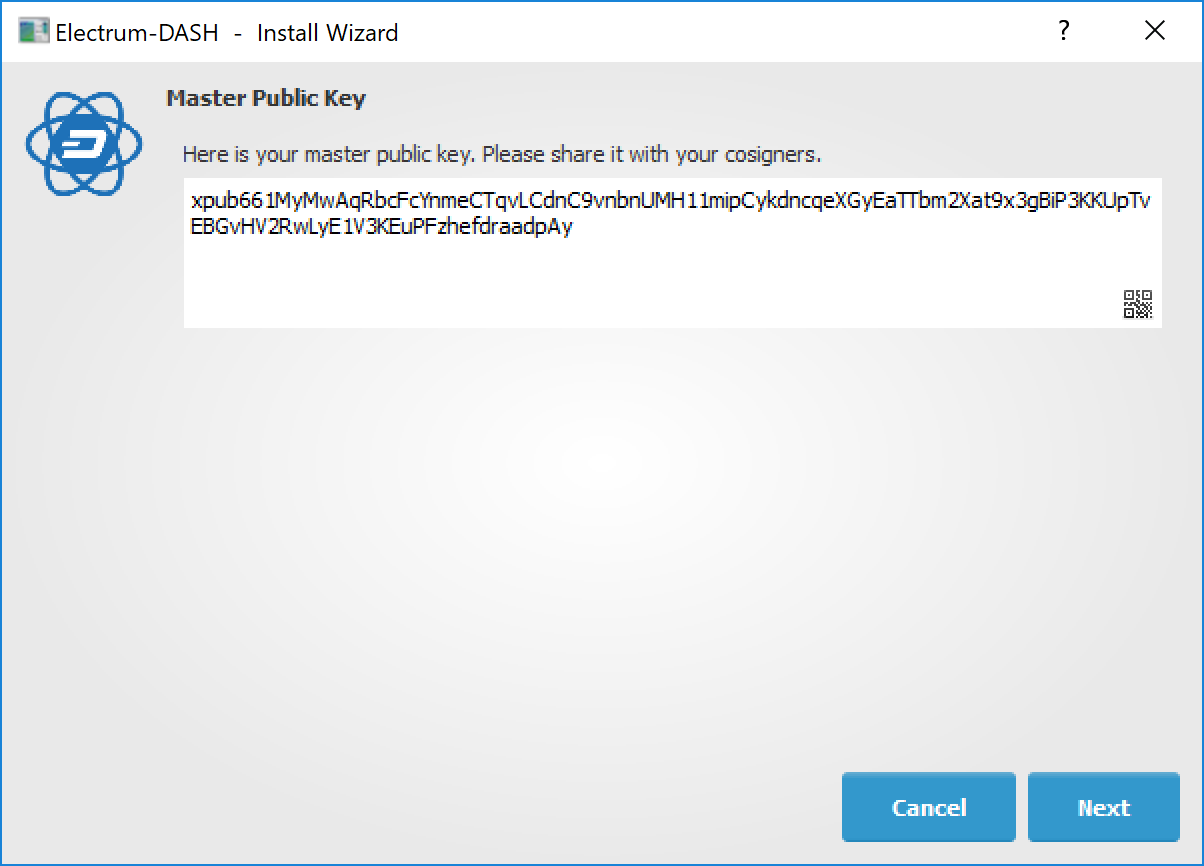
xpub key of the first wallet
After generating a seed (keep it safely!) you will need to provide the master public key of the other wallet. Of course when you create the other wallet, you put the master public key of the first wallet.
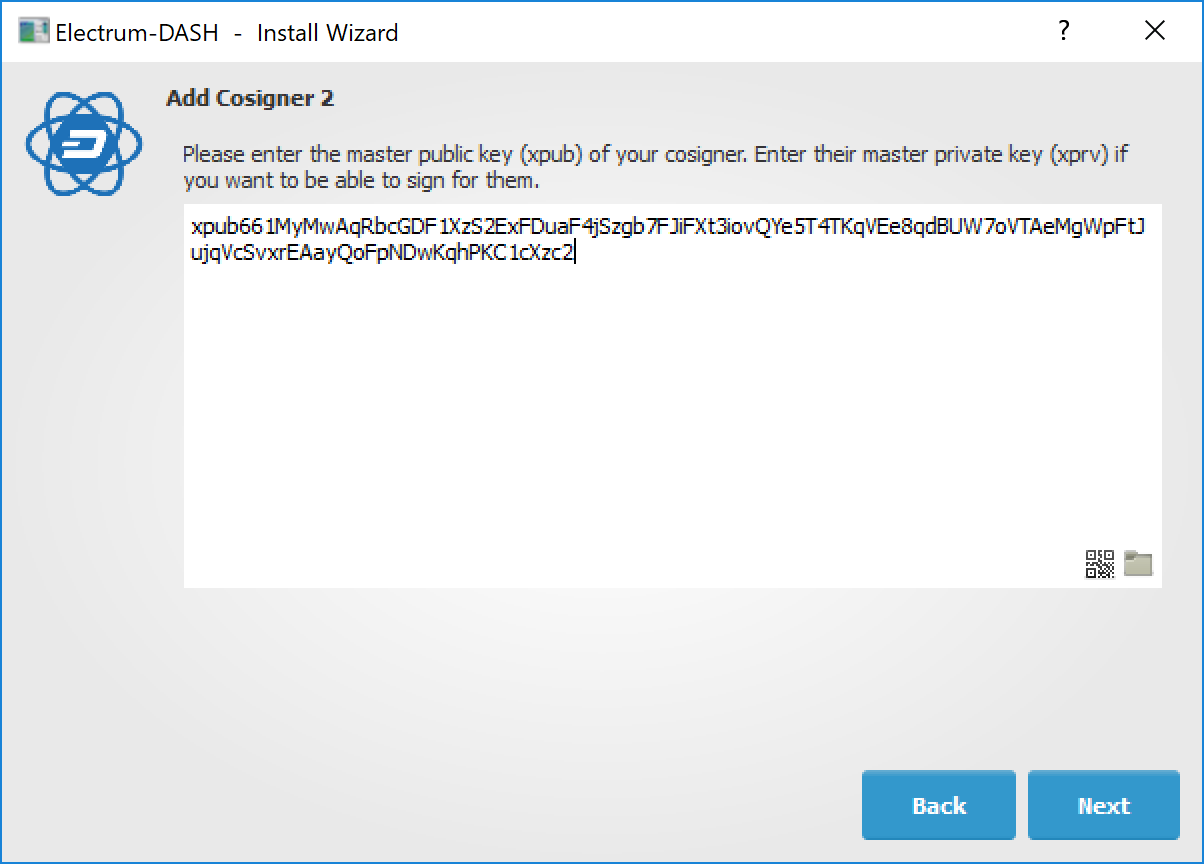
Entering xpub from the second wallet in the first wallet
You will need to do this in parallel for the two wallets. Note that you can press cancel during this step, and reopen the file later.
Recebendo
Check that both wallets generate the same set of Addresses. You can now send to these Addresses (note they start with a “7”) with any wallet that can send to P2SH Addresses.
Enviando
To spend coins from a 2-of-2 wallet, two cosigners need to sign a transaction collaboratively. To accomplish this, create a transaction using one of the wallets (by filling out the form on the Send tab). After signing, a window is shown with the transaction details.

Partially signed 2-of-2 multisig transaction in Dash Electrum
The transaction now has to be sent to the second wallet. Several options are available for this:
You can transfer the file on a USB stick
You can save the partially signed transaction to a file (using the Save button), transfer that to the machine where the second wallet is running (via USB stick, for example) and load it there (using Tools > Load transaction > From file)
You can use QR codes
A button showing a QR code icon is also available. Clicking this button will display a QR code containing the transaction, which can be scanned into the second wallet (Tools > Load Transaction > From QR Code)
With both of the above methods, you can now add the second signature to the transaction (using the Sign button). It will then be broadcast to the network.

Fully signed 2-of-2 multisig transaction in Dash Electrum
Sweep a paper wallet
You may have received a paper wallet as a gift from another Dash user, or previously stored one in a safe deposit box. Funds are swept from a paper wallet into a live wallet by importing its private key, which is a long sequence of characters starting with the number «7» or the capital letter «X». The example below displays a private key (WIF format).
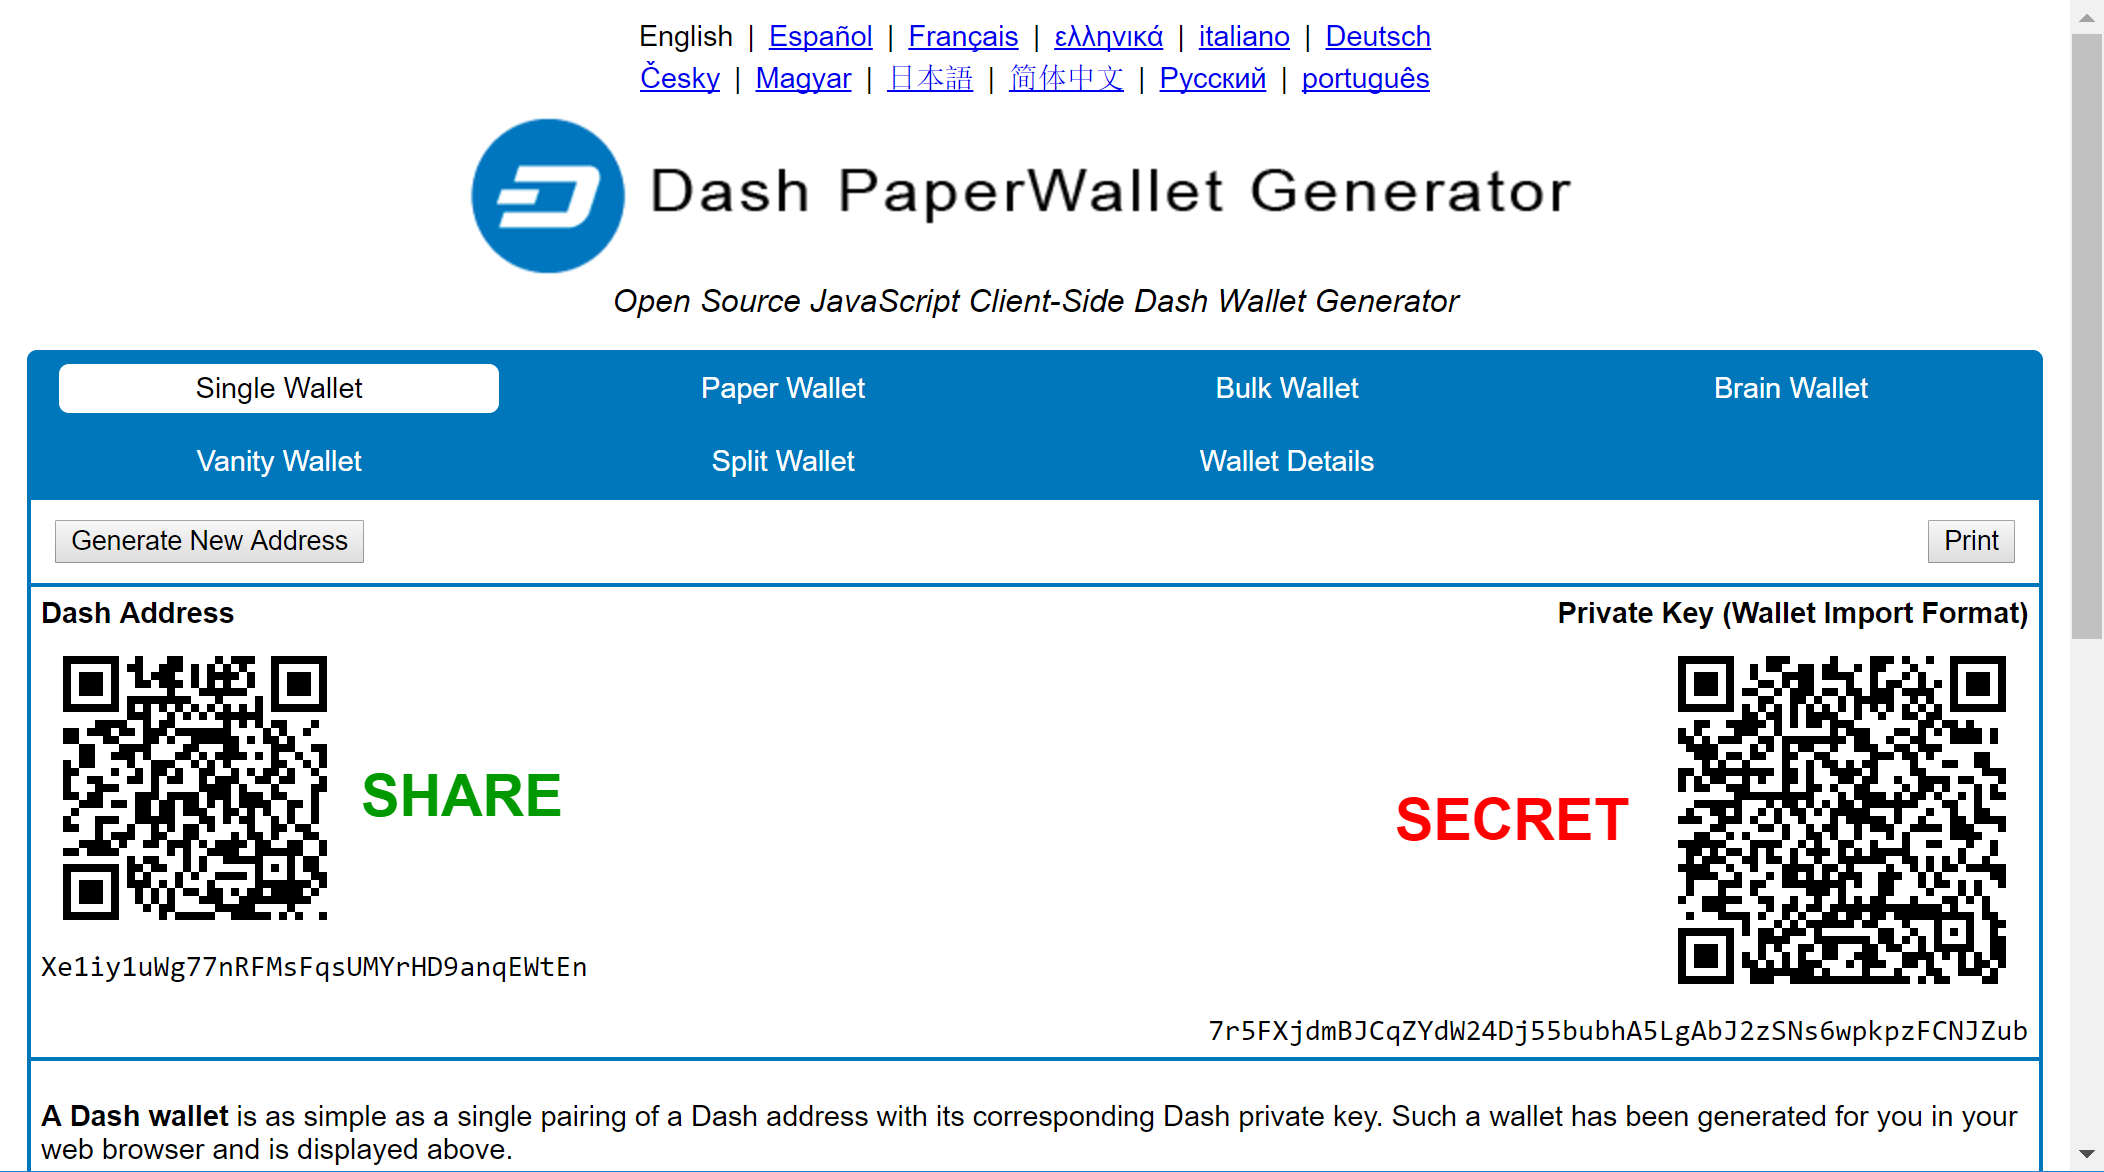
Public address and associated private key produced by Dash Paper Wallet Generator
Funds from paper wallets are swept into an Dash Electrum Wallet by creating a transaction using the private key and sending it to a new address from your wallet. This is necessary because it is not possible to add new public or private keys to an existing deterministic series of addresses derived from a seed phrase.
Begin by selecting the Wallet > Private Keys > Sweep menu item. The Sweep private keys dialog will appear, where you can paste your private key(s). An unused address controlled by your Dash Electrum wallet appears in the lower field, and can be changed by clicking the Address button. Once you have pasted your private key, click the Sweep button.
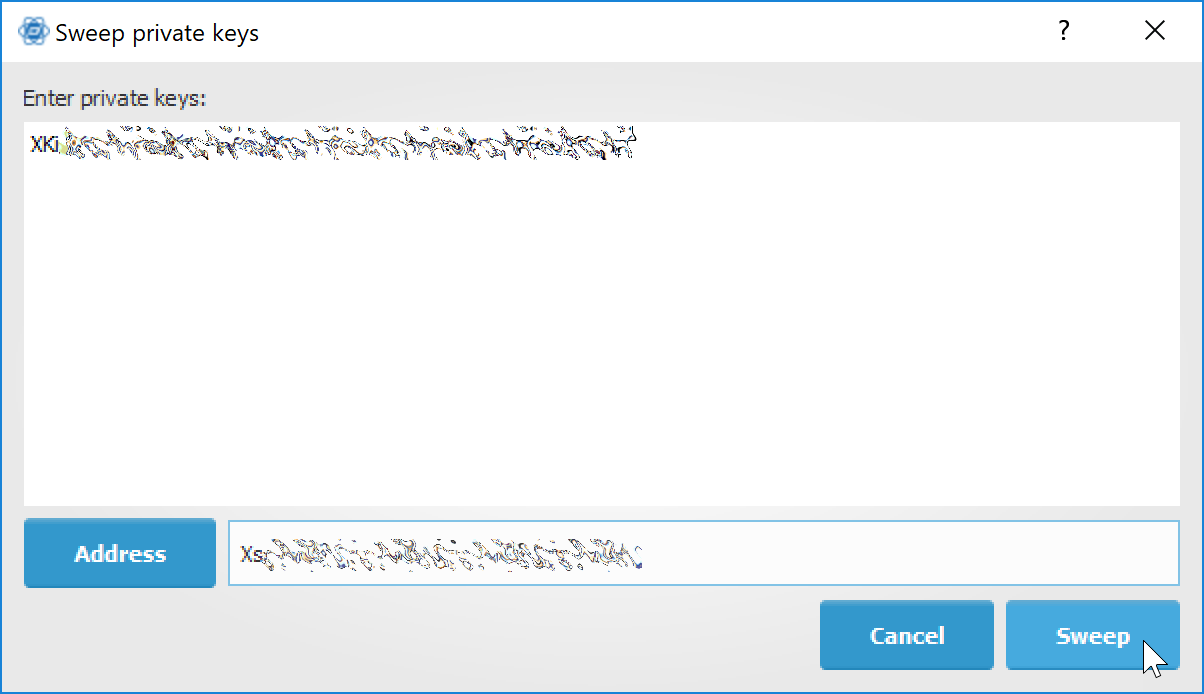
Entering the private key
Dash Electrum then prepares a transaction using the private key you just imported to derive the public address for the transaction input and the address from your wallet as the output, and signs the message. Click Broadcast to enter the transaction on the blockchain. The balance will then appear in your wallet under the specified address. The address you swept is left with zero balance.
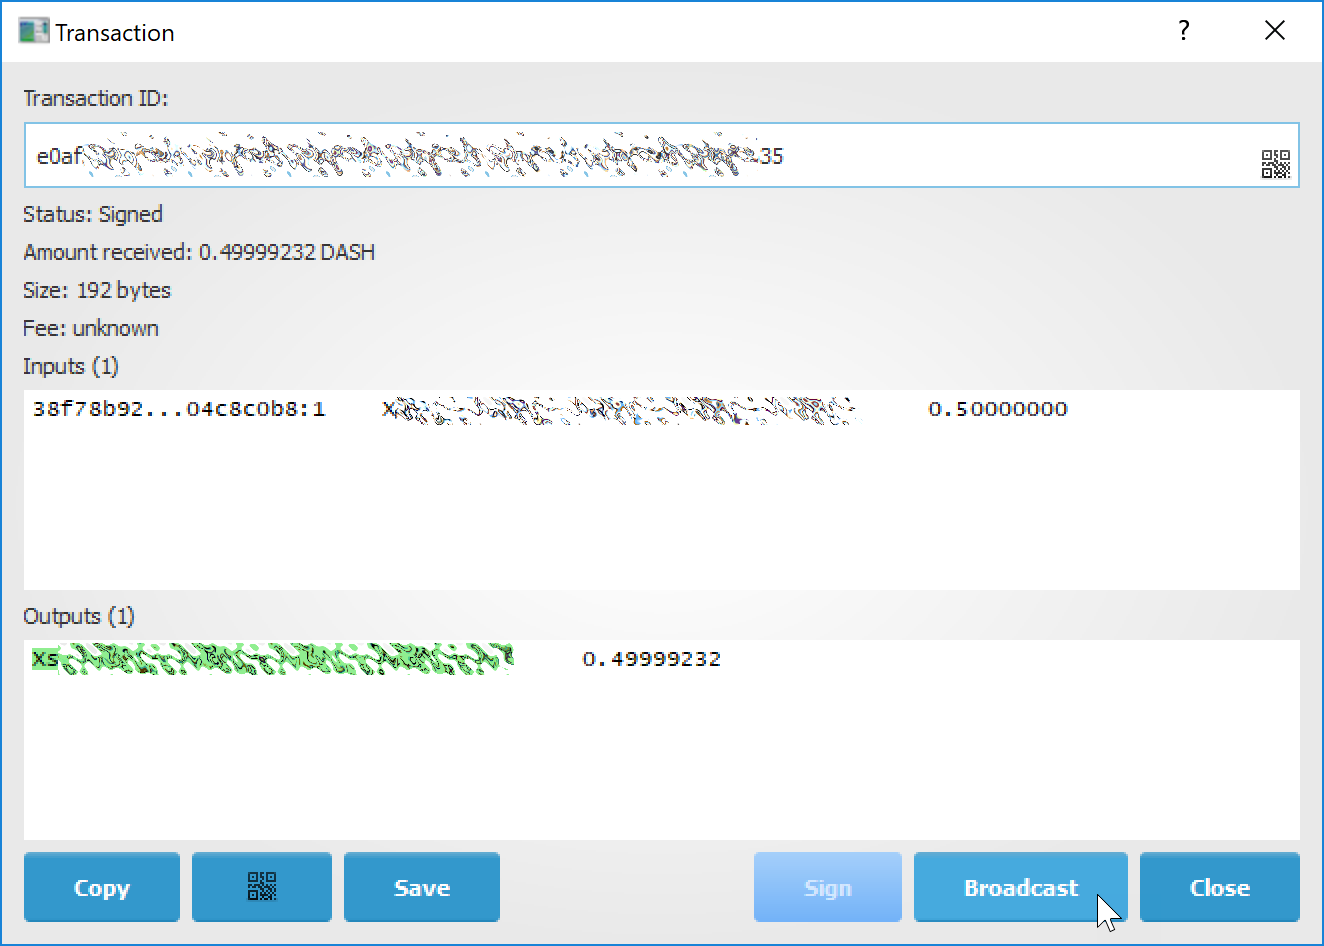
Broadcasting the sweep transaction
Cold storage
This section shows how to create an offline wallet that holds your Dash and a watching-only online wallet that is used to view its history and to create transactions that have to be signed with the offline wallet before being broadcast on the online one.
Create an offline wallet
Create a wallet on an offline machine, as per the usual process (File > New). After creating the wallet, go to Wallet -> Master Public Keys.
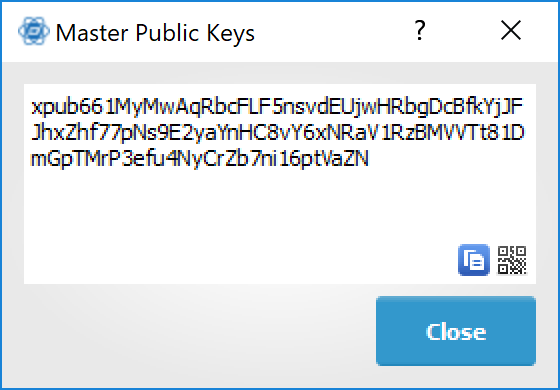
Master Public Key of a new offline wallet
The Master Public Key of your wallet is the string shown in this popup window. Transfer that key to your online machine somehow.
Create a watching-only version of your wallet
On your online machine, open Dash Electrum and select File > New/Restore. Enter a name for the wallet and select Use public or private keys. Paste your master public key in the box. Click Next to complete the creation of your wallet. When you’re done, you should see a popup informing you that you are opening a watching-only wallet.
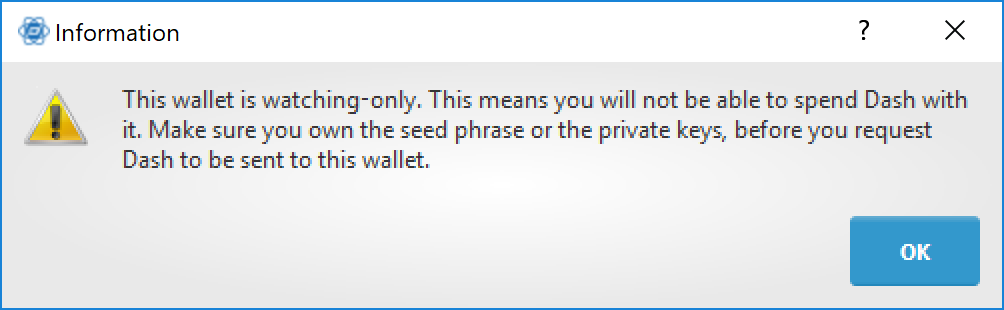
Master Public Key of a new offline wallet
The transaction history of your cold wallet should then appear.
Create an unsigned transaction
Go to the Send tab on your online watching-only wallet, input the transaction data and click Send. A window will appear to inform you that a transaction fee will be added. Continue. In the window that appears up, click Save and save the transaction file somewhere on your computer. Close the window and transfer the transaction file to your offline machine (e.g. with a USB stick).
Sign your transaction
On your offline wallet, select Tools > Load transaction -> From file in the menu and select the transaction file created in the previous step. Click Sign. Once the transaction is signed, the Transaction ID appears in its designated field. Click Save, store the file somewhere on your computer, and transfer it back to your online machine.
Broadcast your transaction
On your online machine, select Tools -> Load transaction -> From file from the menu. Select the signed transaction file. In the window that opens up, click Broadcast. The transaction will be broadcast over the Dash network.
Command line
Dash Electrum has a powerful command line available when running under Linux or macOS. This section will show you a few basic principles.
Using the inline help
To see the list of Dash Electrum commands, type:
electrum help
To see the documentation for a command, type:
electrum help <command>
Magic words
The arguments passed to commands may be one of the following magic words: ! ? : -.
The exclamation mark ! is a shortcut that means ‘the maximum amount available’. Note that the transaction fee will be computed and deducted from the amount. Example:
electrum payto Xtdw4fezqbSpC341vcr8u9HboiJMFa9gBq !
A question mark ? means that you want the parameter to be prompted. Example:
electrum signmessage Xtdw4fezqbSpC341vcr8u9HboiJMFa9gBq ?
Use a colon : if you want the prompted parameter to be hidden (not echoed in your terminal). Note that you will be prompted twice in this example, first for the private key, then for your wallet password:
electrum importprivkey :
A parameter replaced by a dash - will be read from standard input (in a pipe):
cat LICENCE | electrum signmessage Xtdw4fezqbSpC341vcr8u9HboiJMFa9gBq -
Aliases
You can use DNS aliases in place of bitcoin addresses, in most commands:
electrum payto ecdsa.net !
Formatting outputs using jq
Command outputs are either simple strings or json structured data. A very useful utility is the ‘jq’ program. Install it with:
sudo apt-get install jq
The following examples use it.
Sign and verify message
We may use a variable to store the signature, and verify it:
sig=$(cat LICENCE| electrum signmessage Xtdw4fezqbSpC341vcr8u9HboiJMFa9gBq -)
And:
cat LICENCE | electrum verifymessage Xtdw4fezqbSpC341vcr8u9HboiJMFa9gBq $sig -
Show the values of your unspents
The listunspent command returns a list of dict objects, with various fields. Suppose we want to extract the value field of each record. This can be achieved with the jq command:
electrum listunspent | jq 'map(.value)'
Select only incoming transactions from history
Incoming transactions have a positive ‘value’ field:
electrum history | jq '.[] | select(.value>0)'
Filter transactions by date
The following command selects transactions that were timestamped after a given date:
after=$(date -d '07/01/2015' +"%s")
electrum history | jq --arg after $after '.[] | select(.timestamp>($after|tonumber))'
Similarly, we may export transactions for a given time period:
before=$(date -d '08/01/2015' +"%s")
after=$(date -d '07/01/2015' +"%s")
electrum history | jq --arg before $before --arg after $after '.[] | select(.timestamp>($after|tonumber) and .timestamp<($before|tonumber))'
Encrypt and decrypt messages
First we need the public key of a wallet address:
pk=$(electrum getpubkeys Xtdw4fezqbSpC341vcr8u9HboiJMFa9gBq| jq -r '.[0]')
Encrypt:
cat | electrum encrypt $pk -
Decrypt:
electrum decrypt $pk ?
Note: this command will prompt for the encrypted message, then for the wallet password.
Export private keys and sweep coins
The following command will export the private keys of all wallet addresses that hold some Dash:
electrum listaddresses --funded | electrum getprivatekeys -
This will return a list of lists of private keys. In most cases, you want to get a simple list. This can be done by adding a jq filer, as follows:
electrum listaddresses --funded | electrum getprivatekeys - | jq 'map(.[0])'
Finally, let us use this list of private keys as input to the sweep command:
electrum listaddresses --funded | electrum getprivatekeys - | jq 'map(.[0])' | electrum sweep - [destination address]
Using cold storage with the command line
This section will show you how to sign a transaction with an offline Dash Electrum wallet using the command line.
Create an unsigned transaction
With your online (watching-only) wallet, create an unsigned transaction:
electrum payto Xtdw4fezqbSpC341vcr8u9HboiJMFa9gBq 0.1 --unsigned > unsigned.txn
The unsigned transaction is stored in a file named ‘unsigned.txn’. Note that the –unsigned option is not needed if you use a watching-only wallet.
You may view it using:
cat unsigned.txn | electrum deserialize -
Sign the transaction
The serialization format of Dash Electrum contains the master public key needed and key derivation used by the offline wallet to sign the transaction. Thus we only need to pass the serialized transaction to the offline wallet:
cat unsigned.txn | electrum signtransaction - > signed.txn
The command will ask for your password, and save the signed transaction in ‘signed.txn’.
Broadcast the transaction
Send your transaction to the Dash network, using broadcast:
cat signed.txn | electrum broadcast -
If successful, the command will return the ID of the transaction.
How to accept Dash on a website using Dash Electrum
This tutorial will show you how to accept dash on a website with SSL signed payment requests. It is updated for Dash Electrum 2.6.
Requirements
- A webserver serving static HTML
- A SSL certificate (signed by a CA)
- Electrum version >= 2.6
Create a wallet
Create a wallet on your web server:
electrum create
You can also use a watching only wallet (restored from xpub), if you want to keep private keys off the server. Once your wallet is created, start Dash Electrum as a daemon:
electrum daemon start
Add your SSL certificate to your configuration
You should have a private key and a public certificate for your domain. Create a file that contains only the private key:
-----BEGIN PRIVATE KEY-----
your private key
-----BEGIN END KEY-----
Set the path to your the private key file with setconfig:
electrum setconfig ssl_privkey /path/to/ssl.key
Create another file that contains your certificate and the list of certificates it depends on, up to the root CA. Your certificate must be at the top of the list, and the root CA at the end:
-----BEGIN CERTIFICATE-----
your cert
-----END CERTIFICATE-----
-----BEGIN CERTIFICATE-----
intermediate cert
-----END CERTIFICATE-----
-----BEGIN CERTIFICATE-----
root cert
-----END CERTIFICATE-----
Set the ssl_chain path with setconfig:
electrum setconfig ssl_chain /path/to/ssl.chain
Configure a requests directory
This directory must be served by your webserver (eg Apache):
electrum setconfig requests_dir /var/www/r/
By default, Dash Electrum will display local URLs, starting with ‘file://‘ In order to display public URLs, we need to set another configuration variable, url_rewrite. For example:
electrum setconfig url_rewrite "['file:///var/www/','https://electrum.org/']"
Create a signed payment request
electrum addrequest 3.14 -m "this is a test"
{
   "URI": "dash:Xtdw4fezqbSpC341vcr8u9HboiJMFa9gBq?amount=3.14&r=https://electrum.org/r/7c2888541a",
   "address": "Xtdw4fezqbSpC341vcr8u9HboiJMFa9gBq",
   "amount": 314000000,
   "amount (DASH)": "3.14",
   "exp": 3600,
   "id": "7c2888541a",
   "index_url": "https://electrum.org/r/index.html?id=7c2888541a",
   "memo": "this is a test",
   "request_url": "https://electrum.org/r/7c2888541a",
   "status": "Pending",
   "time": 1450175741
}
This command returns a json object with two URLs:
- request_url is the URL of the signed BIP70 request.
- index_url is the URL of a webpage displaying the request.
Note that request_url and index_url use the domain name we defined in url_rewrite. You can view the current list of requests using the listrequests command.
Open the payment request page in your browser
Let us open index_url in a web browser.
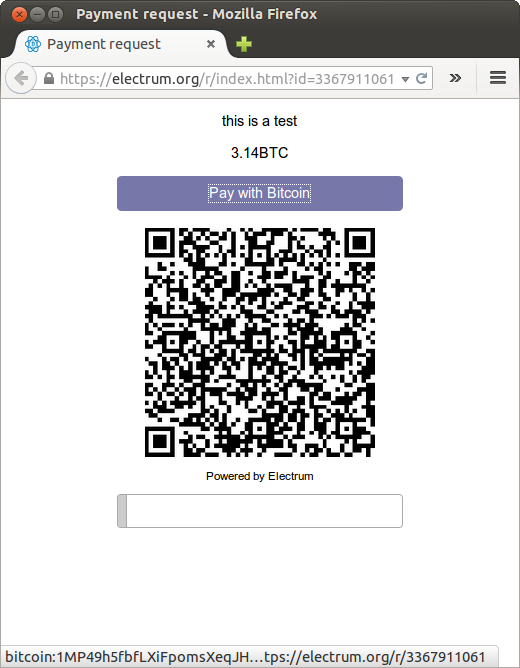
Payment request page in a web browser
The page shows the payment request. You can open the dash: URI with a wallet, or scan the QR code. The bottom line displays the time remaining until the request expires.
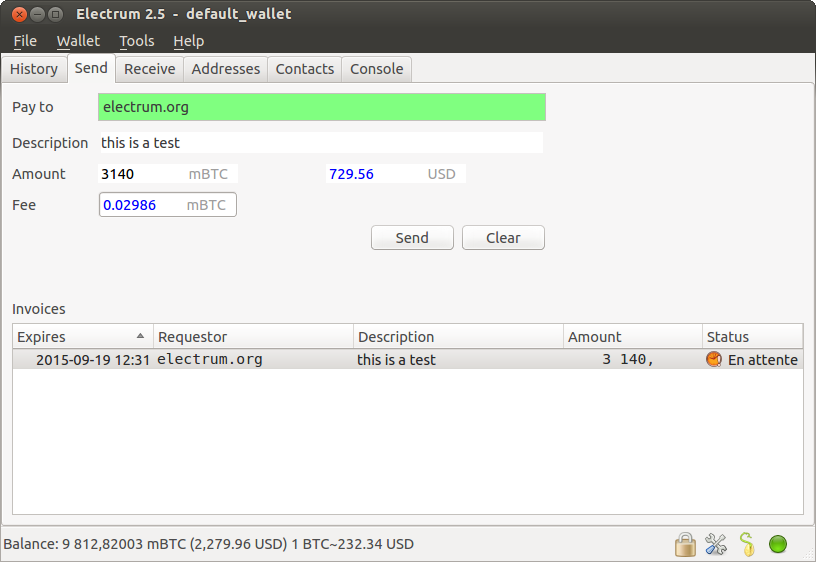
Wallet awaiting payment
This page can already be used to receive payments. However, it will not detect that a request has been paid; for that we need to configure websockets.
Add web sockets support
Get SimpleWebSocketServer from here:
git clone https://github.com/ecdsa/simple-websocket-server.git
Set websocket_server and websocket_port in your config:
electrum setconfig websocket_server <FQDN of your server>
electrum setconfig websocket_port 9999
And restart the daemon:
electrum daemon stop
electrum daemon start
Now, the page is fully interactive: it will update itself when the payment is received. Please notice that higher ports might be blocked on some client’s firewalls, so it is more safe for example to reverse proxy websockets transmission using standard 443 port on an additional subdomain.
JSONRPC interface
Commands to the Dash Electrum daemon can be sent using JSONRPC. This is useful if you want to use Dash Electrum in a PHP script.
Note that the daemon uses a random port number by default. In order to use a stable port number, you need to set the rpcport configuration variable (and to restart the daemon):
electrum setconfig rpcport 7777
With this setting, we can perform queries using curl or PHP. Example:
curl --data-binary '{"id":"curltext","method":"getbalance","params":[]}' http://127.0.0.1:7777
Query with named parameters:
curl --data-binary '{"id":"curltext","method":"listaddresses","params":{"funded":true}}' http://127.0.0.1:7777
Create a payment request:
curl --data-binary '{"id":"curltext","method":"addrequest","params":{"amount":"3.14","memo":"test"}}' http://127.0.0.1:7777