Запуск эвоноды#
Настройка и запуск эвоноды подразумевают наличие базового понимания Linux и технологии блокчейн, а также способности внимательно следовать инструкциям. Этот процесс также требует регулярного обслуживания и тщательной защиты, особенно если вы не храните DASH на аппаратном кошельке. Во время настройки необходимо будет принять некоторые решения и дополнительные меры для повышения безопасности.
Если вы предпочитаете делегировать повседневную работу вашей мастерноды профессиональному оператору, то для этого существуют коммерческие сервисы хостинга эвонод. Используя такие сервисы хостинга, вы сохраняете полный контроль над залогом в 4000 DASH и выплачиваете согласованный процент от вашего вознаграждения оператору. Также можно делегировать представителю ваши ключи для голосования, для получения дополнительной информации смотрите документацию по управлению:.
Прежде чем начать#
В этом руководстве предполагается, что вы настраиваете одну эвоноду в основной сети и делаете это впервые. Если вы обновляете мастерноду, то вместо этой смотрите информацию здесь. Вам понадобится:
4000 Dash
Кошелёк для хранения DASH, предпочтительно аппаратный кошелёк, хотя кошелёк Dash Core также поддерживается
Сервер Linux, предпочтительно виртуальный выделенный сервер (VPS)
Информацию о размещенных мастернодах см. в документации, приведенной ниже:
В этой документации описаны команды Dash Core, как если бы они были введены в графическом интерфейсе, открыв консоль из Window > Console, но того же результата можно достичь на мастерноде, введя те же команды и добавив префикс ~/.dashcore/dash-cli к каждой команде.
Конфигурация сервера#
Правильная конфигурация сервера необходима для успешной работы мастерноды как с точки зрения безопасности, так и с точки зрения производительности. Подробную информацию о подготовке сервера к размещению masternode см. на странице Конфигурация сервера.
После завершения настройки сервера выполните оставшиеся шаги в приведенных ниже разделах, чтобы завершить настройку эвоноды, или следуйте этому пошаговому руководству.
Отправьте обеспечение#
Для работы эвоноды требуется адрес Dash с одним неизрасходованным выходом (UTXO) равным 4000 DASH. После его отправки необходимо извлечь различные ключи, касающиеся транзакции, для последующего внесения в конфигурационный файл и регистрационной транзакции в качестве доказательства для записи конфигурации в блокчейн, чтобы эвонода могла быть включена в детерминированный список.
Мастернода может быть зарегистрирована как с аппаратного кошелька, так и с официального кошелька Dash Core, хотя для повышения безопасности и защиты от взлома настоятельно рекомендуется использовать аппаратный кошелек. В данном руководстве описаны шаги для аппаратных кошельков и Dash Core.
Вариант 1: Обеспечение в аппаратном кошельке#
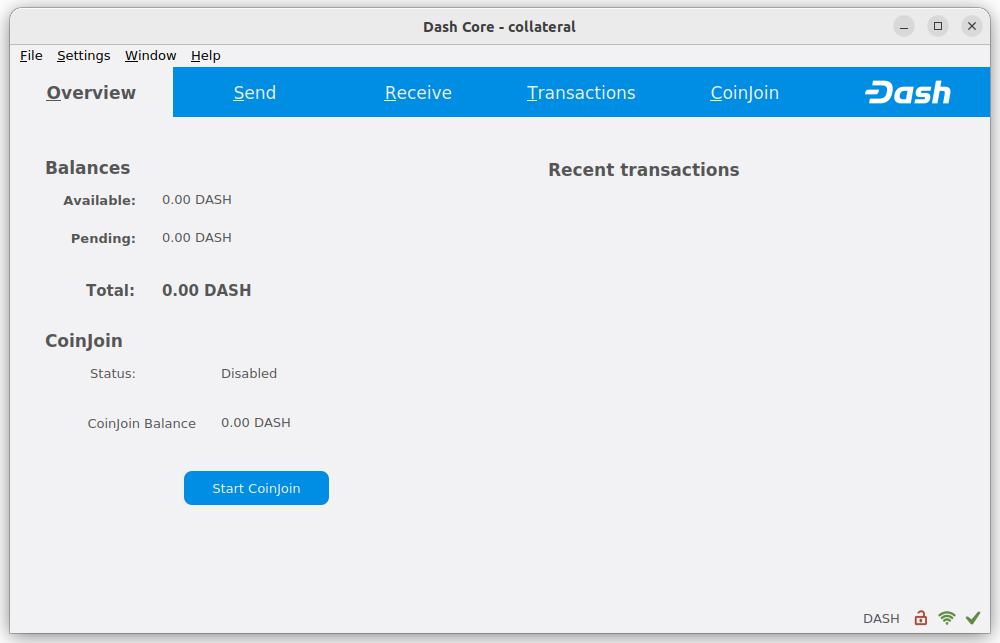
Настройте свой Trezor с помощью кошелька Trezor по адресу https://wallet.trezor.io/ и отправьте тестовую транзакцию, чтобы убедиться в его работоспособности. Помощь в этом вопросе см. в this guide - вы также можете (осторожно!) добавить парольную фразу к вашему Trezor для дополнительной защиты вашего залога. Создайте новый счет в кошельке Trezor, нажав Добавить счет. Затем перейдите на вкладку Получить и отправьте на указанный адрес ровно 4000 DASH. Если вы устанавливаете несколько мастернод, отправляйте на последовательные адреса в рамках одного нового счета. Вы увидите транзакцию, как только придет первое подтверждение, обычно в течение нескольких минут.
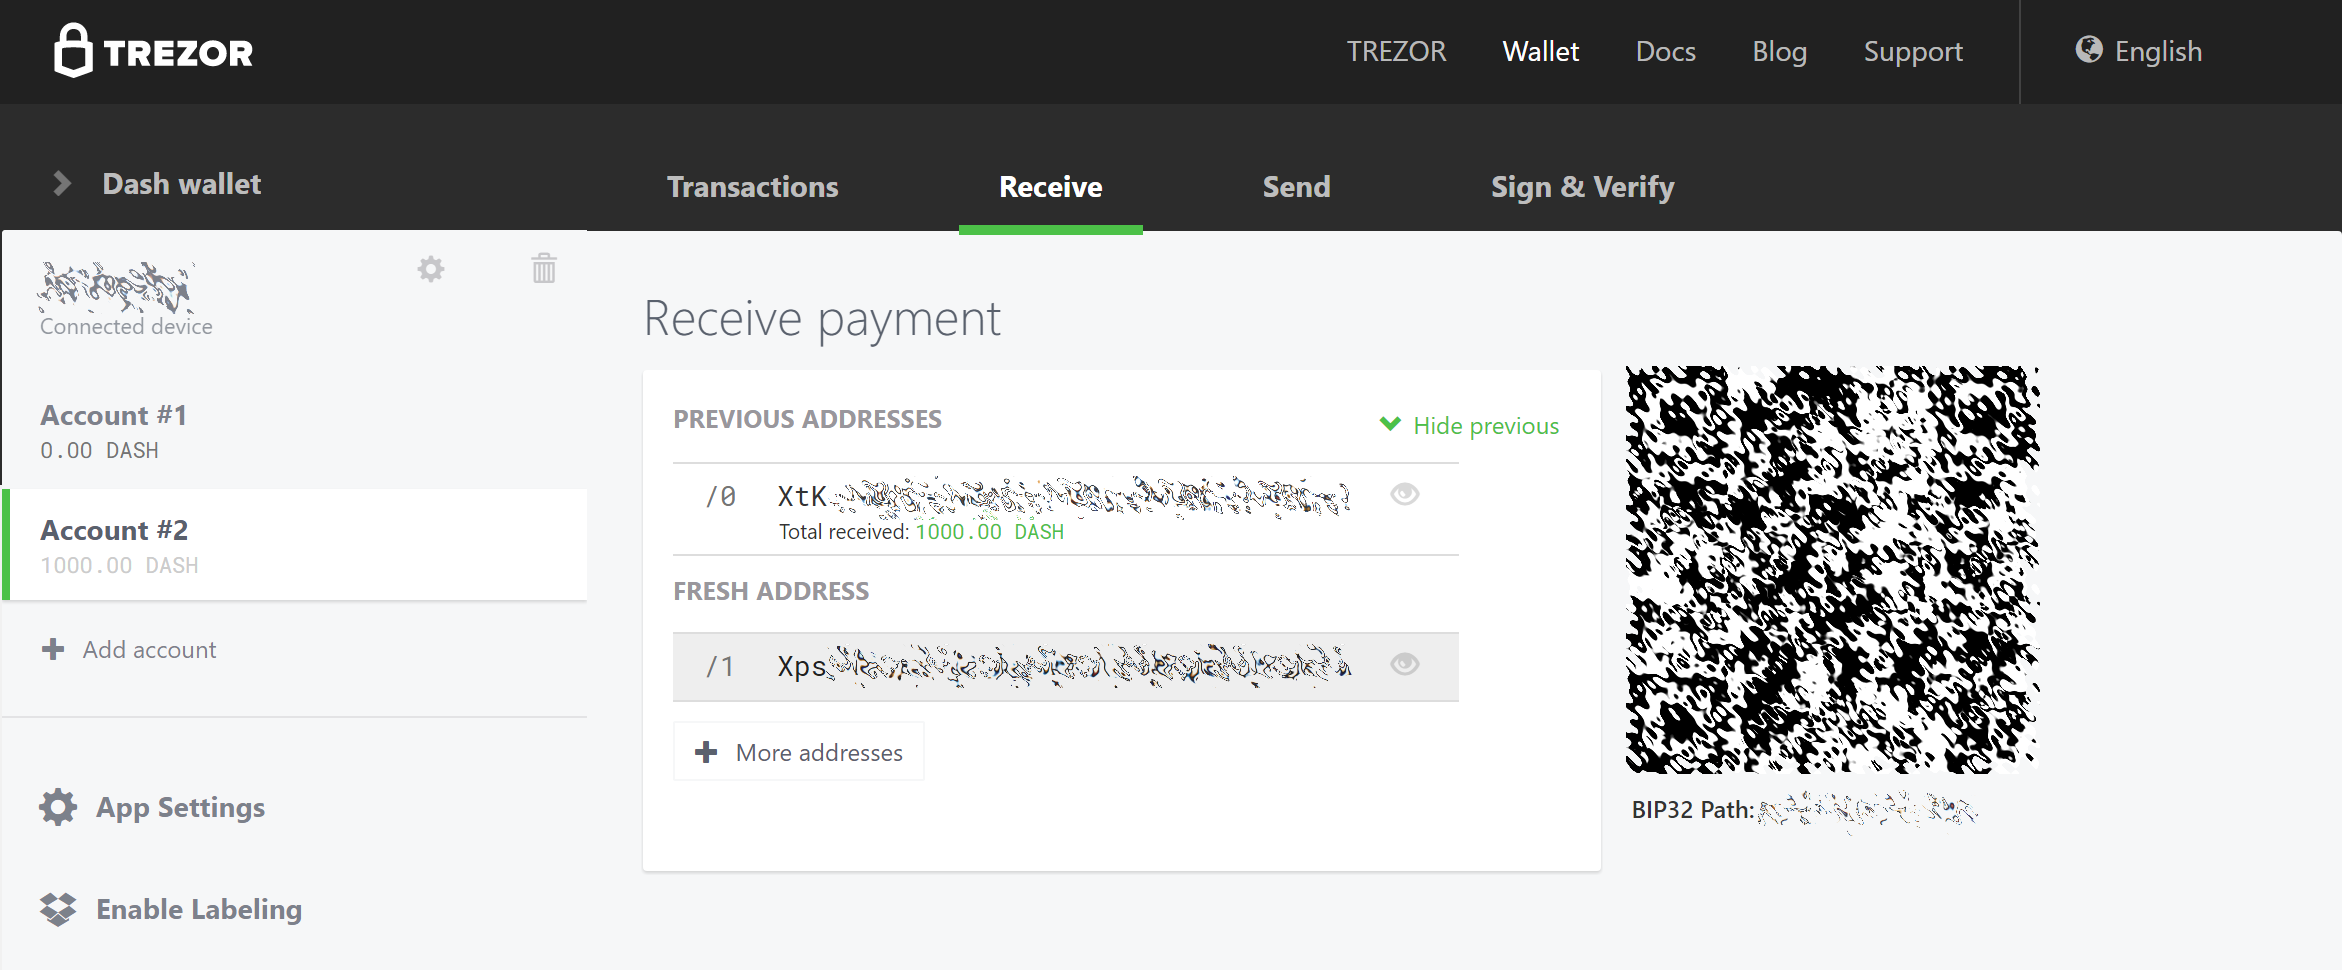
Wallet Receive tab showing successfully received collateral#
Когда транзакция появится, кликните на QR-код справа, чтобы увидеть транзакцию в блокчейне. Не закрывайте это окно, пока выполняете дальнейшие шаги, поскольку скоро нам понадобится подтвердить, что существует 15 подтверждений транзакции, как показано на скриншоте ниже.

Blockchain explorer showing 15 confirmations for collateral transfer#
Во время ожидания завершения 15 подтверждений, загрузите последнюю версию Dash Masternode Tool (DMT) со страницы релизов GitHub здесь. Распакуйте и запустите файл. Появится следующее окно.
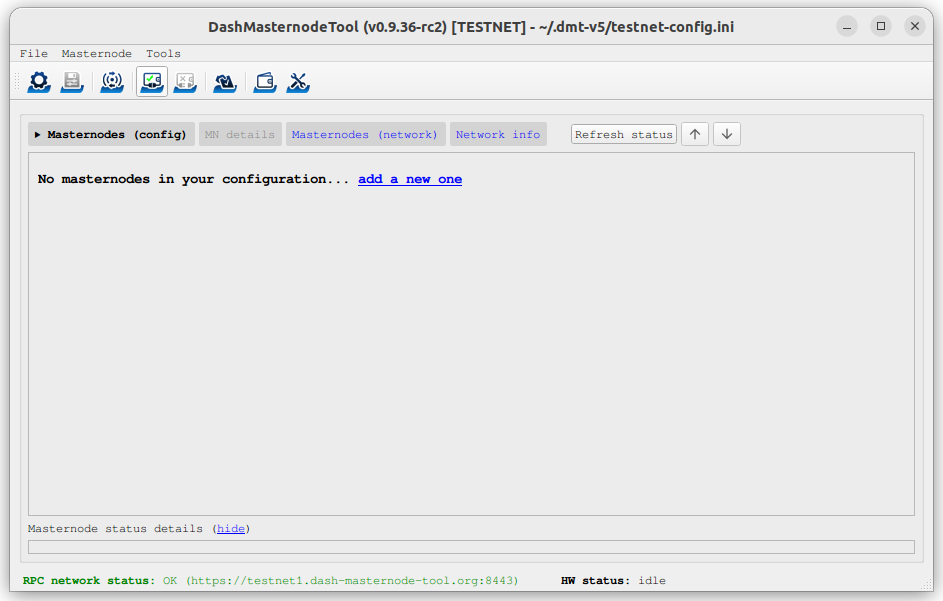
Экран запуска Dash Masternode Tool#
Click the third button from the left Check Dash Network Connection in the top left corner of the main window to verify that the connection is working. Then connect your Trezor device and click the next button Test Hardware Wallet Connection to verify the hardware wallet connection is working.
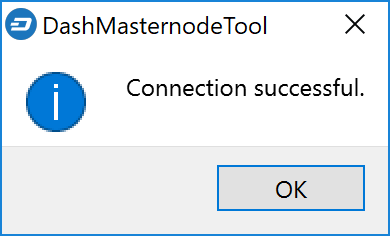
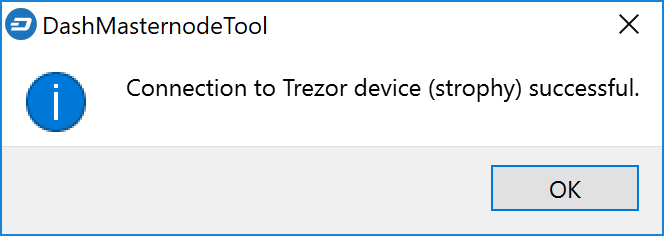
Подтверждения успешного соединения Dash Masternode Tool#
Теперь мы воспользуемся DMT для ввода основной информации о мастерноде2йце и извлечения идентификатора транзакции. Сначала нажмите кнопку add a new one или нажмите MN actions и выберите Add New Masternode Entry…. Выполните следующую последовательность действий, как показано на скриншоте:
Введите имя вашей мастерноды. Имя хоста, которое вы указали для VPS выше, является хорошим вариантом.
Выберите тип настраиваемой ноды.
Введите IP-адрес вашей ноды. Его вы получили от вашего VPS-провайдера во время настройки сервера. Затем введите номер TCP-порта, для основной сети должен быть использован порт 9999.
Нажмите Locate collateral, чтобы просмотреть неиспользованные операции по финансированию залога, доступные на подключенном аппаратном кошельке. Выберите адрес, на который был отправлен залог, и нажмите Apply. Поля Collateral address, path, Collateral TX hash и index заполнятся автоматически.
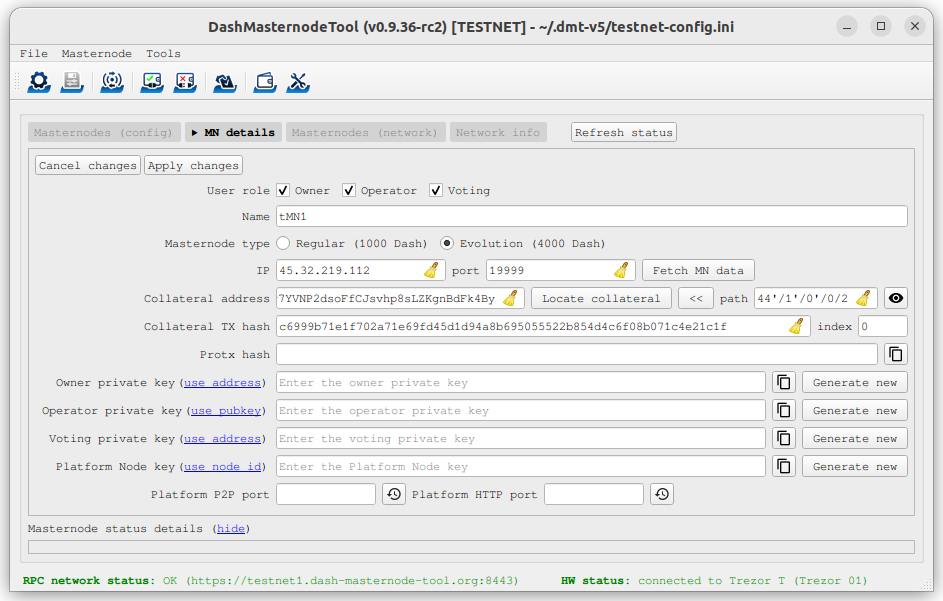
Dash Masternode Tool с конфигурацией ноды#
Оставьте DMT открытым и далее выполните следующий шаг: Установка программы.
Вариант 2: Обеспечение в кошельке Dash Core#
Внимание
Хранить обеспечение в кошельке Dash Core не рекомендуется. Использование аппаратного кошелька - настоятельно рекомендуется для повышения безопасности и защиты от взлома. Приступайте к использованию Dash Core, только если вы понимаете все риски.
Инструкции по обеспечению Dash Core
Откройте кошелёк Dash Core и дождитесь пока он синхронизируется с сетью. По завершении это должно выглядеть вот так:
Полностью синхрониируйте кошелёк Dash Core#
Кликните Окно > Консоль, чтобы открыть консоль. Чтобы сгенерировать новый адрес для обеспечения, введите в консоль эту команду:
getnewaddress
yiFfzbwiN9oneftd7cEfr3kQLRwQ4kp7ue
Обратите внимание на адрес обеспечения, так как позже он нам понадобится. Следующим шагом является защита вашего кошелька (если вы до сих пор этого не сделали). Сначала зашифруйте кошелёк щёлкнув Настройки > Зашифровать кошелёк. Необходимо использовать новый и сильный пароль, который вы нигде не использовали ранее. Запишите свой пароль и сохраните его в безопасном месте, в противном случае доступ к кошельку окажется заблокированным навсегда и вы потеряете доступ к своим средствам. Следующим шагом сделайте резервную копию файла вашего кошелька выбрав Файл > Сделать резервную копию кошелька. Сохраните файл в безопасном месте, физически отдельном от вашего компьютера, так это будет единственный вариант доступа к ваши средствам, если с вашим компьютером что-то случится. Для получения более детальной информации по этим шагам смотрите здесь.
Теперь одиночной транзакцией отправьте сумму, точно равную 4000 DASH на адрес учётной записи, который вы сгенерировали во время выполнения предыдущего шага. Эти деньги можно отправить как с другого кошелька, так и со средств, которые находятся на вашем текущем кошельке. Когда транзакция будет совершена, найдите её по адресу в обозревателе блокчейна и наблюдайте за ней. Прежде чем вы сможете зарегестрировать мастерноду, понадобится 15 подтверждений этой транзакции, но настройку на этом этапе можно продолжать, перейдя на следующий шаг: генерацию ключа оператора мастерноды.
Blockchain explorer showing 15 confirmations for collateral transfer#
Установка мастерноды#
Платформа Dash включает в себя множество сервисов, которые должны быть правильно сконфигурированы для корректной работы эвоноды. Для обеспечения работоспособности конфигурации рекомендуется использовать установку основанную на dashmate.
Установка dashmate#
Dashmate - это универсальный инструмент, предназначенный для настройки и запуска нод Dash в контейнерной среде. Он основан на технологии Docker и содержит интерактивную команду настройки. Dashmate выполняет установку Dash Core, а также всех зависимостей и вспомогательных сервисов. Более подробную информацию см. здесь документация dashmate.
Снова откройте PuTTY или консоль и подключитесь к серверу, используя имя пользователя и пароль, которые вы только что создали для нового пользователя, не являющегося пользователем root. Начните с установки зависимостей dashmate:
curl -fsSL https://get.docker.com -o get-docker.sh && sh ./get-docker.sh
sudo usermod -aG docker $USER
newgrp docker
Загрузите установочный пакет dashmate для вашей архитектуры процессора со страницы релизов на GitHub и установите его с помощью apt:
wget https://github.com/dashpay/platform/releases/download/v4.0.0/dashmate_4.0.0.9f9092cc91-1_amd64.deb
sudo apt update
sudo apt install ./dashmate_4.0.0.9f9092cc91-1_amd64.deb
Примечание
В конце процесса установки apt может выдать ошибку, связанную с установкой загруженного пакета. Вы можете проигнорировать это сообщение об ошибке:
N: Download is performed unsandboxed as root as file '/home/ubuntu/dashmate_4.0.0.9f9092cc91-1_amd64.deb' couldn't be accessed by user '_apt'. - pkgAcquire::Run (13: Permission denied)
Альтернативные варианты установки доступны на странице dashmate.
Продолжите выполнение шага регистрация для настройки обеспечения, ключей и создания транзакции ProTx, необходимой для активации вашей мастерноды.
Зарегистрируйте вашу мастерноду#
Ключи, необходимые для различных ролей мастерноды, кратко описаны в разделе Концепты мастернод данной документации.
Способ 1: Регистрация в аппаратном кошельке#
Вернитесь в DMT и убедитесь, что все поля предыдущего шага заполнены правильно. Нажмите кнопку Генерировать новые для приватных ключей, необходимых для мастерноды
Приватный ключ владельца
Приватный ключ оператора
Приватный ключ голосования
Приватный ключ ноды платформы (только для эвонод)
Для эвонод нажмите кнопку рядом с полями P2P-порт для платформы и HTTP-порт для платформы, чтобы установить значения по умолчанию.
После заполнения этих полей нажмите кнопку Применить изменения.
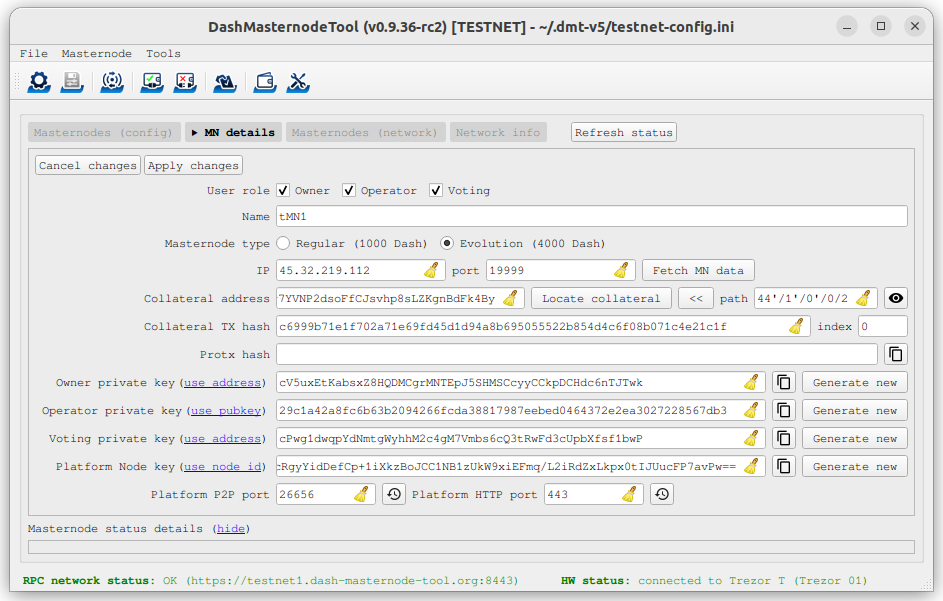
Dash Masternode Tool готов к регистрации новой мастерноды#
Затем нажмите Действия с МН и выберите Регистрация мастерноды. По желанию укажите другой Адрес выплаты и/или Вознаграждение оператора, затем нажмите Продолжить.
Важно
Для начального релиза Dash Platform рекомендуется назначить адрес выплаты из неаппаратного кошелька, например Dash Core. В настоящее время Dash Masternode Tool не поддерживает процесс вывода кредитов, который будет использоваться для перевода вознаграждений Dash Platform.
Выберите Удаленный RPC-узел Dash (автоматический метод). (Подробные сведения об использовании собственного локального узла RPC см. в документации по инструменту Dash Masternode Tool <Bertrand256/dash-masternode-tool>`__). Подтвердите следующие два сообщения:

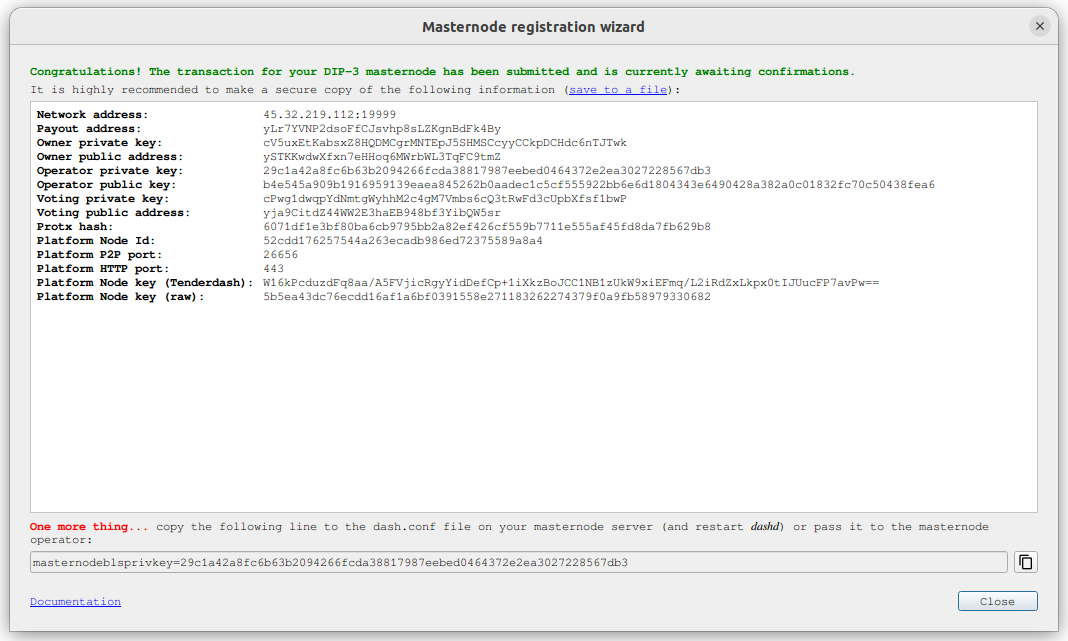
Запрашивающие подтверждение диалоги в Dash Masternode Tool для регистрации мастерноды#
Завершение конфигурации сервера#
На этом регистрация мастерноды завершена, но необходимо добавить приватный ключ BLS на сервер, чтобы он мог начать работу. Ключ BLS позволяет мастерноде следить за блокчейном на предмет соответствующих транзакций Pro*Tx, и она начнет работать в качестве мастерноды, когда подписанная ProRegTx будет транслироваться владельцем, как мы только что сделали выше.
Запишите свой приватный ключ BLS, а затем выполните соответствующие инструкции ниже.
Dashmate#
Для мастернод на базе dashmate введите приватный ключ BLS в процессе начальной настройки dashmate. Запустите мастер настройки dashmate на вашем сервере:
dashmate setup
Выберите сеть и тип мастерноды. Выберите Yes в ответ на вопрос, зарегистрирована ли уже ваша мастернода, поскольку это было сделано ранее в данном разделе.
Введите приватный BLS ключ и ключ ноды платформы из DMT по запросу dashmate.
Dashmate автоматически определит внешний IP-адрес и выберет порты по умолчанию для настраиваемой сети. При необходимости можно изменить эти значения, но, как правило, следует использовать значения по умолчанию.
После успешного завершения работы мастера dashmate запустите ноду следующим образом:
dashmate start
Вы можете управлять статусом, конфигурацией и рабочим состоянием мастерноды полностью из dashmate. Подробности см. в документе dashmate документация по работе с нодами.
Способ 2: Регистрация в dashmate#
Внимание
Для мастернод основной сети настоятельно рекомендуется хранить обеспечение на аппаратном кошельке и использовать Dash Masternode Tool для регистрации, как описано в Вариант 1: Регистрация с аппаратного кошелька.
Dashmate может помочь в регистрации мастернод, запросив параметры, необходимые для создания корректной команды protx, которая может быть отправлена из Dash Core. Эта опция наиболее полезна для настройки мастернод тестовой сети, где обеспечение хранится в Dash Core, а не в аппаратном кошельке.
Сбор необходимой информации#
Перед запуском мастера настройки dashmate необходимо получить информация o транзакции обеспечения и адреса владельца, голосования и выплат для новой эвоноды. Например, используйте Dash Core для генерации адресов, как описано в разделе Получение адресов мастернод.
Запустите мастер настройки#
Чтобы начать настройку мастерноды, выполните команду dashmate setup для запуска интерактивного мастера:
dashmate setup
Вам будет предложено выбрать сеть, тип ноды, IP-адрес и приватныйключ BLS. При настройке незарегистрированной мастерноды вам также будет предложено ввести информацию о транзакции залога и адреса владельца, голосования и выплат.
Введите запрашиваемую информацию или примите найденные/ сгенерированные значения по умолчанию. Пример, показывающий все шаги мастера настройки, приведен в разделе секция dashmate.
Отправить ProRegTx#
Мастер dashmate выдаст команду, которую можно использовать для отправки специальной транзакции регистрации провайдера, регистрирующей мастерноду в сети. Скопируйте предоставленную команду protx и запустите ее с помощью dash-cli или консоли Dash Core.
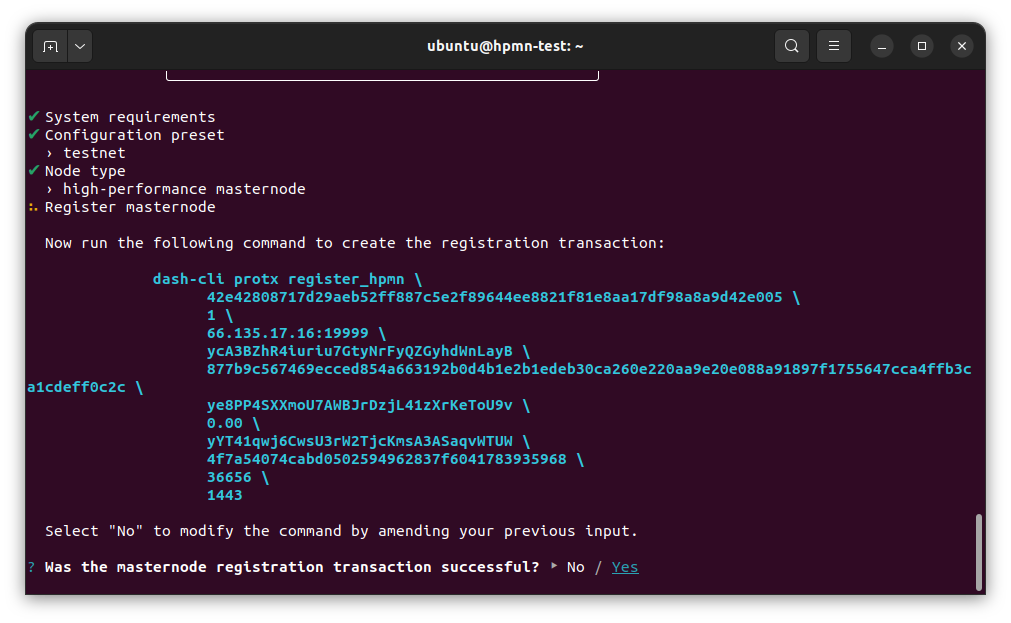
Команда регистрации#
Запустите ноду#
После успешного завершения работы мастера dashmate запустите ноду следующим образом:
dashmate start
Вы можете управлять статусом, конфигурацией и рабочим состоянием мастерноды полностью из dashmate. Подробности см. в документе dashmate документация по работе с нодами.
Способ 3: Регистрация в кошельке Dash Core#
Внимание
Для мастернод основной сети настоятельно рекомендуется хранить обеспечение на аппаратном кошельке и использовать Dash Masternode Tool для регистрации, как описано в Вариант 1: Регистрация с аппаратного кошелька.
Если вы предпочитаете управлять обеспечением и ключами с помощью Dash Core, в следующих разделах показано, как генерировать и получать информацию, которая может потребоваться dashmate или Dash Masternode Tool.
Идентификация транзакции финансирования#
Если для совершения залоговой транзакции вы использовали адрес кошелька Dash Core, то теперь необходимо найти txid этой транзакции. Кликните Окно > Консоль и введите следующую команду:
masternode outputs
Консоль должна вернуть строку символов, аналогичную этой:
{
"16347a28f4e5edf39f4dceac60e2327931a25fdee1fb4b94b63eeacf0d5879e3-1",
}
Первая длинная строка - это хеш вашей транзакции, последние цифры в ней - это индекс обеспечения.
Генерация пары BLS-ключей#
Для работы мастерноды требуется пара открытый/закрытый ключ BLS. Закрытый ключ указывается на самой ноде и позволяет включить его в детерминированный список узлов после создания транзакции регистрации провайдера с соответствующим открытым ключом.
Если вы пользуетесь услугами хостинга, они могут предоставить вам свой открытый ключ, и вы можете пропустить этот шаг. Если вы размещаете свой собственную мастернод или согласились предоставить хостеру закрытый ключ BLS, можно сгенерировать пару открытый/закрытый ключ BLS в Dash Core, нажав Window > Tools и введя следующую команду:
bls generate

{
  "secret": "6d93ececa9993d9f1de4f3ae837115442a48a8e4c757ebb6261090af2f57547b",
  "public": "b4dfbe01becd50c9d754c3b87f9d6728f3bff30b8b820f894e1fd249fd11aa27b0b4145ad550cbc35e9796e60329ad0a",
  "scheme": "basic"
}
Предупреждение
Эти ключи НЕ хранятся в кошельке, их необходимо сохранить и хранить в безопасности.
Генерация ID ноды платформы#
Следующая команда сгенерирует новый P2P-ключ с помощью Tenderdash и выведет его на экран:
docker run --entrypoint /usr/bin/tenderdash --rm -ti dashpay/tenderdash gen-node-key

{"id":"1e8e241c05ca350c8fe0b8ba4680e7652673dae2","priv_key": ...
Сохраните значение, содержащееся в поле id, для использования в качестве platformNodeID.
В качестве альтернативы можно использовать следующие команды: сгенерировать P2P-ключ, сохранить его в файле privkey.pem и сгенерировать platformNodeID в HEX формате:
openssl genpkey -algorithm ed25519 -out privkey.pem
openssl pkey -in privkey.pem -noout  -text_pub |tail -n +3 | tr -d '[:space:]' | xxd -r -p| sha256sum | head -c 40

1e8e241c05ca350c8fe0b8ba4680e7652673dae2
Предупреждение
Эти ключи НЕ хранятся в кошельке, их необходимо сохранить и хранить в безопасности.
Получение адресов мастернод#
Адрес владельца#
Во-первых, нам необходимо получить из кошелька новый, неиспользуемый адрес, который будет служить адресом ключа владельца (ownerKeyAddr). Это не то же самое, что адрес обеспечения, на котором хранится 4000 Dash. Сгенерируйте новый адрес следующим образом:
getnewaddress

yfgxFhqrdDG15ZWKJAN6dQvn6dZdgBPAip
Адрес голосующего#
Этот адрес также может быть использован в качестве адреса ключа голосования (votingKeyAddr). В качестве альтернативы можно указать адрес, предоставленный Вам выбранным Вами делегатом голосования, или просто сгенерировать новый адрес ключа голосования следующим образом:
getnewaddress

yfRaZN8c3Erpqj9iKnmQ9QDBeUuRhWV3Mg
Адрес для выплат#
Затем либо сгенерируйте, либо выберите из существующих второй адрес для получения платежей владельца мастерноды (payoutAddress). Также возможно использовать адрес внешнего кошелька:
getnewaddress

yjZVt49WsQd6XSrPVAUGXtJccxviH9ZQpN
Обновление Core-only Эвоноды#
Существует три варианта обновления существующей эвоноды с поддержкой только Core до поддержки Platform. Пожалуйста, выберите подходящий для вас вариант:
Upgrade an existing dashmate node. If you already have a dashmate-based evonode that meets the minimum system requirements, you just need to update dashmate and obtain SSL certificates. You can upgrade from dashmate v1.0.
Установка ноды dashmate на новом хосте. Если вы используете evonode с dashd на хосте, который не соответствует минимальным системным требованиям, мы рекомендуем создать новый сервер и перенести на него вашу эвоноду. При оценке этого варианта учитывайте следующие детали:
Вам нужно будет настроить новый сервер и поддерживать существующий и новый серверы в рабочем состоянии, пока Core синхронизируется на новом сервере.
Вы должны иметь возможность перенести свой текущий публичный IP на новый сервер или обновить IP-адрес с помощью обновления ProUpServTx.
Ваша действующая нода будет продолжать работать, пока вы настраиваете новый сервер, поэтому любые проблемы с новой нодой не повлияют на существующую.
Это хорошая возможность обновить ОС и программное обеспечение до актуальных версий.
Установите ноду dashmate на существующем хостинге. Если вы предпочитаете установить dashmate на том же сервере, что и существующая нода, убедитесь, что у вас достаточно места на диске для одновременного хранения двух копий блокчейна Core во время миграции (примерно 10 минут).
Предварительные условия#
ARM64 или x86-64 Linux-хост (рекомендуется Ubuntu), отвечающий минимальным требованиям.
Публичные IPv4 адреса
Конфигурация сети (брандмауэр, группы безопасности), дающая публичный доступ к следующим TCP-портам:
9999/tcp
443/tcp
26656/tcp
80/tcp (required for Let’s Encrypt or ZeroSSL certificate validation)
Резервное копирование всех существующих данных конфигурации Dash Core и dashmate, включая приватные ключи
An email address for Let’s Encrypt certificate registration, or a ZeroSSL API access key, or an SSL certificate for the public IPv4 address (not DNS name)
SSL certificates#
An SSL certificate is required for your evonode to communicate securely with the Dash Platform network. There are three ways to get SSL certificates:
Let’s Encrypt (recommended). Let’s Encrypt is a free, automated certificate authority that provides SSL certificates at no cost and with no account registration required. Dashmate has built-in support for obtaining and automatically renewing these Let’s Encrypt short-lived (160 hour) certificates. All you need is an email address for certificate expiry notifications.
During
dashmate setup, select Let’s Encrypt as the SSL provider and enter your email address when prompted. Dashmate will handle the rest, including automatic renewal before certificates expire.Примечание
Let’s Encrypt requires port 80/tcp to be open for the ACME HTTP-01 challenge used to validate your server’s IP address during certificate issuance and renewal.
ZeroSSL. ZeroSSL provides an API that allows dashmate to obtain and update your certificates automatically. The free plan provides 3 free certificates (or 3 renewals of 1 certificate). Other plans require paying with a credit card. You can get an API key for dashmate by completing the following steps:
Зарегистрируйтесь на сайте https://zerossl.com/. Мы рекомендуем не использовать ваш личный адрес электронной почты.
Войдите в систему и нажмите
Разработчикна левой боковой панели.Скопируйте свой API-ключ ZeroSSL чтобы позже вставить его в dashmate. Не создавайте «Новый сертификат».

Вкладка ZeroSSL Developer, показывающая ключ API#
Manual certificate upload. Obtain SSL certificates for your IP address using any available provider and upload the certificate files to your server. SSL Dragon and SuperbitHost are two options that accept cryptocurrency.
Убедитесь, что файл цепочки сертификатов содержит сертификат вашего сервера в верхней части и промежуточные/корневые сертификаты, если они присутствуют. Если файл пакета присутствует, необходимо объединить его с файлом сертификата:
cat certificate.crt bundle.crt > bundle.crt
Проверьте действительность приватного ключа и цепочки сертификатов, выполнив следующие команды:
openssl rsa -noout -modulus -in private.key | openssl md5
openssl x509 -noout -modulus -in bundle.crt | openssl md5
Результат выполнения этих двух команд должен быть одинаковым.