Masternode Setup#
Cài đặt một masternode cần một mức độ hiểu biết cơ bản về Linux và công nghệ blockchain, cũng như khả năng làm theo các hướng dẫn một cách chính xác. Nó cũng cần phải thường xuyên bảo trì và bảo mật một cách cẩn thận, đặc biệt là nếu bạn không giữ Dash trong một ví phần cứng. Cần phải ra một số quyết định trong quá trình thực hiện, và một số bước bổ sung để tăng cường tính bảo mật.
Có các dịch vụ lưu trữ masternode nếu bạn thích việc uỷ nhiệm việc vận hành hàng ngày masternode của bạn cho những nhà vận hành chuyên nghiệp. Khi sử dụng dịch vụ lưu trữ, bạn vẫn giữ toàn quyền kiểm soát 1000 Dash đặt cọc và trả mức thoả thuận tương ứng với phần trăm của phần thưởng cho người vận hành. Bạn cũng có thể uỷ quyền bỏ phiếu cho một người đại diện, xem trong tài liệu về quản trị để biết thêm thông tin.
Trước khi bạn bắt đầu#
Hướng dẫn này giả định rằng bạn thiết lập một masternode riêng trên mạng chính lần đầu tiên. Nếu bạn đang cập nhật một masternode, hãy xem ở đây. Bạn cũng cần:
1000 Dash
Một ví để chứa Dash của bạn, tốt nhất là dùng một ví phần cứng, mặc dù ví Dash Core cũng có thể giúp bạn
Một máy chủ Linux, một máy chủ ảo (VPS) thì hay hơn
For information about hosted masternodes, see the documentation listed below:
Thông tin cho người dùng hoặc dùng dịch vụ lưu trữ masternode
:ref:`Thông tin dành cho người vận hành dịch vụ lưu trữ masternode <operator-transactions>
This documentation describes the commands as if they were entered in the Dash
Core GUI by opening the console from Window > Console, but the same result
can be achieved on a masternode by entering the same commands and adding the
prefix ~/.dashcore/dash-cli to each command.
Server configuration#
Proper server configuration is essential to successful masternode operation for both security and performance reasons. Refer to the Server configuration page for details on preparing your server to host a masternode.
Gửi khoản đặt cọc#
A Dash address with a single unspent transaction output (UTXO) of exactly 1000 DASH is required to operate a masternode. Once it has been sent, various keys regarding the transaction must be extracted for later entry in a configuration file and registration transaction as proof to write the configuration to the blockchain so the masternode can be included in the deterministic list.
A masternode can be registered from a hardware wallet, the official Dash Core wallet, or a Dash Electrum wallet, although a hardware wallet is highly recommended to enhance security and protect yourself against hacking. This guide will describe the steps for both hardware wallets and Dash Core.
Ghi chú
Details of registering a masternode with Dash Electrum can be found on the Electrum - Advanced Functions page.
Tuỳ chọn 1: Gửi từ một ví phần cứng#
Set up your Trezor using the Trezor wallet at https://wallet.trezor.io/ and send a test transaction to verify that it is working properly. For help on this, see this guide - you may also choose to (carefully!) add a passphrase to your Trezor to further protect your collateral. Create a new account in your Trezor wallet by clicking Add account. Then click the Receive tab and send exactly 1000 DASH to the address displayed. If you are setting up multiple masternodes, send 1000 DASH to consecutive addresses within the same new account. You should see the transaction as soon as the first confirmation arrives, usually within a few minutes.

Wallet Receive tab showing successfully received collateral of 1000 DASH#
Once the transaction appears, click the QR code on the right to view the transaction on the blockchain. Keep this window open as we complete the following steps, since we will soon need to confirm that 15 confirmations exist, as shown in the following screenshot.
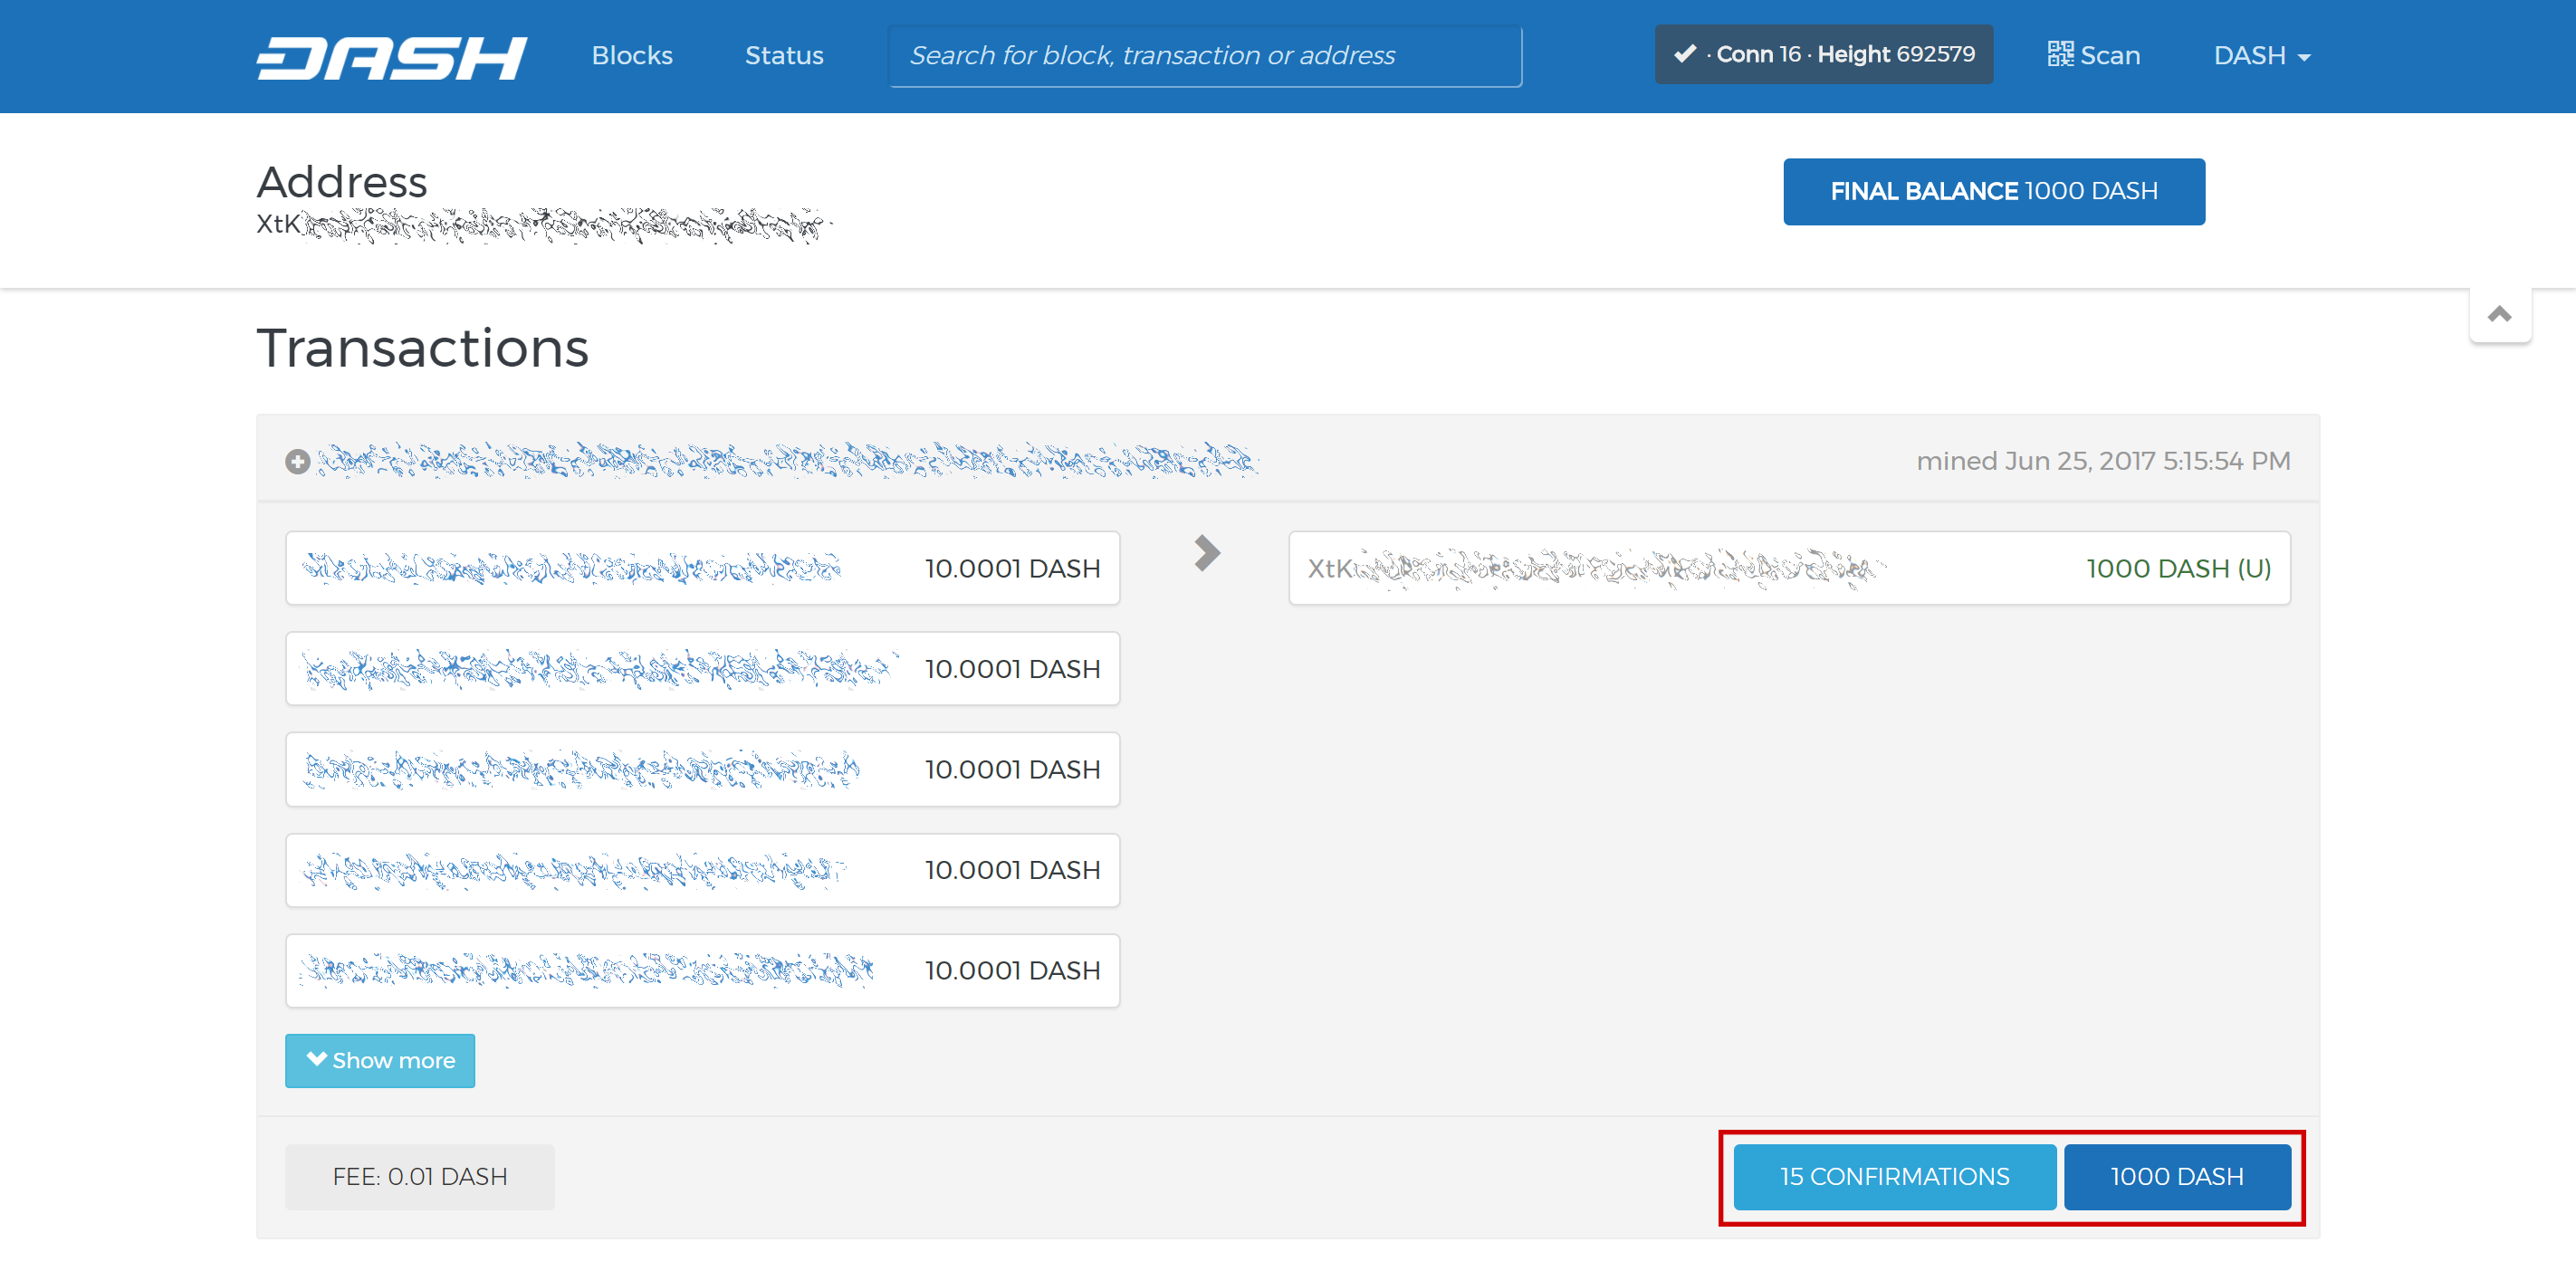
Blockchain explorer showing 15 confirmations for collateral transfer#
While we are waiting for 15 confirmations, download the latest version of the Dash Masternode Tool (DMT) from the GitHub releases page here. Unzip and run the file. The following window appears.

Màn hình khởi động của Dash Masternode Tool#
Click the third button from the left Check Dash Network Connection in the top left corner of the main window to verify that the connection is working. Then connect your Trezor device and click the next button Test Hardware Wallet Connection to verify the hardware wallet connection is working.
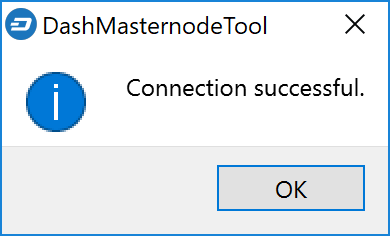
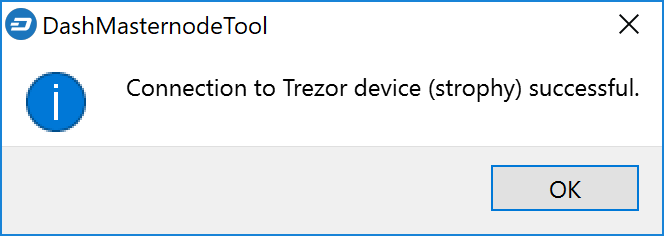
Dash Masternode Tool xác nhận kết nối thành công#
Bây giờ chúng ta sẽ sử dụng DMT để nhập vào một số thông tin căn bản về masternode và trích mã giao dịch. Thực hiện chuỗi các bước sau đây như trong ảnh chụp màn hình này:
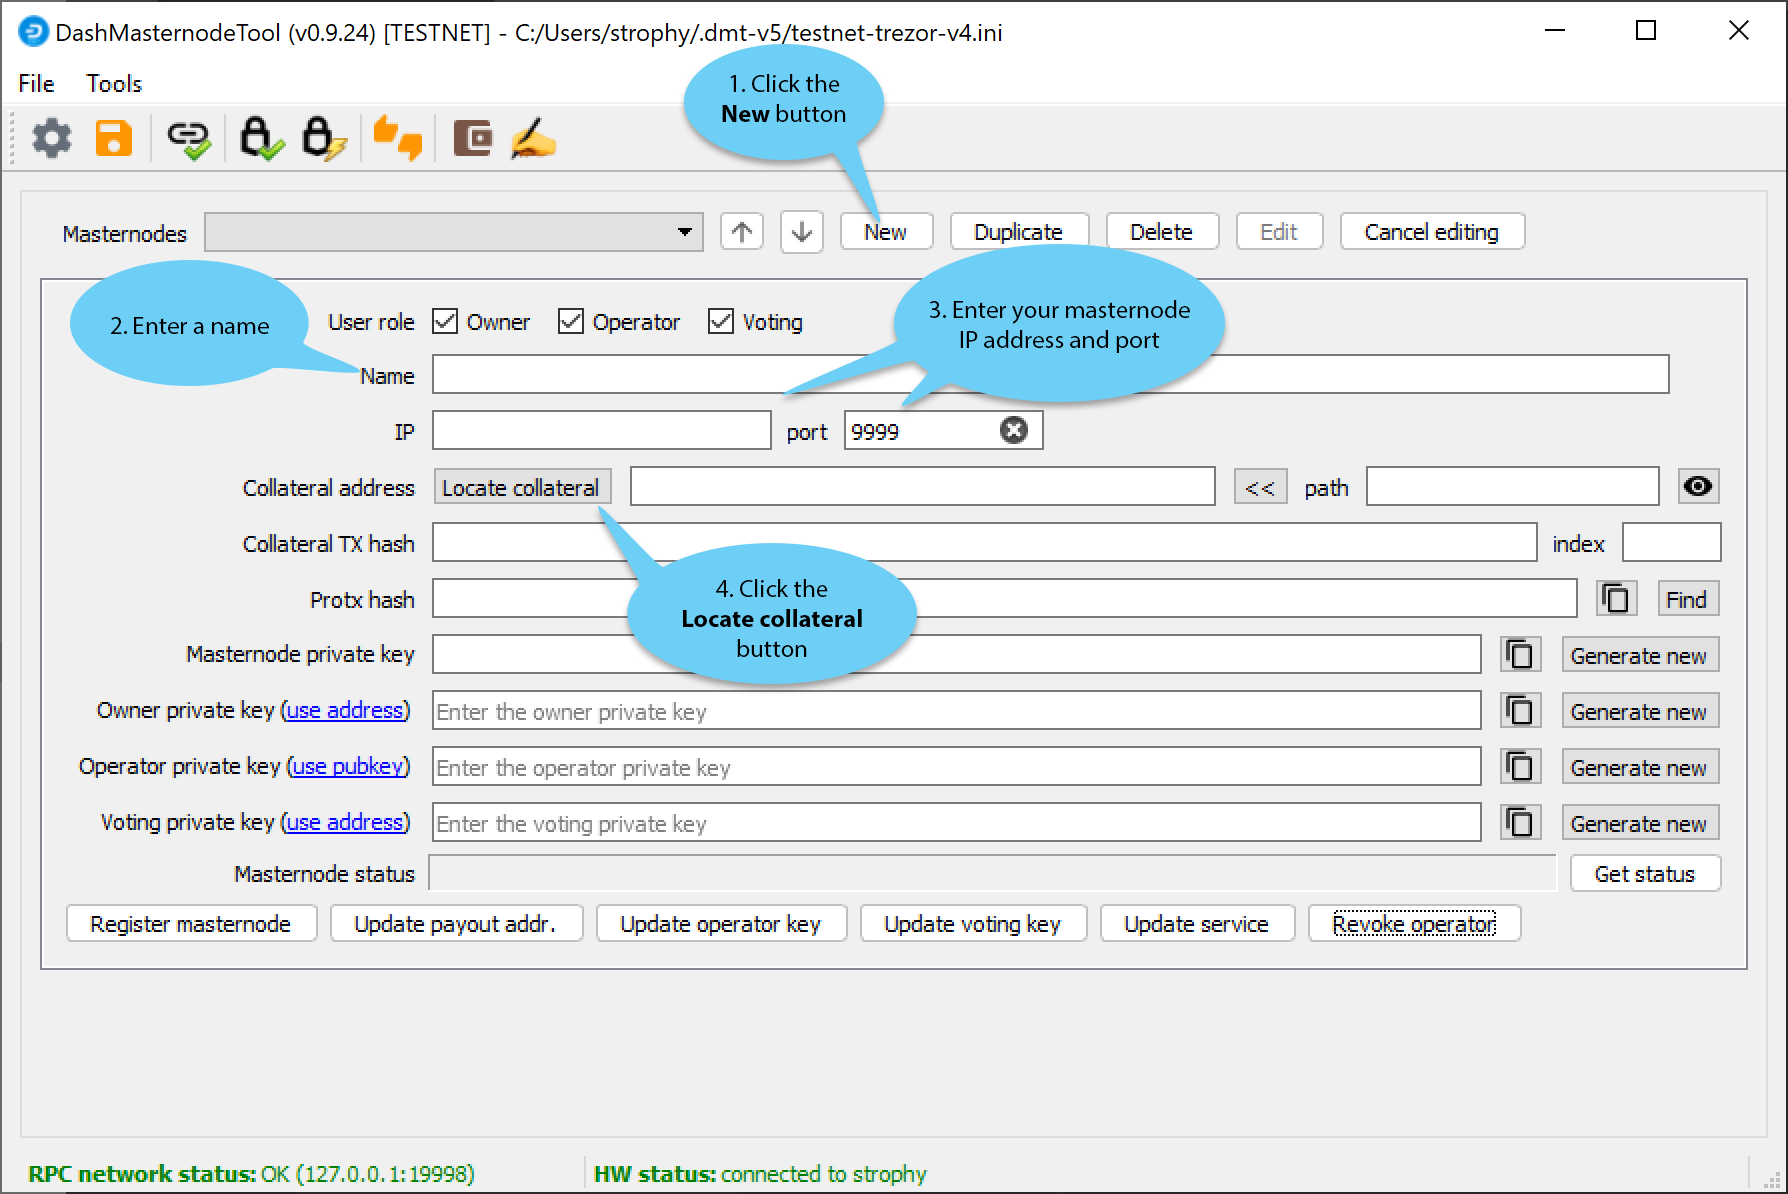
Các bước cấu hình Dash Masternode Tool#
Bấm nút New.
Nhập tên cho masternode của bạn. Bạn có thể dùng luôn tên máy chủ mà bạn xác định cho VPS ở trên.
Nhập vào địa chỉ IP masternode của bạn. Địa chỉ này được cung cấp cho bạn bởi nhà cung cấp VPS khi bạn cài đặt máy chủ. Sau đó nhập vào số cổng TCP. Nó sẽ là 9999.
Click Locate collateral to view unused collateral funding transactions available on the connected hardware wallet. Select the address to which you sent 1000 Dash and click Apply. The Collateral address, path, Collateral TX hash and index fields should be filled automatically.
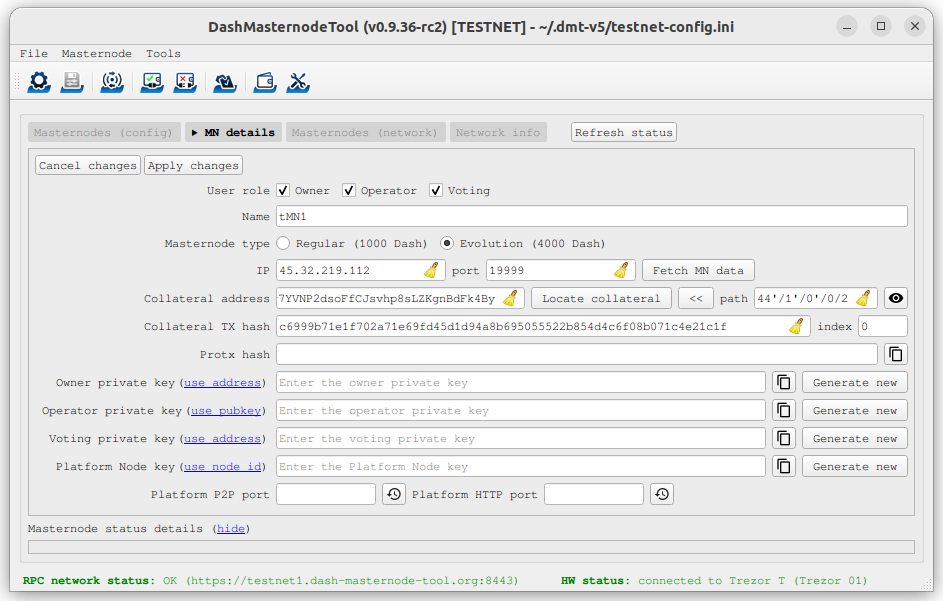
Dash Masternode Tool với cấu hình masternode#
Cứ để DMT mở và tiếp tục bước tiếp theo: Cài đặt Dash Core trên máy chủ ảo.
Tuỳ chọn 2: Gửi từ ví Dash Core#
Mở ví Dash Core và đợi cho nó đồng bộ với mạng lưới. Nó sẽ nhìn như thế này khi đã sẵn sàng:
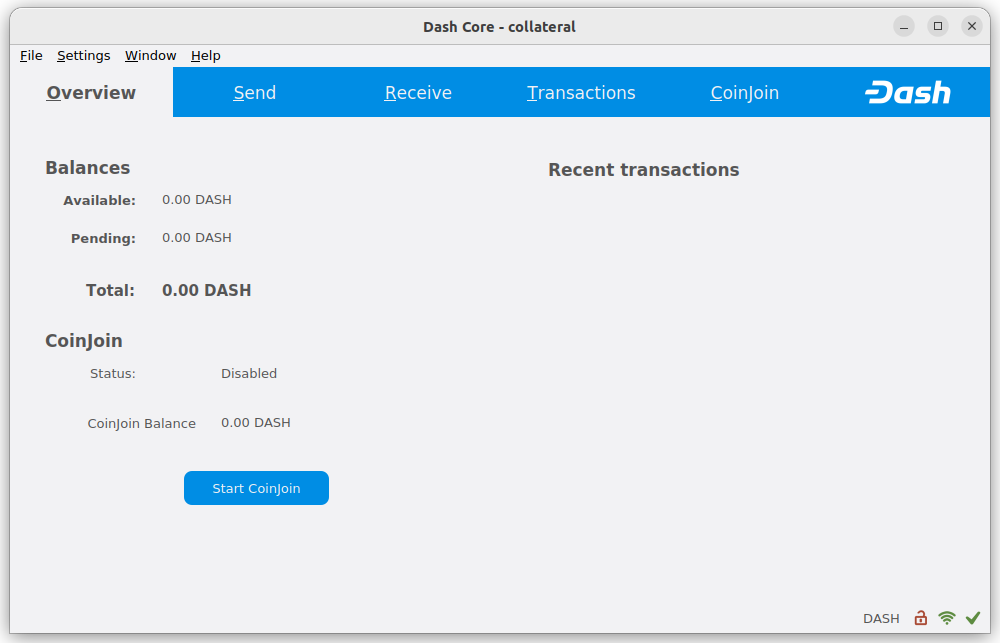
Ví Dash Core đã được đồng bộ xong#
Click Window > Console to open the console. Type the following command into the console to generate a new Dash address for the collateral:
getnewaddress
yiFfzbwiN9oneftd7cEfr3kQLRwQ4kp7ue
Take note of the collateral address, since we will need it later. The next step is to secure your wallet (if you have not already done so). First, encrypt the wallet by selecting Settings > Encrypt wallet. You should use a strong, new password that you have never used somewhere else. Take note of your password and store it somewhere safe or you will be permanently locked out of your wallet and lose access to your funds. Next, back up your wallet file by selecting File > Backup Wallet. Save the file to a secure location physically separate to your computer, since this will be the only way you can access our funds if anything happens to your computer. For more details on these steps, see here.
Now send exactly 1000 DASH in a single transaction to the new address you generated in the previous step. This may be sent from another wallet, or from funds already held in your current wallet. Once the transaction is complete, view the transaction in a blockchain explorer by searching for the address. You will need 15 confirmations before you can register the masternode, but you can continue with the next step at this point already: generating your masternode operator key.
Blockchain explorer showing 15 confirmations for collateral transfer#
Cài đặt phần mềm Dash Core#
Dash Core là phần mềm đằng sau cả ví đồ hoạ Dash Core và Dash masternode. Nếu không hiển thị một giao diện đồ họ, nó chạy ngầm như một dịch vụ trên máy chủ (dashd), được điều khiển bởi giao diện câu lệnh đơn giản (dash-cli).
Open PuTTY or a console again and connect using the username and password you just created for your new, non-root user. The following options are available for installing a Dash masternode:
Manual installation (this guide)
Manual installation#
To manually download and install the components of your Dash masternode,
visit the GitHub releases page
and copy the link to the latest x86_64-linux-gnu version. Go back to
your terminal window and enter the following command, pasting in the
address to the latest version of Dash Core by right clicking or pressing
Ctrl + V:
cd /tmp
wget https://github.com/dashpay/dash/releases/download/v23.1.7/dashcore-23.1.7-x86_64-linux-gnu.tar.gz
Verify the authenticity of your download by checking its detached signature against the public key published by the Dash Core development team. All releases of Dash since 0.16.0 are signed using GPG with the following key:
Pasta (pasta) with the key
5252 7BED ABE8 7984, verifiable on Keybase (download)
curl https://keybase.io/pasta/pgp_keys.asc | gpg --import
wget https://github.com/dashpay/dash/releases/download/v23.1.7/dashcore-23.1.7-x86_64-linux-gnu.tar.gz.asc
gpg --verify dashcore-23.1.7-x86_64-linux-gnu.tar.gz.asc
Tạo một thư mục làm việc cho Dash, gỡ nén file và copy các file cần thiết vào thu mục này:
mkdir ~/.dashcore
tar xfv dashcore-23.1.7-x86_64-linux-gnu.tar.gz
cp -f dashcore-23.1.7/bin/dashd ~/.dashcore/
cp -f dashcore-23.1.7/bin/dash-cli ~/.dashcore/
Tạo một file cấu hình sử dụng câu lệnh sau đây:
nano ~/.dashcore/dash.conf
An editor window will appear. We now need to create a configuration file specifying several variables. Copy and paste the following text to get started, then replace the variables specific to your configuration as follows:
#----
rpcuser=XXXXXXXXXXXXX
rpcpassword=XXXXXXXXXXXXXXXXXXXXXXXXXXXX
rpcallowip=127.0.0.1
#----
listen=1
server=1
daemon=1
#----
#masternodeblsprivkey=
externalip=XXX.XXX.XXX.XXX
#----
Thay những trường được đánh dâu với XXXXXXX như sau:
rpcuser: nhập vào bất kỳ xâu các chữ số hoặc chữ cái nào, không dùng các ký tự đặc biệtrpcpassword: nhập vào bất kỳ xâu các chữ số hoặc chữ cái nào, không dùng các ký tự đặc biệtexternalip: đây là địa chỉ IP của máy chủ của bạn
Leave the masternodeblsprivkey field commented out for now. The
result should look something like this:
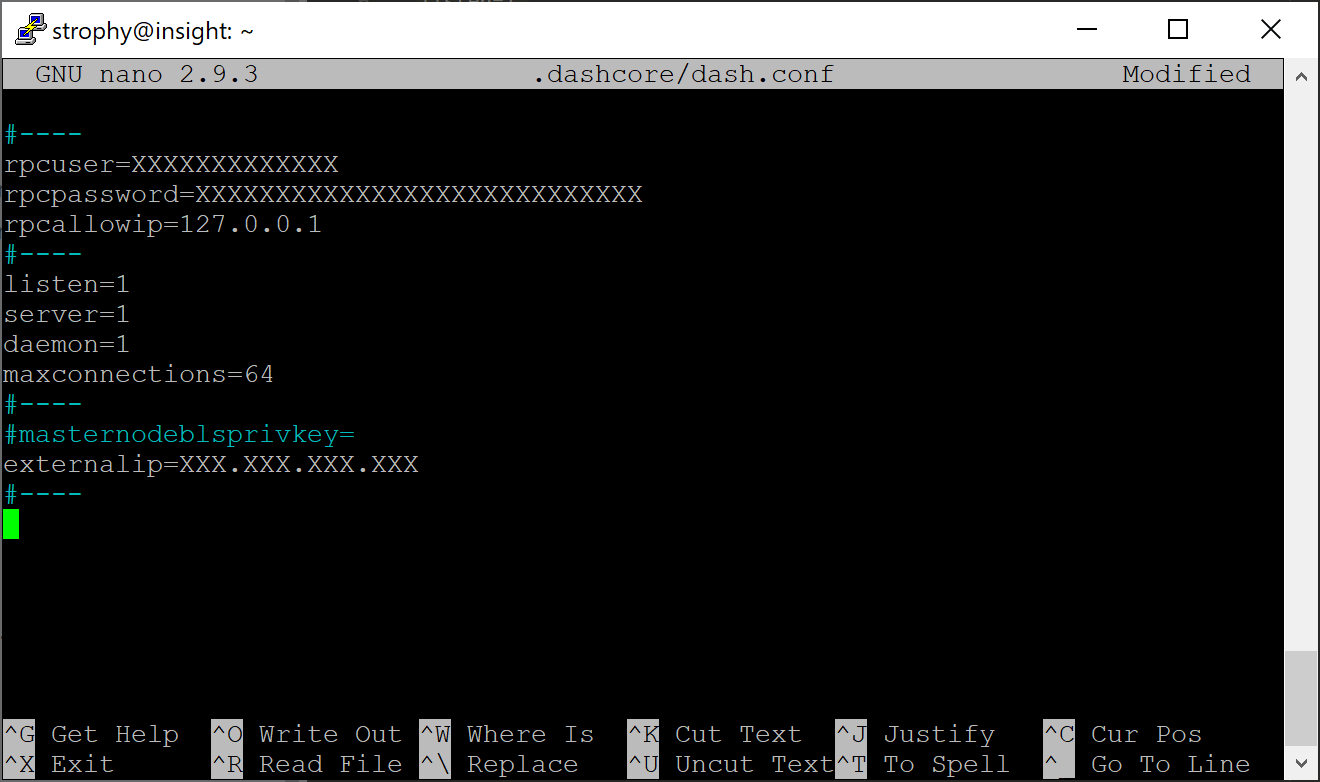
Nhập vào những dữ liệu quan trọng vào file dash.conf trên masternode#
Bấm tổ hợp phím Ctrl + X để đóng trình soạn thảo và Y và Enter để lưu file. Bây giờ bạn có thể bắt đầu chạy Dash trên masternode để bắt đầu đồng bộ blockchain:
~/.dashcore/dashd
You will see a message reading Dash Core server starting.
Add dashd to crontab to make sure it runs every minute to check on your masternode:
crontab -e
Choose nano as your editor and enter the following line at the end of the file:
* * * * * pidof dashd || ~/.dashcore/dashd
Press enter to make sure there is a blank line at the end of the file, then press Ctrl + X to close the editor and Y and Enter save the file. We now need to wait for 15 confirmations of the collateral transaction to complete, and wait for the blockchain to finish synchronizing on the masternode. You can use the following commands to monitor progress:
~/.dashcore/dash-cli mnsync status
Khi quá trình đồng bộ hoàn tất, bạn sẽ thấy những phản hồi như sau:
{
  "AssetID": 999,
  "AssetName": "MASTERNODE_SYNC_FINISHED",
  "AssetStartTime": 1558596597,
  "Attempt": 0,
  "IsBlockchainSynced": true,
  "IsSynced": true,
  "IsFailed": false
}
Tiếp tục với bước tiếp theo để thiết lâu giao dịch ProTx cần cho việc kích hoạt masternode của bạn.
Đăng ký masternode của bạn#
The three keys required for the different masternode roles are described briefly under Masternode Concepts in this documentation.
Tuỳ chọn 1: Đăng ký từ một ví phần cứng#
Go back to DMT and ensure that all fields from the previous step are still filled out correctly. Click Generate new for the three private keys required for a masternode:
Khoá riêng của chủ sở hữu
Khoá riêng của người vận hành
Khoá riêng bỏ phiếu
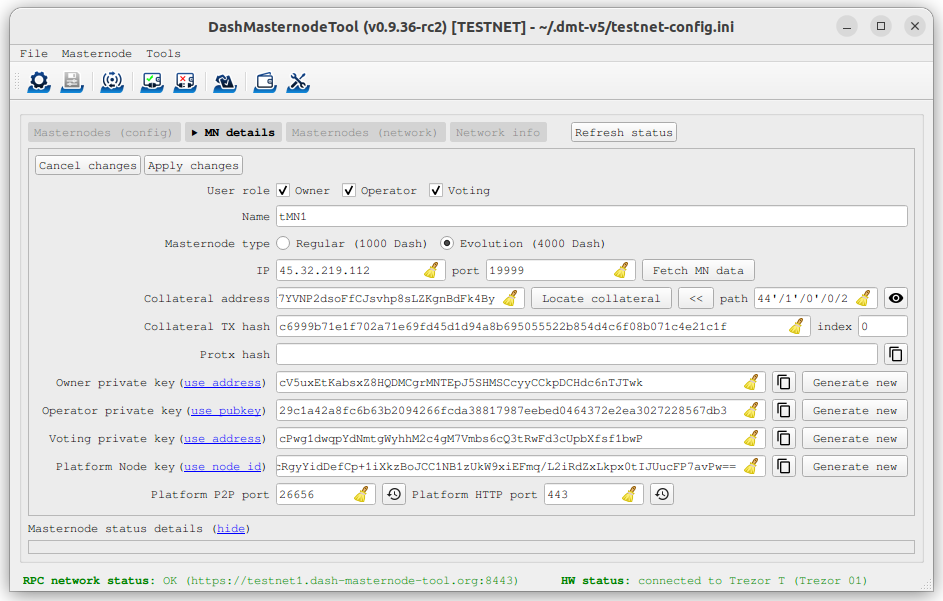
Dash Masternode Tool sẵn sàng cho việc đăng ký một masternode mới#
Then click Register masternode. Optionally specify a different Payout address and/or Operator reward, then click Continue. Select Remote Dash RPC Node (automatic method). (See here for documentation on using your own local RPC node.) and confirm the following two messages:

Các bảng hội thoại của Dash Masternode Tool xác nhận việc đăng ký một masternode#
The BLS private key must be entered in the dash.conf file on the
masternode. This allows the masternode to watch the blockchain for
relevant Pro*Tx transactions, and will cause it to start serving as a
masternode when the signed ProRegTx is broadcast by the owner, as we
just did above. Log in to your masternode using ssh or PuTTY and
edit the configuration file as follows:
nano ~/.dashcore/dash.conf
The editor appears with the existing masternode configuration. Add or uncomment this lines in the file, replacing the key with your BLS private key generated above:
masternodeblsprivkey=24c1fa3c22c6ea6b1cc68a37be18acb51042b19465fe0a26301c8717bf939805
Press enter to make sure there is a blank line at the end of the file,
then press Ctrl + X to close the editor and Y and Enter save
the file. Note that providing a masternodeblsprivkey enables
masternode mode, which will automatically force the txindex=1,
peerbloomfilters=1, and prune=0 settings necessary to provide
masternode service. We now need to restart the masternode for this
change to take effect. Enter the following commands, waiting a few
seconds in between to give Dash Core time to shut down:
~/.dashcore/dash-cli stop
sleep 15
~/.dashcore/dashd
At this point you can monitor your masternode by entering
~/.dashcore/dash-cli masternode status or using the Get status
function in DMT. The final result should appear as follows:
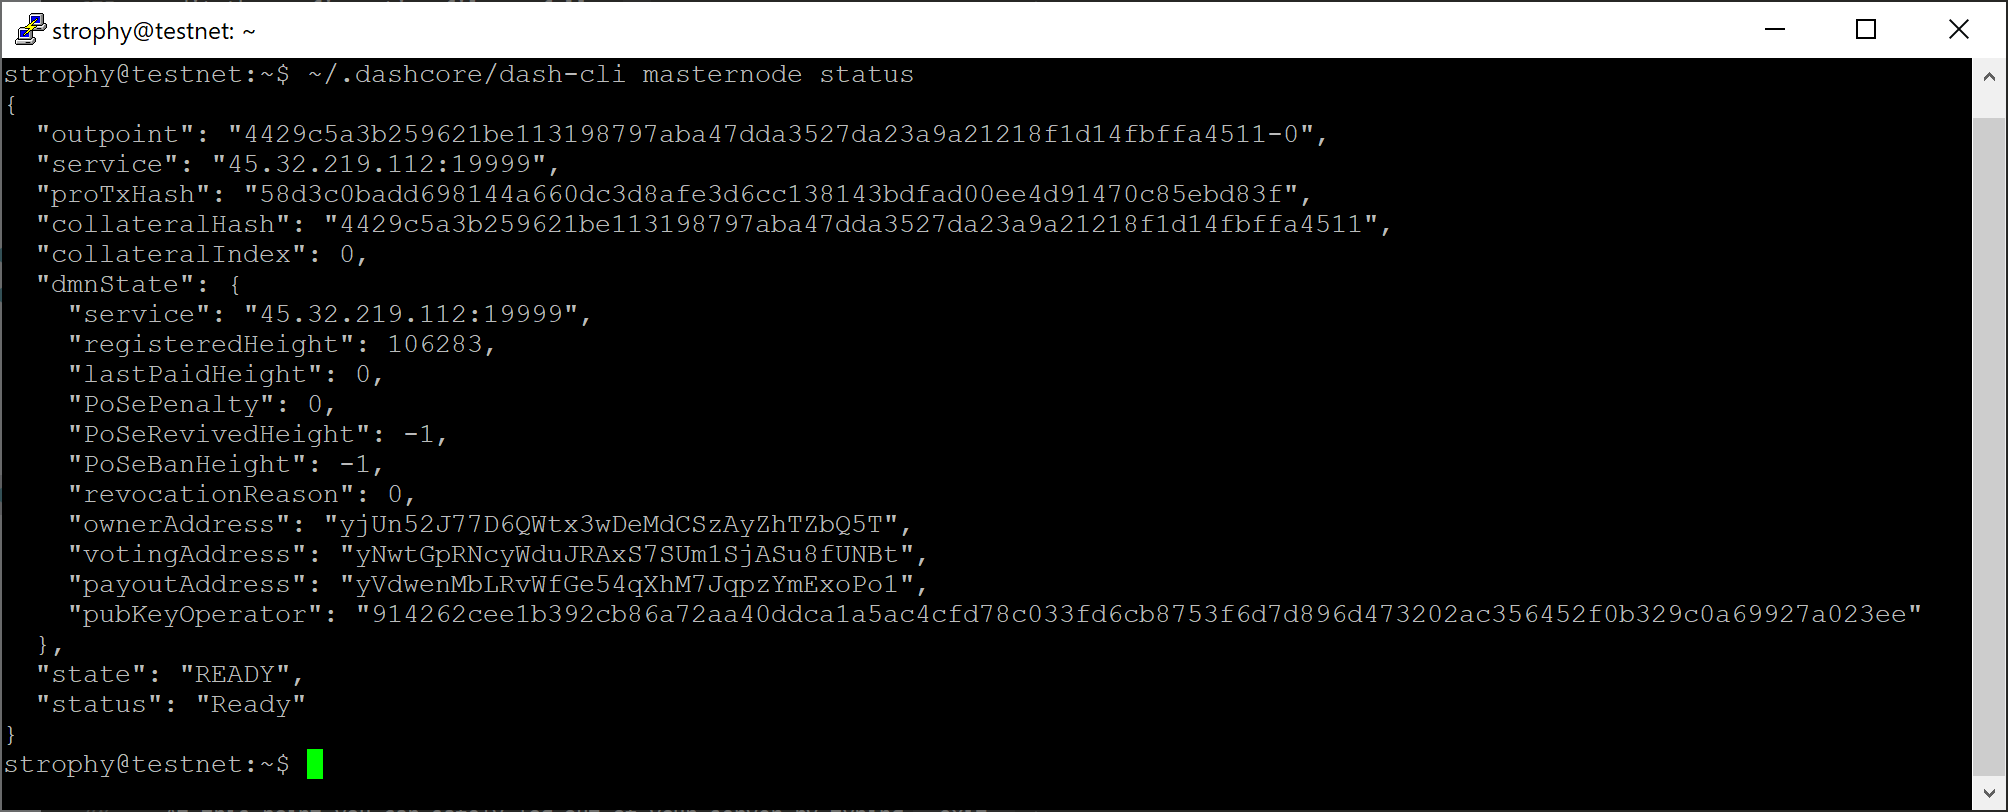
dash-cli masternode status output hiển thị masternode được đăng ký thành công#
Ở thời điểm này bạn có thể thoát khỏi máy chủ của bạn bằng việc gõ exit. Chúc mừng bạn! Masternode của bạn bây giờ đang được chạy.
Tuỳ chọn 2: Đăng ký từ ví Dash Core#
Xác định giao dịch cấp vốn#
If you used an address in Dash Core wallet for your collateral transaction, you now need to find the txid of the transaction. Click Window > Console and enter the following command:
masternode outputs
Điều này sẽ trả về một chuỗi các ký tự tương tự như sau
{
"16347a28f4e5edf39f4dceac60e2327931a25fdee1fb4b94b63eeacf0d5879e3-1",
}
Dòng dài đầu tiên là collateralHash của bạn, còn số cuối cùng là collateralIndex.
Sinh một cặp khoá BLS#
A public/private BLS key pair is required to operate a masternode. The private key is specified on the masternode itself, and allows it to be included in the deterministic masternode list once a provider registration transaction with the corresponding public key has been created.
If you are using a hosting service, they may provide you with their public key, and you can skip this step. If you are hosting your own masternode or have agreed to provide your host with the BLS private key, generate a BLS public/private keypair in Dash Core by clicking Tools > Console and entering the following command:
bls generate

{
  "secret": "395555d67d884364f9e37e7e1b29536519b74af2e5ff7b62122e62c2fffab35e",
  "public": "99f20ed1538e28259ff80044982372519a2e6e4cdedb01c96f8f22e755b2b3124fbeebdf6de3587189cf44b3c6e7670e",
  "scheme": "legacy"
}
Những khoá này KHÔNG được lưu trữ bởi ví mà phải giữ một cách bảo mật, tương tự như giá trị được cung cấp bởi câu lệnh masternode genkey trước đây
Thêm khoá riêng vào cấu hình masternode của bạn#
The public key will be used in following steps. The private key must be
entered in the dash.conf file on the masternode. This allows the
masternode to watch the blockchain for relevant Pro*Tx transactions, and
will cause it to start serving as a masternode when the signed ProRegTx
is broadcast by the owner (final step below). Log in to your masternode
using ssh or PuTTY and edit the configuration file as follows:
nano ~/.dashcore/dash.conf
The editor appears with the existing masternode configuration. Add or uncomment this line in the file, replacing the key with your BLS private key generated above:
masternodeblsprivkey=395555d67d884364f9e37e7e1b29536519b74af2e5ff7b62122e62c2fffab35e
Press enter to make sure there is a blank line at the end of the file,
then press Ctrl + X to close the editor and Y and Enter save
the file. Note that providing a masternodeblsprivkey enables
masternode mode, which will automatically force the txindex=1,
peerbloomfilters=1, and prune=0 settings necessary to provide
masternode service. We now need to restart the masternode for this
change to take effect. Enter the following commands, waiting a few
seconds in between to give Dash Core time to shut down:
~/.dashcore/dash-cli stop
sleep 15
~/.dashcore/dashd
Chúng ta sẽ chuẩn bị giao dịch được dùng để đăng ký masternode lên mạng.
Chuẩn bị cho một giao dịch ProRegTx#
A pair of BLS keys for the operator were already generated above, and
the private key was entered on the masternode. The public key is used in
this transaction as the operatorPubKey.
First, we need to get a new, unused address from the wallet to serve as
the owner key address (ownerKeyAddr). This is not the same as
the collateral address holding 1000 Dash. Generate a new address as
follows:
getnewaddress

yfgxFhqrdDG15ZWKJAN6dQvn6dZdgBPAip
This address can also be used as the voting key address
(votingKeyAddr). Alternatively, you can specify an address provided
to you by your chosen voting delegate, or simply generate a new voting
key address as follows:
getnewaddress

yfRaZN8c3Erpqj9iKnmQ9QDBeUuRhWV3Mg
Then either generate or choose an existing address to receive the
owner's masternode payouts (payoutAddress). It is also possible
to use an address external to the wallet:
getnewaddress

yjZVt49WsQd6XSrPVAUGXtJccxviH9ZQpN
You can also optionally generate and fund another address as the
transaction fee source (feeSourceAddress). If you selected an
external payout address, you must specify a fee source address.
Either the payout address or fee source address must have enough balance
to pay the transaction fee, or the register_prepare transaction will
fail.
The private keys to the owner and fee source addresses must exist in the wallet submitting the transaction to the network. If your wallet is protected by a password, it must now be unlocked to perform the following commands. Unlock your wallet for 5 minutes:
walletpassphrase yourSecretPassword 300
We will now prepare an unsigned ProRegTx special transaction using the
protx register_prepare command. This command has the following
syntax:
protx register_prepare collateralHash collateralIndex coreP2PAddrs ownerKeyAddr
  operatorPubKey votingKeyAddr operatorReward payoutAddress (feeSourceAddress)
Cảnh báo
Previously, protx register_prepare_legacy could be used to register a masternode with a legacy
scheme BLS key. The legacy commands were deprecated as of Dash Core v23.0, so it is now recommended
to generate a new basic scheme BLS key instead. This can be done by following the Generate a
BLS key pair instructions.
Open a text editor such as notepad to prepare this command. Replace each argument to the command as follows:
Ghi chú
As of Dash Core v23.0, the coreP2PAddrs field accepts backwards-compatible input.
collateralHash: Mã txid của giao dịch đặt cọc 1000 DashcollateralIndex: Chỉ số đầu ra của giao dịch cấp vốn 1000 DashcoreP2PAddrs: Array of masternode address(es), in the formatx.x.x.x:yyyyownerKeyAddr: Địa chỉ Dash mới được sinh ở trên cho địa chỉ sở hữu/bỏ phiếuoperatorPubKey: Khoá công khai BLS được sinh ở trên (hoặc được cung cấp bởi nhà cung cấp dịch vụ lưu trữ)votingKeyAddr: Địa chỉ Dash mới được sinh ở trên, hoặc địa chỉ uỷ nhiệm cho việc bỏ phiếu các đề xuấtoperatorReward: Phần trăm phần thưởng khối sẽ được trả cho người vận hànhpayoutAddress: Một địa chỉ mới hoặc cũ để nhận phần thưởng khối cho người chủ sở hữufeeSourceAddress: Một địa chỉ (tuỳ chọn) dùng để cấp vốn cho khoản phí ProTx. NếufeeSourceAddresskhông được cung cấp nó sẽ lấy tiền phí từ địa chỉpayoutAddress.
Note that the operator is responsible for specifying their own
reward address in a separate update_service
transaction if you specify a non-zero operatorReward. The owner of
the masternode collateral does not specify the operator's payout
address.
Ví dụ (hãy xoá các xuống dòng nếu copy):
protx register_prepare
  16347a28f4e5edf39f4dceac60e2327931a25fdee1fb4b94b63eeacf0d5879e3
  1
  '["45.76.230.239:19999"]'
  yfgxFhqrdDG15ZWKJAN6dQvn6dZdgBPAip
  99f20ed1538e28259ff80044982372519a2e6e4cdedb01c96f8f22e755b2b3124fbeebdf6de3587189cf44b3c6e7670e
  yfRaZN8c3Erpqj9iKnmQ9QDBeUuRhWV3Mg
  0
  yjZVt49WsQd6XSrPVAUGXtJccxviH9ZQpN
  yR83WsikBaBaNusTnHZf28kAcL8oVmp1TE
Đầu ra:
{
  "tx": "030001000175c9d23c2710798ef0788e6a4d609460586a20e91a15f2097f56fc6e007c4f8e0000000000feffffff01a1949800000000001976a91434b09363474b14d02739a327fe76e6ea12deecad88ac00000000d1010000000000e379580dcfea3eb6944bfbe1de5fa2317932e260acce4d9ff3ede5f4287a34160100000000000000000000000000ffff2d4ce6ef4e1fd47babdb9092489c82426623299dde76b9c72d9799f20ed1538e28259ff80044982372519a2e6e4cdedb01c96f8f22e755b2b3124fbeebdf6de3587189cf44b3c6e7670ed1935246865dce1accce6c8691c8466bd67ebf1200001976a914fef33f56f709ba6b08d073932f925afedaa3700488acfdb281e134504145b5f8c7bd7b47fd241f3b7ea1f97ebf382249f601a0187f5300",
  "collateralAddress": "yjSPYvgUiAQ9AFj5tKFA8thFLoLBUxQERb",
  "signMessage": "yjZVt49WsQd6XSrPVAUGXtJccxviH9ZQpN|0|yfgxFhqrdDG15ZWKJAN6dQvn6dZdgBPAip|yfRaZN8c3Erpqj9iKnmQ9QDBeUuRhWV3Mg|ad5f82257bd00a5a1cb5da1a44a6eb8899cf096d3748d68b8ea6d6b10046a28e"
}
Next we will use the collateralAddress and signMessage fields to
sign the transaction, and the output of the tx field to submit the
transaction.
Ký cho giao dịch ProRegTx#
We will now sign the content of the signMessage field using the
private key for the collateral address as specified in
collateralAddress. Note that no internet connection is required for
this step, meaning that the wallet can remain disconnected from the
internet in cold storage to sign the message. In this example we will
again use Dash Core, but it is equally possible to use the signing
function of a hardware wallet. The command takes the following syntax:
signmessage collateralAddress signMessage
Ví dụ:
signmessage yjSPYvgUiAQ9AFj5tKFA8thFLoLBUxQERb yjZVt49WsQd6XSrPVAUGXtJccxviH9ZQpN|0|yfgxFhqrdDG15ZWKJAN6dQvn6dZdgBPAip|yfRaZN8c3Erpqj9iKnmQ9QDBeUuRhWV3Mg|ad5f82257bd00a5a1cb5da1a44a6eb8899cf096d3748d68b8ea6d6b10046a28e
Đầu ra:
II8JvEBMj6I3Ws8wqxh0bXVds6Ny+7h5HAQhqmd5r/0lWBCpsxMJHJT3KBcZ23oUZtsa6gjgISf+a8GzJg1BfEg=
Gửi thông điệp đã được ký#
We will now submit the ProRegTx special transaction to the blockchain to
register the masternode. This command must be sent from a Dash Core
wallet holding a balance on either the feeSourceAddress or
payoutAddress, since a standard transaction fee is involved. The
command takes the following syntax:
protx register_submit tx sig
Ở đó:
tx: Kết quả trường đầu ratxđược trả về từ câu lệnhprotx register_preparesig: Là thông điệp được ký với khoá đặt cọc từ câu lệnhsignmessage
Ví dụ:
protx register_submit 030001000175c9d23c2710798ef0788e6a4d609460586a20e91a15f2097f56fc6e007c4f8e0000000000feffffff01a1949800000000001976a91434b09363474b14d02739a327fe76e6ea12deecad88ac00000000d1010000000000e379580dcfea3eb6944bfbe1de5fa2317932e260acce4d9ff3ede5f4287a34160100000000000000000000000000ffff2d4ce6ef4e1fd47babdb9092489c82426623299dde76b9c72d9799f20ed1538e28259ff80044982372519a2e6e4cdedb01c96f8f22e755b2b3124fbeebdf6de3587189cf44b3c6e7670ed1935246865dce1accce6c8691c8466bd67ebf1200001976a914fef33f56f709ba6b08d073932f925afedaa3700488acfdb281e134504145b5f8c7bd7b47fd241f3b7ea1f97ebf382249f601a0187f5300 II8JvEBMj6I3Ws8wqxh0bXVds6Ny+7h5HAQhqmd5r/0lWBCpsxMJHJT3KBcZ23oUZtsa6gjgISf+a8GzJg1BfEg=
Đầu ra:
aba8c22f8992d78fd4ff0c94cb19a5c30e62e7587ee43d5285296a4e6e5af062
Your masternode is now registered and will appear on the Deterministic
Masternode List after the transaction is mined to a block. You can view
this list on the Masternodes -> DIP3 Masternodes tab of the Dash
Core wallet, or in the console using the command protx list valid,
where the txid of the final protx register_submit transaction
identifies your masternode.
At this point you can go back to your terminal window and monitor your
masternode by entering ~/.dashcore/dash-cli masternode status or
using the Get status function in DMT.
Ở thời điểm này bạn có thể thoát khỏi máy chủ của bạn bằng việc gõ exit. Chúc mừng bạn! Masternode của bạn bây giờ đang được chạy.
Option 3: Registering from Dash Electrum wallet#
Dash Electrum supports registering and managing masternodes. Details can be found on the Electrum - Advanced Functions page. If combined with Electrum's multisig features the masternode collateral can be stored in a multisig wallet for increased security flexibility.
Cảnh báo
Always exercise caution when using multisig accounts and verify that each mnemonic is backed up appropriately. See this page for the Dash Electrum documentation demonstrating how to configure a masternode using a multisig collateral.