P2Pool Node Setup
This guide describes how to set up a Dash P2Pool node to manage a pool of miners. Unlike centralized mining pools, P2Pool is based on the same peer-2-peer (P2P) model as Dash, making the pool as a whole highly resistant to malicious attacks, and preserving and protecting the decentralized nature of Dash. When you launch a P2Pool node, it seeks out, connects with, and shares data with a decentralized network of other P2Pool nodes (also known as peers). P2Pool nodes share a cryptographic chain of data representing value, similar to Dash’s blockchain. The P2Pool version is called the sharechain. The decentralized and fair nature of this mining model means mining with P2Pool is strongly encouraged. P2Pool for Dash uses the p2pool-dash software on GitHub, which is a fork of p2pool for Bitcoin. For more information, see here.
Because of the way P2Pool manages difficulty adjustments on the sharechain, it is important to maintain low latency between the miners and the P2Pool node to avoid miners submitting shares too late to enter the sharechain. When setting up your node, you need to consider its physical and network location relative to the miners you intend to connect to the node. If you operate a mining farm, your P2Pool node should probably be a physical machine on the same local network as your miners. If you plan to operate a public node, it may be best to set up your P2Pool node as a virtual machine in a data center with a high speed connection so geographically close miners can mine to your pool with relatively low latency.
This following section describes the steps to setup an Ubuntu Server running P2Pool for Dash. It has been tested with Ubuntu 20.04 LTS and Dash 0.16. While a reasonable effort will be made to keep it up to date, it should be possible to modify the instructions slightly to support different versions or operating systems as necessary.
Setting up the host server
Download a copy of Ubuntu Server LTS from
https://ubuntu.com/download/server and install it on your system
according to the steps described here. If you are
using a VPS such as Vultr or AWS, your provider will most likely provide
an option to install this system during provisioning. Ensure you enable
OpenSSH server during setup so you can control your server from a remote
console. Once you have access to your server, create a new non-root user
if you have not already done so using the following command, replacing
<username> with a username of your choice:
adduser <username>
You will be prompted for a password. Enter and confirm using a new password (different to your root password) and store it in a safe place. You will also see prompts for user information, but this can be left blank. Once the user has been created, we will add them to the sudo group so they can perform commands as root:
usermod -aG sudo <username>
Reboot your server and log in as the new user. At this point it is recommended to connect remotely using PuTTY (for Windows) or ssh (for Linux and macOS) if you have not already done so.
Setting up port forwarding
If you are on a private network behind a router, you will need to set up port forwarding for at least port 8999 (UDP/TCP) for access to the sharechain, as well as port 7903 (UDP/TCP) if you want your node to be accessible to the public. How this is done depends on your particular network router and is therefore beyond the scope of this documentation. An example from the popular DD-WRT open source router distribution is shown below. Guides to setting up port forwarding can be found here and here.
Take note of your IP address either from your router management interface or by visiting https://www.whatismyip.com
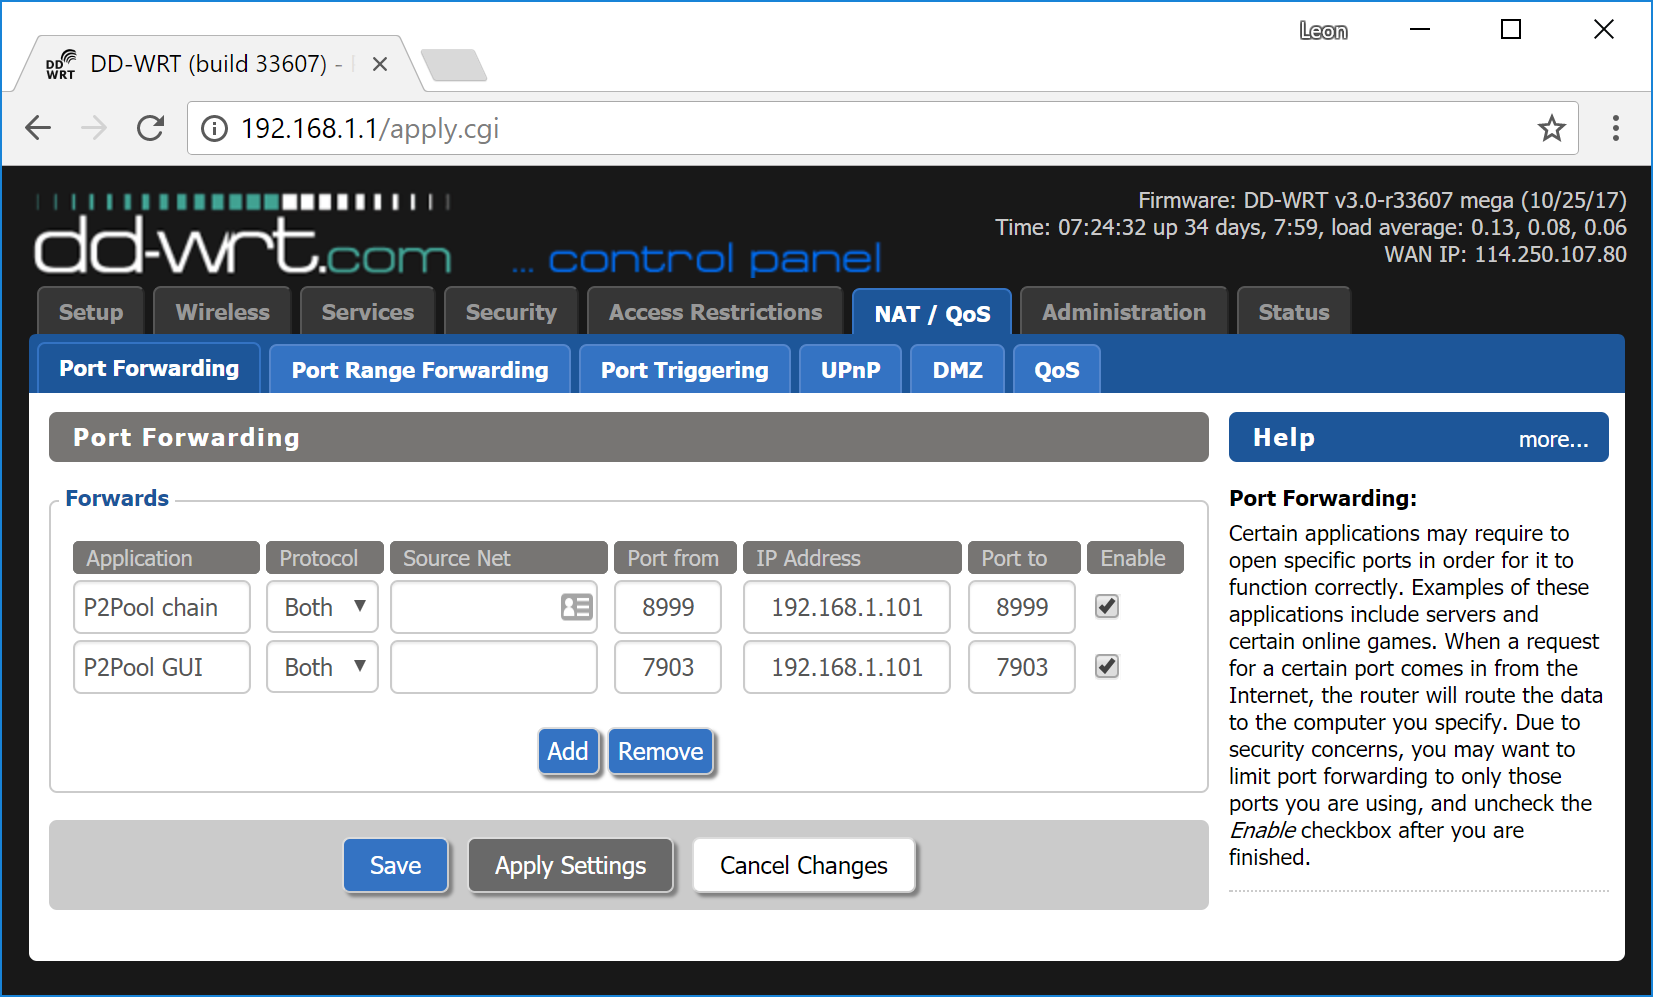
Setting up port forwarding under DD-WRT
Manual setup
First update your operating system as follows:
sudo apt update
sudo apt upgrade
Setting up dashd
P2Pool requires a full Dash node to be running to get block and transaction data. To download and install Dash, visit https://www.dash.org/downloads/ on your computer to find the link to the latest Dash Core wallet. Click Linux, then right-click on Download TGZ for Dash Core x64 and select Copy link address. Go back to your terminal window and enter the following command, pasting in the address to the latest version of Dash Core by right clicking or pressing Ctrl + V:
cd ~
wget https://github.com/dashpay/dash/releases/download/v0.17.0.3/dashcore-0.17.0.3-x86_64-linux-gnu.tar.gz
Verify the authenticity of your download by checking its detached signature against the public key published by the Dash Core development team. All releases of Dash are signed using GPG with one of the following keys:
Alexander Block (codablock) with the key
63A9 6B40 6102 E091, verifiable here on KeybasePasta (pasta) with the key
5252 7BED ABE8 7984, verifiable here on Keybase
curl https://keybase.io/codablock/pgp_keys.asc | gpg --import
curl https://keybase.io/pasta/pgp_keys.asc | gpg --import
wget https://github.com/dashpay/dash/releases/download/v0.17.0.3/dashcore-0.17.0.3-x86_64-linux-gnu.tar.gz.asc
gpg --verify dashcore-0.17.0.3-x86_64-linux-gnu.tar.gz.asc
Create a working directory for Dash, extract the compressed archive, copy the necessary files to the directory and set them as executable:
mkdir ~/.dashcore
tar xfvz dashcore-0.17.0.3-x86_64-linux-gnu.tar.gz
cp dashcore-0.17.0/bin/dashd .dashcore/
cp dashcore-0.17.0/bin/dash-cli .dashcore/
Clean up unneeded files:
rm dashcore-0.17.0.3-x86_64-linux-gnu.tar.gz
rm -r dashcore-0.17.0/
Create a configuration file using the following command:
nano ~/.dashcore/dash.conf
An editor window will appear. We now need to create a configuration file specifying several variables. Copy and paste the following text to get started, then replace the variables specific to your configuration as follows:
#----
rpcuser=XXXXXXXXXXXXX
rpcpassword=XXXXXXXXXXXXXXXXXXXXXXXXXXXX
rpcallowip=127.0.0.1
#----
listen=1
server=1
daemon=1
maxconnections=64
#----
Replace the fields marked with XXXXXXX as follows:
rpcuser: enter any string of numbers or letters, no special characters allowedrpcpassword: enter any string of numbers or letters, no special characters allowed
The result should look something like this:
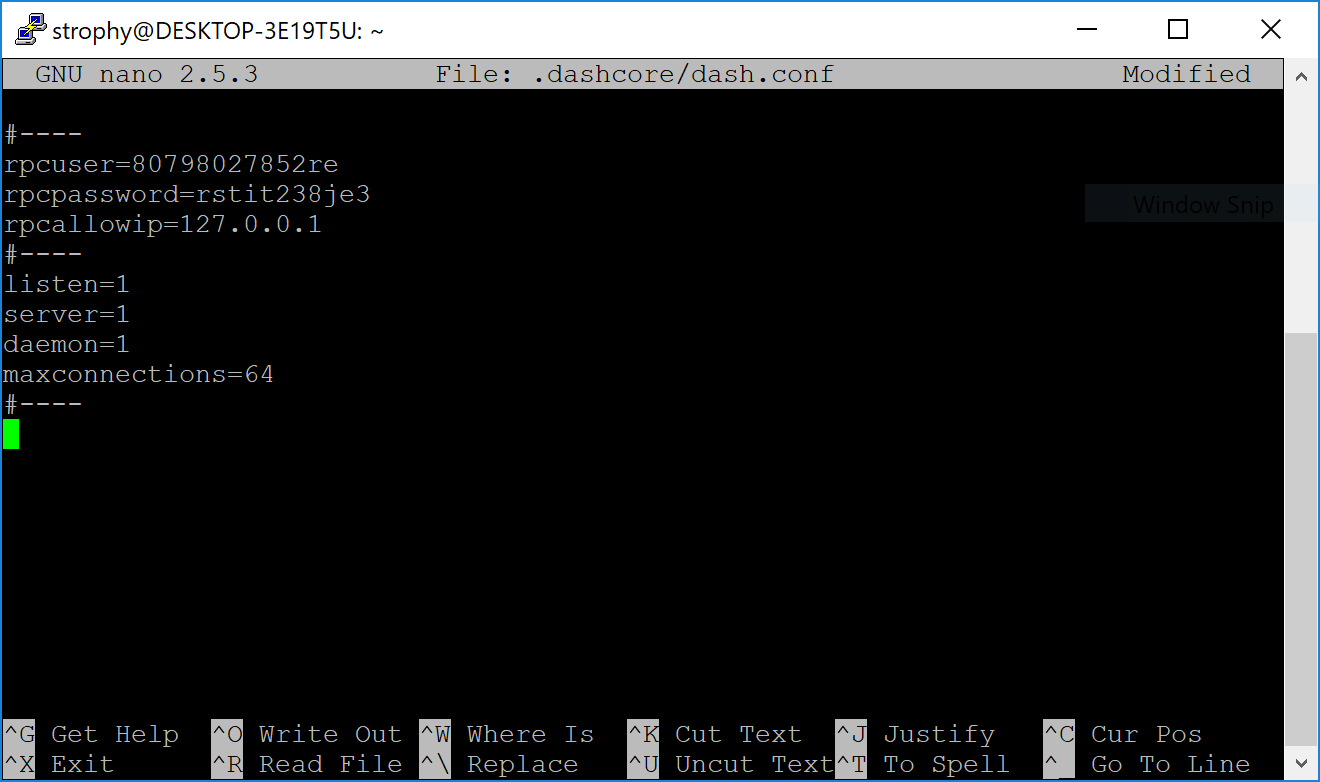
Entering key data in dash.conf on the P2Pool node
Press Ctrl + X to close the editor and Y and Enter save the file. You can now start running Dash on the masternode to begin synchronization with the blockchain:
~/.dashcore/dashd
You will see a message reading Dash Core server starting. You can
continue with the following steps and check synchronization periodically
using the following command. Synchronization is complete when the number
of blocks is equal to the current number of blocks in the Dash
blockchain, as can be seen from any synchronized Dash wallet or block
explorer:
~/.dashcore/dash-cli getblockcount
Setting up P2Pool
We will now set up the P2Pool software and its dependencies. Begin with the dependencies:
sudo apt install python2 python2-dev gcc g++ git
curl https://bootstrap.pypa.io/get-pip.py --output get-pip.py
sudo python2 get-pip.py
pip install twisted
Create working directories and set up p2pool-dash:
git clone https://github.com/dashpay/p2pool-dash
cd p2pool-dash
git submodule update --init
cd dash_hash
python2 setup.py install --user
We will add some optional extra interfaces to the control panel:
cd ..
mv web-static web-static.old
git clone https://github.com/justino/p2pool-ui-punchy web-static
mv web-static.old web-static/legacy
cd web-static
git clone https://github.com/hardcpp/P2PoolExtendedFrontEnd ext
cd ..
You can now start p2pool and optionally specify the payout address, external IP (if necessary), fee and donation as follows:
python2 ~/p2pool-dash/run_p2pool.py --external-ip <public_ip> -w <port> -f <fee> -a <payout_address> --give-author <donation>
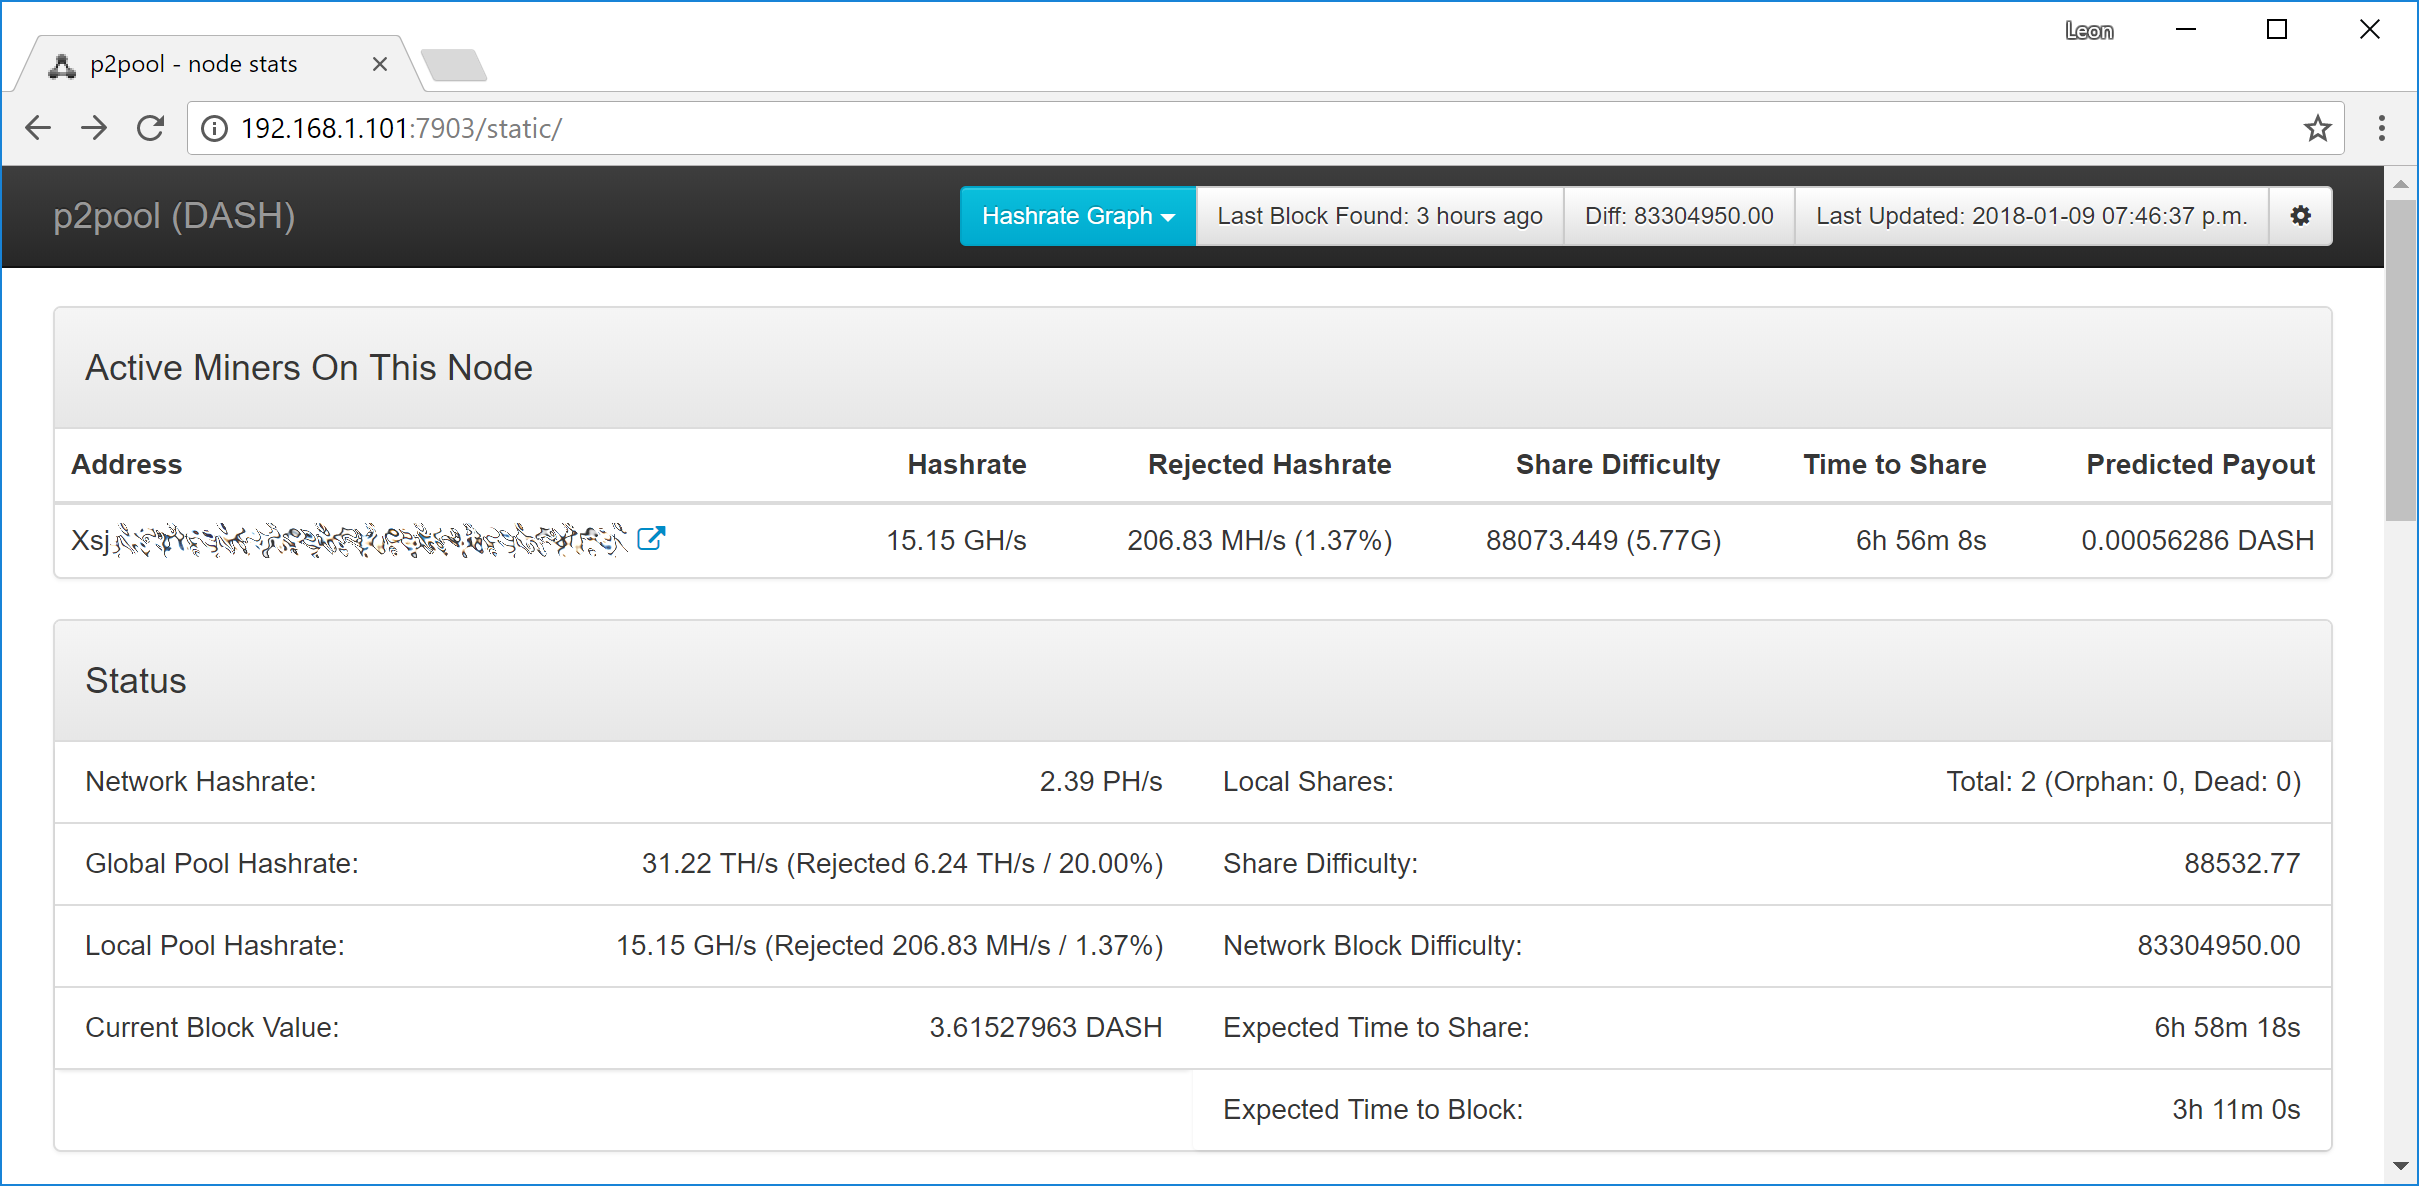
You can then monitor your node by browsing to the following addresses,
replacing <ip_address> with the IP address of your P2Pool node:
Punchy interface: http://ip_address:7903/static
Legacy interface: http://ip_address:7903/static/legacy
Status interface: http://ip_address:7903/static/status
Extended interface: http://ip_address:7903/static/ext
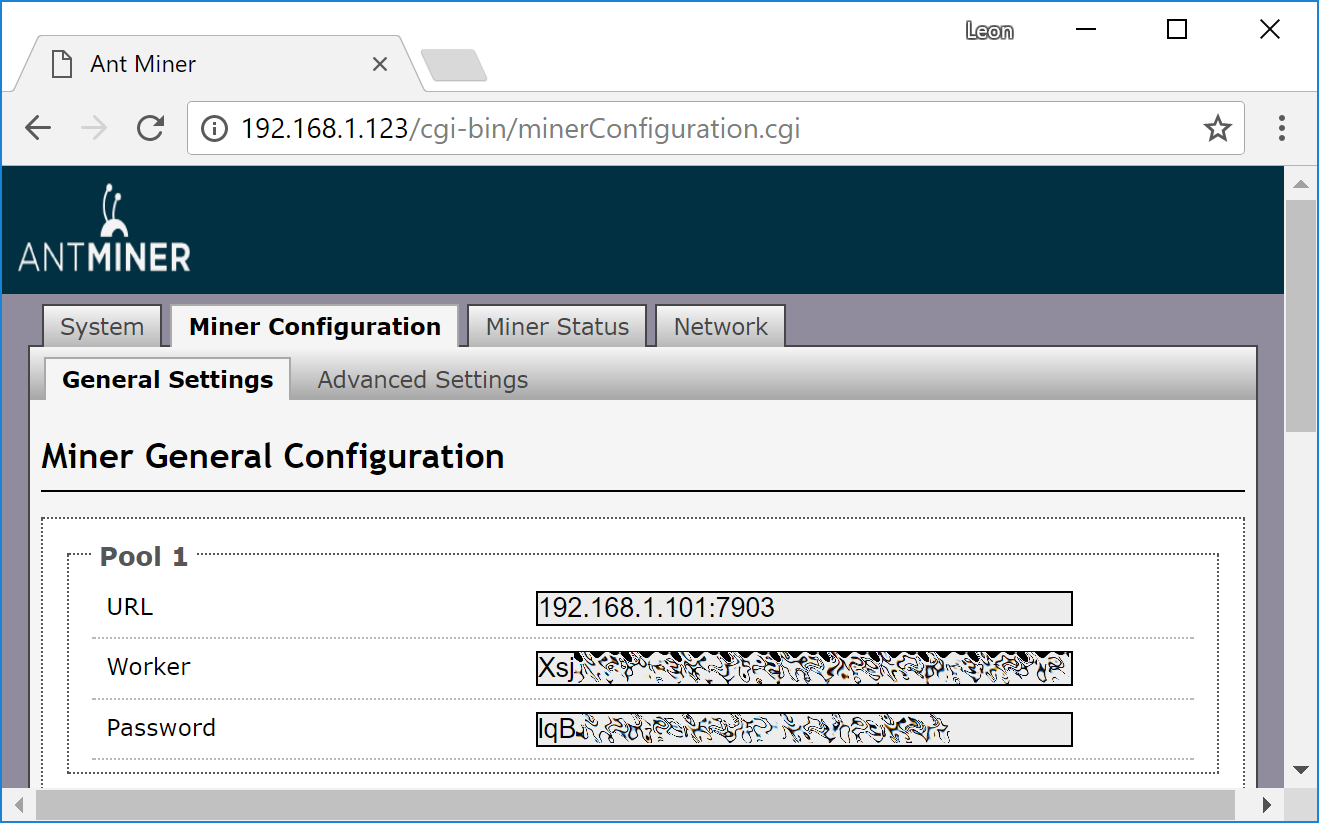
Example configuration showing a single Bitmain Antminer D3 connected to a p2pool-dash node on the local network