Introduction
Hardware wallets offer you the security of storing your keys in secure device while still allowing you to make simple transactions through a web interface. Three major manufacturers of hardware wallets currently exist, with Dash supported on all of them.
Trezor
Developed by Czech startup SatoshiLabs, the $99 device is essentially a USB dongle designed to add an extra authentication layer to all outbound bitcoin transactions. Trezor has supported Dash since January 2017 with the release of firmware version 1.4.2.
By virtue of its design, Trezor can be used to sign transactions on ‘unsafe’ computers and is impervious to keyloggers and many other vectors of attack, so even if your host PC is compromised, the attacker has no way of getting your private key. That’s also where the device gets its name, as ‘trezor’ translates into ‘vault’ in most Slavic languages, including Czech. A kind of ‘vault’ for your private bitcoin key, Trezor claims to use a number of clever tricks to maintain security even on compromised and unsafe machines.
Site: https://trezor.io
Shop: https://shop.trezor.io
Wallet: https://wallet.trezor.io
It is also possible to operate a Dash masternode using your Trezor. See here for details.
Getting Started
Once you have bought your Trezor from https://shop.trezor.io or an authorized reseller, you will need a wallet to use it with. Trezor supports the following Dash wallets:
This documentation describes how to get started using the official Trezor web wallet at https://wallet.trezor.io. Always confirm the URL is correct and SSL encryption is enabled when working with the Trezor Wallet. Follow these steps when setting up your Trezor for the first time:
Inspect the packaging for tampering. There should be two seals and the flaps should be glued shut. It should be impossible to remove the device without totally destroying the packaging.
Go to https://trezor.io/start/ and watch the video to introduce the concepts of a shifting PIN layout and recovery seed.
Go to https://wallet.trezor.io/ to begin the setup process.
If not already installed, install the Trezor Bridge application from https://wallet.trezor.io/#/bridge
Connect the Trezor to your computer when prompted.
If this is the first time you connect your Trezor, you will be prompted to install firmware. Click the Install button, wait for the download and confirm on the device.
When complete, the device will display a fingerprint. Verify that this matches the fingerprint shown on the screen. Note that this is hexadecimal and therefore not case-sensitive.
After verification is complete, disconnect and reconnect your device. Enter a device label on the screen that appears.
Enter and confirm a PIN by clicking on the squares according to the mapping shown on the device.
Your Trezor device will now display a sequence of 24 words on the screen. This is your recovery seed. Write the words down in the order they appear on the recovery card. Never store your recovery seed in any digital format, including photos or text.
Verify the seed against what you have written down and store it in a safe place.
You will be asked to enter your PIN again.
The Trezor Wallet will appear with a message that your device is ready for use. Your device name will appear on the device.
Switch to the Dash wallet using the menu at the top left. You can now use your Trezor to send and receive Dash.
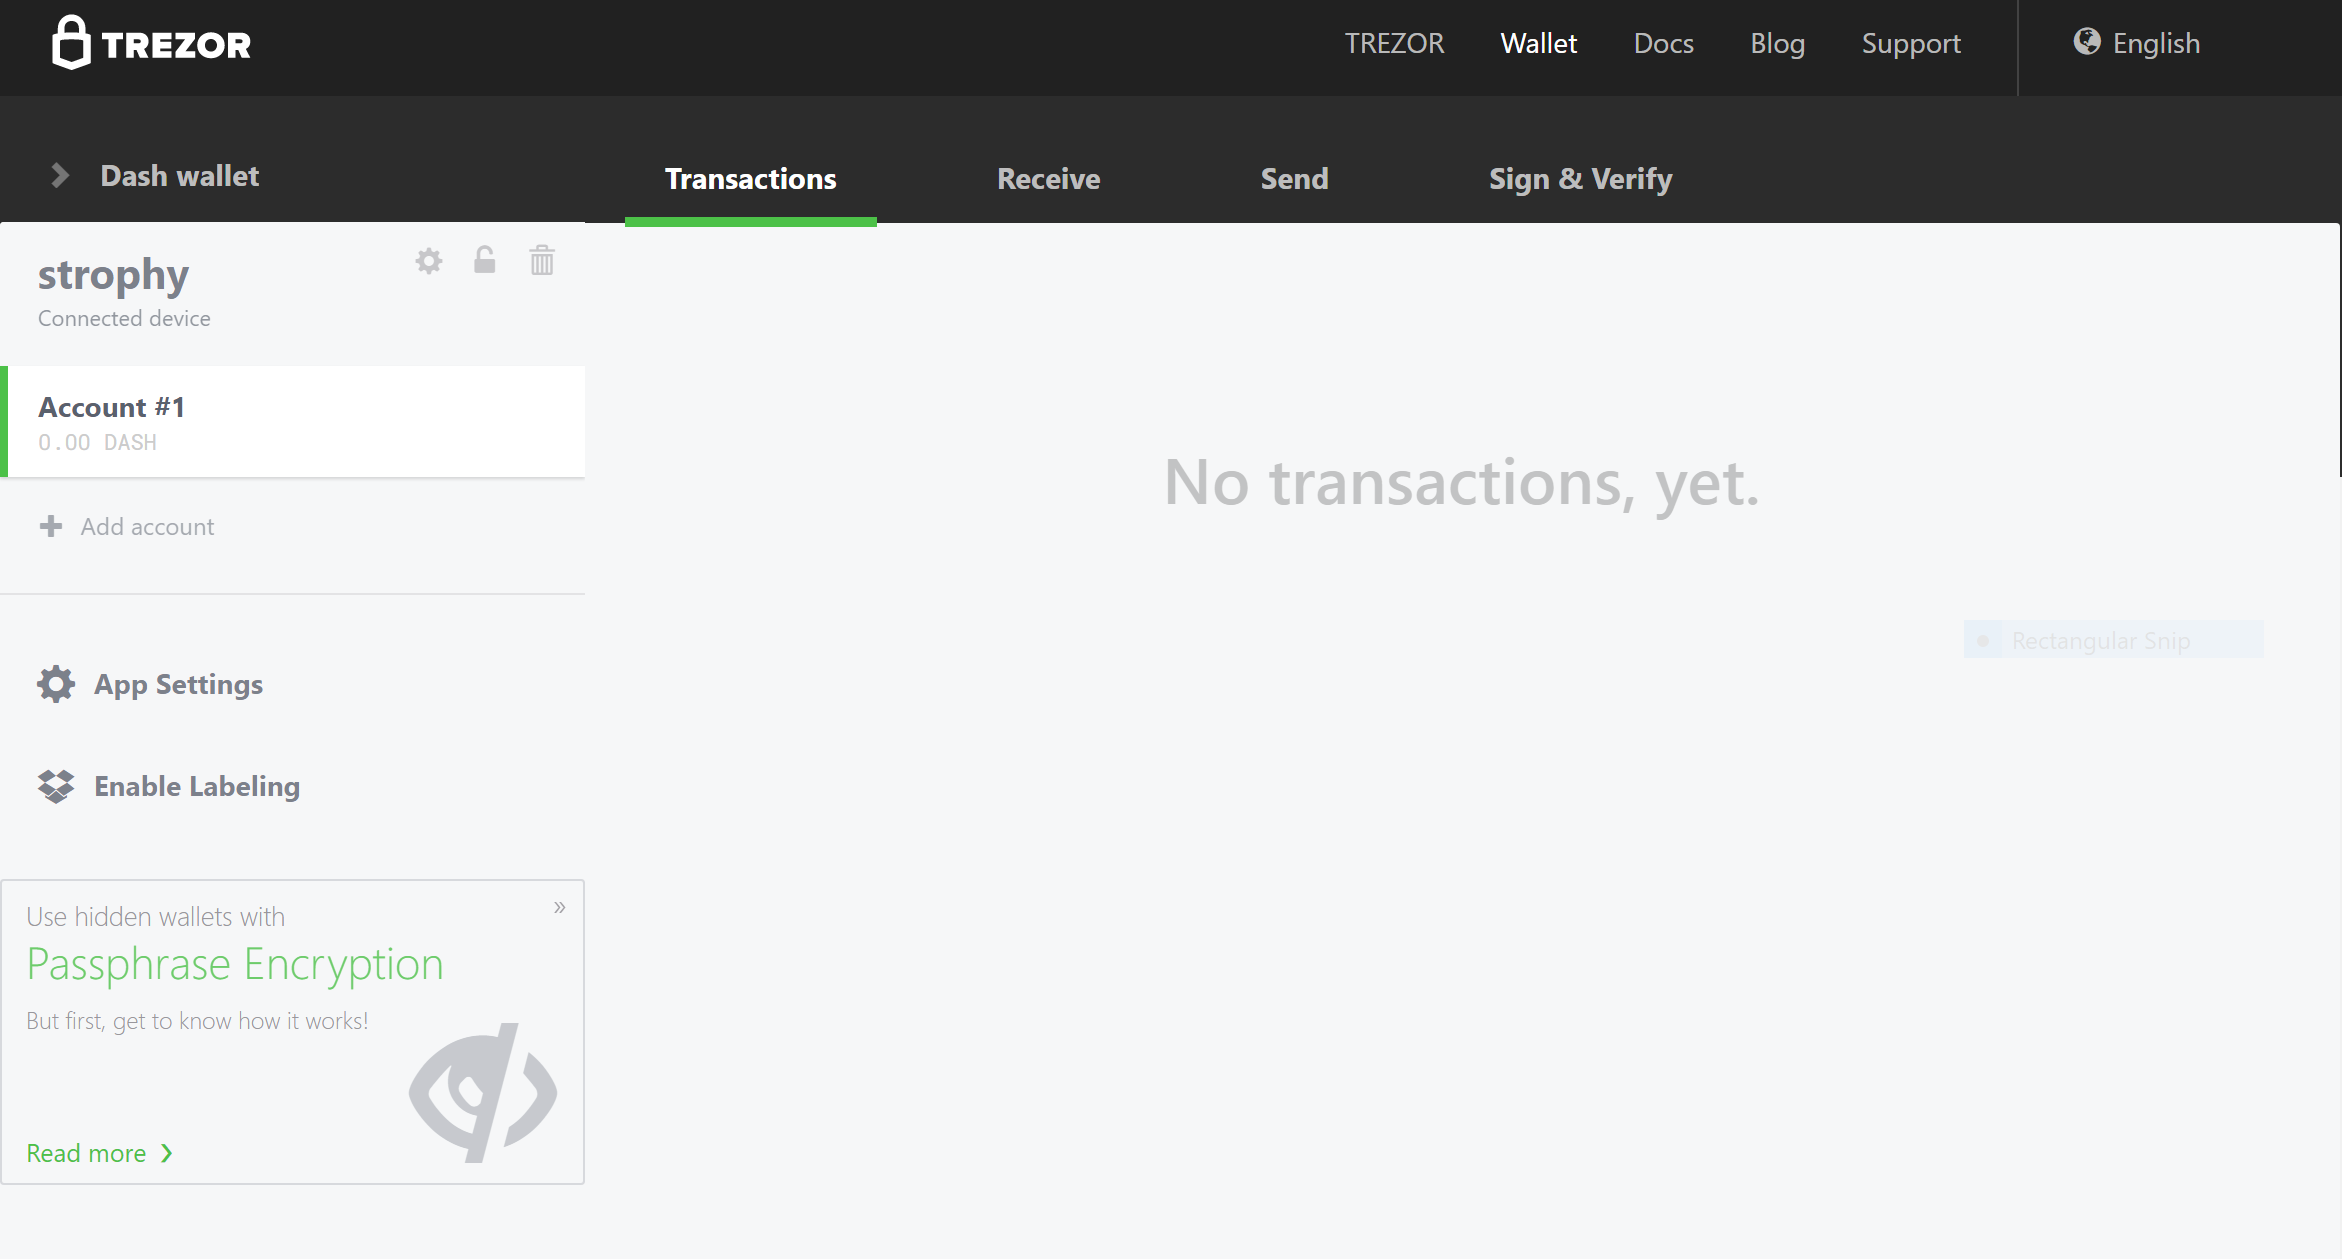
Trezor Web Wallet for Dash ready for first use
Receiving Dash
We will now create a Dash receiving address and attempt to receive 1.0 DASH.
In the Trezor Dash wallet, click Account #1, then click Receive.
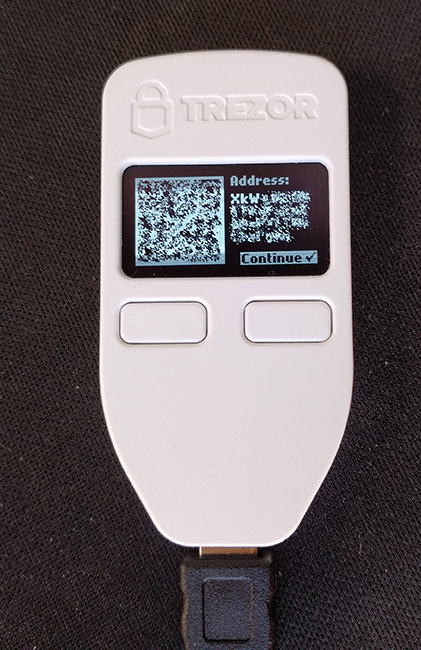
A Dash address will appear. Click Show full address to verify the address on the Trezor device.
Send 1 DASH to this address using an exchange or another wallet.
Once the transaction is confirmed, it will appear on the Transactions tab of your Trezor Wallet.
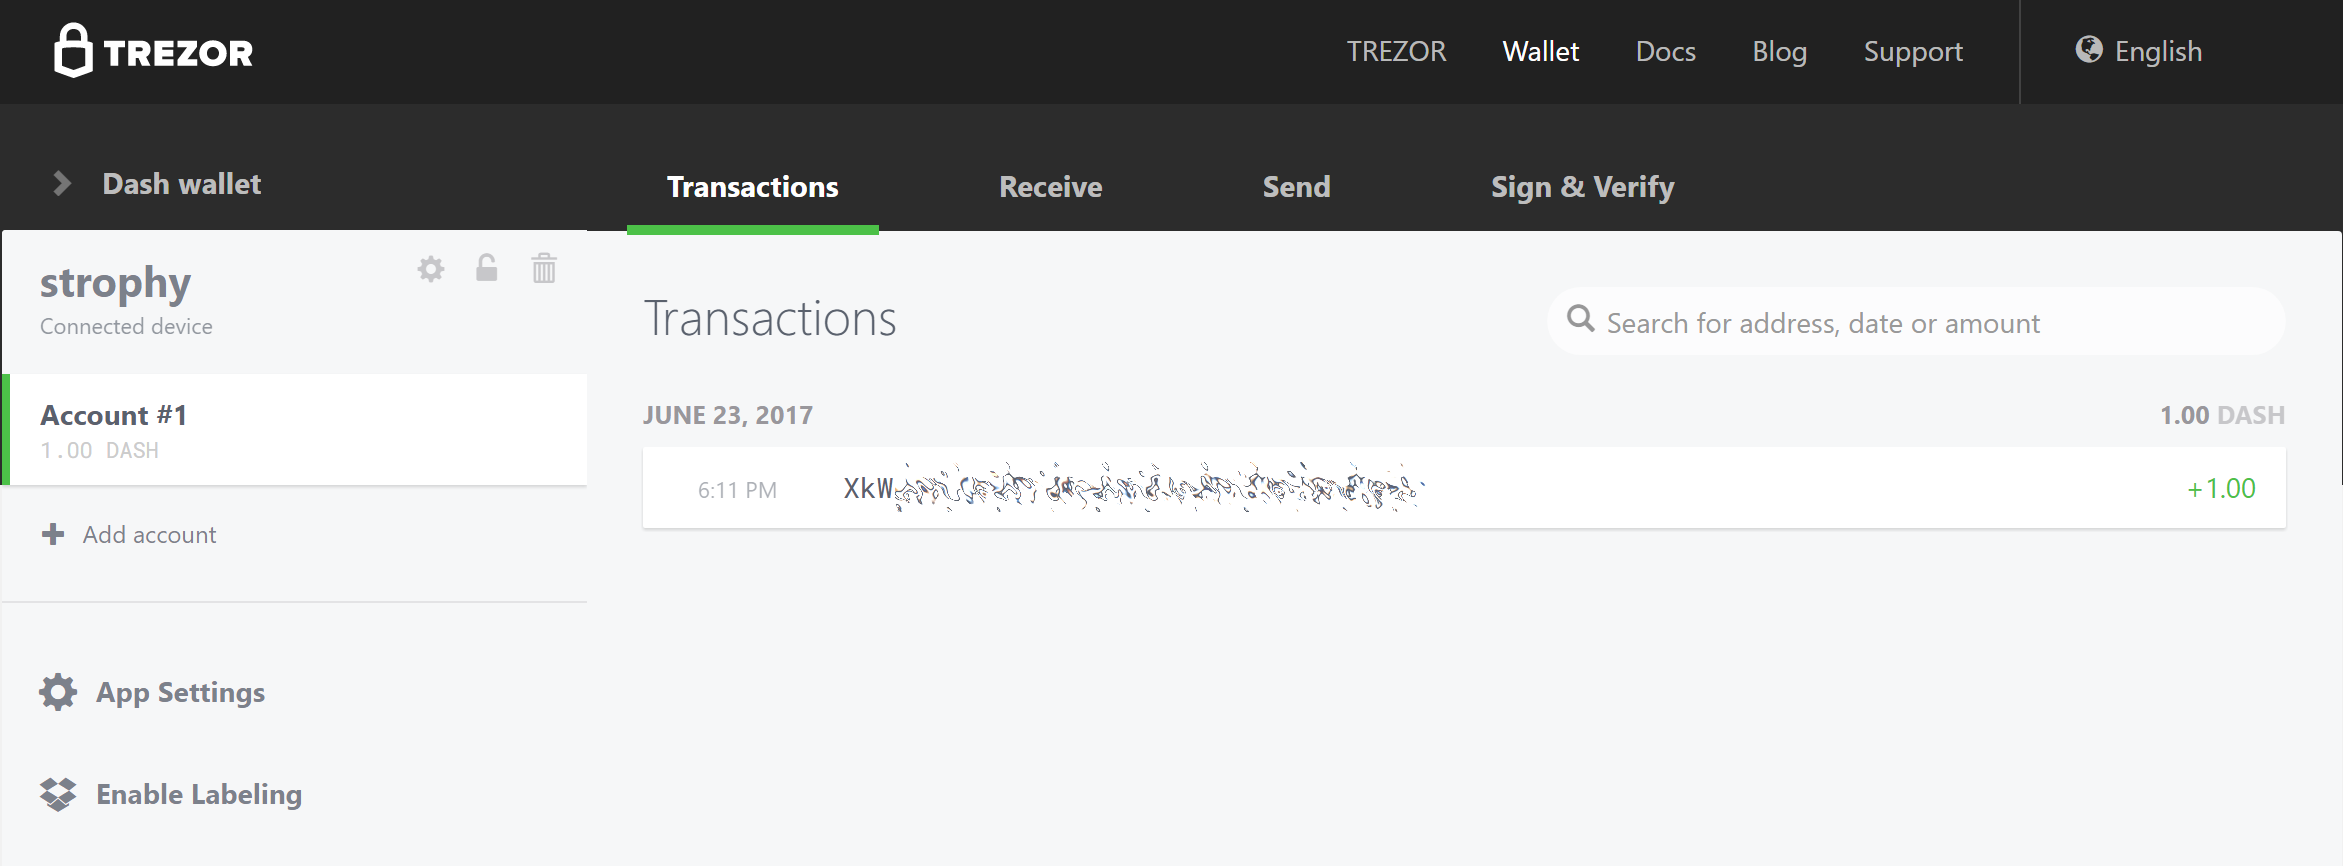
Trezor Web Wallet after receiving Dash
Sending Dash
We will now send the Dash (minus transaction costs) to an external address.
In the Trezor Dash wallet, click Account #1, then click Send.
Enter the Dash address and amount in the fields.
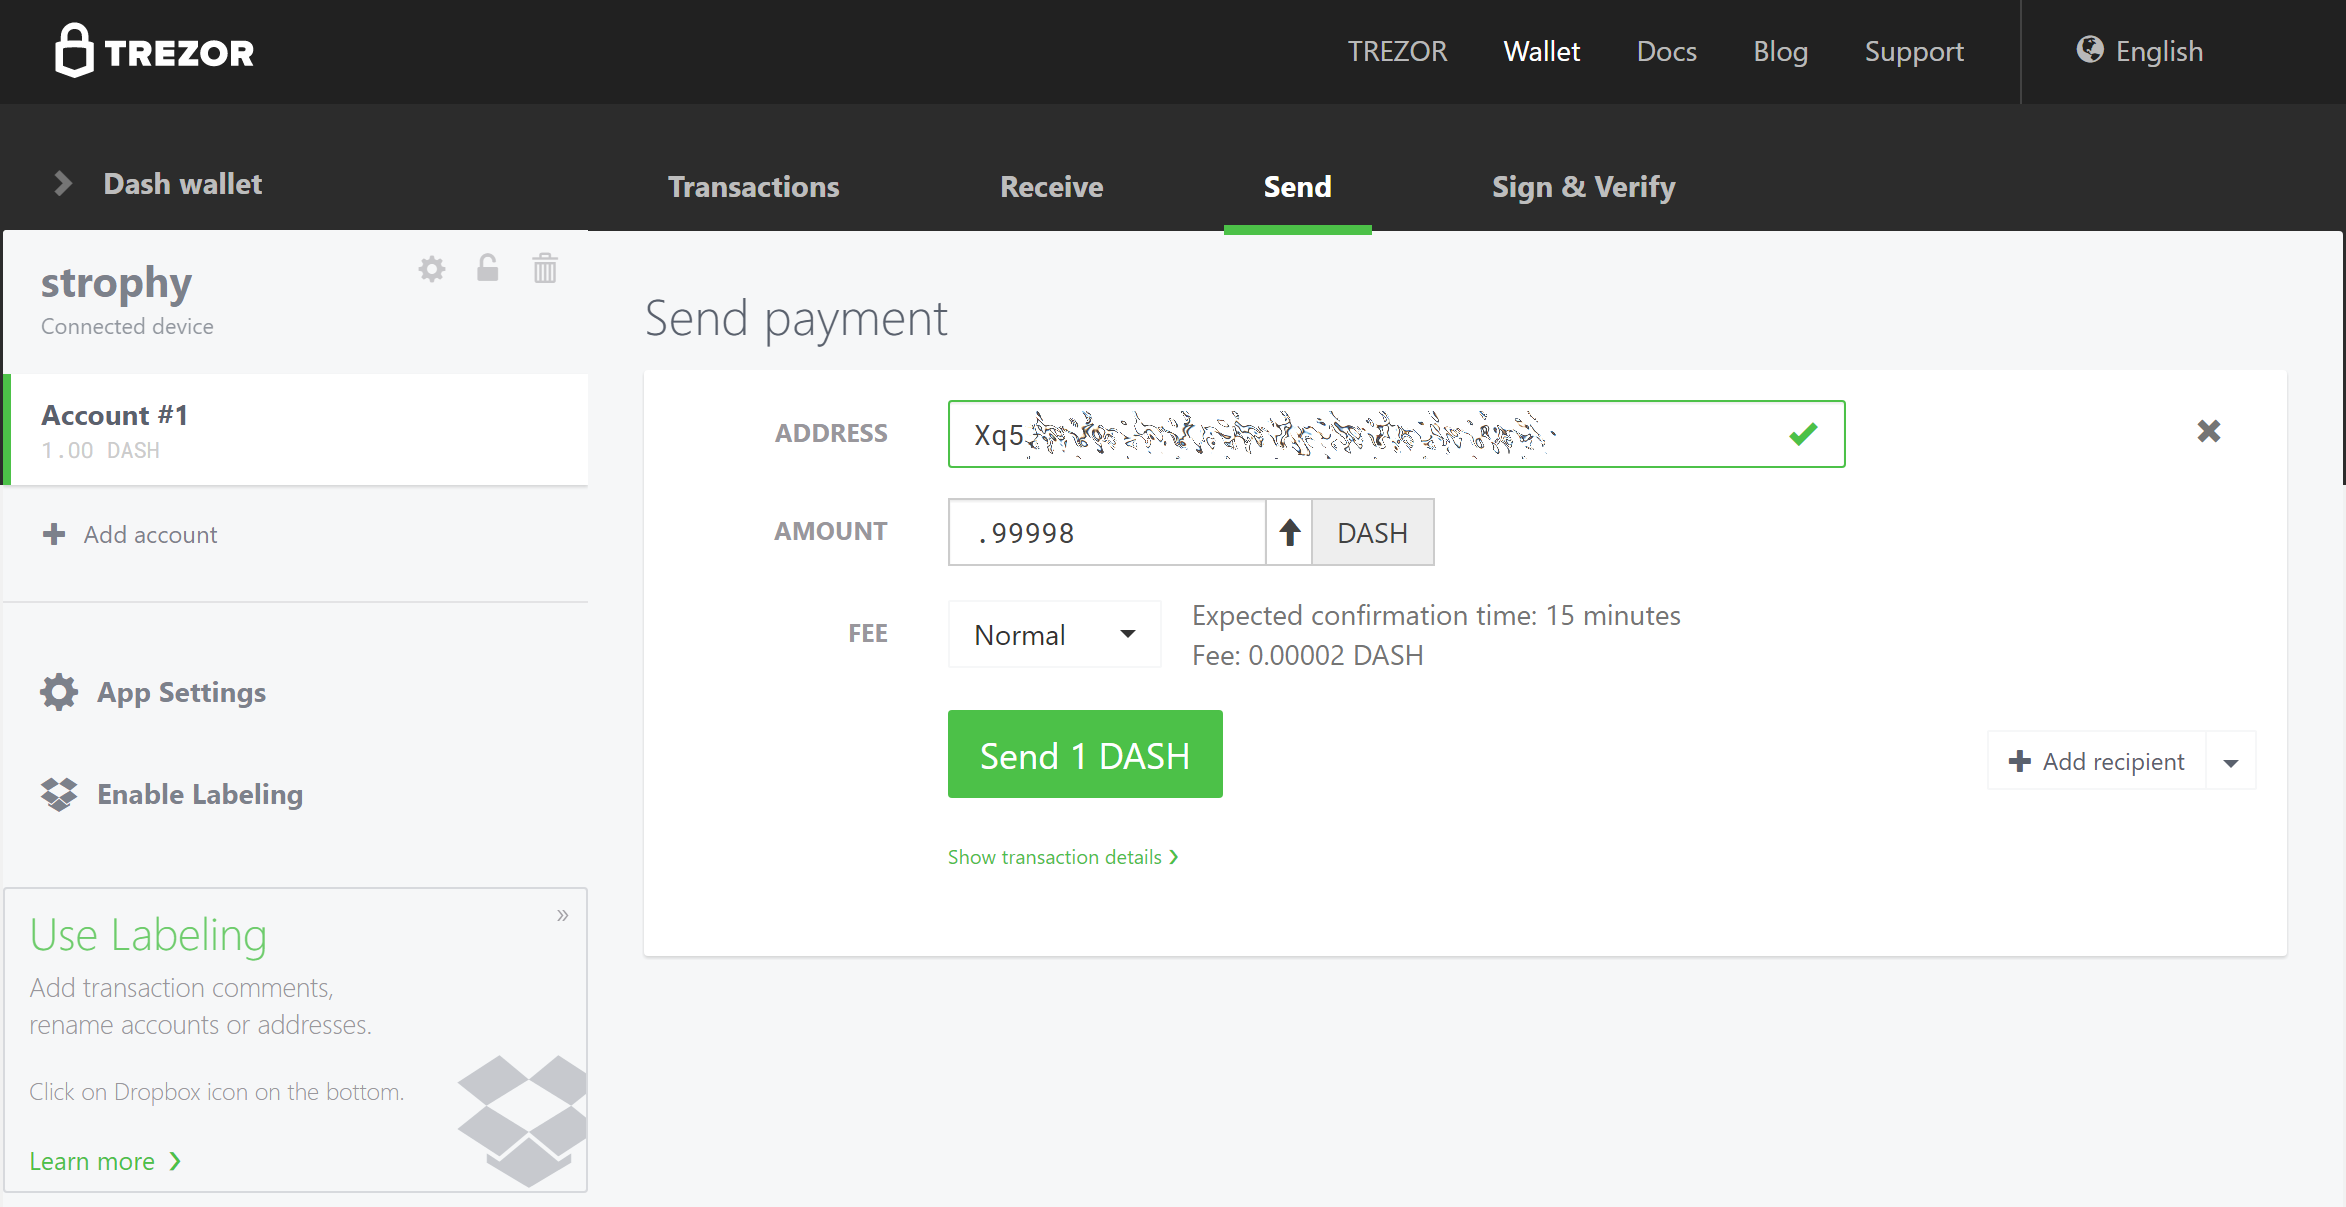
Enter your PIN.
Confirm the address on the device, then confirm the action.
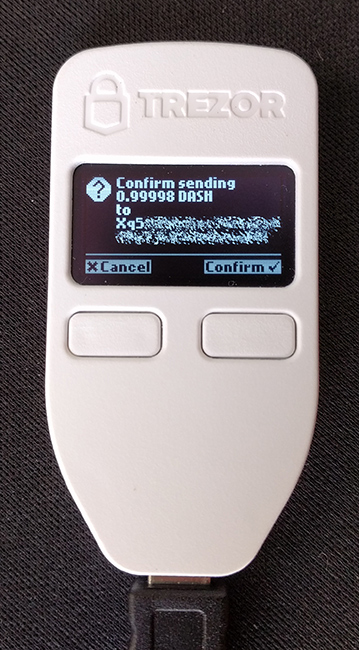
The transaction will be transmitted to the network and the recipient receives the funds.

Trezor Web Wallet after sending Dash
Advanced Functions
Changing the PIN/Passphrase
Your PIN is your primary form of security when using your hardware wallet. It is considered secure because the layout of the PIN keypad changes each time you use it. If you suspect your PIN has been compromised, change it using the following instructions. For extra security, or if you believe you may be subjected to duress at some point in the future, you can add a passphrase to reveal further wallets which only appear when you enter your passphrase. Since the passphrase acts as a cryptographic salt, there is no “correct” passphrase - a different wallet will be displayed for each passphrase you enter. Be absolutely sure you understand passphrases before using them. For more information, see here.
Changing your PIN
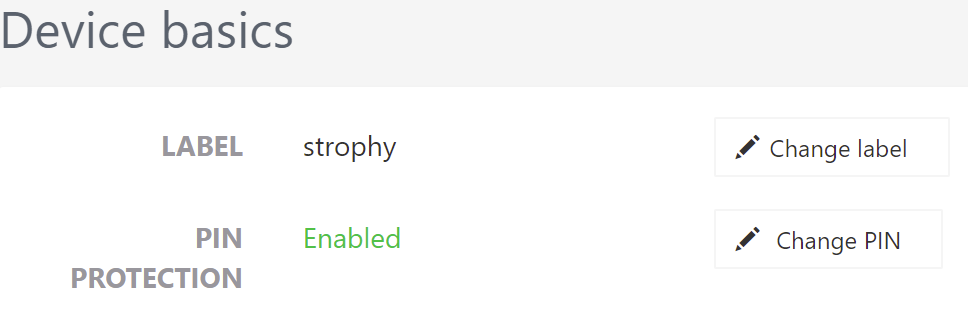
You can change your Trezor PIN from both the Trezor wallet and DMT.
From Trezor: Go to https://wallet.trezor.io and click the cog icon next to your username. Then click Change PIN. You will need to confirm you want to change your PIN on the hardware device, then enter your existing PIN and the new PIN twice.
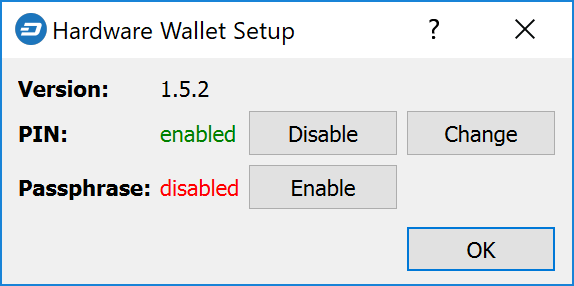
From DMT: Open DMT and click Tools > Hardware Wallet PIN/Passphrase configuration. The following window will appear. Click Change. You will need to confirm you want to change your PIN on the hardware device, then enter your existing PIN and the new PIN twice.
Adding a passphrase
You can add a passphrase to your Trezor from both the Trezor wallet and DMT. Before you add a passphrase, you should be fully aware of how it functions as a “25th word” to your seed, and the risks of forgetting your passphrase. Note that you do not need to enter a passphrase - blank is perfectly acceptable and will reveal your normal wallet.
From Trezor: Click Advanced, confirm you understand the risks and click Enable passphrase encryption. This enables a prompt to enter a passphrase each time you use your Trezor.

From DMT: Open DMT and click Tools > Hardware Wallet PIN/Passphrase configuration. The following window will appear. Click Enable. This enables a prompt to enter a passphrase each time you use your Trezor.
Changing the Homescreen
Your Trezor allows you to change the homescreen image from the default Trezor logo. A range of existing images can be selected, you can generate one yourself using the Trezor Homescreen Editor, or you can create and upload your own 128x64px black and white image. To change your homescreen image:
Go to https://wallet.trezor.io and open your wallet
Click the small cog icon next to your device name
Click the Homescreen tab
Select the new homescreen, then click the Set as homescreen button at the top
Confirm the change on the Trezor device
A few sample images are available for Dash:


Storage Suggestions
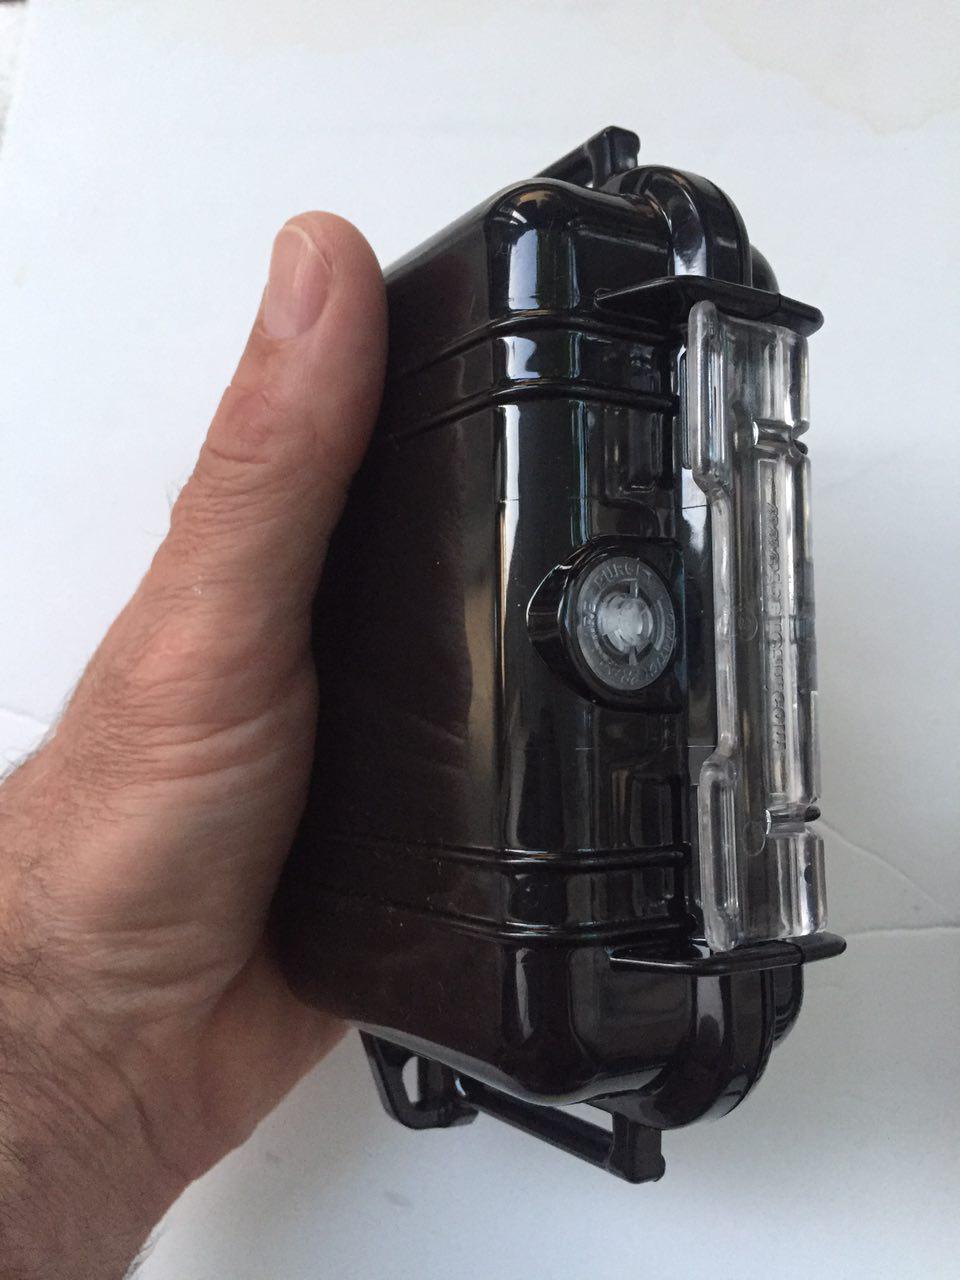
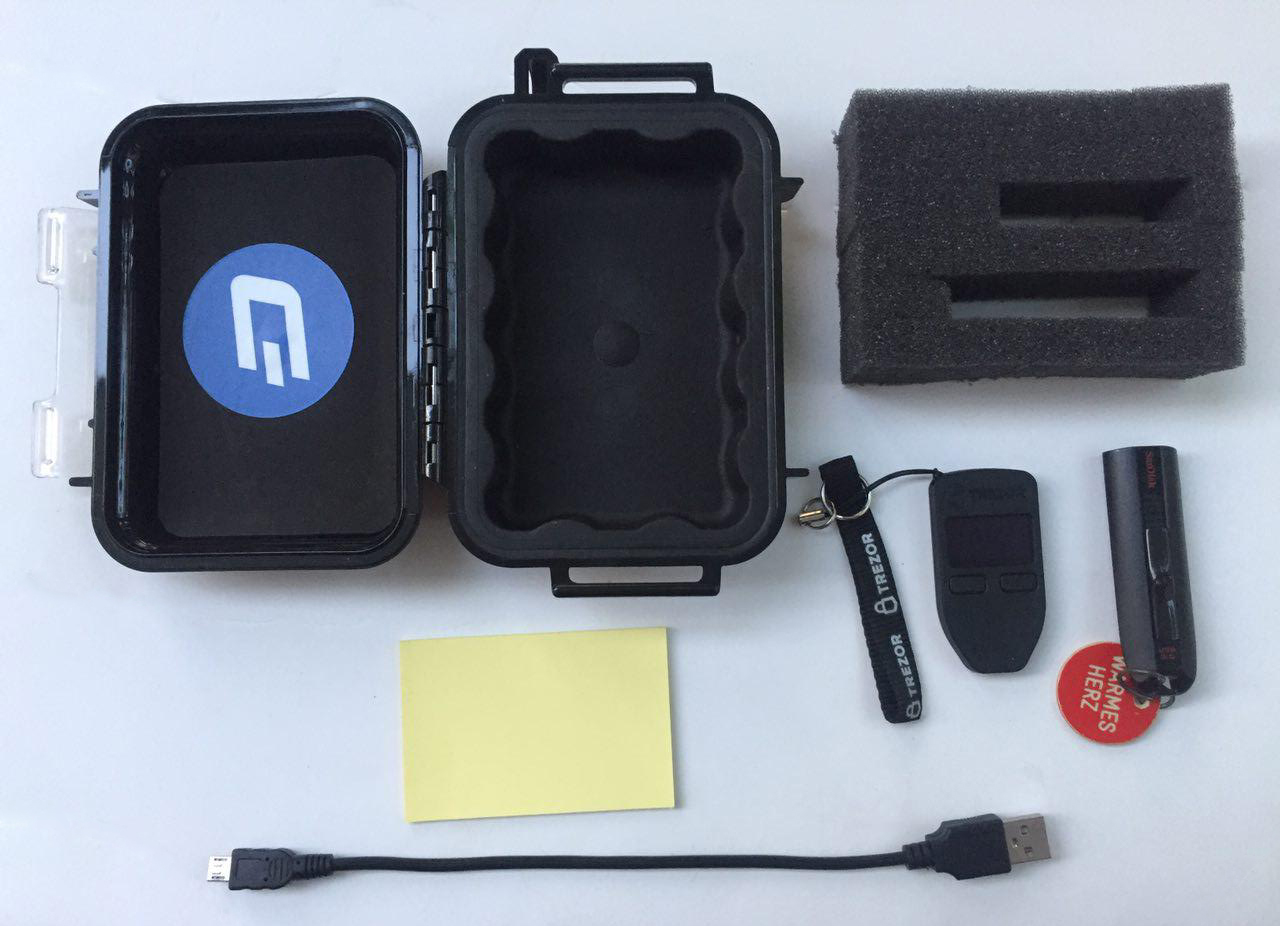
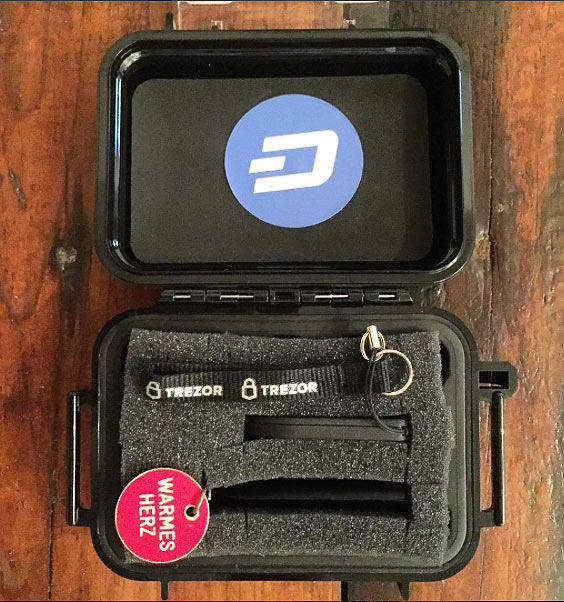
While losing a Trezor is not a security threat (unless someone knows your PIN and/or passphrase), it is a moderately expensive device that can be damaged by pressure or water, for example. For this reason, Dash community member tungfa has shared photos of a custom-made Trezor case. The following materials are required:
Foam
Trezor + Cable
USB Stick (for wallet.dat files + blockchains of all portfolios)
Notepad
KeepKey
The $129 KeepKey hardware wallet features a large screen and 100% open source firmware to guarantee the security of your private keys. KeepKey has supported Dash since firmware version 4.2.10, released on March 28, 2017, and added support for InstantSend in firmware version 5.7.2, released on September 5, 2018. Follow these instructions to begin using Dash on your KeepKey device.
Product video: https://vimeo.com/289712840
It is also possible to operate a Dash masternode using your KeepKey. See here for details.
Ledger
Founded in 2014, French startup Ledger markets enterprise and consumer blockchain security solutions, including the €58 Ledger Nano S and upcoming Ledger Blue. Ledger Nano S has supported Dash since November 2016 and firmware version 1.2. Follow these instructions to add Dash support to the device.
Site: https://www.ledger.com
Product video:
It is also possible to operate a Dash masternode using your Ledger. See here for details.