Server configuration#
يتطلب إعداد ماسترنود فهمًا أساسيًا لتكنولوجيا لينكس و بلوكشين ، بالإضافة إلى القدرة على اتباع الإرشادات عن كثب. كما يتطلب صيانة دورية وأمنًا دقيقًا ، خاصةً إذا كنت لا تقوم بتخزين داش على محفظة الأجهزة. هناك بعض القرارات التي يجب اتخاذها على طول الطريق ، والخطوات الإضافية الاختيارية التي يجب اتخاذها لزيادة الأمان.
Commercial masternode hosting services are available if you prefer to delegate day-to-day operation of your masternode to a professional operator. When using these hosting services, you retain full control of the masternode collateral and pay an agreed percentage of your reward to the operator.
تتبيث VPS الخاصة بك#
A VPS, more commonly known as a cloud server, is fully functional installation of an operating system (usually Linux) operating within a virtual machine. The virtual machine allows the VPS provider to run multiple systems on one physical server, making it more efficient and much cheaper than having a single operating system running on the "bare metal" of each server.
A VPS is ideal for hosting a Dash masternode because they typically offer guaranteed uptime, redundancy in the case of hardware failure and a static IP address that is required to ensure you remain in the masternode payment queue. While running a masternode from home on a desktop computer is technically possible, it will most likely not work reliably because most ISPs allocate dynamic IP addresses to home users.
تنبيه
Disabling IPv6 is highly recommended to prevent communication issues that have been observed when running nodes on some VPS providers. We recommend turning it off through the VPS provider's setup wizard during initial server creation.
Before beginning, take a few minutes to review the masternode and evonode hardware requirements which may help you decide which VPS provider best suits your needs. We will use Vultr hosting as an example of a VPS, although DigitalOcean, Amazon EC2, Google Cloud, Choopa and OVH are also popular choices. First create an account and add credit. Then go to the Servers menu item on the left and click + to add a new server. Select a location for your new server on the following screen:
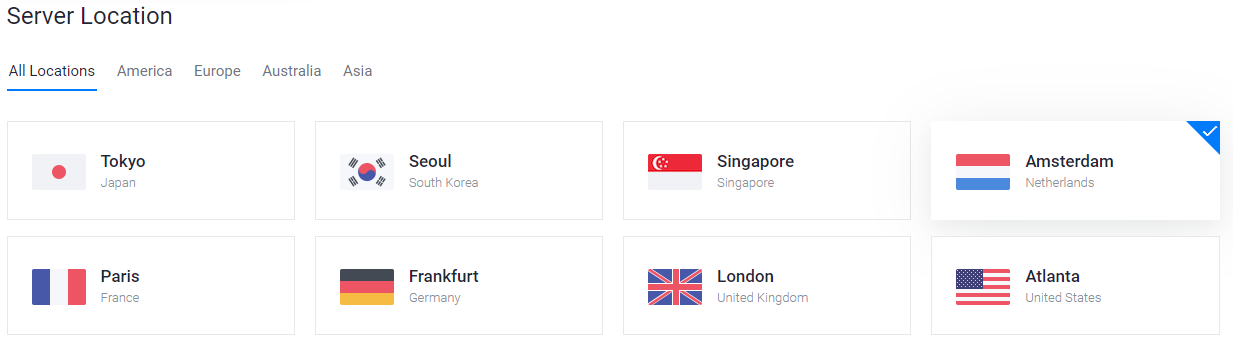
شاشة اختيار موقع خادم Vultr#
Select Ubuntu 24.04 x64 as the server type. We use this LTS release of Ubuntu instead of the latest version because LTS releases are supported with security updates for 5 years, instead of the usual 9 months.
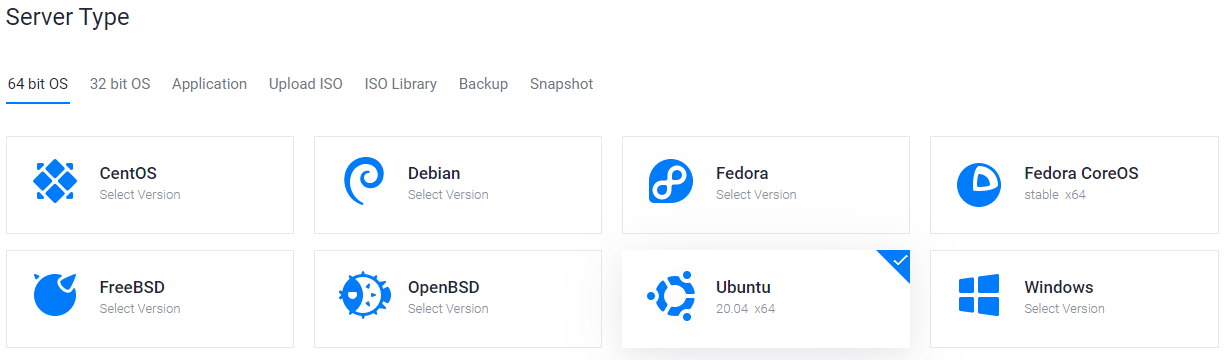
شاشة اختيار نوع الخادم Vultr#
Select a server size according to the hardware requirements for you masternode or evonode:
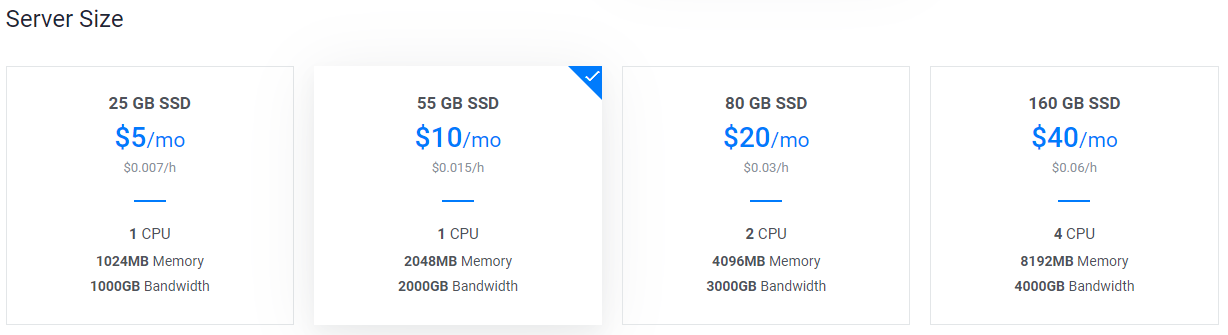
شاشة اختيار حجم الخادم Vultr#
أدخل اسم المضيف وتسمية الخادم الخاص بك. في هذا المثال ، سنستخدم dashmn1 كاسم مضيف.

شاشة اختيار تسمية مضيف خادم Vultr#
سوف Vultr الآن تثبيت الخادم الخاص بك. قد تستغرق هذه العملية بضع دقائق.

شاشة تثبيت خادم Vultr#
انقر فوق ادارة عند اكتمال التثبيت وتحيط علما بعنوان IP واسم المستخدم وكلمة المرور.
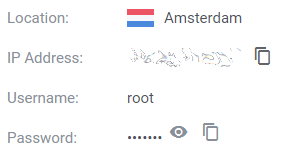
شاشة إدارة خادم Vultr#
قم بإعداد نظام التشغيل الخاص بك#
سنبدأ بالاتصال بخادمك الجديد الذي تم توفيره. على ويندوز ، سنقوم أولاً بتنزيل تطبيق يسمى PuTTY للاتصال بالخادم. اذهب الى تحميل وحدد مثبت MSI المناسب لنظامك. على ماك أو لينكس يمكنك ssh مباشرة من المحطة - ببساطة اكتب ssh root@ <server_ip> و ادخل الرقم السري للإنتهاء.
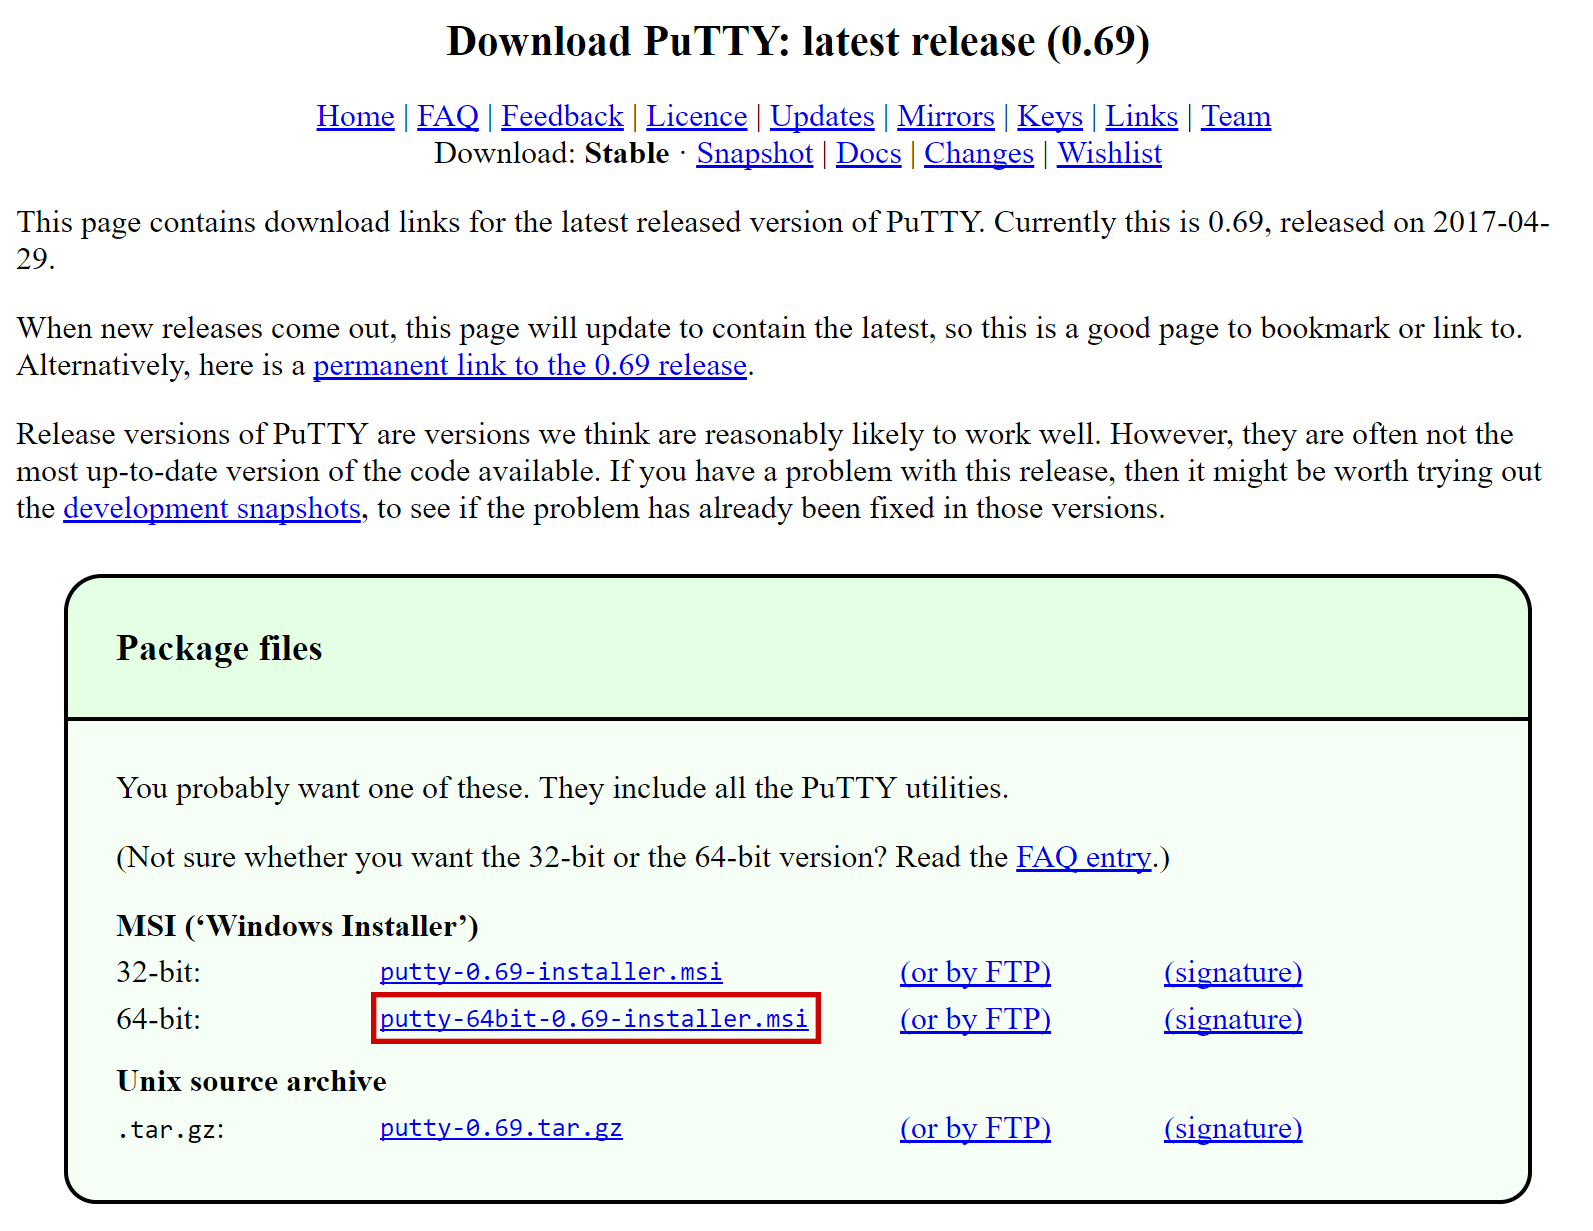
صفحة التحميل PuTTY#
انقر نقرًا مزدوجًا فوق الملف الذي تم تنزيله لتثبيت PuTTY ، ثم قم بتشغيل التطبيق من قائمة بدأ ادخل عنوان IP الخاص بالخادم في الحقل اسم المضيف وانقر فوق فتح. قد تشاهد تحذيرًا بوجود شهادة ، نظرًا لأن هذه هي المرة الأولى التي تتصل فيها بهذا الخادم. يمكنك النقر بأمان نعم للوثوق بهذا الخادم في المستقبل.
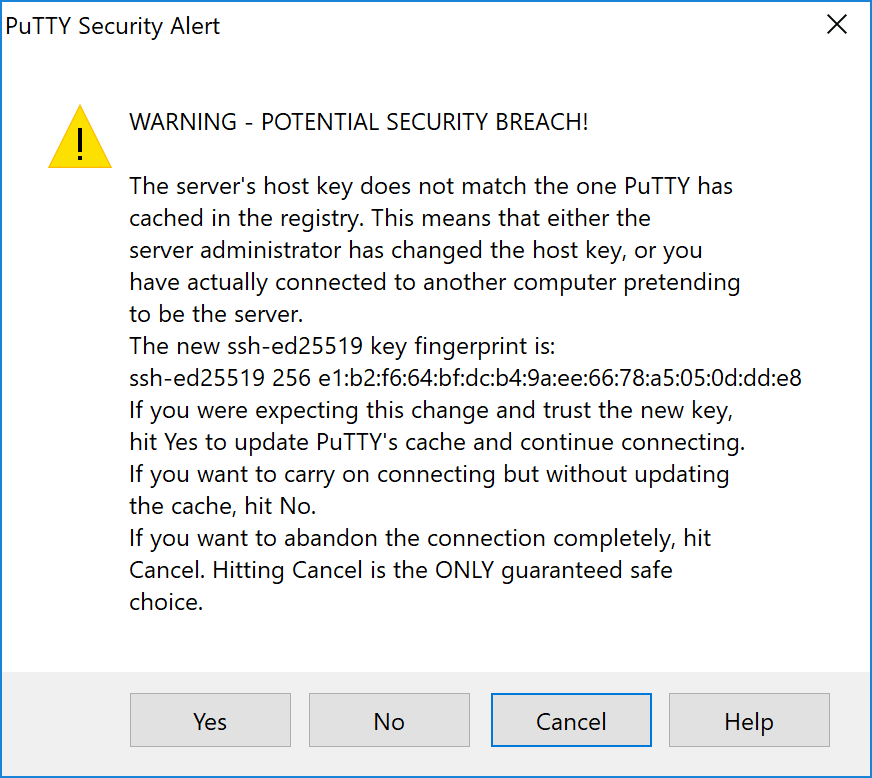
تنبيه الأمان PuTTY عند الاتصال بخادم جديد#
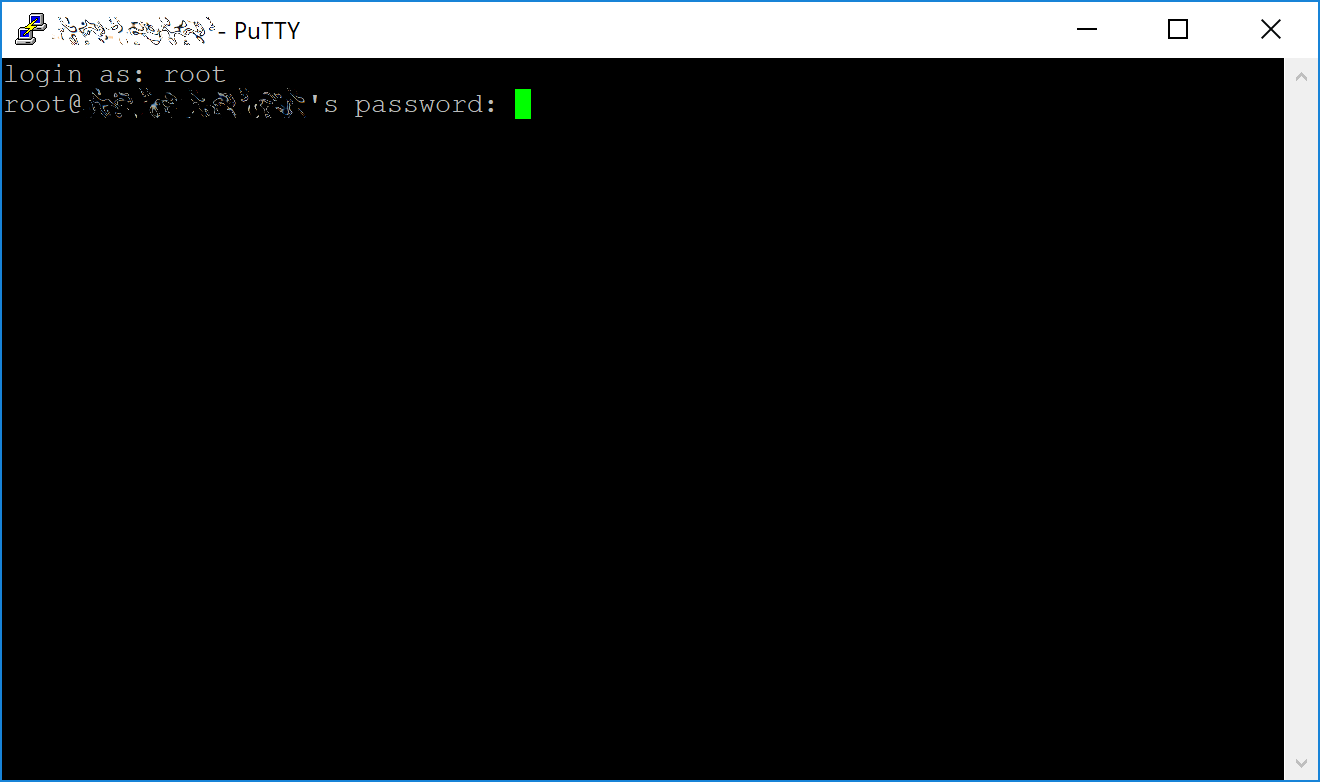
أنت الآن متصل بخادمك ويجب أن تشاهد نافذة طرفية. قم بتسجيل الدخول إلى الخادم الخاص بك باستخدام المستخدم root وكلمة المرور التي قدمها مزود خدمة الاستضافة الخاص بك.
تحديت كلمة المرور عند الاتصال بـ VPS الخاص بك لأول مرة#
Set up users#
يجب تغيير كلمة مرور الجذر فوراً وتخزينها في مكان آمن للأمان. يمكنك نسخ أي من الأوامر التالية ولصقها من خلال تحديدها في المستعرض الخاص بك ، بالضغط على Ctrl + C ، ثم التبديل إلى نافذة PuTTY والنقر بزر الماوس الأيمن في النافذة. سيتم لصق النص في موقع المؤشر الحالي
passwd root
أدخل كلمة مرور جديدة وقم بتأكيدها (يفضل أن تكون طويلة ومولدة بشكل عشوائي). بعد ذلك سننشئ مستخدمًا جديدًا باستخدام الأمر التالي ، مع استبداله <username> مع اسم مستخدم من اختيارك
adduser <username>
ستتم مطالبتك بكلمة مرور. أدخل وتأكد باستخدام كلمة مرور جديدة (مختلفة عن كلمة مرور الجذر) وقم بتخزينها في مكان آمن. سترى أيضًا مطالبات بمعلومات المستخدم ، ولكن يمكن ترك هذا فارغًا. بمجرد أن يتم إنشاء المستخدم ، سنقوم بإضافتهم إلى المجموعة sudo بحيث يمكنهم تنفيذ الأوامر كجذر
usermod -aG sudo <username>
Update the system#
الآن ، بينما لا يزال الجذر ، سنقوم بتحديث النظام من مستودع حزمة أوبونتو
apt update
apt upgrade
The system will show a list of upgradable packages. Press Y and Enter to install the packages.
Disable IPv6#
We recommend turning off IPv6 to avoid potential communication issues. If you cannot do this through your VPS provider's server configuration settings, use the following steps to disable it through the operating system.
Check if IPv6 is enabled:
ip a | grep inet6
If multiple inet6 entries are returned, open sysctrl.conf:
sudo nano /etc/sysctl.conf
Add the following lines at the end of the file, then press Ctrl + X to close the editor, then Y and Enter save the file.:
net.ipv6.conf.all.disable_ipv6 = 1
net.ipv6.conf.default.disable_ipv6 = 1
net.ipv6.conf.lo.disable_ipv6 = 1
Load the changes:
sudo sysctl -p
Finally, check if IPv6 was successfully disabled. No entries should be returned when you run the command this time:
ip a | grep inet6
Configure the firewall#
We will now install a firewall (and some other packages we will use later):
apt install ufw python3 virtualenv git unzip pv
(اضغط Y و ادخل للتأكيد)
Choose the appropriate firewall configuration below based on which network and masternode type your masternode will support:
ufw limit ssh/tcp
ufw allow 9999/tcp
ufw logging on
ufw enable
ufw limit ssh/tcp
ufw allow 443/tcp
ufw allow 9999/tcp
ufw allow 26656/tcp
# Uncomment the following line if using automatic certificate renewal (Let's Encrypt, ZeroSSL, etc.)
# ufw allow 80/tcp
ufw logging on
ufw enable
ufw limit ssh/tcp
ufw allow 1443/tcp
ufw allow 19999/tcp
ufw allow 36656/tcp
ufw logging on
ufw enable
(اضغط Y و ادخل للتأكيد)
Enable swap#
Next, we will add swap memory, enable it, and set it to be enabled on subsequent reboots:
fallocate -l 4G /swapfile
chmod 600 /swapfile
mkswap /swapfile
swapon /swapfile
nano /etc/fstab
أضف السطر التالي في نهاية الملف (اضغط على Tab لفصل كل كلمة / رقم) ، ثم اضغط Ctrl + X لإغلاق المحرر ، ثم Y و ادخل احفظ الملف .
/swapfile none swap sw 0 0
Restrict remote access#
Finally, in order to prevent brute force password hacking attacks, we will install fail2ban and disable root login over ssh. These steps are optional, but highly recommended. Start with fail2ban:
apt install fail2ban
Create a new configuration file:
nano /etc/fail2ban/jail.local
And paste in the following configuration:
[sshd]
enabled = true
port = 22
filter = sshd
logpath = /var/log/auth.log
maxretry = 3
Then press Ctrl + X to close the editor, then Y and Enter save the file. Restart and enable the fail2ban service:
systemctl restart fail2ban
systemctl enable fail2ban
Next, open the SSH configuration file to disable root login over SSH:
nano /etc/ssh/sshd_config
Locate the line that reads PermitRootLogin yes and set it to
PermitRootLogin no. Directly below this, add a line which reads AllowUsers
<username>, replacing <username> with the username you selected above.
Then press Ctrl + X to close the editor, then Y and Enter save the
file.
Optionally install or update AppArmor (try this step if you are having problems related to AppArmor):
sudo apt install apparmor
Reboot#
Now, reboot the server to apply any necessary kernel updates:
reboot now
Your SSH client (e.g. PuTTY) will disconnect when the server reboots.
ملاحظة
While this setup includes basic steps to protect your server against attacks, much more can be done. In particular, authenticating with a public key instead of a username/password combination. Enabling automatic security updates is advisable. More tips are available here.