الموضوعات المتقدمة#
تحكم في العملة#
يتيح نظام التحكم في العملة لمستخدمي محفظة داش كور تحديد العناوين والمخرجات غير المستخدمة (UTXOs) التي يجب استخدامها كمدخلات في المعاملات. هذا يسمح لك بالحفاظ على رصيد معين على بعض العناوين في محفظتك ، بينما تنفق الآخرين بحرية. في محفظة داش كور ، انقر على الإعدادات> الخيارات> المحفظة> تمكين ميزات التحكم بالعملة. الآن ، عندما تذهب إلى علامة التبويب "إرسال" في محفظتك ، سيظهر زر جديد يسمى لمدخلات . انقر فوق هذا الزر لتحديد أي UTXOs يمكن استخدامه كمدخل لأية معاملات تقوم بإنشائها. تظهر النافذة التالية:
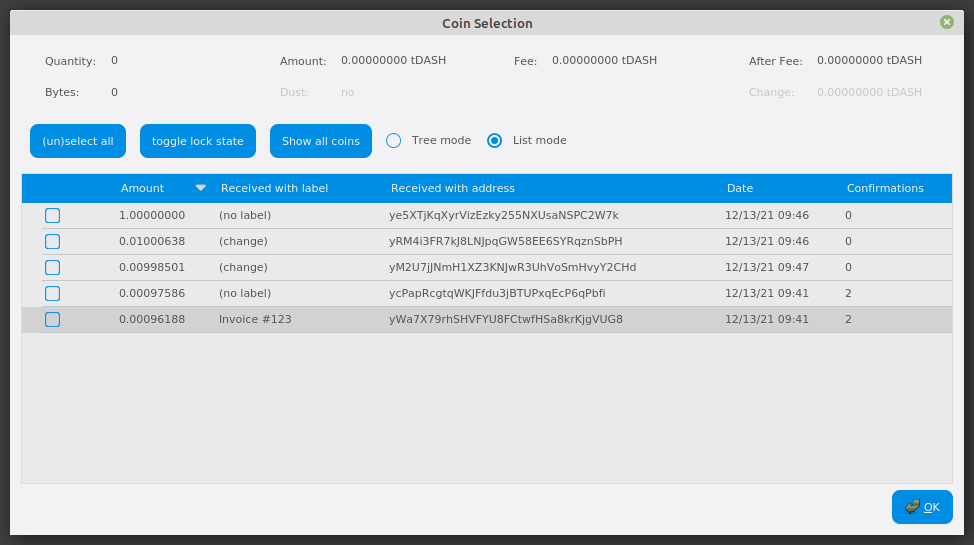
نافذة اختيار النقود في محفظة داش كور ، تظهر اثنين من ماسترنود (testnet)#
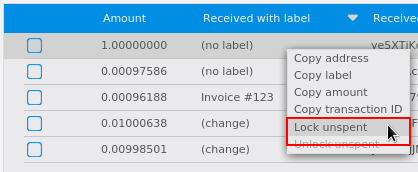
انقر بزر الماوس الأيمن على المعاملة (المعاملات) التي لا ترغب في إنفاقها ، ثم حدد قفل بدون رصيد. سيظهر قفل صغير بجوار المعاملة. يمكنك النقر فوق الزر تبديل قفل الحالة لعكس حالة القفل / عدم القفل لجميع أجهزة UTXO. عندما تكون مستعدًا للمتابعة ، انقر فوق موافق. يمكنك الآن إنشاء معاملات بأموالك المتبقية بأمان دون التأثير على UTXOs المقفلة.
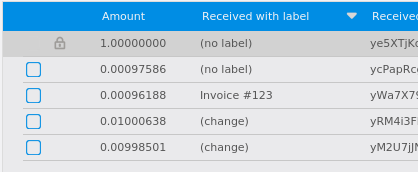
قفل UTXOs في محفظة الأساسية داش#
Running Dash Testnet#
It is recommended to run Dash Core on testnet for your experimentations. To start on testnet via the command line, do the following:
For Linux:
./dash-qt -testnet
For Mac (run from Applications/Dash-Qt.app/Contents/MacOS):
Dash-Qt -testnet
Note: You may need to allow an app from an unknown developer before running this. Cmd+Click on the application and click Open.
Now, open Mac Terminal and run:
cd /Applications/Dash-Qt.app/Contents/MacOS
./Dash-Qt -testnet
You may top up your testnet wallet by accessing the faucet.
محافظ HD#
Added in version v20.1.0: HD wallets are now created by default.
Dash Core includes an implementation of BIP39/BIP44 compatible hierarchical deterministic (HD) key generation.
Upgrade to HD#
تحذير
A new backup must be created after upgrading to an HD wallet.
Dash Core includes the ability upgrade a non-hierarchical deterministic (HD)
wallet to an HD wallet via the upgradetohd command. The command can be run
by either opening the console from Window > Console or issuing the following
RPC command from dash-cli:
upgradetohd "" "" <walletpassphrase>
If your wallet is already encrypted you must enter the passphrase as the third parameter to the command. If your wallet is not already encrypted, specifying a wallet passphrase will trigger wallet encryption.
To see full details for the command, run the following from either the console
or dash-cli:
help upgradetohd
View HD wallet information#
Open the console from Window > Console or issue the following RPC command
from dash-cli to view the mnemonic seed:
dumphdinfo
Dash Core will display the HD seed in both hexadecimal and BIP39 mnemonic formats. It will also display the mnemonic passphrase if one was used when creating the wallet.
Restore HD wallet#
To restore an existing HD wallet, or define your own separately generated mnemonic and/or passphrase, create a new blank wallet with following command:
createwallet "enter wallet name" false true "optional wallet password"
Add the HD wallet details to the newly created wallet by running:
upgradetohd "enter mnemonic" "optional mnemonic passphrase" "optional wallet passphrase"
ستتم استعادة محفظة HD وسيظهر رصيدك بمجرد اكتمال المزامنة.
Note that the wallet passphrase is different to the mnemonic passphrase, which is often also referred to as the "25th word" or "extension word". The wallet passphrase encrypts the wallet file itself, while the mnemonic passphrase is used to specify different derivation branches from the same mnemonic seed.
Enable HD Wallet Creation By Default#
Added in version v20.1.0: HD wallets are now created by default without requiring the steps listed below.
Prior to Dash Core v20.1.0, it was necessary to complete theses steps to make HD
wallet the default. We will use the Windows GUI wallet in this example, but the
commands are similar if using dash-qt or dashd on other operating
systems. Enter the following command to configure Dash Core to generate HD
wallets by default:
dash-qt.exe -usehd
To make this configuration persist between restarts, add usehd=1 to the
dash.conf file.
متعدد التوقيع#
This section presents a worked example to demonstrate multisig functionality in Dash Core. While the transactions may no longer be visible on the current testnet blockchain and some address formats or RPC responses may differ slightly from the version shown here, the principle and commands are the same. The example demonstrates how to set up a 2-of-3 multisig address and create a transaction. The example parties involved are a buyer, a seller and an arbiter. This example is based on:
الخطوة 1: إنشاء ثلاثة عناوين#
البائع:
seller@testnet03:~$ ./dash-cli getnewaddress
yfw6wPY5eo6sWxcU93ej3fRD9VXzppEYkm

seller@testnet03:~$ ./dash-cli getaddressinfo yfw6wPY5eo6sWxcU93ej3fRD9VXzppEYkm
{
  "address": "yfw6wPY5eo6sWxcU93ej3fRD9VXzppEYkm",
  "scriptPubKey": "76a914d728be76cd74b5d148eba2a49246b80dac12f73e88ac",
  "ismine": true,
  "solvable": true,
  "desc": "pkh([d728be76]02a862b412ff9e3afd01a2873a02622897f6df92e3fc85597788b898309fec882e)#7y7rcew8",
  "iswatchonly": false,
  "isscript": false,
  "pubkey": "02a862b412ff9e3afd01a2873a02622897f6df92e3fc85597788b898309fec882e",
  "iscompressed": true,
  "ischange": false,
  "timestamp": 1,
  "labels": [
    "seller"
  ]
}

seller@testnet03:~$ ./dash-cli dumpprivkey yfw6wPY5eo6sWxcU93ej3fRD9VXzppEYkm
cVQVgBr8sW4FTPYz16BSCo1PcAfDhpJArgMPdLxKZQWcVFwMXRXx
المشتري:
buyer@testnet03:~$ ./dash-cli getnewaddress
yUtJQSYvqoicEpUiMiaiSy16Fimpjz6Kjj

buyer@testnet03:~$ ./dash-cli getaddressinfo yUtJQSYvqoicEpUiMiaiSy16Fimpjz6Kjj
{
  "address": "yUtJQSYvqoicEpUiMiaiSy16Fimpjz6Kjj",
  "scriptPubKey": "76a9145df7af25fa0654c90f359034ac756de71f5f25dc88ac",
  "ismine": true,
  "solvable": true,
  "desc": "pkh([5df7af25]0315617694c9d93f0ce92769e050a6868ffc74d229077379c0af8bfb193c3d351c)#795y6m9z",
  "iswatchonly": false,
  "isscript": false,
  "pubkey": "0315617694c9d93f0ce92769e050a6868ffc74d229077379c0af8bfb193c3d351c",
  "iscompressed": true,
  "ischange": false,
  "timestamp": 1,
  "labels": [
    "buyer"
  ]
}

buyer@testnet03:~$ ./dash-cli dumpprivkey yUtJQSYvqoicEpUiMiaiSy16Fimpjz6Kjj
cP9DFmEDb11waWbQ8eG1YUoZCGe59BBxJF3kk95PTMXuG9HzcxnU
الوسيط:
arbiter@testnet03:~$ ./dash-cli getnewaddress
ygR4183tHp46oRuEk4RL1Jz7SkNubE7osu

arbiter@testnet03:~$ ./dash-cli getaddressinfo ygR4183tHp46oRuEk4RL1Jz7SkNubE7osu
{
  "address": "ygR4183tHp46oRuEk4RL1Jz7SkNubE7osu",
  "scriptPubKey": "76a914dc71f0bcf448f9198cdbb1e6f5ca7ba96689fbe188ac",
  "ismine": true,
  "solvable": true,
  "desc": "pkh([dc71f0bc]0287ce6cf69b85593ce7db801874c9a2fb1b653dbe5dd9ebfa73e98b710af9e9ce)#3u5h82dc",
  "iswatchonly": false,
  "isscript": false,
  "pubkey": "0287ce6cf69b85593ce7db801874c9a2fb1b653dbe5dd9ebfa73e98b710af9e9ce",
  "iscompressed": true,
  "ischange": false,
  "timestamp": 1,
  "labels": [
    "arbiter"
  ]
}

arbiter@testnet03:~$ ./dash-cli dumpprivkey ygR4183tHp46oRuEk4RL1Jz7SkNubE7osu
cUbDFL81a2w6urAGZf7ecGbdzM82pdHLeCaPXdDp71s96SzDV49M
هذه النتائج في ثلاثة keypairs (عام / خاص)
seller:    02a862b412ff9e3afd01a2873a02622897f6df92e3fc85597788b898309fec882e / cVQVgBr8sW4FTPYz16BSCo1PcAfDhpJArgMPdLxKZQWcVFwMXRXx
buyer:     0315617694c9d93f0ce92769e050a6868ffc74d229077379c0af8bfb193c3d351c / cP9DFmEDb11waWbQ8eG1YUoZCGe59BBxJF3kk95PTMXuG9HzcxnU
arbiter:   0287ce6cf69b85593ce7db801874c9a2fb1b653dbe5dd9ebfa73e98b710af9e9ce / cUbDFL81a2w6urAGZf7ecGbdzM82pdHLeCaPXdDp71s96SzDV49M
الخطوة 2: إنشاء عنوان multisig#
يأخذ الأمر createmultisig كمتغيرات ، عدد n من التوقيعات لمفاتيح m (المقدمة كصفيف json) مطلوب. في هذا المثال ، مطلوب 2 من 3 مفاتيح لتوقيع المعاملة.
ملاحظة: يمكن إنشاء العنوان بواسطة أي شخص ، طالما أن المفاتيح العامة وتسلسلها معروفان (العنوان الناتج وواجهة الاسترداد متطابقان ، انظر أدناه).
البائع:
seller@testnet03:~$ ./dash-cli createmultisig 2 '["02a862b412ff9e3afd01a2873a02622897f6df92e3fc85597788b898309fec882e","0315617694c9d93f0ce92769e050a6868ffc74d229077379c0af8bfb193c3d351c","0287ce6cf69b85593ce7db801874c9a2fb1b653dbe5dd9ebfa73e98b710af9e9ce"]'
{
  "address": "8gQdvLw7pF7jd8mjGU3nRNESdWi9gkHRZy",
  "redeemScript": "522102a862b412ff9e3afd01a2873a02622897f6df92e3fc85597788b898309fec882e210315617694c9d93f0ce92769e050a6868ffc74d229077379c0af8bfb193c3d351c210287ce6cf69b85593ce7db801874c9a2fb1b653dbe5dd9ebfa73e98b710af9e9ce53ae",
  "descriptor": "sh(multi(2,02a862b412ff9e3afd01a2873a02622897f6df92e3fc85597788b898309fec882e,0315617694c9d93f0ce92769e050a6868ffc74d229077379c0af8bfb193c3d351c,0287ce6cf69b85593ce7db801874c9a2fb1b653dbe5dd9ebfa73e98b710af9e9ce))#36ymhjhs"
}
المشتري:
buyer@testnet03:~$ ./dash-cli createmultisig 2 '["02a862b412ff9e3afd01a2873a02622897f6df92e3fc85597788b898309fec882e","0315617694c9d93f0ce92769e050a6868ffc74d229077379c0af8bfb193c3d351c","0287ce6cf69b85593ce7db801874c9a2fb1b653dbe5dd9ebfa73e98b710af9e9ce"]'
{
  "address": "8gQdvLw7pF7jd8mjGU3nRNESdWi9gkHRZy",
  "redeemScript": "522102a862b412ff9e3afd01a2873a02622897f6df92e3fc85597788b898309fec882e210315617694c9d93f0ce92769e050a6868ffc74d229077379c0af8bfb193c3d351c210287ce6cf69b85593ce7db801874c9a2fb1b653dbe5dd9ebfa73e98b710af9e9ce53ae",
  "descriptor": "sh(multi(2,02a862b412ff9e3afd01a2873a02622897f6df92e3fc85597788b898309fec882e,0315617694c9d93f0ce92769e050a6868ffc74d229077379c0af8bfb193c3d351c,0287ce6cf69b85593ce7db801874c9a2fb1b653dbe5dd9ebfa73e98b710af9e9ce))#36ymhjhs"
}
الوسيط:
arbiter@testnet03:~$ ./dash-cli createmultisig 2 '["02a862b412ff9e3afd01a2873a02622897f6df92e3fc85597788b898309fec882e","0315617694c9d93f0ce92769e050a6868ffc74d229077379c0af8bfb193c3d351c","0287ce6cf69b85593ce7db801874c9a2fb1b653dbe5dd9ebfa73e98b710af9e9ce"]'
{
  "address": "8gQdvLw7pF7jd8mjGU3nRNESdWi9gkHRZy",
  "redeemScript": "522102a862b412ff9e3afd01a2873a02622897f6df92e3fc85597788b898309fec882e210315617694c9d93f0ce92769e050a6868ffc74d229077379c0af8bfb193c3d351c210287ce6cf69b85593ce7db801874c9a2fb1b653dbe5dd9ebfa73e98b710af9e9ce53ae",
  "descriptor": "sh(multi(2,02a862b412ff9e3afd01a2873a02622897f6df92e3fc85597788b898309fec882e,0315617694c9d93f0ce92769e050a6868ffc74d229077379c0af8bfb193c3d351c,0287ce6cf69b85593ce7db801874c9a2fb1b653dbe5dd9ebfa73e98b710af9e9ce))#36ymhjhs"
}
الخطوة 3: يقوم المشتري بتمويل عنوان multisig#
هذا يعمل نفس المعاملة المعتادة.
المشتري:
buyer@testnet03:~$ ./dash-cli sendtoaddress 8gQdvLw7pF7jd8mjGU3nRNESdWi9gkHRZy 0.25
48e6f8f0108549bf932e4d6833fe707d7edafe490788c2ebde688635a995538e
يمكن للبائع / الوسيط تتبع المعاملة بواسطة txid في مستكشف كتلة. أو من وحدة التحكم على النحو التالي.
المشتري:
seller@testnet03:~$ ./dash-cli getrawtransaction 48e6f8f0108549bf932e4d6833fe707d7edafe490788c2ebde688635a995538e 1
{
  "hex" : "02000000068ad5c86eae519b0ba11f8314d5cdf50c872331e7c7efa2eece2107d669cc8926010000006a473044022060e3e8a5194adc690a1d39db181214c56596bdcfef67a5deb2c0932112a56c20022043acb1cb88eb590076ac41ec345c491cab8368befd2513bc7d8cebf378559737012103207b3ed8ce5b61e1dbd1b967e9dc5729d096274e41f43ec3dcff897012425e2dfeffffff2d6d9c0d3dafb66744da94676f4e7f76461241e60dc9cba3bcaa9ac6033b052e000000006a47304402207abaa4b6b4c7fdbd41d1885303dd3f0ae6b350ec5af19546f3fe616cbc5b5b7802201868fdda71c29364c52e6359868c22376a1091b19f6e1184de93d95eb61f3289012103e531f14fdace3f41ce041c366413aaabf26ed837ea6483d4a4f36af376c93b42feffffff1bd67d51fb6c6552c7241a6631a0c08c69517f06f84c4921a3130d74fe722475000000006a47304402203dcbbb063efe24b93c4a37b4efcbc22b2def077610810e1659a236922857393502202b034ab74554b79ca34e21d10a7b9dbf2517f1a79e028a6ed11cd4a28a684376012103622883e8029d188581291e26783991a450b2e38a8b832a5924171e961d8fc7affefffffff2c54c61c55079f0e63eed06c0b3c261e640d985690cefb487370b714ef4ca8c000000006a4730440220462da4ec78ab804fc66844615019979273c20b6c3dbd73e58def7539ac47817102201572a458013e29753b87a390ab06eb7ca71789136f8b8183e19897f30bd49847012103900531aa50569ad35a555726d703b8455e53567e3788369d68f47210e771b61bfeffffff435365937ffb7cc39acc1a8a4678a9273fe0c1384a37565f3748293e717333c7000000006a4730440220233497587ae0377eae2aee5c879893bf6eba0a463c67ac2f995370249730d8390220176e9e818e256c653888046a150bdde0f2e99dcc56c4b339a8615af56695b85f0121035c0a7d6e4e95d2e2802f1c8d8cf37b1597b7b67b4e1a277745b982ae4485156afeffffffcc0aa97c5b5e1ab12d808108285a38e54bd2fe98fe9489cb78bb1fde6b740fff000000006a4730440220731f21d1e766e6408e404fcfc317d507cc03ad09b9d63e76abac83b9b512ad5a022073b73bccd272e4d52a4fe0533887c3a7280a9f440ec78c54e484e1c0e8051e6d012103207b3ed8ce5b61e1dbd1b967e9dc5729d096274e41f43ec3dcff897012425e2dfeffffff02a1910f00000000001976a9147ab95aa3133061fbe7ad020cc638b82451c9acdc88ac40787d010000000017a91415c85c2472f5941b60a49462a2cfd0d17ab49d1c8768500f00",
  "txid" : "48e6f8f0108549bf932e4d6833fe707d7edafe490788c2ebde688635a995538e",
  "version" : 2,
  "locktime" : 1003624,
[...]
  "vout" : [
      {
        "value": 0.25000000,
        "valueSat": 25000000,
        "n": 1,
        "scriptPubKey": {
          "asm": "OP_HASH160 15c85c2472f5941b60a49462a2cfd0d17ab49d1c OP_EQUAL",
          "hex": "a91415c85c2472f5941b60a49462a2cfd0d17ab49d1c87",
          "reqSigs": 1,
          "type": "scripthash",
          "addresses": [
            "8gQdvLw7pF7jd8mjGU3nRNESdWi9gkHRZy"
          ]
        }
      }
[...]
    ],
  "blockhash": "000000bd679c0934333da72d25b85df9a120e2a166d945a8ace514ccd894e809",
  "height": 1003625,
  "confirmations": 9,
  "time": 1712596571,
  "blocktime": 1712596571,
  "instantlock": true,
  "instantlock_internal": true,
  "chainlock": true
}
الخطوة 4: إنفاق multisig#
الآن نحن نفترض أن الصفقة كاملة ، والمشتري حصلت على السلع والجميع سعداء. الآن البائع يريد الحصول على داش. كما تم استخدام 2- من -3 جزيئات ، يجب أن يتم التوقيع على المعاملة من قبل الطرفين (البائع + المشتري أو الحكام). ينشئ البائع معاملة (سنقوم بإعادة استخدام عنوانه العام من الأعلى).
البائع:
seller@testnet03:~$ ./dash-cli createrawtransaction '[{"txid":"48e6f8f0108549bf932e4d6833fe707d7edafe490788c2ebde688635a995538e","vout":1}]' '{"yfw6wPY5eo6sWxcU93ej3fRD9VXzppEYkm":0.249}'
02000000018e5395a9358668deebc2880749feda7e7d70fe33684d2e93bf498510f0f8e6480100000000ffffffff01a0f17b01000000001976a914d728be76cd74b5d148eba2a49246b80dac12f73e88ac00000000
ويوقع عليها جزئيًا ، باستخدام redeemScript و scriptPubKey ومفتاحه الخاص
البائع:
seller@testnet03:~$ ./dash-cli signrawtransactionwithkey '02000000018e5395a9358668deebc2880749feda7e7d70fe33684d2e93bf498510f0f8e6480100000000ffffffff01a0f17b01000000001976a914d728be76cd74b5d148eba2a49246b80dac12f73e88ac00000000' '["cVQVgBr8sW4FTPYz16BSCo1PcAfDhpJArgMPdLxKZQWcVFwMXRXx"]' '[{"txid":"a8b3bf5bcace91a8dbbddbf9b7eb027efb9bd001792f043ecf7b558aaa3cb951","vout":0,"scriptPubKey":"a91415c85c2472f5941b60a49462a2cfd0d17ab49d1c87","redeemScript":"522102a862b412ff9e3afd01a2873a02622897f6df92e3fc85597788b898309fec882e210315617694c9d93f0ce92769e050a6868ffc74d229077379c0af8bfb193c3d351c210287ce6cf69b85593ce7db801874c9a2fb1b653dbe5dd9ebfa73e98b710af9e9ce53ae"}]'
{
  "hex": "02000000018e5395a9358668deebc2880749feda7e7d70fe33684d2e93bf498510f0f8e64801000000b50047304402207574d2af348ba67768849fa630dc42af546a382ecc85e941574b04dd419edd3002201c5704eb32d1df724c258e8bc4d6aa607abe4c01b9a295c3fdfca1763a328edd01004c69522102a862b412ff9e3afd01a2873a02622897f6df92e3fc85597788b898309fec882e210315617694c9d93f0ce92769e050a6868ffc74d229077379c0af8bfb193c3d351c210287ce6cf69b85593ce7db801874c9a2fb1b653dbe5dd9ebfa73e98b710af9e9ce53aeffffffff01a0f17b01000000001976a914d728be76cd74b5d148eba2a49246b80dac12f73e88ac00000000",
  "complete": false,
  "errors": [
    {
      "txid": "48e6f8f0108549bf932e4d6833fe707d7edafe490788c2ebde688635a995538e",
      "vout": 1,
      "scriptSig": "0047304402207574d2af348ba67768849fa630dc42af546a382ecc85e941574b04dd419edd3002201c5704eb32d1df724c258e8bc4d6aa607abe4c01b9a295c3fdfca1763a328edd01004c69522102a862b412ff9e3afd01a2873a02622897f6df92e3fc85597788b898309fec882e210315617694c9d93f0ce92769e050a6868ffc74d229077379c0af8bfb193c3d351c210287ce6cf69b85593ce7db801874c9a2fb1b653dbe5dd9ebfa73e98b710af9e9ce53ae",
      "sequence": 4294967295,
      "error": "CHECK(MULTI)SIG failing with non-zero signature (possibly need more signatures)"
    }
  ]
}
لاحظ أن سداسي المخرجات يحصل على وقت أطول ، ولكن العلم الكامل هو "خطأ" لأن المعاملة تحتاج إلى توقيع آخر. لذلك الآن يمكن للمشتري أو للحكم إكمال توقيع المعاملة ، باستخدام المخرجات من الأعلى ومفتاحها الخاص. لنفترض أن المشتري يكمل التوقيع.
المشتري:
buyer@testnet03:~$ ./dash-cli signrawtransactionwithkey '02000000018e5395a9358668deebc2880749feda7e7d70fe33684d2e93bf498510f0f8e64801000000b50047304402207574d2af348ba67768849fa630dc42af546a382ecc85e941574b04dd419edd3002201c5704eb32d1df724c258e8bc4d6aa607abe4c01b9a295c3fdfca1763a328edd01004c69522102a862b412ff9e3afd01a2873a02622897f6df92e3fc85597788b898309fec882e210315617694c9d93f0ce92769e050a6868ffc74d229077379c0af8bfb193c3d351c210287ce6cf69b85593ce7db801874c9a2fb1b653dbe5dd9ebfa73e98b710af9e9ce53aeffffffff01a0f17b01000000001976a914d728be76cd74b5d148eba2a49246b80dac12f73e88ac00000000' '["cP9DFmEDb11waWbQ8eG1YUoZCGe59BBxJF3kk95PTMXuG9HzcxnU"]' '[{"txid":"a8b3bf5bcace91a8dbbddbf9b7eb027efb9bd001792f043ecf7b558aaa3cb951","vout":0,"scriptPubKey":"a91415c85c2472f5941b60a49462a2cfd0d17ab49d1c87","redeemScript":"522102a862b412ff9e3afd01a2873a02622897f6df92e3fc85597788b898309fec882e210315617694c9d93f0ce92769e050a6868ffc74d229077379c0af8bfb193c3d351c210287ce6cf69b85593ce7db801874c9a2fb1b653dbe5dd9ebfa73e98b710af9e9ce53ae"}]'
{
  "hex": "02000000018e5395a9358668deebc2880749feda7e7d70fe33684d2e93bf498510f0f8e64801000000fc0047304402207574d2af348ba67768849fa630dc42af546a382ecc85e941574b04dd419edd3002201c5704eb32d1df724c258e8bc4d6aa607abe4c01b9a295c3fdfca1763a328edd014730440220764019282400fab0e3bb431b04fada7daca528054e903f13d08deadee01d7c5a02204c7e4e484820e16af0951bc48371c3d0175de4114cee11dc86707b2489432b15014c69522102a862b412ff9e3afd01a2873a02622897f6df92e3fc85597788b898309fec882e210315617694c9d93f0ce92769e050a6868ffc74d229077379c0af8bfb193c3d351c210287ce6cf69b85593ce7db801874c9a2fb1b653dbe5dd9ebfa73e98b710af9e9ce53aeffffffff01a0f17b01000000001976a914d728be76cd74b5d148eba2a49246b80dac12f73e88ac00000000",
  "complete": true
}
اكتمال التوقيع الآن ، ويمكن لأي من الطرفين نقل المعاملة إلى الشبكة.
المشتري:
buyer@testnet03:~$ ./dash-cli sendrawtransaction 02000000018e5395a9358668deebc2880749feda7e7d70fe33684d2e93bf498510f0f8e64801000000fc0047304402207574d2af348ba67768849fa630dc42af546a382ecc85e941574b04dd419edd3002201c5704eb32d1df724c258e8bc4d6aa607abe4c01b9a295c3fdfca1763a328edd014730440220764019282400fab0e3bb431b04fada7daca528054e903f13d08deadee01d7c5a02204c7e4e484820e16af0951bc48371c3d0175de4114cee11dc86707b2489432b15014c69522102a862b412ff9e3afd01a2873a02622897f6df92e3fc85597788b898309fec882e210315617694c9d93f0ce92769e050a6868ffc74d229077379c0af8bfb193c3d351c210287ce6cf69b85593ce7db801874c9a2fb1b653dbe5dd9ebfa73e98b710af9e9ce53aeffffffff01a0f17b01000000001976a914d728be76cd74b5d148eba2a49246b80dac12f73e88ac00000000
d6b27fb30be3d79588900c3f2fb433f8a68fdae70bfa9d6dbad5dd33ed25ba2c
مرة أخرى ، يمكن تتبع هذه المعاملة في مستكشف كتلة. ويسعد البائع باستلام عملاته المعدنية في عنوانه العام على النحو التالي.
البائع:
seller@testnet03:~$ dash-cli listtransactions "*" 1
[
  {
    "involvesWatchonly": true,
    "address": "yfw6wPY5eo6sWxcU93ej3fRD9VXzppEYkm",
    "category": "receive",
    "amount": 0.24900000,
    "label": "seller",
    "vout": 0,
    "confirmations": 1,
    "instantlock": true,
    "instantlock_internal": true,
    "chainlock": true,
    "blockhash": "000000f25253e46db14c5a0316321ea45e0d7c747d00398fc06becd71e93be44",
    "blockheight": 1003642,
    "blockindex": 4,
    "blocktime": 1712598497,
    "txid": "d6b27fb30be3d79588900c3f2fb433f8a68fdae70bfa9d6dbad5dd33ed25ba2c",
    "walletconflicts": [
    ],
    "time": 1712598489,
    "timereceived": 1712598489
  }
]
Daemon#
Dash can be run as a background process (or daemon) on Linux systems. This is particularly useful if you are running Dash as a server instead of as a GUI node. This guide assumes you have installed Dash Core for Linux as described in the دليل التتبيث في لينكس.
Create a user and group to run the daemon:
sudo useradd -m dash -s /bin/bash
Create a data directory for Dash in the new user's home directory:
sudo -u dash mkdir -p /home/dash/.dashcore
Create a configuration file in the new Dash data directory:
sudo -u dash nano /home/dash/.dashcore/dash.conf
Paste the following basic configuration to your
dash.conffile, replacing the password with a long and random password:listen=1 server=1 daemon=1
Register the
dashddaemon as a system service by creating the following file:sudo nano /etc/systemd/system/dashd.service
Paste the following daemon configuration into the file:
[Unit]
Description=Dash Core Daemon
After=syslog.target network-online.target

[Service]
Type=forking
User=dash
Group=dash
OOMScoreAdjust=-1000
ExecStart=/usr/local/bin/dashd -pid=/home/dash/.dashcore/dashd.pid
TimeoutStartSec=10m
ExecStop=/usr/local/bin/dash-cli stop
TimeoutStopSec=120
Restart=on-failure
RestartSec=120
StartLimitInterval=300
StartLimitBurst=3

[Install]
WantedBy=multi-user.target
Register and start the daemon with systemd:
sudo systemctl daemon-reload
sudo systemctl enable dashd
sudo systemctl start dashd
Dash is now installed as a system daemon. View the status as follows:
systemctl status dashd
View logs as follows:
sudo journalctl -u dashd
Tor#
Tor is free and open-source software for enabling anonymous communication. The name derived from the acronym for the original software project name "The Onion Router". Tor directs Internet traffic through a free, worldwide, volunteer overlay network consisting of more than seven thousand relays to conceal a user's location and usage from anyone conducting network surveillance or traffic analysis.
Dash Core GUI#
Dash Core traffic can be directed to pass through Tor by specifying a running Tor service as a proxy. First install Tor by visiting https://www.torproject.org/download/ and downloading the appropriate Tor Browser bundle for your system. Set up the Tor browser by following the documentation on Installation and Running Tor Browser for the First Time.
Once Tor Browser is running, you have two options to configure Dash Core to use Tor for network traffic.
Using the GUI: Start Dash Core and go to Settings > Options > Network and enable the Connect through SOCKS5 proxy setting. Specify
127.0.0.1for the Proxy IP and9150for the Port. Click OK and restart Dash Core.Using dash.conf: Ensure Dash Core is not running and edit your
dash.confsettings file. Add the lineproxy=127.0.0.1:9150, save the file and start Dash Core.
You are now connected through the Tor network. You will need to remember to start the Tor Browser each time before you start Dash Core or you will not be able to sync.
Tor onion service#
Tor onion services allows other users to connect to your Dash node using an onion address, providing further anonymity by concealing your IP address. Follow these steps to set up an onion service under Ubuntu Linux:
Install tor:
sudo apt install tor
Add the following line to the
torrcfile:sudo bash -c "echo -e 'ControlPort 9051\nCookieAuthentication 1\nCookieAuthFileGroupReadable 1' >> /etc/tor/torrc"
Restart Tor:
sudo systemctl restart tor
Determine the group Tor is running under (usually the last entry in your groups file):
tail /etc/group
The group is usually
debian-torunder Debian-based Linux distributions.Add the user running Dash to the Tor group:
sudo usermod -aG debian-tor dash
Add the following two lines to
dash.conf:proxy=127.0.0.1:9050 torcontrol=127.0.0.1:9051
Restart Dash and monitor
debug.logfor onion informatoin:grep -i onion ~/.dashcore/debug.log
You should see a line similar to the following:
2020-06-29 03:43:57 tor: Got service ID knup3fvr6fyvypu7, advertising service knup3fvr6fyvypu7.onion:19999
Your onion service is now available at the shown address.
كتير من المحافظ#
Since version 18.0.0, Dash Core has included the ability work with multiple wallets from the File menu in addition to the previously available options.
تحذير
Wallet-related RPCs require using the -rpcwallet option when more than
one wallet file is loaded. This is to ensure the RPC command is executed
using the correct wallet. See the Core developer documentation
for additional information.
Open a wallet#
To open a wallet, click File -> Open Wallet and then click the name of wallet file.
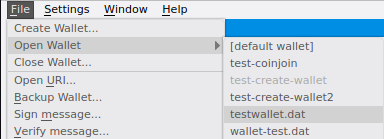
Open wallet#
Select the active wallet#
When multiple wallets are open, a wallet selection dropbox is shown to the left of the Dash logo on the tab bar. Click the dropdown box and select a wallet to set it as the active wallet.
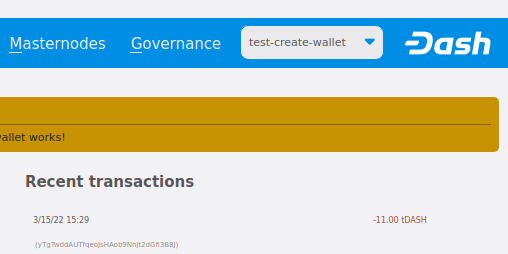
Wallet selection dropdown box#
Close a wallet#
To close a wallet, set it as the active wallet using the wallet selection dropdown box. Next, click File -> Close Wallet... and then click Yes on the Close wallet confirmation screen.
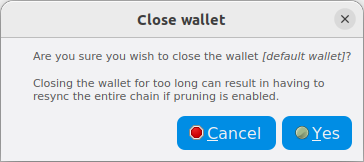
Close wallet confirmation#
ملاحظة
If the only open wallet is closed, wallet-related items on the tab bar will be disabled.
Close all wallets#
To close all wallets, click File -> Close All Wallets... and then click Yes on the Close all wallets confirmation screen.
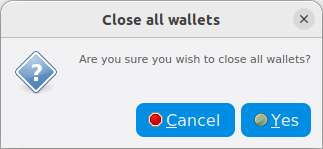
Close wallet confirmation#
Once all wallets are closed, wallet-related items on the tab bar will be disabled.
Alternative methods#
It is also possible to select between different Dash wallets when starting
Dash Core by specifying the wallet argument, or even run multiple
instances of Dash Core simultaneously by specifying separate data
directories using the datadir argument.
للبدء ، قم بتثبيت محفظة داش كور للنظام الخاص بك وفقًا التتبيث. عندما تصل إلى الخطوة تشغيل داش كةر للمرة الأولى ، يمكنك أن تقرر ما إذا كنت تريد الاحتفاظ بملفات منفصلة wallet.dat في الموقع الافتراضي (أبسط إذا كنت لا تحتاج إلى تشغيل محافظ في وقت واحد) ، أو تحديد أدلة بيانات منفصلة تماما مثل على سبيل المثال C:\Dash1 (أبسط إذا كنت ترغب في تشغيل محافظ) في وقت واحد
ملفات wallet.dat منفصلة#
بالنسبة إلى هذا السيناريو ، سننشئ اختصارين على سطح المكتب ، يستخدم كل منهما ملفًا مختلفًا للمحفظة. انتقل إلى الملف الثنائي المستخدم لبدء داش كور (عادةً ما يتم تحديد موقعه في C:\Program Files\DashCore\dash-qt.exe أو ما شابه) وإنشاء اختصارين على سطح المكتب. ثم افتح نافذة خصائص لكل من هذه الاختصارات.
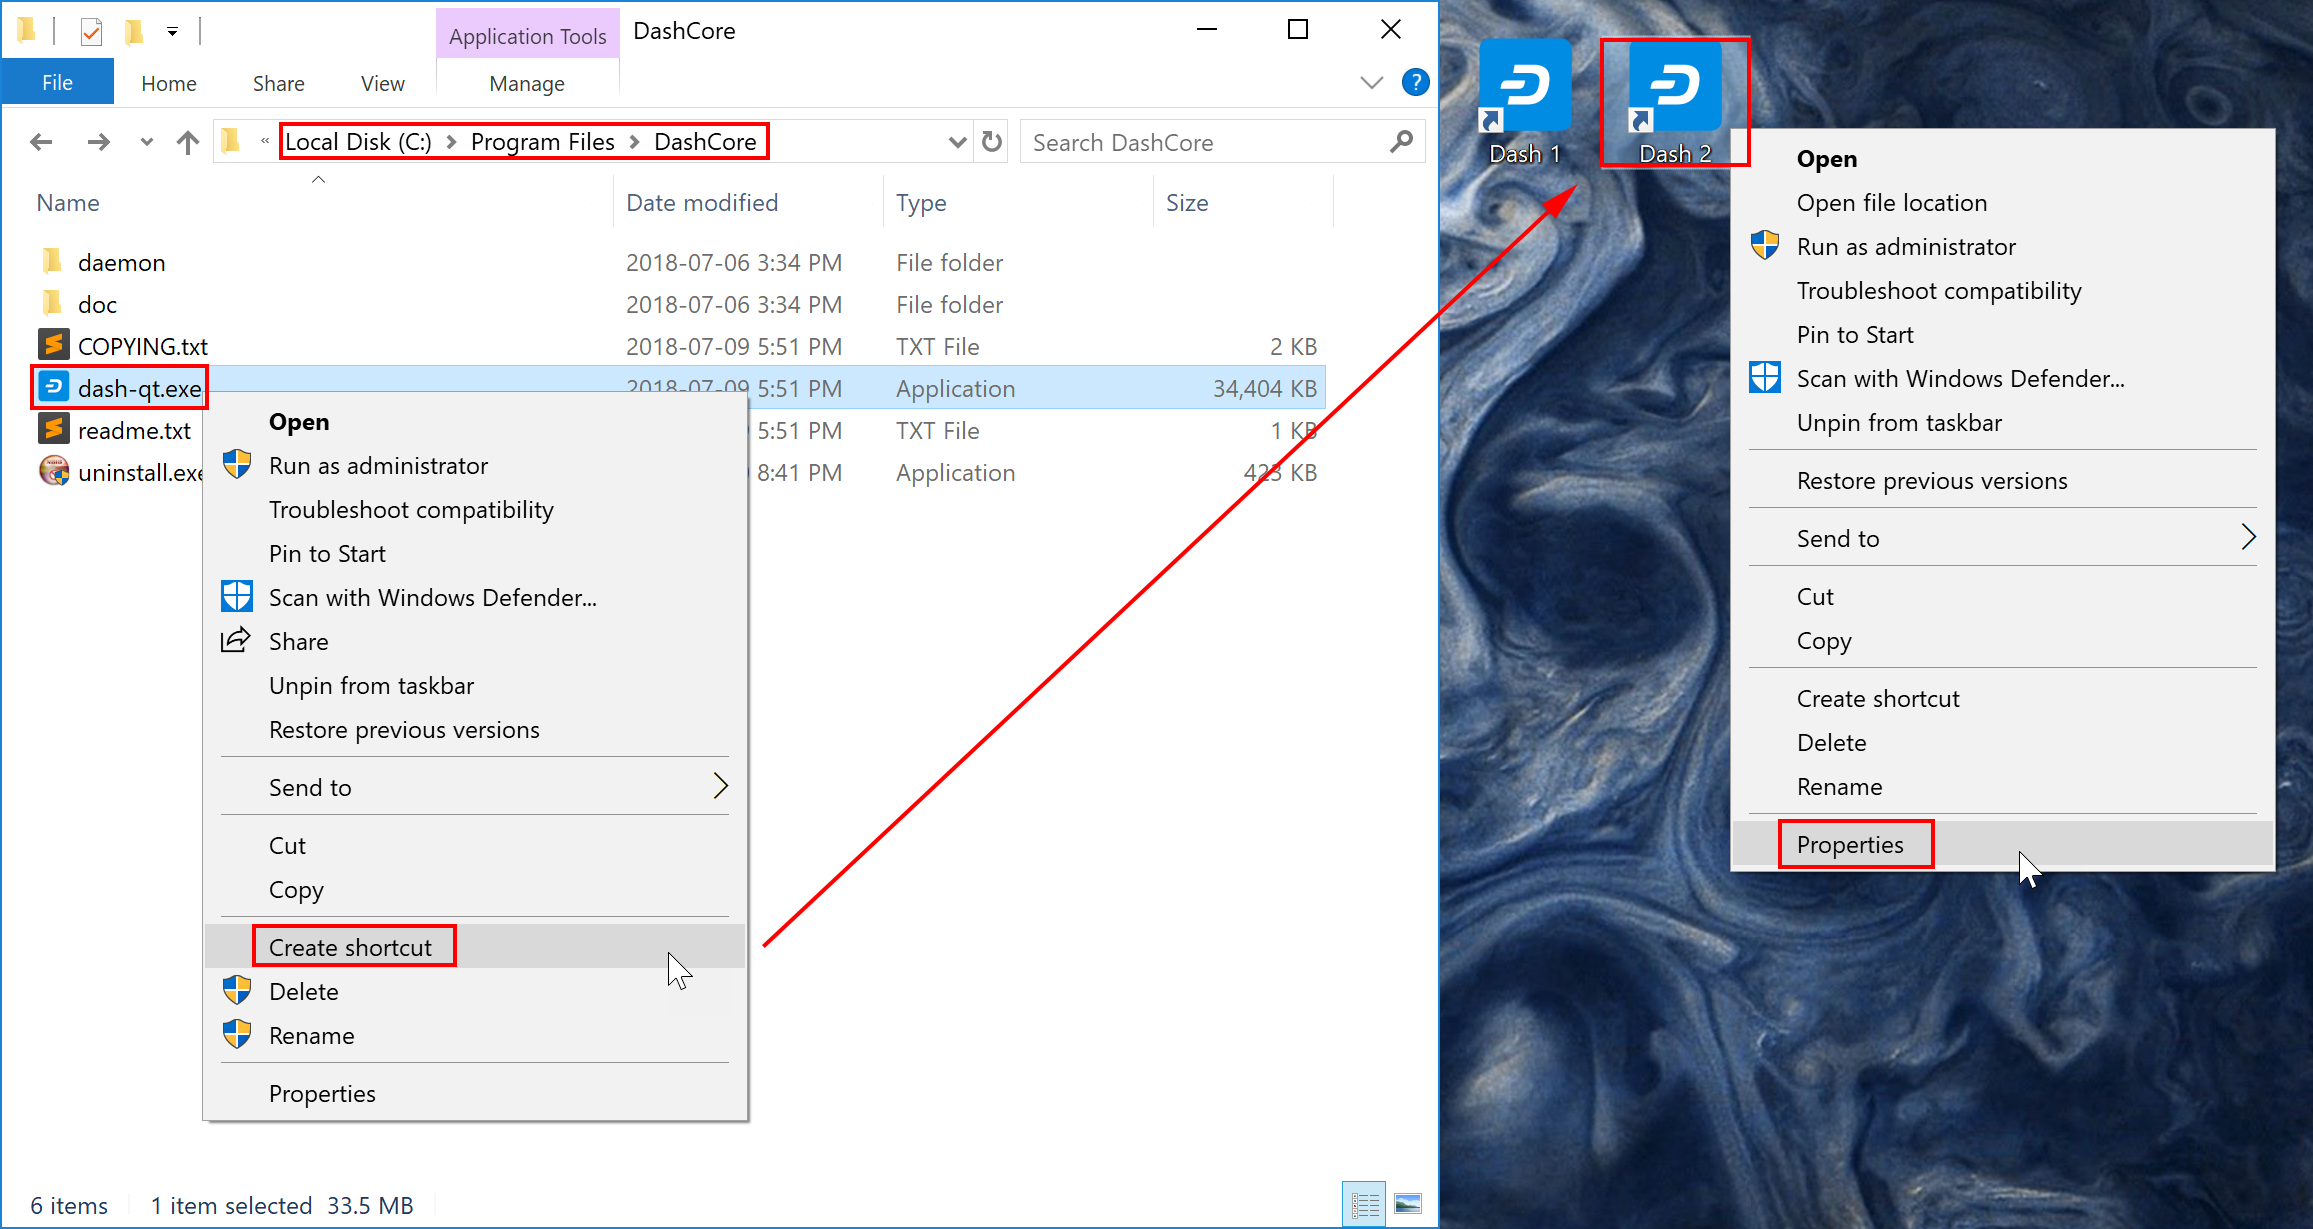
إنشاء اختصارات سطح المكتب باستخدام ويندوز 10#
قم بتعديل الخاصية استهداف لكل اختصار للإشارة إلى ملف محفظة آخر عن طريق تحديد وسيطة محفظة عند بدء تشغيل المحفظة. إذا لم تحدد وسيطة محفظة ، فسيتم استخدام wallet.dat بشكل افتراضي. سيتم إنشاء ملف المحفظة المحدد إذا لم يكن موجودًا. يوضح المثال التالي محافظتين باسم workwallet.dat و homewallet.dat:
Wallet Target 1:
"C:\Program Files\DashCore\dash-qt.exe" -wallet=workwallet.datWallet Target 2:
"C:\Program Files\DashCore\dash-qt.exe" -wallet=homewallet.dat
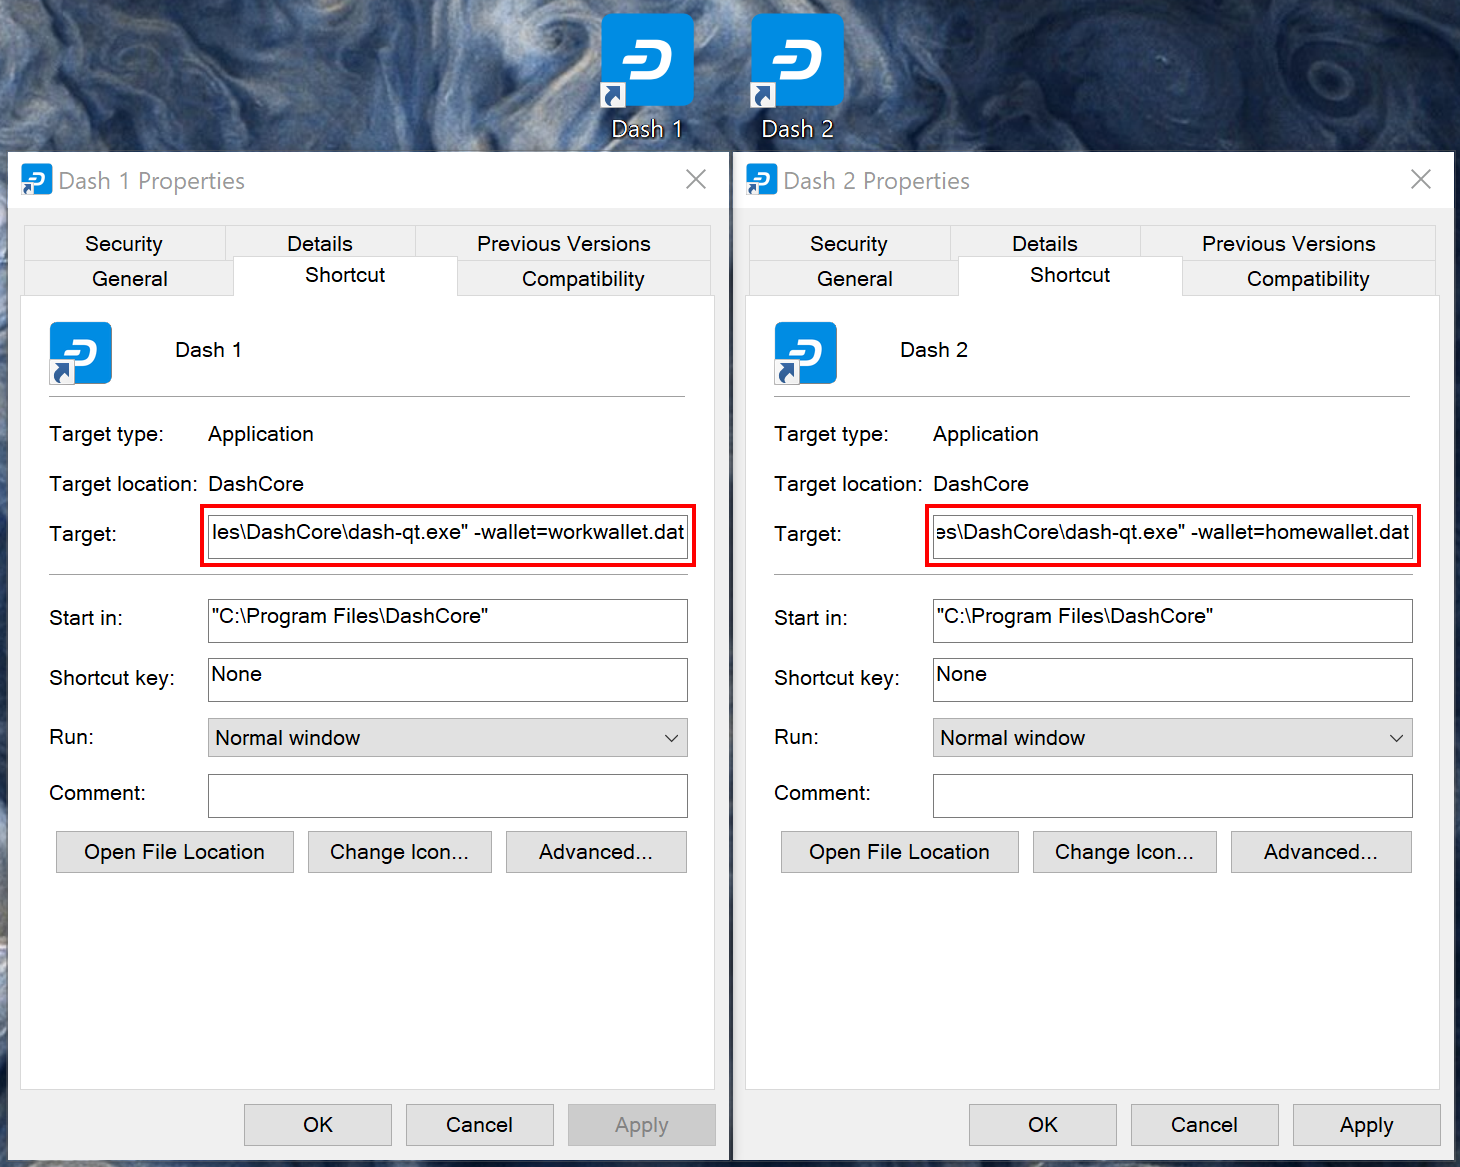
تحديد ملفات محفظة منفصلة#
يمكنك الآن استخدام الشريحتين لفتح محافظ مختلفة بسهولة وسرعة من سطح المكتب. لاحظ أنه لا يمكنك فتح كلا المحفظتين في وقت واحد. للقيام بذلك ، ستحتاج إلى دلائل بيانات منفصلة ، كما هو موضح أدناه.
دلائل بيانات منفصلة#
ابدأ تشغيل داش كور والسماح له بالمزامنة مع الشبكة ، ثم أغلق داش كور مرة أخرى. يمكنك الآن إنشاء دليلين على سبيل المثال. C:\Dash1 و C:\Dash2 ونسخ الدلائل blocks و chainstate من دليل البيانات المتزامنة إلى الدلائل الجديدة. كل من هذه ستعمل كدليل بيانات منفصل ، مما يسمح لك بتشغيل حالتين من داش كور في وقت واحد. قم بإنشاء اختصارين (أو أكثر) على سطح المكتب الخاص بك كما هو موضح أعلاه ، ثم قم بتعيين الوسيطات لـ datadir كما هو موضح أدناه:
Datadir Target 1:
"C:\Program Files\DashCore\dash-qt.exe" -datadir=C:\Dash1 -listen=0Datadir Target 2:
"C:\Program Files\DashCore\dash-qt.exe" -datadir=C:\Dash2 -listen=0
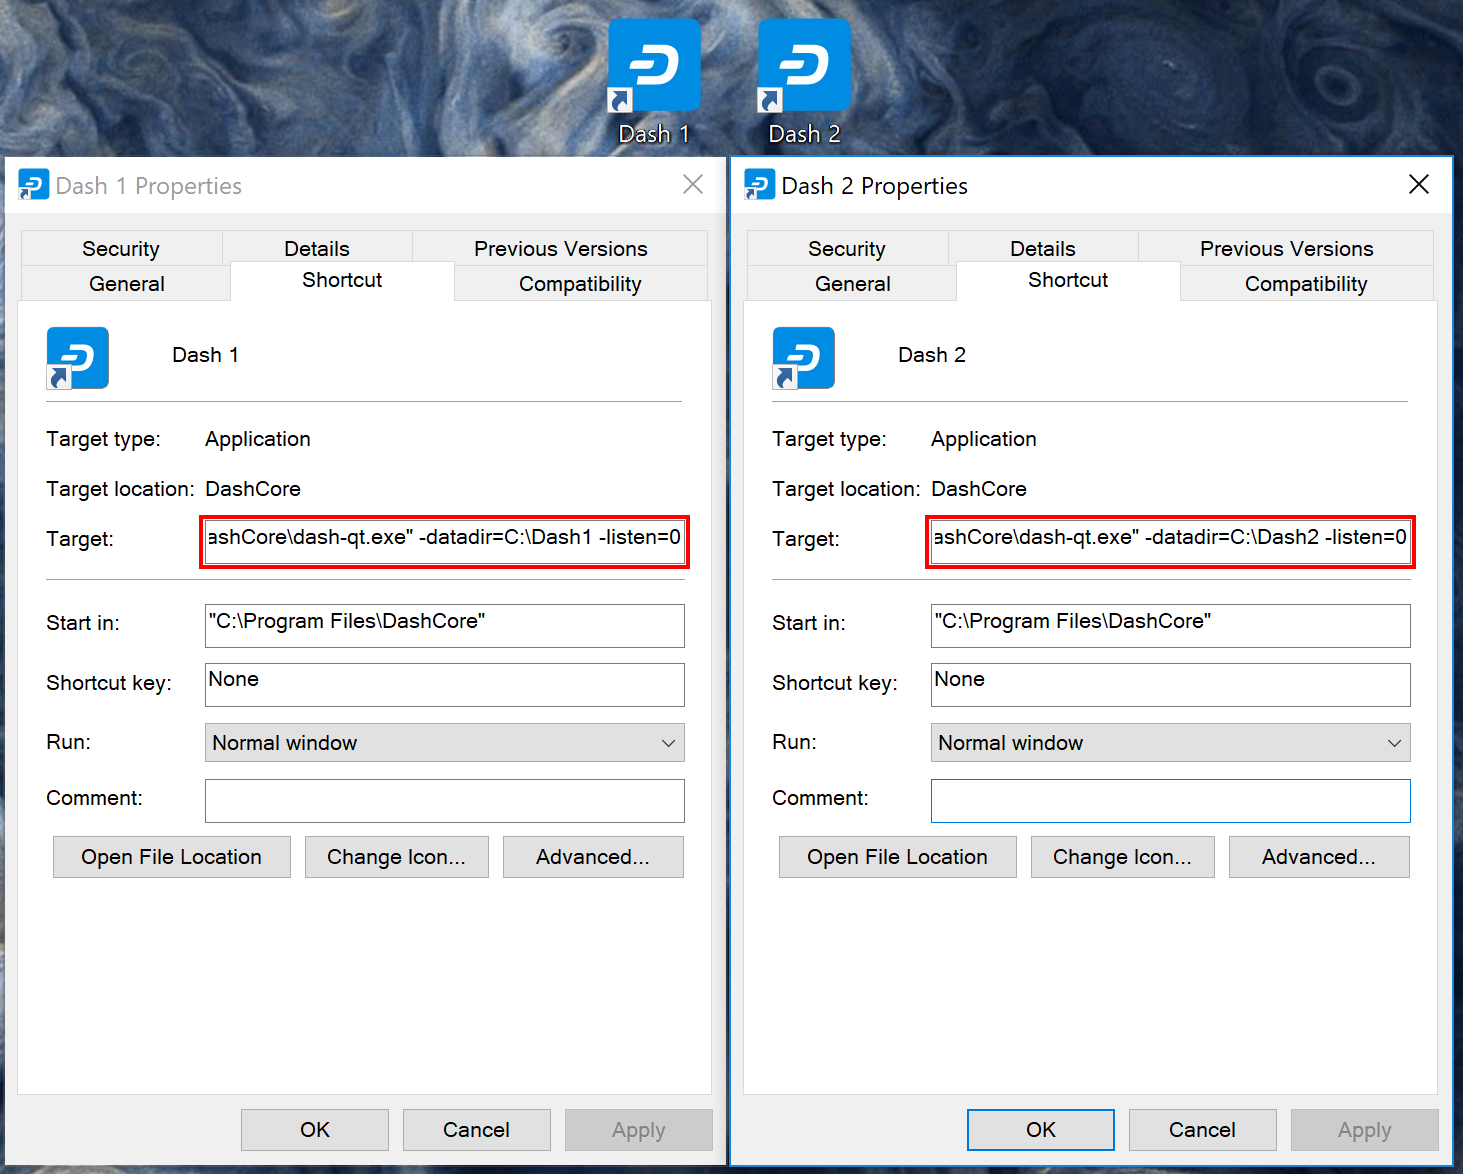
تحديد datadirs منفصلة#
يمكنك الآن استخدام الشريحتين لفتح محافظ مختلفة بسرعة وسهولة في وقت واحد من سطح المكتب. يحتفظ كل من المحافظين بنسخ منفصلة وكاملة من بلوكشين ، والتي قد تستخدم الكثير من مساحة محرك الأقراص. لمزيد من الاستخدام الفعال لمساحة محرك الأقراص ، ضع في اعتبارك استخدام SPV أو محفظة "light" مثل داش الكتروم للحفاظ على محافظ منفصلة متعددة دون الاحتفاظ بنسخة كاملة من بلوكشين.

اثنين من حالات داش كور تعمل في وقت واحد#
رمز المفتاح#
تحذير
KeePass support was removed in Dash Core 18.0.0. Details can still be found in previous versions of this documentation.