الوظائف المتقدمة#
داش ألكتروم مبنية على ألكتروم, محفظة بيتكوين. معظم الوظائف متطابقة ، مما يعني أنه ليس من الضروري إعادة إنتاج كامل وثائق ألكتروم هنا. تصف الأقسام التالية بعض الوظائف المتقدمة المستخدمة بكثرة. لمزيد من التفاصيل حول الوظائف المتقدمة الأخرى في ألكتروم لكل من بيتكون و داش ، يرجى النقر على الروابط أدناه
الإرسال المخفي#
PrivateSend offers users enhanced privacy when creating transactions by splitting the user's balance into a number of predefined denominations in advance of spending. This process is known as CoinJoin. PrivateSend is available in Dash Electrum versions 3.3.8.3 and higher, with support for hardware wallets added in 3.3.8.7.
Processing and sending#
To start PrivateSend processing in Dash Electrum, select Wallet > PrivateSend or click the PS icon in the lower right corner of the main window. The following window appears:
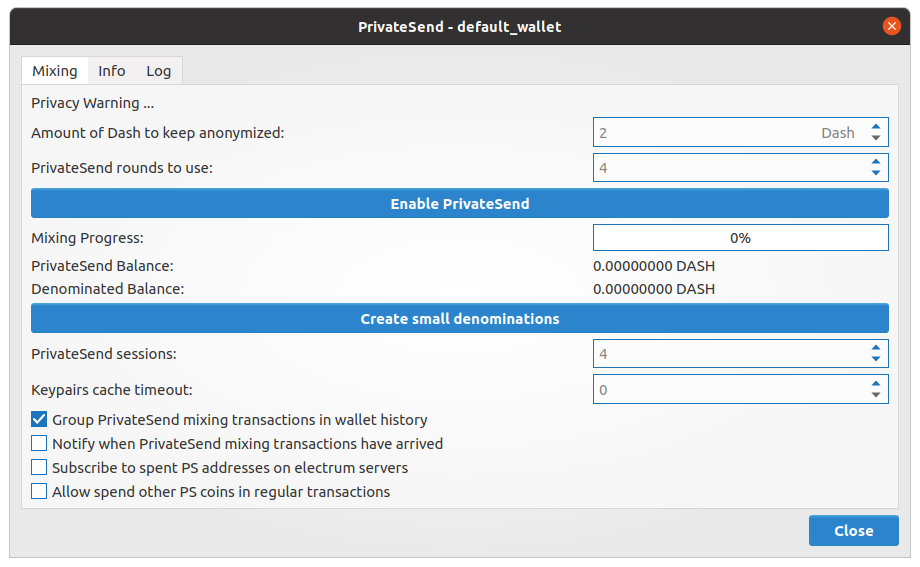
PrivateSend dialog in Dash Electrum#
Enter the Amount of Dash to keep anonymized and the number of PrivateSend rounds to use. Then click Enable PrivateSend, followed by Start Mixing. The process will begin, and the Mixing Progress bar shows the completion progress. Additional information on the process is available on the Info and Log tabs.
When processing is complete, simply check the PrivateSend checkbox on the Send tab before sending your transaction. Dash Electrum will only use Dash processed according to your specifications for the transaction.
أجهزة المحافظ#
You can use hardware wallets with Dash Electrum. Under Linux, it may be necessary to first install dependencies and udev rules as follows:
sudo apt-get install python3-dev python3-pip cython3 libusb-1.0-0-dev libudev-dev
sudo pip3 install trezor
PrivateSend processing is also supported. Starting PrivateSend processing in Dash Electrum with a hardware wallet will generate a new HD wallet and mnemonic for the PrivateSend keystore. A transaction from the hardware wallet to an address in this keystore will be created, and processing will begin. You can then spend the processed Dash, or send it back to your hardware wallet.
ماسترنود#
Dash Electrum supports masternode creation through the DIP3 tab.
DIP3#
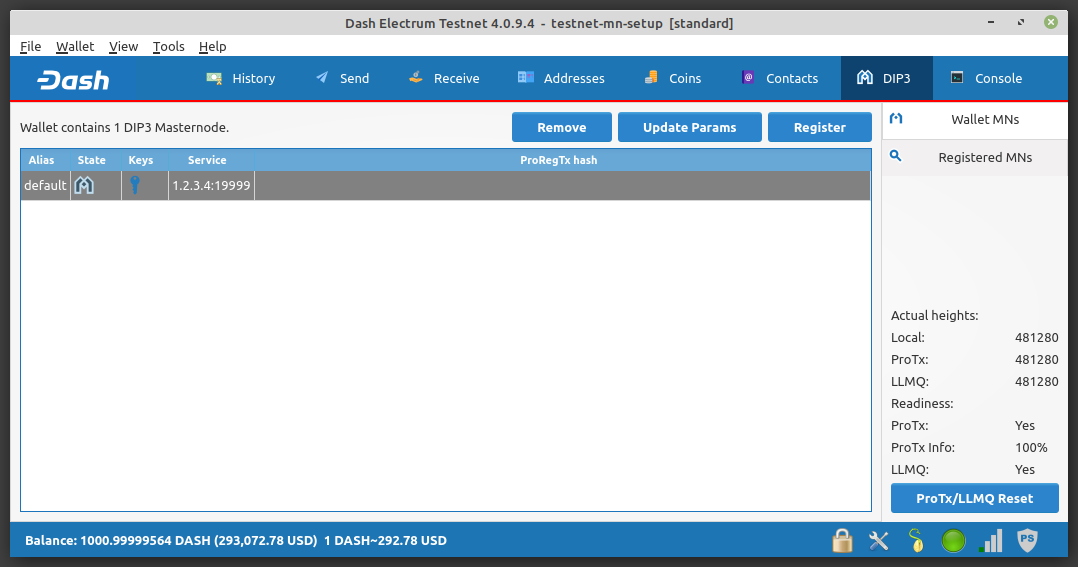
The DIP3 tab can be enabled via the View > Show DIP3 menu. This tab displays the status of your masternode(s) and also allows viewing a list of all registered masternodes on the network.
The tab displays the following data about each masternode you have set up:
الاسم المستعار (الاسم) من ماسترنود.
The state of the masternode (e.g. whether it has been activated).
The keys
The Provider Registration transaction hash of the masternode.
عنوان IP والمنفذ الذي يمكن الوصول إليه في ماسترنود الخاص بك.
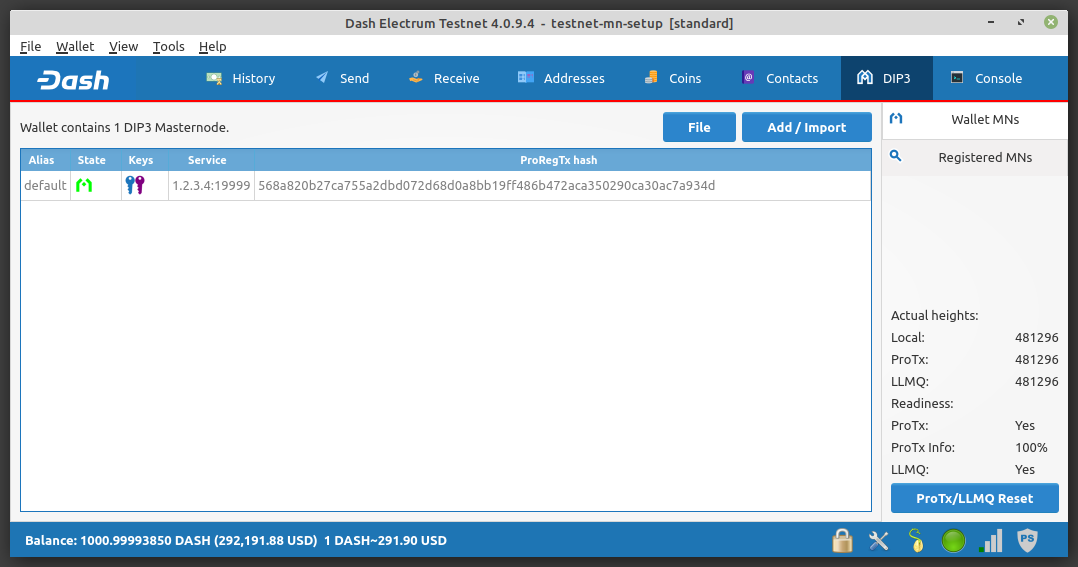
DIP3 tab with masternode information#
تتبيث ماسترنود#
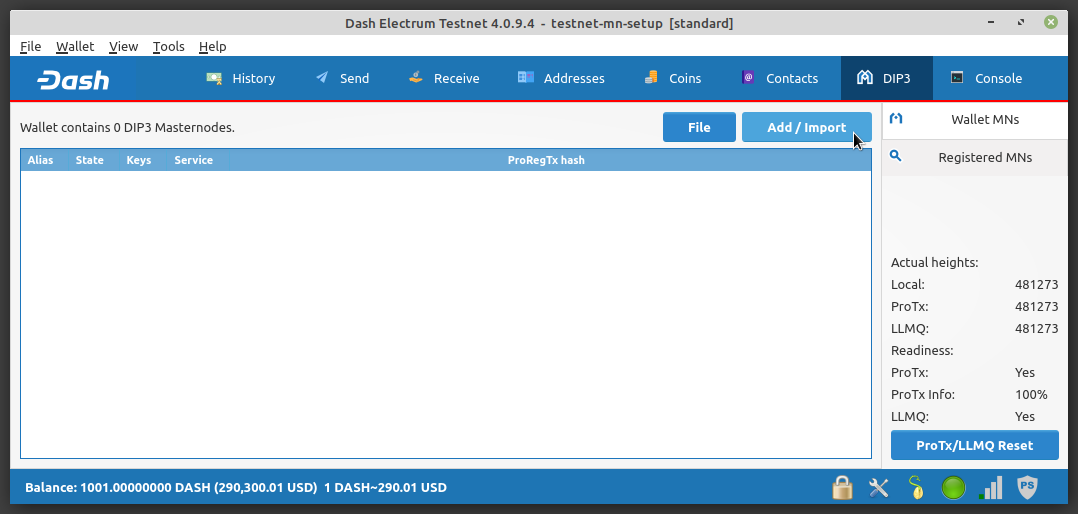
To setup a masternode, navigate to the DIP3 tab and click the Add/Import button.
ملاحظة
If combined with Electrum's multisig features the masternode collateral can be stored in a multisig wallet for increased security flexibility. See this page for the Dash Electrum documentation demonstrating how to configure a masternode using a multisig collateral.
Always exercise caution when using multisig accounts and verify that each mnemonic is backed up appropriately.
Add or import masternode#
Electrum supports creating/registering new masternodes as well as importing and
registering legacy masternodes via a masternode.conf file. At this point
very few legacy masternodes are present, so only the Create and register DIP3
Masternode option will be covered in detail.
There are two supported ownership types: owner-only and owner/operator. The primary difference during setup is whether or not the operator BLS private key is stored in Electrum. The following steps show the creation of a self-hosted masternode so both ownership type checkboxes are selected. Click Next to continue.
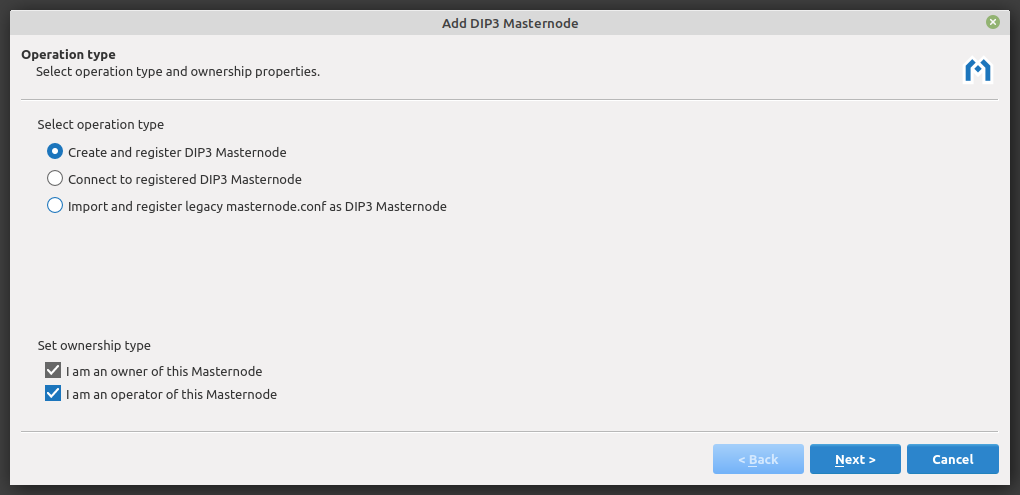
Select operation type and ownership properties#
To start a masternode, you must have a 1000 DASH plus a small amount for fees available in your wallet. Leave Create collateral as ProRegTx output checked and click Next.
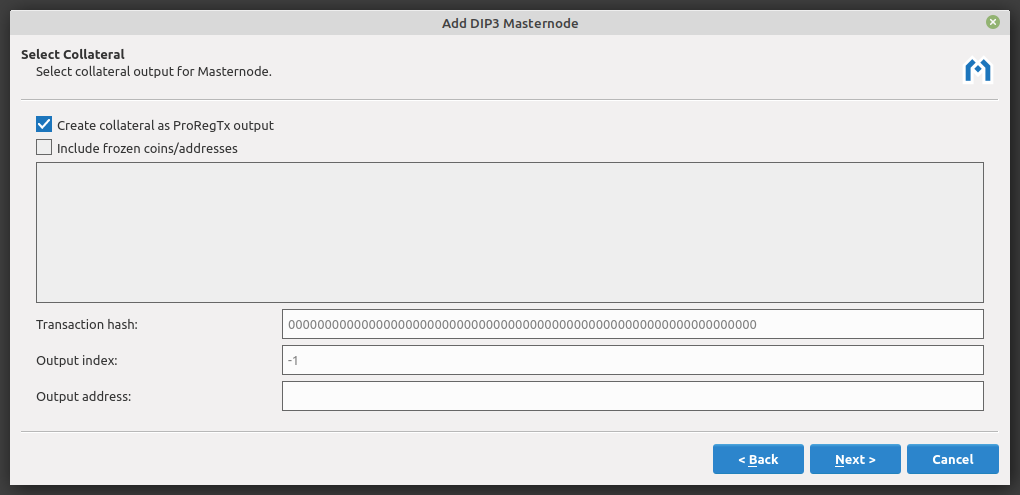
Select collateral output for masternode#
Certain information about your masternode is required. The IP address and port that your masternode uses must be supplied. Click Next after entering them (the port will be set to the default mainnet port of 9999 automatically).
Enter masternode IP address and port#
Each masternode requires three addresses: owner, voting, and payout. Electrum will automatically select addresses from your wallet. Click Next to continue.
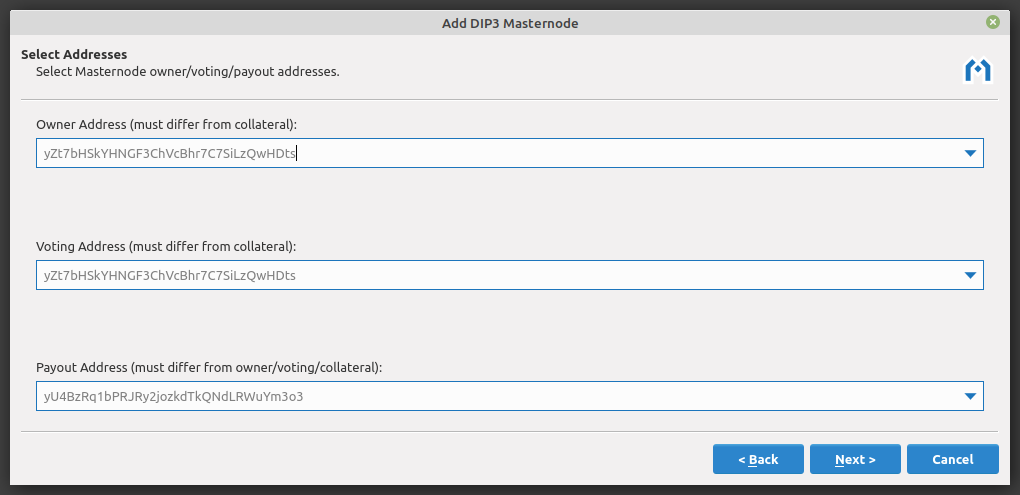
Select masternode owner, voting, and payout addresses#
A masternode requires a BLS "operator" key as described in DIP3. If you manage your own masternode, both Dash Electrum and your masternode must know the operator private key. Your masternode will use the private key to sign messages, and the Dash network will know that you authorized it to do so.
Electrum will generate the required BLS private/public key pair and provide you
with the line that must be copied to the masternode for proper masternode
configuration. Click Next after copying this line to your masternode's
dash.conf file.
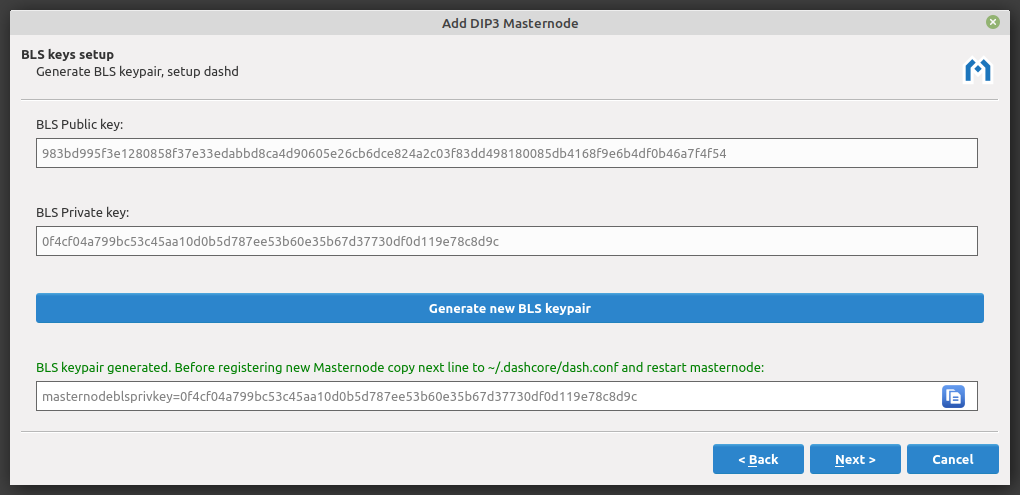
BLS key setup#
All parameters are now configured. This screen shows the configuration details and allows you to save the information. Make sure the Make ProRegTx after saving Masternode data box is checked, then click Save. The Send tab will open and be populated with the info necessary to register the masternode.
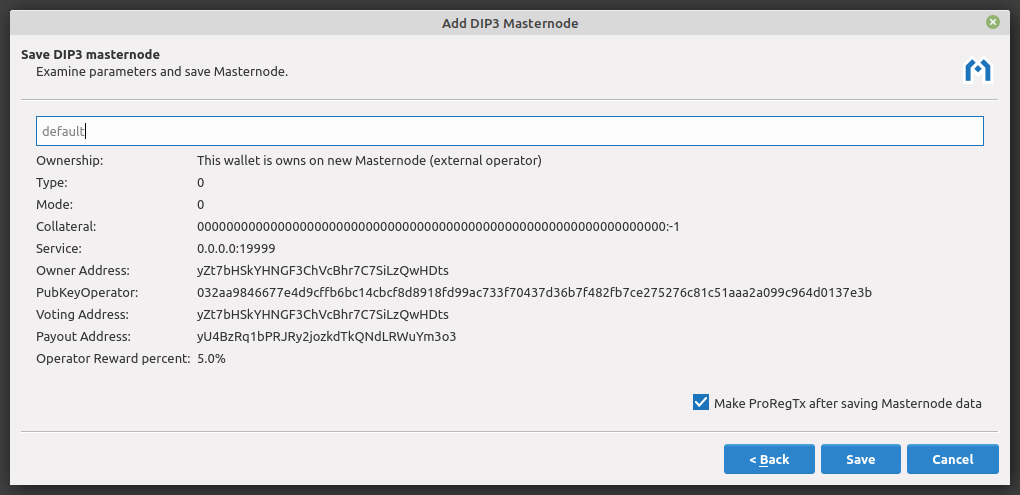
Examine parameters and save masternode#
Registering your masternode#
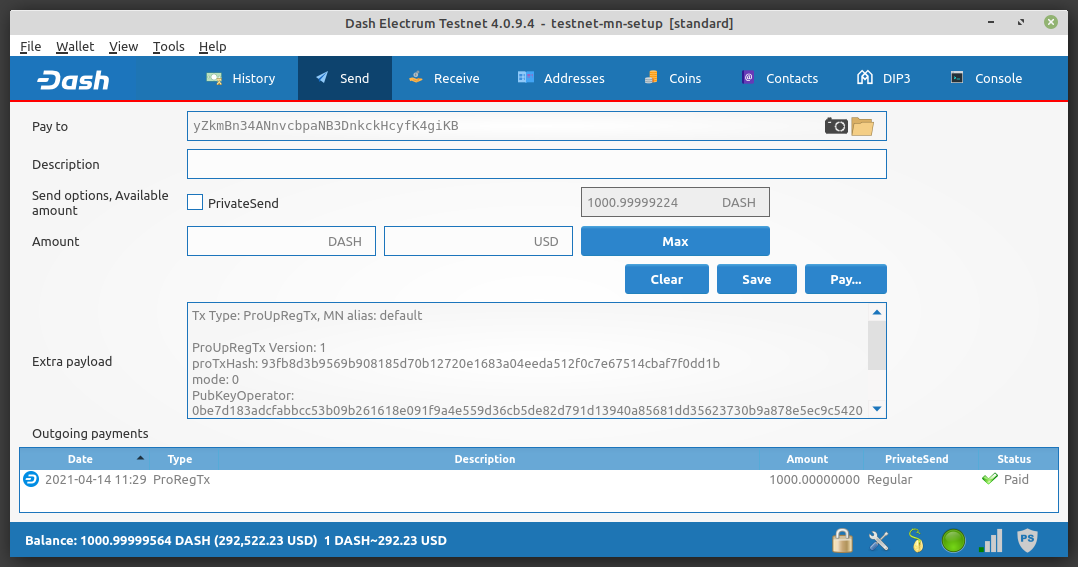
Since the ProRegTx information required to register the masternode was filled out by the previous step, just Click Pay... to complete the registration.
ملاحظة
To complete registration of any previously setup masternode, go to the DIP3 tab, select the unregistered masternode from the list of Wallet MNs, and click Register.
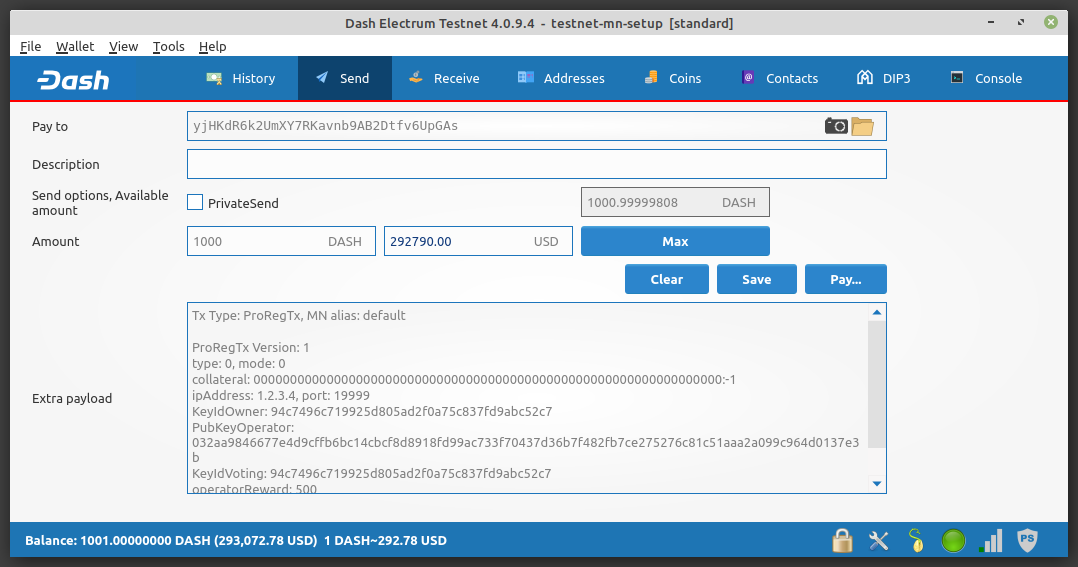
Send tab with ProRegTx prepared#
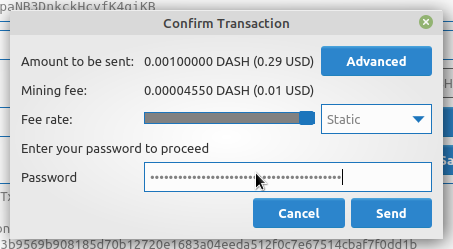
Enter your password and click Send to broadcast the registration transaction.
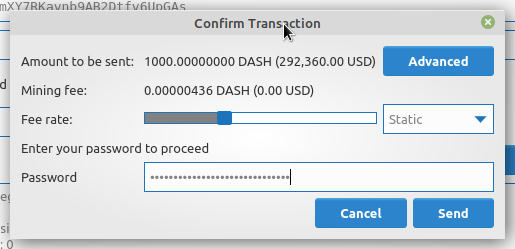
Confirm ProRegTx Transaction#
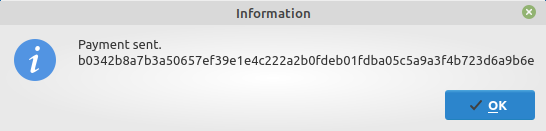
The transaction hash will be displayed once the transaction has been sent successfully. This ProRegTx hash is used by the network to uniquely identify the masternode. Click OK to close the screen.
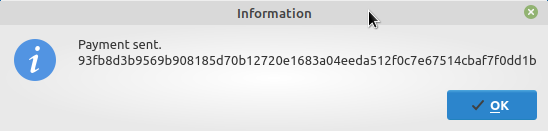
Transaction sent screen showing transaction hash#
Prior to the ProRegTx being confirmed the new masternode will appear as unregistered on the DIP3 tab.
DIP3 tab showing unregistered masternode#
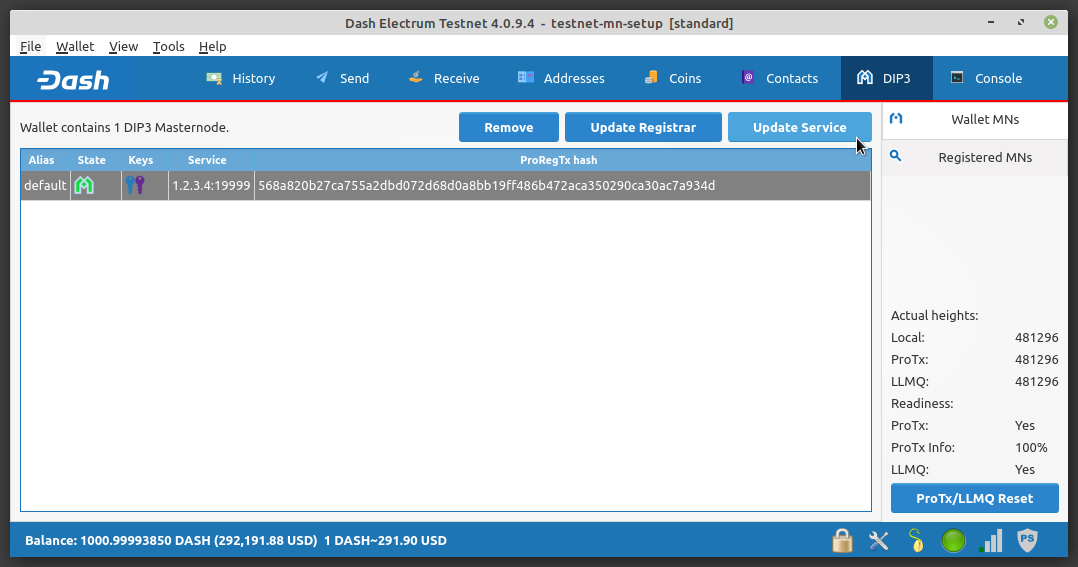
Once the ProRegTx has been confirmed, the new masternode will appear as registered on the DIP3 tab.

DIP3 tab showing registered masternode#
Updating masternode registration#
To update masternode registration information, navigate to the DIP3 tab and click the Update Registrar button.
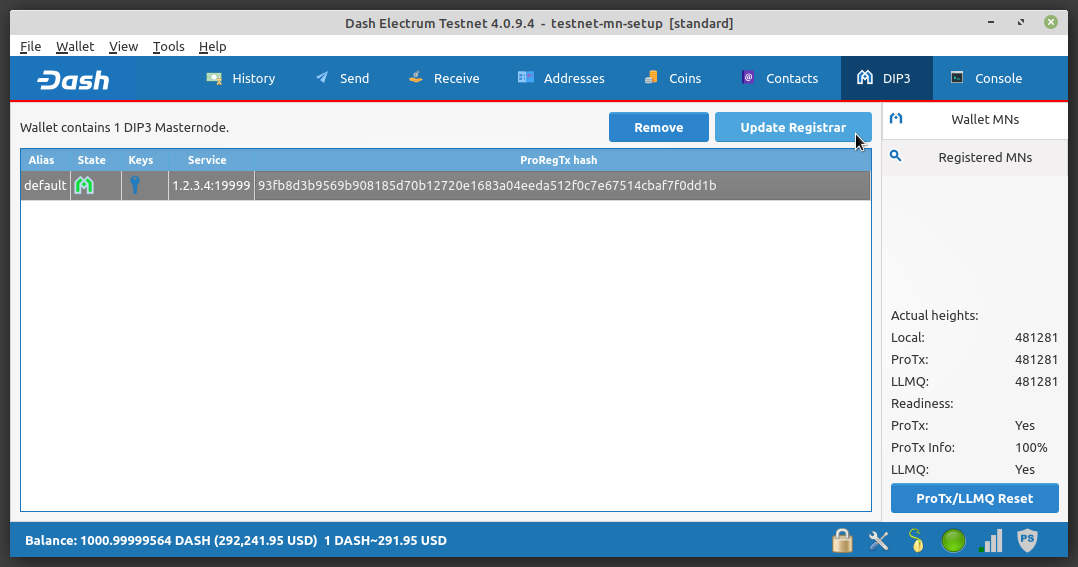
Update Registrar#
The masternode owner may update the voting and payout addresses at any time. Addresses from the current wallet can be selected from the drop down menu or addresses from a different wallet (e.g. a hardware wallet) can be pasted into either field. Click Next to continue.
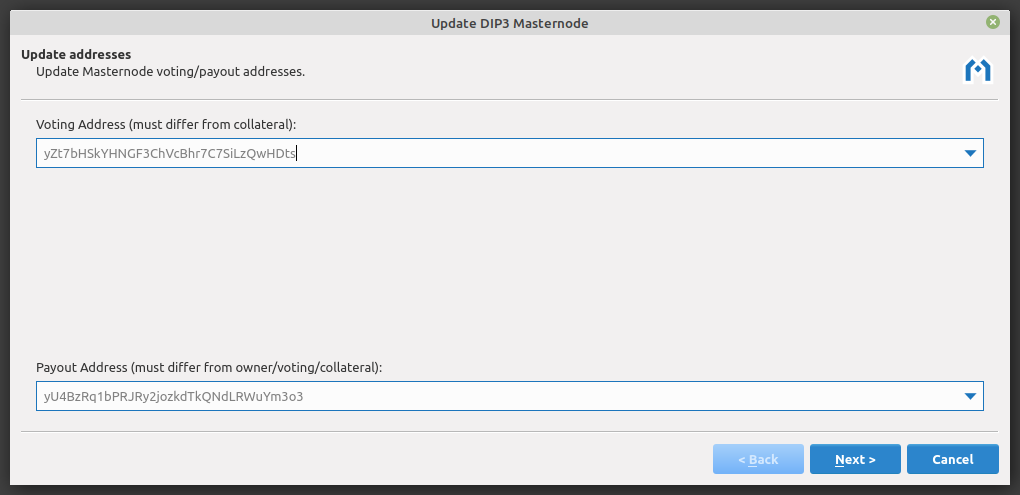
Update masternode voting and/or payout address#
The masternode owner may also update the operator BLS key at any time. Click Next to continue.
تحذير
Any time the the operator private key is changed it must be copied into the
dash.conf file on the masternode. Electrum will provide a notification
with instructions when this is required.
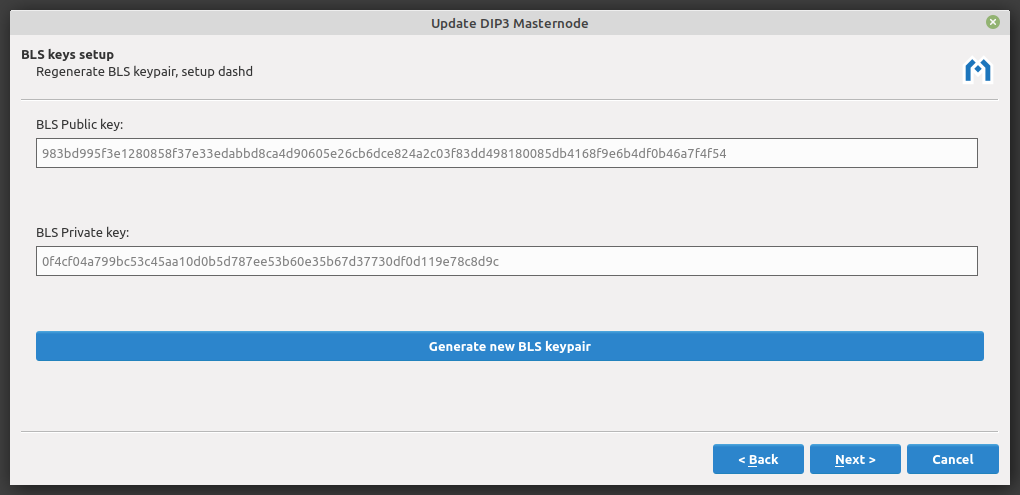
Update operator BLS key#
All parameters are now configured. This screen shows the updated configuration details. Click Prepare ProUpRegTx to continue. The Send tab will open and be populated with the info necessary to update the masternode.

Examine parameters and update masternode#
The ProUpRegTx information required to update the masternode registration was filled out by the previous step so just Click Pay... to complete the update.
Send tab with ProUpRegTx prepared#
Enter your password and click Send to broadcast the update transaction.
Confirm ProUpRegTx Transaction#
The transaction hash will be displayed once the transaction has been sent successfully. Click OK to close the screen.
Transaction sent screen showing transaction hash#
Updating masternode service parameters#
The masternode service may need to be updated to:
Change the IP address, port, or operator payout address of a masternode
Revive a masternode that was Proof of Service (PoSe) banned
To update masternode service information, navigate to the DIP3 tab and click the Update Service button.
Update Service#
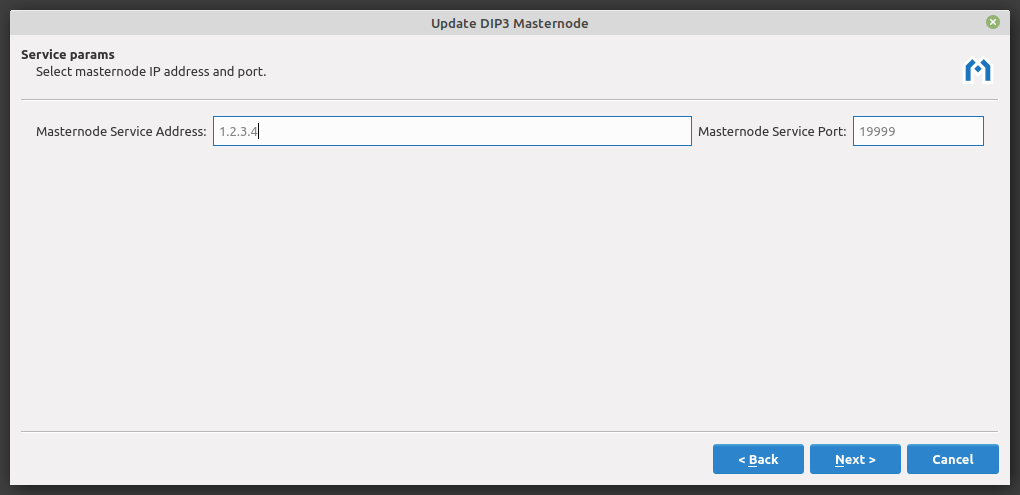
The masternode operator may update the IP address and port at any time. Update the IP address and click Next to continue.
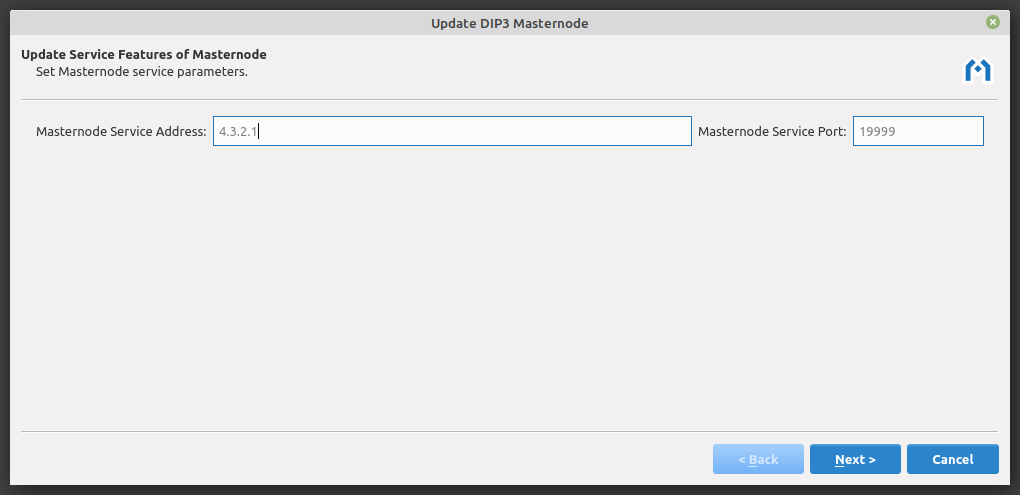
Update masternode IP address#
All parameters are now configured. This screen shows the updated configuration details. Click Prepare ProUpServTx to continue. The Send tab will open and be populated with the info necessary to update the masternode.
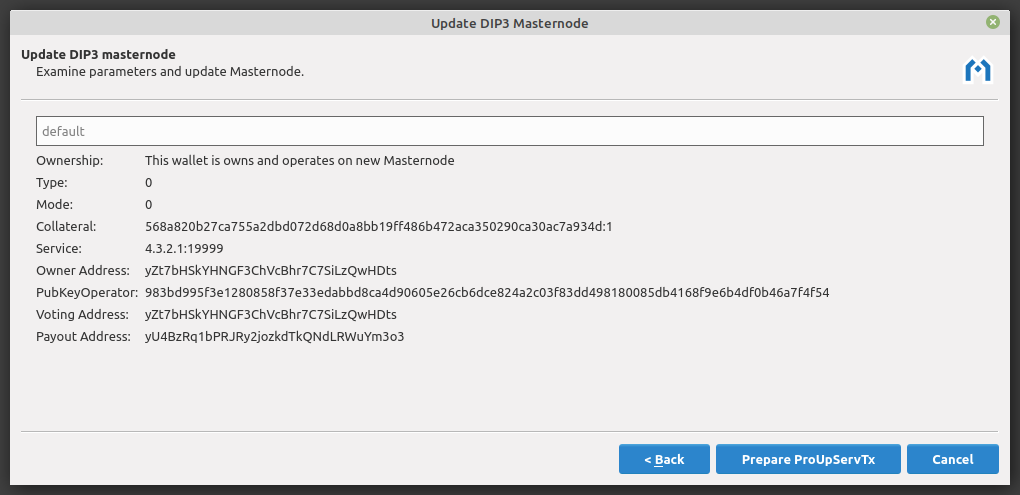
Examine parameters and update masternode service#
The ProUpServTx information required to update the masternode was filled out by the previous step so just Click Pay... to complete the update.

Send tab with ProUpServTx prepared#
Enter your password and click Send to broadcast the update transaction.
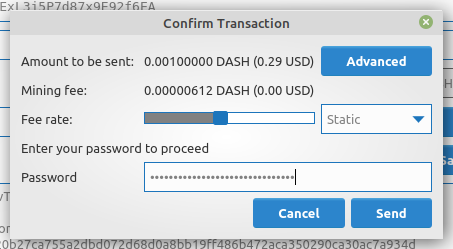
Confirm ProUpServTx Transaction#
The transaction hash will be displayed once the transaction has been sent successfully. Click OK to close the screen.
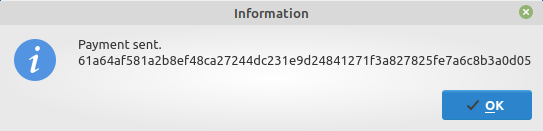
Transaction sent screen showing transaction hash#
محافظ multisig#
يوضح هذا البرنامج التعليمي كيفية إنشاء 2 من 2 محفظة multisig. يتكون 2 من 2 multisig من محفظتين منفصلتين (عادة ما تكون على أجهزة منفصلة ويمكن التحكم بها من قبل أشخاص مختلفين) والتي يجب استخدامها بالاقتران من أجل الوصول إلى الأموال. كل من محافظ لها نفس مجموعة من العناوين.
من حالات الاستخدام الشائعة لذلك إذا كنت تريد التحكم في الأموال بشكل تعاوني: ربما تدير أنت وصديقك الشركة معًا ، ويجب أن تكون بعض الأموال قابلة للانفاق فقط إذا وافق كليهما.
واحد آخر هو الأمن: يمكن أن تكون واحدة من محافظ على الجهاز الرئيسي الخاص بك ، في حين أن الآخر هو على جهاز متواجد حاليا. بهذه الطريقة تجعل من الصعب جدًا على أحد المهاجمين أو البرامج الضارة سرقة عملاتك المعدنية.
إنشاء زوج من محافظ 2- من -2#
يحتاج كل cosigner للقيام بذلك: في القائمة حدد ملف> جديد ، ثم حدد Multi-signature wallet. في الشاشة التالية ، حدد 2 من 2.
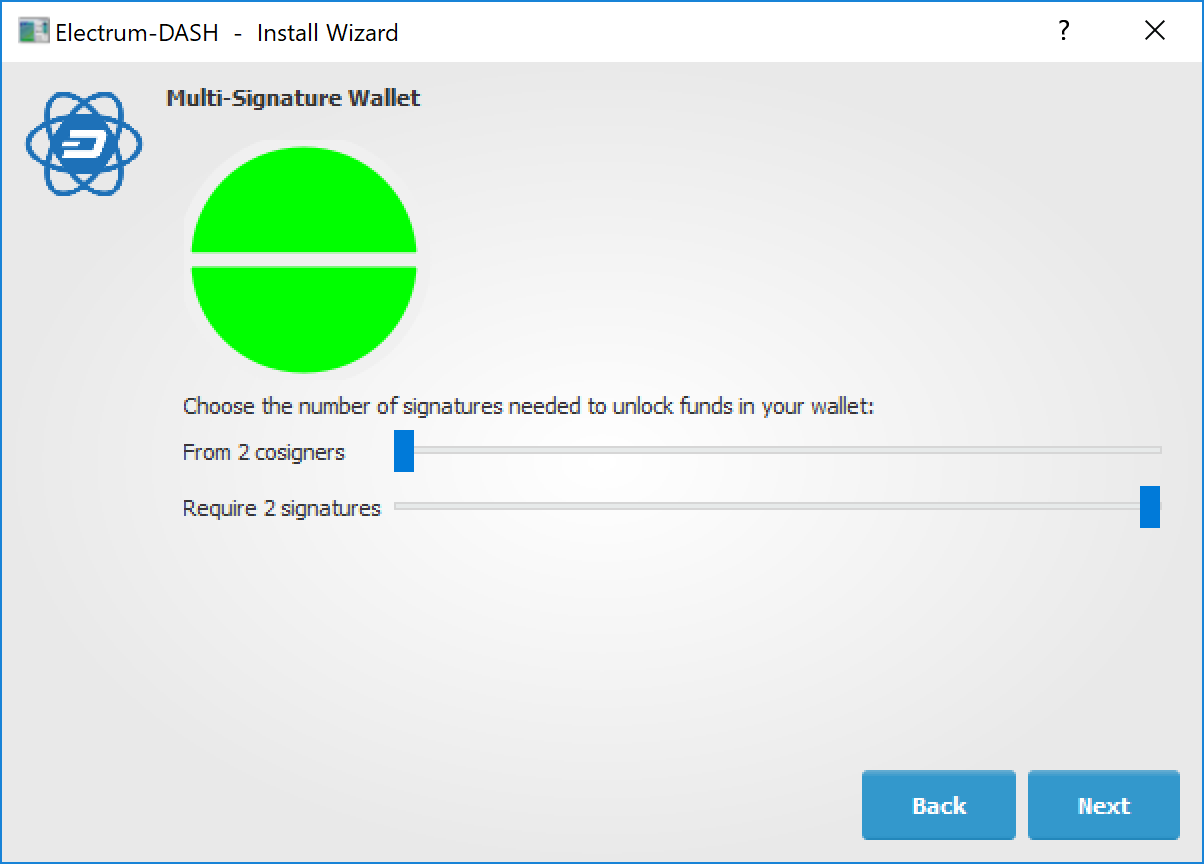
اختيار x من توقيعات y لمحفظة متعددة التوقيع#
بعد توليد وتأكيد بذور الاسترداد ، سيظهر لك عنوان xpub لهذه المحفظة.
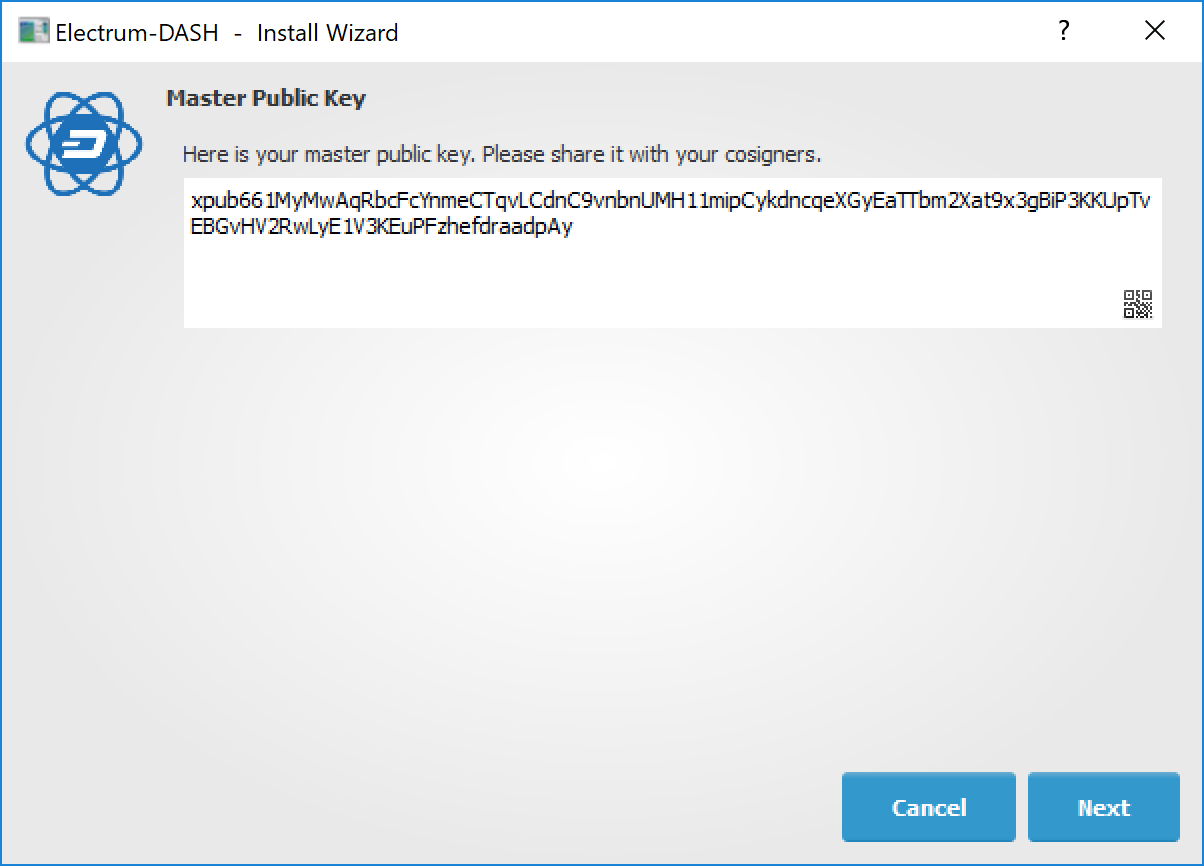
مفتاح xpub من المحفظة الأولى#
بعد إنشاء البذور (احتفظ بها بأمان!) ، ستحتاج إلى توفير المفتاح العام الرئيسي للمحفظة الأخرى. ﺑﺎﻟﻄﺒﻊ ﻋﻨﺪ إﻧﺸﺎء اﻟﻤﺤﻔﻈﺔ اﻷﺧﺮى ، ﺗﻘﻮم ﺑﻮﺿﻊ اﻟﻤﻔﺘﺎح اﻟﻌﺎم اﻟﺮﺋﻴﺴﻲ ﻟﻠﻤﺤﻔﻈﺔ اﻷوﻟﻰ.
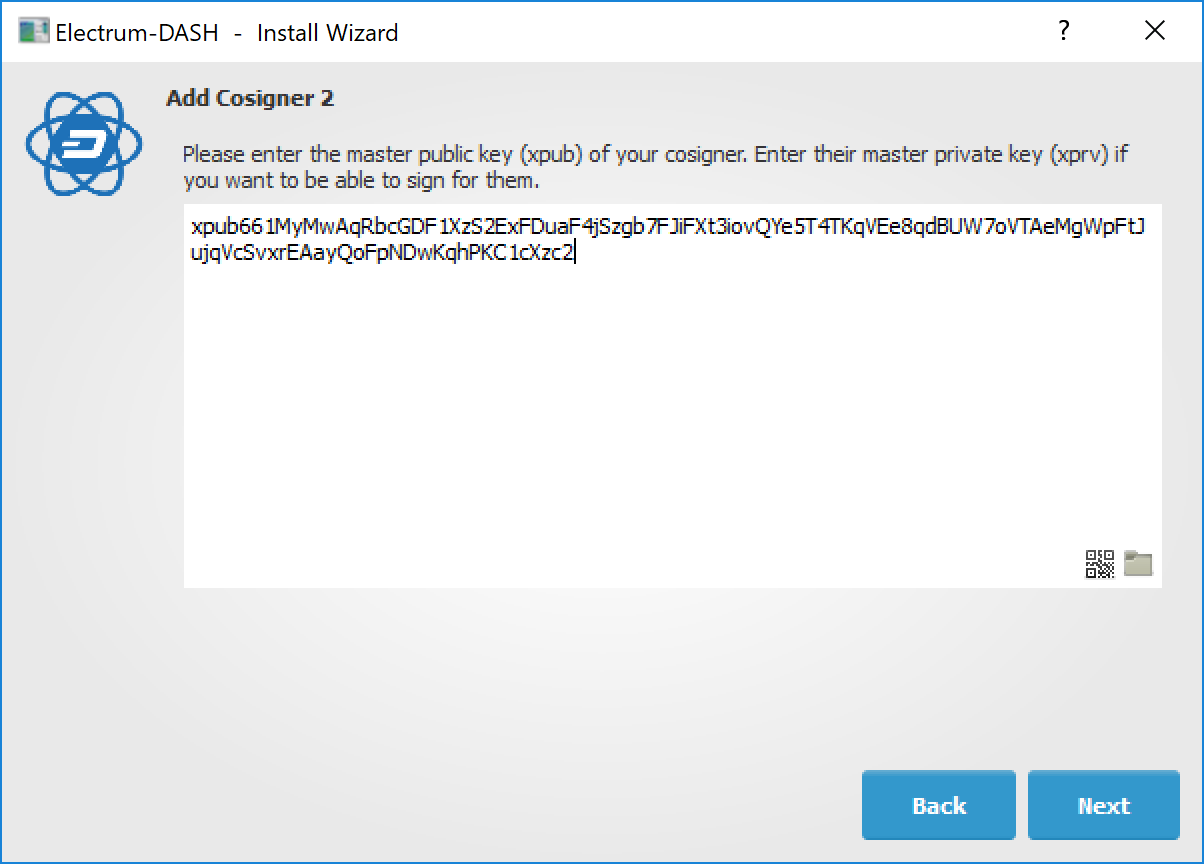
دخول xpub من المحفظة الثانية في المحفظة الأولى#
سوف تحتاج إلى القيام بذلك بالتوازي مع المحافظين. لاحظ أنه يمكنك الضغط على إلغاء أثناء هذه الخطوة ، ثم إعادة فتح الملف لاحقًا.
إستقبال#
تحقق من أن كلا المحفظتين تولد نفس مجموعة العناوين. يمكنك الآن الإرسال إلى هذه العناوين (لاحظ أنها تبدأ بـ "7") مع أي محفظة يمكن إرسالها إلى عناوين P2SH.
إرسال#
لكي تنفق عملات معدنية من محفظة 2- من -2 ، يحتاج اثنان من الكوزيين إلى توقيع صفقة تعاونية. لإنجاز ذلك ، قم بإنشاء معاملة باستخدام إحدى المحافظ (عن طريق ملء النموذج في علامة ارسال). بعد التوقيع ، تظهر نافذة مع تفاصيل المعاملة.
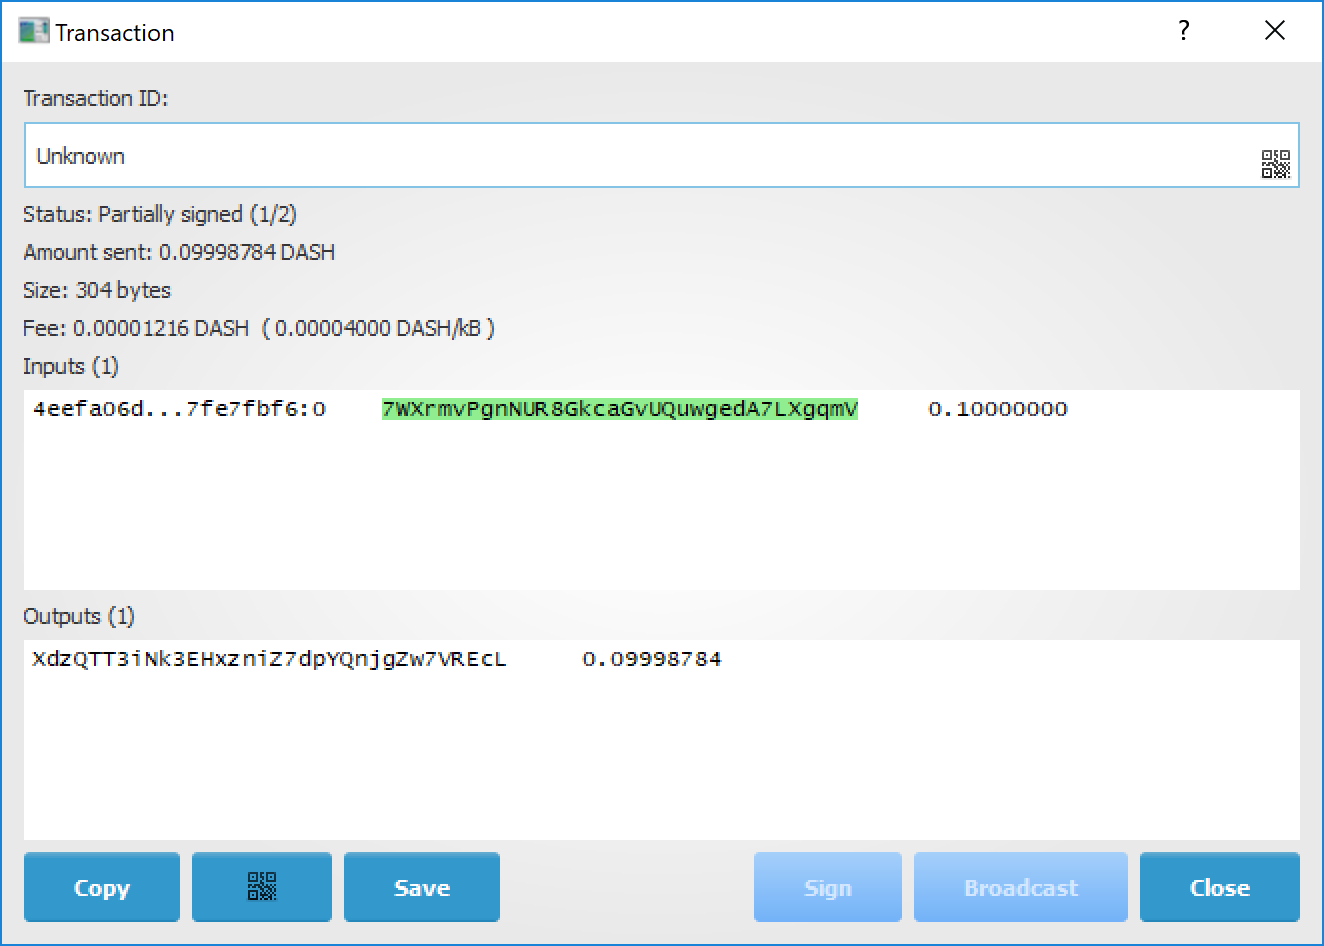
تم توقيع 2- إلى -2 من الصفقة المتعددة في داش ألكتروم#
يجب الآن إرسال المعاملة إلى المحفظة الثانية. هناك العديد من الخيارات المتاحة لهذا:
يمكنك نقل الملف على عصا USB
يمكنك حفظ المعاملة الموقعة جزئياً إلى ملف (باستخدام زر حفظ) ، ونقل ذلك إلى الجهاز حيث يتم تشغيل المحفظة الثانية (عبر USB ، على سبيل المثال) وتحميله هناك (باستخدام الأدوات> تحميل المعاملة> من الملف)
يمكنك استخدام رموز QR
زر يظهر رمز رمز الاستجابة السريعة هو متاح أيضا. سيؤدي النقر فوق هذا الزر إلى عرض رمز الاستجابة السريعة الذي يحتوي على المعاملة ، والذي يمكن مسحه ضوئيًا في المحفظة الثانية (الأدوات> عملية التحميل> من QR Code)
مع كل من الأساليب المذكورة أعلاه ، يمكنك الآن إضافة التوقيع الثاني إلى المعاملة (باستخدام زر تسجيل). سيتم بثه بعد ذلك إلى الشبكة.

صفقة 2-من-2 مرقمة بالكامل في داش إلكتروم#
مسح محفظة الورق#
You may have received a paper wallet as a gift from another Dash user, or previously stored one in a safe deposit box. Funds are swept from a paper wallet into a live wallet by importing its private key, which is a long sequence of characters starting with the number "7" or the capital letter "X". The example below displays a private key (WIF format).
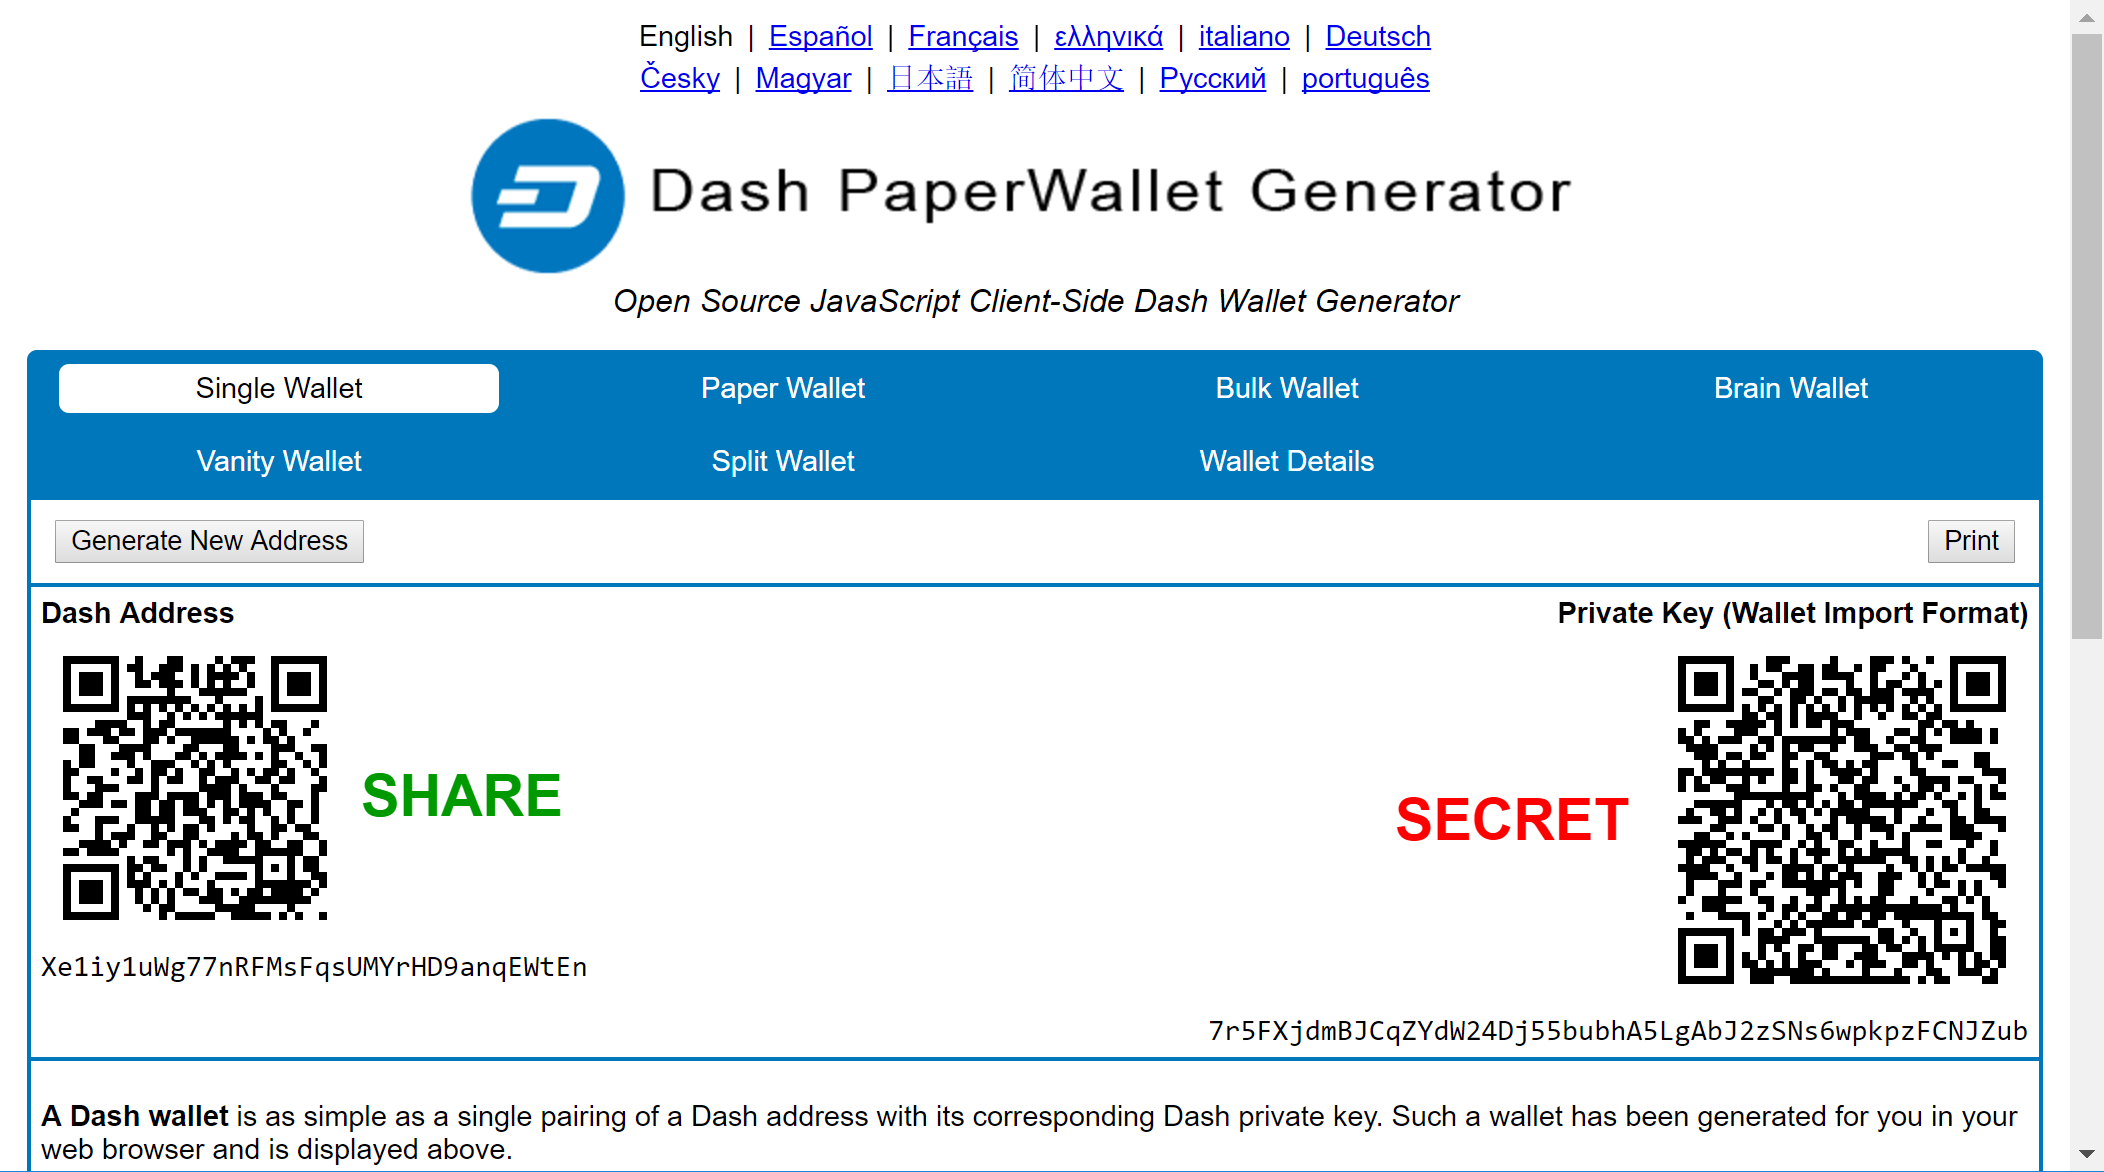
العنوان العام والمفتاح الخاص المرتبط الذي تم إنتاجه بواسطة محفظة داش#
يتم سحب الأموال من محافظ الأوراق إلى محفظة داش ألكتروم عن طريق إنشاء معاملة باستخدام المفتاح الخاص وإرسالها إلى عنوان جديد من محفظتك. وهذا ضروري لأنه لا يمكن إضافة مفاتيح عامة أو خاصة جديدة إلى سلسلة حتمية قائمة من العناوين المشتقة من عبارة بذور.
ابدأ باختيار محفظة> المفتاح الخاص> مسح العنوان. سيظهر مربع الحوار مفاتيح مسح الخاصة ، حيث يمكنك لصق مفتاحك (مفاتيحك) الخاصة. يظهر عنوان غير مستخدم يتم التحكم فيه بواسطة محفظة داش أليكتروم في الحقل السفلي ، ويمكن تغييره بالنقر فوق الزر العنوان. بمجرد لصق المفتاح الخاص ، انقر فوق زر مسح.
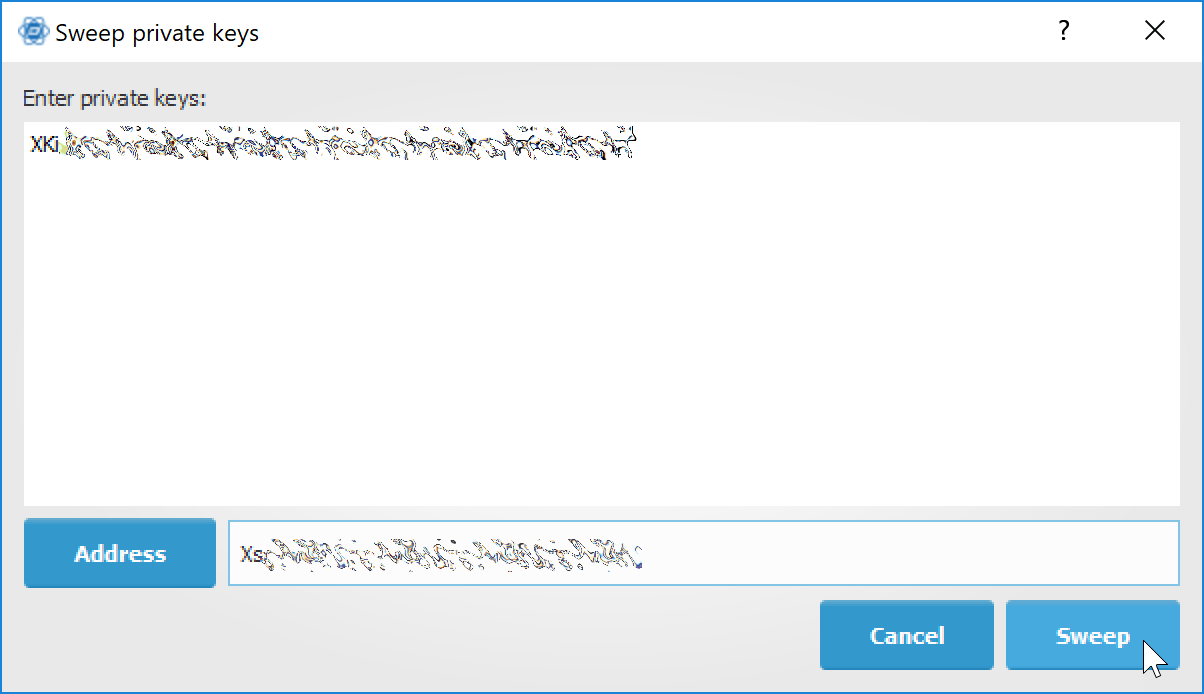
دخول المفتاح الخاص#
ثم يقوم داش أليكتروم بإعداد معاملة باستخدام المفتاح الخاص الذي استوردته للتو لاشتقاق العنوان العام لإدخال المعاملة والعنوان من محفظتك كخرج ، وتوقيع الرسالة. انقر فوق البث للدخول في المعاملة على بلوكشين. سيظهر الرصيد بعد ذلك في محفظتك تحت العنوان المحدد. يتم ترك العنوان الذي تم مسحه بدون رصيد
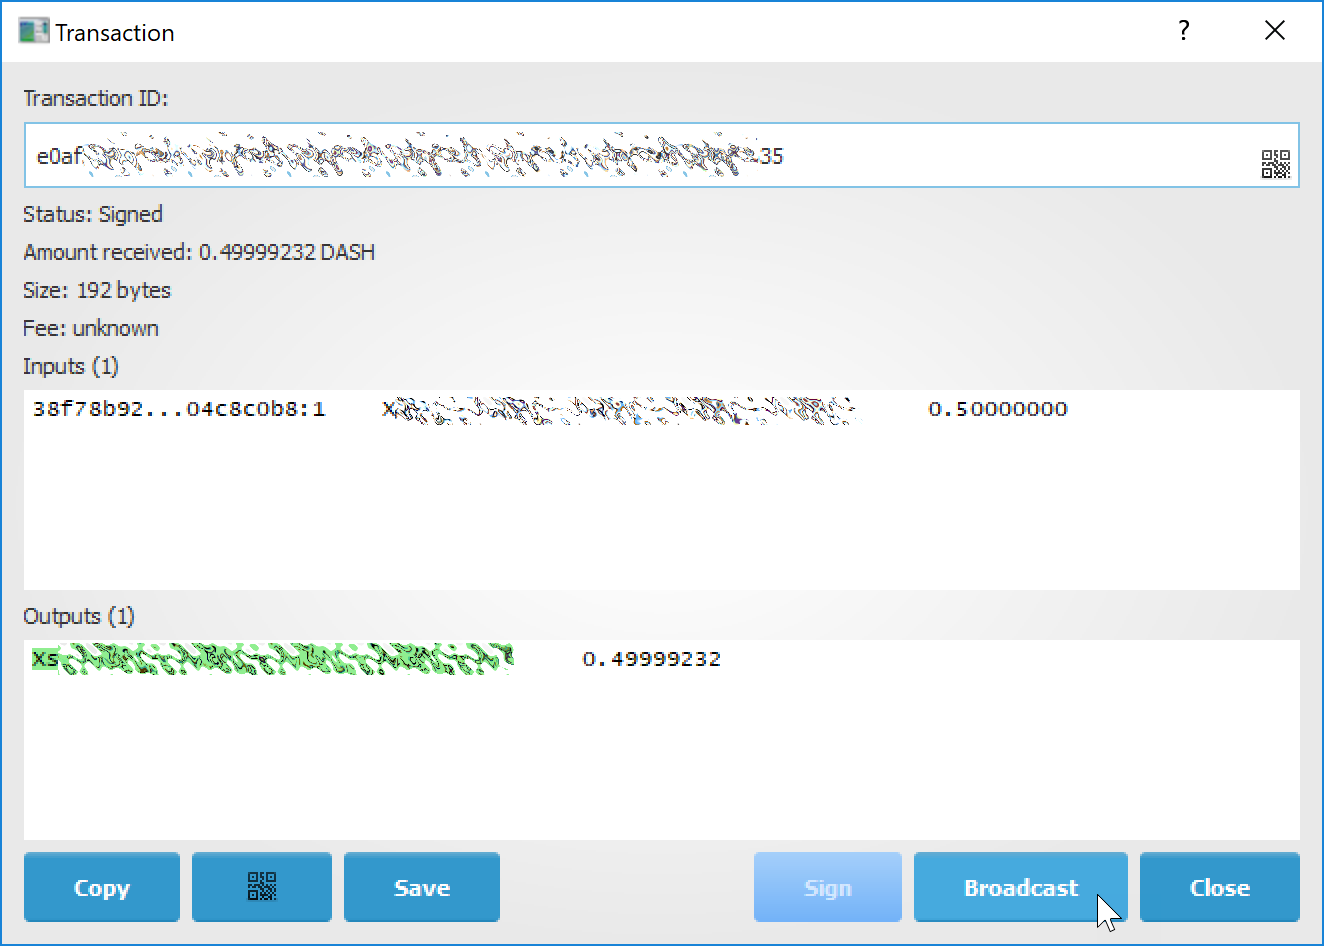
بث عملية المسح#
التخزين البارد#
يوضح هذا القسم كيفية إنشاء محفظة غير متصلة بالإنترنت والتي تحتوي على داش ومحفظتك على الإنترنت فقط والتي يتم استخدامها لعرض تاريخها ولإنشاء معاملات يجب توقيعها مع المحفظة غير المتصلة بالإنترنت قبل بثها على الإنترنت.
إنشاء محفظة دون اتصال بالإنترنت#
قم بإنشاء محفظة على جهاز غير متصل ، وفقًا للعملية المعتادة (ملف> جديد). بعد إنشاء المحفظة ، انتقل إلى محفظة -> المفتاح الخاص.
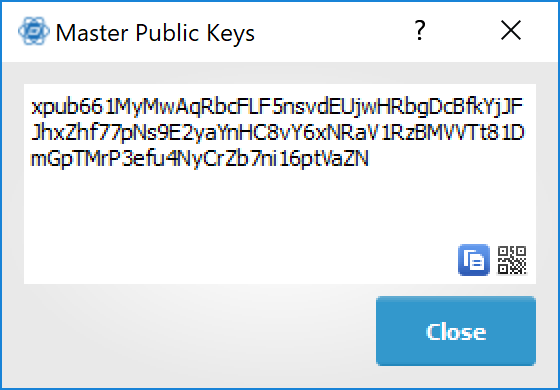
المفتاح العام لمحفظة جديدة غير متصلة بالإنترنت#
المفتاح العام الرئيسي في محفظتك هو السلسلة الموضحة في هذه النافذة المنبثقة. نقل هذا المفتاح إلى جهازك عبر الإنترنت بطريقة أو بأخرى.
قم بإنشاء نسخة مشاهدة فقط من محفظتك#
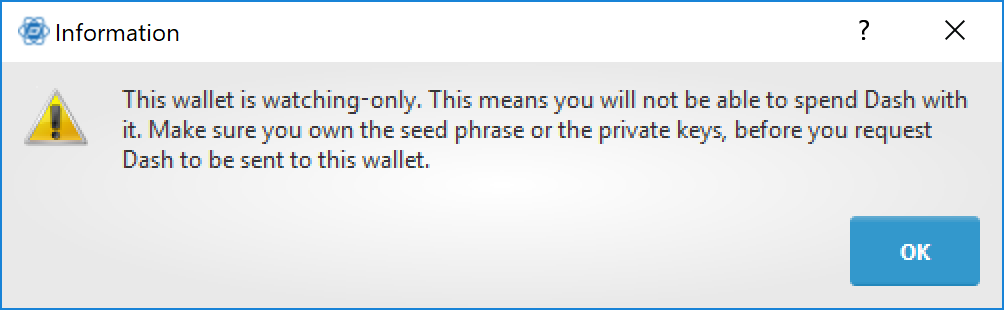
على جهازك عبر الإنترنت ، افتح داش ألكتروم واختر ملف> جديد / إسترجاع . أدخل اسمًا للمحفظة وحدد استخدم المفاتيح العامة أو الخاصة . الصق مفتاحك العمومي الرئيسي في المربع. انقر فوق التالي لإكمال إنشاء محفظتك. عند الانتهاء ، سترى نافذة منبثقة تخبرك بأنك تفتح محفظة مراقبة فقط.
المفتاح العام لمحفظة جديدة غير متصلة بالإنترنت#
يجب أن يظهر تاريخ المعاملة لمحفظتك.
قم بإنشاء معاملة غير موقعة#
انتقل إلى علامة ارسال في محفظة المشاهدة الخاصة بك على الإنترنت ، وقم بإدخال بيانات المعاملة وانقر فوق إرسال. ستظهر لك نافذة لإعلامك بإضافة رسوم معاملة. استمر. في النافذة التي تظهر ، انقر على حفظ واحفظ ملف المعاملة في مكان ما على جهاز الكمبيوتر. أغلق النافذة ونقل ملف المعاملة إلى جهازك بلا اتصال (مثل عصا USB).
قم بتوقيع معاملتك#
في محفظتك في وضع عدم الاتصال ، حدد الأدوات> تحميل المعاملة -> من الملف في القائمة وحدد ملف المعاملة الذي تم إنشاؤه في الخطوة السابقة. انقر فوق تسجيل. بمجرد التوقيع على المعاملة ، يظهر معرف المعاملة في الحقل المخصص لها. انقر حفظ ، قم بتخزين الملف في مكان ما على جهاز الكمبيوتر الخاص بك ، وقم بنقله إلى جهازك عبر الإنترنت.
بث معاملتك#
على جهازك عبر الإنترنت ، حدد الأدوات -> تحميل المعاملة -> من الملف من الواجهة. حدد ملف المعاملات الموقعة. في النافذة التي تفتح ، انقر على البث. سيتم بث المعاملة عبر شبكة داش.
سطر الأوامر#
يحتوي داش ألكتروم على سطر أوامر قوي متوفر عند التشغيل في لينكس أو ماك. سيعرض لك هذا القسم بعض المبادئ الأساسية.
باستخدام مساعدة مضمنة#
للاطلاع على قائمة أوامر داش ألكتروم ، اكتب
electrum help
لرؤية الوثائق الخاصة بأمر ، اكتب
electrum help <command>
الكلمات السحرية#
قد تكون الحجج التي تم تمريرها إلى الأوامر إحدى الكلمات السحرية التالية: ؟ ! : - .
علامة التعجب "!" هي اختصار يعني "الحد الأقصى للمبلغ المتاح". لاحظ أنه سيتم حساب رسوم المعاملة وخصمها من المبلغ. مثال:
electrum payto Xtdw4fezqbSpC341vcr8u9HboiJMFa9gBq !
علامة الاستفهام ؟ تعني أنك تريد المطالبة بالمعلمة. مثال:
electrum signmessage Xtdw4fezqbSpC341vcr8u9HboiJMFa9gBq ?
استخدم النقطتين ":" إذا كنت تريد إخفاء المعلمة المطلوبة (وليس مرددًا في الجهاز). لاحظ أنه ستتم مطالبتك مرتين في هذا المثال ، أولاً بالنسبة للمفتاح الخاص ، ثم كلمة مرور محفظتك:
electrum importprivkey :
سيتم قراءة المعلمة التي تم استبدالها بشرطة - من الإدخال القياسي (في الأنبوب)
cat LICENCE | electrum signmessage Xtdw4fezqbSpC341vcr8u9HboiJMFa9gBq -
الإسم المستعار#
يمكنك استخدام الأسماء المستعارة لـ DNS بدلاً من عناوين بيتكوين ، في معظم الأوامر
electrum payto ecdsa.net !
تنسيق المخرجات باستخدام jq#
مخرجات القيادة هي إما سلاسل بسيطة أو بيانات هيكلية json. فائدة مفيدة للغاية هي برنامج "jq". تثبيته مع
sudo apt-get install jq
تستخدم الأمثلة التالية ذلك.
تسجيل و التحقق من الرسالة#
يجوز لنا استخدام متغير لتخزين التوقيع والتحقق منه
sig=$(cat LICENCE| electrum signmessage Xtdw4fezqbSpC341vcr8u9HboiJMFa9gBq -)
و:
cat LICENCE | electrum verifymessage Xtdw4fezqbSpC341vcr8u9HboiJMFa9gBq $sig -
أظهر قيم#
يقوم الأمر listunspent بإرجاع قائمة بكائنات dict ، مع حقول متنوعة. لنفترض أننا نريد استخراج حقل القيمة لكل سجل. هذا يمكن أن يتحقق مع الأمر jq
electrum listunspent | jq 'map(.value)'
حدد فقط المعاملات الواردة من التاريخ#
المعاملات الواردة لها حقل "قيمة" إيجابية
electrum history | jq '.[] | select(.value>0)'
تصفية المعاملات حسب التاريخ#
الأمر التالي يختار المعاملات التي تم ختمها بعد تاريخ معين:
after=$(date -d '07/01/2015' +"%s")
electrum history | jq --arg after $after '.[] | select(.timestamp>($after|tonumber))'
وبالمثل ، يجوز لنا تصدير المعاملات لفترة زمنية محددة
before=$(date -d '08/01/2015' +"%s")
after=$(date -d '07/01/2015' +"%s")
electrum history | jq --arg before $before --arg after $after '.[] | select(.timestamp>($after|tonumber) and .timestamp<($before|tonumber))'
تشفير وفك تشفير الرسائل#
نحتاج أولاً إلى المفتاح العام لعنوان المحفظة:
pk=$(electrum getpubkeys Xtdw4fezqbSpC341vcr8u9HboiJMFa9gBq| jq -r '.[0]')
تشفير
cat | electrum encrypt $pk -
فك تشفير:
electrum decrypt $pk ?
ملاحظة: سيطالب هذا الأمر بالرسالة المشفرة ، ثم إلى كلمة مرور الحافظة.
تصدير مفاتيح خاصة وكسب القطع النقدية#
سيقوم الأمر التالي بتصدير المفاتيح الخاصة لجميع عناوين المحفظة التي تحمل بعض داش
electrum listaddresses --funded | electrum getprivatekeys -
سيؤدي ذلك إلى عرض قائمة من قوائم المفاتيح الخاصة. في معظم الحالات ، تريد الحصول على قائمة بسيطة. يمكن القيام بذلك عن طريق إضافة ملف jq ، كما يلي:
electrum listaddresses --funded | electrum getprivatekeys - | jq 'map(.[0])'
وأخيرًا ، دعونا نستخدم هذه القائمة الخاصة بالمفاتيح الخاصة كإدخال لأمر المسح:
electrum listaddresses --funded | electrum getprivatekeys - | jq 'map(.[0])' | electrum sweep - [destination address]
باستخدام التخزين البارد مع سطر الأوامر#
سيوضح لك هذا القسم كيفية توقيع معاملة باستخدام محفظة داش الكتروم دون اتصال باستخدام سطر الأوامر.
قم بإنشاء معاملة غير موقعة#
باستخدام محفظتك (مشاهدة فقط) عبر الإنترنت ، قم بإنشاء معاملة غير موقعة
electrum payto Xtdw4fezqbSpC341vcr8u9HboiJMFa9gBq 0.1 --unsigned > unsigned.txn
يتم تخزين المعاملة غير الموقعة في ملف باسم "unsigned.txn". لاحظ أن الخيار –unsigned غير مطلوب إذا كنت تستخدم محفظة مراقبة فقط.
يمكنك مشاهدته باستخدام
cat unsigned.txn | electrum deserialize -
التوقيع على الصفقة#
يحتوي تنسيق التسلسل من دتش الكتروم على المفتاح العام الرئيسي المطلوب واشتقاق المفتاح المستخدم من قبل المحفظة غير المتصلة بالإنترنت لتوقيع المعاملة. وبالتالي فإننا نحتاج فقط إلى تمرير المعاملة المتسلسلة إلى المحفظة غير المتصلة
cat unsigned.txn | electrum signtransaction - > signed.txn
سيطلب الأمر كلمة المرور الخاصة بك ، وحفظ المعاملة الموقعة في signed.txn
بث المعاملة#
إرسال المعاملة الخاصة بك إلى شبكة داش ، وذلك باستخدام البث
cat signed.txn | electrum broadcast -
في حالة نجاح ذلك ، سيعود الأمر معرّف المعاملة
كيفية قبول داش على موقع باستخدام داش الكتروم#
سيوضح لك هذا البرنامج التعليمي كيفية قبول الشرطة على موقع ويب مع طلبات الدفع الموقعة من SSL. يتم تحديثه ل داش ألكتروم 2.6.
المتطلبات#
خادم الويب الذي يقدم HTML ثابت
شهادة SSL (موقعة من CA)
إصدار ألكترم >= 2.6
أنشاء محفظة#
انشاء محفظة في سيرفر الموقع؛:
electrum create
يمكنك أيضًا استخدام مراقبة فقط للمحفظة (التي تمت استعادتها من xpub) ، إذا كنت تريد الاحتفاظ بالمفاتيح الخاصة بعيدًا عن الخادم. بمجرد إنشاء محفظتك ، ابدأ داش الكتروم كبرنامج daemon
electrum daemon start
أضف شهادة SSL إلى التهيئة الخاصة بك#
يجب أن يكون لديك مفتاح خاص وشهادة عامة لنطاقك. قم بإنشاء ملف يحتوي على المفتاح الخاص فقط
-----BEGIN PRIVATE KEY-----
your private key
-----BEGIN END KEY-----
قم بتعيين المسار إلى ملف المفتاح الخاص باستخدام setconfig
electrum setconfig ssl_privkey /path/to/ssl.key
قم بإنشاء ملف آخر يحتوي على شهادتك وقائمة الشهادات التي يعتمد عليها ، وصولاً إلى المرجع المصدق الجذري. يجب أن تكون الشهادة الخاصة بك في أعلى القائمة ، و CA الجذر في النهاية
-----BEGIN CERTIFICATE-----
your cert
-----END CERTIFICATE-----
-----BEGIN CERTIFICATE-----
intermediate cert
-----END CERTIFICATE-----
-----BEGIN CERTIFICATE-----
root cert
-----END CERTIFICATE-----
تعيين مسار ssl_chain باستخدام setconfig
electrum setconfig ssl_chain /path/to/ssl.chain
تكوين دليل طلبات#
يجب أن يتم تقديم هذا الدليل بواسطة خادم الويب الخاص بك (مثل Apache)
electrum setconfig requests_dir /var/www/r/
بشكل افتراضي ، سيعرض داش ألكتروم عناوين URL المحلية ، بدءًا من "file: //" لعرض عناوين URL العامة ، نحتاج إلى تعيين متغير تهيئة آخر ، url_rewrite. فمثلا:
electrum setconfig url_rewrite "['file:///var/www/','https://electrum.org/']"
أنشئ طلبًا للدفع موقعًا#
electrum addrequest 3.14 -m "this is a test"
{
   "URI": "dash:Xtdw4fezqbSpC341vcr8u9HboiJMFa9gBq?amount=3.14&r=https://electrum.org/r/7c2888541a",
   "address": "Xtdw4fezqbSpC341vcr8u9HboiJMFa9gBq",
   "amount": 314000000,
   "amount (DASH)": "3.14",
   "exp": 3600,
   "id": "7c2888541a",
   "index_url": "https://electrum.org/r/index.html?id=7c2888541a",
   "memo": "this is a test",
   "request_url": "https://electrum.org/r/7c2888541a",
   "status": "Pending",
   "time": 1450175741
}
يعرض هذا الأمر كائن json مع عنوانين URL:
request_url هو عنوان URL لطلب BIP70 الموقع.
index_url هو عنوان URL لصفحة ويب تعرض الطلب.
لاحظ أن request_url و index_url يستخدمان اسم النطاق المحدد في url_rewrite. يمكنك عرض القائمة الحالية للطلبات باستخدام الأمر listrequests.
افتح صفحة طلب الدفع في متصفحك#
دعونا نفتح index_url في متصفح ويب.
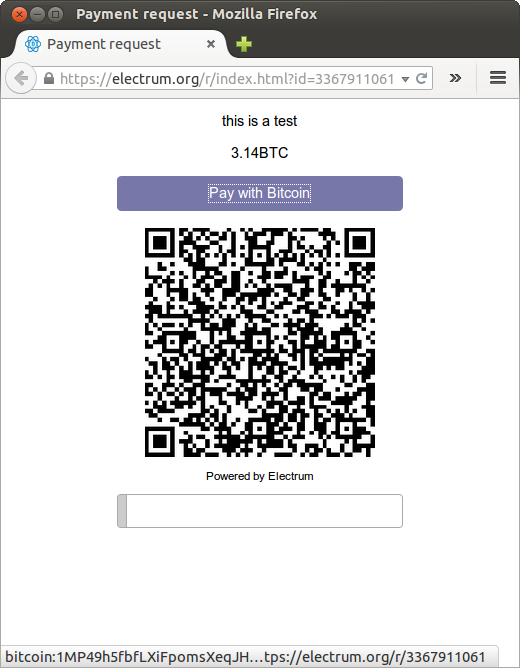
صفحة طلب الدفع في متصفح الويب#
تعرض الصفحة طلب الدفع. يمكنك فتح شرطة: URI مع محفظة ، أو مسح رمز الاستجابة السريعة. يعرض السطر السفلي الوقت المتبقي حتى انتهاء صلاحية الطلب.
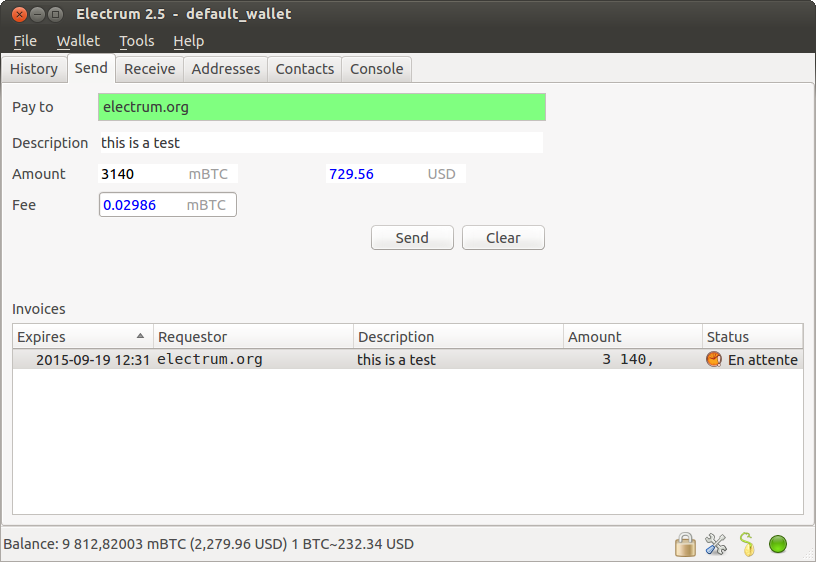
المحفظة في انتظار الدفع#
يمكن استخدام هذه الصفحة بالفعل لاستلام الدفعات. ومع ذلك ، لن تكتشف أنه تم سداد طلب ما ؛ لذلك نحن بحاجة إلى تكوين websockets.
إضافة دعم مآخذ الويب#
احصل على SimpleWebSocketServer من هنا
git clone https://github.com/ecdsa/simple-websocket-server.git
تعيين websocket_server و websocket_port في التهيئة الخاصة بك
electrum setconfig websocket_server <FQDN of your server>
electrum setconfig websocket_port 9999
وأعد تشغيل daemon
electrum daemon stop
electrum daemon start
الآن ، الصفحة تفاعلية بالكامل: ستقوم بتحديث نفسها عند استلام الدفعة. يرجى ملاحظة أنه قد يتم حظر المنافذ الأعلى على جدران الحماية الخاصة بالعميل ، لذلك يكون من الأسهل على سبيل المثال عكس عملية نقل خدمة ويب بروكسي عبر استخدام المنفذ القياسي 443 على نطاق فرعي إضافي.
واجهة JSONRPC#
يمكن إرسال أوامر إلى داش ألكتروم daemon باستخدام JSONRPC. هذا مفيد إذا كنت تريد استخدام داش ألكتروم في برنامج نصي PHP.
لاحظ أن البرنامج يستخدم رقم منفذ عشوائي بشكل افتراضي. لاستخدام رقم منفذ ثابت ، تحتاج إلى تعيين متغير تكوين rpcport (وإعادة تشغيل البرنامج الخفي):
electrum setconfig rpcport 7777
باستخدام هذا الإعداد ، يمكننا تنفيذ الاستعلامات باستخدام curl أو PHP. مثال
curl --data-binary '{"id":"curltext","method":"getbalance","params":[]}' http://127.0.0.1:7777
الاستعلام مع المعلمات المسماة
curl --data-binary '{"id":"curltext","method":"listaddresses","params":{"funded":true}}' http://127.0.0.1:7777
إنشاء طلب دفع
curl --data-binary '{"id":"curltext","method":"addrequest","params":{"amount":"3.14","memo":"test"}}' http://127.0.0.1:7777