Temas avanzados#
Control de monedas#
El control de monedas permite a los usuarios de la billetera Dash Core especificar qué direcciones y salidas de transacciones no utilizadas (UTXOs) deben usarse como entradas en las transacciones. Esto te permite mantener un saldo específico en ciertas direcciones en tu billetera, mientras que gastas otros libremente. En la billetera Dash Core, haz clic en Configuración > Opciones > Billetera > Habilitar funciones de control de monedas. Ahora, cuando vayas a la pestaña Enviar en tu billetera, aparecerá un nuevo botón con la etiqueta Entradas … Haz click en este botón para seleccionar qué UTXOs se pueden usar como entrada para cualquier transacción que crees. La siguiente ventana aparecerá:
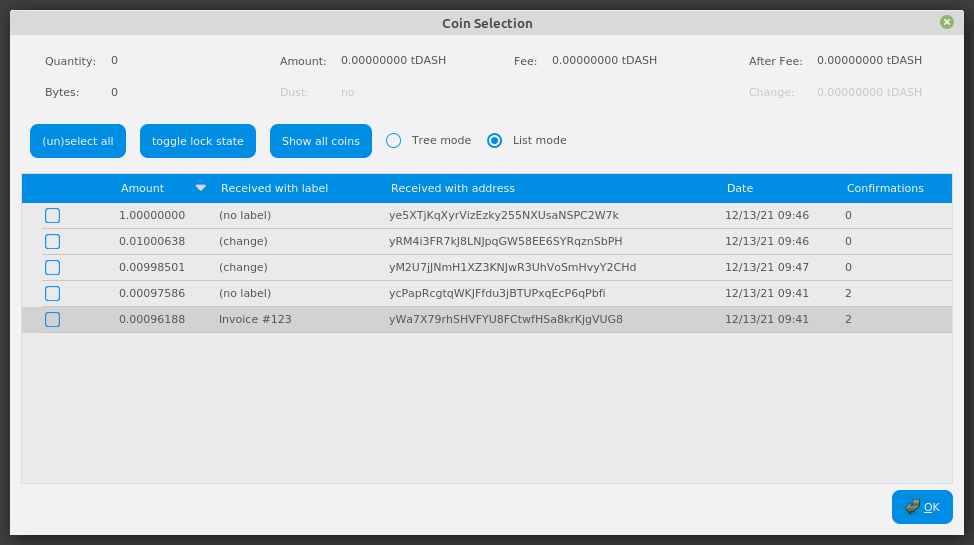
Ventana de selección de monedas en la billetera Dash Core, que muestra dos masternodes (red de prueba)#
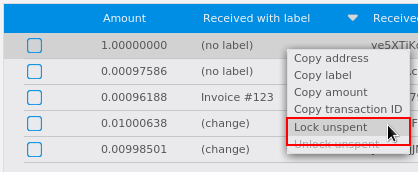
Haz click derecho en las transacción(es) que no deseas gastar, luego selecciona Bloquear sin gastar. Aparecerá un pequeño candado junto a la transacción. Puedes hacer click en el botón Conmutar estado de bloqueo para invertir el estado bloqueado/desbloqueado de todos los UTXOs. Cuando estés listo para continuar, haz click en Aceptar. Ahora puedes crear transacciones de forma segura con los fondos restantes sin afectar los UTXOs bloqueados.
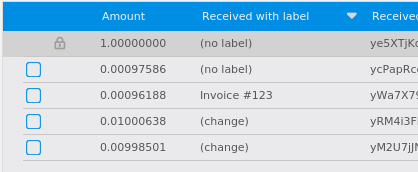
Bloquear UTXOs en la billetera Dash Core#
Running Dash Testnet#
It is recommended to run Dash Core on testnet for your experimentations. To start on testnet via the command line, do the following:
For Linux:
./dash-qt -testnet
For Mac (run from Applications/Dash-Qt.app/Contents/MacOS):
Dash-Qt -testnet
Note: You may need to allow an app from an unknown developer before running this. Cmd+Click on the application and click Open.
Now, open Mac Terminal and run:
cd /Applications/Dash-Qt.app/Contents/MacOS
./Dash-Qt -testnet
You may top up your testnet wallet by accessing the faucet.
BIlleteras HD#
Added in version v20.1.0: HD wallets are now created by default.
Dash Core includes an implementation of BIP39/BIP44 compatible hierarchical deterministic (HD) key generation.
Upgrade to HD#
Advertencia
A new backup must be created after upgrading to an HD wallet.
Dash Core includes the ability upgrade a non-hierarchical deterministic (HD)
wallet to an HD wallet via the upgradetohd command. The command can be run
by either opening the console from Window > Console or issuing the following
RPC command from dash-cli:
upgradetohd "" "" <walletpassphrase>
If your wallet is already encrypted you must enter the passphrase as the third parameter to the command. If your wallet is not already encrypted, specifying a wallet passphrase will trigger wallet encryption.
To see full details for the command, run the following from either the console
or dash-cli:
help upgradetohd
View HD wallet information#
Open the console from Window > Console or issue the following RPC command
from dash-cli to view the mnemonic seed:
dumphdinfo
Dash Core will display the HD seed in both hexadecimal and BIP39 mnemonic formats. It will also display the mnemonic passphrase if one was used when creating the wallet.
Restore HD wallet#
To restore an existing HD wallet, or define your own separately generated mnemonic and/or passphrase, create a new blank wallet with following command:
createwallet "enter wallet name" false true "optional wallet password"
Add the HD wallet details to the newly created wallet by running:
upgradetohd "enter mnemonic" "optional mnemonic passphrase" "optional wallet passphrase"
La billetera HD sera restaurada y tu balance aparecerá una vez que la sincronización esta completa.
Note that the wallet passphrase is different to the mnemonic passphrase, which is often also referred to as the «25th word» or «extension word». The wallet passphrase encrypts the wallet file itself, while the mnemonic passphrase is used to specify different derivation branches from the same mnemonic seed.
Enable HD Wallet Creation By Default#
Added in version v20.1.0: HD wallets are now created by default without requiring the steps listed below.
Prior to Dash Core v20.1.0, it was necessary to complete theses steps to make HD
wallet the default. We will use the Windows GUI wallet in this example, but the
commands are similar if using dash-qt or dashd on other operating
systems. Enter the following command to configure Dash Core to generate HD
wallets by default:
dash-qt.exe -usehd
To make this configuration persist between restarts, add usehd=1 to the
dash.conf file.
Multifirma#
This section presents a worked example to demonstrate multisig functionality in Dash Core. While the transactions may no longer be visible on the current testnet blockchain and some address formats or RPC responses may differ slightly from the version shown here, the principle and commands are the same. The example demonstrates how to set up a 2-of-3 multisig address and create a transaction. The example parties involved are a buyer, a seller and an arbiter. This example is based on:
Paso 1: Crear tres direcciones#
Vendedor:
seller@testnet03:~$ ./dash-cli getnewaddress
yfw6wPY5eo6sWxcU93ej3fRD9VXzppEYkm

seller@testnet03:~$ ./dash-cli getaddressinfo yfw6wPY5eo6sWxcU93ej3fRD9VXzppEYkm
{
  "address": "yfw6wPY5eo6sWxcU93ej3fRD9VXzppEYkm",
  "scriptPubKey": "76a914d728be76cd74b5d148eba2a49246b80dac12f73e88ac",
  "ismine": true,
  "solvable": true,
  "desc": "pkh([d728be76]02a862b412ff9e3afd01a2873a02622897f6df92e3fc85597788b898309fec882e)#7y7rcew8",
  "iswatchonly": false,
  "isscript": false,
  "pubkey": "02a862b412ff9e3afd01a2873a02622897f6df92e3fc85597788b898309fec882e",
  "iscompressed": true,
  "ischange": false,
  "timestamp": 1,
  "labels": [
    "seller"
  ]
}

seller@testnet03:~$ ./dash-cli dumpprivkey yfw6wPY5eo6sWxcU93ej3fRD9VXzppEYkm
cVQVgBr8sW4FTPYz16BSCo1PcAfDhpJArgMPdLxKZQWcVFwMXRXx
Comprador:
buyer@testnet03:~$ ./dash-cli getnewaddress
yUtJQSYvqoicEpUiMiaiSy16Fimpjz6Kjj

buyer@testnet03:~$ ./dash-cli getaddressinfo yUtJQSYvqoicEpUiMiaiSy16Fimpjz6Kjj
{
  "address": "yUtJQSYvqoicEpUiMiaiSy16Fimpjz6Kjj",
  "scriptPubKey": "76a9145df7af25fa0654c90f359034ac756de71f5f25dc88ac",
  "ismine": true,
  "solvable": true,
  "desc": "pkh([5df7af25]0315617694c9d93f0ce92769e050a6868ffc74d229077379c0af8bfb193c3d351c)#795y6m9z",
  "iswatchonly": false,
  "isscript": false,
  "pubkey": "0315617694c9d93f0ce92769e050a6868ffc74d229077379c0af8bfb193c3d351c",
  "iscompressed": true,
  "ischange": false,
  "timestamp": 1,
  "labels": [
    "buyer"
  ]
}

buyer@testnet03:~$ ./dash-cli dumpprivkey yUtJQSYvqoicEpUiMiaiSy16Fimpjz6Kjj
cP9DFmEDb11waWbQ8eG1YUoZCGe59BBxJF3kk95PTMXuG9HzcxnU
Árbitro:
arbiter@testnet03:~$ ./dash-cli getnewaddress
ygR4183tHp46oRuEk4RL1Jz7SkNubE7osu

arbiter@testnet03:~$ ./dash-cli getaddressinfo ygR4183tHp46oRuEk4RL1Jz7SkNubE7osu
{
  "address": "ygR4183tHp46oRuEk4RL1Jz7SkNubE7osu",
  "scriptPubKey": "76a914dc71f0bcf448f9198cdbb1e6f5ca7ba96689fbe188ac",
  "ismine": true,
  "solvable": true,
  "desc": "pkh([dc71f0bc]0287ce6cf69b85593ce7db801874c9a2fb1b653dbe5dd9ebfa73e98b710af9e9ce)#3u5h82dc",
  "iswatchonly": false,
  "isscript": false,
  "pubkey": "0287ce6cf69b85593ce7db801874c9a2fb1b653dbe5dd9ebfa73e98b710af9e9ce",
  "iscompressed": true,
  "ischange": false,
  "timestamp": 1,
  "labels": [
    "arbiter"
  ]
}

arbiter@testnet03:~$ ./dash-cli dumpprivkey ygR4183tHp46oRuEk4RL1Jz7SkNubE7osu
cUbDFL81a2w6urAGZf7ecGbdzM82pdHLeCaPXdDp71s96SzDV49M
Esto resulta en tres pares de llaves (pública/privada):
seller:    02a862b412ff9e3afd01a2873a02622897f6df92e3fc85597788b898309fec882e / cVQVgBr8sW4FTPYz16BSCo1PcAfDhpJArgMPdLxKZQWcVFwMXRXx
buyer:     0315617694c9d93f0ce92769e050a6868ffc74d229077379c0af8bfb193c3d351c / cP9DFmEDb11waWbQ8eG1YUoZCGe59BBxJF3kk95PTMXuG9HzcxnU
arbiter:   0287ce6cf69b85593ce7db801874c9a2fb1b653dbe5dd9ebfa73e98b710af9e9ce / cUbDFL81a2w6urAGZf7ecGbdzM82pdHLeCaPXdDp71s96SzDV49M
Paso 2: Crear una dirección multifirma#
El comando createmultisig toma como variables el número n de firmas de m claves (suministradas como arreglo json) requeridas. En este ejemplo, se requieren 2 de 3 llaves para firmar la transacción.
Nota: Cualquier persona puede crear la dirección, siempre que se conozcan las llaves públicas y su secuencia (la dirección resultante y redeemScript son idénticos, ver abajo).
Vendedor:
seller@testnet03:~$ ./dash-cli createmultisig 2 '["02a862b412ff9e3afd01a2873a02622897f6df92e3fc85597788b898309fec882e","0315617694c9d93f0ce92769e050a6868ffc74d229077379c0af8bfb193c3d351c","0287ce6cf69b85593ce7db801874c9a2fb1b653dbe5dd9ebfa73e98b710af9e9ce"]'
{
  "address": "8gQdvLw7pF7jd8mjGU3nRNESdWi9gkHRZy",
  "redeemScript": "522102a862b412ff9e3afd01a2873a02622897f6df92e3fc85597788b898309fec882e210315617694c9d93f0ce92769e050a6868ffc74d229077379c0af8bfb193c3d351c210287ce6cf69b85593ce7db801874c9a2fb1b653dbe5dd9ebfa73e98b710af9e9ce53ae",
  "descriptor": "sh(multi(2,02a862b412ff9e3afd01a2873a02622897f6df92e3fc85597788b898309fec882e,0315617694c9d93f0ce92769e050a6868ffc74d229077379c0af8bfb193c3d351c,0287ce6cf69b85593ce7db801874c9a2fb1b653dbe5dd9ebfa73e98b710af9e9ce))#36ymhjhs"
}
Comprador:
buyer@testnet03:~$ ./dash-cli createmultisig 2 '["02a862b412ff9e3afd01a2873a02622897f6df92e3fc85597788b898309fec882e","0315617694c9d93f0ce92769e050a6868ffc74d229077379c0af8bfb193c3d351c","0287ce6cf69b85593ce7db801874c9a2fb1b653dbe5dd9ebfa73e98b710af9e9ce"]'
{
  "address": "8gQdvLw7pF7jd8mjGU3nRNESdWi9gkHRZy",
  "redeemScript": "522102a862b412ff9e3afd01a2873a02622897f6df92e3fc85597788b898309fec882e210315617694c9d93f0ce92769e050a6868ffc74d229077379c0af8bfb193c3d351c210287ce6cf69b85593ce7db801874c9a2fb1b653dbe5dd9ebfa73e98b710af9e9ce53ae",
  "descriptor": "sh(multi(2,02a862b412ff9e3afd01a2873a02622897f6df92e3fc85597788b898309fec882e,0315617694c9d93f0ce92769e050a6868ffc74d229077379c0af8bfb193c3d351c,0287ce6cf69b85593ce7db801874c9a2fb1b653dbe5dd9ebfa73e98b710af9e9ce))#36ymhjhs"
}
Árbitro:
arbiter@testnet03:~$ ./dash-cli createmultisig 2 '["02a862b412ff9e3afd01a2873a02622897f6df92e3fc85597788b898309fec882e","0315617694c9d93f0ce92769e050a6868ffc74d229077379c0af8bfb193c3d351c","0287ce6cf69b85593ce7db801874c9a2fb1b653dbe5dd9ebfa73e98b710af9e9ce"]'
{
  "address": "8gQdvLw7pF7jd8mjGU3nRNESdWi9gkHRZy",
  "redeemScript": "522102a862b412ff9e3afd01a2873a02622897f6df92e3fc85597788b898309fec882e210315617694c9d93f0ce92769e050a6868ffc74d229077379c0af8bfb193c3d351c210287ce6cf69b85593ce7db801874c9a2fb1b653dbe5dd9ebfa73e98b710af9e9ce53ae",
  "descriptor": "sh(multi(2,02a862b412ff9e3afd01a2873a02622897f6df92e3fc85597788b898309fec882e,0315617694c9d93f0ce92769e050a6868ffc74d229077379c0af8bfb193c3d351c,0287ce6cf69b85593ce7db801874c9a2fb1b653dbe5dd9ebfa73e98b710af9e9ce))#36ymhjhs"
}
Paso 3: el comprador financia la dirección multifirma#
Esto funciona igual que una transacción normal.
Comprador:
buyer@testnet03:~$ ./dash-cli sendtoaddress 8gQdvLw7pF7jd8mjGU3nRNESdWi9gkHRZy 0.25
48e6f8f0108549bf932e4d6833fe707d7edafe490788c2ebde688635a995538e
El vendedor/árbitro puede rastrear la transacción por su txid en el explorador de bloques. O desde la consola de la siguiente manera.
Comprador:
seller@testnet03:~$ ./dash-cli getrawtransaction 48e6f8f0108549bf932e4d6833fe707d7edafe490788c2ebde688635a995538e 1
{
  "hex" : "02000000068ad5c86eae519b0ba11f8314d5cdf50c872331e7c7efa2eece2107d669cc8926010000006a473044022060e3e8a5194adc690a1d39db181214c56596bdcfef67a5deb2c0932112a56c20022043acb1cb88eb590076ac41ec345c491cab8368befd2513bc7d8cebf378559737012103207b3ed8ce5b61e1dbd1b967e9dc5729d096274e41f43ec3dcff897012425e2dfeffffff2d6d9c0d3dafb66744da94676f4e7f76461241e60dc9cba3bcaa9ac6033b052e000000006a47304402207abaa4b6b4c7fdbd41d1885303dd3f0ae6b350ec5af19546f3fe616cbc5b5b7802201868fdda71c29364c52e6359868c22376a1091b19f6e1184de93d95eb61f3289012103e531f14fdace3f41ce041c366413aaabf26ed837ea6483d4a4f36af376c93b42feffffff1bd67d51fb6c6552c7241a6631a0c08c69517f06f84c4921a3130d74fe722475000000006a47304402203dcbbb063efe24b93c4a37b4efcbc22b2def077610810e1659a236922857393502202b034ab74554b79ca34e21d10a7b9dbf2517f1a79e028a6ed11cd4a28a684376012103622883e8029d188581291e26783991a450b2e38a8b832a5924171e961d8fc7affefffffff2c54c61c55079f0e63eed06c0b3c261e640d985690cefb487370b714ef4ca8c000000006a4730440220462da4ec78ab804fc66844615019979273c20b6c3dbd73e58def7539ac47817102201572a458013e29753b87a390ab06eb7ca71789136f8b8183e19897f30bd49847012103900531aa50569ad35a555726d703b8455e53567e3788369d68f47210e771b61bfeffffff435365937ffb7cc39acc1a8a4678a9273fe0c1384a37565f3748293e717333c7000000006a4730440220233497587ae0377eae2aee5c879893bf6eba0a463c67ac2f995370249730d8390220176e9e818e256c653888046a150bdde0f2e99dcc56c4b339a8615af56695b85f0121035c0a7d6e4e95d2e2802f1c8d8cf37b1597b7b67b4e1a277745b982ae4485156afeffffffcc0aa97c5b5e1ab12d808108285a38e54bd2fe98fe9489cb78bb1fde6b740fff000000006a4730440220731f21d1e766e6408e404fcfc317d507cc03ad09b9d63e76abac83b9b512ad5a022073b73bccd272e4d52a4fe0533887c3a7280a9f440ec78c54e484e1c0e8051e6d012103207b3ed8ce5b61e1dbd1b967e9dc5729d096274e41f43ec3dcff897012425e2dfeffffff02a1910f00000000001976a9147ab95aa3133061fbe7ad020cc638b82451c9acdc88ac40787d010000000017a91415c85c2472f5941b60a49462a2cfd0d17ab49d1c8768500f00",
  "txid" : "48e6f8f0108549bf932e4d6833fe707d7edafe490788c2ebde688635a995538e",
  "version" : 2,
  "locktime" : 1003624,
[...]
  "vout" : [
      {
        "value": 0.25000000,
        "valueSat": 25000000,
        "n": 1,
        "scriptPubKey": {
          "asm": "OP_HASH160 15c85c2472f5941b60a49462a2cfd0d17ab49d1c OP_EQUAL",
          "hex": "a91415c85c2472f5941b60a49462a2cfd0d17ab49d1c87",
          "reqSigs": 1,
          "type": "scripthash",
          "addresses": [
            "8gQdvLw7pF7jd8mjGU3nRNESdWi9gkHRZy"
          ]
        }
      }
[...]
    ],
  "blockhash": "000000bd679c0934333da72d25b85df9a120e2a166d945a8ace514ccd894e809",
  "height": 1003625,
  "confirmations": 9,
  "time": 1712596571,
  "blocktime": 1712596571,
  "instantlock": true,
  "instantlock_internal": true,
  "chainlock": true
}
Paso 4: Gastar la multifirma#
Ahora suponemos que el trato está completo, el comprador obtuvo los productos y todos están contentos. Ahora el vendedor quiere obtener sus Dash. Como se utilizó una multifirma de 2-de-3, la transacción debe estar firmada por 2 partes (vendedor + comprador o árbitro). El vendedor crea una transacción (reutilizaremos su dirección pública de arriba).
Vendedor:
seller@testnet03:~$ ./dash-cli createrawtransaction '[{"txid":"48e6f8f0108549bf932e4d6833fe707d7edafe490788c2ebde688635a995538e","vout":1}]' '{"yfw6wPY5eo6sWxcU93ej3fRD9VXzppEYkm":0.249}'
02000000018e5395a9358668deebc2880749feda7e7d70fe33684d2e93bf498510f0f8e6480100000000ffffffff01a0f17b01000000001976a914d728be76cd74b5d148eba2a49246b80dac12f73e88ac00000000
Y lo firma parcialmente, usando redeemScript, scriptPubKey y su llave privada
Vendedor:
seller@testnet03:~$ ./dash-cli signrawtransactionwithkey '02000000018e5395a9358668deebc2880749feda7e7d70fe33684d2e93bf498510f0f8e6480100000000ffffffff01a0f17b01000000001976a914d728be76cd74b5d148eba2a49246b80dac12f73e88ac00000000' '["cVQVgBr8sW4FTPYz16BSCo1PcAfDhpJArgMPdLxKZQWcVFwMXRXx"]' '[{"txid":"a8b3bf5bcace91a8dbbddbf9b7eb027efb9bd001792f043ecf7b558aaa3cb951","vout":0,"scriptPubKey":"a91415c85c2472f5941b60a49462a2cfd0d17ab49d1c87","redeemScript":"522102a862b412ff9e3afd01a2873a02622897f6df92e3fc85597788b898309fec882e210315617694c9d93f0ce92769e050a6868ffc74d229077379c0af8bfb193c3d351c210287ce6cf69b85593ce7db801874c9a2fb1b653dbe5dd9ebfa73e98b710af9e9ce53ae"}]'
{
  "hex": "02000000018e5395a9358668deebc2880749feda7e7d70fe33684d2e93bf498510f0f8e64801000000b50047304402207574d2af348ba67768849fa630dc42af546a382ecc85e941574b04dd419edd3002201c5704eb32d1df724c258e8bc4d6aa607abe4c01b9a295c3fdfca1763a328edd01004c69522102a862b412ff9e3afd01a2873a02622897f6df92e3fc85597788b898309fec882e210315617694c9d93f0ce92769e050a6868ffc74d229077379c0af8bfb193c3d351c210287ce6cf69b85593ce7db801874c9a2fb1b653dbe5dd9ebfa73e98b710af9e9ce53aeffffffff01a0f17b01000000001976a914d728be76cd74b5d148eba2a49246b80dac12f73e88ac00000000",
  "complete": false,
  "errors": [
    {
      "txid": "48e6f8f0108549bf932e4d6833fe707d7edafe490788c2ebde688635a995538e",
      "vout": 1,
      "scriptSig": "0047304402207574d2af348ba67768849fa630dc42af546a382ecc85e941574b04dd419edd3002201c5704eb32d1df724c258e8bc4d6aa607abe4c01b9a295c3fdfca1763a328edd01004c69522102a862b412ff9e3afd01a2873a02622897f6df92e3fc85597788b898309fec882e210315617694c9d93f0ce92769e050a6868ffc74d229077379c0af8bfb193c3d351c210287ce6cf69b85593ce7db801874c9a2fb1b653dbe5dd9ebfa73e98b710af9e9ce53ae",
      "sequence": 4294967295,
      "error": "CHECK(MULTI)SIG failing with non-zero signature (possibly need more signatures)"
    }
  ]
}
Ten en cuenta que el hexágono de salida se hace más largo, pero el indicador completo es «falso» ya que la transacción necesita otra firma. Entonces, ahora el comprador o el árbitro pueden completar la firma de la transacción, utilizando el resultado de arriba y sus llaves privada. Supongamos que el comprador está completando la firma.
Comprador:
buyer@testnet03:~$ ./dash-cli signrawtransactionwithkey '02000000018e5395a9358668deebc2880749feda7e7d70fe33684d2e93bf498510f0f8e64801000000b50047304402207574d2af348ba67768849fa630dc42af546a382ecc85e941574b04dd419edd3002201c5704eb32d1df724c258e8bc4d6aa607abe4c01b9a295c3fdfca1763a328edd01004c69522102a862b412ff9e3afd01a2873a02622897f6df92e3fc85597788b898309fec882e210315617694c9d93f0ce92769e050a6868ffc74d229077379c0af8bfb193c3d351c210287ce6cf69b85593ce7db801874c9a2fb1b653dbe5dd9ebfa73e98b710af9e9ce53aeffffffff01a0f17b01000000001976a914d728be76cd74b5d148eba2a49246b80dac12f73e88ac00000000' '["cP9DFmEDb11waWbQ8eG1YUoZCGe59BBxJF3kk95PTMXuG9HzcxnU"]' '[{"txid":"a8b3bf5bcace91a8dbbddbf9b7eb027efb9bd001792f043ecf7b558aaa3cb951","vout":0,"scriptPubKey":"a91415c85c2472f5941b60a49462a2cfd0d17ab49d1c87","redeemScript":"522102a862b412ff9e3afd01a2873a02622897f6df92e3fc85597788b898309fec882e210315617694c9d93f0ce92769e050a6868ffc74d229077379c0af8bfb193c3d351c210287ce6cf69b85593ce7db801874c9a2fb1b653dbe5dd9ebfa73e98b710af9e9ce53ae"}]'
{
  "hex": "02000000018e5395a9358668deebc2880749feda7e7d70fe33684d2e93bf498510f0f8e64801000000fc0047304402207574d2af348ba67768849fa630dc42af546a382ecc85e941574b04dd419edd3002201c5704eb32d1df724c258e8bc4d6aa607abe4c01b9a295c3fdfca1763a328edd014730440220764019282400fab0e3bb431b04fada7daca528054e903f13d08deadee01d7c5a02204c7e4e484820e16af0951bc48371c3d0175de4114cee11dc86707b2489432b15014c69522102a862b412ff9e3afd01a2873a02622897f6df92e3fc85597788b898309fec882e210315617694c9d93f0ce92769e050a6868ffc74d229077379c0af8bfb193c3d351c210287ce6cf69b85593ce7db801874c9a2fb1b653dbe5dd9ebfa73e98b710af9e9ce53aeffffffff01a0f17b01000000001976a914d728be76cd74b5d148eba2a49246b80dac12f73e88ac00000000",
  "complete": true
}
La firma está completa ahora, y cualquiera de las partes puede transmitir la transacción a la red.
Comprador:
buyer@testnet03:~$ ./dash-cli sendrawtransaction 02000000018e5395a9358668deebc2880749feda7e7d70fe33684d2e93bf498510f0f8e64801000000fc0047304402207574d2af348ba67768849fa630dc42af546a382ecc85e941574b04dd419edd3002201c5704eb32d1df724c258e8bc4d6aa607abe4c01b9a295c3fdfca1763a328edd014730440220764019282400fab0e3bb431b04fada7daca528054e903f13d08deadee01d7c5a02204c7e4e484820e16af0951bc48371c3d0175de4114cee11dc86707b2489432b15014c69522102a862b412ff9e3afd01a2873a02622897f6df92e3fc85597788b898309fec882e210315617694c9d93f0ce92769e050a6868ffc74d229077379c0af8bfb193c3d351c210287ce6cf69b85593ce7db801874c9a2fb1b653dbe5dd9ebfa73e98b710af9e9ce53aeffffffff01a0f17b01000000001976a914d728be76cd74b5d148eba2a49246b80dac12f73e88ac00000000
d6b27fb30be3d79588900c3f2fb433f8a68fdae70bfa9d6dbad5dd33ed25ba2c
De nuevo, esta transacción se puede rastrear en un explorador de bloques. Y el vendedor está feliz de recibir sus monedas en su dirección pública de la siguiente manera.
Vendedor:
seller@testnet03:~$ dash-cli listtransactions "*" 1
[
  {
    "involvesWatchonly": true,
    "address": "yfw6wPY5eo6sWxcU93ej3fRD9VXzppEYkm",
    "category": "receive",
    "amount": 0.24900000,
    "label": "seller",
    "vout": 0,
    "confirmations": 1,
    "instantlock": true,
    "instantlock_internal": true,
    "chainlock": true,
    "blockhash": "000000f25253e46db14c5a0316321ea45e0d7c747d00398fc06becd71e93be44",
    "blockheight": 1003642,
    "blockindex": 4,
    "blocktime": 1712598497,
    "txid": "d6b27fb30be3d79588900c3f2fb433f8a68fdae70bfa9d6dbad5dd33ed25ba2c",
    "walletconflicts": [
    ],
    "time": 1712598489,
    "timereceived": 1712598489
  }
]
Daemon#
Dash can be run as a background process (or daemon) on Linux systems. This is particularly useful if you are running Dash as a server instead of as a GUI node. This guide assumes you have installed Dash Core for Linux as described in the Guía de instalación de Linux.
Create a user and group to run the daemon:
sudo useradd -m dash -s /bin/bash
Create a data directory for Dash in the new user’s home directory:
sudo -u dash mkdir -p /home/dash/.dashcore
Create a configuration file in the new Dash data directory:
sudo -u dash nano /home/dash/.dashcore/dash.conf
Paste the following basic configuration to your
dash.conffile, replacing the password with a long and random password:listen=1 server=1 daemon=1
Register the
dashddaemon as a system service by creating the following file:sudo nano /etc/systemd/system/dashd.service
Paste the following daemon configuration into the file:
[Unit]
Description=Dash Core Daemon
After=syslog.target network-online.target

[Service]
Type=forking
User=dash
Group=dash
OOMScoreAdjust=-1000
ExecStart=/usr/local/bin/dashd -pid=/home/dash/.dashcore/dashd.pid
TimeoutStartSec=10m
ExecStop=/usr/local/bin/dash-cli stop
TimeoutStopSec=120
Restart=on-failure
RestartSec=120
StartLimitInterval=300
StartLimitBurst=3

[Install]
WantedBy=multi-user.target
Register and start the daemon with systemd:
sudo systemctl daemon-reload
sudo systemctl enable dashd
sudo systemctl start dashd
Dash is now installed as a system daemon. View the status as follows:
systemctl status dashd
View logs as follows:
sudo journalctl -u dashd
Tor#
Tor is free and open-source software for enabling anonymous communication. The name derived from the acronym for the original software project name «The Onion Router». Tor directs Internet traffic through a free, worldwide, volunteer overlay network consisting of more than seven thousand relays to conceal a user’s location and usage from anyone conducting network surveillance or traffic analysis.
Dash Core GUI#
Dash Core traffic can be directed to pass through Tor by specifying a running Tor service as a proxy. First install Tor by visiting https://www.torproject.org/download/ and downloading the appropriate Tor Browser bundle for your system. Set up the Tor browser by following the documentation on Installation and Running Tor Browser for the First Time.
Once Tor Browser is running, you have two options to configure Dash Core to use Tor for network traffic.
Using the GUI: Start Dash Core and go to Settings > Options > Network and enable the Connect through SOCKS5 proxy setting. Specify
127.0.0.1for the Proxy IP and9150for the Port. Click OK and restart Dash Core.Using dash.conf: Ensure Dash Core is not running and edit your
dash.confsettings file. Add the lineproxy=127.0.0.1:9150, save the file and start Dash Core.
You are now connected through the Tor network. You will need to remember to start the Tor Browser each time before you start Dash Core or you will not be able to sync.
Tor onion service#
Tor onion services allows other users to connect to your Dash node using an onion address, providing further anonymity by concealing your IP address. Follow these steps to set up an onion service under Ubuntu Linux:
Install tor:
sudo apt install tor
Add the following line to the
torrcfile:sudo bash -c "echo -e 'ControlPort 9051\nCookieAuthentication 1\nCookieAuthFileGroupReadable 1' >> /etc/tor/torrc"
Restart Tor:
sudo systemctl restart tor
Determine the group Tor is running under (usually the last entry in your groups file):
tail /etc/group
The group is usually
debian-torunder Debian-based Linux distributions.Add the user running Dash to the Tor group:
sudo usermod -aG debian-tor dash
Add the following two lines to
dash.conf:proxy=127.0.0.1:9050 torcontrol=127.0.0.1:9051
Restart Dash and monitor
debug.logfor onion informatoin:grep -i onion ~/.dashcore/debug.log
You should see a line similar to the following:
2020-06-29 03:43:57 tor: Got service ID knup3fvr6fyvypu7, advertising service knup3fvr6fyvypu7.onion:19999
Your onion service is now available at the shown address.
Múltiples billeteras#
Since version 18.0.0, Dash Core has included the ability work with multiple wallets from the File menu in addition to the previously available options.
Advertencia
Wallet-related RPCs require using the -rpcwallet option when more than
one wallet file is loaded. This is to ensure the RPC command is executed
using the correct wallet. See the Core developer documentation
for additional information.
Open a wallet#
To open a wallet, click File -> Open Wallet and then click the name of wallet file.
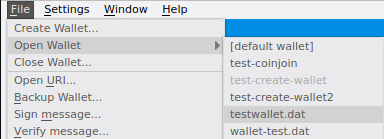
Open wallet#
Select the active wallet#
When multiple wallets are open, a wallet selection dropbox is shown to the left of the Dash logo on the tab bar. Click the dropdown box and select a wallet to set it as the active wallet.
Wallet selection dropdown box#
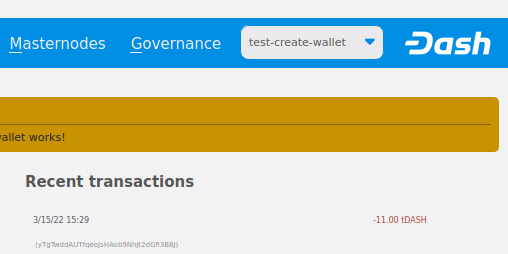
Close a wallet#
To close a wallet, set it as the active wallet using the wallet selection dropdown box. Next, click File -> Close Wallet… and then click Yes on the Close wallet confirmation screen.
Close wallet confirmation#
Nota
If the only open wallet is closed, wallet-related items on the tab bar will be disabled.
Close all wallets#
To close all wallets, click File -> Close All Wallets… and then click Yes on the Close all wallets confirmation screen.

Close wallet confirmation#
Once all wallets are closed, wallet-related items on the tab bar will be disabled.
Alternative methods#
It is also possible to select between different Dash wallets when starting
Dash Core by specifying the wallet argument, or even run multiple
instances of Dash Core simultaneously by specifying separate data
directories using the datadir argument.
Para empezar, instala la billetera Dash Core para tu sistema de acuerdo a la instrucciones de instalación. Cuando llegues al paso Ejecutando Dash Core por primera vez, puedes decidir si desea mantener archivos `` wallet.dat`` separados en la ubicación predeterminada (más sencillo si no necesita ejecutar las carteras simultáneamente), o especificar directorios de datos completamente separados como, por ejemplo, `` C: Dash1`` (más simple si desea ejecutar las carteras simultáneamente).
Archivos wallet.dat separados#
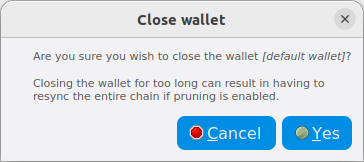
Para este escenario, crearemos dos atajos en el escritorio, cada uno usando un archivo de billetera diferente. Navega al archivo binario usado para iniciar Dash Core (tipicamente localizado en C:\Program Files\DashCore\dash-qt.exe o similar) y crea dos atajos en el escritorio. Entonces abre la ventana Propiedades para cada uno de estos atajos.
Creando atajos de escritorio usando Windows 10#
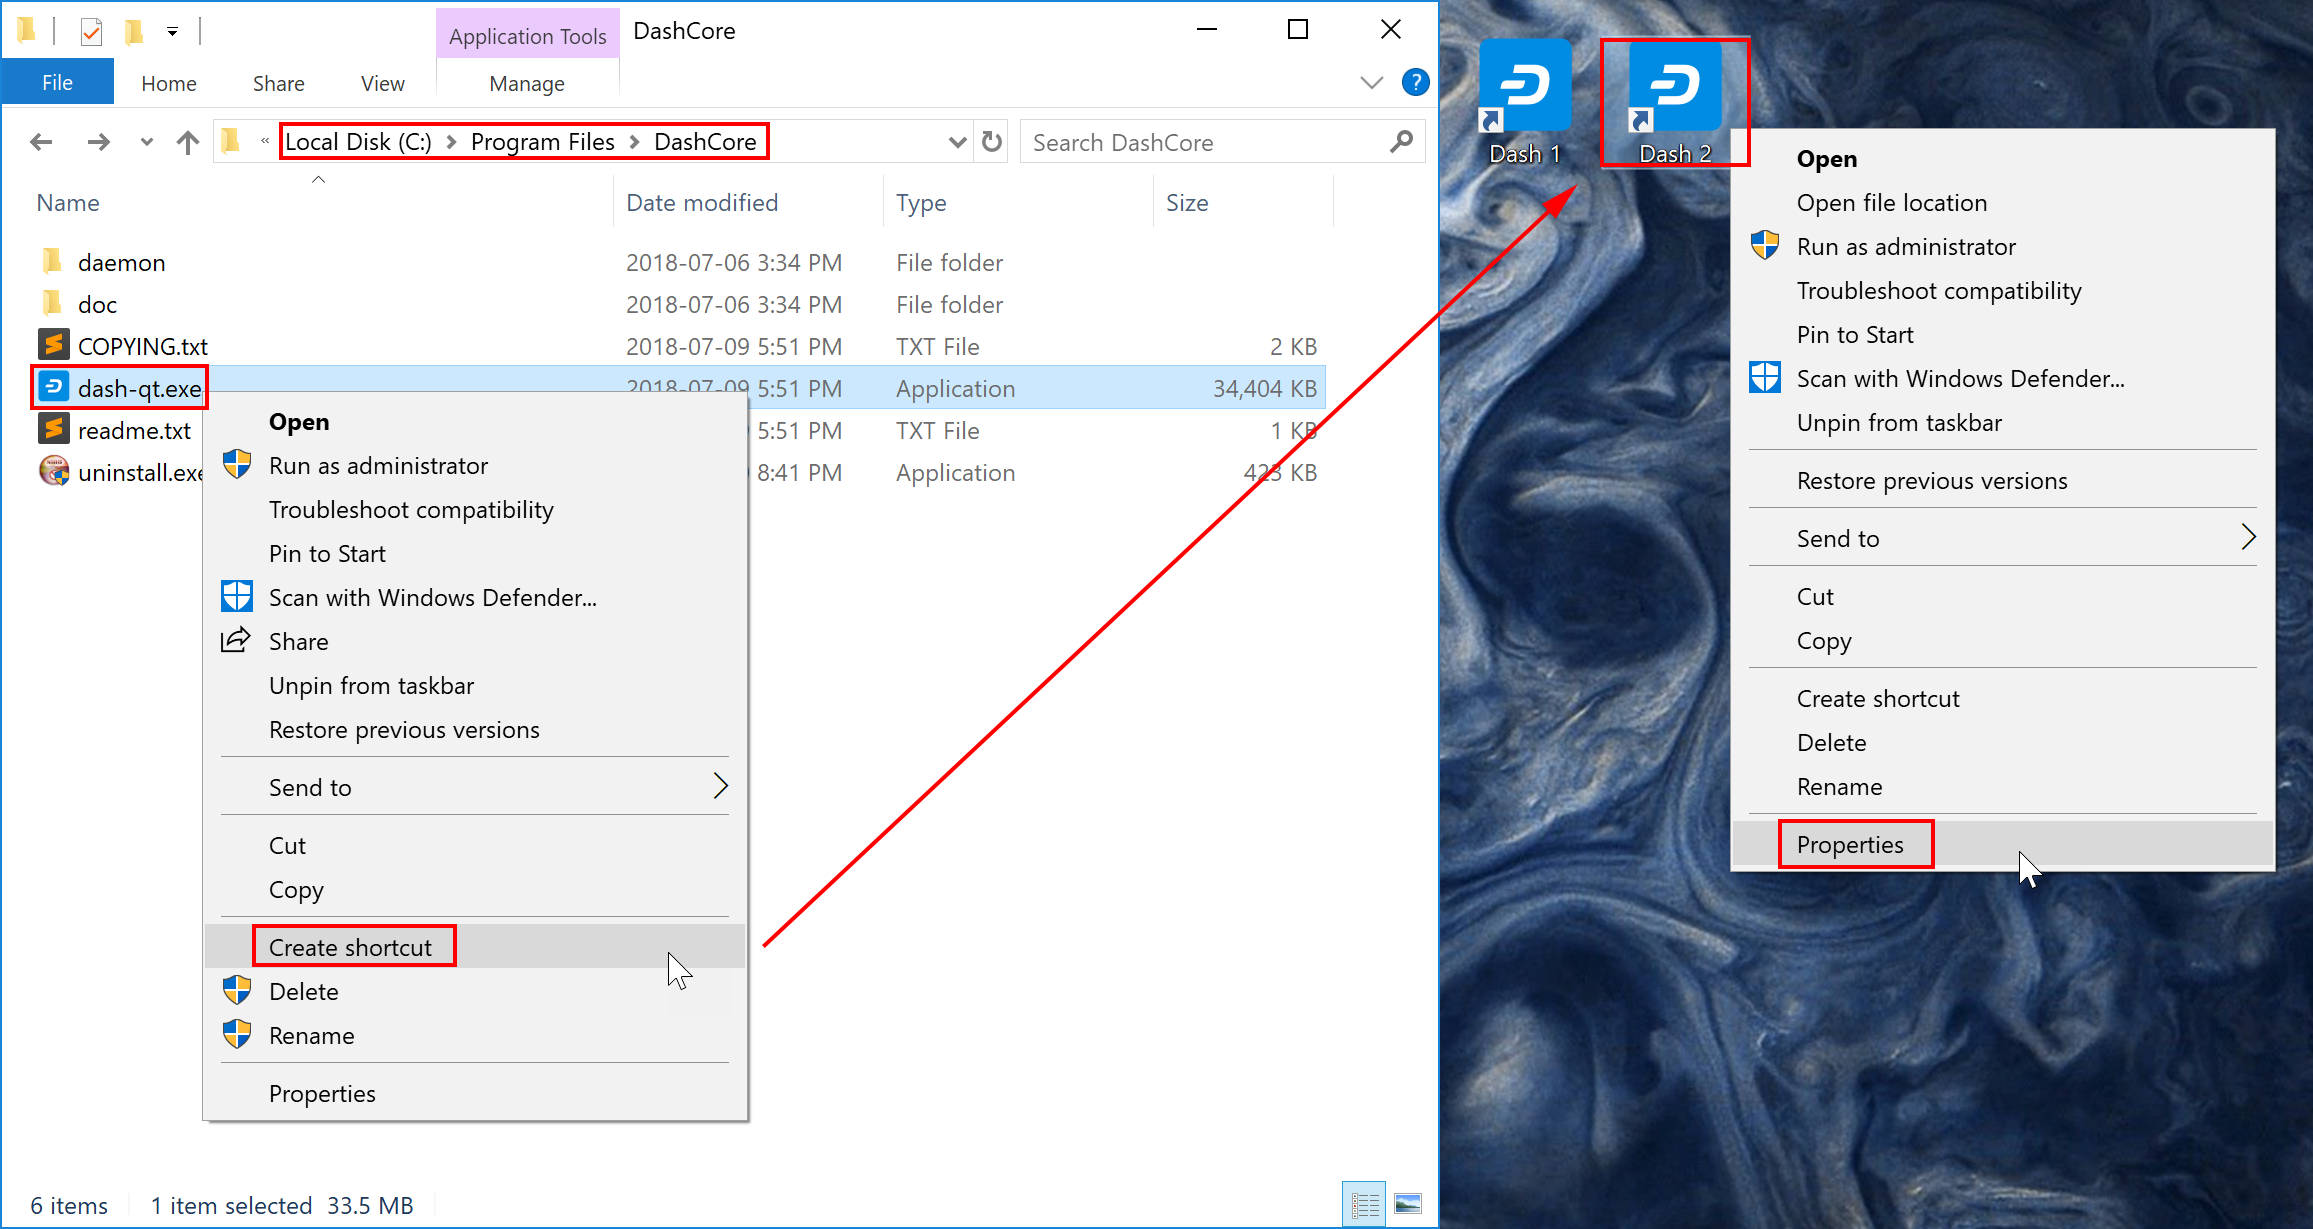
Modificar la propiedad Objetivo de cada acceso directo para puntar a diferentes archivos de billeteras especificando la el argumento wallet cuando inicia la billetera. Si no especificas un argumento wallet, wallet.dat se usara por defecto. El archivo billetera especificado sera creado sino existe. Los siguientes ejemplos muestran dos billeteras nombradas workwallet.dat y homewallet.dat:
Billetera Objetivo 1:
"C:\Program Files\DashCore\dash-qt.exe" -wallet=workwallet.datBilletera Objetivo 2:
"C:\Program Files\DashCore\dash-qt.exe" -wallet=homewallet.dat
Especificando archivos de billeteras separadas#
Puedes usar ahora los dos iconos para abrir rápida y fácilmente diferentes billeteras desde tu escritorio. Ten en cuenta que no puedes abrir ambas billeteras simultáneamente. Para hacer esto, necesitas dos directorios de datos separados, como se describe abajo.
Directorios de datos separados#
Inicia la Dash Core y deja que sincronice con la red, luego cierra la Dash Core de nuevo. Ahora puedes crear dos directorios por ejemplo C:\Dash1 y C:\Dash2 y copia los directorios blocks y chainstate dentro del directorio de datos sincronizado a los nuevos directorios. Cada uno estos servirá como un directorio de datos separado, permitiendo que ejecutes dos instancias de la Dash Core simultáneamente. Crea dos (o mas) atajos en tu escritorio como se describe abajo, entonces especifica el argumento datadir como se muestra abajo:
Datadir Objetivo 1:
"C:\Program Files\DashCore\dash-qt.exe" -datadir=C:\Dash1 -listen=0Datadir Objetivos 2:
"C:\Program Files\DashCore\dash-qt.exe" -datadir=C:\Dash2 -listen=0
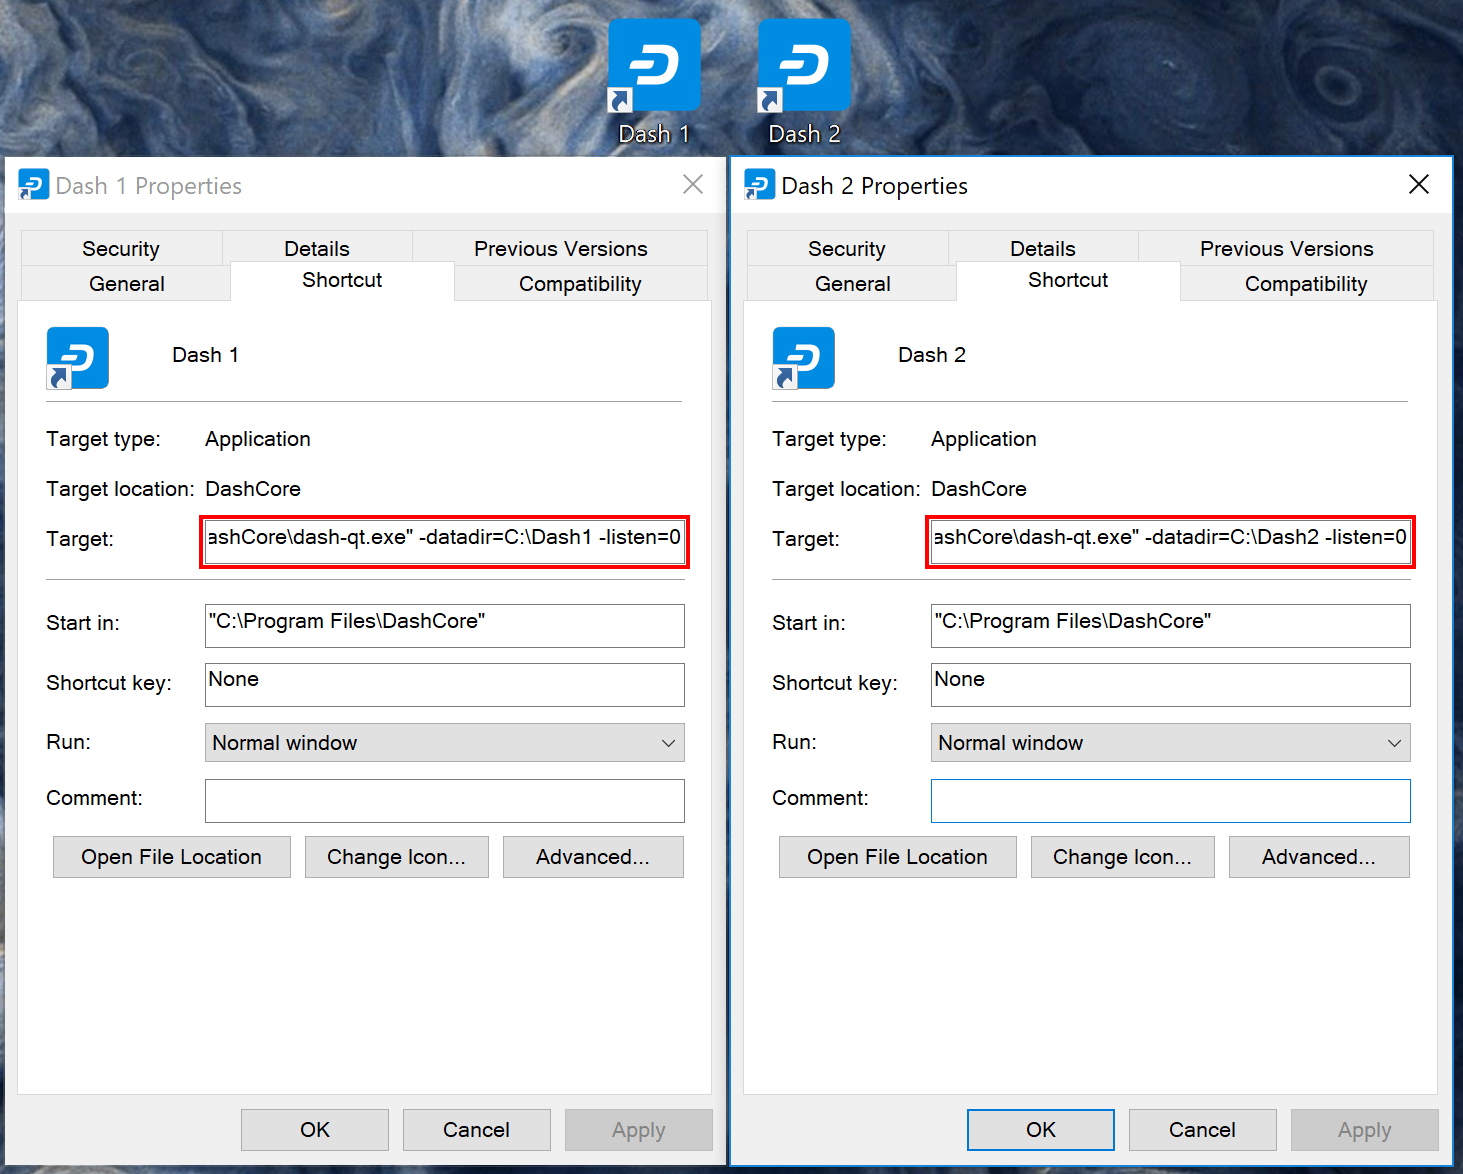
Especificar directorios de datos separados#
Puedes ahora usar dos iconos para abrir rápida y fácilmente diferentes billeteras simultáneamente desde su escritorio. Ambas billeteras mantienen copias enteras y separadas de la cadena de bloques, la cual puede usar mucho espacio en disco. Para uso mas eficiente del espacio en disco, considere usar un SPV o una billetera «liviana» como Dash Electrum para mantener separadas múltiples billeteras sin mantener una copia completa de la cadena de bloques.
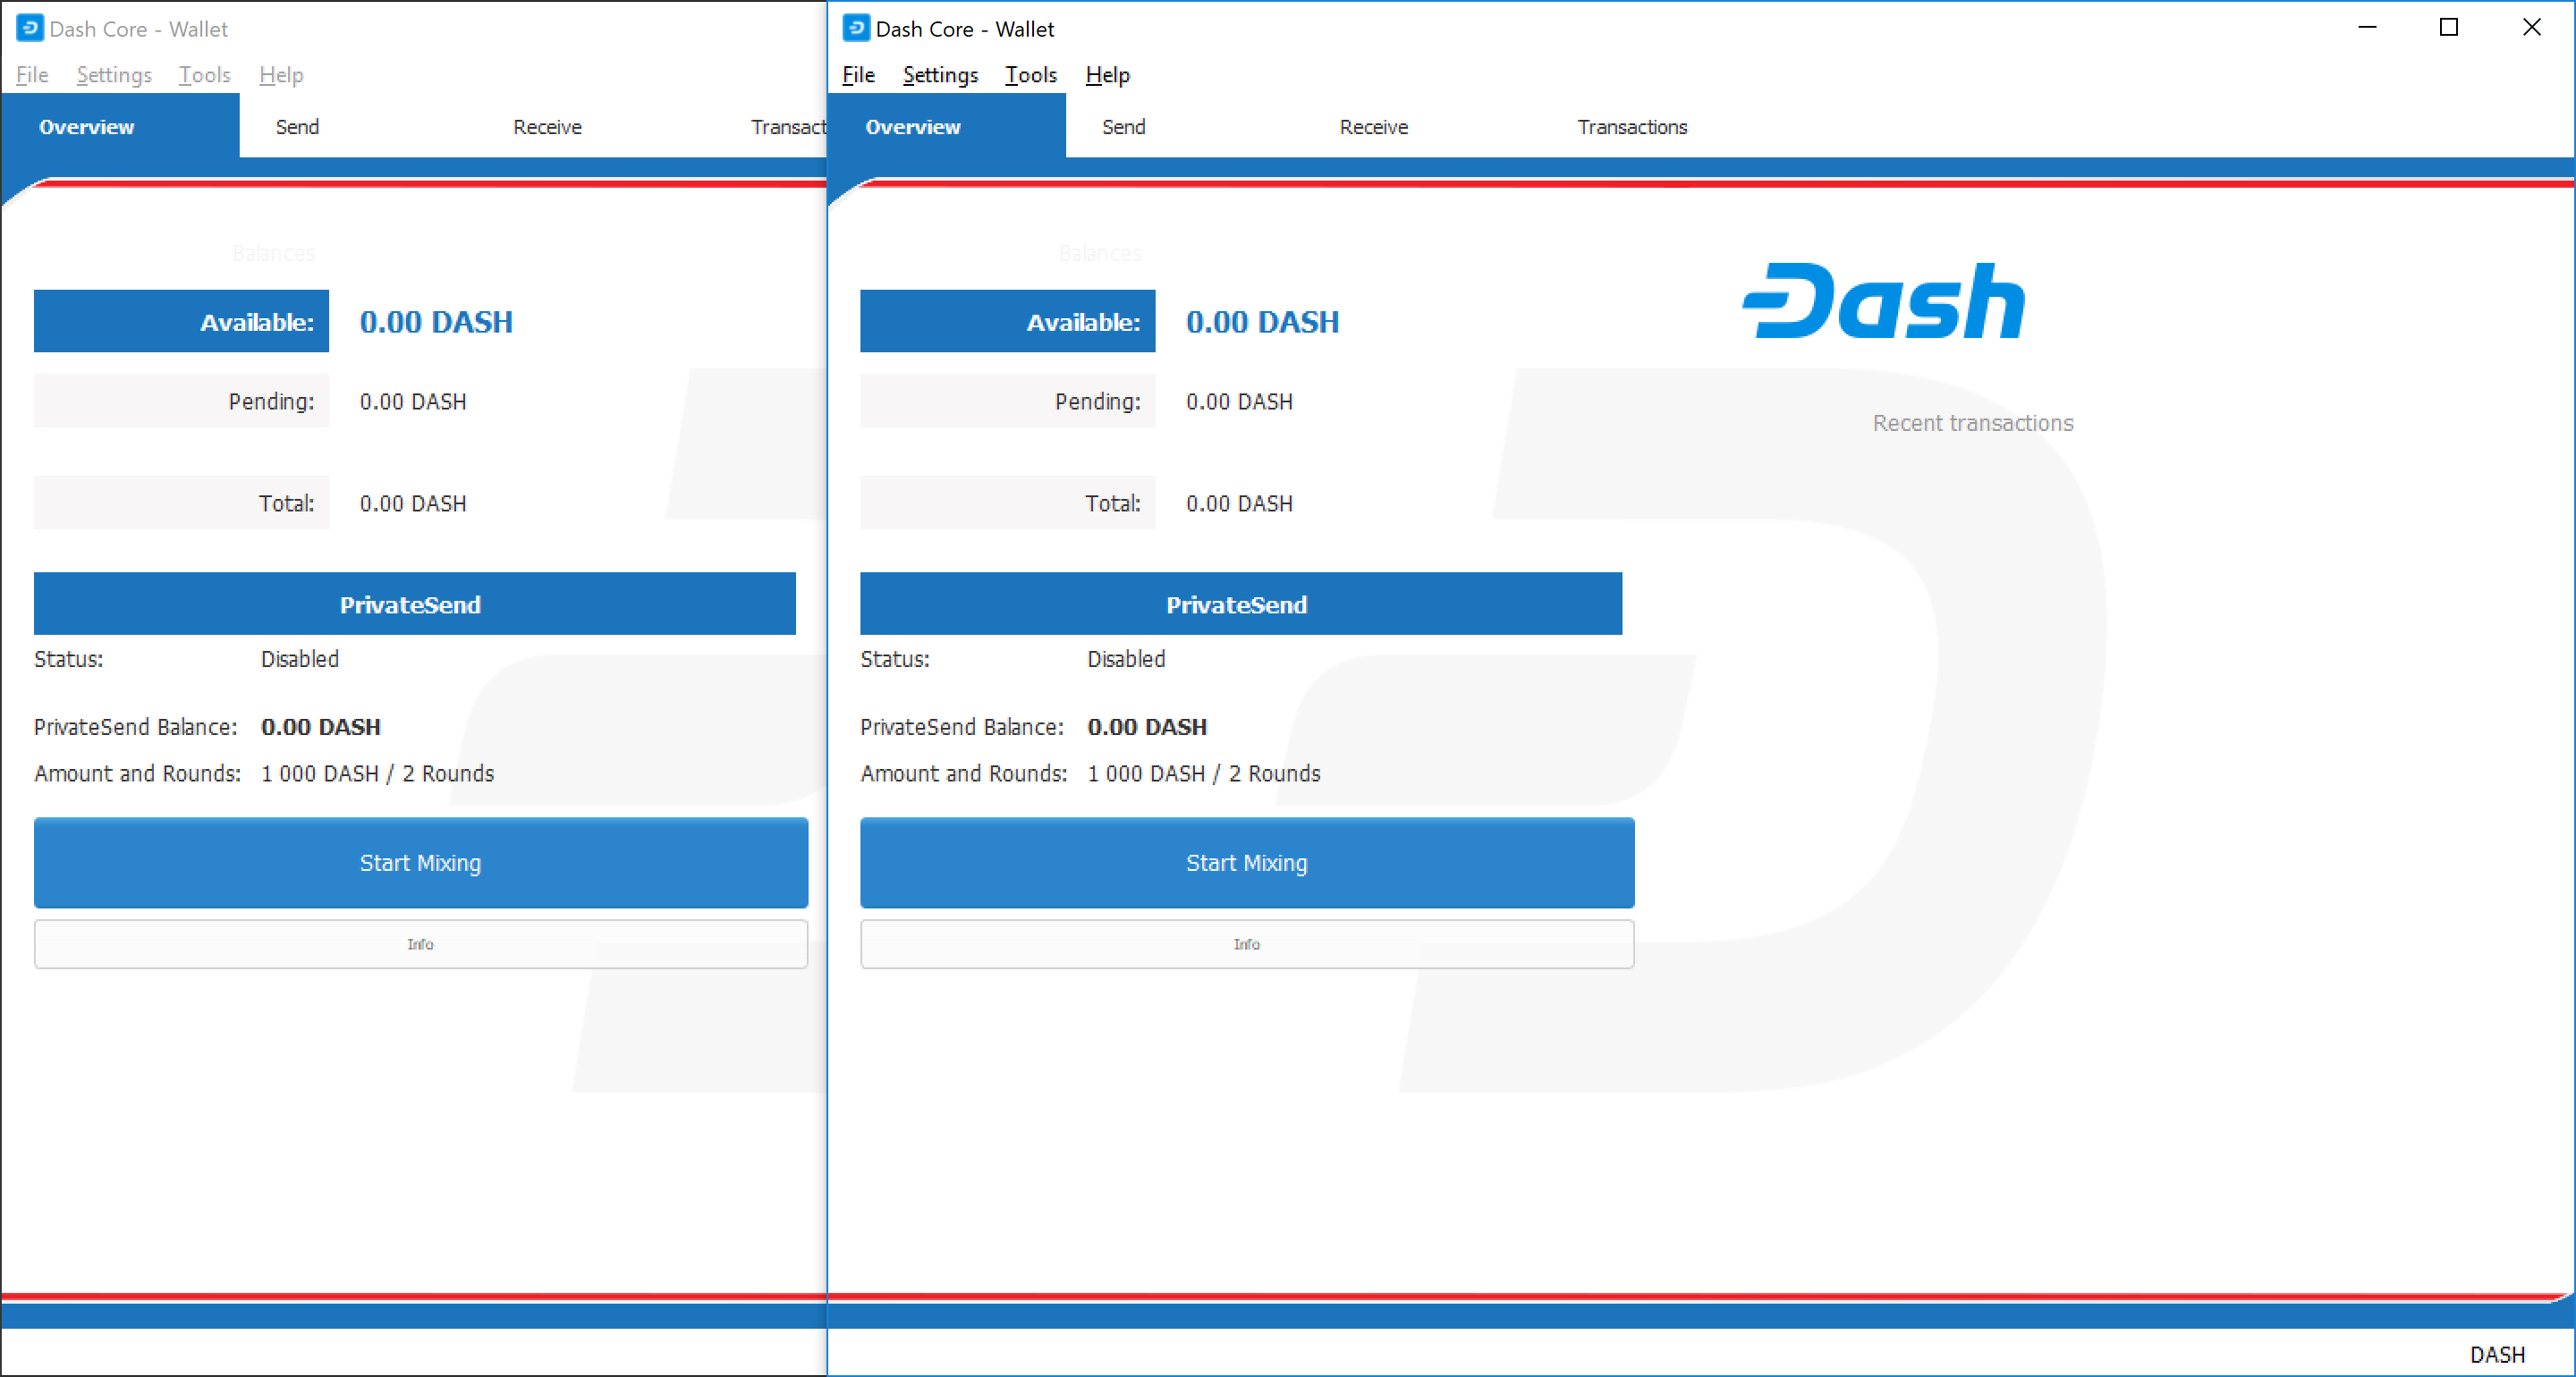
Dos instancias de Dash Core ejecutándose simultáneamente#
KeePass#
Advertencia
KeePass support was removed in Dash Core 18.0.0. Details can still be found in previous versions of this documentation.